
 )
or https:// means you've safely connected to the .gov website. Share sensitive information only on official, secure websites.
)
or https:// means you've safely connected to the .gov website. Share sensitive information only on official, secure websites.
- 3.0.101 Schedule K-1 Processing
- 3.0.101.1 Program Scope and Objectives
- 3.0.101.1.1 Background
- 3.0.101.1.2 Authority
- 3.0.101.1.3 Roles and Responsibilities
- 3.0.101.1.4 Program Management and Review
- 3.0.101.1.5 Program Controls
- 3.0.101.1.6 Acronyms/Terms/Definitions
- 3.0.101.1.7 Related Resources
- 3.0.101.2 IRM Deviations
- 3.0.101.3 Program Codes
- 3.0.101.4 Extracting and Sorting
- 3.0.101.4.1 Batching for Original Entry (OE) Paper
- 3.0.101.5 Code and Edit
- 3.0.101.5.1 Unprocessable Schedules K-1
- 3.0.101.5.2 Standard Schedules K-1
- 3.0.101.5.3 Substitute Schedules K-1
- 3.0.101.5.4 Non-Standard Schedules K-1
- 3.0.101.6 Loose Schedules K-1
- 3.0.101.6.1 Loose Schedules K-1 for Electronic File Returns
- 3.0.101.6.2 Schedules K-1 Received in Suspense/Rejects
- 3.0.101.7 Money Amounts Fields
- 3.0.101.8 Converting Schedule K-1 Forms
- 3.0.101.8.1 Prior Year Format for Schedules K-1
- 3.0.101.9 Moving Processable Schedules K-1
- 3.0.101.10 Numbering Parent Returns
- 3.0.101.11 Batching
- 3.0.101.11.1 Loose Schedules K-1
- 3.0.101.12 Preparing Schedules K-1 for Processing
- 3.0.101.13 Schedules K-1 Pre-Document Preparation (Pre-Doc Prep)
- 3.0.101.13.1 Loose Schedules K-1
- 3.0.101.13.2 Duplex Schedules K-1
- 3.0.101.13.3 Two-Sided Schedules K-1
- 3.0.101.14 Schedules K-1 Processing Through SCRIPS
- 3.0.101.14.1 Forms/Program Numbers/Tax Classes/Doc. Codes
- 3.0.101.14.1.1 Work Prioritization
- 3.0.101.14.2 Scanner Reject
- 3.0.101.14.3 Loose Schedules K-1
- 3.0.101.14.4 Workstation Operations
- 3.0.101.14.5 Form Identification (FI) Function
- 3.0.101.14.5.1 Form Identification (FI) QUICK START
- 3.0.101.14.5.2 Forms Identification (FI) Processing
- 3.0.101.14.6 Original Entry (OE) Function
- 3.0.101.14.6.1 Original Entry (OE) Image QUICK START
- 3.0.101.14.6.2 Original Entry (OE) Image Processing
- 3.0.101.14.6.3 Original Entry (OE) Paper QUICK START
- 3.0.101.14.6.4 Original Entry (OE) Paper Processing
- 3.0.101.14.6.5 Image and Paper Processing Releasing a Unit-of-Work in Original Entry (OE)
- 3.0.101.14.6.6 Selecting a Specific Unit-of-Work in Original Entry (OE)
- 3.0.101.14.7 Data Validation (DV) Function
- 3.0.101.14.7.1 Data Validation (DV) Image QUICK START
- 3.0.101.14.7.2 Data Validation (DV) Paper QUICK START
- 3.0.101.14.7.3 Selecting a Specific Unit-of-Work in Data Validation (DV)
- 3.0.101.14.8 General Correction Procedures
- 3.0.101.14.8.1 Poor Quality Image
- 3.0.101.14.8.2 Schedules K-1 Name and Address Information
- 3.0.101.14.8.3 Edit Marks
- 3.0.101.14.9 Tax Year and Tax Period Entries
- 3.0.101.14.10 Name and Address Block Reader (NABR)
- 3.0.101.14.11 Name Entries
- 3.0.101.14.11.1 Address Elements
- 3.0.101.14.11.1.1 Foreign Address
- 3.0.101.14.11.1 Address Elements
- 3.0.101.14.12 Percentage Field Instructions
- 3.0.101.14.13 Money Amount Fields
- 3.0.101.14.14 Deleting a Block
- 3.0.101.14.15 Prior Year Form Revision Processing
- 3.0.101.14.16 Payer General Instructions
- 3.0.101.14.17 SCRIPS Transcription Sheets
- 3.0.101.14.17.1 Form 1041 Schedule K-1 (Program 44386)
- 3.0.101.14.17.2 Form 1065 Schedule K-1 (Program 44387)
- 3.0.101.14.17.3 Form 1120-S Schedule K-1 (Program 44388)
- 3.0.101.14.1 Forms/Program Numbers/Tax Classes/Doc. Codes
- 3.0.101.15 ERS
- 3.0.101.16 Types of Errors
- 3.0.101.16.1 Priority II Errors - Section Errors
- 3.0.101.16.2 Priority III - Field Errors
- 3.0.101.16.3 Part IV Errors - Consistency/Math Errors
- 3.0.101.17 Section 01 Errors
- 3.0.101.17.1 General Information
- 3.0.101.17.2 Section 01TIN - Payee Identification Number
- 3.0.101.17.3 Section 01TVC - Primary TIN Validity Bypass Code
- 3.0.101.17.4 Section 01NM1 - Payee Name Line 1
- 3.0.101.17.5 Section 01NM2 - Payee Name Line 2
- 3.0.101.17.6 Section 01ADD - Payee Street Address
- 3.0.101.17.7 Section 01CTY - Payee City
- 3.0.101.17.8 Section 01ST - Payee State
- 3.0.101.17.9 Section 01ZIP - Payee ZIP Code
- 3.0.101.18 Section 02 Errors
- 3.0.101.18.1 General Information
- 3.0.101.18.1.1 Section 02TNI - 2nd TIN NOT indicator
- 3.0.101.18.1.2 Section 02AMD - Corrected/Amended Indicator
- 3.0.101.18.1 General Information
- 3.0.101.19 Section 06 Errors
- 3.0.101.19.1 General Information
- 3.0.101.20 Section 16 Errors
- 3.0.101.20.1 General Information
- 3.0.101.20.2 Section 16NM1 - Payer Name Line 1
- 3.0.101.20.3 Section 16NM2 - Payer Name Line 2
- 3.0.101.20.4 Section 16ADD - Payer Street Address
- 3.0.101.20.5 Section 16CTY - Payer City
- 3.0.101.20.6 Section 16ST - Payer State
- 3.0.101.20.7 Section 16ZIP - Payer ZIP Code
- 3.0.101.20.8 Section 16TIN - Payer TIN
- 3.0.101.21 Priority IV Errors - Error Codes 014, 016, 020, 024 and 026
- 3.0.101.21.1 ♦Error Code 014 - Payee Address♦
- 3.0.101.21.1.1 Invalid Condition - Error Code 014
- 3.0.101.21.1.2 Correction Procedures - Error Code 014
- 3.0.101.21.2 ♦Error Code 016 - Payee Zip/Major City Code Mismatch♦
- 3.0.101.21.2.1 Invalid Condition - Error Code 016
- 3.0.101.21.2.2 Correction Procedures - Error Code 016
- 3.0.101.21.3 Error Code 020
- 3.0.101.21.4 Error Code 024 - Payer Address
- 3.0.101.21.4.1 Invalid Condition - Error Code 024
- 3.0.101.21.4.2 Correction Procedures - Error Code 024
- 3.0.101.21.5 Error Code 026 - Payer Zip/Major City Code Mismatch
- 3.0.101.21.5.1 Invalid Condition - Error Code 026
- 3.0.101.21.5.2 Correction Procedures - Error Code 026
- 3.0.101.21.1 ♦Error Code 014 - Payee Address♦
- 3.0.101.22 ERS – When Correspondence is Required
- 3.0.101.23 Post Document Preparation
- 3.0.101.23.1 Output Report
- 3.0.101.23.2 Post Document Preparation for Files
- 3.0.101.23.3 Duplex Schedules K-1
- 3.0.101.24 Set-Up for Document File Retention
- 3.0.101.25 Files
- 3.0.101.26 Servicing Requests for Returns, Copies, and Information
- 3.0.101.27 Re-Filing
- 3.0.101.28 Retiring Documents to Federal Records Center
- Exhibit 3.0.101-1 Form 1041 Schedule K-1
- Exhibit 3.0.101-2 Form 1065 Schedule K-1
- Exhibit 3.0.101-3 Form 1120-S Schedule K-1
- Exhibit 3.0.101-4 Standard Abbreviations
- Exhibit 3.0.101-5 Street Address Abbreviations
- Exhibit 3.0.101-6 State/Major City/ZIP Code/Major City Code
- Exhibit 3.0.101-7 Foreign ZIP Code, City and State Exceptions
- Exhibit 3.0.101-8 Conversion Chart
- Exhibit 3.0.101-9 Valid Characters For Schedules K-1
- Exhibit 3.0.101-10 Key Function Table
- Exhibit 3.0.101-11 List of Foreign Country Codes in Country Code Order
- Exhibit 3.0.101-12 List of Foreign Country Codes in Country Name Order
- Exhibit 3.0.101-13 Province, State, and Territory in Abbreviation Order
- Exhibit 3.0.101-14 Province, State and Territory Abbreviations in Country Order
- Exhibit 3.0.101-15 American Possessions and ZIP Codes
- 3.0.101.1 Program Scope and Objectives
Part 3. Submission Processing
Chapter 0. General
Section 101. Schedule K-1 Processing
3.0.101 Schedule K-1 Processing
Manual Transmittal
September 12, 2025
Purpose
(1) This transmits revised IRM 3.0.101, General, Schedule K-1 Processing.
Material Changes
(1) IRM 3.0.101.5 Updated editing instructions for (7) a.
(2) IRM editorial changes, spelling, grammar, plain language and tax years.
Effect on Other Documents
IRM 3.0.101 dated November 25, 2024 (effective January 01, 2025) is superseded.Audience
The primary users of this IRM are Submission Processing Data Conversion Operation, Receipt and Control Operation, Input Correction Operation (Error Resolution) and their support staff which includes peripheral scanner operators, clerks, tax examiners, leads, technical advisors, and supervisors.Effective Date
(01-01-2026)Scott Wallace
Director, Submission Processing
Taxpayer Services
-
Purpose: IRM 3.0.101 provides written instructions about the processing of Schedules K-1 through the Service Center Recognition/Image Processing System (SCRIPS).
-
Audience: The users of this IRM are Submission Processing Data Conversion Operation, Receipt and Control Operation, Code and Edit, Input Correction Operation (Error Resolution) and their support staff which includes but isn’t limited to the following: extracting and sorting employees, peripheral scanner operators, clerks, tax examiners, leads, and supervisors. These instructions apply to all campuses.
-
Policy Owner: The Director of Submission Processing.
-
Program Owner: Return Processing Branch, Mail Management/Data Conversion (an Organization within Submission Processing).
-
Primary Stakeholders: Primary stakeholders for this IRM include:
-
Service and Enforcement,
-
ACA Implementation,
-
Compliance Strategy and Policy,
-
Large Business and International (LB&I),
-
Operations Business Support,
-
Office of Servicewide Penalties and
-
Statistics of Income (SOI).
-
-
Program Goals: The goal of this program is to convert processable Schedules K-1 filed on paper media to electronic data records.
-
Paper returns and schedules are sent to the IRS by filers to fulfill their requirement to file a paper return and provide their taxpayer identification number (TIN). IRS must convert these returns to an electronic data record for use. Validation of the paper return information and conversion to electronic data is required.
-
The following provides authority for the procedures in this IRM to be performed in support of completing compliance functions to make credits or refunds of any internal revenue tax, processing of non-revenue forms, and administrative support forms.
-
Title 26 of the United States Code (USC) or more commonly known as the Internal Revenue Code (IRC).
-
All policy statements for Submission Processing are in IRM 1.2.1.4, Servicewide Policies and Authorities, Policy Statements for Submission Processing Activities:
-
Code sections which provide the IRS with the authority to issue levies.
-
Congressional Acts which outline additional authorities and responsibilities like the Travel and Transportation Reform Act of 1998 or the Tax Reform Act of 1986.
-
Policy statements that provide authority for the work being done.
-
-
The Operation manager secures, assigns, and provides training for the staff needed to perform the duties presented in this IRM.
-
The Planning and Analysis staff provides feedback and support to local management to monitor and achieve scheduled goals.
-
The team manager assigns, monitors, and controls the workflow to accomplish timely completion of the duties presented in this IRM.
-
The employee applies the instruction for the duties presented in this IRM on the SCRIPS system to accurately convert paper data to an electronic data record for proper posting for use by the IRS.
-
Program Reports: The reports listed below show receipts, production, and inventory for conversion of paper returns to electronic data. Management uses these reports to monitor the daily and weekly status of the program through completion.
-
IPS0083, Workstation Operator Statistics Program and Function Summary Report
-
IPS10610, Run Balancing Report
-
IPS06440, Throughput Statistics Report
-
PCC 2240, Daily Production Report - Program Sequence
-
PCC 6040, SC WP&C Performance and Cost Report
-
PCC 6240, SC WP&C Program Analysis Report
-
PCB 0440, Daily Workload and Staff Hours Schedule
-
PCB 0540, Weekly Workload and Staffing Schedule
-
-
Program Effectiveness: Management measures weekly goals using the above reports for each function compared to the established completion schedule. Each function is expected to complete the inventory on or before the program completion date, and to meet or exceed schedule prior to the program completion date as stated in IRM 3.30.123, Work Planning and Control Processing Timeliness: Cycles, Criteria, and Critical Dates.
-
Annual Review: Management reviews the processes in this manual annually to ensure accuracy and promote consistent tax administration.
-
Local reports may be used to establish more information for keeping daily program control. Local reports do not replace the established official reports and required production reporting.
-
The following list of acronyms are used in this IRM. Definition of data entry prompts are in the charts.
Acronyms Definition ABC Alphanumeric Block Control BMF Business Master File CC Command Code DLN Document Locator Number DV Data Validation EIN Employer Identification Number ERS Error Resolution System FLC File Location Code IMF Individual Master File IRM Internal Revenue Manual MCC Major City Code OE Original Entry PCD Program Completion Date SSN Social Security Number T Lines Transcription Lines TIN Taxpayer Identification Number -
Listed below are terms and their definitions related to SCRIPS processing.
Term Definition Alpha Character A character (letter) of the alphabet. Alphanumeric Field A field that accepts both alpha and numeric characters. Application Refers to the form type being processed (e.g., Schedule K-1 or IRP). Block A group of Schedule K-1 documents identified with consecutive DLNs. The output program creates a block by combining documents from various units-of-work that share a block DLN. Block DLN An 11-digit DLN that consists of a two-digit File Location Code, tax class (always 5 for Schedules K-1), a two-digit document type, a three-digit Julian date and a three-digit block number. Block Number Also called "blocking series." The 9th, 10th, and 11th digits in a DLN. Up to 100 sequence numbers may be associated with one block number 00 through 99. Capture The process of obtaining images of a document for character recognition and operator use. Character Any symbol or alpha (special or numeric), that represents information. Character Recognition The process of converting information from paper to digital form. Cursor A vertical line showing the position where the next entry is keyed. Data Fields Those fields that do not include entity fields (e.g., money amounts, dates, etc.). DLN A 14-digit Document Locator Number that consists of a two-digit File Location Code, tax class a two-digit document type, a three-digit Julian date and a three-digit block number, two-digit sequence number and a year digit. EIN An Employer Identification Number (a nine-digit number) typically identifies an entity such as a corporation, or trust. Usually in nn-nnnnnnn format. Entity/Entity Fields The portion of the document that deals with TIN, name, and address information. Field Specific area provided for data entry. Flag A question mark used to "mark" an unrecognizable character, or an error within a field. Function Keys The upper row of keys on the keyboard. The function keys are <F1> through <F12>. Highlighting A three-dimensional shadowing of a template field used to direct attention to the field. Used in OE to show the current cursor position. Used in DV to show the current field containing an error. Image Strip A section of the true and complete image. Each strip corresponds to a particular field. Key Combination Keystroke commands that require two or more simultaneous keystrokes. For example, press <Ctrl>-<P> for (post-to-close) means to press and hold the <Ctrl> key and then press the <P> key before releasing the <Ctrl> key. Menu A list of operations/options from which the workstation operator selects. Message Window A window that appears within the main window. It usually appears in the center of the screen. The system uses these windows to relay messages to the operator. NABR Name and Address Block Reader. NABR compares the address captured from the scanner and the United States Postal Service database of addresses. Non-Conforming Form A form the scanner cannot recognize. Numeric Character A number ranging from 0 to 9. Payee A recipient of money amounts issued by the payer. A filer may identify a payee on the form as one of the following: Beneficiary, Partner, or Shareholder. Payer An issuer of money amounts to a payee. A form may identify the payer as one of the following: Parent, Fiduciary, Estate, Partnership, or Corporation. Prompt A message or statement displayed that requires an operator response. Reverse Video A reversed display of the black and white on an image (i.e., black becomes white and white becomes black). Sequence Number/Serial Number A two-digit number within the DLN that uniquely identifies the document. Sight-Verify Examine a highlighted field in DV. If correct, release the field. If incorrect, correct the field. Also called "verify." Special Characters (symbols) *, &, /, %, #, ?, etc. SSN Social Security Number, a nine-digit number issued to an individual by the Social Security Administration. Usually in nnn-nn-nnnn format. Status Line A strip of information found along the bottom right side of the main working window below the prompt area. Template A window that has fields for data entry. The template mirrors the actual form layout, to the extent possible. The system always displays it in the right side of the monitor screen. TIN Taxpayer Identification Number. Either an EIN or an SSN. Transmittal A Form 1332-SC Block and Selection Record/Breaker Sheet. True and Complete Image The black and white image that the system displays for data entry or validation purposes. If available, the system always displays it on the left half of the monitor screen. It is like a photocopy. Unit-of-Work (UW) A group of Schedule K-1 documents containing one transmittal and Schedules K-1.
-
The following table lists the IRM primary sources of guidance for processing paper filed Schedules K-1.
IRM Title Guidance on IRM 3.10.5 Campus Mail and Work Control - Batch/Block Tracking System (BBTS) utilizing BBTS to drop unit production cards for daily incoming receipts and production IRM 3.10.72 Campus Mail and Work Control - Receiving, Extracting, and Sorting receiving, extracting, sorting, and routing mail within the Submission Processing campuses IRM 3.10.73 Campus Mail and Work Control - Batching and Numbering batching and numbering with a Document Locator Number (DLN) of documents IRM 3.11.14 Returns and Documents Analysis, Income Tax Returns for Estates and Trusts, (Forms 1041, 1041-QFT, and 1041-N) document perfection to code and edit (perfect) returns and other documents for input to the Master File (MF) through the Service Center Recognition/Image Processing System (SCRIPS) IRM 3.11.15 Returns and Documents Analysis - Return of Partnership Income document perfection to code and edit (perfect) returns and other documents for input to the MF through SCRIPS IRM 3.11.217 Returns and Documents Analysis, Form 1120-S Corporation Income Tax Returns document perfection to code and edit (perfect) returns and other documents for input to the MF through SCRIPS IRM 3.41.274 Optical Character Recognition Scanning Operations, General Instructions for Processing via Service Center Recognition/Image Processing System workstation functions, workstation keyboard, windows environment, and general instruction for entering data for tax returns and related data through SCRIPS IRM 3.41.275 Optical Character Recognition Scanning Operations, Scanner Operations on Service Center Recognition/Image Processing System scanning returns on SCRIPS -
The IRS adopted the Taxpayer Bill of Rights in June 2014. Employees are responsible for being familiar with and acting in accord with taxpayer rights. See IRC 7803(a)(3), and the following site for additional information about the Taxpayer Bill of Rights.
-
These instructions supersede all instructions in other IRMs regarding the processing of Schedule K-1 documents.
-
IRM Deviations - Must be submitted in writing following the instructions from IRM 1.11.2.2.3, When Procedures Deviate from the IRM and elevated through proper channels for executive approval.
-
Use the program codes listed below when processing Schedules K-1 through SCRIPS, unless otherwise instructed:
Return Type Program Code Tax Class/Doc Code Parent
Tax Class/Doc Code1041 Schedule K-1 44386 566 244 1065 Schedule K-1 44387 565 265 1120-S Schedule K-1 44388 567 316 -
Use the program codes listed below when processing Schedules K-1 through E-File, unless otherwise instructed:
Return Type Program Code Tax Class/Doc Code Parent
Tax Class/Doc Code1041 Schedule K-1 44390 566 236 1065 Schedule K-1 44360 565 265 1120-S Schedule K-1 44370 567 316 -
Code and Edit: should use the parent return program codes for coding both the parent returns and the Schedules K-1. Don’t use a 4438X - program code when coding the Schedules K-1.
-
Batching/Numbering: should use the Schedule K-1 program codes for time spent batching and numbering Schedules K-1.
-
Data Conversion: should use the parent return program code when transcribing the parent returns and the Schedule K-1 program code when transcribing Schedules K-1. (Use the program codes listed above.)
-
Bob Register Transcription: should use program code 44930.
-
Error Resolution (ERS): should use function/program code 340–44380.
-
BOB Register: should use function/program code 620–44380.
-
-
Schedules K-1 attached to the parent returns are not sorted during the sorting function. However, because of Schedules K-1 processing, parent returns do require more sorts.
-
Sort the parent returns into the following categories:
-
Remittance versus Non-remittance
-
Refund versus Non-refund
-
Tax period
-
Current timely filed calendar year (current processing year minus one)
-
One-Year Prior (current processing year minus two)
-
Two-Years Prior (current processing year minus three)
-
Prior Year (current processing year minus four or more)
-
Current fiscal and delinquent current year (current processing year minus one)
-
Future Years (current processing year)
-
-
Current forms and future Form 1041 with Schedules K-1 attached versus without Schedules K-1 attached.
-
Code and Edit detaches current year, one-year prior to current year and two-years prior to current year Schedules K-1. Always detach future year Schedules K-1. DO NOT detach Schedules K-1 that are three or more years prior to current year.
-
-
If during the sorting process a discovered remittance is found refer to IRM 3.8.46, Deposit Activity - Discovered Remittance for further instructions.
-
When documents are severely torn, cut, or separated, the ink is to light, or for any other reason can’t pass through the scanner they will need to be processed as OE Paper.
-
Instructions for batching "OE Paper" returns:
-
Place approximately 25-80 returns into a gusset folder.
-
Place gusset folders containing returns on a batch cart.
-
Establish batches on BBTS using the Document Locator Number (DLN) Reference Number specifically set up for SCRIPS OE Paper.
-
Clearly mark the Batch Transmittal "OE Paper."
-
Line through the SCRIPS DLN on the Batch Transmittal.
-
Manually generate DLNs in BBTS using the Off-Line DLN Generation Screen and stamp the DLN on the returns.
-
-
This section has instructions for processing parent returns with Schedules K-1 through Code and Edit.
-
Schedule K-1 parent returns are processed in Kansas City Submission Processing Center (KCSPC) and Ogden Submission Processing Center (OSPC).
-
Edit Schedules K-1 in red ink.
-
If the return is for three or more years prior to current year, don’t research or correspond for missing or incomplete Schedules K-1.
-
Verify that the pre-printed year on the Schedules K-1 matches the beginning tax year on the parent return. If not, edit the YY digits on all Schedule K-1 forms to the beginning tax period of the parent return.
-
The beginning and ending tax periods must be in the same year, if not the Schedules K-1 fallout to ERS if not edited correctly.
Note:
If the Schedules K-1 are blank and:
• Calendar year - no action needed.
• Fiscal year - edit the tax period (beginning and ending) to list the same tax year.Example:
If 2023 is the pre-printed year on the Schedules K-1 and the beginning tax period on the parent return is 2024, then line through the 23(YY) and edit 24(YY) on all Schedules K-1. Also, if the pre-printed year on the Schedules K-1 is 2023 and the beginning tax period on the parent return is 2022, then line through the 23(YY) and edit 2022 (YY) on all Schedules K-1.
-
If the ending tax period isn’t in the same year as the beginning tax period, edit the ending tax period on the Schedules K-1 using the final quarter of the tax year, to ensure the beginning and ending tax periods are in the same year.
Example:
Beginning tax period is February 2024 and the ending tax period is January 2025 the ending tax period is 122024.
Note:
Watch that batches of work do not contain mixed tax periods since SCRIPS systemically deletes any batches with mixed tax periods causing rework and reprocessing.
-
When making this correction be sure to edit directly under the printed tax year.
-
When finding future returns with attached Schedules K-1 in a current year batch, pull the return(s) and re-batch.
-
-
Ensure that each tax year is in separate gussets. Different years cannot be in the same gusset/box.
-
If an exact duplicate of a Schedule K-1 has been filed with the parent return, process one Schedule K-1 and cross out the duplicate Schedule K-1 with an "X" and leave the duplicate attached to the parent return.
-
Don’t bracket negative amounts. (See IRM 3.0.101.7 for Money Amount Fields instructions).
-
If two-dollar amounts are listed on the same line, manually add together and enter total amount on the first line only.
-
If the Individual Master File (IMF) payee social security number (SSN) or Business Master File (BMF) payee employer identification number (EIN) isn’t found in the correct box but is in the name and address box, re-write the SSN/EIN in the SSN/EIN box.
-
A payer TIN must be present on at least the first Schedule K-1. If not present, enter the TIN from the parent return in the SSN/EIN box. If the TIN on the parent return has changed, enter the new parent TIN on the payer TIN line.
-
Edit a check mark or "X" in the amended box of the Schedule K-1 if the parent return of the Schedules K-1 is an amended or corrected return and the amended box is not checked. Detach from parent and continue processing.
-
When Schedules K-1 are received in continuous formats (e.g., computer listings and typed listings) correspond requesting separate Schedules K-1. Don’t dispose of the listing as it is an attachment to a tax return.
When correspondence is required for the paragraph above, one of the following letters should be used:-
Letter 177-C for Form 1041 Schedule K-1
-
Letter 1355-C for Form 1065 Schedule K-1
-
Letter 118-C for Form 1120-S Schedule K-1
-
-
Don’t correspond for the missing, incomplete, or incorrect Schedules K-1 for Form 1065 on the following types of returns:
-
Sec. 6020(b) returns
-
Sec. 501(d) returns, Religious and Apostolic Organizations
-
Returns filed under a Common Trust
-
Sec. 761(a) returns
-
Nominee returns
-
Inactive returns
-
26 CFR 1.736-1 (Payments to a retiring partner)
-
Final returns
-
If foreign box is checked, then it is accepted as a foreign return
-
Amended ("G" coded) returns
-
Payee is a foreign entity
-
Return is being reprocessed as an original return and has a Form 13596 attached
-
≡ ≡ ≡ ≡ ≡ ≡ ≡ ≡ ≡ ≡ ≡ ≡ ≡ ≡ ≡ ≡ ≡ ≡ ≡ ≡ ≡ ≡ ≡ ≡ ≡ ≡ ≡ ≡ ≡ ≡ ≡ ≡ ≡ ≡ ≡ ≡ ≡ ≡ ≡ ≡ ≡ ≡ ≡ ≡ ≡ ≡ ≡ ≡ ≡ ≡ ≡
-
Returns filed for three or more years prior to current year
-
-
When reviewing Form 1065 Schedule K-1 and the partnership has indicated the number of Schedules K-1 is "1" and/or the Schedules K-1 attached to the return has 100% interest in the partnership then follow the instructions in IRM 3.11.15.16(6), Line I - Number of Schedules K-1 (or Number of Partners).
-
When the Form 1065 Schedule K-1 shows two names listed in the partner’s name and address section:
-
Correspond to request separate Schedules K-1 using Letter 1355-C or approved local correspondence procedures.
-
Notate the letter sent in the lower left margin of Form 1065.
-
Continue editing the return.
-
-
Don’t correspond for missing, incomplete, or incorrect Schedules K-1 for Form 1120-S on the following types of returns:
-
Sec. 6020(b) returns
-
Examination Secured Substitute for Return (SFR) returns
-
Re-entry returns
-
Amended ("G" coded) returns
-
Payee is a foreign entity
-
Return is being reprocessed as an original return and has a Form 13596 attached
-
≡ ≡ ≡ ≡ ≡ ≡ ≡ ≡ ≡ ≡ ≡ ≡ ≡ ≡ ≡ ≡ ≡ ≡ ≡ ≡ ≡ ≡ ≡ ≡ ≡ ≡ ≡ ≡ ≡ ≡ ≡ ≡ ≡ ≡ ≡ ≡
-
Returns filed for three or more years prior to current year
-
-
Don’t correspond for missing Schedules K-1 for Form 1041 on the following types of returns:
-
Sec. 6020(b) returns
-
Examination Secured Substitute for Return (SFR) returns
-
Re-entry returns
-
Amended ("G" coded) returns
-
Electing Small Business Trust (ESBT), Grantor Type Trust, or Bankruptcy Estate
-
Payee is a foreign entity
-
Return is being reprocessed as an original return and has a Form 13596 attached
-
Section 642(i) Trust (Maintenance of Cemetery Property or Number of Gravesites)
-
≡ ≡ ≡ ≡ ≡ ≡ ≡ ≡ ≡ ≡ ≡ ≡ ≡ ≡ ≡ ≡ ≡ ≡ ≡ ≡ ≡ ≡ ≡ ≡ ≡ ≡ ≡ ≡ ≡ ≡ ≡ ≡ ≡
-
Returns filed for three or more years prior to current year
-
-
Form 1041, non-taxable grantor trust filers aren’t required to file Schedules K-1. Do not process or detach any Schedules K-1 attached to a Non-taxable Grantor Trust. These trusts are edited with a Fiduciary Code of 4 and a Trust Code of 3. See IRM 3.11.14.13.4.1, Grantor Trusts, for updated instructions concerning Grantor Trust returns.
-
The criteria for unprocessable Schedules K-1 are as follows:
-
The tax period is more than two-years prior to current year.
-
The payer information shows a different entity than the parent entity.
-
The form is a 1065-B Schedule K-1 or Schedule K-1 is attached to a Form 1065-B.
-
Schedule K-1 attached to Form 1041 for Non-Taxable Grantor Trust.
-
The form is blank (no entity information and no line entries).
-
-
Discontinue processing any Schedules K-1 if income reported is for a different tax year than the form.
-
When processing is discontinued attach the unprocessable form(s) to the parent return.
-
To be processable, the Schedules K-1 must meet all the following requirements:
-
Must be for the parent return it is attached to, e.g., if attached to Form 1065 the Schedule K-1 must be a Form 1065 Schedule K-1.
-
Schedules K-1 must contain the payer and payee’s name, address, and SSN/EIN.
-
Each taxpayer’s information must be on a separate Schedule K-1 form.
-
The amount of each partner, shareholder or beneficiary share cannot be combined as one total.
-
-
If the Schedules K-1 don’t meet the requirements listed above, research the return and attachments, if information isn’t found, research Integrated Data Retrieval System (IDRS). If unable to find the missing information, and the payee is not a foreign entity correspond to request a valid Schedule K-1 using:
As of October 29, 2008, returns are no longer sent back to the taxpayer for missing information/signature per Chief Counsel opinion issued in September 2008.-
Letter 177-C for Form 1041 Schedule K-1
-
Letter 1355-C for Form 1065 Schedule K-1
-
Letter 118-C for Form 1120-S Schedule K-1
Exception:
There must be an SSN/EIN in the payee entity area to research IDRS. If the SSN/EIN isn’t present, and only a name OR only an address is present, DO NOT research IDRS. There isn’t enough information to find the correct payee. Either process the Schedules K-1 as is or correspond for the missing information if the K-1s are required.
-
-
≡ ≡ ≡ ≡ ≡ ≡ ≡ ≡ ≡ ≡ ≡ ≡ ≡ ≡ ≡ ≡ ≡ ≡ ≡ ≡ ≡ ≡ ≡ ≡ ≡ ≡ ≡ ≡ ≡ ≡ ≡ ≡ ≡ ≡ ≡ ≡ ≡ ≡ ≡ ≡ ≡ ≡ ≡ ≡ ≡ ≡ ≡ ≡ ≡ ≡ ≡ ≡ ≡ ≡ ≡ ≡ ≡ ≡ ≡ ≡ ≡ ≡ ≡ ≡ ≡ ≡ ≡ ≡ ≡ ≡ ≡ ≡ ≡ ≡ ≡ ≡ ≡ ≡ ≡ ≡ ≡ ≡ ≡ ≡ ≡ ≡ ≡ ≡ ≡ ≡ ≡ ≡ ≡ ≡ ≡ ≡ ≡ ≡ ≡ ≡ ≡ ≡ ≡ ≡ ≡ ≡ ≡ ≡ ≡ ≡ ≡ ≡ ≡ ≡ ≡ ≡ ≡ ≡ ≡ ≡ ≡ ≡ ≡ ≡ ≡ ≡ ≡ ≡ ≡ ≡ ≡ ≡ ≡ ≡
-
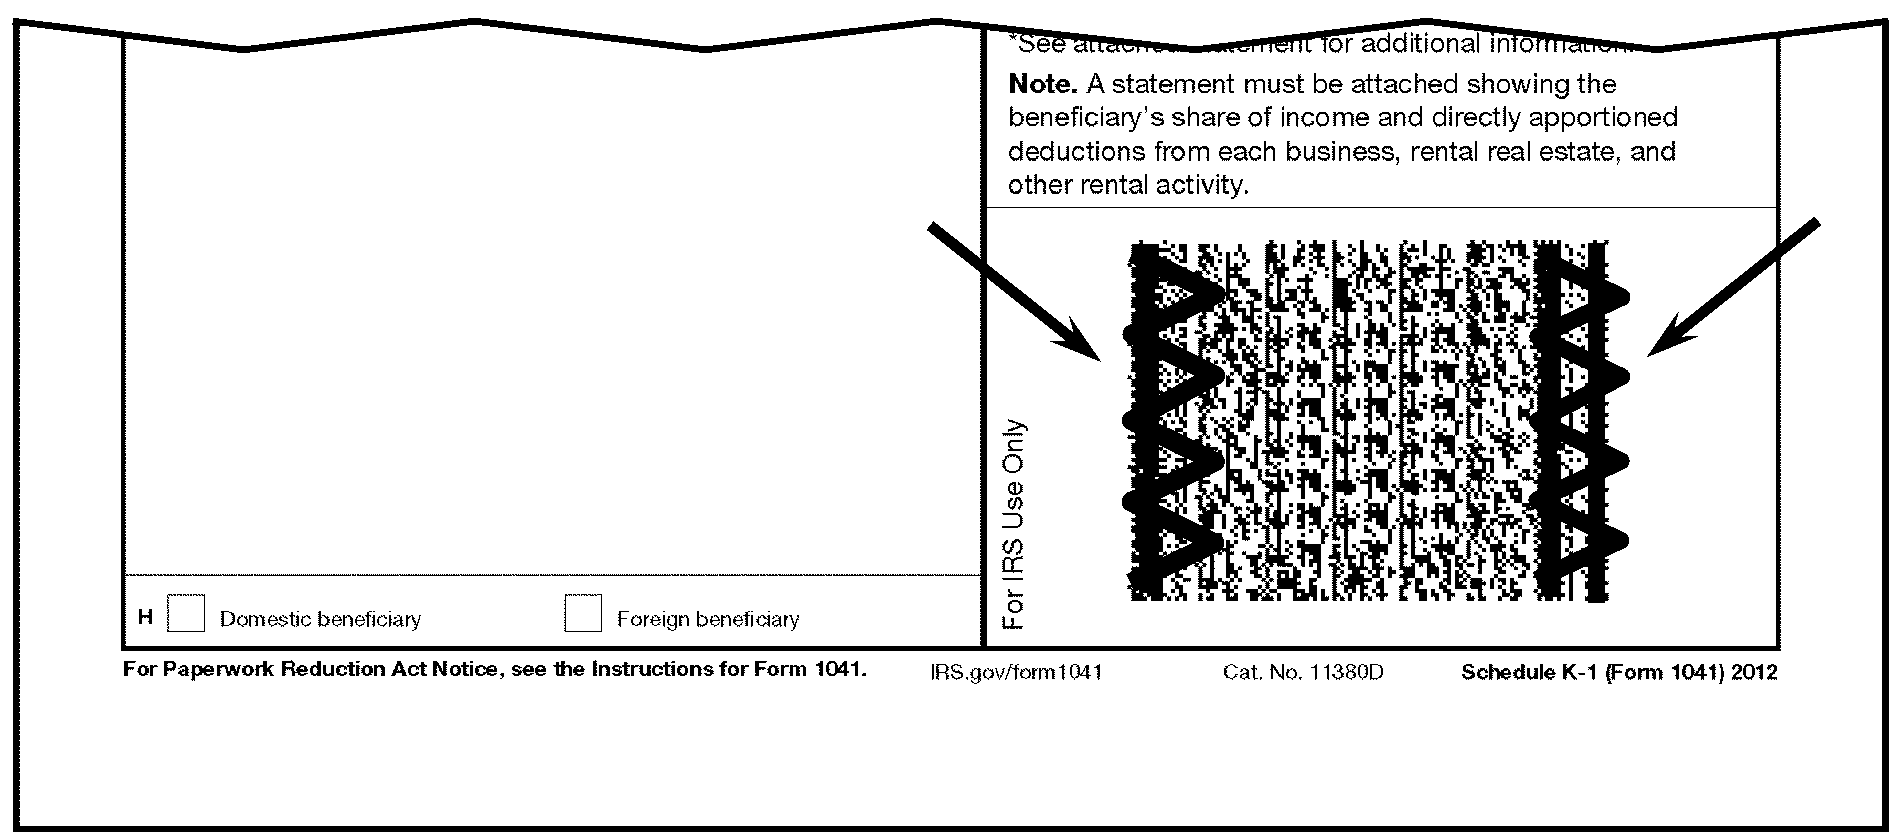
See Exhibit 3.0.101-1, Form 1041 Schedule K-1, Exhibit 3.0.101-2, Form 1065 Schedule K-1, and/or Exhibit 3.0.101-3, Form 1120-S Schedule K-1, for examples of standard Schedules K-1.
-
Schedules K-1 can be submitted in substitute format (e.g., 2D Bar Code).
-
Edit Section 16 to tell clerks where to put payer information.
-
To be processable, substitute Schedules K-1 must meet all the following requirements:
-
Schedules K-1 must contain the payer and payee’s name, address, and SSN/EIN.
-
Each taxpayer's information must be on a separate Schedule K-1 form.
-
The amount of each partner, shareholder or beneficiary share cannot be combined as one total.
-
-
If the substitute Schedules K-1 don’t meet the requirements listed above, research the return and attachments, if information isn’t found research IDRS. If unable to find the missing information, and the payee is not a foreign entity correspond to request a valid Schedule K-1 using:
As of October 29, 2008, returns are no longer sent back to the taxpayer for missing information/signature per Chief Counsel opinion issued in September 2008.-
Letter 177-C for Form 1041 Schedule K-1
-
Letter 1355-C for Form 1065 Schedule K-1
-
Letter 118-C for Form 1120-S Schedule K-1
-
-
≡ ≡ ≡ ≡ ≡ ≡ ≡ ≡ ≡ ≡ ≡ ≡ ≡ ≡ ≡ ≡ ≡ ≡ ≡ ≡ ≡ ≡ ≡ ≡ ≡ ≡ ≡ ≡ ≡ ≡ ≡ ≡ ≡ ≡ ≡ ≡ ≡ ≡ ≡ ≡ ≡ ≡ ≡ ≡ ≡ ≡ ≡ ≡ ≡ ≡ ≡ ≡ ≡ ≡ ≡ ≡ ≡ ≡ ≡ ≡ ≡ ≡ ≡ ≡ ≡ ≡ ≡ ≡ ≡ ≡ ≡ ≡ ≡ ≡ ≡ ≡ ≡ ≡ ≡ ≡ ≡ ≡ ≡ ≡ ≡ ≡ ≡ ≡ ≡ ≡ ≡ ≡ ≡ ≡ ≡ ≡ ≡ ≡ ≡ ≡ ≡ ≡ ≡ ≡ ≡ ≡ ≡ ≡ ≡ ≡ ≡ ≡ ≡ ≡ ≡ ≡ ≡ ≡ ≡ ≡ ≡ ≡ ≡ ≡ ≡ ≡ ≡ ≡ ≡
-
Schedules K-1 can be submitted in non-standard format. A non-standard Schedule K-1 has missing lines.
-
Edit Section 16 to tell clerks where to put payer information.
-
For all processable non-standard Schedules K-1, DO NOT black out the Forms Identification Number found in the upper right corner of the Schedule K-1.
-
To be processable, non-standard Schedules K-1 must meet all the following requirements:
-
Schedules K-1 must contain the payer and payee’s name, address, and SSN/EIN.
-
Line items may be missing, however, line items that are present must be in the same order as those on the official form.
-
Each taxpayer's information must be on a separate Schedule K-1 form.
-
The amount of each partner, shareholders or beneficiary share cannot be combined as one total.
-
-
If the non-standard Schedules K-1 don’t meet the requirements listed above, research the return and attachments, if information isn’t found research IDRS. If unable to find the missing information, and the payee is not a foreign entity, correspond to request a valid Schedule K-1 using:
As of October 29, 2008, returns are no longer sent back to the taxpayer for missing information/signature per Chief Counsel opinion issued in September 2008.-
Letter 177-C for Form 1041 Schedule K-1
-
Letter 1355-C for Form 1065 Schedule K-1
-
Letter 118-C for Form 1120-S Schedule K-1
-
-
≡ ≡ ≡ ≡ ≡ ≡ ≡ ≡ ≡ ≡ ≡ ≡ ≡ ≡ ≡ ≡ ≡ ≡ ≡ ≡ ≡ ≡ ≡ ≡ ≡ ≡ ≡ ≡ ≡ ≡ ≡ ≡ ≡ ≡ ≡ ≡ ≡ ≡ ≡ ≡ ≡ ≡ ≡ ≡ ≡ ≡ ≡ ≡ ≡ ≡ ≡ ≡ ≡ ≡ ≡ ≡ ≡ ≡ ≡ ≡ ≡ ≡ ≡ ≡ ≡ ≡ ≡ ≡ ≡ ≡ ≡ ≡ ≡ ≡ ≡ ≡ ≡ ≡ ≡ ≡ ≡ ≡ ≡ ≡ ≡ ≡ ≡ ≡ ≡ ≡ ≡ ≡ ≡ ≡ ≡ ≡ ≡ ≡ ≡ ≡ ≡ ≡ ≡ ≡ ≡ ≡ ≡ ≡ ≡ ≡ ≡ ≡ ≡ ≡ ≡ ≡ ≡ ≡ ≡ ≡ ≡ ≡ ≡ ≡ ≡ ≡ ≡ ≡ ≡
-
If loose Schedules K-1 are received in Code and Edit, research for the parent return DLN and proceed as follows:
If parent return DLN and Schedule K-1 Then Is found and is for either current year, one-year prior to current year, two-years prior to current year or future year -
Write the parent DLN in the upper left of the Schedule K-1.
-
If the DLN is for an electronic filed return File Location Code (FLC) of DLN (first two-digits) are 14, 16, 22, 35, 38, 41, 43, 52, 64, 65, 72, 75, 76, 92, 93, or 95, consider the Schedules K-1 as classified waste using Service Center Procedures.
-
Place the Schedules K-1 in a gusset folder and label the folder "Loose Schedules K-1."
-
Forward the folder, with the Schedules K-1 to Batching/Numbering to continue processing.
Is found and is for three or more years prior to current year -
Prepare an "attachment slip" requesting the Schedules K-1 be attached to the parent return if the parent return is not an electronic filed DLN.
-
If parent return is an electronic filed DLN, consider the Schedules K-1 as classified waste using Service Center Procedures.
Isn’t found and is for either current, one-year prior to current year, two-years prior to current year or future year -
Hold in suspense and monitor weekly for parent return DLN.
-
Current Year: Hold until six weeks after parent return Processing Completion Date (PCD).
-
One-Year Prior to Current Year: Hold until six weeks after parent return PCD.
-
Two-Years Prior to Current Year: Hold until six weeks after parent return PCD.
-
Future Year: Hold for six weeks (research ERS suspense and Master File, weekly, for parent DLN).
-
-
If parent DLN is found, follow procedures above.
-
If parent DLN is not found, route to Accounts Management as a loose schedule.
Isn’t found and is for three or more years prior to current year. Consider the Schedules K-1 as classified waste using Service Center Procedures. -
-
When a loose Schedule K-1 is received from Code and Edit, research to determine if the Schedule K-1 is filed electronically with the parent return.
IF AND THEN All Schedules K-1 are filed with the parent return. Schedules K-1 are for current, one-year prior to current year, two-years prior to current year future or prior year. Consider the Schedules K-1 as classified waste using Service Center Procedures. -
Consider any Schedules K-1, as classified waste, if it is a duplicate of an electronic filed Schedule K-1.
-
Place all other Schedules K-1 in a gusset folder and label the folder Loose Schedule K-1. Make sure the parent DLN is clearly written/stamped in the upper left margin of the first Schedule K-1 for that parent DLN.
-
Forward the gusset folder, with the Schedules K-1 to Batching/Numbering to continue processing.
Schedules K-1 are for three or more years prior to current year. Consider Schedules K-1 as classified waste using Service Center Procedures. -
-
Schedules K-1 are form specific and should not be converted to match the parent return (i.e., Form 1065 must have a Form 1065 Schedule K-1, Form 1041 must have a Form 1041 Schedule K-1, or Form 1120-S must have a Form 1120-S Schedule K-1). If the Schedule does not match the parent form, don’t send the Schedules K-1 for processing. Take the necessary steps to have them attached to the parent return.
-
For all others do the following when correspondence is received in Error Resolution.
-
Separate the Schedules K-1 from the rest of the correspondence.
-
Write or verify the parent return DLN is stamped in the upper left corner of the first Schedule K-1.
-
Place the Schedules K-1 in a gusset folder and label the folder "Loose Schedule K-1."
-
Forward the folder, with the Schedules K-1, to Numbering/Batching to continue processing.
-
If there are attachments (other than the actual Schedules K-1), attach them to the parent return.
-
If there are attachments (other than the actual Schedules K-1) and you don’t have the parent return, prepare an "attachment slip" requesting the documents be stapled to the parent return.
-
If the Schedules are for other than the above returns (i.e., Form 1065-B, Form 8865), leave attached to the parent return.
-
If the Schedules are for other than the above returns (i.e., Form 1065-B, Form 8865) and you don’t have the parent return, prepare an "attachment slip" requesting the document be attached to the parent return.
-
-
Do not bracket negative amounts.
-
If taxpayer enters a negative amount in a positive only field, "X" the negative amount. See table below for positive only fields for each Schedule K-1.
.Form 1065
Line Number and Title Line K1 - Nonrecourse Ending Line K1 - Qualified Nonrecourse Ending Line K1 - Recourse Ending Line 4a - Guaranteed Payments for Services Line 4b - Guaranteed Payments for Capital Line 5 - Interest Income Line 6a - Ordinary Dividends Line 6c - Dividends Equivalents Amount Line 7 Royalties Line 12 - Section 179 deduction Line 15 - Credits -
Amounts are transcribed in dollars only. If taxpayer enters a positive or negative $.49 or less, "X" the amount. If taxpayer enters a positive or negative $.50 to $.99, edit a $1 or -$1, respectively.
-
Schedules K-1 with zeros, blanks or dashes in the entire money amount T-Lines are considered a "Zero Balance Schedule K-1" and are valid, continue processing.
-
Ogden Campus Only
-
Foreign documents – if a circled "U" is edited to the right of the name, on name line 1, enter "U" in the 2nd TIN Notification field in Section 02. The "U" code is valid with File Location Code 60 (Ogden) only.
-
When transcribing money amounts, the equivalent U.S. cents amount should not be transcribed. Many European currencies use commas for decimals and decimals for commas. Do not transcribe punctuation. Don’t transcribe the last two numeric digits of a foreign money amount if the amount is preceded by either a decimal or a comma (e.g., Deutsche Marks may be written as "DM 2.941,18" only 2941 should be transcribed).
-
-
Schedules K-1 are form specific and should not be converted to match the parent return, (i.e., Form 1065 must have a Form 1065 Schedule K-1, Form 1041 must have a Form 1041 Schedule K-1, and Form 1120-S must have a Form 1120-S Schedule K-1).
-
All current year, one-year prior to current year and two-years prior to current year Schedules K-1 on a prior year form must be reformatted to current year format. See Exhibit 3.0.101-8, Conversion Chart.
-
If there is a bar code present on the prior year revision (2012 and prior for Form 1120-S Schedule K-1, Form 1065 Schedule K-1 and Form 1041 Schedule K-1), using a marker, black out the straight lines on both sides of the bar code. See Figure 3.0.101-1, Black Out Bar Code on Prior Year Documents.
-
Separate processable Schedules K-1 from the parent return.
-
Staple the parent return, attachments, unprocessable Schedules K-1, and envelope together.
-
Move the processable Schedules K-1, un-stapled, to the back of the parent return.
-
When numbering the parent return, the Numbering function:
-
Separates Schedules K-1 from the parent return and ensures all Schedules K-1 beginning tax year match the calendar/tax year of the parent return if other than calendar year.
-
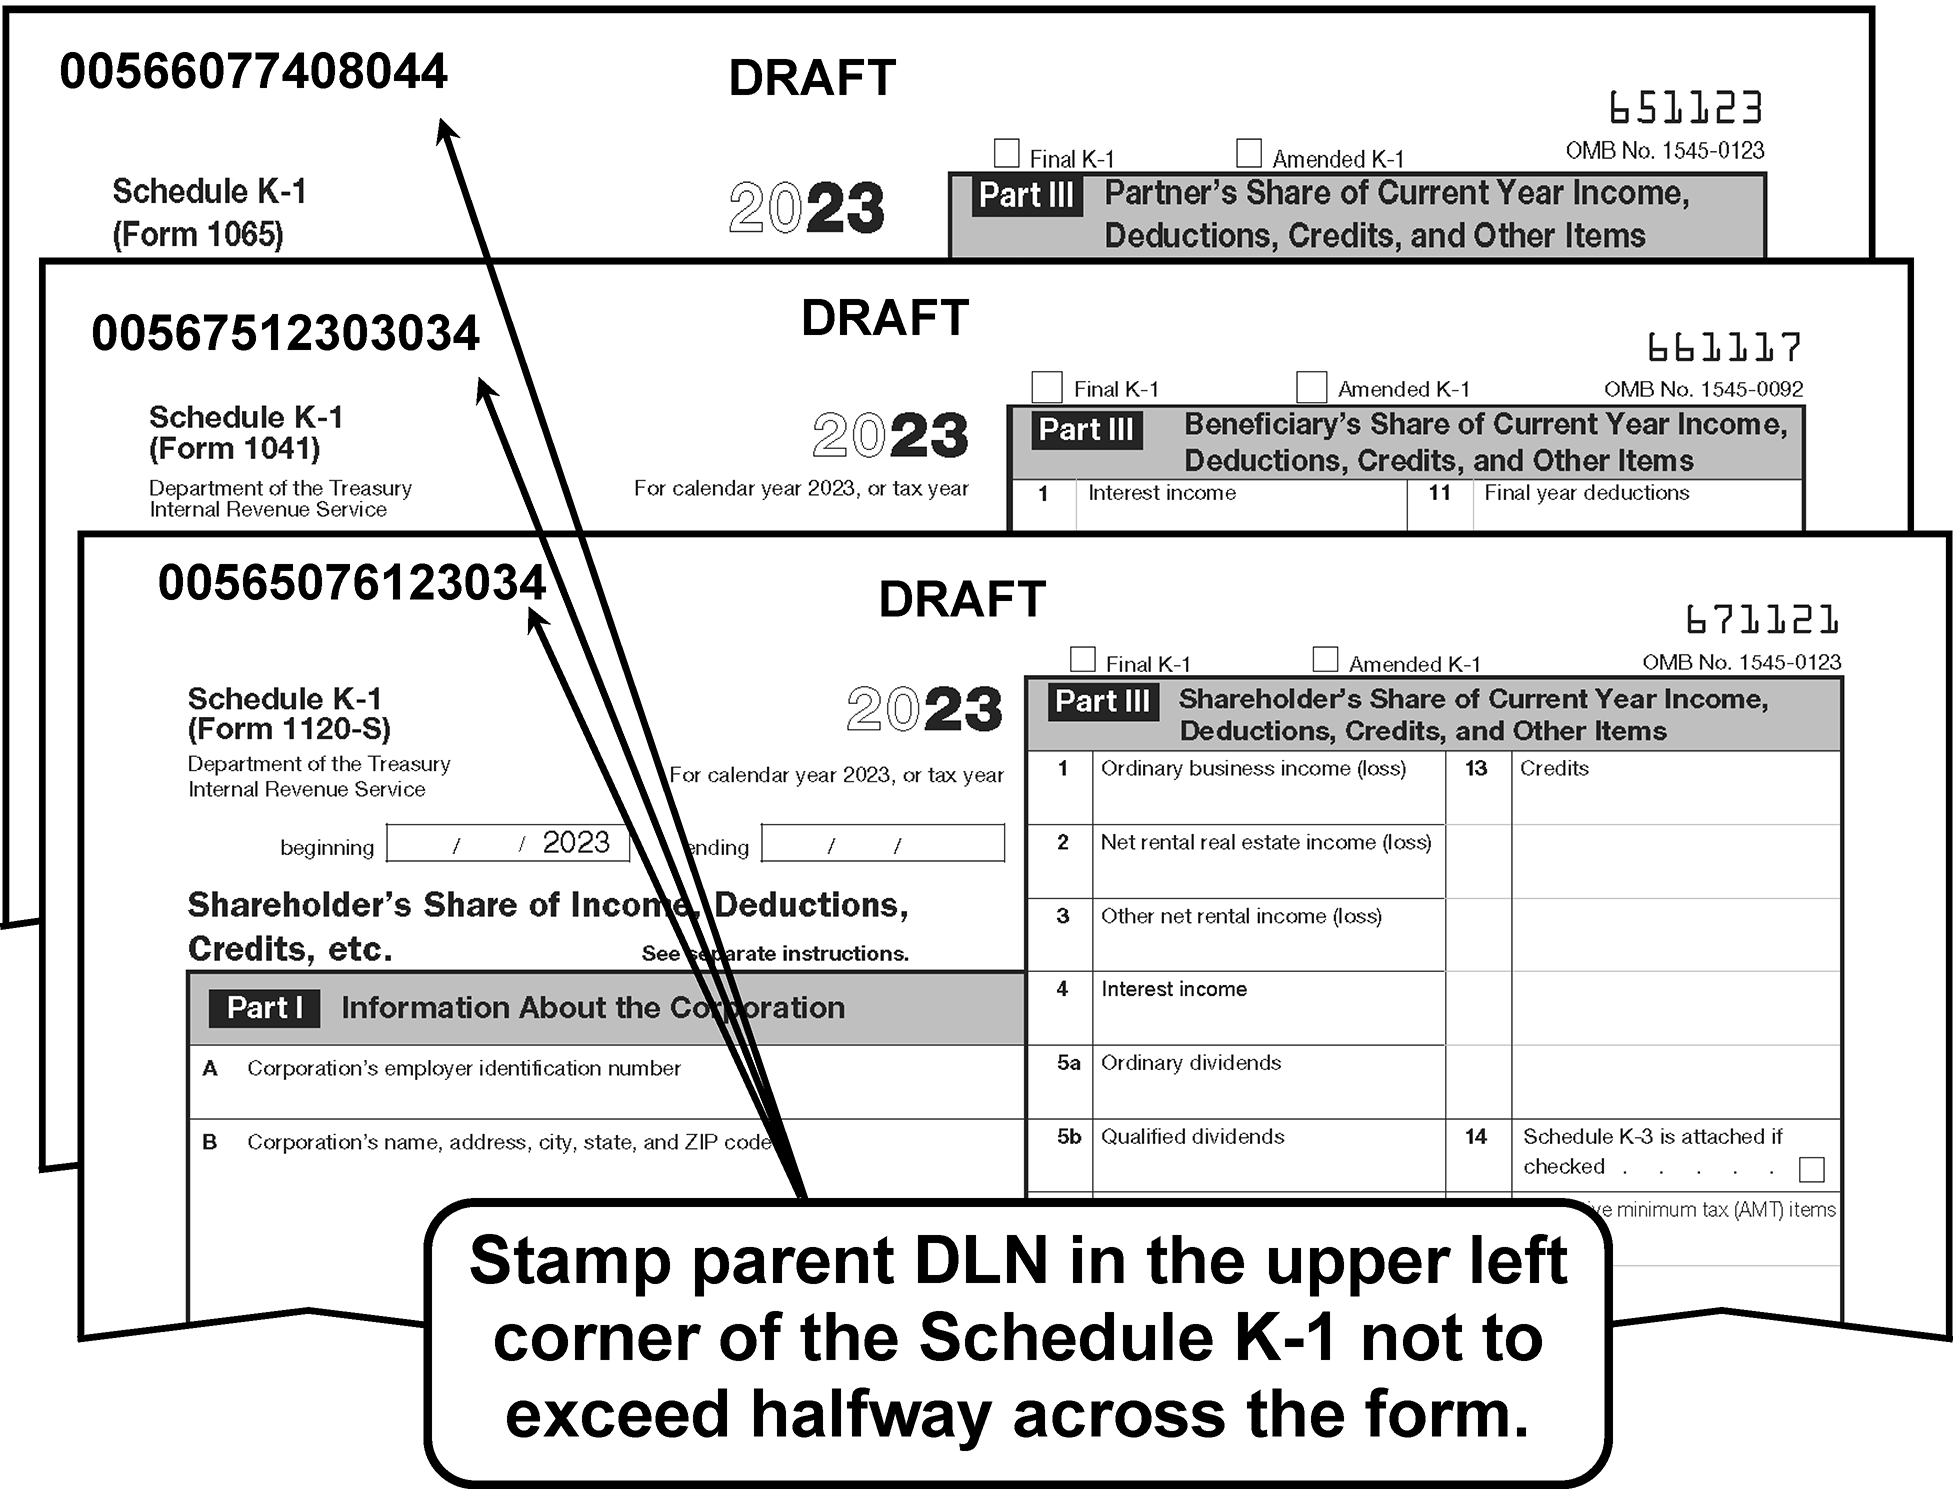
Assigns and stamps a DLN on the parent return on the upper right side of document. Stamp this same DLN in the upper left corner (at least 2 inches from the edge) on all Schedules K-1 for that parent. If there is no room in the upper margin, stamp DLN in the right-side margin. Do Not use the Entity area. See Figure 3.0.101-2, DLN Stamp Location.
-
Stamps or writes the parent block DLN on the gusset folder, places the parent returns in the folders and puts the folders on the batch cart, in DLN order and forwards to Data Conversion.
-
Places the Schedules K-1 into a box in parent DLN numbered order.
-
Places parent transmittal in the same slot holding folder 1 and transfers the numbered parent documents and numbered Schedules K-1 to the final tech's work area.
Note:
Although the parent documents are in folders and Schedules K-1 are in a box, they both need to remain with the transmittal.
-
-
Line up Schedules K-1 boxes according to program (Form 1041 Schedules K-1 with Form 1041 Schedules K-1 etc.) making sure to keep multiple boxes (1 of 2 and 2 of 2) together.
-
It is very important to keep current and future year Schedules K-1 in different batches. The year is input once for each batch and it is repeated for each return in the batch.
-
Current = Current processing year minus one
-
One-Year Prior = Current processing year minus two
-
Two-Years Prior = Current processing year minus three
-
Future = Current processing year (fiscal years)
-
-
Check that each box only contains one tax year. Different years cannot be in the same gusset/box. If different years are mixed in the same box, pull the different tax year(s) and put in a separate gusset/box.
-
Input information in Batch Block Tracking System (BBTS) to create the new batch, and then record new batch number "1."
-
On the Schedules K-1 box line through the old parent program and batch and write the new Schedules K-1 program and batch as well as the cycle number of boxes (i.e., 1 of 1, 1 of 2, and 2 of 2).
-
Document count are 80 documents for each block. You can allow BBTS to default to the number of blocks or change the count to "1."
-
Box is ready for Pre-Doc Prep Unit.
-
Prepare the Schedule K-1 folders or SCRIPS breaker sheets the same time the parent returns are numbered.
-
Assign and stamp a DLN on the parent return.
-
Stamp this same DLN in the upper left corner of all Schedules K-1 from that parent return as a cross-reference.
-
Stamp the parent return gusset folder and the Schedules K-1 gusset/blue folder or SCRIPS breaker sheet with the (FLC), tax class and document code then write the block number on both folders.
-
Place Schedules K-1 (in folders or with SCRIPS breaker sheet after every 80 documents) on batch cart or in stat boxes.
-
-
When preparing Schedules K-1 for the scanner, the most critical area for repair is the right side of the form.
-
The Pre-Doc Prep function is responsible for the following:
-
Do not mix tax years. All tax years must be sorted and boxed separately. If mixed, pull out the tax year(s) with the least amount of returns in the box. For example: If the majority in the box is 2024, pull any Schedules K-1 that are not 2024.
-
Locate the parent DLN and write or verify the DLN is stamped on the Schedules K-1 that are pulled out of batches/boxes due to mixed tax years.
-
Remove staples from the Schedules K-1, if present.
-
Ensure all pages are oriented in the correct direction to be scanned.
-
Remove all Schedules K-1, with tax periods 2022 or prior, write the parent DLN on the upper left corner (if not already present), and return to the Code and Edit function.
-
Remove all attachments, write the parent DLN on the upper left corner (if not already present), and give to lead or manager.
-
ALL damage on the right side of the form must be repaired prior to sending to the scanner function.
-
Repair any rips, tears or holes prior to sending to the scanner function and make sure document is laid out flat for scanning.
-
If Code and Edit has put a slash (/) or "X" through the entire form, pull the form, write the parent DLN on the upper left corner (if not already present), and return to the Code and Edit function.
-
-
Loose Schedules K-1 are received from Batching in a colored folder.
-
Sort by document type, then sort each document type by future year, current year, one-year prior to current year and two-years prior to current year.
-
Batch
-
Follow all Pre-Doc Prep Procedures in IRM 3.0.101.13
-
Place in blue gusset folder and label the box as "RE-FILE"
-
-
After preparing Schedules K-1, route to SCRIPS.
-
Duplex (Carbon Copy) Schedules K-1, cannot be processed through SCRIPS. When you receive a duplex take the following actions:
-
Photocopy the duplex Schedules K-1.
-
Staple the duplex forms together by parent EIN.
-
Place stapled duplex forms in a folder and place in front of the block.
-
Place photocopied forms in the block to be processed through SCRIPS.
-
-
Two-sided Schedules K-1 (two different Schedules K-1 on the front and back of a page) cannot be processed through SCRIPS. When you receive a two-sided Schedule K-1, take the following actions:
-
Copy the back side of the Schedule K-1.
-
Slash or put an "X" on the side that was copied.
-
Put the copied Schedule K-1 behind the original Schedule K-1.
-
-
This section provides instructions for entering data using the SCRIPS System.
-
Use the program codes listed below when entering Schedules K-1 through SCRIPS.
Return Type Program Number Tax Class/Doc Code Parent
Tax Class/Doc Code1041 Schedule K-1 44386 566 236, 244 and 254 1065 Schedule K-1 44387 565 265 and 254 1120-S Schedule K-1 44388 567 316 and 354
-
The system automatically sets the Unit Task Prioritization using the following criteria:
Program Number Return Type Description based on cycle 44388 1120-S Schedule K-1 Prior (by cycle, then batch #), then Current Cycle (by batch #) 44386 1041 Schedule K-1 Prior (by cycle, then batch #), then Current Cycle (by batch #) 44387 1065 Schedule K-1 Prior (by cycle, then batch #), then Current Cycle (by batch #) 44388 1120-S Schedule K-1 Future Cycle (by cycle then batch #) 44386 1041 Schedule K-1 Future Cycle (by cycle then batch #) 44387 1065 Schedule K-1 Future Cycle (by cycle then batch #) -
The system automatically re-prioritizes the work every time the cycle on the system changes.
-
Form 1120-S Schedule K-1must be batched and processed on cycle. They cannot be shelved.
-
Form 1065 Schedule K-1 and Form 1041 Schedule K-1 can be shelved. However, they must be processed by Program Completion Date (PCD).
-
The scanner prints a one-character reject code to the left of the DLN area on any form that is routed to the Reject Bin. The rejected form then is sent back to Batching.
Note:
Prior to sending to Batching, write the parent DLN in the upper left corner of the Schedules K-1 (if not already present).
Form Reject Code Description 44386 (1041 Schedule K-1)
44387 (1065 Schedule K-1)
44388 (1120-S Schedule K-1)M Mixed document type within a unit-of-work. (e.g., Form 1041 Schedule K-1 within a Form 1065 Schedule K-1 unit-of-work)
-
Loose Schedules K-1 are received in a colored folder.
-
After scanning, the SCRIPS operators place the loose Schedules K-1 back in blue gusset folders labeled "RE-FILE" and sends to Post-Doc Prep.
-
Refer to IRM 3.41.274, General Instructions for Processing via Service Center Recognition/Image Processing System, for a description of these and other items:
-
Keyboard Layout
-
Login/Logoff
-
Operator Statistics
-
Post-to-Close
-
Interrupt/Resume
-
Suspend/Resume
-
Status Line
-
-
Whenever IRM 3.41.274, General Instructions for Processing via Service Center Recognition/Image Processing System, and this IRM conflict, this IRM takes precedence.
-
The scanner doesn’t recognize all documents. These documents are called non-conforming forms. They range from photocopies of official documents, that might be official forms but for some reason don’t meet the official specification for measurement, homemade documents of varying formats, to non-Schedule K-1 forms. The Form Identification (FI) function allows the workstation operator to identify the form to avoid rework at the scanner. The FI screen has an image on the left and an entry template on the right. The entry template permits the operator to select what form type the image is, or to delete a single image or an entire submission from further processing. The menus shown on the screen vary depending on how your supervisor profiled you. For instance, if you are not profiled for the FI function, this option isn’t present on the OE Function Menu.
-
From the Workstation Main Menu, select the numeric code for Original Entry (OE).
-
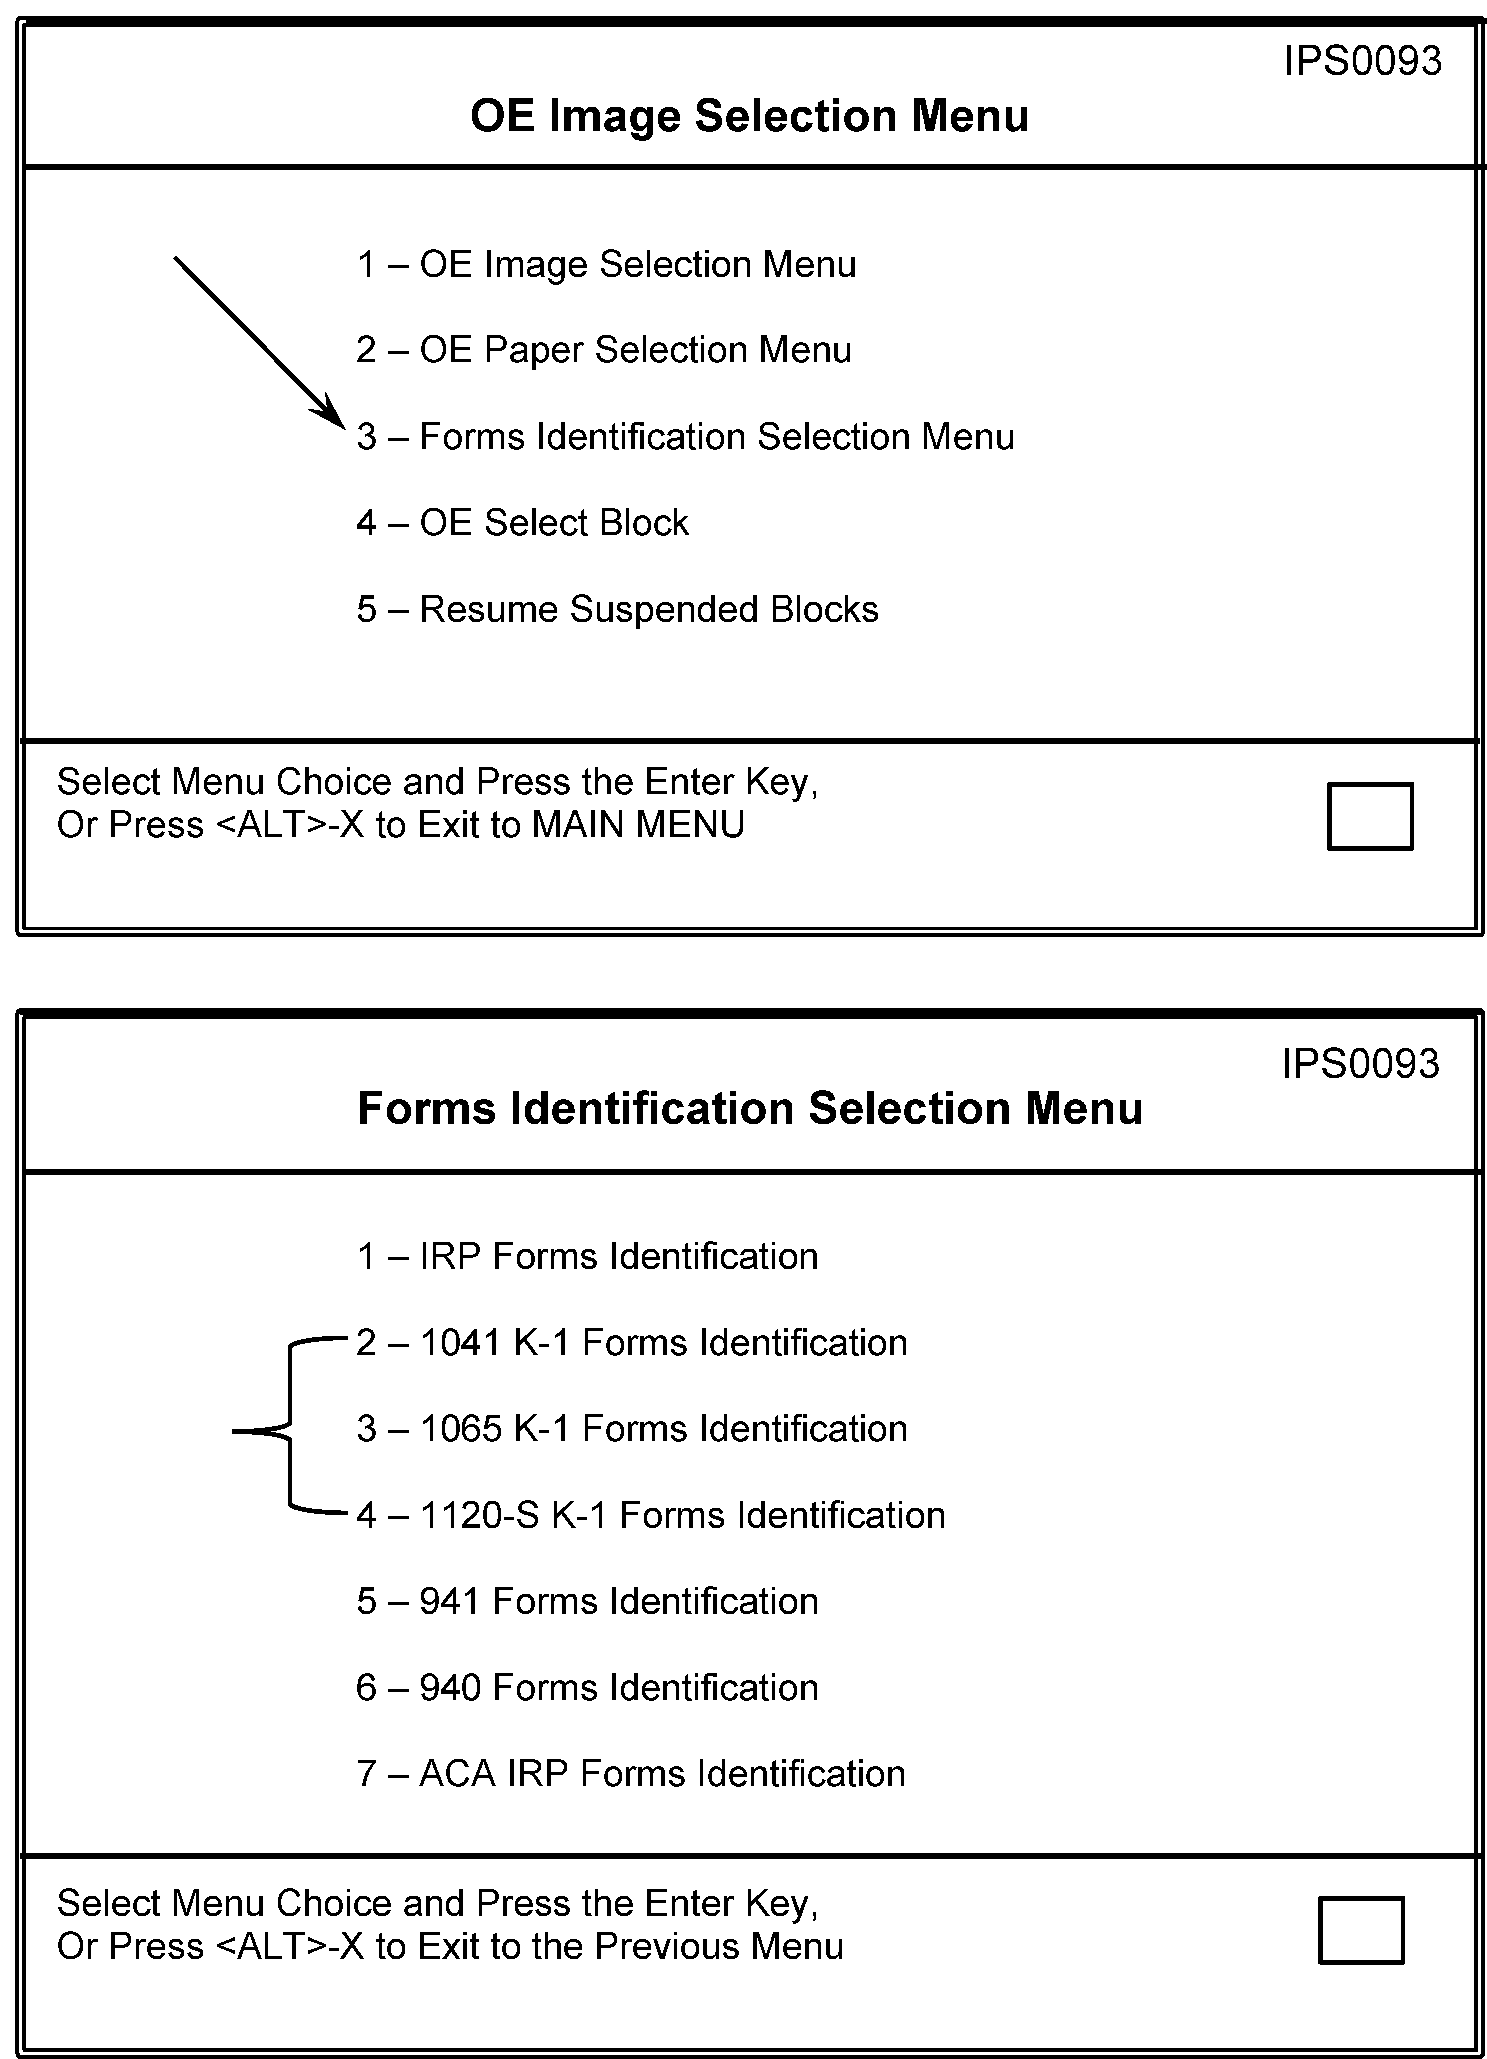
From the Original Entry (OE) Image Selection Menu, select the numeric code for Forms Identification (FI) Selection Menu. See Figure 3.0.101-3.
-
From the Forms Identification (FI) Selection Menu, Select 1041 K-1 Forms Identification, 1065 K-1 Forms Identification or 1120-S K-1 Forms Identification.
-
The first group of images from a unit-of-work (UW) requiring identification opens.
-
If an incorrect option is selected from the Forms Identification (FI) Selection Menu, press the <Ctrl>-P key combination to set (post-to-close) and press <F9> to suspend, before entering any data, to return to the Forms Identification (FI) Selection Menu.
-
If you need to stop FI:
-
Press the <Ctrl>-P key combination (post-to-close) to end FI after completing the current UW.
-
Press the <Ctrl>-P key combination (post-to-close) followed by <F9> to suspend the block immediately.
-
-
The system returns you to the Schedule K-1 Forms Identification (FI) Selection Menu when you complete the last image in the UW.
-
The system assigns a six-digit sequence number instead of a DLN to Schedule K-1 documents it cannot identify. This number helps in locating the UW when researching documents. Once the form type has been identified, the system assigns a DLN to the submission.
-
If you can identify the image, chose the proper letter or number selection from the form template. Depending on the form type selected (1041, 1065, or 1120-S), one of the following menus appears:
1041 K-1 Form Type 1 - Current Year (TY24) 1041 K-1 (661117) 2 - 1 Year Prior Year (TY23) 1041 K-1 (661117) 3 - 2 Years Prior Year (TY22) 1041 K-1 (661117) B - Breaker Sheet (F1332) X - Remove 1065 K-1 Form Type 1 - Current Year (TY24) 1065 K-1 (651123) 2 - 1 Year Prior Year (TY23)1065 K-1 (651121) 3 - 2 Years Prior Year (TY22)1065 K-1 (651121) B - Breaker Sheet (F1332) X - Remove 1120-S K-1 Form Type 1 - Current Year (TY24) 1120S K-1 (671124) 2 - 1 Year Prior Year (TY23) 1120S K-1 (671121) 3 - 2 Years Prior Year (TY22) 1120S K-1 (671121) B - Breaker Sheet (F1332) X - Remove The <Enter> key must be pressed to complete a selection.Note:
If you receive an unrecognized Breaker Sheet (Form 1332, Block and Selection Record), press <X> to remove the document from further processing.
-
If you cannot identify the image, press <F9> to suspend the document for research. Some documents are scanned backwards. These require research to determine exactly which document type they are. If the image is unprocessable, press <X> to remove the document from further processing.
-
To end a session, press the <Ctrl>-P key combination to set (post-to-close). The system returns you to the Original Entry (OE) Selection Menu when you complete the last image in the UW.
-
The Original Entry (OE) function is used to manually enter data from both scanned images and from paper documents. The menus shown on the screen vary depending on your operator profile. For instance, if you are not profiled for the OE function, this option isn’t listed, or is grayed on the Workstation Main Menu.
-
From the Workstation Main Menu, select the numeric code for Original Entry (OE).
-
From the Original Entry (OE) Selection Menu, select the numeric code for OE Image Selection Menu.
-
From the OE Image Selection Menu, select the numeric code for one of the following:
-
All K-1s OE Image
-
1041 K-1 OE Image
-
1065 K-1 OE Image
-
1120-S K-1 OE Image
-
-
The first whole unit-of-work (UW), or first individual document requiring OE opens (because an entire UW may not require OE from image). Refer to IRM 3.0.101.14.17, SCRIPS Transcription Sheets and other exhibits in this IRM as needed when entering data.
-
If an incorrect option is selected from the OE Image Selection Menu, press the <Ctrl>-<P> key combination and then <F9> to suspend the UW and return to the OE Image Selection Menu.
-
Press the <Ctrl>-P key combination (post-to-close) to end OE Image when the current UW is finished.
-
The system returns you to the Original Entry (OE) Selection Menu when you complete the last document in the current UW.
-
The Status Line at the bottom of the screen displays the following information:
-
The Program field shows one of the following: 44386, 44387 or 44388 for Schedule K-1 documents.
-
The DLN field shows the DLN of the document being displayed.
-
The Document field shows the relative count of the document. For example, if it is the first document in a UW that has 80 documents, the Document field shows a count of "1 of 80."
-
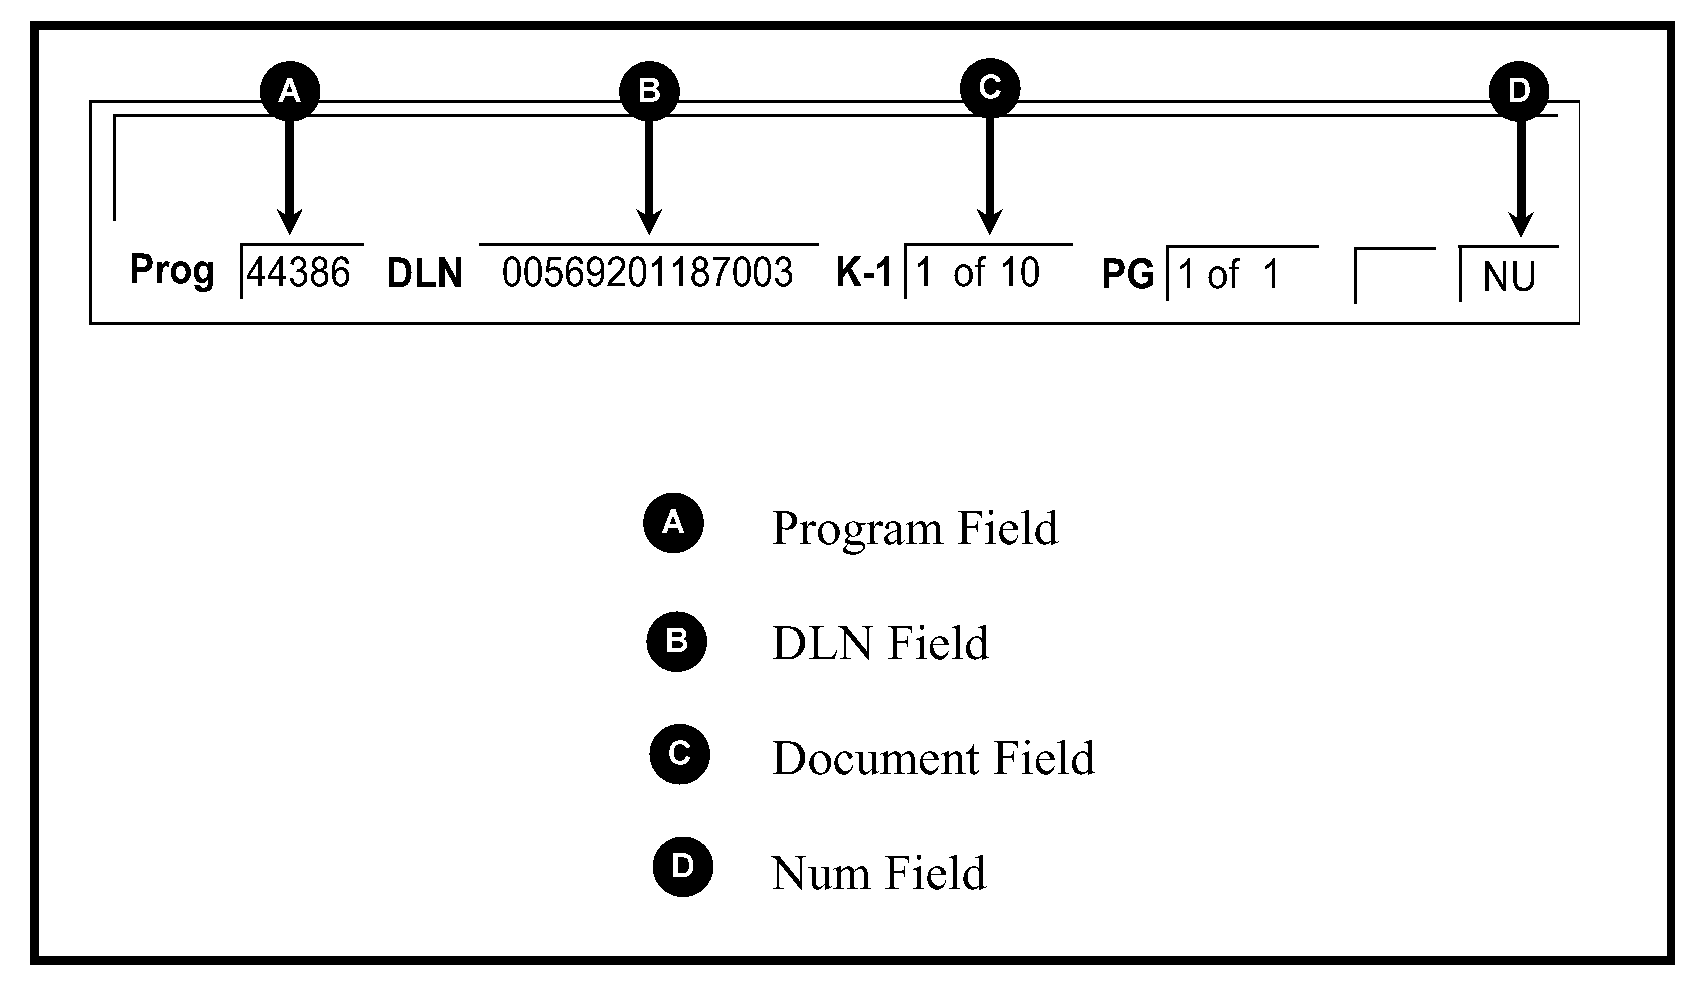
The Num field shows either "NU" or blank, indicates a numeric field, or if the shift key is pressed in an alpha/numeric field. See Figure 3.0.101-4, Num Field Location.
-
-
In OE Image, you manually enter information into the template using a scanned image of the return as the source.
-
From the Workstation Main Menu, select Original Entry (OE).
-
From the Original Entry (OE) Selection Menu, select OE Paper Selection Menu.
-
From the OE Paper Selection Menu, select one of the following:
-
Once the workstation operator has successfully completed steps 1 through 3 above, a window labeled "Schedule K-1 Block Input" opens. Input the following information:
-
BBTS Batch ID = is the four-digit Batch Number found in the upper right corner of the BBTS Transmittal.
-
Tax Year = two-digits that are taken from the first document in the block and are either the year in the Tax Period Beginning area of the document or the form year if the tax period beginning is missing.
-
DLN = is taken from the first document in the block and MUST contain 14-digits for example (00566102790000).
-
-
If the wrong program is selected press <Esc>, to returned to the OE Paper Selection Menu.
-
In OE Paper, the workstation operators manually enter the information into the system and eliminates all transport processing. The operators need the paper Schedules K-1 UW to perform OE Paper. These documents should be batched separately and the BBTS Transmittal clearly marked as "OE Paper."
-
After selecting the form type from the OE Paper Selection Menu, you are first prompted for the form year, followed by the system reminder window "Enter amounts as DOLLARS ONLY."
-
The correct prompt for the first required field is displayed for the first document in the block. Input the information from the document and when finished press <F6> to get the next document.
-
A sequence number (found in the 12th and 13th position of the DLN) is required for each additional document input (01, 02, 03, etc.). A sequence number cannot be skipped or repeated.
-
The Status Line at the bottom of the monitor screen has the following information:
-
The Program field shows 44386, 44387 or 44388 for Schedule K-1 documents.
-
The DLN field shows the DLN of the current document.
-
The Document field shows the relative count of the document. The field shows "1 of 1" if this is the first document in the block. As each subsequent paper document is processed it increases to 2 of 2, 3 of 3 etc.
-
The Num Field either shows "NU" or is blank, depending on whether you have activated the embedded numeric keypad or not.
-
-
Once all the documents have been input press the <Esc> and <F8> keys to end OE Paper or press <Ctrl>-P (post-to-close) while entering, but before releasing the last document in the UW.
-
For OE Image, when you release the last document in a UW, the UW is released.
-
If <Ctrl>-P has been pressed before releasing the UW, the OE Selection Menu opens.
-
If <Ctrl>-P has not been pressed, another UW opens.
-
-
For OE Paper, press the <Esc> then <F8> key to release (close) the UW.
-
If you answer "NO" to the question window that opens, a template appears for other Schedules K-1 entry.
-
If you answer "YES" to the question window, and have not issued a post-to-close (<Ctrl>-P), a Schedule K-1 template appears to begin a new UW.
-
If you answer "YES" to the question window, and have issued a post-to-close (<Ctrl>-P), the OE Selection Menu opens.
-
-
A specific Schedule K-1 UW may be selected for OE by following these steps:
-
From the Workstation Main Menu, select the numeric code for OE. The Workstation Main Menu closes, and the OE Selection Menu opens. Menu options vary depending on operator profiles set by your supervisor. For instance, if you are not profiled for the OE function, this option is not listed or is grayed on the Workstation Main menu.
-
From the OE Selection Menu, enter the numeric code for OE Select Block. The OE Selection Menu closes, and the Open Block/Unit-of-Work window opens.
-
From the Open Block/Unit-of-Work window, enter the first 11-digits of the DLN from the Schedule K-1 in the UW.
-
Press the <Enter> key. The Open Block/Unit-of-Work window closes and the selected UW opens.
-
The designated Schedules K-1 opens. Enter data using instructions found in IRM 3.0.101.14.8, General Correction Procedures, IRM 3.0.101.14.17, SCRIPS Transcription Sheets, and other instructions in this IRM as needed.
-
If the block isn’t available, an error message is displayed indicating the block isn’t available.
-
If an incorrect UW is selected from the Open Block/Unit-of-Work menu, press <Ctrl>-P and then <F9> to suspend the UW.
-
-
The DV function is used to manually correct data from scanned images. Menu options vary depending on your profile set by your supervisor. For instance, if you are not profiled for the DV function, this option isn’t listed or is grayed on the Workstation Main Menu.
-
The Status Line at the bottom of the screen displays the following information:
-
The DLN field shows the DLN of the document being displayed.
-
The SUB field shows the relative count of the document.
-
The Pg field shows the relative count of the page of the document.
-
The Status Line shows "AUTO" when the automatic mode is on, "INS" when the insert mode is on, and "NU" when the numeric mode is on.
Note:
AUTO Indicator is a toggle which turns the AUTO Mode on and off. When AUTO is on, the cursor automatically moves from the current field to the next field requiring perfection. When AUTO is off, the cursor manually moves through every field using the cursor movement keys. A Select Block or Suspended Block in DV requires the operator to restore the AUTO on mode using <Ctrl>--<A>.
-
-
From the Workstation Main Menu, select the numeric code for Data Validation (DV).
-
From the Data Validation (DV) Selection Menu, select the numeric code for DV Selection Menu.
-
From the DV Selection Menu, select one of the following:
-
All K-1s DV
-
1041 K-1 DV
-
1065 K-1 DV
-
1120-S K-1 DV
-
-
The first UW opens and the cursor stops at the first highlighted field. Make the necessary corrections following instructions found in IRM 3.0.101.14.8, General Correction Procedures.
-
If an incorrect option is selected from the DV Selection Menu before entering any data, press <Ctrl>-P then press <F9> to suspend and return to the DV Selection Menu.
-
After entering the last field on the document, if AUTO is off, press the <F6> key to release the document and display the next template.
-
Press <Ctrl>-P to not receive more blocks once the current UW is completed.
-
The system returns you to the Data Validation (DV) Selection Menu when you release the last document.
-
From the Workstation Main Menu, select Data Validation (DV).
-
From the Data Validation (DV) Selection Menu, select DV Select Block.
-
From the Open Block/Unit-of-Work window, enter the first 11-digits of the DLN stamped on the Schedule K-1 in the UW.
-
The selected UW opens and the cursor stops at the first highlighted field. Make the necessary corrections following instructions found in IRM 3.0.101.14.8, General Correction Procedures.
-
The Open Block/Unit-of-Work window is displayed when you release the UW. If you want to continue Data Validation (DV) from paper, go back to step 3. Otherwise press the <Esc> key to return to the DV Selection Menu.
-
To begin DV on a specific UW of Schedule K-1 documents follow these steps:
-
From the Workstation Main Menu, select the numeric code for Data Validation (DV). The Workstation Main Menu closes, and the Data Validation (DV) Selection Menu opens. Menu options vary depending on your profile set by your supervisor. For instance, if you are not profiled for the DV function, this option isn’t listed or is grayed on the menu.
-
From the Data Validation (DV) Selection Menu window, enter the numeric code for DV Select Block. The Data Validation (DV) Selection Menu window closes and the Open Block/Unit-of-Work window opens.
-
From the Open Block/Unit-of-Work window enter the first 11-digits of the DLN from the Schedule K-1 in the UW.
-
Press the <Enter> key. The Open Block/Unit-of-Work window closes and the selected UW opens.
-
The designated Schedule K-1 opens. Enter data using instructions found in IRM 3.0.101.14.8, General Correction Procedures, and IRM 3.0.101.14.17, SCRIPS Transcription Sheets and other instructions, as needed, in this IRM.
-
If the block isn’t available, an error message is displayed indicating the block isn’t available.
-
A suspended UW in DV requires the operator to restore the AUTO on mode.
-
If an incorrect UW is selected from the Open Block/Unit-of-Work menu, press the <Ctrl>-P key combination and then <F9> to suspend the UW.
-
-
Use these procedures as a guide during the Original Entry (OE) and Data Validation (DV) functions. Not all the items are always applied to specific situations in either function. If the scanned information is correct, no action is necessary. If the scanner reads the information and it is incorrect, or if scanned information is put into the wrong field, remove from incorrect field and input the information in the correct field.
-
If you reach the maximum field length while entering data, the cursor, in most cases, automatically moves to the next field. Therefore, incorrect characters can be inadvertently entered into the next field. Remove or correct these characters. Use standard abbreviations as shown in Exhibit 3.0.101-4, Standard Abbreviations, and Exhibit 3.0.101-5, Street Address Abbreviations, to avoid this situation.
-
Error Messages - Error messages with information are often helpful to correct the error and may be found in the Status Line. Most error messages are two lines with the first line being the error message and the second line containing information that may help resolve the error condition.
-
While working in OE Image or DV Image, if you can’t determine the data for any field (except the street address or city fields) from the image because it is illegible or the image is incomplete, suspend the UW and pull the paper document for verification.
-
In certain situations, the scanner may read a name or address or even a city without spaces. If the name and/or address can be determined, leave as is.
-
When validating an address change, ensure the system read the correct ZIP Code. If the address, city, and state on the template doesn’t match the information on the image and a correct ZIP Code isn’t present on the template, correct the information to match what is on the image.
-
If a document is received and appears totally blank (no payer/payee entity or tax data), suspend UW and pull the paper document for verification.
-
While working in OE Image or DV Image, don’t enter data marked out or crossed through by the filer.
-
The <Ctrl>-<F7> combination provides the operator the ability to access the last edited field or the last flagged field of the previous document.
-
After DV is complete the system runs a verification of parent DLNs. If the parent DLN is missing from any of the documents within the UW the error message, "Blank Parent DLN still exists after DV. Press <Enter> to review possible parent matched." Another window appears stating "Possible Parent Match 1 of (however many) is this the same payer?" If the operator selects "YES," SCRIPS populates the payer information. If the operator selects "NO," the system continues to ask until it has gone through all payers in the UW.
Note:
System compares the parent EIN/TIN to the previous document. If the parent EIN/TIN matches, the system duplicates all the parent information, including the parent DLN from the previous document.
-
The valid parent return File Location Codes (FLC) for Ogden are 29, 60, 78, 81, 82, 83, 85, 87, or 88.
-
The valid parent return File Location Codes (FLC) for Kansas City are 09, 36, 39, 41, or 43.
-
-
For more information on Function Keys refer to the table in Exhibit 3.0.101-13, Key Function Table or IRM 3.41.274, Optical Character Recognition Scanning Operations, General Instructions for Processing via Service Center Recognition/Image Processing System, Exhibit 3.41.274-1, Function Key Use and Description by Form Type.
-
Occasionally the "Image" of the return presented to the OE or DV Operator is unreadable. Some reasons for this are:
-
Writing on image is too light,
-
Image is too dark to read ,
-
Image is illegible, or
-
Image is incomplete, etc.
-
-
When working in OE or DV, if you can’t determine the data for ANY field (except the name, street address, city, state, or ZIP Code) from the Image, suspend the UW as "Poor Quality Image" (<F9>; press "S" ; select "Poor Quality Image" ).
-
The lead clerk/designated employee reviews the Work Status Report for suspended "Poor Quality Image" and pulls the document from the block and gives it to the employee who suspended the UW.
-
The employee resumes the suspended block, corrects the data using the paper document or releases the document leaving the field blank, if unable to determine the data.
-
The employee then gives the document back to the lead clerk/designated employee.
-
The lead clerk/designated employee re-files the document in its original block.
-
-
Payee Information - Transcribe name(s) and address information from Part II; box F labeled "Beneficiary’s name, address, city, state and ZIP Code."
-
Payer Information - Transcribe payer Name Line 1 from Part I, box B labeled "Estate’s or trust’s name." Transcribe payer Name Line 2 and address information from box C labeled "Fiduciary’s name, address, city, state and ZIP Code."
-
-
-
Payee Information- Transcribe name(s) and address information from Part II; box F labeled "Partner's name, address, city, state and ZIP Code."
-
Payer Information - Transcribe payer name(s) from Part I, box B labeled "Partnership’s name, address, city, state and ZIP Code."
-
-
-
Payee Information - Transcribe name(s) and address information from Part II box F labeled; "Shareholder’s name, address, city, state and ZIP Code."
-
Payer Information - Transcribe payer name(s) and address information from Part I box B labeled, "Corporation’s name, address, city, state and ZIP Code."
-
-
In certain situations, the scanner may read a name, address or city without spaces. If the name and/or address can be determined, leave as is.
-
Edit marks and their descriptions are below:
EDIT MARK DESCRIPTION "X" -
The "X" is used to delete tax data or to show an item is not to be transcribed.
-
For money amounts, enter the amount written to the left of the "X," when applicable.
"/" (Slash) or "X" through the entire page. -
A "/" (slash) or "X" through the entire page means the page is to be deleted.
-
If the form has a "/" (slash) or "X" through the entire page, delete the page as "Unprocessable Attachment."
-
-
Tax Year and Tax Period dates must meet the following criteria:
-
Current timely filed calendar year
-
One-Year Prior to current calendar year
-
Two-Years Prior to current calendar year
-
The beginning and ending tax year on all Schedules K-1 must list the same tax year. If not, they fall out to ERS if not edited correctly.
OE/DV Screen Prompts Description Instructions Tax Year Tax Year -
Enter the pre-printed or edited Tax Year from the top of the form in YY format.
-
If the Tax Year is different than the Beginning Tax Period Year, then enter the Beginning Tax Period Year as the Tax Year.
Beginning Tax Period Date from the Tax Year Beginning date box at the top of form. -
Enter the Beginning Tax Period date in MMYY format.
-
If blank press <Enter>, the output program updates the Tax Period based on the Tax Year.
Ending Tax Period Date from the Tax Year Ending date box at the top of form. -
Enter the Ending Tax Period date in MMYY format or the edited Ending Tax Year from the top of the form in YY format.
-
If blank press <Enter>, the output program updates the Tax Period based on the Tax Year.
-
-
Name and Address Block Reader is referred to as NABR. NABR is used to improve the accuracy of addresses captured by the scanner from Schedule K-1 documents. The NABR accomplishes this improvement by comparing the address captured by the scanner with a database of addresses used by the United States Postal Service. SCRIPS processes the NABR through a Postal Database.
-
When validating a NABR change, ensure the system read the correct ZIP Code. If address, city, and state changes are made and a correct ZIP Code is not present in the data field, correct the information to match what is on the image.
-
The system prompts an operator to "Please verify" the following conditions:
-
State is determined by the system from the city present
-
State is determined from the ZIP Code present
-
City is updated by the system to a phonetic match
-
City is determined from the ZIP Code
-
Acceptable city name used
Return Postal Data Base Update Comments 2121 SE TUNA
NEW YORK, NY 100012121 TUNA BLVD
NEW YORK, NY 10001System removed SE and put BLVD 112 POODLE A TURTLE CT
RABBIT CITY BCH, FL 32413112 POODLE A TURTLE CT
RC BEACH, FL 32413System abbreviated Rabbit City and spelled out Beach 14658 ANACONDA RD NE
WASHINGTON DC 2001314658 NE ANACONDA RD
WASHINGTON DC 20013System moved NE from the end of the line to after the numbers 1705 SW PIGEON CIRCLE
NEW YORK, NY 100011705 SW PIGEON CIR
NEW YORK, NY 10001System abbreviated Circle -
-
Enter the information as shown on the document with as many characters as permitted in the provided name line, except as instructed below. Refer to Exhibit 3.0.101-4, Standard Abbreviations and Exhibit 3.0.101-5, Street Address Abbreviations for a list of valid abbreviations. If the scanned information is correct, no action is necessary.
Example:
Except as noted below, enter the information exactly as shown or edited on the document, including all Trust numbers, Account numbers and dates if part of name line.
Example of Taxpayer Entry Enter as: Iris Gopher Acct #14542 IRIS GOPHER ACCT 14542 Estate of Gopher Family ESTATE OF GOPHER FAMILY -
If a Partner Number or SSN number is shown in the name line, do not enter.
-
If an account number is shown above or to the right of the first name line, enter it on the first name line. (See example above.)
-
Do not enter periods and don’t space for them. Only enter a space in an internet name, for example, "Flower.com" should be entered as "FLOWER (space) COM" .
-
If the name appears with the last name first and the first name last, and the system read it correctly, leave as is.
-
Enter Name Line 2 as shown. If a foreign address is present in entity information, use Name Line 2 for foreign information only. For further guidance on entering foreign addresses please refer to IRM 3.0.101.14.11.1.1, Foreign Address.
-
If Name 1 or Name 2 entry is too long for the field, shorten it using the abbreviations listed in Exhibit 3.0.101-4, Standard Abbreviations.
-
Omit a slash (/), if shown, between two names (e.g., John Pine/Mary Birch). Leave a space.
-
-
Enter a space before and after an ampersand (&). In the payer’s name line enter "and" or "&" as shown.
Example: Enter as: (1) Linda Snake and Joe Guppy, Ptrs LINDA SNAKE AND JOE GUPPY PTRS (2) J. Gecko & R. Frog, Inc J GECKO & R FROG INC -
Omit punctuation, except for hyphens (-). Do not enter a space before or after hyphens. The hyphen is keyed using the MINUS (-).
Example: Enter as: (1) O'Graphite OGRAPHITE (2) Maple-Pecan MAPLE-PECAN -
Space within a true last name if shown.
Example: Enter as: De Pine DE PINE Van Yew VAN YEW -
In the second name line change "and" to "&."
-
If ″In Care Of″ or "%" is found in the middle of Name Line 1, move the information to the Name Line 2 field.
Enter name In Prompt ROGER BANANA Name 1 % ANACONDA TRUCKING & MOVING CORP Name 2 -
If an "In-Care-Of" name is present, enter "%," space, and the name. If information is already present on Name Line 2, include as much as possible after the "In-Care-Of" information is input.
-
-
If there are two or more names in Name 2, separate them with the word "OR" , unless "and" (&) or "C/O" (%) are present. Enter "&C" when edited as the last two characters of Name 2 data (no space between the two characters) when the taxpayer entry is too long for the field.
-
Enter name In Prompt WOOD N WILLOW Name 1 TULIP R SPANIEL OR ROSE E LOCUST &C Name 2 Enter name In Prompt ROBERT WOODPECKER Name 1 ELEANOR WOODPECKER OR GLORIA ROBIN Name 2 Enter name In Prompt ALBERT PALM JR Name 1 ROSE HOLLY OR ROBERT COFFEE Name 2 Enter name In Prompt ARTHUR POPLAR Name 1 ROBERTA POPLAR OR STEPHEN POPLAR Name 2
-
-
Second Name Line data, such as DBA, C/O, or % should be entered on the second line if placed on the address line, and clerk intervention is required.
-
If the payer’s name line is illegible, suspend for "Poor Quality Image."
-
If payer name is missing, leave blank.
-
If payer or payee Name Line 2 is illegible or not present, leave blank.
-
If payee name is missing or illegible, enter a "Z" in the payee’s name line field.
-
IMF Only - Do not enter titles such as Mr., Mrs., Capt., Dr., Rev., etc., in any individual's name.
-
BMF Only
-
Abbreviate corporate name information only when it is abbreviated on the document or the name line exceeds the allowable space. Never abbreviate the first four characters containing the Name Control.
Exception:
The following always are abbreviated for corporate entries:
ASSN for Association
CO for Company
CORP for Corporation
FDN for Foundation
INC for Incorporated
LLC for Limited Liability Company
PA for Professional Association
PC for Professional Corporation
PS for Professional Service
SC for Small Corporation -
Use the following when you see one of these symbols:
• #, enter NO,
• ¢, enter CENT,
• +, enter PLUS,
• @, enter AT,
• $, enter DOLLAR. -
Special characters not outlined above and/or symbols are omitted and a blank space entered in its position in the name line.
-
Omit the designation only such as TA, DBA, AKA, Owner, Proprietor when entering data.
-
If a city or state is shown as part of the first name line, enter the complete name of the city or state. NO abbreviations.
-
If the name begins with the word "The" and has more than one word following "The" DO NOT enter "The" .
-
If the name begins with the word "The" and has only one word following "The" enter "The" as the first word on the name line.
-
If there are initials in a person's name or a company name with abbreviations such as LLC, MD, PC, etc., do not space for periods. If scanner picks up spaces, leave as is.
-
If there is a business name in the name line such as ″Rug Doctor″ or ″Mister Clean″ and the system drops the Doctor or Mister, re-enter the name as submitted.
-
If a foreign address is present, do not use the Name 2 field to enter names. Further instruction for entering foreign addresses can be found in IRM 3.0.101.14.11.1.1, Foreign Address.
BMF NAME LINE ENTRY EXAMPLES
Example of Paragraph (13) alpha above Taxpayer entry Enter (First Name Line) as a, f The Spaniel Corporation Apple Spaniel, Pres. SPANIEL CORP
APPLE SPANIEL PRES (Second Name Line)b Banana Dental Office #5 Ltd. BANANA DENTAL OFFICE NO 5 LTD a Fig Spaniel Corporation FIG SPANIEL CORP I Dr. Fig Spaniel Inc. DR FIG SPANIEL INC c 5 & 10 & 25¢ Store 5 & 10 & 25 CENT STORE d, h, f Service Cleaners L.L.C. DBA The Clean Machine SERVICE CLEANERS LLC
CLEAN MACHINE (Second Name Line)e First Bank of FL FIRST BANK OF FLORIDA f The First Bear Bank FIRST BEAR BANK g The Labrador THE LABRADOR -
-
If the scanned information is correct, no action is necessary.
-
If the scanned information is NOT correct, enter the information exactly as shown on the document except as instructed below or when the NABR has perfected the address. See IRM 3.0.101.14.10.
-
Do not enter periods in the address field, however, punctuation such as slash (/) and hyphen (-) are acceptable. If a period is present between two numbers, enter a space for the period.
-
If an ampersand (&) is present in the street address, enter as "AND."
-
If an apostrophe (‘) is present, omit the apostrophe and do not leave a space for the apostrophe.
-
If perfecting only part of the address, such as the state or ZIP Code, do not go back to the street address to abbreviate or correct characters if the scanner picked up the street address as present on the document.
-
If a document has a PO Box, Post Office Box, POB, PO, or PO Drawer, enter the Post Office Box or an asterisk (*) followed by a space and the number.
-
If a document has a street address and a PO Box, the PO Box takes precedence.
-
If two street addresses are present with the same city and ZIP Code, enter the first street address. If two addresses are present, with different cities and ZIP Codes, enter the first in the address, city, state, and ZIP Code fields. Also, use abbreviations as necessary to limit this entry to 35 positions. Enter as much of the street address with abbreviations as possible. (See Exhibit 3.0.101-5 for Street Address Abbreviations).
-
Omit No, No., Num, or "#" symbol and Number if it appears as a prefix to a house, apartment, Route, or PO Box number.
-
If North, South, East or West is shown as part of the city name, use the standard abbreviation (such as N=North, S=South, etc.). NEVER use a Major City Code and the standard abbreviation together.
-
If the city has numerics, enter as alphas.
-
If multiple street designations are present, only abbreviate the last designation present.
-
If the street address cannot be determined or is blank, enter "Z" in the address field. If the city cannot be determined or is blank, enter "ZZZ" in the city field and leave the state and ZIP Code fields blank.
-
Enter standard abbreviations for states and territories as shown in Exhibit 3.0.101-6, State/Major City/ZIP Code/Major City Code, and Exhibit 3.0.101-7, Foreign ZIP Code, City and State Exceptions.
-
If there is no state, but a ZIP Code is present, enter the ZIP Code as shown and press <Enter>. This generates the state code for this ZIP Code in the prompt area. Follow the screen prompt to accept this code or to enter a different code.
-
If there is no ZIP Code (or the ZIP Code is less than or more than five-digits) but a state is present, press the <Enter> key in the ZIP Code field. The system generates the default ZIP Code for this state.
-
If the system prompts that the ZIP Code entered and present on the form does not match the state, delete the ZIP Code entered from the form and generate the default ZIP Code for the state.
-
If both the state and ZIP Code are blank, leave both blank.
-
For instructions regarding foreign addresses see IRM 3.0.101.14.11.1.1.
-
Army Post Office (APO), Diplomatic Post Office (DPO) and Fleet Post Office (FPO) addresses must be transcribed with the proper two-character state code followed by the corresponding unique five-digit ZIP Code.
-
When an APO, DPO, or FPO is used, don’t enter any other data in the city field.
-
If the ZIP Code is out of range on APO, DPO, or FPO addresses, enter 34001 for Miami, 09001 for New York and 96201 for San Francisco or Seattle.
-
When APO, DPO, or FPO is to be transcribed in the city field, the state code field must correspond with the tables below.
State Code ZIP Code Range Geographic Location AA 340 Americas AE 090-098 Europe AP 962-966 Pacific EXAMPLE: ENTER AS: APO New York, NY 091XX APO AE 091XX FPO San Francisco, CA 962XX FPO AP 962XX -
-
Operators are responsible to perfect all entity information on all foreign Schedules K-1.
-
Foreign addresses on Schedules K-1 documents are entered as follows:
-
Enter the foreign street address in the Name Line 2. Omit any existing Name Line 2 information.
-
Enter the foreign city, state, province or territory, and mailing code, if present, in the street address field. Spell out the city, state, province or territory, if abbreviated (See Exhibit 3.0.101-11 through Exhibit 3.0.101-15). Separate the postal code from the foreign city or province with a space. Example: London 02.
-
Enter the foreign country in the city field. Spell out the country if abbreviated by the taxpayer. If the country is missing or illegible, use Exhibit 3.0.101-11 through Exhibit 3.0.101-15 to determine the country. If you are unable to determine the country, enter "ZZZ."
-
Enter a period (.) in the first position of the state field to identify the address as foreign.
-
Leave the ZIP Code blank.
-
-
Should be input and validated as a seven-position field and must be in the format XXX.XXX.
-
Must be positive only.
-
Must be between 000 - 100.
-
Percentage fields can be blank.
-
If there are more than three numeric to the left of the decimal point enter 100. If there are more than three numeric to the right of the decimal point, enter the first three numeric closest to the decimal point. (See examples 6 and 7 below).
-
If the decimal point is not present, enter the decimal point after the numeric presented (with decimal point no further then fourth position). For validation purposes, the decimal point must be entered so the system can zero fill the percentage correctly. (See examples 1 and 3 below).
-
If the percentage has a fraction, ignore the fraction, and enter the number only. (See example 8 and 9 below).
No Percentage Recognized as Invalid = send for verification/correction Valid = not sent to Operator Operator to enter/verify 1 10 missing decimal point 10. 2 95.1 Valid 3 100 missing decimal point 100. 4 101.123 percentage is > 100 100. 5 15.123 Valid 6 15.0876 too many numbers to the right of decimal 15.087 7 1201 percentage is >100.00 and to many numbers to the left of the decimal 100. 8 33 1/2 Ignore the fraction; enter the whole number only 33. 9 14 7/8 Ignore the fraction; enter the whole number only 14.
-
Enter all money amounts as DOLLARS ONLY.
-
DO NOT enter money amounts from any form or document that is "X'd out."
-
Enter negative amounts, where allowed, by leading the amount with a hyphen (-).
-
If a negative money amount appears in a positive only field, press <F3>, to clear the field and press <Enter>. Negative amounts can be identified by a minus sign or being enclosed in parentheses or brackets.
-
If the taxpayer enters a positive or negative $.49 or less, <F3>, to clear the field, then press <Enter>. If the taxpayer enters a positive or negative $.50 to $.99, enter $1 or -$1 respectively.
-
If the taxpayer files a State Schedule K-1, and it has a column with the federal information, transcribe the information from the federal lines.
-
The following lines are presented for verification:
-
Form 1041 Schedule K-1 = Lines 1 and 2a
-
Form 1065 Schedule K-1 = Lines 5, 6a, 6c and 7
-
Form 1120-S Schedule K-1 = Lines 4, 5a and 6
-
-
If two-dollar amounts are present on the same line, manually add together and enter total amount.
-
Alpha Codes are used in Part III to identify certain types of income, deductions, or credits. Valid Alpha Code characters consist of A-ZZ and blank. Enter the amount that corresponds with the valid Alpha Code. Alpha Codes can be found on the following lines of Schedules K-1:
Schedule K-1 Lines Form 1041 Schedule K-1 •Line 13 Credits and Credit Recapture
•Line 14 Other informationForm 1065 Schedule K-1 •Line 11 Other income (loss)
•Line 13 Other deduction
•Line 15 Credits
•Line 20 Other informationForm 1120-S Schedule K-1 •Line 10 Other income (loss)
•Line 12 Other deductions
•Line 13 Credits
•Line 17 Other Information
-
Always delete a block if the tax year cannot be determined.
-
If a prior year Schedule K-1 is processed by the scanner, SCRIPS operators:
-
Input the preprinted or edited year on the Schedules K-1.
-
Convert transcription lines using Exhibit 3.0.101-8, Conversion Chart.
-
Continue processing.
-
-
If the payer EIN is the same as the previous document, the system copies the payer information into the document and then the next Schedule K-1 is presented.
-
If the payer EIN is different, the payer Entity fields appear, and the operator is to enter the payer entity information.
-
The following tables represent specific SCRIPS entry procedures.
-
Enter from Part II, information about the Beneficiary on Form 1041 Schedule K-1.
OE/DV Screen Prompts Description Instructions Tax Year Tax Year. -
Enter the Tax Year from the top center of the form in YY format.
-
If the Tax Year is different than the Beginning Tax Period Year, then enter the Beginning Tax Period Year as the Tax Year.
Beginning Tax Period Date from the Tax Year Beginning date box at the top of form. -
Enter the Beginning Tax Period date in MMYY format.
-
If blank, press <Enter>. The output program updates the Tax Period based on the Tax Year.
Ending Tax Period Date from the Tax Year Ending date box at the top of form. -
Enter the Ending Tax Period date in MMYY format.
-
If blank, press <Enter> the output program updates the Tax Period based on the Tax Year.
[F] Beneficiary ID Beneficiary ID from Part II box F. -
Input or correct the nine-digit TIN.
-
If "APPLD FOR" is listed, <F3> to clear the field, then press <Enter>.
-
If two or more TINs are shown, the TIN is missing, or the TIN has more or less than nine-digits, <F3> to clear the field, then press <Enter>.
-
If illegible leave blank and press <Enter>.
[G] Name 1 (Beneficiary) Name from box G. -
Enter or correct Beneficiary Name Line 1 from box G.
-
If missing, or illegible, enter "Z" and press <Enter> per IRM 3.0.101.14.11 (11).
[G] Name 2 (Beneficiary) Name from box G. -
If an "In-Care-Of" name is present, enter "%," space and then the name.
-
If information is present on Name Line 2, include as much as possible after the "%" information.
-
If a foreign address is present, see IRM 3.0.101.14.11.1.1.
[G] Address (Beneficiary) Address from box G. -
Enter the street address.
-
If PO Box is present, enter an asterisk (*) and a space in the first two positions of the field, followed by the PO Box number.
-
If the street address is missing or illegible, enter "Z" then press <Enter>.
-
If a foreign address is present, see IRM 3.0.101.14.11.1.1.
[G] City (Beneficiary) City from box G. -
Enter the city.
-
If a Major City Code (MCC) applies, enter the MCC for the listed city (optional).
-
If the city is missing or illegible, enter "ZZZ" then press <Enter>.
-
If a foreign address is present, see IRM 3.0.101.14.11.1.1.
[G] State (Beneficiary) State from box G. -
Enter the state code.
-
If a MCC is entered, the state field is bypassed.
-
If a foreign address is present, see IRM 3.0.101.14.11.1.1.
[G] Zip Code (Beneficiary) ZIP Code from box G. -
Enter the ZIP Code.
-
If missing, press <Enter> to generate the default ZIP Code.
-
If a foreign address is present, see IRM 3.0.101.14.11.1.1.
K-1 Amended Amended K-1 box found above Part III. -
Enter an "X" if the box is marked.
-
If box has been mis-read, <F3> to clear the box and press <Enter>.
-
-
Enter from Part III, the money amounts on Form 1041 Schedule K-1.
OE/DV Screen Prompt Description Instructions [1] Interest Income Line 1 (+) Enter the amount from Line 1. [2a] Ordinary Dividends Line 2a (+) Enter the amount from Line 2a. [3] Net Short-Term Capital Gain Line 3 (+) Enter the amount from Line 3. [4a] Net Long-Term Capital Gain Line 4a (+) Enter the amount from Line 4a. [5] Other Portfolio Income Line 5 (+/-) Enter the amount from Line 5. [6] Ordinary Business Income Line 6 (+/-) Enter the amount from Line 6. [7] Net Rental Real Estate Income Line 7 (+/-) Enter the amount from Line 7. [8] Other Rental Income Line 8 (+/-) Enter the amount from Line 8. [13] Credit and Credit Recapture Code Line 13
Alpha Designator CodeEnter the valid code to the left of Line 13. The valid codes are A-ZZ, if blank, press <Enter>. [13] Credit and Credit Recapture Amount Line 13 (+) Enter the amount from Line 13 that corresponds with the valid code A-ZZ, if blank, press <Enter>. [14] Other Information Code Line 14
Alpha Designator CodeEnter the valid code to the left of Line 14. The valid codes are A-ZZ, if blank press <Enter>. [14] Other Information Amount Line 14 (+/-) Enter the amount from Line 14 that corresponds with the valid code A-ZZ, if blank press <Enter>. -
Enter from Part I, information about the Estate or Trust, on Form 1041 Schedule K-1.
OE/DV Screen Prompt Description Instructions [A] Estate/Trust ID Parent Return ID. -
Correct or verify the nine-digit TIN.
-
If two or more TINs are shown, the TIN is missing, or the TIN has more or less than nine-digits, <F3> to clear the field then press <Enter>.
-
If illegible, suspend UW for Poor Quality Image per IRM 3.0.101.14.8.1.
Parent DLN The 14-digit Document Locator Number (DLN) is stamped in the upper left margin. -
Correct or verify the 14-digit DLN if missing or invalid. If unable to correct, <F3> to clear the field then press <Enter> twice.
-
If illegible, suspend UW for Poor Quality Image. If still unable to read from paper copy leave blank per IRM 3.0.101.14.8.1.
-
If File Location Code (FLC) is 78 or 60 (KCSPC only), clear the field and press <Enter> twice.
[B] Name 1 (Estate/Trust) Name from box B. [C] Name 2 (Fiduciary) Name from box C. -
If an "In-Care-Of" name is present, enter "%," space and then the name.
-
If information is present on Name Line, include as much as possible after the "%" information.
-
If a foreign address is present, see IRM 3.0.101.14.11.1.1.
[C] Address (Fiduciary) Address from box C. -
Enter the street address.
-
If PO Box is present, enter an asterisk (*) and a space in the first two positions of the field, followed by the PO Box number.
-
If the street address is missing or illegible, enter "Z" then press <Enter>.
-
If a foreign address is present, see IRM 3.0.101.14.11.1.1.
[C] City (Fiduciary) City from box C. -
Enter the city.
-
If a Major City Code (MCC) applies, enter the MCC for the listed city (optional).
-
If the city is missing or illegible, enter "ZZZ" then press <Enter>.
-
If a foreign address is present, see IRM 3.0.101.14.11.1.1.
[C] State (Fiduciary) State from box C. -
Enter the state code.
-
If a MCC is entered, the state field is bypassed.
-
If a foreign address is present, see IRM 3.0.101.14.11.1.1.
[C] ZIP Code (Fiduciary) ZIP Code from box C. -
Enter the ZIP Code.
-
If missing, press <Enter> to generate the default ZIP Code.
-
If a foreign address is present, see IRM 3.0.101.14.11.1.1.
-
-
Enter from Part II, information about the Partner, on Form 1065 Schedule K-1.
OE/DV Screen Prompts Description Instructions Tax Year Tax Year. -
Enter the Tax Year from the top center of the form in YY format.
-
If the Tax Year is different than the Beginning Tax Period Year, then enter the Beginning Tax Period Year as the Tax Year.
Beginning Tax Period Date from the Tax Year Beginning date box at the top of form. -
Enter the Beginning Tax Period date in MMYY format.
-
If blank, press <Enter> the output program updates the Tax Period based on the Tax Year.
Ending Tax Period Date from the Tax Year Ending date box at the top of form. -
Enter the Ending Tax Period date in MMYY format.
-
If blank, press <Enter> the output program updates the Tax Period based on the Tax Year.
[E] Partner TIN TIN from Part II box E. -
Input or correct the nine-digit TIN.
-
If "APPLD FOR" is listed, <F3> to clear the field, then press <Enter>.
-
If two or more TINs are shown, the TIN is missing, or the TIN has more or less than nine-digits, <F3> to clear the field then press <Enter>.
-
If illegible, leave blank and press <Enter>.
[F] Name 1 (Partner) Name from box F. -
Enter or correct Partner Name Line 1 from box F.
-
If missing or illegible, enter a "Z" and press <Enter> per IRM 3.0.101.14.11 (11).
[F] Name 2 (Partner) Name from box F. -
If an "In-Care-Of" name is present, enter "%," space and then the name.
-
If information is present on Name Line 2, include as much as possible after the "%" information.
-
If a foreign address is present, see IRM 3.0.101.14.11.1.1.
[F] Address (Partner) Address from box F. -
Enter the street address.
-
If PO Box is present, enter an asterisk (*) and a space in the first two positions of the field, followed by the PO Box number.
-
If the street address is missing or illegible, enter "Z" then press <Enter>.
-
If a foreign address is present, see IRM 3.0.101.14.11.1.1.
[F] City (Partner) City from box F. -
Enter the city.
-
If a Major City Code (MCC) applies, enter the MCC for the listed city (optional).
-
If the city is missing or illegible, enter "ZZZ" then press <Enter>.
-
If a foreign address is present, see IRM 3.0.101.14.11.1.1.
[F] State (Partner) State from box F. -
Enter the state code.
-
If a MCC is entered, the state field is bypassed.
-
If a foreign address is present, see IRM 3.0.101.14.11.1.1.
[F] Zip Code (Partner) ZIP Code from box F. -
Enter the Zip Code.
-
If missing, press <Enter> to generate the default ZIP Code.
-
If a foreign address is present, see IRM 3.0.101.14.11.1.1.
[H2] Disregarded Entity checkbox H2 CKBOX If the box is checked, enter an "X," otherwise leave blank. [H2] Disregarded Entity TIN H2 TIN -
Input or correct the nine-digit TIN.
-
If "APPLD FOR" is listed, <F3> to clear the field, then press <Enter>.
-
If two or more TINs are shown, the TIN is missing, or the TIN has more or less than nine-digits, <F3> to clear the field, then press <Enter>.
-
If illegible, leave blank and press <Enter>.
[H2] Disregarded Entity Name H2 NAME -
Enter or correct Disregarded Entity Name Line H2.
-
If missing, or illegible, enter "Z" and press <Enter> per IRM 3.0.101.14.11 (11).
[I2] A Retirement plan I2 CKBOX If the box is checked, enter an "X," otherwise leave blank. [J] Beginning Capital Gain J Capital beginning Enter % from Capital Beginning Line J. See instructions in IRM 3.0.101.14.12, Percentage Field Instructions. [J] Ending Capital Gain J Capital ending Enter % from Capital Ending Line J. See instructions in IRM 3.0.101.14.12, Percentage Field Instructions. [J] Partnership Decrease Due to
Sales
ExchangeJ CKBOX Enter an X, if either sales or exchange box is checked, otherwise leave blank. If both are checked clear the field. [K1] Nonrecourse Ending K Nonrecourse ending (+) Enter the amount from Nonrecourse Ending Line K1. [K1] Qualified Nonrecourse Ending K Qualified Nonrecourse Financing ending (+) Enter the amount from Qualified Nonrecourse Financing Ending, Line K1. [K1] Recourse Ending K Recourse ending (+) Enter the amount from Recourse Ending, Line K1. [K2] Liabilities Amount checkbox K2 Liabilities from Lower Tier Partnership CKBOX If the box is checked, enter an X, otherwise leave blank. [K3] Liability Subject to Guarantees checkbox K3 Liability is Subject to Guarantees or other... checkbox If the box is checked, enter an X, otherwise leave blank. [L] Beginning Capital Account L Capital beginning (+/-) Enter the amount from Beginning Capital Account Line L. [L] Ending Capital Account L Capital ending (+/-) Enter the amount from Ending Capital Account Line L. [N] Beginning Unrec. Sec 704(c) Gain or Loss N Beginning (+/-) Enter the amount from the Beginning Line N. [N] Ending Unrec. Sec 704(c) Gain or Loss N Ending (+/-) Enter the amount from the Ending Line N. K-1 Amended Amended K-1 box found above Part III. -
Enter an X if the box is marked.
-
If box has been mis-read, <F3> to clear the box and press <Enter>.
-
-
Enter from Part III, the money amounts from Form 1065 Schedule K-1.
OE/DV Screen Prompt Description Instructions [1] Ordinary Business Income (Loss) Line 1 (+/-) Enter the amount from Line 1. [2] Net Rental Real Estate Income (Loss) Line 2 (+/-) Enter the amount from Line 2. [3] Other Net Rental Income (Loss) Line 3 (+/-) Enter the amount from Line 3. [4a] Guaranteed Payments for Service Line 4a (+) Enter the amount from Line 4a. [4b] Guaranteed Payments for Capital Line 4b (+) Enter the amount from Line 4b. [5] Interest Income Line 5 (+) Enter the amount from Line 5. [6a] Ordinary Dividend Line 6a (+) Enter the amount from Line 6a. [6c] Dividend Equivalents Amount Line 6c (+) Enter the amount from Line 6c. [7] Royalties Line 7 (+) Enter the amount from Line 7. [8] Net Short-Term Capital Gain (Loss) Line 8 (+/-) Enter the amount from Line 8. [9a] Net Long-Term Capital Gain (Loss) Line 9a (+/-) Enter the amount from Line 9a. [11] Other Income Code Line 11
Alpha Designator CodeEnter the valid code to the left of Line 11. Valid codes are A-ZZ, if blank, press <Enter>. [11] Other Income Amount Line 11 (+/-) Enter the amount from Line 11 that corresponds with the valid code A-ZZ, if blank, press <Enter>. [12] Section 179 Deduction Line 12 (+) Enter the amount from Line 12. [13] Other Deductions Code Line 13
Alpha Designator CodeEnter the valid code to the left of Line 13. Valid codes are A-ZZ, if blank, press <Enter>. [13] Other Deductions Amount Line 13 (+/-) Enter the amount from Line 13 that corresponds with the valid code A-ZZ, if blank, press <Enter>. [15] Credits Code Line 15
Alpha Designator CodeEnter the valid code to the left of Line 15. Valid codes are A-ZZ, if blank, press <Enter>. [15] Credits Amount Line 15 (+) Enter the amount from Line 15 that corresponds with the valid code A-ZZ, if blank, press <Enter>. [16] Schedule K-3 Attached Checkbox Line 16 CKBOX If the box is checked, enter an X, otherwise leave blank. [20] Other Information Code Line 20
Alpha Designator CodeEnter the valid code to the left of Line 20. Valid codes are A-ZZ, if blank, press <Enter>. [20] Other Information Line 20 (+/-) Enter the amount from Line 20 that corresponds with the valid code A-ZZ, if blank, press <Enter>. [22] At Risk Checkbox Line 22 CKBOX If the box is checked, enter an X, otherwise leave blank. [23] Passive Activity Checkbox Line 23 CKBOX If the box is checked, enter an X, otherwise leave blank. -
Enter from Part I, information about the Partnership, on Form 1065 Schedule K-1.
OE/DV Screen Prompt Description Instructions [A] Partnership EIN Parent Return ID. -
Correct or verify the nine-digit TIN.
-
If two or more TINs are shown, the TIN is missing, or the TIN has more or less than nine-digits, <F3> to clear the field then press <Enter>.
-
If illegible, suspend UW for Poor Quality Image per IRM 3.0.101.14.8.1.
Parent DLN The 14-digit Document Locator Number (DLN) is stamped in the upper left margin. -
Correct or verify the 14-digit DLN if missing or invalid. If unable to correct, <F3> to clear the field if necessary and press <Enter> twice.
-
If illegible, suspend UW for Poor Quality Image. If still unable to read from paper copy, leave blank per IRM 3.0.101.14.8.1.
-
If File Location Code (FLC) is 78 or 60 (KCSPC only) clear the field, and press <Enter> twice.
[B] Name 1 (Partnership) Name from box B. -
Enter or correct Payer Name Line 1 from box B.
-
If missing, leave blank and press <Enter>.
-
If illegible, suspend UW for Poor Quality Image.
[B] Name 2 (Partnership) Name from box B. -
If an "In-Care-Of" name is present, enter "%," space and then the name.
-
If information is present on Name Line 2, include as much as possible after the "%" information.
-
If a foreign address is present, see IRM 3.0.101.14.11.1.1.
[B] Address (Partnership) Address from box B. -
Enter the street address.
-
If PO Box is present, enter an asterisk (*) and a space in the first two positions of the field, followed by the PO Box number.
-
If the street address is missing or illegible, enter "Z" then press <Enter>.
-
If a foreign address is present, see IRM 3.0.101.14.11.1.1.
[B] City (Partnership) City from box B. -
Enter the city.
-
If a Major City Code (MCC) applies, enter the MCC for the listed city (optional).
-
If the city is missing or illegible, enter "ZZZ" then press <Enter>.
-
If a foreign address is present, see IRM 3.0.101.14.11.1.1.
[B] State (Partnership) State from box B. -
Enter the state code.
-
If a MCC is entered, the state field is bypassed.
-
If a foreign address is present, see IRM 3.0.101.14.11.1.1.
[B] ZIP Code (Partnership) ZIP Code from box B. -
Enter the ZIP Code.
-
If missing, press <Enter> to generate the default ZIP Code.
-
If a foreign address is present, see IRM 3.0.101.14.11.1.1.
-
-
Enter from Part II, information about the Shareholder, on Form 1120-S Schedule K-1.
OE/DV Screen Prompts Description Instructions Tax Year Tax Year. -
Enter the Tax Year from the top center of the form in YY format.
-
If the Tax Year is different than the Beginning Tax Period Year, then enter the Beginning Tax Period Year as the Tax Year.
Beginning Tax Period Date from the Tax Year Beginning date box at the top of form. -
Enter the Beginning Tax Period date in MMYY format.
-
If blank, press <Enter> the output program updates the Tax Period based on the Tax Year.
Ending Tax Period Date from the Tax Year Ending date box at the top of form. -
Enter the Ending Tax Period date in MMYY format.
-
If blank, press <Enter> the output program updates the Tax Period based on the Tax Year.
[E] Shareholder TIN TIN from Part II box E. -
Input or correct the nine-digit TIN.
-
If "APPLD FOR" is listed, <F3> to clear the field, then press <Enter>.
-
If two or more TINs are shown, the TIN is missing, or the TIN has more or less than nine-digits, <F3>to clear the field then press <Enter>.
-
If illegible, leave blank and press <Enter>.
[F1] Name 1 (Shareholder) Name from box F1. -
Enter or correct Shareholder Name Line 1 from box F.
-
If missing or illegible, enter a "Z" and press <Enter> per IRM 3.0.101.14.11 (11).
[F1] Name 2 (Shareholder) Name from box F1. -
If an "In-Care-Of" name is present, enter "%," space and then the name.
-
If information is present on Name Line 2, include as much as possible after the "%" information.
-
If a foreign address is present, see IRM 3.0.101.14.11.1.1.
[F1] Address (Shareholder) Address from box F1. -
Enter the street address.
-
If PO Box is present, enter an asterisk (*) and a space in the first two positions of the field, followed by the PO Box number.
-
If the street address is missing or illegible, enter "Z" then press <Enter>.
-
If a foreign address is present, see IRM 3.0.101.14.11.1.1.
[F1] City (Shareholder) City from box F1. -
Enter the city.
-
If a Major City Code (MCC) applies, enter the MCC for the listed city (optional).
-
If the city is missing or illegible, enter "ZZZ" then press <Enter>.
-
If a foreign address is present, see IRM 3.0.101.14.11.1.1.
[F1] State (Shareholder) State from box F1. -
Enter the state code.
-
If a MCC is entered, the state field is bypassed.
-
If a foreign address is present, see IRM 3.0.101.14.11.1.1.
[F1] Zip Code (Shareholder) ZIP Code from box F1. -
Enter the ZIP Code.
-
If missing, press <Enter> to generate the default ZIP Code.
-
If a foreign address is present, see IRM 3.0.101.14.11.1.1.
[F2] Entity Responsible for reporting TIN TIN from Box F2. -
Input or correct the nine-digit TIN.
-
If "APPLD FOR" is listed <F3> to clear the field, then press <Enter>.
-
If two or more TINs are shown, the TIN is missing, or the TIN has more or less than nine-digits, <F3> to clear the field then press <Enter>.
-
If illegible, leave blank and press <Enter>.
[F2] Entity Responsible for reporting Name Name from Box F2. [F3] Type of Entity Type from Box F3. Enter or correct name from Box F3. If missing, leave blank and press <Enter>. K-1 Amended Amended K-1 box found above Part III. -
Enter an "X" if the box is marked.
-
If box has been mis-read, <F3> to clear the box and press <Enter>.
[G] Current Year allocation percentage G Shareholder % of Stock Ownership (+) Enter % from box G. See instructions in IRM 3.0.101.14.12, Percentage Field Instructions. -
-
Enter from Part III, the money amounts from Form 1120-S Schedule K-1.
OE/DV Screen Prompts Description Instructions [1] Ordinary Business Income (Loss) Line 1(+/-) Enter the amount from Line 1. [2] Net Rental Real Estate Income (Loss) Line 2 (+/-) Enter the amount from Line 2. [3] Other Net Rental Income (Loss) Line 3 (+/-) Enter the amount from Line 3. [4] Interest Income Line 4 (+) Enter the amount from Line 4. [5a] Ordinary Dividends Line 5a (+) Enter the amount from Line 5a. [6] Royalties Line 6 (+) Enter the amount from Line 6. [7] Net Short-Term Capital Gain (Loss) Line 7 (+/-) Enter the amount from Line 7. [8a] Net-Long-Term Capital Gain (Loss) Line 8a (+/-) Enter the amount from Line 8a. [10] Other Income Code Line 10
Alpha Designator CodeEnter the valid code to the left of Line 10. Valid codes are A-ZZ, if blank, press <Enter>. [10] Other Income Amount Line10 (+/-) Enter the amount from Line 10 that corresponds with the valid code A-ZZ, if blank, press <Enter>. [11] Section 179 Deductions Line 11 (+) Enter the amount from Line 11. [12] Other Deductions Code Line 12
Alpha Designator CodeEnter the valid code to the left of Line 12. Valid codes are A-ZZ, if blank, press <Enter>. [12] Other Deductions Amount Line 12 (+/-) Enter the amount from Line 12 that corresponds with the valid code A-ZZ, if blank, press <Enter>. [13] Credit Code Line 13
Alpha Designator CodeEnter the valid code to the left of Line 13. Valid codes are A-ZZ, if blank, press <Enter>. [13] Credits Amount Line 13 (+) Enter the amount from Line 13 that corresponds with the valid code A-ZZ, if blank, press <Enter>. [14] Schedule K-3 Attached Checkbox Line 14 CKBX If the box is checked, enter an X, otherwise leave blank. [17] Other Information Code Line 17 Enter the valid code to the left of Line 17. Valid codes are A-ZZ, if blank, press <Enter>. [17] Other Information Amount Line 17 (+) Enter the amount from Line 17 that corresponds with the valid code A-ZZ, if blank present <Enter>. -
Enter from Part I, information about the Corporation, on Form 1120-S Schedule K-1.
OE/DV Screen Prompt Description Instruction [A] Corporation EIN Parent Return EIN -
Correct or verify the nine-digit TIN.
-
If two or more TINs are shown, the TIN is missing, or the TIN has more or less than nine-digits <F3> to clear the field then press <Enter>.
-
If illegible, suspend UW for Poor Quality Image per IRM 3.0.101.14.8.1.
Parent DLN The 14-digit Document Locator Number (DLN) is stamped in the upper left margin. -
Correct or verify the 14-digit DLN if missing or invalid. If unable to correct, <F3> to clear the field if necessary and press <Enter> twice.
-
If illegible, suspend UW for Poor Quality Image, if still unable to read from paper copy, leave blank per IRM 3.0.101.14.8.1.
-
If File Location Code (FLC) is 78 or 60 (KCSPC only) clear the field, and press <Enter> twice.
[B] Name 1 (Corporation) Name from box B. -
Enter or correct Payer Name Line 1 from box B.
-
If missing, leave blank and press <Enter>.
-
If illegible, suspend for Poor Quality Image.
[B] Name 2 (Corporation) Name from box B. -
If an "In-Care-Of" name is present, enter "%," space and then the name.
-
If information is present on Name Line 2, include as much as possible after the "%" information.
-
If a foreign address is present, see IRM 3.0.101.14.11.1.1.
[B] Address (Corporation) Address from box B. -
Enter the street address.
-
If PO Box is present, enter an asterisk (*) and a space in the first two positions of the field, followed by the PO Box number.
-
If the street address is missing or illegible, enter "Z" then press <Enter>.
-
If a foreign address is present, see IRM 3.0.101.14.11.1.1.
[B] City (Corporation) City from box B. -
Enter the city.
-
If a Major City Code (MCC) applies, enter the MCC for the listed city (optional).
-
If the city is missing or illegible, enter "ZZZ" then press <Enter>.
-
If a foreign address is present, see IRM 3.0.101.14.11.1.1.
[B] State (Corporation) State from box B. -
Enter the state code.
-
If a MCC is entered, the state field is bypassed.
-
If a foreign address is present, see IRM 3.0.101.14.11.1.1.
[B] Zip Code (Corporation) ZIP Code from box B. -
Enter the ZIP Code.
-
If missing, press <Enter> to generate the default ZIP Code.
-
If a foreign address is present, see IRM 3.0.101.14.11.1.1.
-
-
This section has instructions for resolving Schedules K-1 error conditions. All forms go to Error Resolution Systems (ERS) under program code 44380.
-
This section provides a description of the types of errors generated during Schedules K-1 processing.
-
The Error Resolution System (ERS) identifies errors according to type and priority. This shows in the record heading.
-
Action Code Error (Priority I) - Not valid on Schedules K-1
-
Section Error (Priority II) - Includes terminus error
-
Validity Error (Priority III)
-
Math/Consistency Error (Error Codes) (Priority IV)
-
-
There may be records where the tax examiner finds programming has not furnished a section or a field that is needed to resolve an error. In this event, the tax examiner can use Command Code (CC) GTSEC. This should be reported to Headquarters for correction of the display.
-
The following conditions may be present if normal SCRIPS validity checks have been bypassed:
-
Terminus Errors
-
Edit Errors
-
Missing required sections
-
-
Terminus Error - This error is caused by a section with variable length input fields containing an erroneous size field.
-
When displayed, this type of error shows all input fields of the terminus section. Transcribed data is present. Computer generated fields are not present.
-
All fields present for the section must be examined and the necessary correction(s) made to all the fields.
-
-
Correction Procedures:
-
CC CRECT is displayed. If the section needs to be deleted, use CC DLSEC to delete the section.
-
If no corrections are needed, transmit from the bottom of the screen.
-
-
Definition - Any field that does not meet the requirement(s) for that field is shown as a Priority III error. Consistency and or relationships with other fields are not a factor.
-
Some reasons for this type of error are:
-
Non-numeric character in a numeric field
-
Non-alphabetical character in an alpha field
-
Blank space in a numeric field
-
Blank in the first position of an alpha field if followed by significant data
-
-
Display - Every field displayed is in error.
-
All fields with a Priority III error are displayed in columnar format in the order encountered in the record.
-
An overflow field is identified by all question marks for a money field.
-
-
Correction Procedures:
-
Correct every error field displayed using the specific instructions within each section for the field in error.
-
MeF - Check the information on the source document to determine if each displayed field has been correctly edited and transcribed.
-
Enter the correct data for each field displayed.
-
If no data is to be in a displayed field, blank the field.
-
Transmit.
-
-
Definition - Any valid field used in any computation in which the result is inconsistent with (or contrary to) any other valid field has Error Code 001–999 assigned and is shown as a Priority IV Error.
-
Display - These errors are displayed with the Error Code assigned to them for the specific error in ascending numerical order. The screen display shows the Error Code assigned and the fields needed to make the necessary correction.
-
The blank field "CL" is displayed for the entry of a Clear Code on records where the possibility exists that a change or correction may not be needed.
-
All errors must be resolved by either eliminating the error or entering a Clear Code.
-
-
Correction Procedures:
-
MeF - Correct all coding and transcription errors.
-
If the data in the field is correct, enter a "C" in the Clear Code field.
-
-
This section provides instructions for correcting Section 01 error conditions.
-
Foreign Address see IRM 3.0.101.14.11.1.1.
-
Section 01 contains the payee entity data and is required for every record.
-
Listed below are the fields contained in Section 01 that applies to Schedules K-1 processing:
Field Field Length Title 01TIN 09 Payee Identification Number 01TVC 01 Primary TIN Validity Bypass Code 01NM1 40 Payee Name Line 1 01NM2 40 Payee Name Line 2 01ADD 35 Payee Street Address 01CTY 22 Payee City 01ST 02 Payee State Code 01ZIP 09 Payee ZIP Code
-
There is no validity check of this field.
-
This field is always blank.
-
Valid characters are alpha, hyphen (-), blank, numeric, and ampersand (&).
-
Invalid Conditions:
-
Field is completely blank.
-
Field has characters other than alpha, hyphen (-), numeric, or ampersand (&).
-
A character follows two consecutive blanks.
-
The first position has a blank.
-
The number of character positions is more than 40.
-
-
Correction Procedure:
-
MeF - Correct all coding and transcription errors. If name is not present, research using the TIN if present.
If Then There is a name entered in SEC01NM2 Move to SEC01NM1 TIN research matches name in 01ADD
There is an address match on CC INOLEEnter the name from CC INOLE as the Payee There is no information or no information on CC INOLE Enter "Z" and continue processing
-
-
Valid characters are alpha, hyphen (-), blank, numeric, percent (%), and ampersand (&).
-
Invalid Conditions:
-
Field has characters other than alpha, hyphen (-), numeric, percent (%) and ampersand (&).
-
The number of character positions is more than 40.
-
-
Corrections Procedure:
-
MeF - Correct all coding and transcription errors.
-
For "In-Care-Of" names, enter the percent (%) sign, space, and then the name.
-
For foreign address, enter the street address, omit the existing Name Line 2. See IRM 3.0.101.14.11.1.1.
-
-
Description - Field 01ADD is in the Entity Section of the return.
-
Valid Characters are alpha, numeric, blank, hyphen (-), or slash (/).
-
-
Invalid Condition - Field 01ADD generates as a field error when any of the following conditions are present:
-
Any character is present other than alpha, numeric, blank, hyphen (-), or slash (/).
-
The first position is blank.
-
Any character follows two consecutive blanks.
-
-
Correction Procedures:
-
MeF - Correct all coding and transcription errors.
-
If address is not present, research using the TIN if present.
-
If unable to perfect, after research enter "ZZZ" as the street address.
-
Enter the foreign city, state, province if present.
-
-
If Then CC INOLE matches one of the addresses on the return Enter the address listed on CC INOLE in Field 01ADD. CC INOLE does not match any of the addresses on the return Enter the first address found on the return to field 01ADD.
-
Description - Field 01CTY is in the Entity Section of the return.
-
Valid characters are alpha and blank.
-
-
Invalid Conditions - Field 01CTY displays as a field error when any of the following conditions are present:
-
The first position is blank.
-
Any character is present and the second and third characters are blank.
-
Any character follows two consecutive blanks.
-
The Major City Code does not match any of the valid codes in the Major City Code table.
-
-
Correction Procedures:
-
Description - Field 01ST is in the Entity section of the return.
-
Valid characters are alpha and blank.
-
-
Invalid Condition - This field is invalid if it is not found in the State Code Table.
-
Correction Procedures:
-
MeF - Correct all coding and transcription errors.
-
For a description of valid State Codes, see Document 7475, State Abbreviations, Major City Codes, and Address Abbreviations.
-
-
Correction Procedures for APO/DPO/FPO
-
The U.S. Postal Service established new requirements for APO/DPO/FPO addresses.
-
If the old address appears (i.e., AP New York, NY 091XX), convert the address to the new state code abbreviation based on the ZIP Code.
ADDRESS ABBREVIATION LOCATION ZIP CODE APO AA Americas 340 DPO AA Americas 340 FPO AA Americas 340 APO AE Europe 090-098 DPO AE Europe 090-098 FPO AE Europe 090-098 APO AP Pacific 962-987 DPO AP Pacific 962-987 FPO AP Pacific 962-987 -
-
Description - Field 01ZIP is in the Entity Section of the return.
-
Valid characters are numeric and blank.
-
-
Invalid Condition - Field 01ZIP generates as a field error when any of the following conditions are present:
-
Any character is other than numeric or blank.
-
An entry is other than five or nine positions.
-
The entry isn’t within the range of 00501 and 99999.
-
The first five positions are blank, and an entry is present in the last four positions.
-
-
Correction Procedures:
-
MeF - Correct all coding and transcription errors. Research any of the following for valid ZIP Code information: Document 7475, State Abbreviations, Major City Codes and Address Abbreviations, CC INOLE or NAME.
If Then 01ZIP is blank Search return and attachments for a valid ZIP Code, if found enter in 01ZIP. A Major City Code is entered in field 01CTY -
Determine the first three digits of the ZIP Code from Exhibit 3.0.101-6, State/Major City/ZIP Code/Major City Code.
-
Enter "01" for the fourth and fifth digits.
There is not a Major City Code listed in field 01CTY Enter the ZIP Code for the state from Exhibit 3.0.101-6 State/Major City/ZIP Code/Major City Code. -
-
-
This section provides instructions for correcting Section 02 error conditions.
-
Section 02 contains miscellaneous data fields.
-
Listed below are the fields contained in Section 02 that applies to Schedules K-1 processing:
Field Field Length Title 02TNI 01 2nd TIN NOT Indicator 02AMD 01 Corrected/Amended Indicator
-
Valid characters are "G" and blank.
-
MeF- For Schedules K-1 processed through SCRIPS, enter a "G" if the Amended Schedule K-1 Box is checked.
Type of Schedule K-1 Location of Check Box Form 1041 Schedule K-1 Above Part III Form 1065 Schedule K-1 Above Part III Form 1120-S Schedule K-1 Above Part III
-
This section provides instructions for correcting Section 06 error conditions.
-
Section 06 contains, date fields, money amounts, indicators, and descriptions.
-
If invalid dates are listed in the 06BTP and 06ETP fields, these are typos from the taxpayer or the SCRIPS operators.
-
ERS must use CC ENMOD and use the parent’s tax year, it is listed under "FYM."
-
To correct errors in Fields 06BTP and 06ETP, enter a space after the P, enter seven zeros, and then enter the four-digit year, and the two-digit month.
-
Below are the fields listed in Section 06 that apply to Schedules K-1 processing:
-
Form 1041 Doc Code 66
Field Field Length Title +/- 06BTP 13 Beginning Tax Period N/A 06ETP 13 Ending Tax Period N/A 0601 12 Interest Amount + 0602B 12 Dividends Amount + 0603A 12 Net Short-Term Capital Gains + 0604A 12 Net Long-Term Capital Gains + 0605 12 Other Portfolio Income +/- 0605A 12 Ordinary Business Income +/- 0606A 12 Net Rental Real Estate Income +/- 0608 12 Other Rental Income +/- 0613C 2 Credits and Credit Recapture Code Enter the first valid code to the left of Line 0613C The valid codes are A-ZZ. 0613A 12 Credits and Credit Recapture Amount +
Delete the money amount in Field 0613A if the corresponding Alpha Designator Code A-ZZ is not present in Field 0613C.0614C 2 Other Information Code Enter the first valid code to the left of Line 0614C The valid codes are A-ZZ. 0614A 12 Other Information Amount +/-
Delete the money amount in Field 0614A if the corresponding Alpha Designator Code A-ZZ is not present in Field 0614C. -
Form 1065 Doc Code 65
Field Field Length Title +/- 06BTP 13 Beginning Tax Period N/A 06ETP 13 Ending Tax Period N/A 06H2I 1 Disregarded Entity Checkbox N/A 06H2N 26 Disregarded Entity Name N/A 06H2T 9 Disregarded Entity TIN N/A 06PRP 1 Retirement Plan Checkbox N/A 06JPS 6 Capital Beginning % N/A 06JPE 6 Capital Ending % N/A 06JCI 1 Partnership Interest Checkbox N/A 06KNE 12 NonRecourse Ending Amount + 06KQE 12 Qualified Nonrecourse Ending Amount + 06KRE 12 Recourse Ending Amount + 06KCI 1 Liability Amount Checkbox N/A 06KC3 1 Debit Subject to Guarantees Checkbox N/A 06LCB 12 Beginning Capital Account +/- 06LCE 12 Ending Capital Account +/- 06NUB 12 Beginning Unrecognized Sec 704(C) +/- 06NUE 12 Ending Unrecognized Sec 704(C) +/- 0601 12 Ordinary Income Amount +/- 0602 12 Net Real Estate Rental Amount +/- 0603 12 Other Net Rental Amount +/- 0604A 12 Guaranteed Payments for Service + 0604B 12 Guaranteed Payments for Capital + 0605 12 Interest Income + 0606A 12 Ordinary Dividends Amount + 0606C 12 Dividend Equivalents + 0607 12 Royalties + 0608 12 Net Short-Term Capital Gains +/- 0609A 12 Net Long-Term Capital Gains +/- 0611C 2 Other Income (Loss) Code Enter the first valid code to the left of Line 0611C. The valid codes are A-ZZ. 0611A 12 Other Income (Loss) Amount +/-
Delete the money amount in Field 0611A if the corresponding Alpha Designator Code A-ZZ is not present in Field 0611C.0612 12 Section 179 Deduction + 0613C 2 Other Deductions Code Enter the first valid code to the left of Line 0613C. The valid codes are A-ZZ. 0613A 12 Other Deductions Amount +/-
Delete the money amount in Field 0613A if the corresponding Alpha Designator Code A-ZZ is not present in field 0613C.0615C 2 Credit Code Enter the first valid code to the left of line 0615C. The valid codes are A-ZZ. 0615A 12 Credit Amounts +/-
Delete the money amount in Field 0615A if the corresponding Alpha Designator Code A-ZZ is not present in 0615C.0616 1 Sch K-3 Attached Checkbox N/A 0620C 2 Other Information Code Enter the first valid code to the left of Line 0620C. The valid codes are A-ZZ. 0620A 12 Other Information Amount +/-
Delete the money amount in Field 0620A if the corresponding Alpha Designator Code A-ZZ is not present in field 0620C.0622 1 At-Risk Checkbox N/A 0623 1 Passive Activity Checkbox N/A -
Form 1120-S Doc Code 67
Field Field Length Title +/- 06BTP 13 Beginning Tax Period N/A 06ETP 13 Ending Tax Period N/A 06F2T 9 Entity Responsible for Reporting TIN N/A 06F2N 26 Entity Responsible for Reporting Entity N/A 06F3E 26 Type of Shareholder Entity N/A 06FSP 12 Shareholders allocation percentage N/A 0601 12 Ordinary Income Amount +/- 0602 12 Net Real Estate Rental Amount +/- 0603 12 Other Net Rental Amount +/- 0604 12 Interest Amount + 0605A 12 Dividends Amount + 0606 12 Royalties + 0607 12 Net Short-Term Capital Gains +/- 0608A 12 Net Long-Term Capital Gains +/- 0610C 2 Other Income-Loss Code Enter the first valid code to the left of Line 0610C. The valid codes are A-ZZ. 0610A 12 Other Income-Loss-Amount +/-
Delete the money amount in Field 0610A if the corresponding Alpha Designator Code A-ZZ is not present in Field 0610C.0611 12 Section 179 Deduction + 0612C 2 Other-Deductions Code Enter the first valid code to the left of Line 0612C. The valid codes are A-ZZ. 0612A 12 Other-Deductions Amount +/-
Delete the money amount in Field 0612A if the corresponding Alpha Designator Code A-ZZ is not present in Field 0612C.0613C 2 Credits Code Enter the first valid code to the left of Line 0613C. The valid codes are A-ZZ. 0613A 12 Credits Amount +
Delete the money amount in Field 0613A if the corresponding Alpha Designator Code A-ZZ is not present in Field 0613C.0614 1 Schedule K-3 Attached Checkbox N/A 0617C 2 Other Information Code Enter the first valid code to the left of Line 0617C. The valid codes are A-ZZ. 0617A 12 Other Information Amount +
Delete the money amount in Field 0617A if the corresponding Alpha Designator Code A-ZZ is not present in Field 0617C.
-
This section provides instructions for correcting Section 16 error conditions.
-
Foreign addresses see IRM 3.0.101.14.11.1.1.
-
Section 16 contains the payer entity data and is required for every record.
-
Listed below are the fields contained in Section 16 that applies to Schedules K-1 processing:
Field Field Length Title 16NM1 40 Payer Name Line 1 16NM2 40 Payer Name Line 2 16ADD 35 Payer Street Address 16CTY 22 Payer City 16ST 02 Payer State Code 16ZIP 09 Payer ZIP Code 16TIN 09 Payer TIN 16DLN 14 Payer DLN 16FCC 02 Foreign Country Code
-
Valid characters are alpha, hyphen (-), blank, numeric and ampersand (&).
-
Invalid Conditions:
-
Field is completely blank.
-
Field has characters other than alpha, hyphen (-), blank, numeric, or ampersand (&).
-
A character follows two consecutive blanks.
-
The first position has a blank.
-
The number of character positions is more than 40.
-
-
Correction Procedure:
-
MeF - Correct all coding and transcription entry errors. If name is not present, research using the TIN if present.
If Then There is a name entered in SEC16NM2 Move to SEC16NM1. TIN research matches name in 16ADD Enter name as payer and enter the street address (if City/ST match) from CC INOLE into SEC16ADD. There is an address match on CC INOLE Enter the name from CC INOLE as the payer. There is no name match or information on CC INOLE Enter "Z" and continue processing.
-
-
Valid characters are alpha, hyphen (-), blank, numeric and ampersand (&).
-
Invalid Conditions:
-
Field has characters other than alpha, hyphen (-), blank, numeric, or ampersand (&).
-
A character follows two consecutive blanks.
-
The first position has a blank.
-
The number of character positions is more than 40.
-
-
Correction Procedure:
-
MeF - Correct all coding and transcription errors. If name is not present, research using the TIN if present.
If Then There is an address match on CC INOLE Enter the name from CC INOLE as the payer. There is no information Enter "Z" and continue processing.
-
-
Description - Field 16ADD is in the Entity Section of the return.
-
Valid Characters are alpha, numeric, blank, hyphen (-), or slash (/).
-
-
Invalid Condition - Field 16ADD generates as a field error when any of the following conditions are present:
-
Any character is present other than alpha, numeric, blank, hyphen (-), or slash (/).
-
The first position is blank.
-
Any character follows two consecutive blanks.
-
-
Correction Procedures:
-
MeF - Correct all coding and transcription errors.
-
If address is not present, research using the TIN if present.
-
If unable to perfect, after research enter "ZZZ" as the street address.
-
-
If Then CC INOLE matches one of the addresses on the return Enter the address listed on CC INOLE in Field 16ADD. CC INOLE does not match any of the addresses on the return Enter the first address found on the return to Field 16ADD. -
Foreign addresses see IRM 3.0.101.14.11.1.1.
-
Description - Field 16CTY is in the Entity Section of the return.
-
Valid characters are alpha and blank.
-
-
Invalid Conditions - Field 16CTY generates as a field error when any of the following conditions are present:
-
The first position is blank.
-
Any character is present and the second and third characters are blank.
-
Any character follows two consecutive blanks.
-
The Major City Code does not match any of the valid codes in the Major City Code Table.
-
-
Correction Procedures:
-
Description - Field 16ST is in the Entity section of the return.
-
Valid characters are alpha and blank.
-
-
Invalid Condition - This field is invalid if it is not found in the State Code Table.
-
Correction Procedures:
-
MeF - Correct all coding and transcription errors.
-
For a description of valid State Codes, see Document 7475, State Abbreviations, Major City Codes, and Address Abbreviations.
-
-
Correction Procedures for APO/DPO/FPO Addresses -
-
The U.S. Postal Service established new requirements for APO/DPO/FPO addresses.
-
If the old address appears (i.e., AP New York, NY 091XX), convert the address to the new state code abbreviation based on the ZIP Code:
ADDRESS ABBREVIATION LOCATION ZIP CODE APO AA Americas 340 DPO AA Americas 340 FPO AA Americas 340 APO AE Europe 090-098 DPO AE Europe 090-098 DPO AE Europe 090-098 FPO AE Europe 090-098 APO AP Pacific 962-987 DPO AP Pacific 962-987 FPO AP Pacific 962-987 -
-
Description - Field 16ZIP is in the Entity Section of the return.
-
Valid characters are numeric and blank.
-
-
Invalid Condition - Field 16ZIP generates as a field error when any of the following conditions are present:
-
Any character is other than numeric or blank.
-
An entry is other than five or nine positions.
-
The entry is not within the range of 00501 and 99999.
-
The first five positions are blank, and an entry is present in the last four positions.
-
-
Correction Procedures:
-
MeF - Correct all coding and transcription errors. Research any of the following for valid ZIP Code information: Document 7475, State Abbreviations, Major City Codes, and Address Abbreviations, CCs INOLE or NAME.
If Then Field 16ZIP is transcribed incorrectly Enter the correct ZIP Code from the return. Only the first five digits are required. A valid ZIP Code is not available from the return or attachment -
Determine the first three-digits of a valid ZIP Code for the Major City from Exhibit 3.0.101-6, State/Major City/Zip Code/Major City Code.
-
Enter "01" for the fourth and fifth digits.
The Major City is not listed in Exhibit 3.0.101-6, State/Major City/Zip Code/Major City Code or the first three digits cannot be determined Enter the ZIP Code of the state shown in the address from Exhibit 3.0.101-6, State/Major City/Zip Code/Major City Code. -
-
-
Description - Field 16TIN is in Part I of the return.
-
Valid characters are numeric.
-
-
Invalid Condition - Field 16TIN generates as a field error when any of the following conditions are present:
-
It is not numeric.
-
It is less than nine characters.
-
-
Correction Procedures:
-
MeF - Correct all coding and transcription errors. If TIN is not present, research using the name line.
If Then There is a match Enter TIN from research. A correct number cannot be determined Enter the number nine, (9) times. -
-
This section provides detailed error correction procedures for Error Codes 014, 016, 020, 024 and 026. These errors are displayed with the Error Code assigned to them for the specific error in ascending numerical order. The screen display shows the Error Code assigned and the fields needed to make the necessary corrections.
-
Foreign Address see IRM 3.0.101.14.11.1.1.
-
Error Code 014 displays as follows:
Field Designator Field Name Field Length 01ADD Payee Street Address 35 01CTY Payee City 22 01ST Payee State Code 02 01ZIP Payee ZIP Code 09
-
Error Code 014 generates when all fields are not present as follows:
-
If the street address is present, Field 01CTY and 01ST must be present, unless a Major City Code (MCC) is used.
-
If a MCC is used, Field 01ADD must be present.
-
A city must be present. If the city is not in the Major City format, Field 01ST must be present. Field 01ADD can be blank.
-
A MCC is used and Field 01ST is present.
-
-
MeF - Correct all coding and transcription errors.
-
Compare the displayed fields with the return and attachments. If incorrect, overlay the screen with the correct information.
-
Research any of the following for valid address information.
-
Document 7475, State Abbreviations Major City Codes, and Address Abbreviations
-
CCs INOLE, ENMOD, or NAME
If And Then A MCC is present A street address is not available -
Enter the city name (Spelled out, not in Major City format) in Field 01CTY.
-
Enter the State Code in Field 01ST.
-
Foreign addresses see IRM 3.0.101.14.11.1.1
The MCC is correct The state is present Delete Field 01ST. The ZIP Code cannot be corrected from the information on the return, attachments, or research -
Determine the first three-digits of the ZIP Code from Exhibit 3.0.101-6, State/Major City/ZIP Code/Major City Code.
-
Enter "01" for the fourth and fifth digits in Field 01ZIP.
-
-
Error Code 016 displays as follows:
Field Designator Field Name Field Length 01CTY Payee City 22 01ST Payee State 02 01ZIP Payee ZIP Code 09
-
Error Code 016 generates when the ZIP Code is inconsistent with the Major City Code or State Code.
-
MeF - Correct all coding and transcription errors.
-
Compare the displayed fields with the return and attachments. If incorrect, overlay the screen with the correct information.
-
Research any of the following for valid ZIP Code information:
-
Document 7475, State Abbreviations, Major City Codes, and Address Abbreviations
-
CCs INOLE, ENMOD, or NAME
-
-
If only the first three-digits of the ZIP Code can be determined, enter "01" in the fourth and fifth positions.
If And Then Unable to determine a valid ZIP Code from the return or attachment Enter the valid ZIP Code found through research in Field 01ZIP. The address is in a Major City A MCC can be determined, -
Enter the name of the city in Field 01CTY.
-
Enter the State Code in Field 01ST.
The address is not in a Major City -
Enter the proper state abbreviation in Field 01ST.
-
Enter the ZIP Code in Field 01ZIP.
-
-
Correct Procedures for APO/DPO/FPO Address -
-
The U.S. Postal Service established new requirements for APO/DPO/FPO addresses.
-
If the old address appears (i.e., AP New York, NY 091XX), convert the address to the new state code abbreviations based on the ZIP Code:
ADDRESS ABBREVIATION LOCATION ZIP CODE APO AA Americas 340 DPO AA Americas 340 FPO AA Americas 340 APO AE Europe 090-098 DPO AE Europe 090-098 FPO AE Europe 090-098 APO AP Pacific 090-098 DPO AP Pacific 090-098 FPO AP Pacific 090-098 -
-
Error Code 020 screen displays as follows:
-
Form 1041 Doc Code 66
Field Designator Field Name 06BTP Beginning 06ETP Ending 0601 Interest Income 0602B Ordinary Dividends 0603A Net Short-Term Capital Gains 0604A Net Long-Term Capital Gains 0605 Other Portfolio Income 0605A Ordinary Business Income 0606A Net Rental Real Estate Income 0608 Other Rental Income 0613C Credit Recapture Code 0613A Credit Recapture 0614C Other Information Code 0614A Other Information
-
Form 1065 Doc Code 65
Field Designator Field Name 06BTP Beginning 06ETP Ending 06KNE Nonrecourse Ending 06KQE Qualified Nonrecourse Ending 06KRE Recourse Ending 06LCB Beginning Capital 06LCE Ending Capital 06NUB Beginning Unrecognized Sec. 704(c) 06NUE Ending Unrecognized Sec. 704(c) 0601 Ordinary Income 0602 Net Real Estate Rental Amount 0603 Other Net Rental Amount 0604a Guaranteed Payment for Service 0604b Guaranteed Payment for Capital 0605 Interest Income 0606A Ordinary Dividends Amount 0606C Dividend Equivalents 0607 Royalties 0608 Net Short-Term Capital Gains 0609a Net Long-Term Capital Gains 0611C Other Income Code 0611A Other Income 0612 Section 179 Deduction 0613C Other Deductions Code 0613A Other Deductions 0615C Other Credits Code 0615A Other Credits 0620C Other Information Code 0620A Other Information
-
Form 1120-S Doc Code 67
Field Designator Field Name 06BTP Beginning 06ETP Ending 0601 Ordinary Income Amount 0602 Net Real Estate Rental Amount 0603 Other Net Rental Amount 0604 Interest Amount 0605A Dividends Amount 0606 Royalties 0607 Net Short-Term Capital Gains 0608A Net Long-Term Capital Gains 0611 Section 179 Deduction 0612C Other Deductions Code 0612A Other Deductions 0613C Credits Code 0613A Credits 0617A Other Information Code 0617C Other Information
-
-
Invalid Conditions by form type:
Forms Transcribed Fields 1041 0605a, 0607 1065 0601, 0602, 0603, 0608, 0609a 1120-S 0601, 0602, 0603, 0607, 0608a -
Transcribed Fields by form type:
≡ ≡ ≡ ≡ ≡ ≡ ≡ ≡ ≡ ≡ ≡ ≡ ≡ ≡ ≡ ≡ ≡ ≡ ≡ ≡ ≡ ≡ ≡ ≡ ≡ ≡ ≡ ≡ ≡ ≡ ≡ ≡ ≡ ≡ ≡ ≡ ≡ ≡ ≡ ≡ ≡ ≡ ≡ ≡ ≡ ≡ ≡Forms Transcribed Fields 1041 0601, 0602a, 0603, 0604a, 0614 1065 0604, 0605, 0606a, 0607, 0612 1120-S 0604, 0605a, 0606, 0611, 0613
≡ ≡ ≡ ≡ ≡ ≡ ≡ ≡ ≡ ≡ ≡ ≡ ≡ ≡ ≡ ≡ ≡ ≡ ≡ ≡ ≡ ≡ ≡ ≡ ≡ ≡ ≡ ≡ ≡ ≡ ≡ ≡ ≡ ≡ ≡ ≡ ≡ ≡ ≡ ≡ ≡ ≡ ≡ ≡ ≡ ≡ ≡ ≡ -
Correction Procedures:
-
Check the entries to make sure the entries are valid or are not misplaced entries. If there are misplaced entries, move or delete the entries.
≡ ≡ ≡ ≡ ≡ ≡ ≡ ≡ ≡ ≡ ≡ ≡ ≡ ≡ ≡ ≡ ≡ ≡ ≡ ≡ ≡ ≡ ≡ ≡ ≡ ≡ ≡ ≡ ≡ ≡"≡ ≡ ≡" ≡ ≡ ≡ ≡ ≡ ≡ ≡ ≡ ≡ ≡ ≡ ≡ ≡ ≡ ≡ ≡ ≡ ≡ ≡ ≡ ≡ ≡ ≡ ≡ ≡ ≡ ≡ ≡ ≡ ≡ ≡ ≡ ≡ ≡ ≡ ≡ ≡ ≡ ≡ ≡ ≡ ≡ ≡ ≡ ≡ ≡ ≡ ≡ ≡ ≡ ≡ ≡ ≡ ≡ ≡ ≡ ≡ ≡ ≡ ≡ ≡ ≡ ≡ ≡ ≡ ≡ ≡ ≡ ≡ ≡ ≡ ≡ ≡ ≡ ≡ ≡ ≡ ≡ ≡ ≡ ≡ ≡ ≡ ≡ ≡ ≡ ≡ ≡ ≡ ≡"≡ ≡" ≡ ≡ ≡ ≡ ≡ ≡ ≡ ≡ ≡ ≡ ≡ ≡ ≡ ≡ ≡ ≡ ≡ ≡ ≡ ≡ ≡ ≡ ≡ ≡ ≡ ≡ ≡ ≡ ≡ ≡ ≡ ≡ ≡ ≡ ≡ ≡ ≡ ≡ ≡ ≡ ≡ ≡ ≡ ≡ ≡ ≡ ≡
-
-
Error Code 024 displays as follows:
Field Designator Field Name Field Length 16ADD Payer Street Address 35 16CTY Payer City 22 16ST Payer State Code 02 16ZIP Payer ZIP Code 09
-
Error Code 024 generates if all fields are not present as follows:
-
If the street address is present, Field 16CTY and Field 16ST must be present unless a Major City Code (MCC) is used.
-
If a MCC is used, Field 16ADD must be present.
-
A city must be present. If the city is not in the Major City format, Field 16ST must be present. Field 16ADD can be blank.
-
A MCC is used and Field 16ST is present.
-
-
MeF - Correct all coding and transcription errors.
-
Compare the displayed fields with the return and attachments. If incorrect, overlay the screen with the correct information.
-
Research any of the following for valid address information:
-
Document 7475, State Abbreviations, Major City Codes, and Address Abbreviations
-
CCs INOLE, ENMOD, or NAME
If And Then A MCC is present A street address is not available -
Enter the city name (spelled out, not in Major City format) in Field 16CTY.
-
Enter the State Code in Field 16ST.
The MCC is correct The state is present Delete Field 16ST. The ZIP Code or address cannot be corrected from the information on the return, attachments, or from research -
Determine the first three-digits of the ZIP Code from Exhibit 3.0.101-6, State/Major City/Zip Code/Major City Code.
-
Enter "01" for the fourth and fifth digits in Field 16ZIP.
-
-
Error Code 026 displays as follows:
Field Designator Field Name Field Length 16CTY Payer City 22 16ST Payer State 02 16ZIP Payer ZIP Code 09
-
Error Code 026 generates when the ZIP Code is inconsistent with the Major City Code or State Code.
-
MeF - Correct all coding and transcription errors.
-
Compare the displayed fields with the return and attachments. If incorrect, overlay the screen with the correct information.
-
Research any of the following for valid ZIP Code information:
-
Document 7475, State Abbreviations, Major City Codes, and Address Abbreviations
-
CCs INOLE, ENMOD, or NAME
-
-
If only the first three-digits of the ZIP Code can be determined, enter "01" in the fourth (4th) and fifth (5th) positions.
If And Then Unable to determine a valid ZIP Code from the return or attachment Enter the valid ZIP Code found through research in Field 16ZIP. The address is in a Major City A MCC can be determined -
Enter the MCC in Field 16CTY.
-
Delete the State Code in Field 16ST.
The address is not in a Major City -
Enter the proper state abbreviation in Field 16ST.
-
Enter the ZIP Code in Field 16ZIP.
-
-
Correction Procedure for APO/DPO/FPO Address
-
The U.S. Postal Service established new requirements for APO/DPO/FPO addresses.
-
If the old address appears (i.e., (AP New York, NY 091XX), convert the address to the new state code abbreviations based on the ZIP Code:
ADDRESS ABBREVIATION LOCATION ZIP CODE APO AA Americas 340 DPO AA Americas 340 FPO AA Americas 340 APO AE Europe 090-098 DPO AE Europe 090-098 FPO AE Europe 090-098 APO AP Pacific 962-987 DPO AP Pacific 962-987 FPO AP Pacific 962-987 -
-
Correspondence may be required if any of the following is present:
-
If the Schedules K-1 are received in continuous format (e.g., computer listings or typed listings), correspond requesting separate Schedules K-1.
-
If substitute Schedules K-1 are received and do not meet the requirements listed in IRM 3.0.101.5.3, Substitute Schedules K-1, correspond requesting a valid substitute form, or the official IRS form.
-
-
Pick up work according to the number of carts or boxes included (i.e., box 1 of 2, box 2 of 2).
-
Leaf through Schedules K-1 to determine which Schedules K-1 belong to a single parent (parent DLN is stamped in the upper left of the first Schedule K-1). The Schedules K-1 for each parent should be in separate gusset/blue folder or separated by a pink piece of paper.
-
You may find many documents with attachments. In this case, all the following pages should match the front page in some way (EIN, Name).
-
If there is a stray Schedule K-1 without a DLN that doesn’t match any other documents, pull the document, and send to Code and Edit as a "Loose Schedule K-1."
-
-
Return block of documents to "stat" box or cart.
-
Instructions for working the "Actual Output Report."
-
The "Actual Output Report" lists all DLNs that is either output or deleted.
-
Verify every DLN on the "Actual Output Report."
-
-
If the batch has a DLN not on the report:
-
Pull entire block and make sure the parent DLN is written or stamped on the first document.
-
Give the entire block of documents to the lead or designated employee for research.
-
If block is deleted, the lead or designated employee routes it for processing.
-
If block is not deleted and is still on the SCRIPS system, the lead or designated employee takes the necessary action to have the block worked and output.
-
-
If a single document is deleted from a block:
-
Pull the document from the block.
-
Make sure the parent DLN is written in the upper left corner of each Schedule K-1 pulled.
-
Route deleted, pulled documents to Batching for further processing.
-
-
The documents are received on batch carts in gusset/blue folders or in "stat" boxes after raw input has been completed.
-
After receipt, prepare documents for filing as follows:
-
Check parent DLN on folder or on "stat" box against the first Schedule K-1 parent DLN in each folder or "stat" box to ensure they match.
-
If parent DLN is for an electronically filed return (FLC of DLN (first two-digits) are 14, 16, 22, 35, 38, 41, 43, 52, 64, 65, 72, 75, 76, 92, 93, or 95), destroy as classified waste.
-
If folder is labeled "Loose Schedules K-1," prepare an "attachment document," staple to the Schedule and route to Files to be attached to the parent return.
-
For all others, make sure parent DLN is stamped/written on gusset/blue folders or "stat" boxes.
-
If gusset/blue folder is not provided for a parent DLN, create one by stamping/writing the parent DLN on the top tab and placing the Schedules K-1 inside the folder.
-
Place folders in the box or batch cart with the parent DLN sticking out, in ascending order, from right to left, facing the front of the box/batch cart.
-
If DLN is out of order (e.g., LC244–091–49700–2, LC244–091–49800–2, LC244–091–51000–2, LC244-091–49900–2), associate in the correct DLN order.
-
If there are different FLCs within the DLNs, ensure that they are in their own gusset/blue folder and placed at the back of the box in order.
-
"Re-file" documents should be stapled together for each parent DLN, place the documents in a "stat" box labeled "Re-file" and route to Files.
-
Prepare other gusset/blue folders or "stat" boxes, when necessary, to eliminate over stuffing. If over-stuffing is an ongoing problem, coordinate with the Pre-Doc Prep Function.
-
-
Duplex (Carbon Copy) Schedules K-1 cannot process through SCRIPS and are photocopied in Pre-Doc Prep and placed in a folder. When received take the following actions:
-
Remove the duplex Schedules K-1 from the folder.
-
Re-associate to the photocopied Schedules K-1 before routing to Files.
-
-
Documents are placed in "stat" boxes.
-
Arrange documents in proper filing sequence. Keep all documents in parent DLN order.
-
After the weekly cycle has been accumulated (daily where space limitations or other local requirements dictate) inter-file the cycle on permanent shelving for retention.
-
When requests for the parent return (Form 1041, Form 1065 and Form 1120-S) and Schedules K-1 are received by Files:
-
If the requests are received via Form 5546 (Exam request) pull and charge out both the parent return and the Schedules K-1 and forward to requester.
-
If a request is received from Statistic of Income (SOI), for both the Form 1120-S and the related Schedules K-1, pull and charge out both and forward to SOI. Don’t pull the Schedules K-1 for Form 1041 and Form 1065.
-
If a request is received from Return and Income Verification Services (RAIVS) for Form 1120-S, Form 1041, or Form 1065 and the related Schedules K-1, pull and charge out both and forward to RAIVS.
-
If requests are received from other areas for Form 1041, Form 1065 and Form 1120-S and the related Schedules K-1 via CC ESTAB/DOALL, they must enter "Pull Schedule K-1" in the remarks field. If "Pull Schedule K-1" is not present in the remarks field, pull and charge out only the parent return and forward to the requester.
-
If the request is received via Form 2275, Records Request, Charge and Recharge for the parent return and the related Schedules K-1, they must write "Pull Schedule K-1" in the Remarks block. If "Pull Schedule K-1" is not present in the remarks block, pull and charge out only the parent return and forward to the requester.
-
-
When a request for a document arrives in Files, and the document is already charged-out or is missing, note the complete charge-out data on the requisition.
-
If the document/block is not in Files, ensure necessary action is taken to guarantee that the document/block is not misfiled or possibly shelved incorrectly (i.e., notify supervisor for special search).
-
If an "A" is marked on the Block Control Sheet, there is a duplicate DLN. Check the following block, marked "B" on the block control sheet, to ensure pulling of the correct document.
-
Prepare copies where requested. Re-file the original.
-
Sort filled requests into location of requestor and route to requestor. The Unit Address List (UAL) is available on the Submission Processing website and has addresses corresponding with the IDRS group numbers of the requestor. Perform special search on unfilled requests only if the special search criteria are met. See IRM 3.5.61.11, Requests for Association of Attachments.
-
Form 8161, Error Resolution Charge-outs, are received in two ways:
-
Part 1 only - Error Resolution already has the return. File part 1 in its proper place in the block.
-
All three parts - Attach parts 2 and 3 to return and route to Error Resolution. File part 1 in its proper place in the block.
-
-
When previously charged-out parent and Schedules K-1 are received back in Files to be re-filed, file both parent and Schedules K-1 associated by parent DLN. Never attach, associate, or re-file into Schedules K-1 folders.
-
When processed "Loose Schedules K-1" are received in Files, if necessary, research IDRS for matching parent DLN, then re-file behind parent return.
-
When attachments other than Schedules K-1 are received, file with the parent return using Form 10023-B, Attachment (To Be Associated With Return). The parent DLN is written on the upper left of the Schedules K-1. These attachments are pulled in the Pre-Doc Prep area but cannot be processed through the SCRIPS scanners and need to be re-associated with the parent return.
-
Files function retires Schedules K-1 at the same time as the matching parent blocks, per Document 12990, Records and Information Management Records Control Schedules. To find this information, open the attached link and refer to the information in the table below.
IRS Records Control Schedules (RCS) Schedule Page Item Item Tax Administration – Taxpayer Services (TS) Records 29 420 56 58
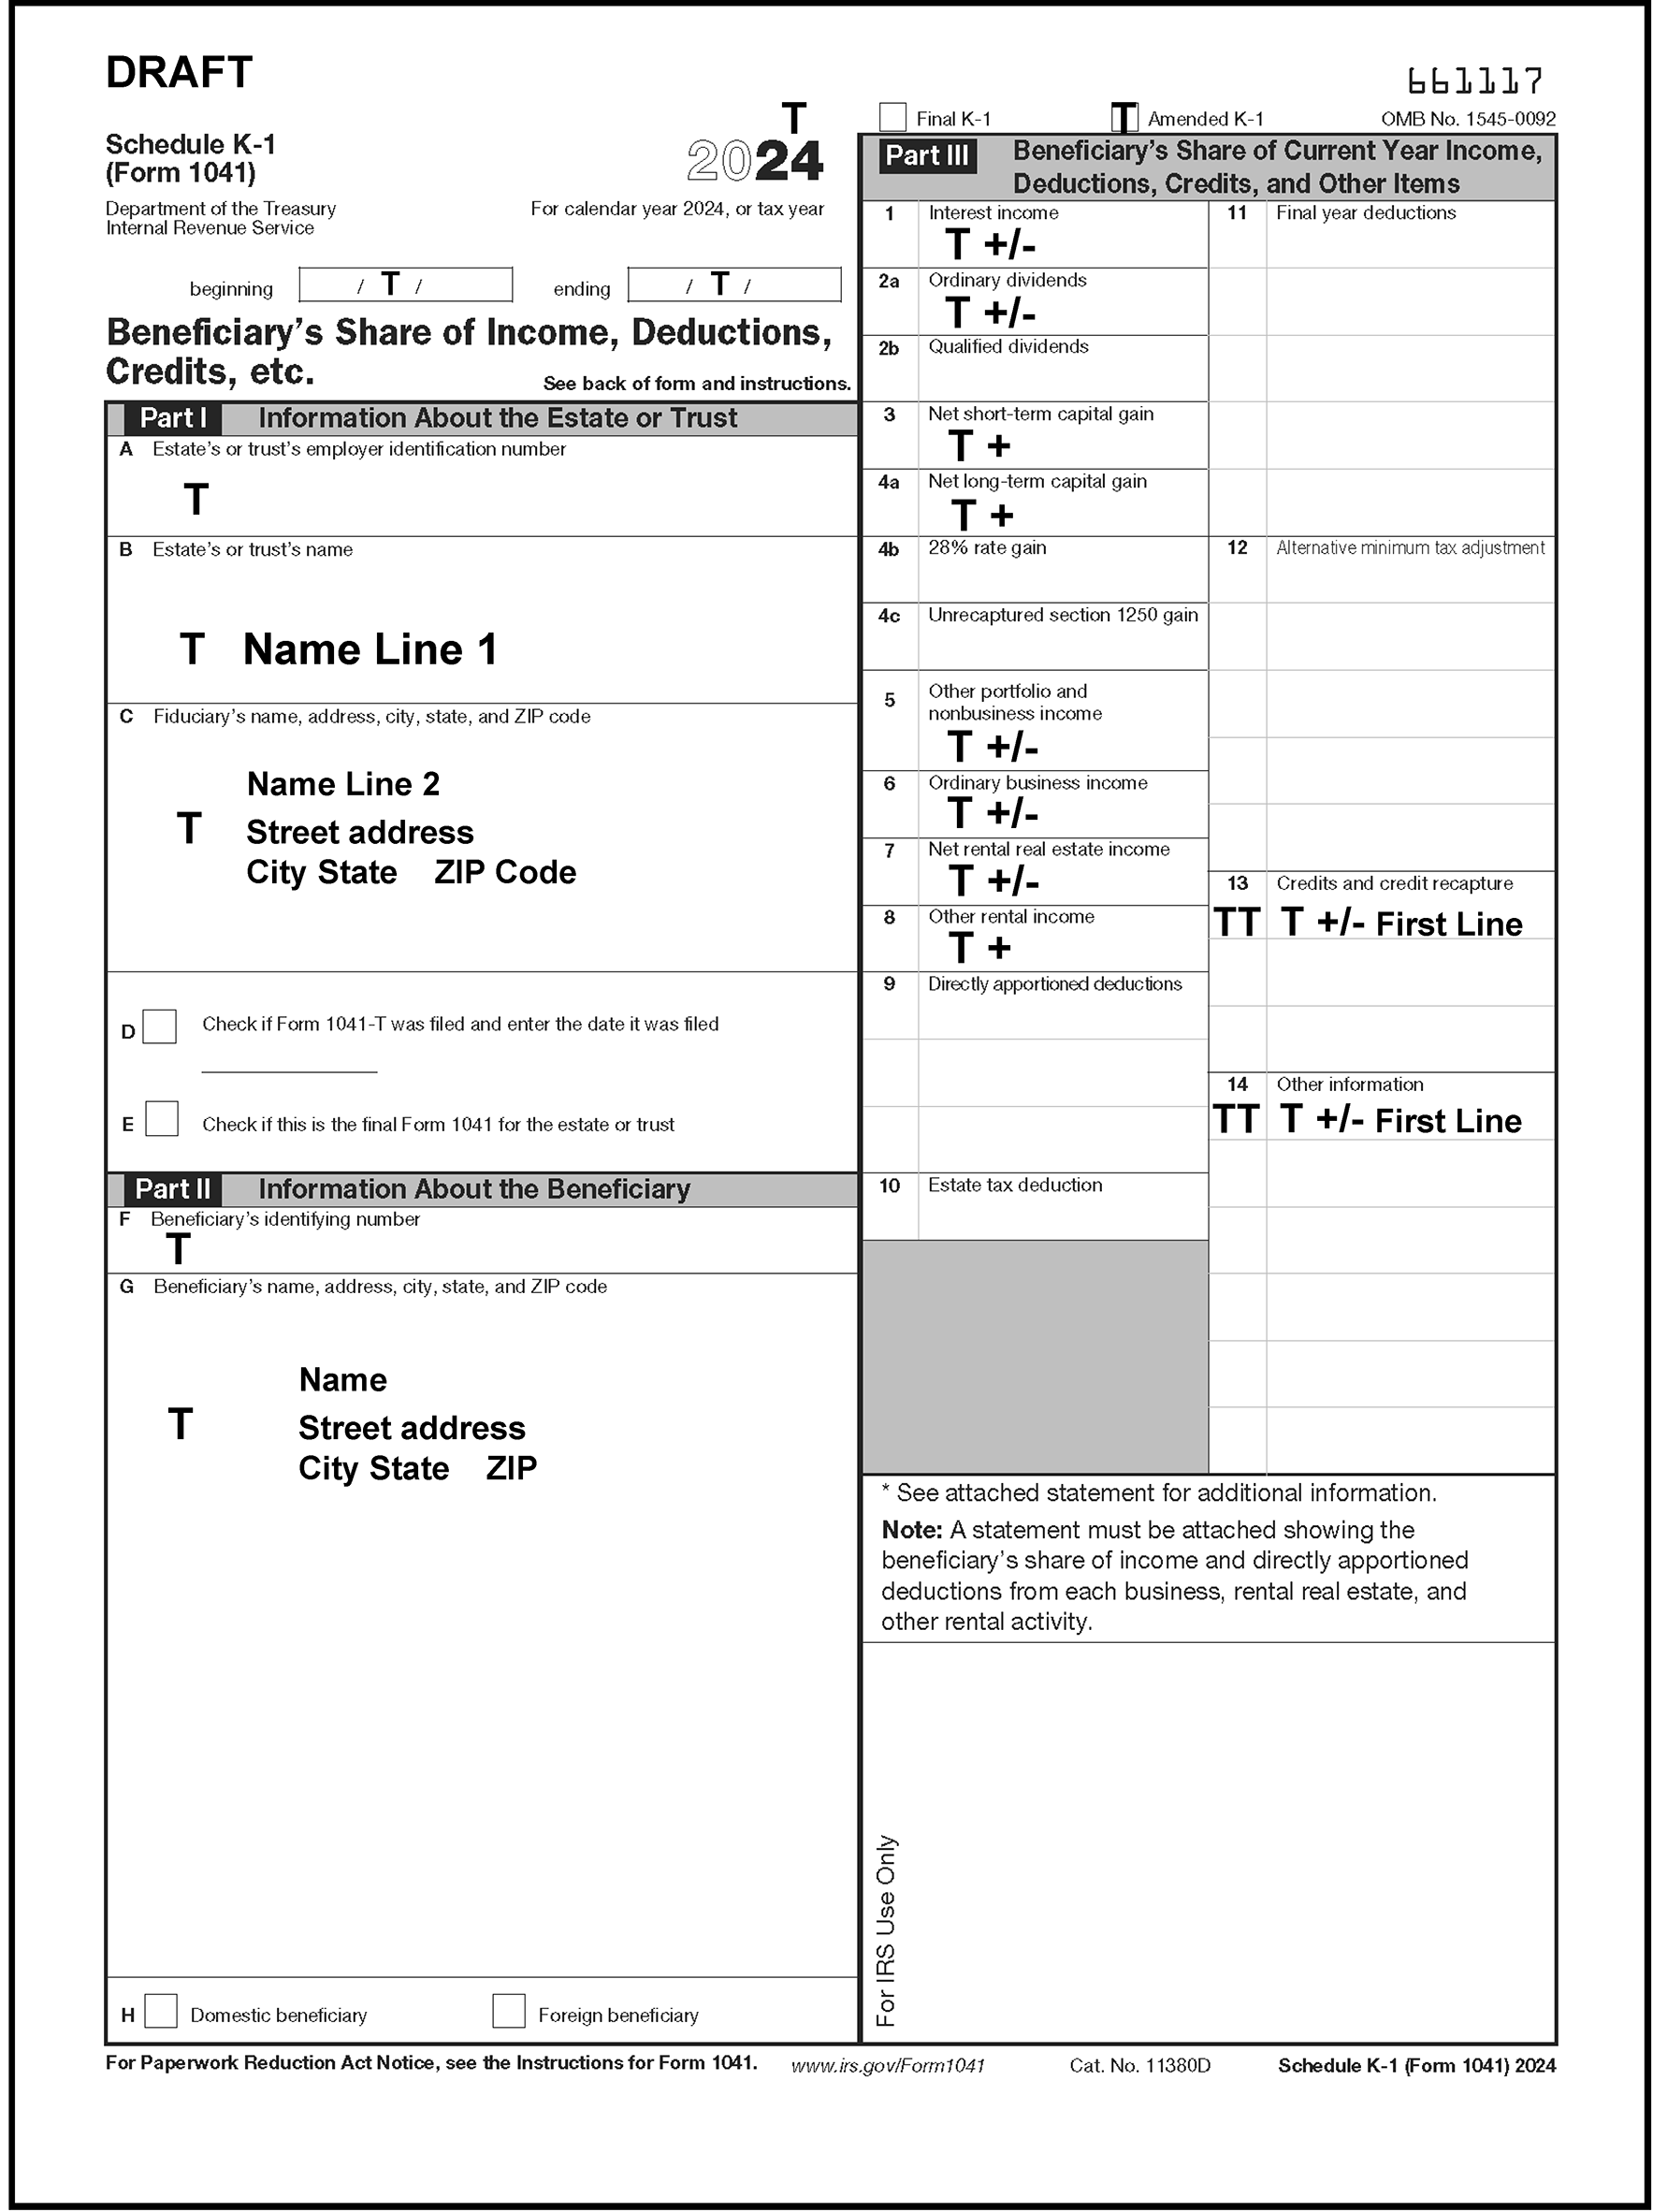
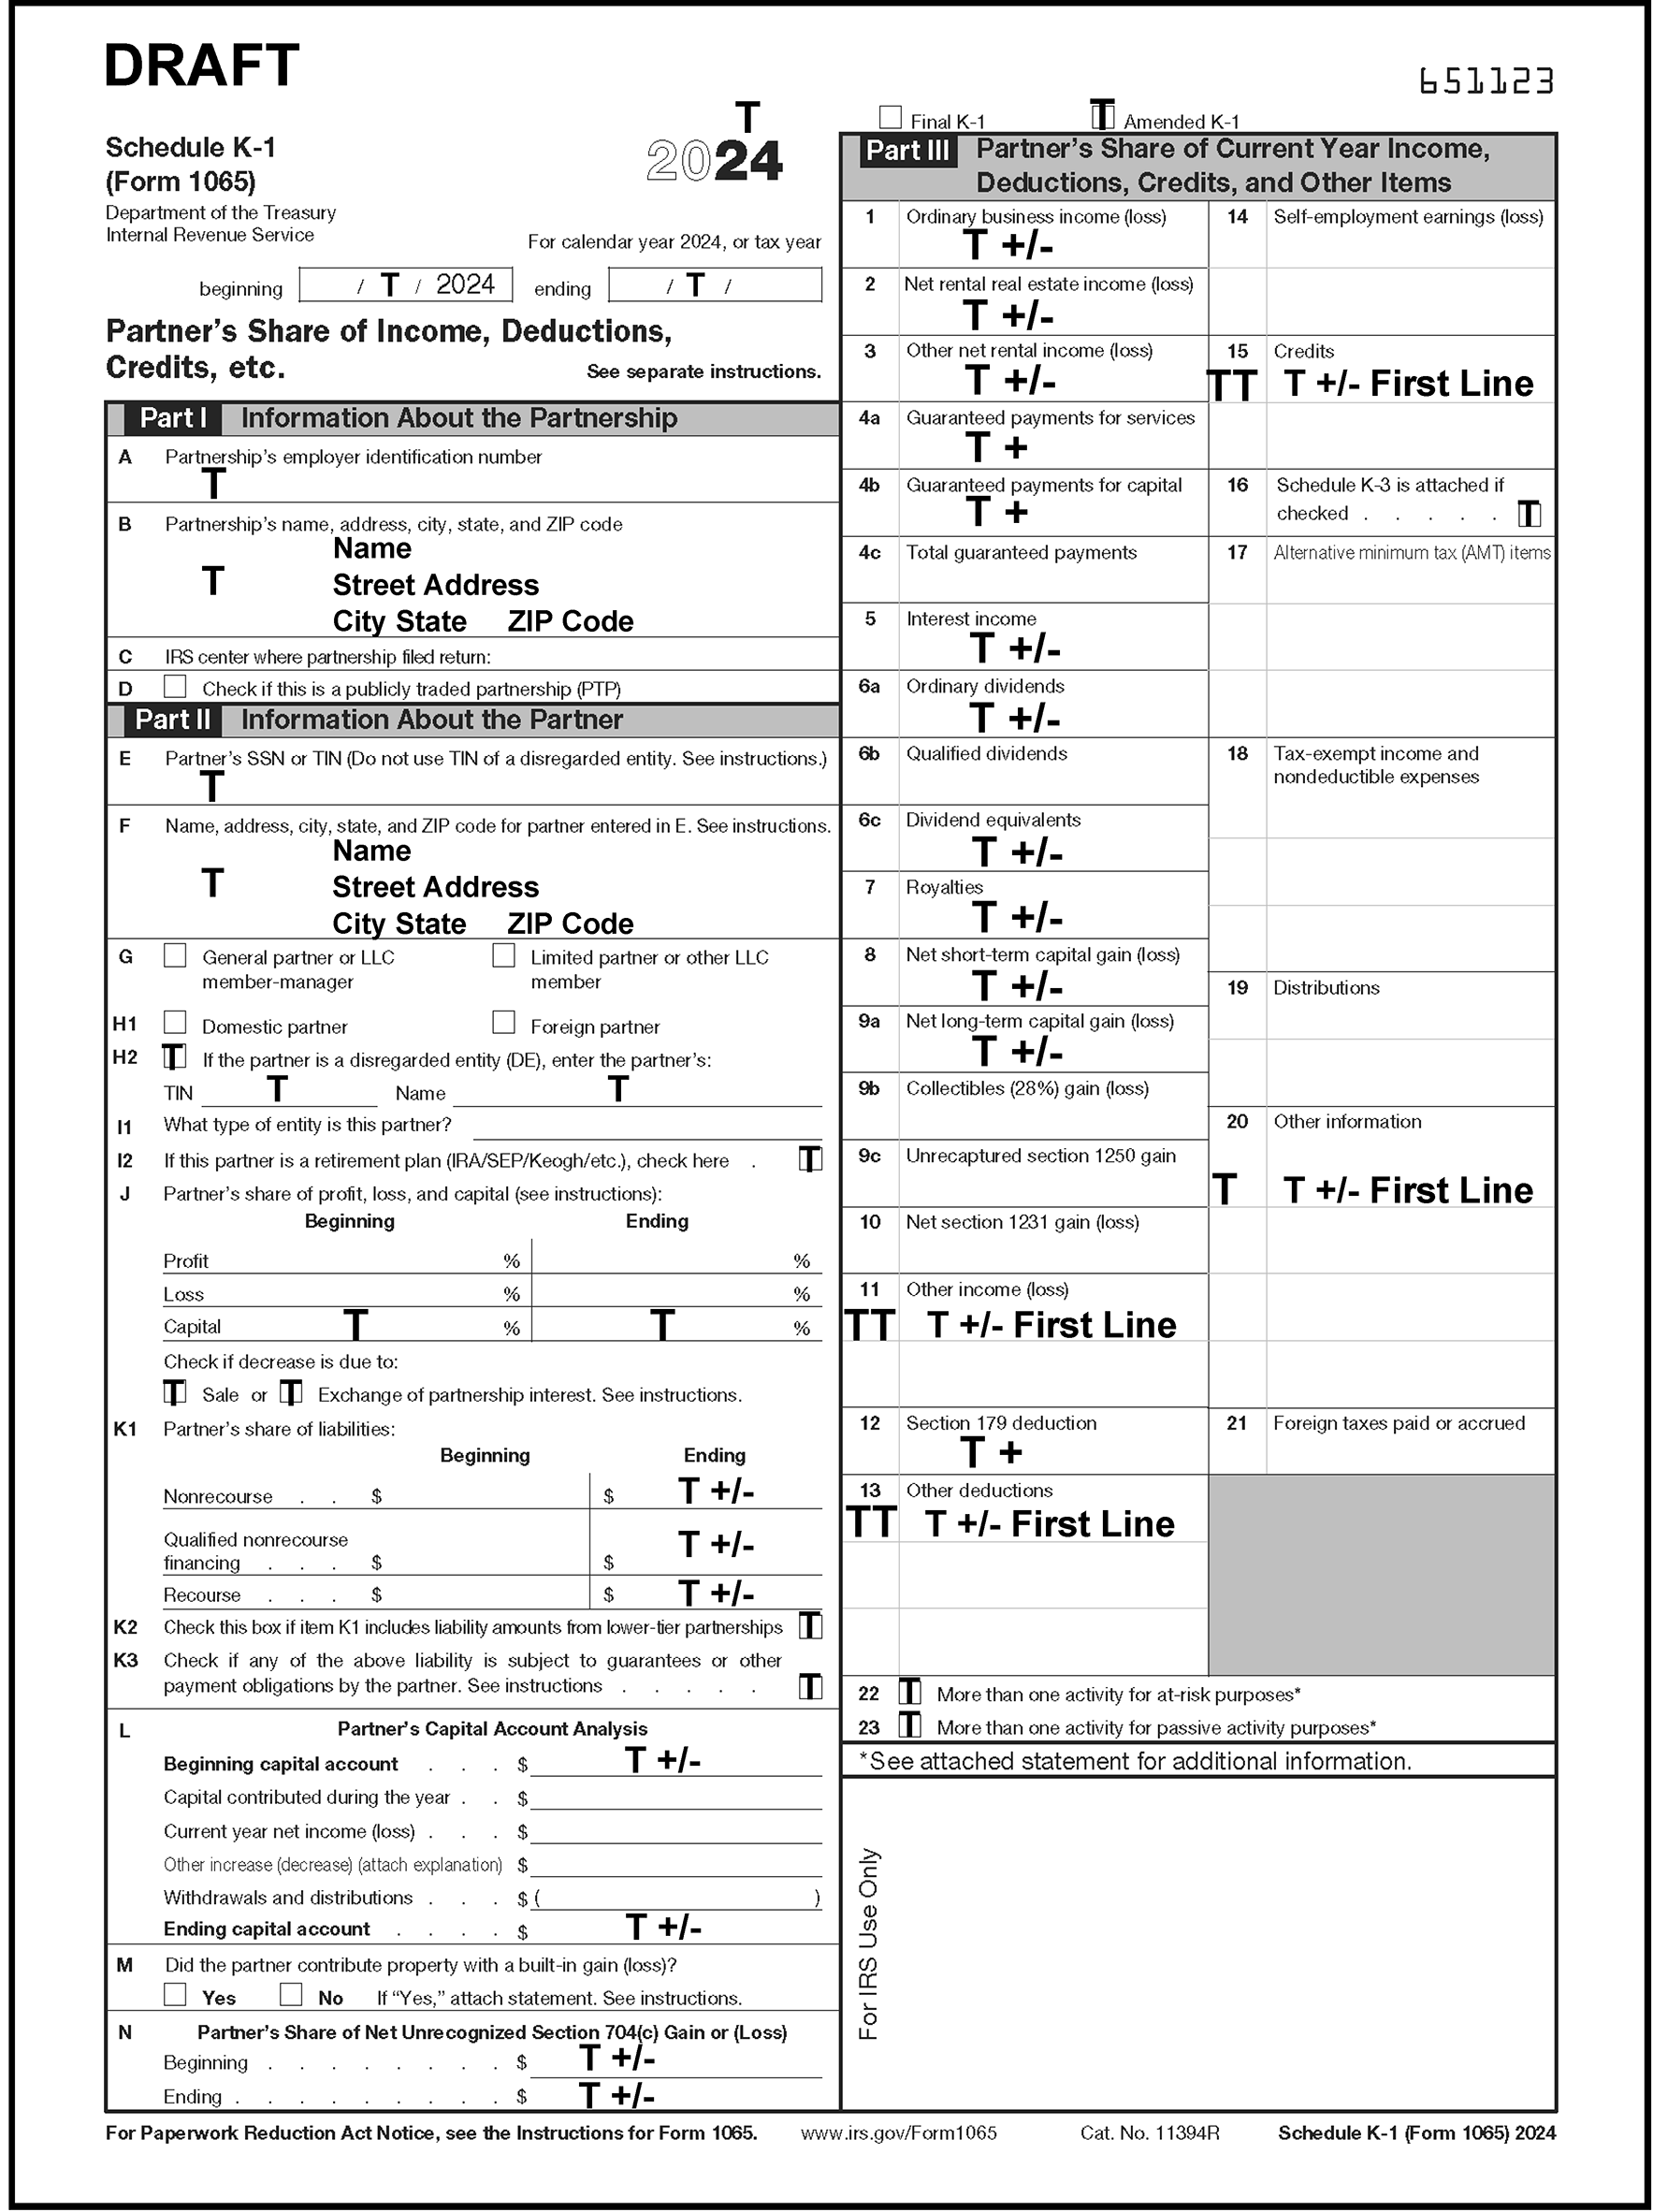
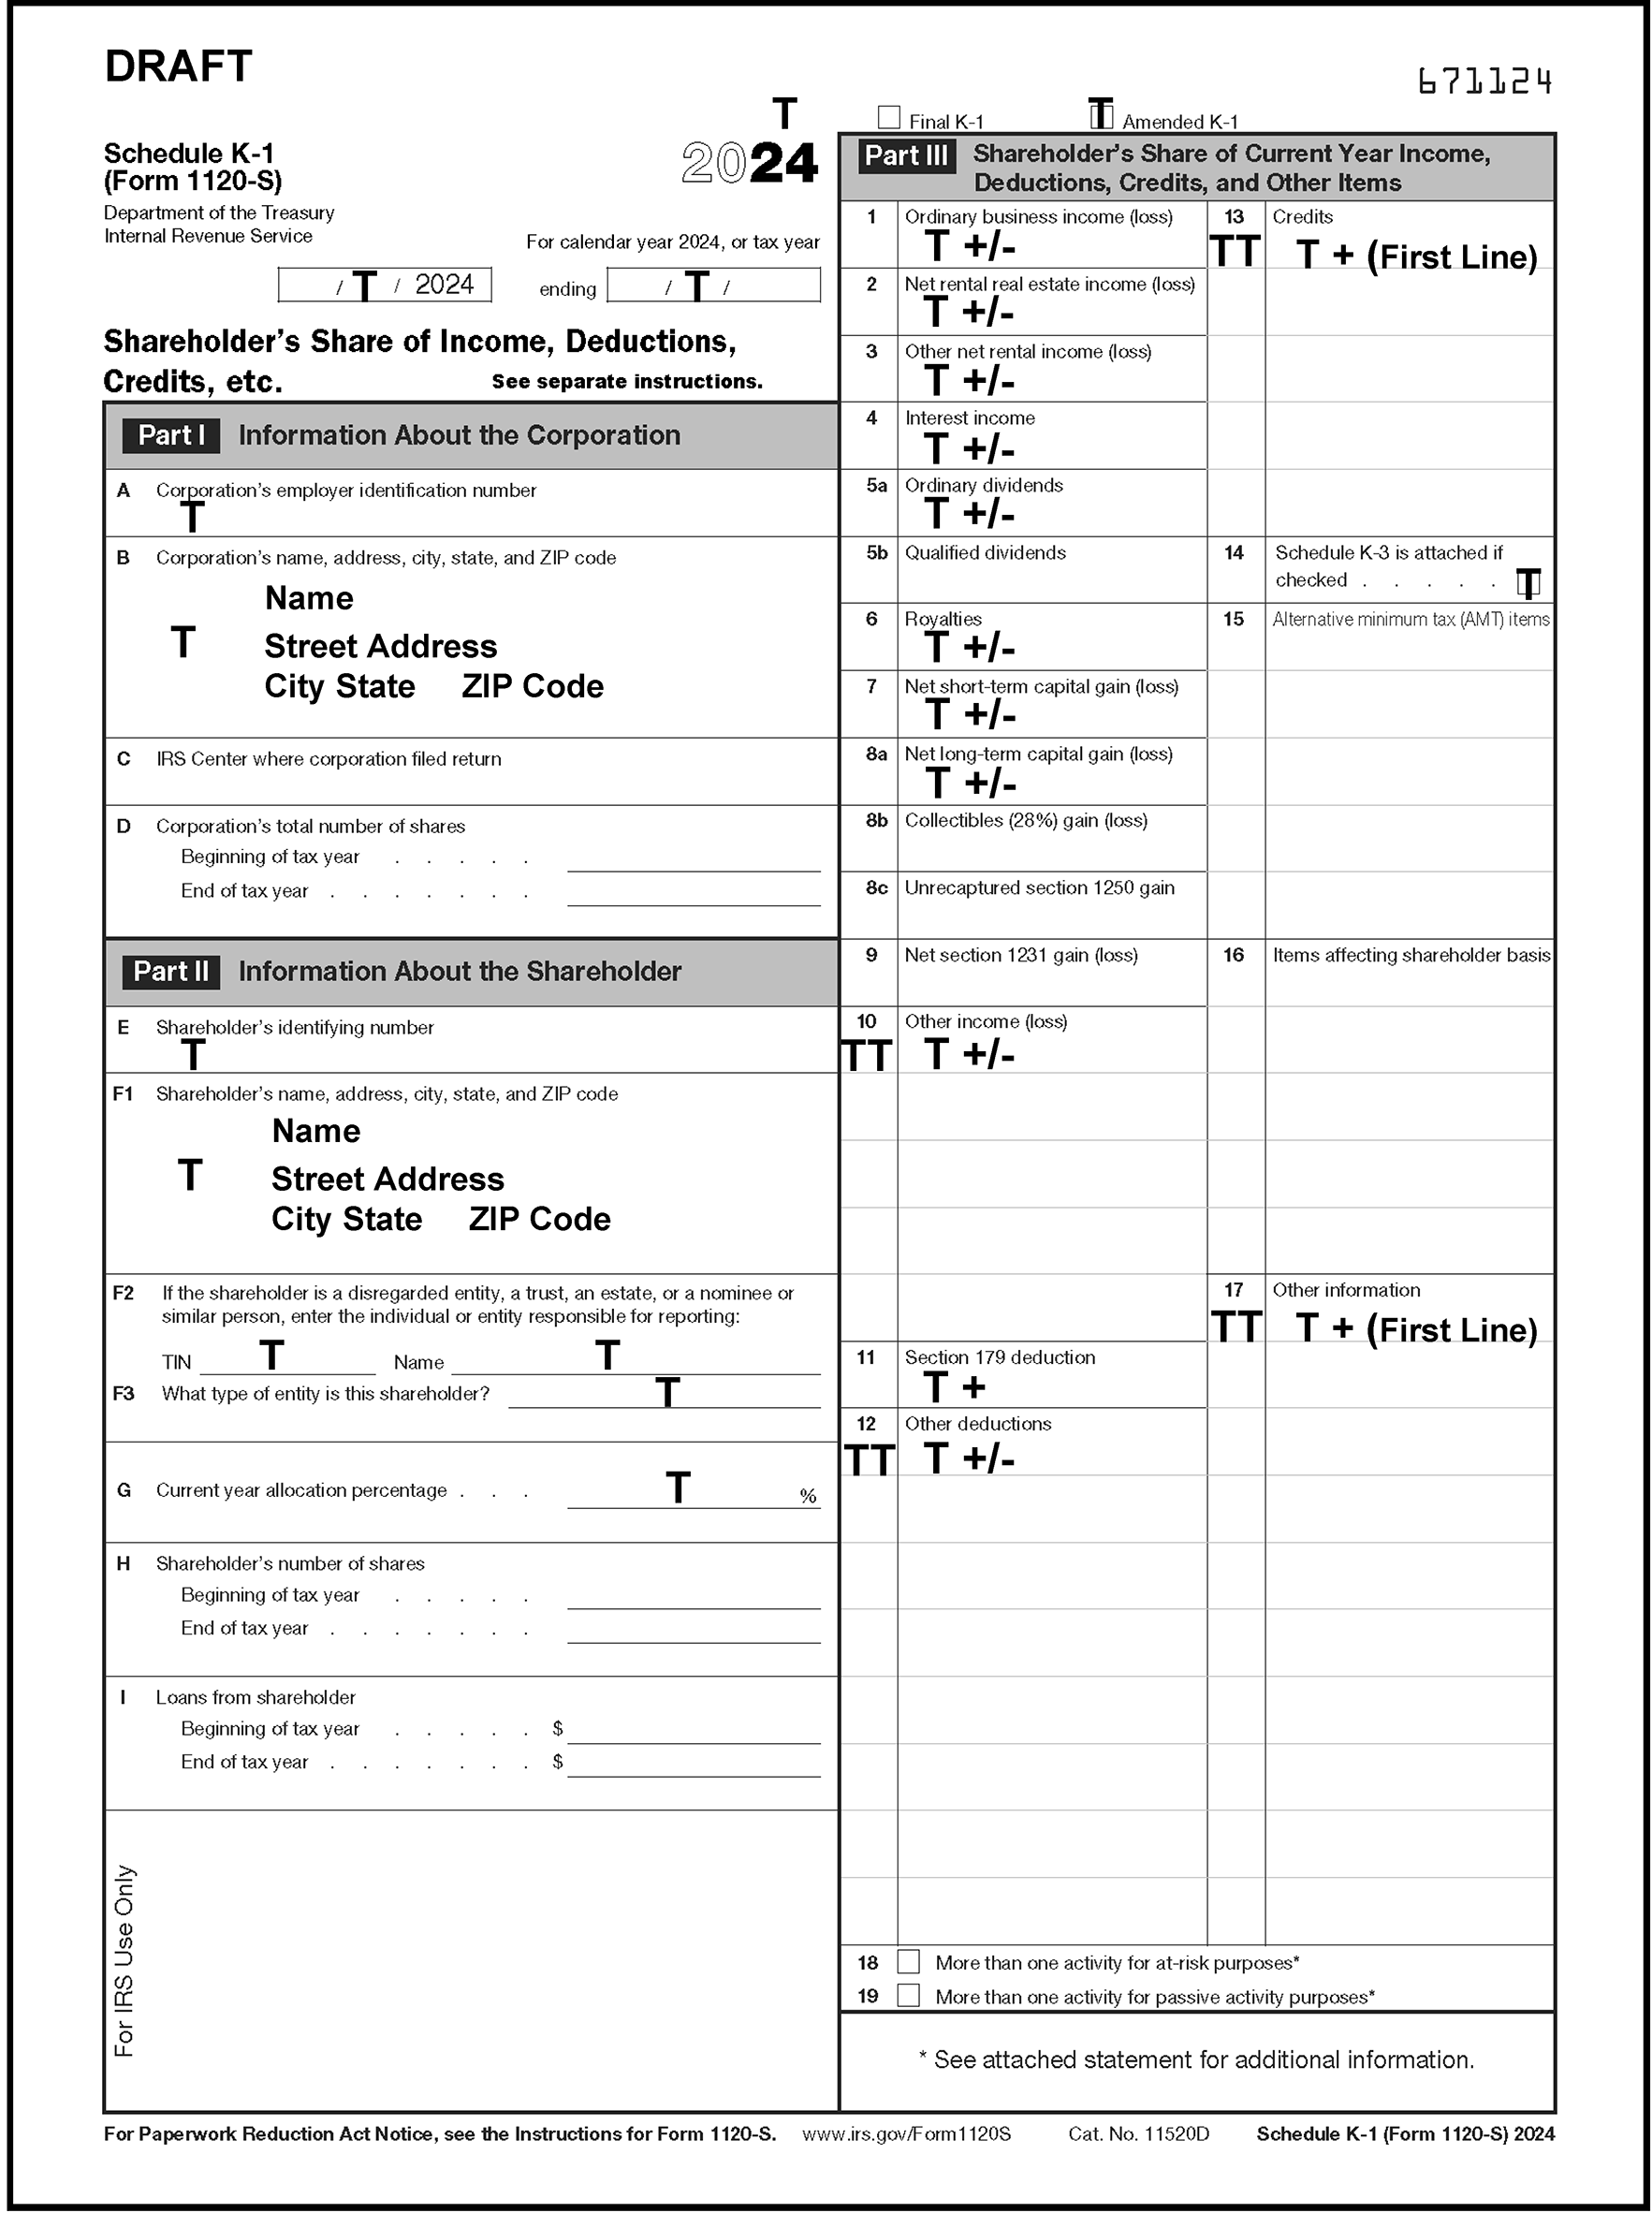
When it is necessary to shorten entries, the abbreviations listed below must be used to shorten entries, EXCEPT when used to determine name control.
| NAME/OR PHRASE | ABBREVIATION |
|---|---|
| Accounting | ACCTG |
| Account | ACCT |
| Accounts | ACCTS |
| Administration | ADMIN |
| Administrator/Administrators | ADM/ADMS |
| America(n) | AMER |
| Associates | ASSOC |
| Association | ASSN |
| Blue Cross/Blue Shield | BC BS |
| Brook(s) | BRK(S) |
| Brotherhood | BRTHHD |
| Brothers | BROS |
| Burg(s) | BG(S) |
| Care of/in care of | % (Name Line 2 only) |
| Casualty | CASLTY |
| Commission | COMM |
| Company/Companies | CO/COS |
| Comptroller | COMPT |
| Computer | COMP |
| Consolidated | CONS |
| Construction | CONST |
| Cooperative | COOP |
| Corporation/Corporations | CORP/CORPS |
| Co-Trustee | CO-TTEE |
| Co-Trustees | CO-TTEES |
| Credit Union | CU |
| Data Processing | DP |
| Dated Jan. 16, 1987 | Convert dates to MM-DD-YY format with hyphens. (DO NOT ENTER DATE/DATED/DTD OR THE ALPHA MONTH.) |
| Deceased | DECD |
| Department | DEPT |
| Doing business as, D/B/A, D.B.A. | DBA |
| District | DIST |
| Division | DIV |
| Electrical | ELEC |
| Employees | EMP |
| Enterprises | ENT |
| Executor/Executrix | EX |
| Executors/Executives | EXS |
| Family | FAM |
| Family Trust | FAM TR |
| Federal | FED |
| Federal Credit Union | FCU |
| Fiduciary | FID |
| Finance | FIN |
| First National Bank | FNB |
| For the Benefit of, F/B/O, F.B.O. | FBO |
| Funeral Trust | FNER TR |
| Group | GRP |
| Headquarters | HDQTRS |
| Hourly | HRLY |
| Human Resources | HM RES |
| Human Development | HUM DEVLP |
| Incorporated | INC |
| Industry(ies) | INDUST |
| Institute, Institution | INST |
| Insurance | INS |
| International | INT |
| Investment, Investors | INVEST |
| Irrevocable | IRRV |
| Irrevocable Trust | IRRV TR |
| Limited | LTD |
| Management | MGMT |
| Manufacturing | MFG |
| Marital Trust | MRTL TR |
| Mental Health | MEN HLTH |
| Municipal | MUN |
| Mutual | MUTL |
| National | NAT |
| National Guard | NAT GD |
| Non-exempt Charitable Trust | NECT |
| Pension | PENS |
| Partner | PTR |
| Partner Number | PTR NO |
| Partnership | PTRSP |
| Personal Representative | PER REP |
| Professional Association | PA |
| Professional Corporation | PC |
| Professional Service | PS |
| Products | PROD |
| Railroad | RR |
| Realty | RLTY |
| Retirement | RET |
| Revocable | RVOC |
| Revocable Trust | RVOC TR |
| Salary(ies) | SAL |
| Savings | SAV |
| Savings and Loan | SL |
| Service(s) | SERV(S) |
| Small Corporation | SC |
| Stevedoring | STVDG |
| Transportation | TRANS |
| Telegraph | TEL |
| Telephone | TEL |
| Testamentary | TEST |
| Trust/Trusts | TR/TRS |
| Trustee/Trustees | TTEE/TTEES |
| Under the will of, U/W, under will | UW |
| Under agreement, U/A, Under agreement with | UA |
| Under Trust Agreement | UTA |
| United States | US |
| University | UNIV |
| US Air Force | USAF |
| US Army | USA |
| US Coast Guard | USCG |
| US Marine Corp | USMC |
| US Navy | USN |
| Voluntary Employee Benefit Association | VEBA |
When necessary to shorten entries, street address abbreviations that must be used. For SCRIPS processing it is not necessary to abbreviate any word if it is correctly recognized by the scanner. This requirement applies only if the word is manually entered.
| Word | Abbr. | Word | Abbr. | Word | Abbr. |
|---|---|---|---|---|---|
| Alley | ALY | Ford | FRD | Pines | PNES |
| Annex | ANX | Forest | FRST | Plain | PLN |
| Arcade | ARC | Forge | FRG | Plains | PLNS |
| Bayou | BYU | Fork | FRK | Plaza | PLZ |
| Beach | BCH | Forks | FRKS | Point | PT |
| Bend | BND | Fort | FT | Port | PRT |
| Bluff | BLF | Freeway | FWY | Prairie | PR |
| Bottom | BTM | Gardens | GDNS | Radical | RADL |
| Branch | BR | Gateway | GTWY | Ranch | RNCH |
| Bridge | BRG | Glen | GLN | Rapids | RPDS |
| Brook | BRK | Green | GRN | Rest | RST |
| Burg | BG | Grove | GRV | Ridge | RDG |
| Bypass | BYP | Harbor | HBR | River | RIV |
| Camp | CP | Haven | HVN | Second | 2nd |
| Canyon | CYN | Heights | HTS | Shoal | SHL |
| Cape | CPE | Hill | HL | Shoals | SHLS |
| Causeway | CSWY | Hills | HLS | Shore | SHR |
| Center | CTR | Hollow | HOLW | Shores | SHRS |
| Cliffs | CLFS | Inlet | INLT | Spring | SPG |
| Club | CLB | Island | IS | Springs | SPGS |
| Corner | COR | Islands | ISS | Square | SQ |
| Corners | CORS | Isle | ISLE | Station | STA |
| Course | CRSE | Junction | JCT | Stream | STRM |
| Cove | CV | Knolls | KNLS | Summit | SMT |
| Creek | CRK | Lake | LK | Third | 3rd |
| Crescent | CRES | Lakes | LKS | Trace | TRCE |
| Crossing | Landing | LNDG | Track | TRAK | |
| Dale | DL | Light | LGT | Trail | TRL |
| Dam | DM | Loaf | LF | Trailer | TRLR |
| Divide | DV | Locks | LCKS | Tunnel | TUNL |
| Estates | EST | Lodge | LDG | Turnpike | TPKE |
| Expressway | EXPY | Manor | MNR | Union | UN |
| Extension | EXT | Meadows | MDWS | Valley | VLY |
| Falls | FLS | Mill | ML | Viaduct | VIA |
| Ferry | FRY | Mills | MLS | View | VW |
| Field | FLD | Mission | MSN | Village | VLG |
| Fields | FLDS | Mount | MT | Ville | VL |
| First | 1st | Mountain | MTN | Vista | VIS |
| Flats | FLT | Orchard | ORCH | Wells | WLS |
Street address abbreviations that must be used. For SCRIPS processing it is not necessary to abbreviate any word if it is correctly recognized by the scanner. This requirement applies only if the word is manually entered.
| Word | Abbr. | Word | Abbr. |
|---|---|---|---|
| Air Force Base | AFB | One-half (all fractions space before and after the number) | 1/1 |
| Apartment | APT | Parkway | PKWY |
| Avenue | AVE | Place | PL |
| Boulevard | BLVD | Post Office Box | * or PO BOX |
| Building | BLDG | Route | RTE |
| Circle | CIR | Road | RD |
| Court | CT | Room | RM |
| Department | DEPT | R.D., RFD, R.F.D., R. Rural Delivery, Rural Route | RR |
| Drive | DR | South | S |
| East | E | Southeast, S.E. | SE |
| Floor | FL | Southwest, S.W. | SW |
| General Delivery | GEN DEL | Street | ST |
| Highway | HWY | Suite | STE |
| Highway Contract | HC | Terrace | TER |
| Lane | LN | West | W |
| North | N | ||
| Northeast, N.E. | NE | ||
| Northwest, N.W. | NW |
If the ZIP Code is missing or invalid, add "01" to the three digits shown below.
| State | Major City | Zip | Major City Code |
|---|---|---|---|
| AK | Anchorage | 995 | AN |
| AK | Fairbanks | 997 | FK |
| AL | Auburn | 368 | AF |
| AL | Birmingham | 352 | BI |
| AL | Florence | 356 | FC |
| AL | Huntsville | 358 | HU |
| AL | Mobile | 366 | MO |
| AL | Montgomery | 361 | MG |
| AL | Tuscaloosa | 354 | TB |
| AR | Fayetteville | 727 | FB |
| AR | Fort Smith | 729 | FS |
| AR | Jonesboro | 724 | JB |
| AR | Little Rock | 722 | LR |
| AR | North Little Rock | 721 | NL |
| AR | Pine Bluff | 716 | PB |
| AZ | Chandler | 852 | YZ |
| AZ | Glendale | 853 | GE |
| AZ | Mesa | 852 | MZ |
| AZ | Peoria | 853 | PY |
| AZ | Phoenix | 850 | PX |
| AZ | Scottsdale | 852 | YS |
| AZ | Tempe | 852 | TE |
| AZ | Tucson | 857 | TU |
| CA | Alhambra | 918 | YA |
| CA | Anaheim | 928 | AH |
| CA | Bakersfield | 933 | BD |
| CA | Berkeley | 947 | BE |
| CA | Chula Vista | 919 | DV |
| CA | Englewood | 903 | ID |
| CA | Fresno | 937 | FO |
| CA | Glendale | 912 | GL |
| CA | Huntington Beach | 926 | HB |
| CA | Inglewood | 903 | ID |
| CA | Irvine | 926-927 | IV |
| CA | Long Beach | 907-908 | LB |
| CA | Los Angeles | 900 | LA |
| CA | Modesto | 953 | MC |
| CA | North Hollywood | 916 | NW |
| CA | Oakland | 946 | OA |
| CA | Oceanside | 920 | OE |
| CA | Oxnard | 930 | OX |
| CA | Palo Alta | 943 | PQ |
| CA | Pasadena | 910-911 | PD |
| CA | Riverside | 925 | RS |
| CA | Sacramento | 942, 958 | SC |
| CA | Salinas | 939 | YL |
| CA | San Bernardino | 924 | SR |
| CA | San Diego | 921 | SD |
| CA | San Francisco | 941 | SF |
| CA | San Jose | 951 | SJ |
| CA | Santa Ana | 927 | SA |
| CA | Santa Barbara | 931 | SC |
| CA | Stockton | 952 | SN |
| CA | Torrance | 905 | TN |
| CA | Van Nuys | 913-914 | VN |
| CO | Arvada | 800, 804 | AV |
| CO | Aurora | 800 | AZ |
| CO | Boulder | 803 | BV |
| CO | Colorado Springs | 809 | CS |
| CO | Denver | 800-802 | DN |
| CO | Greeley | 806 | GC |
| CO | Lakewood | 801-802, 804 | LW |
| CO | Pueblo | 810 | PU |
| CO | Westminster | 800, 802 | WD |
| CT | Bridgeport | 066 | BP |
| CT | Hartford | 061 | HD |
| CT | New Haven | 065 | NH |
| CT | Stamford | 069 | ST |
| CT | Waterbury | 067 | WT |
| DC | Washington | 200-205, 569 | DC |
| DE | Wilmington | 198 | WI |
| FL | Boca Raton | 334 | BZ |
| FL | Bradenton | 342 | BG |
| FL | Cape Coral | 339 | CF |
| FL | Clearwater | 337 | CQ |
| FL | Daytona Beach | 320-321 | DF |
| FL | Fort Lauderdale | 333 | FL |
| FL | Fort Pierce | 349 | FP |
| FL | Gainesville | 326 | GF |
| FL | Hialeah | 330 | HI |
| FL | Hollywood | 330 | HW |
| FL | Jacksonville | 322 | JV |
| FL | Lakeland | 338 | LK |
| FL | Melbourne | 329 | ML |
| FL | Miami | 330-332 | MF |
| FL | Orlando | 328 | OR |
| FL | Pensacola | 325 | PE |
| FL | St. Petersburg | 337 | SP |
| FL | Tallahassee | 323 | TL |
| FL | Tampa | 336 | TA |
| FL | West Palm Beach | 334 | WP |
| GA | Albany | 317 | AY |
| GA | Athens | 306 | AE |
| GA | Atlanta | 303,311,399 | AT |
| GA | Augusta | 309 | AG |
| GA | Columbus | 318-319 | CM |
| GA | Macon | 312 | MA |
| GA | Marietta | 300 | MT |
| GA | Savannah | 314 | GS |
| HI | Honolulu | 968 | HL |
| IA | Cedar Rapids | 524 | CR |
| IA | Davenport | 528 | DP |
| IA | Des Moines | 503 | DM |
| IA | Dubuque | 520 | DQ |
| IA | Sioux City | 511 | SX |
| IA | Waterloo | 507 | WL |
| ID | Boise | 837 | BS |
| ID | Pocatello | 832 | PC |
| IL | Aurora | 605 | AO |
| IL | Champaign | 618 | CX |
| IL | Chicago | 606-608 | CH |
| IL | Decatur | 625 | DT |
| IL | East St. Louis | 622 | ES |
| IL | Evanston | 602 | EN |
| IL | Joliet | 604 | JT |
| IL | Naperville | 605 | NP |
| IL | Oak Park | 603 | OP |
| IL | Peoria | 616 | PL |
| IL | Rockford | 611 | RF |
| IL | Springfield | 627 | XL |
| IN | Bloomington | 474 | BQ |
| IN | Evansville | 477 | EV |
| IN | Fort Wayne | 468 | FY |
| IN | Gary | 464 | GY |
| IN | Hammond | 463 | HM |
| IN | Indianapolis | 462 | IN |
| IN | Lafayette | 479 | LF |
| IN | South Bend | 466 | SB |
| IN | Terre Haute | 478 | TH |
| KS | Kansas City | 661 | KA |
| KS | Overland Park | 662 | OV |
| KS | Shawnee Mission | 662 | SM |
| KS | Topeka | 666 | TP |
| KS | Wichita | 672 | WK |
| KY | Lexington | 405 | LX |
| KY | Louisville | 402 | LE |
| KY | Owensboro | 423 | OW |
| LA | Baton Rouge | 708 | BR |
| LA | Bossier City | 711 | BW |
| LA | Lafayette | 705 | LL |
| LA | Lake Charles | 706 | LC |
| LA | Metairie | 700 | MI |
| LA | Monroe | 712 | MB |
| LA | New Orleans | 701 | NO |
| LA | Shreveport | 711 | SH |
| MA | Boston | 021,022 | BO |
| MA | Cambridge | 021,022 | CB |
| MA | Fall River | 027 | FR |
| MA | Lowell | 018 | LM |
| MA | Lynn | 019 | LY |
| MA | New Bedford | 027 | ND |
| MA | Newton | 021 | NE |
| MA | Quincy | 021 | QU |
| MA | Springfield | 011 | XA |
| MA | Worcester | 016 | WE |
| MD | Baltimore | 212 | BA |
| MD | Cumberland | 215 | CK |
| MD | Gaithersburg | 208 | GG |
| MD | Silver Spring | 209 | SS |
| ME | Augusta | 043 | AA |
| ME | Lewiston | 042 | LT |
| ME | Portland | 041 | PT |
| MI | Dearborn | 481 | DB |
| MI | Detroit | 482 | DE |
| MI | East Lansing | 488 | ET |
| MI | Flint | 485 | FT |
| MI | Grand Rapids | 495 | GR |
| MI | Kalamazoo | 490 | KZ |
| MI | Lansing | 489 | LG |
| MI | Muskegon | 494 | MK |
| MI | Saginaw | 486 | SG |
| MI | Sterling Heights | 483 | YH |
| MI | Warren | 480 | WR |
| MN | Bloomington | 554 | BN |
| MN | Duluth | 557-558 | DL |
| MN | Minneapolis | 554 | MS |
| MN | St. Paul | 551 | SU |
| MO | Independence | 640 | IE |
| MO | Kansas City | 641 | KC |
| MO | Springfield | 658 | XO |
| MO | St. Joseph | 645 | XM |
| MO | St. Louis | 631 | SL |
| MS | Biloxi | 395 | BL |
| MS | Greenwood | 389 | GW |
| MS | Hattiesburg | 394 | HT |
| MS | Jackson | 392 | JN |
| MS | Meridian | 393 | MD |
| MT | Billings | 591 | IB |
| MT | Great Falls | 594 | GT |
| MT | Helena | 596 | HE |
| MT | Missoula | 59 | MM |
| NC | Asheville | 288 | AS |
| NC | Chapel Hill | 275 | CJ |
| NC | Charlotte | 282 | CE |
| NC | Durham | 277 | DU |
| NC | Fayetteville | 283 | FN |
| NC | Gastonia | 280 | GN |
| NC | Greensboro | 274 | GO |
| NC | High Point | 272 | HC |
| NC | Raleigh | 276 | RL |
| NC | Wilmington | 284 | WN |
| NC | Winston-Salem | 271 | WS |
| ND | Bismarck | 585 | BB |
| ND | Fargo | 581 | FA |
| NE | Lincoln | 685 | LN |
| NE | Omaha | 681 | OM |
| NH | Manchester | 031 | MR |
| NH | Nashua | 030 | NS |
| NH | Portsmouth | 038 | PS |
| NJ | Atlantic City | 084 | AC |
| NJ | Camden | 081 | CD |
| NJ | East Orange | 070 | EO |
| NJ | Elizabeth | 072 | EL |
| NJ | Hackensack | 076 | HS |
| NJ | Jersey City | 073 | JC |
| NJ | New Brunswick | 089 | NB |
| NJ | Newark | 071 | NK |
| NJ | Paterson | 075 | PN |
| NJ | Trenton | 086 | TR |
| NM | Albuquerque | 871 | AQ |
| NM | Las Cruses | 880 | LZ |
| NM | Santa Fe | 875 | YF |
| NV | Henderson | 890 | HF |
| NV | Las Vegas | 891 | LV |
| NV | North Las Vegas | 890 | NT |
| NV | Reno | 895 | RE |
| NY | Albany | 122 | AL |
| NY | Binghamton | 139 | BC |
| NY | Bronx | 104 | BX |
| NY | Brooklyn | 112 | BK |
| NY | Buffalo | 142 | BF |
| NY | Far Rockaway | 110,116 | BK |
| NY | Flushing | 113 | FG |
| NY | Jamaica | 114 | JA |
| NY | Jamestown | 147 | JM |
| NY | Long Island City | 111 | LI |
| NY | New York | 100-102 | NY |
| NY | Niagara Falls | 143 | NF |
| NY | Rochester | 146 | RC |
| NY | Schenectady | 123 | SK |
| NY | Staten Island | 103 | SI |
| NY | Syracuse | 132 | SY |
| NY | Utica | 135 | UT |
| NY | White Plains | 106 | WJ |
| NY | Yonkers | 107 | YK |
| OH | Akron | 443 | AK |
| OH | Canton | 447 | CA |
| OH | Cincinnati | 452 | CN |
| OH | Cleveland | 441 | CL |
| OH | Columbus | 432 | CO |
| OH | Dayton | 454 | DY |
| OH | Hamilton | 450 | HA |
| OH | Parma | 441 | PZ |
| OH | Springfield | 455 | XH |
| OH | Toledo | 436 | TO |
| OH | Warren | 444 | WO |
| OH | Youngstown | 445 | YO |
| OK | Norman | 730 | NR |
| OK | Oklahoma City | OC | 731 |
| OK | Tulsa | 741 | TS |
| OR | Eugene | 974 | EU |
| OR | Portland | 972 | PO |
| OR | Salem | 973 | XR |
| PA | Allentown | 181 | AW |
| PA | Bethlehem | 180 | BM |
| PA | Erie | 165 | ER |
| PA | Harrisburg | 171 | HG |
| PA | Johnstown | 159 | JO |
| PA | Lancaster | 176 | LP |
| PA | Philadelphia | 190-192 | PH |
| PA | Pittsburgh | 151-152 | PI |
| PA | Reading | 196 | RD |
| PA | Scranton | 185 | XC |
| PA | Wilkes-Barre | 187 | WR |
| PA | Williamsport | 177 | WM |
| PA | York | 173-174 | YR |
| PR | San Juan | 009 | XJ |
| RI | Cranston | 029 | RT |
| RI | Providence | 029 | PR |
| RI | Warwick | 028 | WW |
| SC | Anderson | 296 | AJ |
| SC | Charleston | 294 | CT |
| SC | Columbia | 292 | CU |
| SC | Florence | 295 | FE |
| SC | Greenville | 296 | GV |
| SC | Rock Hill | 297 | RH |
| SC | Spartanburg | 293 | SQ |
| SD | Aberdeen | 574 | AD |
| SD | Sioux Falls | 571 | IQ |
| TN | Chattanooga | 374 | CG |
| TN | Clarkesville | 370 | YN |
| TN | Johnson City | 376 | JH |
| TN | Kingsport | 376 | KP |
| TN | Knoxville | 379 | KN |
| TN | Memphis | 375,381 | ME |
| TN | Nashville | 372 | NA |
| TX | Abilene | 796 | AB |
| TX | Amarillo | 791 | AM |
| TX | Arlington | 760 | IA |
| TX | Austin | 733,787 | AU |
| TX | Beaumont | 777 | BT |
| TX | Brownsville | 785 | BJ |
| TX | Corpus Christi | 786,784 | CC |
| TX | Dallas | 752-753 | DA |
| TX | El Paso | 799 | EP |
| TX | Fort Worth | 761 | FW |
| TX | Galveston | 775 | GA |
| TX | Garland | 750 | GD |
| TX | Harlingen | 782 | HR |
| TX | Houston | 770-772 | HO |
| TX | Irving | 750 | IR |
| TX | Laredo | 780 | LD |
| TX | Lubbock | 794 | LU |
| TX | Port Arthur | 776 | PA |
| TX | San Antonio | 782 | SO |
| TX | Waco | 767 | WX |
| TX | Wichita Falls | 763 | WF |
| UT | Ogden | 844 | OG |
| UT | Provo | 846 | PV |
| UT | Salt Lake City | 841 | XU |
| UT | West Valley City | 841 | WC |
| VA | Alexandria | 223 | AX |
| VA | Arlington | 222 | AR |
| VA | Charlottesville | 229 | CV |
| VA | Chesapeake | 233 | CP |
| VA | Hampton | 236 | HP |
| VA | Newport News | 236 | NN |
| VA | Norfolk | 235 | NV |
| VA | Portsmouth | 237 | PM |
| VA | Richard | 231-232 | RI |
| VA | Roanoke | 240 | RO |
| VA | Virginia Beach | 234 | VB |
| VT | Burlington | 054 | BU |
| WA | Bellingham | 982 | BH |
| WA | Bremerton | 983 | BY |
| WA | Kennewick | 993 | KW |
| WA | Olympia | 985 | OL |
| WA | Seattle | 981 | SE |
| WA | Spokane | 992 | SW |
| WA | Tacoma | 983-984 | TC |
| WA | Vancouver | 986 | VA |
| WI | Green Bay | 543 | GB |
| WI | Janesville | 535 | JE |
| WI | Kenosha | 531 | KE |
| WI | Madison | 537 | MN |
| WI | Milwaukee | 532 | MW |
| WI | Oshkosh | 549 | OK |
| WI | Racine | 534 | RA |
| WI | Sheboygan | 530 | XB |
| WI | West Allis | 532 | WA |
| WV | Charleston | 253 | CW |
| WV | Huntington | 257 | HN |
| WV | Parkersburg | 261 | PK |
| WV | Wheeling | 260 | WH |
| WY | Casper | 826 | CZ |
| WY | Cheyenne | 820 | CY |
| ZIP | CITY | STATE |
|---|---|---|
| 75502 | Texarkana | AR |
| 45275 | Airport | KY |
| 71749 | Junction City | LA |
| 03801 | Naval Base | ME |
| 20331 | Andrews AFB | MD |
| 06390 | Fishers Island | NY |
| 73949 | Texhoma | TX |
| 20041 | Dulles Int'l Airport | VA |
| 20370 | Navy Annex | VA |
| 20301 | Pentagon | VA |
| 49936 | Alvin | WI |
Instructions for converting Schedule K-1
| Form 1041 Conversion Chart Line Title | 2004 Line Number | 2005 through 2016 Line Number | 2018 Line Number and Later |
|---|---|---|---|
| Beginning and Ending Tax Period | N/A | N/A | Beginning and Ending Tax Period |
| Ordinary Dividends | 2b | 2a | 2a |
| Other Portfolio Income | 5a | 5 | 5 |
| Net Rental Real Estate Income | 6a | 7 | 7 |
| Other Rental Income | 6a | 8 | 8 |
| Form 1065 Conversion Chart Line Title | 2004 through 2017 Line Number | 2018 through 2020 Line Number | 2021 through 2022 Line Number | 2023 and Later Line Number |
|---|---|---|---|---|
| Beginning and Ending Tax Period | N/A Started 2017 |
Beginning and Ending Tax Period | Beginning and Ending Tax Period | Beginning and Ending Tax Period |
| Guaranteed Payments | 4 | 4 | 4c | 4c |
| Interest Income | 5 | 5 | 5 | 5 |
| Ordinary Dividends | 6a | 6a | 6a | 6a |
| Dividend Equivalents | N/A | 6c | 6c | 6c |
| Royalties | 7 | 7 | 7 | 7 |
| Net Short-Term Capital Gain (Loss) | 8 | 8 | 8 | 8 |
| Net Long-Term Capital Gain (Loss) | 9a | 9a | 9a | 9a |
| NonRecourse Ending | N/A | N/A | Line K | Line K1 |
| Qualified NonRecourse Ending | N/A | N/A | Line K | Line K1 |
| Recourse Ending | N/A | N/A | Line K | Line K1 |
| Liabilities from Lower Tier.. | N/A | N/A | Line K | Line K2 |
| Liability is Subject to Guarantees or other.. | N/A | N/A | N/A | Line K3 |
| Schedule K-3 CHBX | N/A | N/A | 16 | 16 |
| At-Risk CHBX | N/A | 21 started 2019 |
21 | 22 |
| Passive Activity CHBX | N/A | 21 started 2019 |
22 | 23 |
| Form 1120-S Conversion Chart Line Title | 2004 through 2016 Line Number | 2017 through 2020 Line Number | 2021 and Later Line Number | 2024 and Later Line Number |
|---|---|---|---|---|
| Beginning and Ending Tax Period | N/A | Beginning and Ending Tax Period | Beginning and Ending Tax Period | Beginning and Ending Tax Period |
| Interest Income | 4 | 4 | 4 | 4 |
| Ordinary Dividends | 5a | 5a | 5a | 5a |
| Royalties | 6 | 6 | 6 | 6 |
| Net Short-Term Capital Gain/Loss | 7 | 7 | 7 | 8 |
| Net Long-Term Capital Gain/Loss | 8a | 8a | 8a | 8a |
| Section 179 Deduction | 11 | 11 | 11 | 11 |
| Schedule K-3 CHBX | N/A | N/A | 14 | 14 |
| Other Information | N/A | N/A | N/A | 17 |
| At Risk CHBX | N/A | 18 Started 2019 |
18 | 18 |
| Passive Activity CHBX | N/A | 19 Started 2019 |
19 | 19 |
| OE/DV Screen Prompt | Valid Characters |
|---|---|
| Payer/Payee First Name Line |
|
| Payer/Payee Second Name Line |
|
| Address Line |
|
| City Line | |
| State Line | |
| ZIP Code |
|
| Percentage Fields |
|
| Tax Year/Tax Period |
|
| Key Function | Key | Description |
|---|---|---|
| Delete characters in the field to right of the cursor position | <F2> | Deletes the characters in the current field to the right of the cursor position. |
| Delete all characters in the field and places the cursor at the beginning of the field | <F3> | Causes characters in a field to be deleted and places the cursor at the beginning of the field. (For dollar amount fields, the beginning of the field is on the right. For all other fields, the beginning of the field is on the left). |
| Move the Image Strip | <Ctrl><Shift> Arrow keys | Moves the image strip when it is not lined up and holds the position for the current image. |
| Clear the field | <Ctrl>-<F3> | Clears any field containing a "?" automatically. |
| Display the FI number | <CTRL>-<F4> | Displays the FI number assigned at scanning. |
| Display Image Strip relative to the area on the scanned image | <F5> | Moves the entry field so it appears in different places relative to the area on the scanned image. |
| Release document | <F6> | Releases a document and brings up the next document in the block or unit-of-work. A document can only be released if all necessary work is completed. |
| Display preceding document | <F7> | Allows operator to go back and review the previous document in the block or unit-of-work. |
| Release Block/Unit-of-Work | <F8> | Releases a block or unit-of-work. A block or unit-of-work can only be released if all necessary work is completed. |
| Interrupt or Suspend | <F9> | Allows operator to either interrupt or suspend the unit-of-work currently being worked. |
| Return to current document | <F10> | Returns to the current document after pressing <F7> or <Home> to go to a preceding document. |
|
|
Allows the operator to toggle a third window showing the current Parent Entity Information. |
| Display Magnified Image Strip | <Ctrl>-3 | Displays the Magnified Image Strip for the current field. An optional Parent Entity Information Window and Image Strip containing a zoomed version of the current field can be displayed above the Data Entry Template. When selected using the <Ctrl>-3 combination key, the Image Strip Window take priority over the Parent Entity Information Window, therefore; it is displayed on top, typically obscuring the bottom of the Parent Entity Information Window. |
| Toggle to activate highlighting of the image field | <Ctrl>-5 | Allows operator to disable and enable highlighting of image field as needed. |
| Rotate 180 degrees | <Ctrl>-6 | Rotates the image 180 degrees. |
| Return to previous menu | <Alt>-X | Returns to the previous menu. |
| AUTO On/Off (DV only) | <Ctrl>-A | Toggles the AUTO Mode on and off. When AUTO is:
|
| Move cursor right one character | → | Moves the cursor to the right one-character position from the current position. When this key is held down, the movement is repeated. |
| Delete document | <Ctrl>- <Shift>-<Delete> <Ctrl>-<Shift>- <Del> |
Deletes a document from a unit-of-work. |
| Move to previous field | <Ctrl>-<Tab> | Moves cursor to the preceding field. If the cursor is on the first field of a document, pressing this key combination causes the cursor to move to the first field of the preceding document. |
| Move cursor back one word | <Ctrl>-B | Places the cursor at the beginning of the previous word in current field. |
| Move cursor forward one word | <Ctrl>-F | Places the cursor at the beginning of the next word in current field. |
| Go to a requested document number (Review Function Only) | <Ctrl>-G | Opens a query window requesting the document number to which you want to go and allows you the selection of any document in that unit-of-work. |
| Post-To-Close | <Ctrl>-P | Notifies the system to stop work on the current function at the end of the current block or unit-of-work. When work is completed, the menu window of the function appears. |
| Move cursor to previous document | <Ctrl>-<F7> | Moves cursor to the last edited field or last flagged field, on the prior document in DV. In OE, places cursor in last field on previous document. |
| Reposition to bottom of template | <Ctrl>- ↓ | Moves the cursor to the first character in the last field that is enabled at the bottom of a template. |
| Reposition to top of template | <Ctrl>-↑ | Moves the cursor to the first character in the first field that is enabled at the top of a template. |
| Field Release | <Enter> (Main Keypad and Numeric Keypad) | Accepts the contents of the current field or allows the release of a field without entering any data. (Move to next field.) |
| Move data down | <Shift>-↓ | Allows data to be moved from Name Line 1 to Name Line 2 or from Name Line 2 to the Street Address field. |
| Move data up | <Shift>-↑ | Allows data to be moved from Name Line 2 to Name Line 1 or from the Street Address field to the Name Line 2 field. |
| Move cursor left one character | ← | Moves the cursor to the left one-character position from the current position. When this key is held down, the movement is repeated. |
| Delete characters at the current cursor position | <Delete> (Central Keypad) <Del> (Numeric Keypad) |
Deletes the character at the current cursor position. |
| Duplicate a previous field | <Ctrl>-D | Copies the data from the same field on the previous document. |
| Escape from a window | <Esc> | If a menu or window selection is made in error and the wrong window opens, press <Esc> to escape back to the previous menu or window. |
| Insert character(s) at current position | <Insert> (Central Keypad) <Ins> (Numeric Keypad) |
Inserts a character to the left of the current cursor position. Since this is a toggle key function, it must be turned off by pressing one of these keys again. |
| Num Lock On/Off (Toggle) |
<Num Lock> (Numeric Keypad) |
Turns the Main Keypad Numeric Mode on and off, including the embedded keypad. |
| Numeric On/Off | <Shift> (Main Keypad) | Can be toggled off and on so that
|
| Move to previous document | <Page Up> (Main Keypad) <Pg Up> (Numeric Keypad) |
Moves to previous section for all sections except the block header. |
| Move to next document | <Page Down> (Main Keypad) <Pg Dn> (Numeric Keypad) |
Moves to the next section for all sections except the last section entered. |
| Print Screen | <Print Scrn> | Prints the current screen display. |
| Move cursor to next field | • Down Arrow ↓ (Cent. Pad) • Down Arrow ↓ (Num. Pad) |
Moves cursor to next field when AUTO is off. When AUTO is on, the cursor moves to the next required field in the template. |
| Move cursor to preceding field | • Up arrow ↑ (Cent. Pad) • Up Arrow ↑ (Num. Pad) |
Moves cursor to the beginning of a preceding field. |
| Position cursor at the beginning of a field | • Home (Central Pad) • Home (Numeric Pad) • Left Arrow key (←) (Central Pad) • Left Arrow key (←) (Numeric Pad) |
Positions the cursor at the left most position in a field. (To use keys found in the Numeric keypad, the Num Lock must be off.) |
| Position cursor at end of field | • End (Central Pad) • End (Numeric Pad) • Right Arrow key (→) (Central Pad) • Right Arrow key (→) (Numeric Pad) |
When AUTO is on, position the cursor at the right most position in a field. (To use keys found in the Numeric keypad, the Num Lock must be off.) |
| Bypass money field | <Ctrl>-S | Allows the Data Entry Clerk in OE to bypass the money fields and go directly to the parent EIN. |
| Enlarge Image Strip | <Ctrl> -M | Enlarges the image strip that appears above the entry field. |
| Reduce Image Strip | <Ctrl> -L | Reduces the size of the image strip that appears above the entry field. (after pressing <Ctrl>-M to enlarge.) |
| Country Code | Country Name |
|---|---|
| AA | Aruba |
| AC | Antigua and Barbuda |
| AE | United Arab Emirates (Abu Dubai) |
| AF | Afghanistan |
| AG | Algeria |
| AJ | Azerbaijan |
| AL | Albania |
| AM | Armenia |
| AN | Andorra |
| AO | Angola |
| AR | Argentina |
| AS | Australia |
| AT | Ashmore and Cartier Islands |
| AU | Austria |
| AV | Anguilla |
| AX | Akrotiri Sovereign Base Area |
| AY | Antarctica |
| BA | Bahrain |
| BB | Barbados |
| BC | Botswana |
| BD | Bermuda |
| BE | Belgium |
| BF | The Bahamas (Eleuthera Island) |
| BG | Bangladesh |
| BH | Belize |
| BK | Bosnia and Herzegovina |
| BL | Bolivia |
| BM | Burma |
| BN | Benin (Dahomey) |
| BO | Belarus |
| BP | Solomon Islands |
| BQ | Navassa Island |
| BR | Brazil |
| BS | Bassas da India |
| BT | Bhutan |
| BU | Bulgaria |
| BV | Bouvet Island |
| BX | Brunei |
| BY | Burundi |
| CA | Canada |
| CB | Cambodia |
| CD | Chad |
| CE | Sri Lanka |
| CF | Republic of Congo (Brazzaville) |
| CG | Democratic Republic of Congo (Zaire) |
| CH | China |
| CI | Chile |
| CJ | Cayman Islands |
| CK | Cocos Island |
| CM | Cameroon |
| CN | Comoros |
| CO | Columbia |
| CR | Coral Sea Islands Territory |
| CS | Costa Rica |
| CT | Central African Republic |
| CU | Cuba |
| CV | Cape Verde |
| CW | Cook Islands |
| CY | Cyprus |
| DA | Denmark |
| DJ | Djibouti |
| DO | Dominica |
| DQ | Jarvis Island |
| DR | Dominican Republic |
| DX | Dhekelia Sovereign Base Area |
| EC | Ecuador |
| EG | Egypt |
| EI | Ireland |
| EK | Equatorial Guinea |
| EN | Estonia |
| ER | Eritrea |
| ES | El Salvador |
| ET | Ethiopia |
| EU | Europa Island |
| EZ | Czech Republic |
| FG | French Guiana |
| FI | Finland |
| FJ | Fiji |
| FK | Falkland Islands (Islas Malvinas) |
| FO | Faroe Islands |
| FP | French Polynesia (Tahiti) |
| FQ | Baker Island |
| FR | France (Corsica) |
| FS | French Southern and Antarctic Lands |
| GA | The Gambia |
| GB | Gabon |
| GG | Georgia |
| GH | Ghana |
| GI | Gibraltar |
| GJ | Grenada |
| GK | Guernsey |
| GL | Greenland |
| GM | Germany |
| GO | Glorioso Islands |
| GP | Guadeloupe |
| GR | Greece |
| GT | Guatemala |
| GV | Guinea |
| GY | Guyana |
| GZ | Gaza Strip |
| HA | Haiti |
| HK | Hong Kong |
| HM | Heard Island and McDonald Island |
| HO | Honduras |
| HQ | Howland Island |
| HR | Croatia |
| HU | Hungary |
| IC | Iceland |
| ID | Indonesia |
| IM | Isle of Man |
| IN | India |
| IO | British Indian Ocean Territory |
| IP | Clipperton Island |
| IR | Iran |
| IS | Israel |
| IT | Italy |
| IV | Cote D' Ivoire (Ivory Coast) |
| IZ | Iraq |
| JA | Japan (Ryukyu Islands) |
| JE | Jersey |
| JM | Jamaica |
| JN | Jan Mayen |
| JO | Jordan |
| JQ | Johnston Atoll |
| JU | Juan de Nova Island |
| KE | Kenya |
| KG | Kyrgyzstan |
| KN | North Korea |
| KQ | Kingman Reef |
| KR | Kiribati |
| KS | South Korea |
| KT | Christmas Island |
| KU | Kuwait |
| KV | Kosovo, Republic of |
| KZ | Kazakhstan |
| LA | Laos |
| LE | Lebanon |
| LG | Latvia |
| LH | Lithuania |
| LI | Liberia |
| LO | Slovakia |
| LQ | Palmyra Atoll |
| LS | Liechtenstein |
| LT | Lesotho |
| LU | Luxembourg |
| LY | Libya |
| MA | Madagascar (Malagasy Republic) |
| MB | Martinique |
| MC | Macau |
| MD | Moldova |
| MF | Mayotte |
| MG | Mongolia |
| MH | Montserrat |
| MI | Malawi |
| MJ | Montenegro |
| MK | Macedonia |
| ML | Mali |
| MN | Monaco |
| MO | Morocco |
| MP | Mauritius |
| MQ | Midway Islands |
| MR | Mauritania |
| MT | Malta |
| MU | Oman |
| MV | Maldives |
| MX | Mexico |
| MY | Malaysia (Sarawak) |
| MZ | Mozambique |
| NC | New Caledonia |
| NE | Niue |
| NF | Norfolk Island |
| NG | Niger |
| NH | Vanuatu |
| NI | Nigeria |
| NL | The Netherlands |
| NO | Norway |
| NP | Nepal |
| NR | Nauru |
| NS | Suriname |
| NT | Netherlands Antilles (Bonair) |
| NU | Nicaragua |
| NZ | New Zealand |
| PA | Paraguay |
| PC | Pitcairn Island |
| PE | Peru |
| PF | Paracel Islands |
| PG | Spratly Islands |
| PK | Pakistan |
| PL | Poland |
| PM | Panama |
| PO | Portugal |
| PP | Papua New Guinea |
| PU | Guinea-Bissau |
| QA | Qatar |
| RB | Serbia |
| RE | Réunion |
| RN | St Martin |
| RO | Romania |
| RP | Philippines |
| RQ | Puerto Rico |
| RS | Russia (Kurile Island) |
| RW | Rwanda |
| SA | Saudi Arabia |
| SB | St Pierre and Miquelon |
| SC | St Kitts and Nevis (St Christopher) |
| SE | Seychelles |
| SF | South Africa |
| SG | Senegal |
| SH | St Helena |
| SI | Slovenia |
| SL | Sierra Leone |
| SM | San Marino |
| SN | Singapore |
| SO | Somalia |
| SP | Spain (Balearic Islands) |
| ST | St Lucia |
| SU | Sudan |
| SV | Svalbard |
| SW | Sweden |
| SX | S Georgia Islands and S Sandwich Island |
| SY | Syria |
| SZ | Switzerland |
| TB | St Barthelemy |
| TD | Trinidad and Tobago |
| TE | Tromelin Island |
| TH | Thailand |
| TI | Tajikistan |
| TK | Turks and Caicos Islands |
| TL | Tokelau |
| TN | Tonga |
| TO | Togo |
| TP | Sao Tome and Principe |
| TS | Tunisia |
| TT | East Timor (Timor-Leste) |
| TU | Turkey |
| TV | Tuvalu |
| TW | Taiwan |
| TX | Turkmenistan |
| TZ | Tanzania |
| UG | Uganda |
| UK | United Kingdom (Great Britain) |
| UP | Ukraine |
| UV | Burkina Faso |
| UY | Uruguay |
| UZ | Uzbekistan |
| VC | St. Vincent and The Grenadines (Windward Island) |
| VE | Venezuela |
| VI | British Virgin Islands |
| VM | Vietnam |
| VT | Vatican City |
| WA | Namibia |
| WE | West Bank |
| WF | Wallis and Futuna |
| WI | Western Sahara |
| WQ | Wake Island |
| WS | Western Samoa |
| WZ | Swaziland |
| XA | Ascension |
| XC | Channel Islands |
| XE | England |
| XI | Aland Islands |
| XM | Myanmar |
| XN | Northern Ireland |
| XR | Slovak Republic |
| XS | Scotland |
| XT | Tristan Da Cunha |
| XW | Wales |
| XX | Country not identified, missing, or illegible |
| XY | Canary Islands |
| XZ | Azores |
| YI | Yugoslavia |
| YM | Yemen |
| ZA | Zambia |
| ZI | Zimbabwe |
| Country name | Code |
|---|---|
| Abu Dubai | AE |
| Afghanistan | AF |
| Akrotiri | AX |
| Aland Island | XI |
| Albania | AL |
| Algeria | AG |
| Andorra | AN |
| Angola | AO |
| Anguilla | AV |
| Antarctic Lands | FS |
| Antarctica | AY |
| Antigua and Barbuda | AC |
| Argentina | AR |
| Armenia | AM |
| Aruba | AA |
| Ascension Island | XA |
| Ashmore and Cartier Islands | AT |
| Australia | AS |
| Austria | AU |
| Azerbaijan | AJ |
| Azores | XZ |
| Bahamas (The) | BF |
| Bahrain | BA |
| Baker Island | FQ |
| Balearic Islands | SP |
| Bangladesh | BG |
| Barbados | BB |
| Barbuda | AC |
| Bassas da India | BS |
| Belarus | BO |
| Belgium | BE |
| Belize | BH |
| Benin (Dahomey) | BN |
| Bermuda | BD |
| Bhutan | BT |
| Bolivia | BL |
| Bonaire, Sint Eustatius and Saba | NT |
| Bosnia and Herzegovina | BK |
| Botswana | BC |
| Bouvet Island | BV |
| Brazzaville (Capital of Republic of Congo) | CF |
| Brazil | BR |
| British Indian Ocean Territory | IO |
| British Virgin Islands | VI |
| Brunei | BX |
| Bulgaria | BU |
| Burkina Faso | UV |
| Burma | BM |
| Burundi | BY |
| Caicos Islands | TK |
| Cambodia | CB |
| Cameroon | CM |
| Canada | CA |
| Canary Islands | XY |
| Cape Verde | CV |
| Cartier Island | AT |
| Cayman Islands | CJ |
| Central African Republic | CT |
| Chad | CD |
| Channel Islands | XC |
| Chile | CI |
| China, People's Republic of (Including Inner Mongolia, Tibet and Manchuria) | CH |
| Christmas Island | KT |
| Clipperton Island | IP |
| Cocos (Keeling) Islands | CK |
| Colombia | CO |
| Comoros | CN |
| Congo, Republic of (Brazzaville) | CF |
| Congo, Democratic Republic of (Kinshasa) (formerly Zaire) | CG |
| Cook Islands | CW |
| Coral Sea Islands | CR |
| Corsica | FR |
| Costa Rica | CS |
| Cote D′Ivoire (Ivory Coast) | IV |
| Croatia | HR |
| Cuba | CU |
| Curacao | CW |
| Cyprus | CY |
| Czech Republic | EZ |
| Dem. People's Rep. of Korea (North) | KN |
| Dem. Rep. of Congo (Kinshasa) (formerly Zaire) | CG |
| Dem. Rep. of Timor-Leste | TT |
| Denmark | DA |
| Dhekelia | DX |
| Djibouti | DJ |
| Dominica | DO |
| Dominican Republic | DR |
| Dubai | AE |
| East Timor | TT |
| Ecuador | EC |
| Egypt | EG |
| El Salvador | ES |
| Eleuthera Island | BF |
| England | XE |
| Equatorial Guinea | EK |
| Eritrea | ER |
| Estonia | EN |
| Ethiopia | ET |
| Europa Island | EU |
| Falkland Islands (Islas Malvinas) | FK |
| Faroe Islands | FO |
| Federated States of Micronesia | FM |
| Fiji | FJ |
| Finland | FI |
| France | FR |
| French Guiana | FG |
| French Polynesia | FP |
| French Southern and Antarctic Lands | FS |
| Futuna | WF |
| Gabon | GB |
| Gambia | GA |
| Gaza Strip | GZ |
| Georgia | GG |
| Germany | GM |
| Ghana | GH |
| Gibraltar | GI |
| Glorioso Islands | GO |
| Great Britain (United Kingdom) | UK |
| Greece | GR |
| Greenland | GL |
| Grenada | GJ |
| Grenadines | VC |
| Guadeloupe | GP |
| Guam | GQ |
| Guatemala | GT |
| Guernsey | GK |
| Guinea | GV |
| Guinea-Bissau | PU |
| Guyana | GY |
| Haiti | HA |
| Heard Island and McDonald Islands | HM |
| Holy See | VT |
| Honduras | HO |
| Hong Kong | HK |
| Howland Island | HQ |
| Hungary | HU |
| Iceland | IC |
| India | IN |
| Indonesia (Including Bali, Belitung, Flores, Java, Moluccas and Sumatra) | ID |
| Iran | IR |
| Iraq | IZ |
| Ireland, Republic of | EI |
| Isle of Man | IM |
| Israel | IS |
| Italy | IT |
| Jamaica | JM |
| Jan Mayen | JN |
| Japan | JA |
| Jarvis Island | DQ |
| Jersey | JE |
| Johnston Atoll | JQ |
| Jordan | JO |
| Juan de nova Island | JU |
| Kazakhstan | KZ |
| Kenya | KE |
| Kingman Reef | KQ |
| Kiribati | KR |
| Korea, Dem People's Republic of (North) | KN |
| Korea, Republic of (South) | KS |
| Kosovo, Republic of | KV |
| Kurile Islands | RS |
| Kuwait | KU |
| Kyrgyzstan | KG |
| Laos | LA |
| Latvia | LG |
| Lebanon | LE |
| Lesotho | LT |
| Liberia | LI |
| Libya | LY |
| Liechtenstein | LS |
| Lithuania | LH |
| Luxembourg | LU |
| Macao | MC |
| Macedonia (formerly Republic of Yugoslav) | MK |
| Madagascar (Malagasy Republic) | MA |
| Malawi | MI |
| Malaysia | MY |
| Maldives | MV |
| Mali | ML |
| Malta | MT |
| Marshall Islands | RM |
| Martinique | MB |
| Mauritania | MR |
| Mauritius | MP |
| Mayotte | MF |
| McDonald Island | HM |
| Mexico | MX |
| Micronesia, (Federated States of) | FM |
| Midway Islands | MQ |
| Miquelon | SB |
| Moldova | MD |
| Monaco | MN |
| Mongolia | MG |
| Montenegro | MJ |
| Montserrat | MH |
| Morocco | MO |
| Mozambique | MZ |
| Myanmar | XM |
| Namibia | WA |
| Nauru | NR |
| Navassa Island | BQ |
| Nepal | NP |
| Netherlands | NL |
| Netherlands Antilles | NT |
| Nevis | SC |
| New Caledonia | NC |
| New Zealand | NZ |
| Nicaragua | NU |
| Niger | NG |
| Nigeria | NI |
| Niue | NE |
| Norfolk Island | NF |
| North Korea | KN |
| Northern Grenadines | VC |
| Northern Ireland | XN |
| Northern Mariana Islands | CQ |
| Norway | NO |
| Oman | MU |
| Other Countries | OC |
| Pakistan | PK |
| Palmyra Atoll | LQ |
| Panama | PM |
| Papua New Guinea | PP |
| Paracel Islands | PF |
| Paraguay | PA |
| Peru | PE |
| Philippines | RP |
| Pitcairn Islands | PC |
| Poland | PL |
| Portugal | PO |
| Puerto Rico | RQ |
| Principe | TP |
| Qatar | QA |
| Redonda | VI |
| Republic of Korea (South) | KS |
| Republic of Singapore | SN |
| Réunion | RE |
| Romania | RO |
| Russia | RS |
| Rwanda | RW |
| Ryukyu Islands | JA |
| Samoa | WS |
| San Marino | SM |
| Sao Tome and Principe | TP |
| Sarawak | MY |
| Saudi Arabia | SA |
| Scotland | XS |
| Senegal | SG |
| Serbia | RB |
| Seychelles | SE |
| Sierra Leone | SL |
| Singapore | SN |
| Slovak Republic | XR |
| Slovakia | LO |
| Slovenia | SI |
| Solomon Islands | BP |
| Somalia | SO |
| South Africa | SF |
| South Georgia and the South Sandwich Islands | SX |
| South Sudan | OD |
| South Korea | KS |
| South Sandwich Island | SX |
| Spain | SP |
| Spratly Islands | PG |
| Sri Lanka | CE |
| St Barthelemy | TB |
| St Christopher | SC |
| St Helena | SH |
| St Kitts and Nevis (Includes St. Christopher) | SC |
| St Lucia | ST |
| St. Martin | RN |
| St Miquelon | SB |
| St Pierre and Miquelon | SB |
| St Vincent and The Grenadines (Northern Grenadines) | VC |
| Sudan | SU |
| Suriname | NS |
| Svalbard | SV |
| Swaziland | WZ |
| Sweden | SW |
| Switzerland | SZ |
| Syria | SY |
| Tahiti (French Polynesia) | FP |
| Taiwan | TW |
| Tajikistan | TI |
| Tanzania, United Republic of | TZ |
| Thailand | TH |
| The Bahamas | BF |
| The Gambia | GA |
| The Netherlands | NL |
| Timor, East | TT |
| Timor-Leste | TT |
| Togo | TO |
| Tokelau | TL |
| Tonga | TN |
| Tortola | VI |
| Trinidad and Tobago | TD |
| Tristan Da Cunha | XT |
| Tromelin Island | TE |
| Tunisia | TS |
| Turkey | TU |
| Turkmenistan | TX |
| Turks and Caicos Islands | TK |
| Tuvalu | TV |
| Uganda | UG |
| Ukraine | UP |
| United Arab Emirates | AE |
| United Kingdom (England, Northern Ireland, Scotland, and Wales) | UK |
| Uruguay | UY |
| Uzbekistan | UZ |
| Vanuatu | NH |
| Vatican City | VT |
| Venezuela | VE |
| Vietnam | VM |
| Virgin Islands, British | VI |
| Wake Island | WQ |
| Wales | XW |
| Wallis and Futuna | WF |
| West Bank | WE |
| Western Sahara | WI |
| Western Samoa | WS |
| Windward Island | VC |
| Yemen | YM |
| Yugoslavia | YI |
| Zaire (Democratic Republic of Congo) | CG |
| Zambia | ZA |
| Zimbabwe | ZI |
| Abbreviation | Province/State/Territory | Country |
|---|---|---|
| AB | Alberta | Canada |
| AC | Acre | Brazil |
| ACT | Australian Capital Territory | Australia |
| AG | Agrigento | Italy |
| AGS | Aguascalientes | Mexico |
| AL | Alagoas | Brazil |
| AL | Alessandria | Italy |
| AM | Amazonas | Brazil |
| AN | Ancona | Italy |
| AO | Aosta/Aoste | Italy |
| AP | Amapa | Brazil |
| AP | Ascoli Piceno | Italy |
| AQ | L’Aquila | Italy |
| AR | Arezzo | Italy |
| AT | Asti | Italy |
| BA | Bahia | Brazil |
| BA | Bari | Italy |
| BC | British Columbia | Canada |
| BCN | Baja California Norte | Mexico |
| BCS | Baja California Sur | Mexico |
| BG | Bergamo | Italy |
| BI | Biella | Italy |
| BL | Belluno | Italy |
| BN | Beneveto | Italy |
| BO | Bologna | Italy |
| BR | Brindisi | Italy |
| BS | Brescia | Italy |
| BZ | Bolozano Bolzen | Italy |
| CA | Ciego de Avila | Cuba |
| CA | Cagliari | Italy |
| CAM | Campeche | Mexico |
| CB | Campobasso | Italy |
| CE | Ceara | Brazil |
| CE | Caserta | Italy |
| CF | Cienfuegos | Cuba |
| CG | Camaguey | Cuba |
| CH | Ciudad de La Habana | Cuba |
| CH | Chieti | Italy |
| CHIH | Chihuahua | Mexico |
| CHIS | Chiapas | Mexico |
| CL | Caltanissetta | Italy |
| CN | Cuneo | Italy |
| CO | Como | Italy |
| COAH | Coahuila | Mexico |
| COL | Colima | Mexico |
| CS | Cosenza | Italy |
| CT | Catania | Italy |
| CZ | Catanzaro | Italy |
| CZ | Cremona | Italy |
| DF | Distrito Federal | Brazil |
| DF | Distrito Federal | Mexico |
| DGO | Durango | Mexico |
| DR | Drenthe | The Netherlands |
| EN | Enna | Italy |
| ES | Espirito Santo | Brazil |
| FE | Ferrara | Italy |
| FG | Foggia | Italy |
| FI | Firenze or Florence | Italy |
| FLD | Flevoland | The Netherlands |
| FO | Forli | Italy |
| FR | Frosinone | Italy |
| FR | Friesland | The Netherlands |
| GE | Genoa | Italy |
| GLD | Gelderland | The Netherlands |
| GN | Groningen | The Netherlands |
| GO | Goias | Brazil |
| GO | Gorizia | Italy |
| GR | Granma (Bayamo) | Cuba |
| GR | Grosseto | Italy |
| GRO | Guerrero | Mexico |
| GT | Guantanamo | Cuba |
| GTO | Guanajuato | Mexico |
| HA | La Habana | Cuba |
| HGO | Hidalgo | Mexico |
| HO | Holguin | Cuba |
| IJ | Municipio Especial Isla de la Juventud | Cuba |
| IM | Imperia | Italy |
| IS | Isernia | Italy |
| JAL | Jalisco | Mexico |
| KR | Crotone | Italy |
| LB | Limburg | The Netherlands |
| LE | Lecce | Italy |
| LI | Livorno | Italy |
| LO | Lodi | Italy |
| LT | (Victoria de) Las Tunas | Cuba |
| LT | Latina | Italy |
| LU | Lucca | Italy |
| MA | Maranhao | Brazil |
| MB | Manitoba | Canada |
| MC | Macerata | Italy |
| ME | Messina | Italy |
| MEX | Mexico | Mexico |
| MG | Minas Gerais | Brazil |
| MI | Milan | Italy |
| MICH | Michoacan | Mexico |
| MN | Mantua | Italy |
| MO | Modena | Italy |
| MOR | Morelos | Mexico |
| MS | Mato Grosso do Sul | Brazil |
| MS | Massa-Carrara | Italy |
| MT | Mato Grosso | Brazil |
| MT | Matanzas | Cuba |
| MT | Matera | Italy |
| NA | Naples | Italy |
| NAY | Nayarit | Mexico |
| NB | New Brunswick | Canada |
| NB | North Brabant | The Netherlands |
| NH | North Holland | The Netherlands |
| NL | Newfoundland and Labrador | Canada |
| NL | Nuevo Leon | Mexico |
| NO | Novara | Italy |
| NS | Nova Scotia | Canada |
| NSW | New South Wales | Australia |
| NT | Northern Territory | Australia |
| NT | Northwest Territories | Canada |
| NU | Nunavut | Canada |
| NU | Nuoro | Italy |
| OAX | Oaxaca | Mexico |
| ON | Ontario | Canada |
| OR | Oristano | Italy |
| OV | Overijssel | The Netherlands |
| PA | Para | Brazil |
| PA | Palermo | Italy |
| PB | Paraiba | Brazil |
| PC | Piacenza | Italy |
| PD | Padua | Italy |
| PE | Pernambuco | Brazil |
| PE | Prince Edward Island | Canada |
| PE | Pescara | Italy |
| PG | Perugia | Italy |
| PI | Piaui | Brazil |
| PI | Pisa | Italy |
| PN | Pordenone | Italy |
| PO | Prato | Italy |
| PR | Parana | Brazil |
| PR | Pinar del Rio | Cuba |
| PR | Parma | Italy |
| PS | Pesaro-Urbino | Italy |
| PT | Pistoia | Italy |
| PUE | Puebla | Mexico |
| PV | Pavia | Italy |
| PZ | Potenza | Italy |
| QC | Quebec | Canada |
| QLD | Queensland | Australia |
| QRO | Queretaro | Mexico |
| QROO | Quintana Roo | Mexico |
| RA | Ravenna | Italy |
| RC | Reggio de Calabria | Italy |
| RE | Reggio nell’Emilia | Italy |
| RG | Ragusa | Italy |
| RI | Rieti | Italy |
| RJ | Rio de Janeiro | Brazil |
| RM | Rome | Italy |
| RN | Rio Grande do Norte | Brazil |
| RN | Rimini | Italy |
| RO | Rondonia | Brazil |
| RO | Rovigo | Italy |
| RR | Roraima | Brazil |
| RS | Rio Grande do Sul | Brazil |
| SA | South Australia | Australia |
| SA | Salerno | Italy |
| SC | Santa Catarina | Brazil |
| SC | Santiago de Cuba | Cuba |
| SE | Sergipe | Brazil |
| SI | Siena | Italy |
| SIN | Sinaloa | Mexico |
| SK | Saskatchewan | Canada |
| SLD | Zeeland | The Netherlands |
| SLP | San Luis Potosi | Mexico |
| SO | Sondrio | Italy |
| SON | Sonora | Mexico |
| SP | Sao Paulo | Brazil |
| SP | La Spezia | Italy |
| SR | Siracusa | Italy |
| SS | Sancti Spiritus | Cuba |
| SS | Sassari | Italy |
| SV | Savona | Italy |
| TA | Taranto | Italy |
| TAB | Tabasco | Mexico |
| TAMPS | Tamaulipas | Mexico |
| TAS | Tasmania | Australia |
| TE | Teramo | Italy |
| TLAX | Tlaxcala | Mexico |
| TN | Trento | Italy |
| TO | Tocantins | Brazil |
| TO | Torino | Italy |
| TO | Trapani | Italy |
| TR | Terni | Italy |
| TS | Trieste | Italy |
| TV | Treviso | Italy |
| UD | Udine | Italy |
| UT | Utrecht | The Netherlands |
| VA | Varese | Italy |
| VB | Verbania | Italy |
| VC | Villa Clara | Cuba |
| VC | Vercelli | Italy |
| VE | Venezia | Italy |
| VER | Veracruz | Mexico |
| VI | Vicenza | Italy |
| VIC | Victoria | Australia |
| VR | Verona | Italy |
| VT | Viterbo | Italy |
| VV | Vibo Valentia | Italy |
| WA | Western Australia | Australia |
| YT | Yukon | Canada |
| YUC | Yucatan | Mexico |
| ZAC | Zacatecas | Mexico |
| ZH | South Holland | The Netherlands |
| Australia State | Abbreviation |
|---|---|
| Australian Capital Territory | ACT |
| New South Wales | NSW |
| Northern Territory | NT |
| Queensland | QLD |
| South Australia | SA |
| Tasmania | TAS |
| Victoria | VIC |
| Western Australia | WA |
| Brazil State | Abbreviation |
| Acre | AC |
| Alagoas | AL |
| Amapa | AP |
| Amazonas | AM |
| Bahia | BA |
| Ceara | CE |
| Distrito Federal | DF |
| Espirito Santo | ES |
| Goias | GO |
| Maranhao | MA |
| Mato Grosso | MT |
| Mato Grosso do Sul | MS |
| Minas Gerais | MG |
| Para | PA |
| Paraiba | PB |
| Parana | PR |
| Pernambuco | PE |
| Piaui | PI |
| Rio de Janeiro | RJ |
| Rio Grande do Norte | RN |
| Rio Grande do Sul | RS |
| Rondonia | RO |
| Roraima | RR |
| Santa Catarina | SC |
| Sao Paulo | SP |
| Sergipe | SE |
| Tocantins | TO |
| Canada Province/Territory | Abbreviation |
| Alberta | AB |
| British Columbia | BC |
| Manitoba | MB |
| New Brunswick | NB |
| Newfoundland and Labrador | NL |
| Northwest Territories | NT |
| Nova Scotia | NS |
| Nunavut | NU |
| Ontario | ON |
| Prince Edward Island | PE |
| Quebec | QC |
| Saskatchewan | SK |
| Yukon | YT |
| Cuba Provincias | Abbreviation |
| Camaguey | CG |
| Ciego de Avila | CA |
| Cienfuegos | CF |
| Ciudad de La Habana | CH |
| Granma (Bayamo) | GR |
| Guantanamo | GT |
| Holguin | HO |
| La Habana | HA |
| Matanzas | MT |
| Municipio Especial Isla de lLa Juventud | IJ |
| Pinar del Rio | PR |
| Sancti Spiritus | SS |
| Santiago de Cuba | SC |
| (Victoria de) Las Tunas | LT |
| Villa Clara | VC |
| Italy Provincia | Abbreviation |
| Agrigento | AG |
| Alessandria | AL |
| Ancona | AN |
| Aosta/Aoste | AO |
| Arezzo | AR |
| Ascoli Piceno | AP |
| Asti | AT |
| Bari | BA |
| Belluno | BL |
| Benevento | BN |
| Bergamo | BG |
| Biella | BI |
| Bologna | BO |
| Bolozano Bolzen | BZ |
| Brescia | BS |
| Brindisi | BR |
| Cagliari | CA |
| Caltanissetta | CL |
| Campobasso | CB |
| Caserta | CE |
| Catania | CT |
| Catanzaro | CZ |
| Chieti | CH |
| Como | CO |
| Cosenza | CS |
| Cremona | CZ |
| Crotone | KR |
| Cuneo | CN |
| Enna | EN |
| Ferrara | FE |
| Firenze or Florence | FI |
| Foggia | FG |
| Forli-Cesena | FO |
| Frosinone | FR |
| Genoa | GE |
| Gorizia | GO |
| Grosseto | GR |
| Imperia | IM |
| Isernia | IS |
| La Spezia | SP |
| L’Aquila | AQ |
| Latina | LT |
| Lecce | LE |
| Livorno | LI |
| Lodi | LO |
| Lucca | LU |
| Macerata | MC |
| Mantua | MN |
| Massa-Carrara | MS |
| Matera | MT |
| Messina | ME |
| Milan | MI |
| Modena | MO |
| Naples | NA |
| Novara | NO |
| Nuoro | NU |
| Oristano | OR |
| Padua | PD |
| Palermo | PA |
| Parma | PR |
| Pavia | PV |
| Perugia | PG |
| Pesaro-Urbino | PS |
| Pescara | PE |
| Piacenza | PC |
| Pisa | PI |
| Pistoia | PT |
| Pordenone | PN |
| Potenza | PZ |
| Prato | PO |
| Ragusa | RG |
| Ravenna | RA |
| Reggio de Calabria | RC |
| Reggio nell’Emilia | RE |
| Rieti | RI |
| Rimini | RN |
| Rome | RM |
| Rovigo | RO |
| Salerno | SA |
| Sassari | SS |
| Savona | SV |
| Siena | SI |
| Siracusa | SR |
| Sondrio | SO |
| Taranto | TA |
| Teramo | TE |
| Terni | TR |
| Torino | TO |
| Trapani | TO |
| Trento | TN |
| Treviso | TV |
| Trieste | TS |
| Udine | UD |
| Varese | VA |
| Venezia | VE |
| Verbania | VB |
| Vercelli | VC |
| Verona | VR |
| Vibo Valentia | VV |
| Vicenza | VI |
| Viterbo | VT |
| Mexico State | Abbreviation |
| Aguascalientes | AGS |
| Baja California Norte | BCN |
| Baja California Sur | BCS |
| Campeche | CAM |
| Chiapas | CHIS |
| Chihuahua | CHIH |
| Coahuila | COAH |
| Colima | COL |
| Distrito Federal | DF |
| Durango | DGO |
| Guanajuato | GTO |
| Guerrero | GRO |
| Hidalgo | HGO |
| Jalisco | JAL |
| Mexico | MEX |
| Michoacán | MICH |
| Morelos | MOR |
| Nayarit | NAY |
| Nuevo Leon | NL |
| Oaxaca | OAX |
| Puebla | PUE |
| Queretaro | QRO |
| Quintana Roo | QROO |
| San Luis Potosí | SLP |
| Sinaloa | SIN |
| Sonora | SON |
| Tabasco | TAB |
| Tamaulipas | TAMPS |
| Tlaxcala | TLAX |
| Veracruz | VER |
| Yucatán | YUC |
| Zacatecas | ZAC |
| The Netherlands Province | Abbreviation |
| Drenthe | DR |
| Flevoland | FLD |
| Friesland | FR |
| Gelderland | GLD |
| Groningen | GN |
| Limburg | LI |
| North Brabant | NB |
| North Holland | NH |
| Overijssel | OV |
| South Holland | ZH |
| Utrecht | UT |
| Zeeland | ZE |
| American Samoa (AS)Cites | ZIP Code | Federated States of Micronesia (FM) Cities | Zip Code |
|---|---|---|---|
| Faga'itua | 96799 | Chuuk | 96942 |
| Leone | 96799 | Kosrae | 96944 |
| Olosega Manua' | 96799 | Pohnpei | 96941 |
| Pago Pago | 96799 | Yap | 96943 |
| Marshall Islands (MH) Cities | ZIP Code | Palau (PW) Cities | ZIP Code |
|---|---|---|---|
| Ebeye | 96970 | Koror | 96940 |
| Majuro | 96960 | Palau | 96940 |
| Guam (GU) Cities | ZIP Code | Northern Mariana Islands (MP) Cities | ZIP Code |
|---|---|---|---|
| Agana | 96910 | Capitol Hill | 96950 |
| Inarajan | 96917 | Rota | 96951 |
| Merizo | 96916 | Saipan | 96950 |
| Tamuning | 96931 | Tinian | 96952 |
| Umatac | 96915 | ||
| Yona | 96915 |
| Virgin Islands (VI) Cities | ZIP Code | Virgin Islands (VI) Cities | ZIP Code |
|---|---|---|---|
| Charlotte Amalie | 00802 | Christiansted | 00820 |
| Cruz Bay | 00830 | Downtown | 00840 |
| Frederiksted | 00840 | Kingshill | 00850 |
| Saint Croix | 00820 | Saint John | 00830 |
| Saint Thomas | 00805 | Sunny Isle | 00850 |
| Veterans Annex | 00820 |
| Puerto Rico (PR) Cities | ZIP Code | Puerto Rico (PR) Cities | ZIP Code |
|---|---|---|---|
| Adjuntas | 00601 | La Plata | 00786 |
| Aguada | 00602 | Lares | 00669 |
| Aguadilla | 00603 | Las Marias | 00670 |
| Aguas Buenas | 00703 | Las Piedras | 00771 |
| Aguirre | 00704 | Levittown | 00949 |
| Aibonito | 00705 | Loiza | 00772 |
| Anasco | 00610 | Loiza Street Station | 00936 |
| Angeles | 00611 | Luquillo | 00773 |
| Arecibo | 00612 | Manati | 00674 |
| Arroyo | 00714 | Maricao | 00606 |
| Bajadero | 00616 | Maunabo | 00707 |
| Barceloneta | 00617 | Mayaquez | 00680 |
| Barraquitas | 00794 | Mercedita | 00715 |
| Barrio Obrero Station | 00935 | Minillas Center | 00936 |
| Bayamon | 00956 | Moca | 00676 |
| Boqueron | 00622 | Morovis | 00687 |
| Cabo Rojo | 00623 | Naguabo | 00718 |
| Caguas | 00725 | Naranjito | 00719 |
| Camuy | 00627 | Orocovis | 00720 |
| Canovanas | 00729 | Palmer | 00721 |
| Caparra Heights | 00920 | Patillas | 00723 |
| Carolina | 00982 | Penuelas | 00624 |
| Catano | 00962 | Ponce | 00731 |
| Cayey | 00736 | Puerta de Tierra | 00936 |
| Ceiba | 00735 | Puerta Real | 00740 |
| Cerro Gordo | 00754 | Punta Santiago | 00741 |
| Ciales | 00638 | Quebradillas | 00678 |
| Cidra | 00739 | Ramey | 00603 |
| Coamo | 00769 | Rincon | 00677 |
| Comerio | 00782 | Rio Blanco | 00744 |
| Condado | 00907 | Rio Grande | 00721 |
| Corozal | 00783 | Rio Piedras | 00927 |
| Coto Laurel | 00780 | Rosario | 00636 |
| Culebra | 00775 | Sabana Grande | 00637 |
| Dorado | 00646 | Sabana Hoyos | 00688 |
| Ensenada | 00647 | Sabana Seca | 00952 |
| Esperanza | 00765 | Saint Just | 00978 |
| Fajardo | 00738 | Salinas | 00751 |
| Fernandez Juncos | 00936 | San Antonio | 00690 |
| Florida | 00650 | San Francisco | 00927 |
| Fort Buchanan | 00934 | San German | 00683 |
| Garrachales | 00652 | San Juan | 00936 |
| Guanica | 00653 | San Lorenzo | 00754 |
| Guayama | 00784 | San Sebastian | 00685 |
| Guayanilla | 00656 | Santa Isabel | 00757 |
| Guaynabo | 00965 | Santrurce | 00936 |
| Gurabo | 00778 | Toa Alta | 00953 |
| Hatillo | 00659 | Toa Baja | 00949 |
| Hato Rey | 00936 | Trujillo Alto | 00976 |
| Hormigueros | 00660 | University | 00936 |
| Humacao | 00791 | Utuado | 00641 |
| Isabela | 00662 | Vega Alta | 00692 |
| Jayuya | 00664 | Vega Baja (Box 1-9049) | 00694 |
| Juana Diaz | 00795 | Vieques | 00765 |
| Juncos | 00777 | Villalba | 00766 |
| La Cumbre | 00926 | Yabucoa | 00767 |
| Lajas | 00667 | Yauco | 00698 |