)
or https:// means you've safely connected to the .gov website. Share sensitive information only on official, secure websites.
)
or https:// means you've safely connected to the .gov website. Share sensitive information only on official, secure websites.
- 3.8.44 Campus Deposit Activity
- 3.8.44.1 Program Scope and Objectives
- 3.8.44.1.1 Background
- 3.8.44.1.2 Authority
- 3.8.44.1.3 Roles and Responsibilities
- 3.8.44.1.4 Program Management and Review
- 3.8.44.1.5 Program Controls
- 3.8.44.1.6 Terms/Definitions/Acronyms
- 3.8.44.1.7 Related Resources
- 3.8.44.2 Introduction
- 3.8.44.2.1 Cash Management Responsibilities
- 3.8.44.2.2 Managerial Responsibilities (Product Review of Final Deposit)
- 3.8.44.2.3 Managerial Responsibilities (Integrated Submission and Remittance Processing (ISRP) Deposit End of Day (EOD) Processing Guidelines When Working Outside the Scope of a Normal Workday)
- 3.8.44.2.4 Managerial Responsibilities (Peak Processing Extended Hardware Maintenance Shift Cancellation Procedures)
- 3.8.44.2.5 Managerial Responsibilities (Deposit BancTec Scanners Operation Hardware and Software Problems)
- 3.8.44.2.6 Security Responsibilities
- 3.8.44.2.7 Reporting Responsibilities
- 3.8.44.2.8 Weekday/Weekend Reporting
- 3.8.44.2.9 Holiday Reporting
- 3.8.44.2.10 Losses and Shortages
- 3.8.44.2.11 Depository Bank
- 3.8.44.2.12 Courier Service
- 3.8.44.2.13 Deposit Items Not Processed Through Integrated Submission and Remittance Processing (ISRP)
- 3.8.44.3 Business Entitlement Access Request System (BEARS) Sub-Applications and Special Instructions Field for Access Requests to 2018 Win10 DS Domain Workstations and Transaction Management System (TMS) Track Users-ISRP Domain
- 3.8.44.4 Deposit Procedures (General)
- 3.8.44.5 Remittance Processing System (RPS)
- 3.8.44.6 General Payment Perfection/Manual Processing Procedures
- 3.8.44.6.1 General Remittance Information
- 3.8.44.6.2 Remittance Not Payable to United States Treasury
- 3.8.44.6.3 Handling Special Remittances
- 3.8.44.6.4 Questionable Payments
- 3.8.44.6.5 Source Document General Information
- 3.8.44.7 Scanner Preventive Maintenance
- 3.8.44.7.1 Tools and Materials
- 3.8.44.7.2 Preparing the BancTec Scanner for Cleaning
- 3.8.44.7.3 Cleaning the Auto Feeder, Aligner Module, Keyboard and Monitor, Reader Module, Control Point Module, Image Module, Ink Jet Printer, and Stacker Modules.
- 3.8.44.7.3.1 Auto Feeder
- 3.8.44.7.3.2 Aligner Module
- 3.8.44.7.3.3 Keyboard and Monitor
- 3.8.44.7.3.4 Reader Module
- 3.8.44.7.3.5 Control Point Module
- 3.8.44.7.3.6 Image Module
- 3.8.44.7.3.7 Ink Jet Printer
- 3.8.44.7.3.8 Stacker Modules
- 3.8.44.8 BancTec Scanner Operation
- 3.8.44.9 Remittance Verification Operation
- 3.8.44.9.1 Free/Missing Entry
- 3.8.44.9.2 Scan Line Fix
- 3.8.44.9.3 Stub Amount Entry
- 3.8.44.9.4 Check Amount Entry
- 3.8.44.9.5 Balancing Function
- 3.8.44.9.6 Suspense Balancing
- 3.8.44.10 Electronic Check Processing through OTCnet
- 3.8.44.10.1 OTCnet Access
- 3.8.44.10.2 OTCnet Training
- 3.8.44.10.3 Making an Electronic Deposit Through OTCnet
- 3.8.44.10.4 Balancing the Remittance Processing System (RPS) Deposit
- 3.8.44.10.5 Balancing the Remittance Transaction Research (RTR) System by Deposit Date
- 3.8.44.10.6 OTCnet Failed Items
- 3.8.44.10.7 Reports
- 3.8.44.10.8 Deposit Batch Header Tickets
- 3.8.44.11 Electronic Check Presentment (ECP) Check Retention and Destruction
- 3.8.44.11.1 Storage of Electronic Check Presentment (ECP) Payment Documents
- 3.8.44.11.1.1 Tracking of Keys to Locked Storage Cabinets
- 3.8.44.11.1.2 Campus Deposit Retention/Destruction Tracking Log
- 3.8.44.11.2 Destruction of Electronic Check Processing (ECP) Payment Documents
- 3.8.44.11.3 Pulling Stored Checks for Accounting
- 3.8.44.11.1 Storage of Electronic Check Presentment (ECP) Payment Documents
- 3.8.44.12 Definition of Terms
- Exhibit 3.8.44-1 Bogus Check
- Exhibit 3.8.44-2 Date Stamp Requirements
- Exhibit 3.8.44-3 Timely Postmarks
- Exhibit 3.8.44-4 Individual Master File (IMF) Name Control Job Aid
- Exhibit 3.8.44-5 Business Master File (BMF) Name Control Job Aid
- Exhibit 3.8.44-6 IDRS Printout and Envelope Used as a Source Document
- Exhibit 3.8.44-7 Agency Location Codes (ALC)
- Exhibit 3.8.44-8 Use of Taxpayer Correspondence as a Source Document
- Exhibit 3.8.44-9 Campus Generated Letter Used as a Source Document
- Exhibit 3.8.44-10 CP 2000 with Tear-Off Stub
- Exhibit 3.8.44-11 Form 3244 with Multiple Remittance
- Exhibit 3.8.44-12 Split Remittance
- Exhibit 3.8.44-13 Split/Multiple Remittance
- Exhibit 3.8.44-14 Document Locator Number (DLN) Components
- Exhibit 3.8.44-15 Automated Collection System (ACS) Printout and Envelope Used as a Source Document
- Exhibit 3.8.44-16 Form 3244, Payment Voucher, Designated Payment Code Present (Top) and Not Present (Bottom)
- Exhibit 3.8.44-17 Form 4907, Designated Payment Code Present (Top) and Not Present (Bottom)
- Exhibit 3.8.44-18 File Location Codes
- Exhibit 3.8.44-19 Pre-batch/Clerical Preparation of Form 1332–C, Block and Selection Record
- Exhibit 3.8.44-20 Master File Tax (MFT) Codes Combined for Batching
- Exhibit 3.8.44-21 Pre-batch/Clerical Preparation of Form 9382, Batch Transmittal
- Exhibit 3.8.44-22 Remittance Processing System (RPS)/Magnetic-Ink Character Recognition (MICR) Encoding
- Exhibit 3.8.44-23 Scan Line Verification
- Exhibit 3.8.44-24 Check Endorsement and Audit Trail
- Exhibit 3.8.44-25 Special Account Funds Table
- Exhibit 3.8.44-26 Program Codes for the Remittance Processing System (RPS)
- Exhibit 3.8.44-27 Master File/Non-Master File Form/Program Processing Table
- Exhibit 3.8.44-28 Deposit Summary Report
- Exhibit 3.8.44-29 RRPS Master File Remittance Recap Report
- Exhibit 3.8.44-30 RRPS Refund Repayment Remittance Recap Report
- Exhibit 3.8.44-31 RRPS Deposit Fund Remittance Recap Report
- Exhibit 3.8.44-32 RRPS General Fund Remittance Recap Report
- Exhibit 3.8.44-33 RRPS Non-Master File Remittance Recap Report
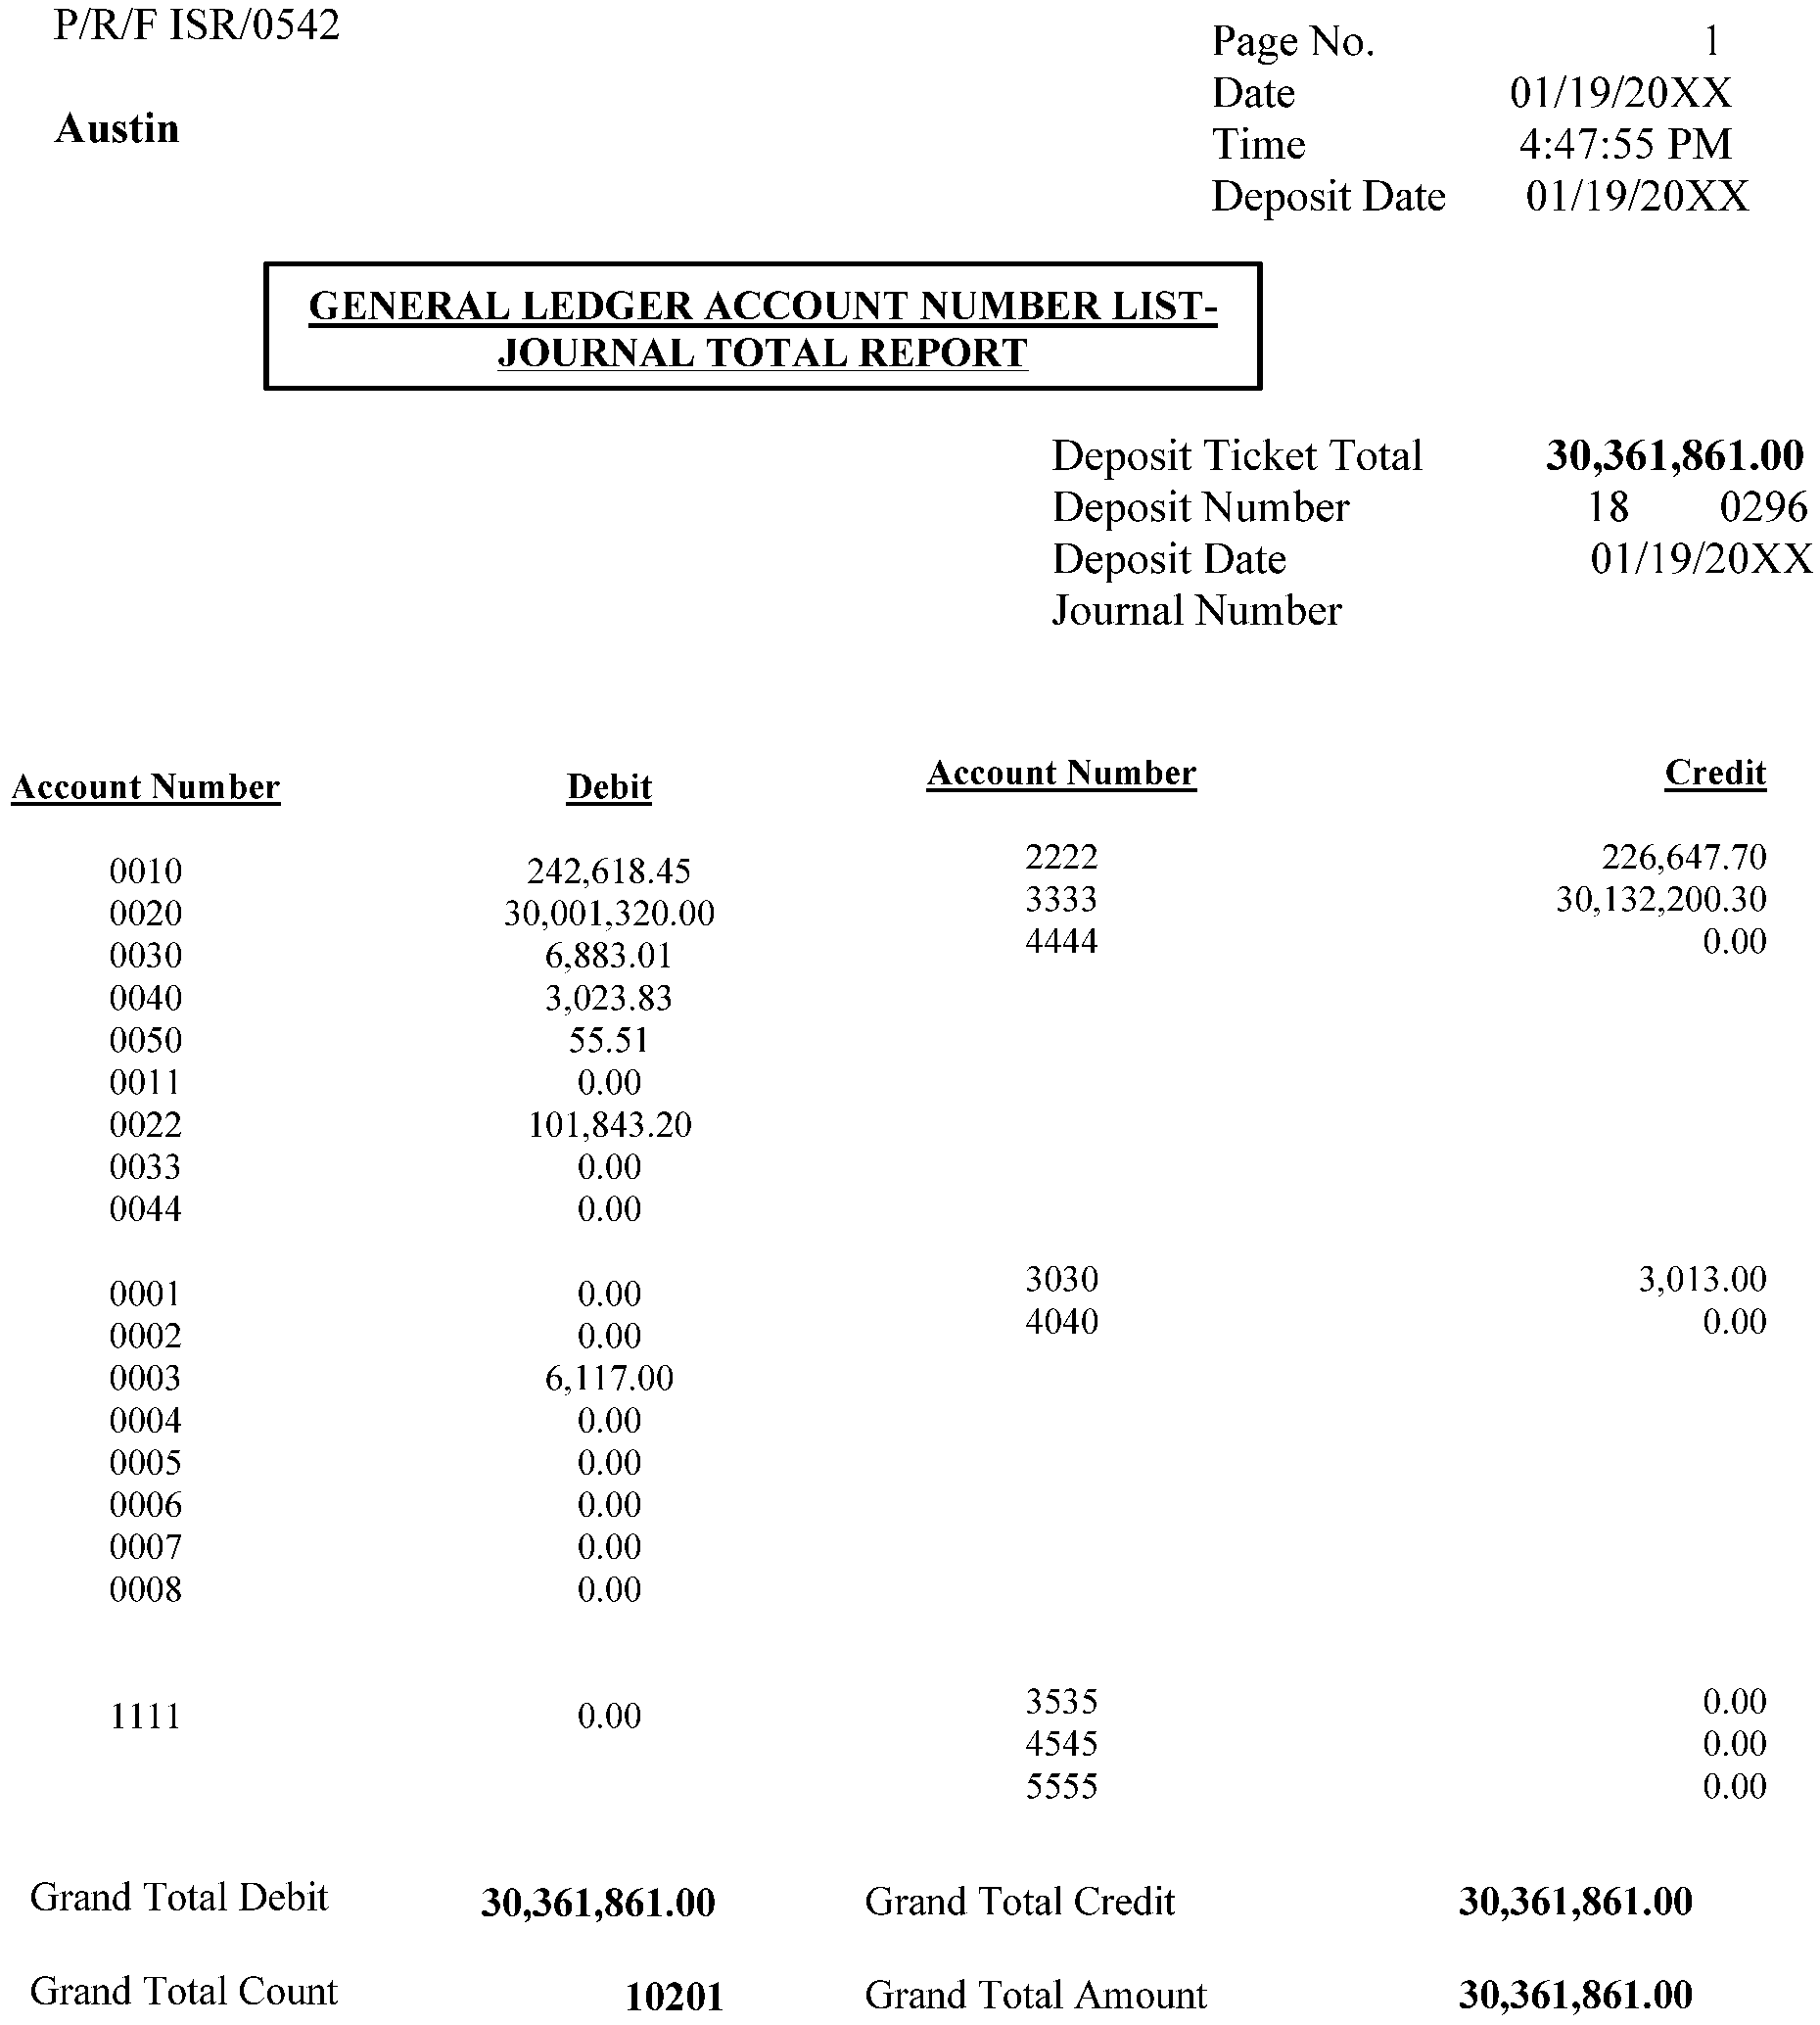
- Exhibit 3.8.44-34 RPS General Ledger Account Number List—Journal Totals (Master File)
- Exhibit 3.8.44-35 RPS General Ledger Account Number List—Journal Totals (Non-Master File)
- Exhibit 3.8.44-36 RPS General Ledger Account Number List—Journal Totals (General Fund)
- Exhibit 3.8.44-37 RPS General Ledger Account Number List—Journal Totals (Deposit Fund)
- Exhibit 3.8.44-38 RPS General Ledger Account Numbers List—Journal Totals (Refund Repayments)
- Exhibit 3.8.44-39 Transaction Received Date Report
- Exhibit 3.8.44-40 Deposit Ticket SF 215–A Report
- Exhibit 3.8.44-41 Transport Batch Status Report
- Exhibit 3.8.44-42 Label Template for Storage of Electronic Check Processing (ECP) Payment Documents
- Exhibit 3.8.44-43 Electronic Check Processing Storage Cabinet Key Assignment Tracking Sheet
- Exhibit 3.8.44-44 Campus Deposit Retention/Destruction Tracking Log
- Exhibit 3.8.44-45 Master File/ Non-Master File Processing Form by Category Table
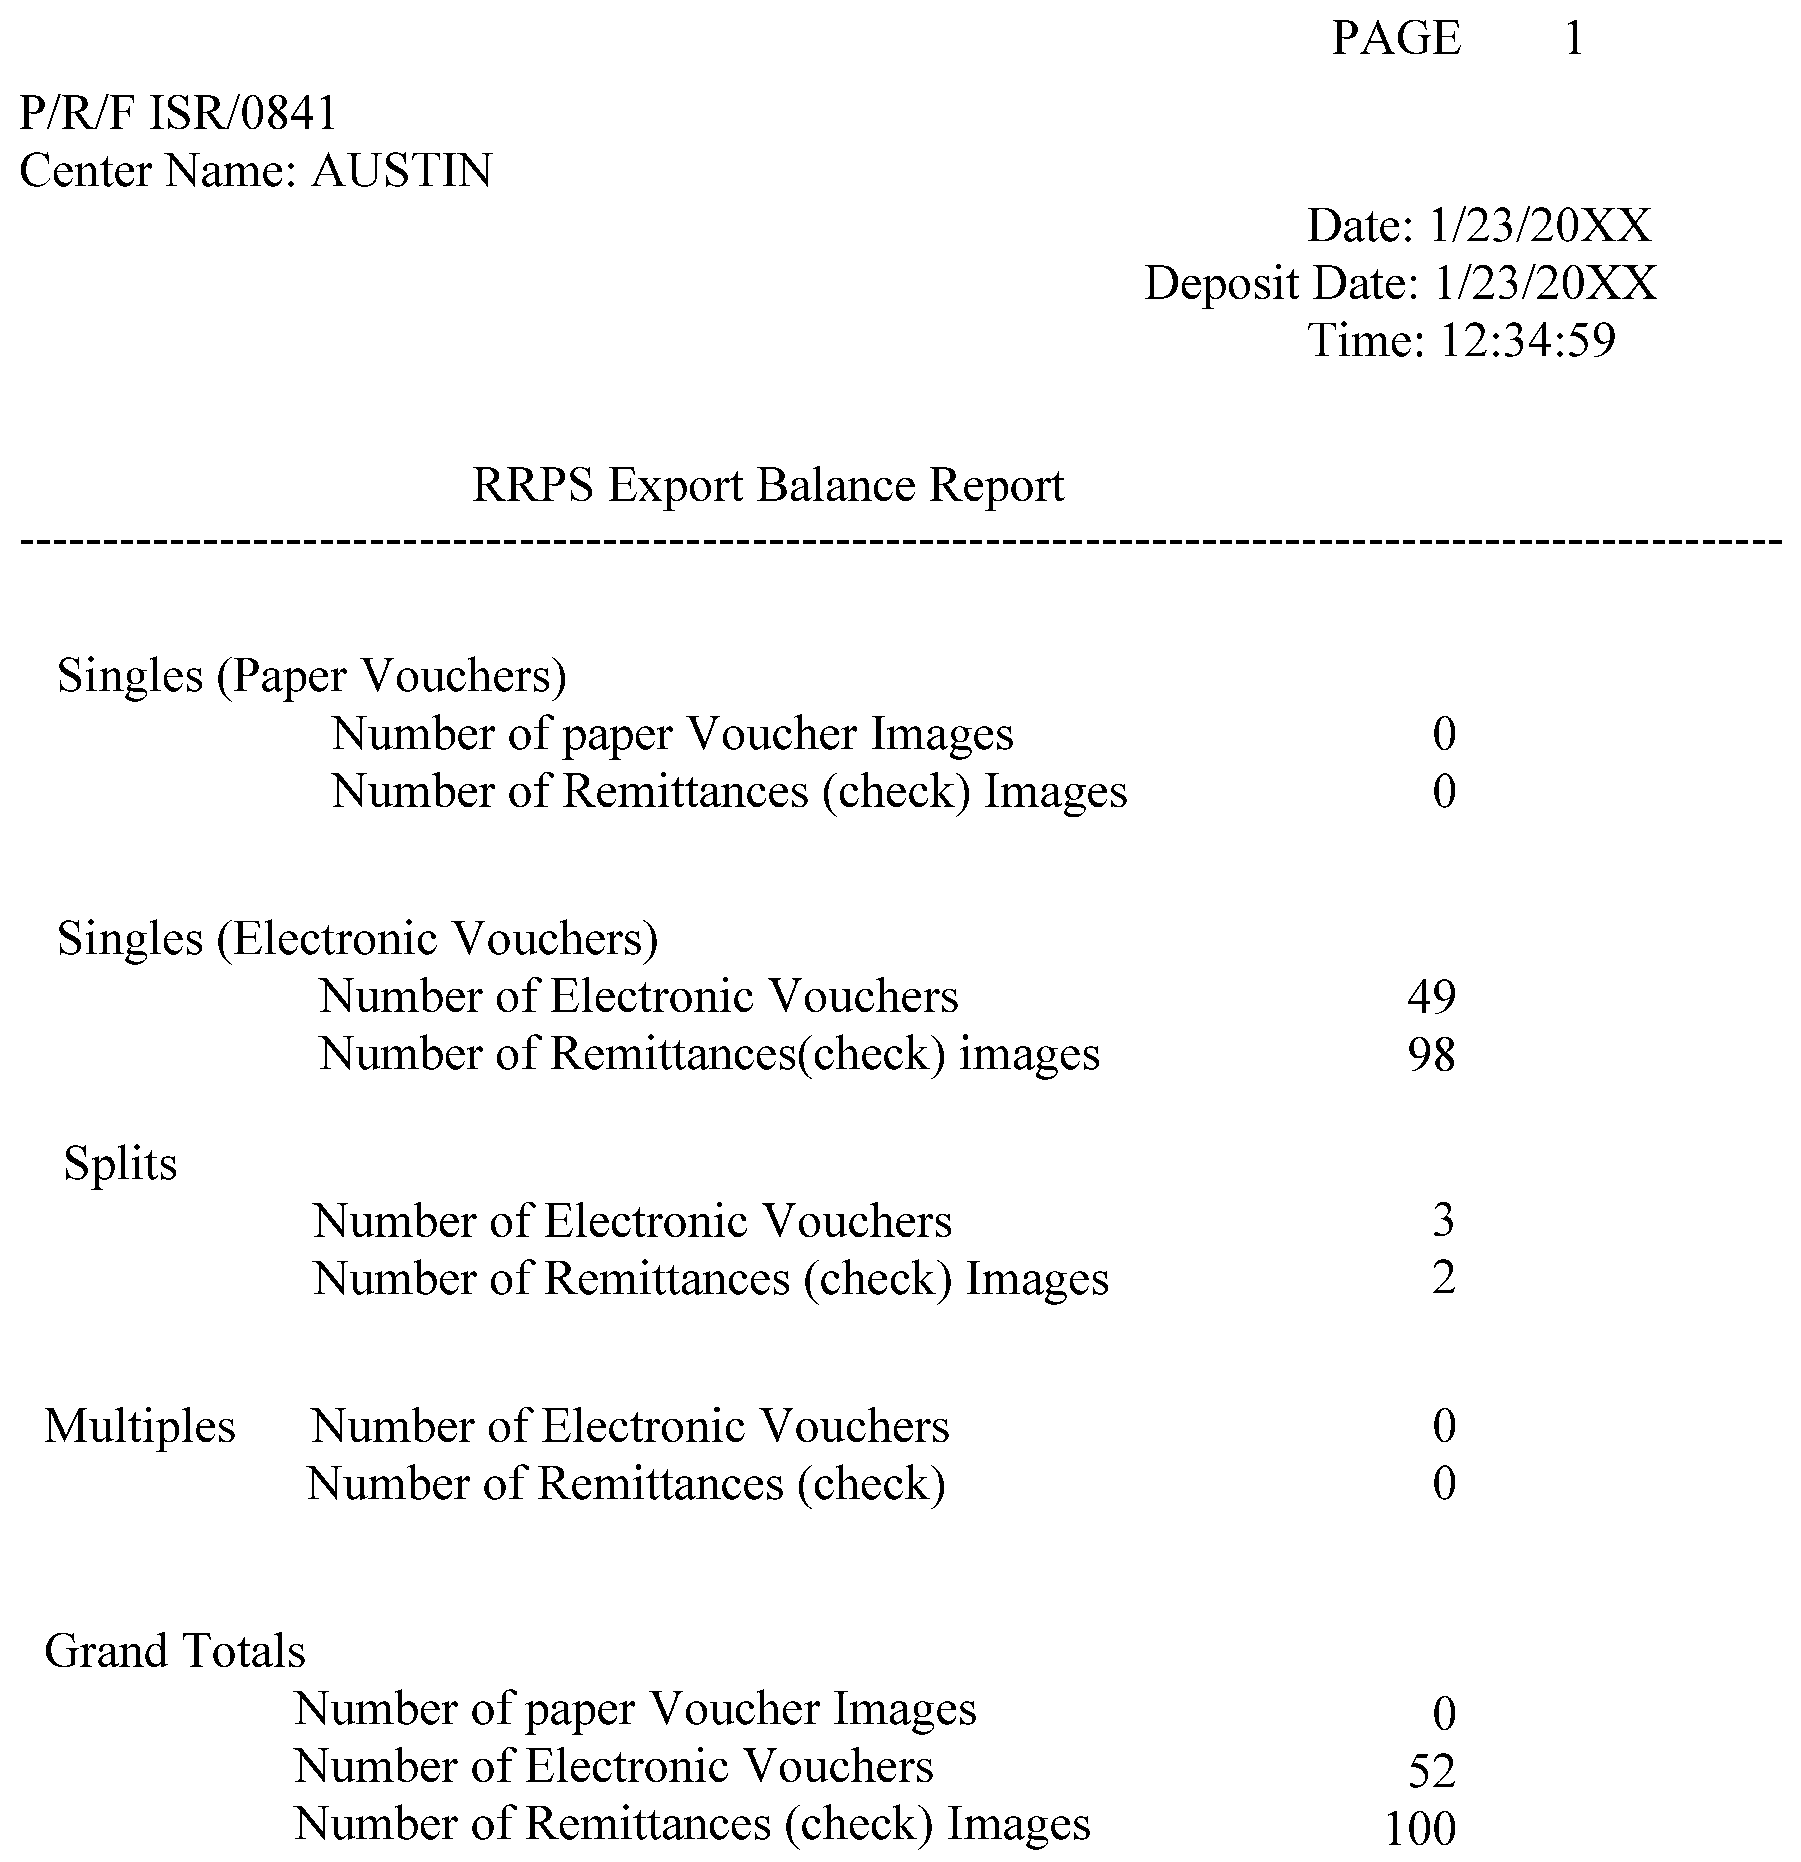
- Exhibit 3.8.44-46 RPS Export Balance Report
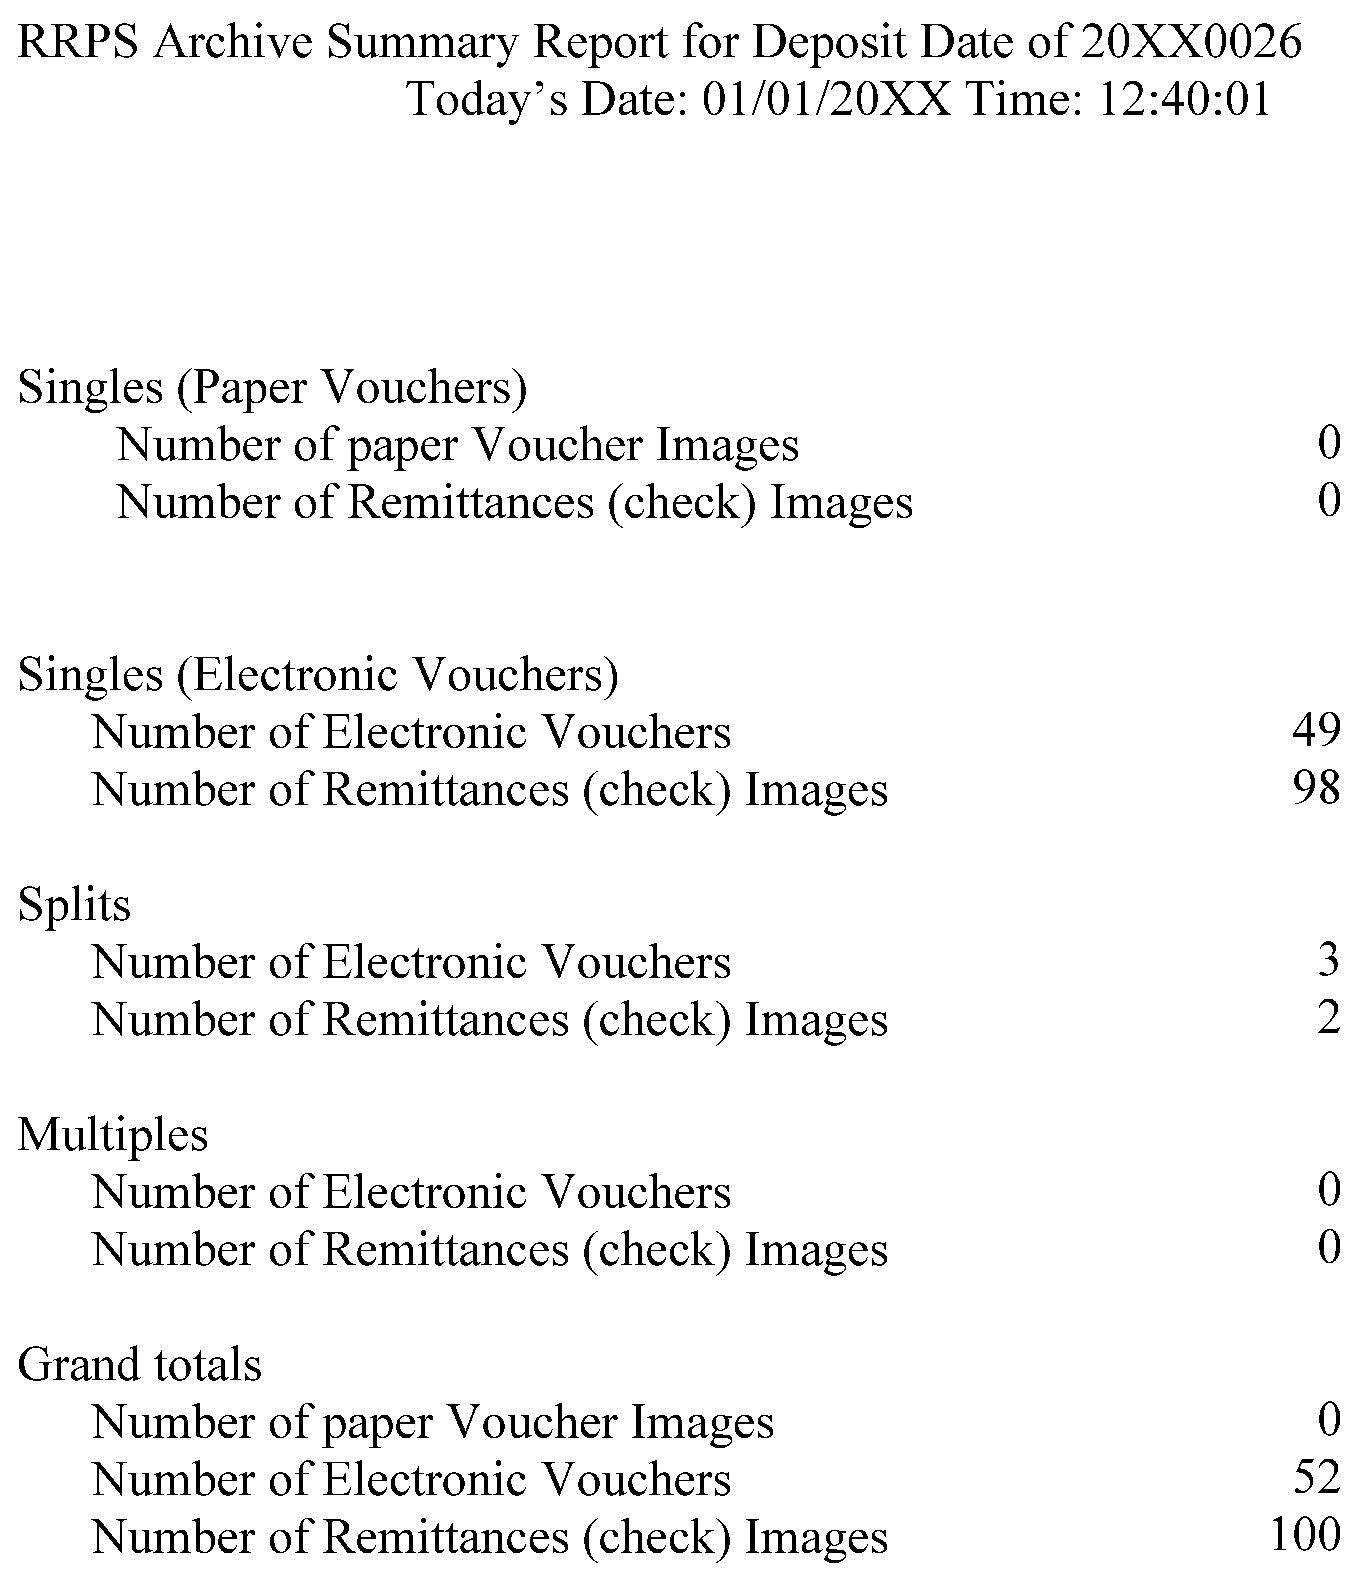
- Exhibit 3.8.44-47 RPS Archive Summary Report
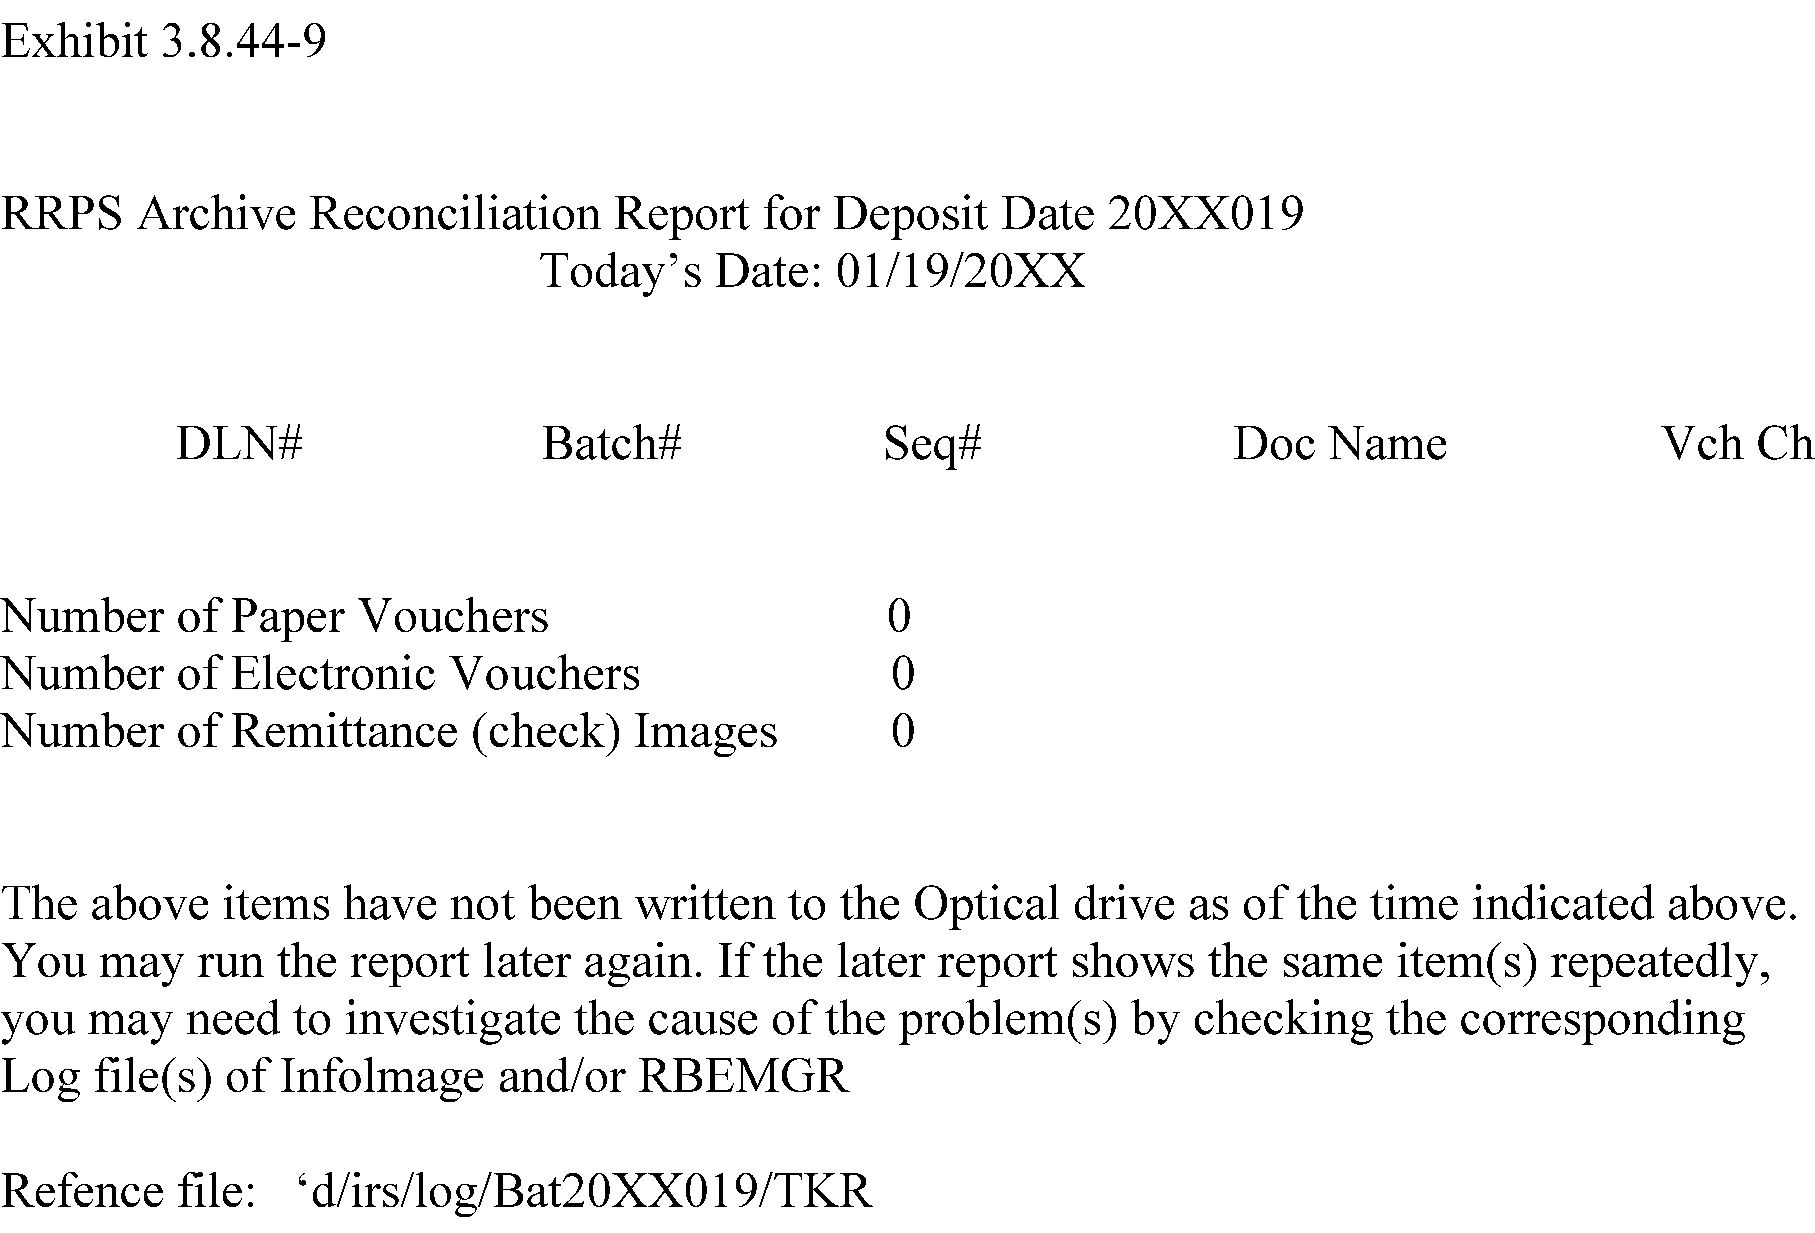
- Exhibit 3.8.44-48 RPS Archive Reconciliation Report
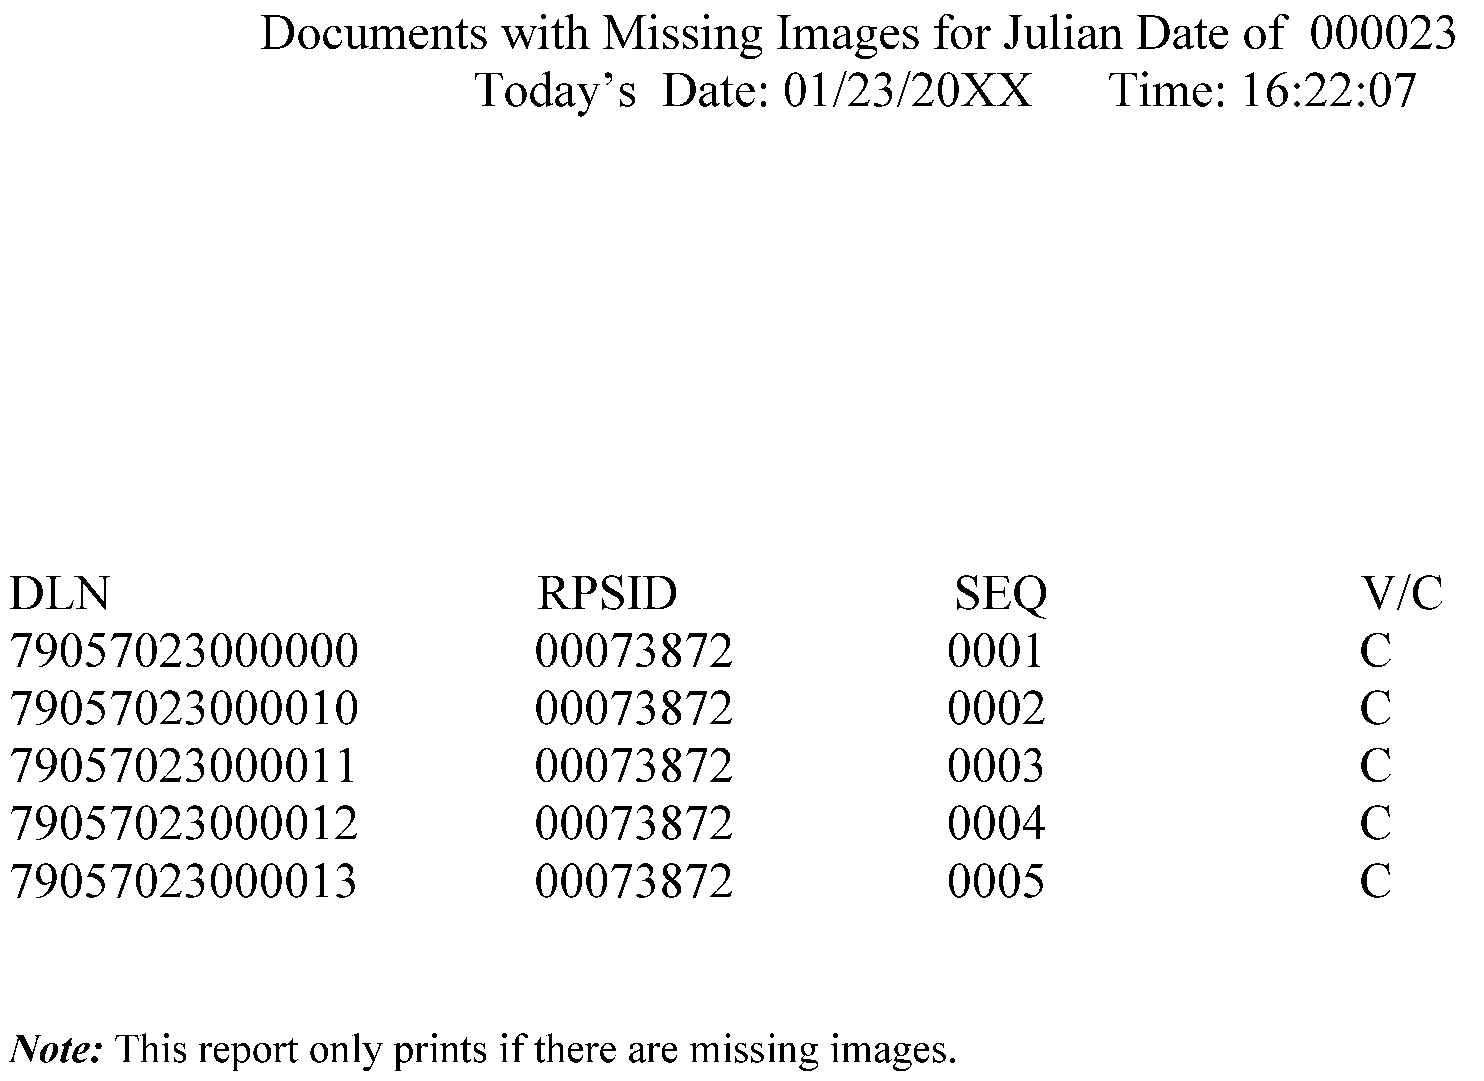
- Exhibit 3.8.44-49 Missing Image Document Locator Report
- Exhibit 3.8.44-50 General Ledger Account Number List Journal Total Report for Image Balancing
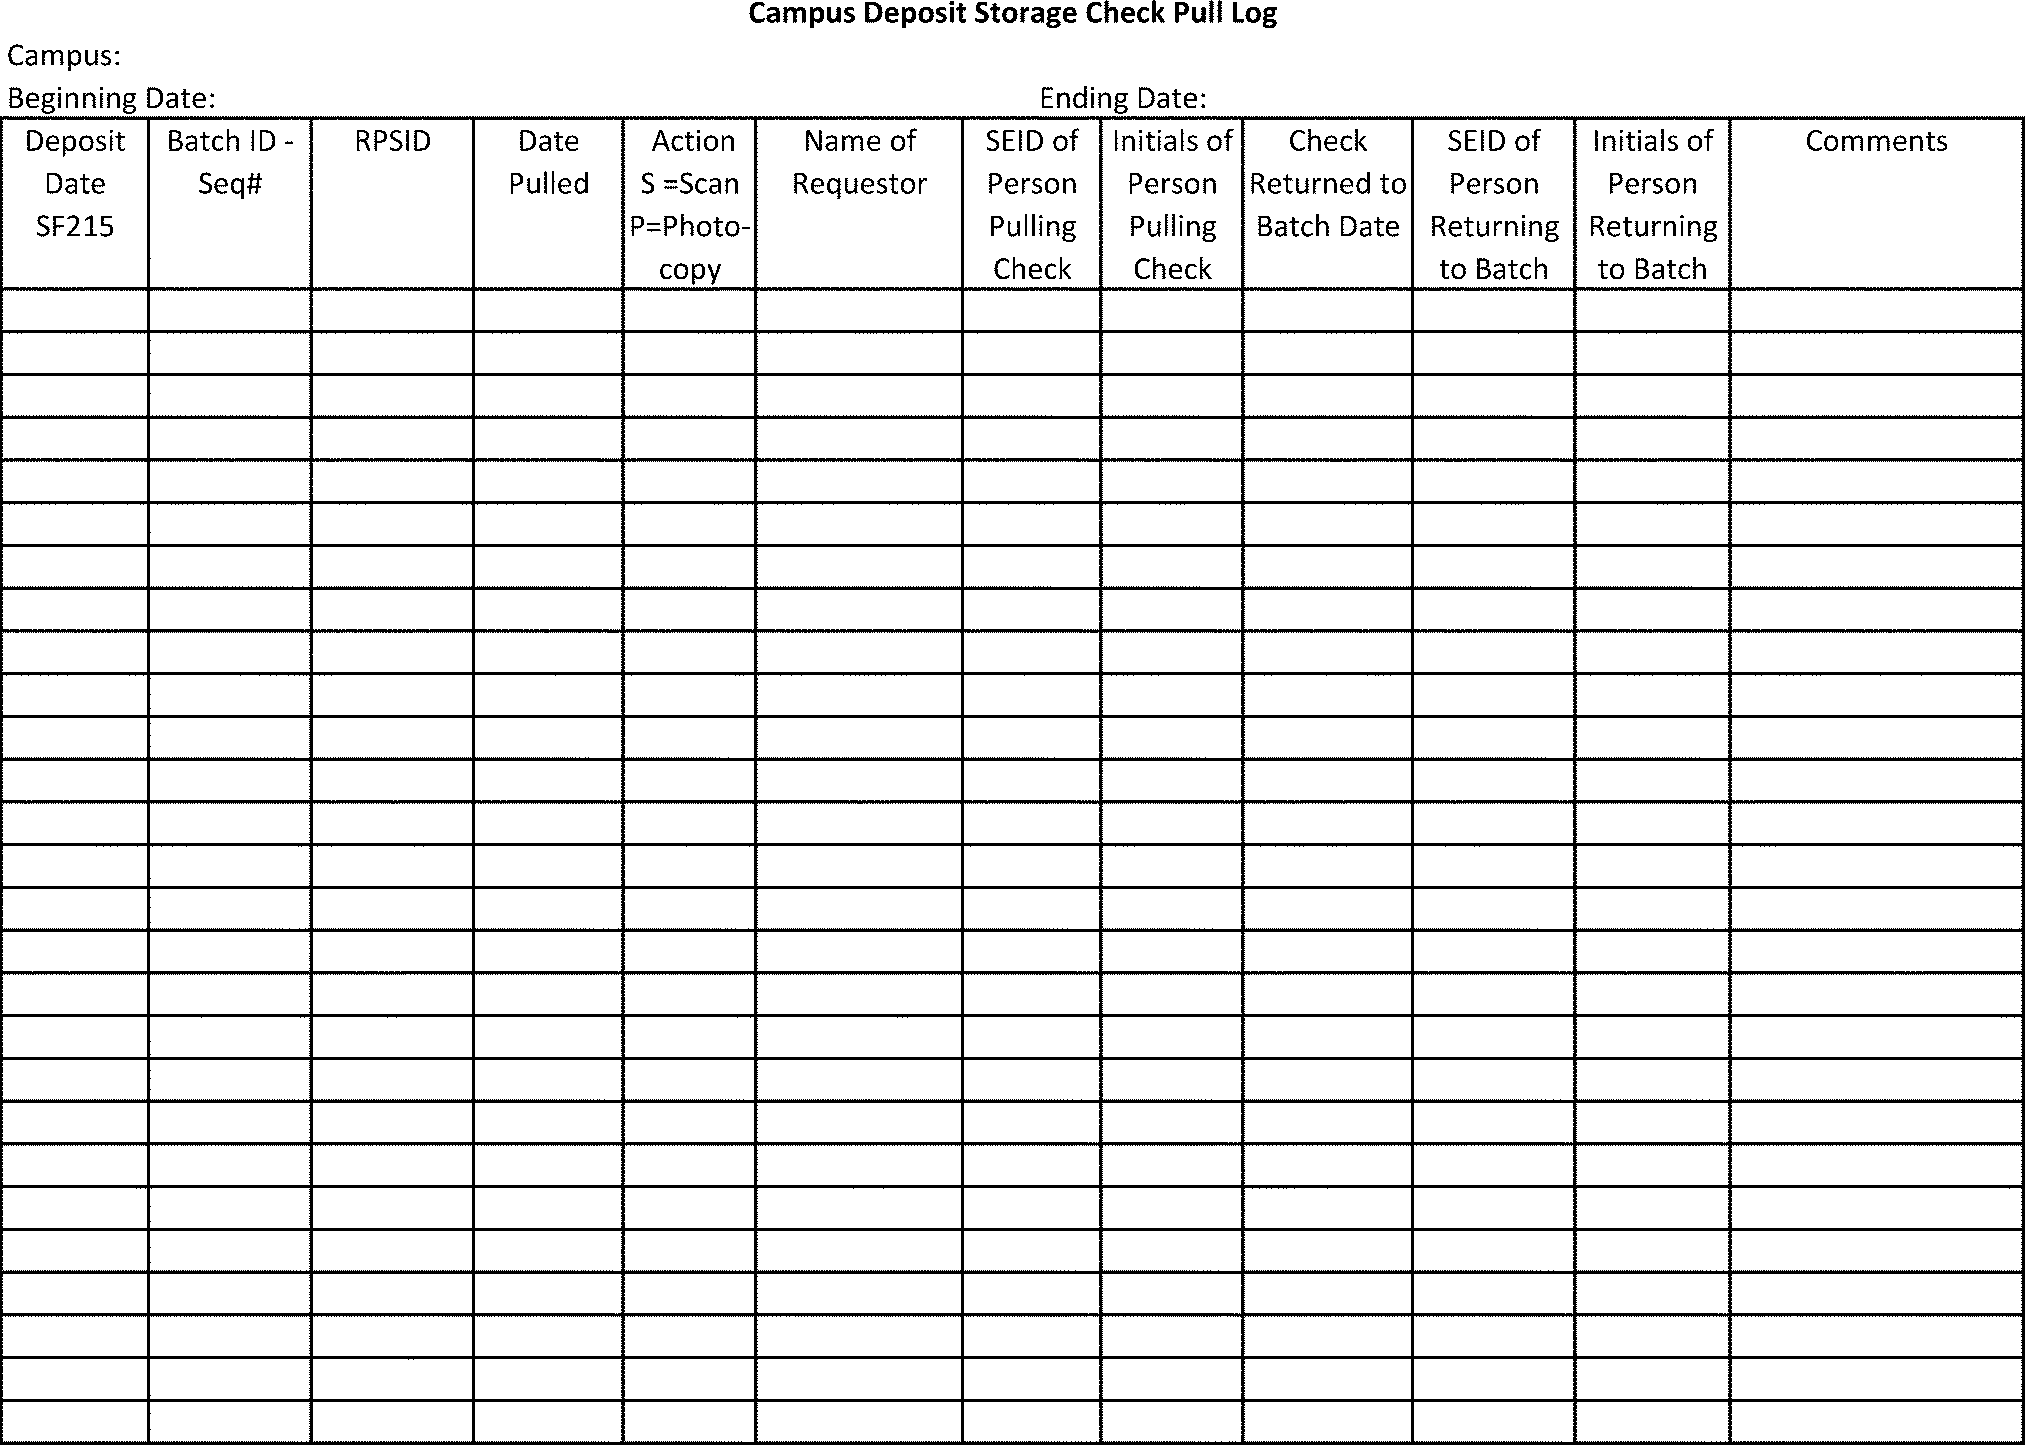
- Exhibit 3.8.44-51 Campus Deposit Storage Check Pull Log
- 3.8.44.1 Program Scope and Objectives
Part 3. Submission Processing
Chapter 8. Deposit Activity
Section 44. Campus Deposit Activity
3.8.44 Campus Deposit Activity
Manual Transmittal
September 23, 2025
Purpose
(1) This transmits revised IRM 3.8.44, Deposit Activity - Campus Deposit Activity.
Material Changes
(1) IRM 3.8.44.1.7 - Added additional resource links.
(2) IRM 3.8.44.2.3(3)(b) - Corrected email distribution list. IPU 25U0478 issued 04-23-2025.
(3) IRM 3.8.44.2.6(4) - Added clarification on strictly prohibited items. IPU 25U0478 issued 04-23-2025.
(4) IRM 3.8.44.2.6(11) - Updated link to Enterprise Electronic Fax SharePoint site. IPU 25U3422 issued 06-20-2025.
(5) IRM 3.8.44.2.10(1) - Updated link to PII Breach Reporting Form.
(6) IRM 3.8.44.2.10(2) - Updated link to Disclosure and Privacy Knowledge Base.
(7) IRM 3.8.44.5.1(3) - Added note to define classified waste.
(8) IRM 3.8.44.5.3(1) - Updated link to Enterprise Electronic Fax SharePoint site. IPU 25U3422 issued 06-20-2025.
(9) IRM 3.8.44.5.3(1)(f) - Updated guidance for sending Acknowledgement back to the Lockbox site. IPU 25U0018 issued 01-03-2025.
(10) IRM 3.8.44.5.4(1)(c) - Added note for balance due notices. IPU 25U0478 issued 04-23-2025.
(11) IRM 3.8.44.6.3(3) - Updated If/Then table to clarify procedures for determining money amounts.
(12) IRM 3.8.44.10.3(9), - Added note to define classified waste.
(13) IRM 3.8.44.10.6(6), - Added bullet for Failed Item Code 184 received from Lockbox.
(14) Exhibit 3.8.44-3(4) - Added note for guidance regarding amended returns. IPU 25U3422 issued 06-20-2025.
(15) Editorial changes made throughout the IRM for clarity, to correct IRM references, exhibit numbers, correct links, and dates to reflect the current processing year.
Effect on Other Documents
IRM 3.8.44, Campus Deposit Activity, dated November 26, 2024, (effective January 1, 2025) is superseded. The following IRM procedural updates (IPU) have been incorporated into this IRM: IPU 25U0018 issued 01-03-2025, IPU 25U0478 issued 04-23-2025, and IPU 25U3422 issued 06-20-2025.Audience
This IRM provides instructions for Taxpayer Services and Small Business/Self Employed Submission Processing Clerks, Batch Schedulers, and Managers in Receipt and Control Deposit Unit and BancTec Scanner Processing, and Data Conversion Clerks and Managers in the Residual Remittance Processing areas.Effective Date
(01-01-2026)Scott Wallace
Director, Submission Processing
Customer Account Services
Taxpayer Services
-
Purpose - This IRM contains instructions for Campus Deposit Activities of Pre-Batch, Remittance Processing System (RPS), Deposit BancTec Scanners, and Transaction Management System (TMS) when processing paper checks through the Campus Deposit function.
-
Audience - Receipt and Control Deposit function Clerks, Batch Schedulers, and Managers. Data Conversion RPS Clerks and Managers.
-
Policy Owner - Director Submission Processing.
-
Program Owner - Return Processing Branch, an organization with Submission Processing.
-
Primary Stakeholders - Enterprise Operations (EOps), Integrated Submission and Remittance Processing Project Management Office (ISRP PMO), Remittance Processing System Pre-mainline, Chief Financial Officer (CFO) Financial Management, Redesign Revenue Accounting Control System (RRACS), Accounting Branch, Payment Perfection, and Manual Refund.
-
Program Goals - Deposit Timeliness of processing checks within 24 hours of receipt. It is of the utmost importance to deposit the largest amount of money in the shortest possible time frame while maintaining best cash management practices.
-
This IRM provides administrative instruction and procedural guidance to the management and clerical staff for the processing and deposits of paper checks received and processed through the Integrated Submission and Remittance Processing (ISRP) system at the following Submission Processing Campuses:
-
Austin Submission Processing Center (AUSPC)
-
Kansas City Submission Processing Center (KCSPC)
-
Ogden Submission Processing Center (OSPC)
-
-
Every employee is accountable for a remittance they receive or collect on behalf of the IRS. By law, Internal Revenue Code (IRC) 7804(c) imposes liability against any officer or employee of the Internal Revenue Service or Treasury Department who fails to account for and pay over any amount of money or property collected or received in connection with the Internal Revenue Law. The statute does not require intentional misconduct, such as willfulness, on the part of the employee.
-
IRS Strategic plan includes providing America’s taxpayers top quality service by helping them understand and meet their tax responsibilities and by applying the tax law with integrity and fairness to all.
-
The IRS frames internal controls by principles outlined in Standards for the Internal Control in the Federal Government. Internal control is a process used by management to help achieve its objective.
-
Government funds collected are generally deposited within three banking days (31, U.S.C. 3302). IRC 7809 further requires a 24-hour deposit standard for tax collections.
-
The Campus Director oversees the flow of receipts to ensure the Deposit Activity program objective of accurately depositing money receipts within 24 hours is achieved.
-
Roles and Responsibilities Operations Manager and Department Managers.
-
Monitor the flow of receipts to ensure the program objective of accurately depositing money receipts within 24 hours is achieved.
-
Monitor team manager’s product reviews of the final deposit, IRM 3.8.44.2.2, Managerial Responsibilities (Product Review of Final Product).
-
Managers and employees follow the ISRP RPS Deposit End of Day (EOD) Processing Guidelines when working outside the scope of a normal workday, IRM 3.8.44.2.3, Managerial Responsibilities (ISRP Deposit End of Day Processing Guidelines) When Working Outside The Scope Of A Normal Workday.
-
Managers and employees follow Peak Processing Extended Hardware Maintenance Shift Cancellation Procedures in a timely manner, IRM 3.8.44.2.4, Managerial Responsibilities (Peak Processing Extended Hardware Maintenance Shift Cancellation Procedures).
-
Security and security reviews, IRM 3.8.44.2.6, Security Responsibilities.
-
Monitor the Daily Activity Report (DAR) and the Daily Deposit Report (DDR), IRM 3.8.44.2.7, Reporting Responsibilities.
-
Ensure weekday, weekend, and holiday reporting is conducted within the guidelines of IRM 3.8.44.2.8, Weekday/Weekend Reporting, and IRM 3.8.44.2.9, Holiday Reporting.
-
-
Roles and Responsibilities of the Team Manager.
-
Monitor the flow of receipts to ensure the program objective of accurately depositing money receipts within 24 hours is achieved.
-
Conduct product reviews of the final deposit, IRM 3.8.44.2.2, Managerial Responsibilities (Product Review of Final Product).
-
Follow the ISRP Deposit End of Day (EOD) Processing Guidelines, when working outside the scope of a normal workday, IRM 3.8.44.2.3, Managerial Responsibilities (ISRP Deposit End of Day (EOD) Processing Guidelines When Working Outside The Scope Of A Normal Workday).
-
Follow the Peak Processing Extended Hardware Maintenance Shift Cancellation Procedures, in a timely manner, IRM 3.8.44.2.4, Managerial Responsibilities (Peak Processing Extended Hardware Maintenance Shift Cancellation Procedures).
-
Monitor security guidelines and conduct security reviews, IRM 3.8.44.2.6, Security Responsibilities.
-
Monitor the Daily Activity Report (DAR) and the Daily Deposit Report (DDR), IRM 3.8.44.2.7, Reporting Responsibilities.
-
Conduct weekday, weekend, and holiday reporting within the guidelines of IRM 3.8.44.2.8, Weekday/Weekend Reporting, and IRM 2.3.44.2.9, Holiday Reporting.
-
-
Roles and Responsibilities of team employees.
-
Follow instructions contained in this IRM.
-
Maintain updated IRM material.
-
-
Program Reports: Use the following reports to manage and review the Deposit Activity program. You can find examples of each form in the Exhibits subsection of this IRM.
-
RPS Document Remittance Register Report
-
RPS Master Remittance Recap Report
-
RPS Refund Repayment Remittance Recap Report
-
RPS Deposit Fund Remittance Recap Report
-
RPS General Fund Remittance Recap Report
-
RPS General Ledger Account Number List-Journal Totals (Master File)
-
RPS General Ledger Account Number List-Journal Totals (Non-Master File)
-
RPS General Ledger Account Number List-Journal Totals (General Funds)
-
RPS General Ledger Account Number List-Journal Totals (Refund Repayments)
-
Transaction Received Date Report
-
Deposit Ticket SF215-C Report
-
Transport Batch Status Report
-
RPS Export Balance Report
-
RPS Archive Summary Report
-
Missing Image Document Locator Report
-
General Ledger Account Number List Journal Total Report for Image Balancing.
-
Deposit Summary Report
-
-
Program Effectiveness: The Deposit Activity Program effectiveness is measured through:
-
Quality Review
-
Managerial Reviews
-
Deposit Timeliness Business Measure
-
-
Integrated Submission and Remittance Processing (ISRP) System, BancTec Scanners, and Transaction Management System access granted through Business Entitlement Access Request System (BEARS) process.
-
Security level monitoring.
-
Key Verification of input payment data by a second employee other than the original entry operator.
-
Terms, definitions, and acronyms is located in IRM 3.8.44.12.
-
All employees and managers of the Deposit Function must familiarize themselves with the following manuals to ensure accuracy, timely deposits, and adherence to internal controls:
-
Document 6209, IRS Processing Codes and Information.
-
Document 12990, IRS Records Control Schedules.
-
IRM 1.14.5, Occupational Health and Safety Program.
-
IRM 1.15.3, Disposing of Records.
-
IRM 3.0.167, Losses and Shortages.
-
IRM 3.0.276, General, Scorecard Performance Measure Process - Security and Internal Control Review.
-
IRM 3.5.10, Remittance Transaction Research (RTR) System.
-
IRM 3.8.45, Manual Deposit Process.
-
IRM 3.8.46, Discovered Remittance.
-
IRM 3.8.47, Manual Deposit for Field Office Payment Processing.
-
IRM 3.10.72, Receiving, Extracting, and Sorting.
-
IRM 3.10.73, Batching and Numbering.
-
IRM 3.24.133, Residual Remittance Processing System.
-
IRM 3.30.123, Processing Timeliness: Cycles, Criteria and Critical Dates.
-
IRM 10.2.8, Incident Reporting.
-
IRM 10.2.11, Basic Security Concepts.
-
IRM 10.2.14, Methods of Providing Protection.
-
IRM 10.5.1, Privacy and Information Protection, Privacy Policy.
-
IRM 10.5.4, Incident Management Program.
-
IRM 10.8.34, Information Technology (IT) Security - IDRS Security.
-
IRM 11.3.1, Introduction to Disclosure.
-
IRM 21.3.3, Incoming and Outgoing Correspondence/Letters.
-
The Taxpayer Bill of Rights (TBOR) lists rights that already existed in the tax code, putting them in simple language and grouping them into 10 fundamental rights. Employees are responsible for being familiar with and acting in accord with taxpayer rights. See IRC 7803(a)(3), Execution of Duties in Accord with Taxpayer Rights. For more information about the TBOR, see Taxpayer Bill of Rights.
-
-
In addition, managers of the Deposit Function must also be familiar with:
-
IRM 10.2.1, Physical Security.
-
IRM 1.4.6, Resource Guide for Managers, Managers Security Handbook.
-
-
This subsection provides administrative directives and processing procedures for remittances in Campus Deposit Operations. Administrative directives include cash management, managerial product review, security, and reporting responsibilities.
-
Campuses continue to receive obsolete forms and/or documents with tax payments. Therefore, the procedures for these obsolete forms and/or documents must remain for correct applications of payments.
-
To ensure accuracy and timely deposits, employees of the Deposit Function must familiarize themselves with the related resources shown in IRM 3.8.44.1.7, Related Resources.
-
Submit Internal Revenue Manual (IRM) deviations in writing following instructions from IRM 1.11.2.2, Internal Management Documents System - Internal Revenue Manual (IRM) Process, IRM Standards, and elevated through proper channels for executive approval.
-
The Internal Revenue Service (IRS) is committed to ensuring a 24-hour deposit standard. As we move toward attaining that goal through improved technology, it is of the utmost importance to deposit the largest amount of money in the shortest possible time frame to achieve good cash management practices. Management at all levels must monitor the flow of receipts to ensure that this objective is achieved. Close of business for a deposit is the final deposit for a deposit date as identified by the date on the deposit ticket. As of 01/01/2016, Internal Revenue Service no longer processes remittances of $100 million or more. See IRM 3.8.44.6.3(6) for handling of $100 Million or more remittances.
-
The Receipt and Control Operations Manager is responsible for the receipt, safeguard, accuracy, and timely deposit of all monies received in payment to the government through the Internal Revenue Service. Maintaining the integrity of the IRS received date is required. Credit all payments for the earliest date a payment is received by the Internal Revenue Service or the Department of the Treasury. See Exhibit 3.8.44-3, Timely Postmark Check List, for more information on timely postmarks.
-
Deposit remittances of $100,000.00 or more on the day of extraction. If the remittance is extracted after the daily cut-off time for processing the daily deposit, deposit the remittance with the next scheduled deposit.
-
Deposit remittances of $50,000.00 and up on the same day of extraction. If the remittance is extracted after the daily cut-off time for processing of the daily deposit, deposit the remittance by the next business day (excluding Saturdays and Sundays).
-
The extended cycle for depositing receipts for the April peak completion date is determined by Taxpayer Services Operating Division and sent to the campuses via memorandum.
-
During the following mini-peak periods, extended cycles must not exceed five business days. However, it is possible to extend the deposit cycle a maximum of two workdays. See IRM 3.30.123, Processing Timeliness Cycles, Criteria and Critical Dates, for more information.
-
Form 1040 series, during the October period
-
Form 1120 series, during the March period
-
Form 720 series, during the February, March, May, August, and November periods
-
During the January and September 15th periods, when the IRS receives large volumes of mail
-
-
It is possible to extend the deposit cycle a maximum of three workdays during the January, April, July, and October periods, when the Internal Revenue Service received larger volumes of returns.
-
During the above-mentioned peak periods, use multiple smaller daily deposit cuts to avoid OTCnet file transfer bottlenecks and continue to deposit the largest amount of money in the shortest time frame. Take into consideration prior year receipts and production standards balanced with approved projected changes (e.g., consolidation issues, transshipping, increase in Electronic Filing System (ELF), changes in Lockbox volume, etc.). See IRM 3.8.45, Manual Deposit Process, for more cash management guidelines.
-
Receipt and Control deposit managers must ensure the release of a quality balanced deposit.
-
Deposit managers must perform regular reviews of completed work accumulated in final deposit area.
-
Conduct the review on 5 percent of the remittances during non-peak periods.
-
After a deposit cut on the BancTec Scanners, fan the lower right corner of the block of remittances verifying that the Magnetic-Ink Character Recognition (MICR) encoded amount agrees with written amount of remittances. Review remittances for breaks in MICR encoded digits and for improper encoding, for example, encoded upside down. Also review the first and last check to ensure the audit trail is complete and legible.
-
Deposit managers or appointed representatives must conduct a 100 percent review of deposits prior to release on a given day of each week. Continue the reviews until deposits reach 100 percent accuracy on a regular basis and controllable deposit discrepancies reach below 100 cumulative items.
-
Prepare an action plan for conducting the reviews.
-
Schedule review dates. (Do not use the same day of the week on a regular basis.)
-
Initiate action if the 24-hour deposit cycle is missed.
-
Record any unbalanced blocks, slipped blocks, encoding errors, piggyback checks, etc.
-
Provide employee feedback.
-
Provide more training if necessary.
-
-
Schedule a meeting with Accounting Operations, when necessary, to review discrepancies discovered during the 100 percent Product Review. Record all discrepancies and follow-up annotate action accordingly.
-
When working overtime during a weekend, holiday, or on a day that is typically outside the scope of a normal workday (i.e., working a Friday night for a Sunday - Thursday shift), the need for End of Day (EOD) processing may exist. Successful posting of deposits to RRACs is dependent on each Site’s Deposit Operation notifying EOps and RRACs when EOD processing is necessary. Deposits that do not successfully post to RRACs poses a significant impact to your Site’s Accounting function, and various support functions.
-
Tips for EOD Processing:
-
Do not merge Deposit Dates into one Deposit Date
-
Perform only one EOD for each Deposit Date
-
It is possible to open a new Deposit Date, once the previous Deposit Date is closed and the EOD is complete for the closed Deposit Date. Thus, a Deposit Date does not have to match the system date nor the calendar date.
-
It is possible to span several calendar days with one Deposit Date. This is done with a Monday Deposit Date covering the weekend before, if no “deposit cut” is done and only one deposit cut off is performed at the conclusion of the Deposit Date. This is typically done when a site wishes to work overtime on a weekend date to catch up on the previous weeks receipts or to get ahead of incoming Monday receipts. Use Monday’s date as the weekend Processing Date, and do not perform “deposit cut” at the end of the weekend shift. Only one EOD is performed after the end of the normal Monday day shift to include deposit receipts processed Saturday through Monday day shift.
-
When deposit receipts become large, or with the change of work shift from day shift to night shift, Integrated Submission and Remittance Processing (ISRP) allows multiple “deposit cuts” within a deposit date. Remittances would go to the bank on each cut, this includes the last cut. Then at the end of the Deposit Date, one End of Day is done that includes all deposit cuts.
-
When working overtime during a weekend, holiday, or on a day that is typically outside the scope of a normal workday, it is critical to operations that both the RPS area and ISRP EOps understand what the site is planning to work during the overtime hours, what support is necessary, and whether an EOD is required. Open an IRWorks ticket to EOps when an EOD is necessary.
-
-
Once ISRP Deposit determines the need for EOD processing, the site must provide notification as outlined below.
-
Open an IRWorks ticket and assign to the two groups listed below. Open a separate ticket for each day requested.
EOps assignment group - EOps-ECC-WSSB-TSS-SPS
RRACS assignment group - &IT ACIOAD-RRACS-Developers -
Issue an e-mail to the following groups and individuals.
&IT ACIOEOPS-ECC-SPASB4-WSPAS4A
&IT ACIOAD-RRACS-Developers
SP-PPB-ISRP
&TS SP PB MMDC DEPOSIT STAFF
Include the following verbiage in the e-mail. “(Site Name) opened IRWorks ticket number (XXXXXXXXX), to request EOD processing support on (Day of Week), (Date). Please pull to RRACs”.
-
-
Every December each Submission Processing Site provides the Deposit Headquarters Analyst with the Site’s projected peak processing Deposit shift schedule. This schedule is necessary to ensure each site is provided with the contracted maintenance coverage during April peak processing. Headquarters Integrated Submission and Remittance Processing (ISRP) Project Management Office (PMO) and Headquarter Deposit Analyst issues a final Extended Hardware Maintenance Schedule prior to April peak processing. Carefully review your site’s final schedule, and follow the instructions provided below if management determines it is necessary to cancel a shift that is shown on your site’s final April peak processing extended hardware maintenance schedule. Failure to follow the instruction below results in an unnecessary cost paid to the contracted vendor.
-
When cancelling a weekday shift, perform the steps below at least 10 hours prior to the beginning of the cancelled shift. If the cancelled shift is a night shift or weekend shift, complete the steps below at least 26 hours prior to the beginning of the cancelled shift.
-
Open an IRWorks ticket and assign directly to ISRP PMO IRWorks group “SP-PPB-ISRP”.
-
Call the local Systems Analyst (SA) to notify them of the opened ticket.
-
Call the Headquarters ISRP PMO management to notify them of the opened ticket. If voice mail is reached, leave a message. ISRP PMO provides the names and telephone numbers to the site ISRP Coordinator every April.
-
Send a follow-up e-mail to the ISRP PMO management, and local Operations Specialist with a copy of the “Shift Cancellation Log” (completed up to the “PMO Contact” column). ISRP PMO provides the log to the site ISRP Coordinator every April.
-
-
Anytime a problem is encountered with the Deposit BancTec hardware or software, the site must open an IRWorks trouble ticket as soon as the site identifies there is a problem. Even if the Operation Specialist and/or local Enterprise Operations (EOps) SA fixed the problem immediately, the site must open a ticket.
-
Priority 2 - Impact to daily deposit. Daily deposit is in jeopardy.
-
Priority 3 and 4 - No impact to daily deposit. Daily deposit is not in jeopardy.
-
-
Deposit managers must communicate security standards contained in IRM 10.2.1, Physical Security, to their employees at least once a year.
-
Management must provide adequate security equipment and facilities to safeguard money, securities, etc., handled in the Deposit Activity Function. See IRM 3.8.45, Manual Deposit Process, for more information.
-
Employees must report any employee suspected of embezzlement, fraud, theft, or identity theft to the Treasury Inspector General for Tax Administration (TIGTA) Office of Investigations at 800-366-4484 immediately. If reporting potential losses to TIGTA, then also inform the campus Remittance Security Coordinator (RSC).
-
Items strictly prohibited from the secure Receipt Processing areas:
-
Lunch Bags / Lunch boxes
-
Purses
-
Backpacks
-
Briefcases
-
Sports Bags
-
Hats (e.g., beanies, skull caps, durags, bandanas, any garment or object worn to cover the head)
-
Shopping Bags
-
Shoulder Totes
-
Fanny Packs
-
CD or Tape Cases
-
Books
-
Newspapers, magazines and
-
Similar type items
-
-
A transparent laptop bag or backpack is permitted inside limited areas only when transporting an official government assigned laptop by authorized management personnel.
-
Before entering the limited area remove the transparent laptop bag from the non-transparent laptop bag and transport the transparent laptop into the limited area. Leave the non-transparent laptop bag in the locker.
-
Enter the limited area with the laptop inside the transparent bag. The transparent laptop bag and laptop is subject to inspection upon arriving and leaving the limited area.
-
When leaving the limited area, exit with the laptop in the transparent laptop bag. Retrieve the non-transparent laptop bag from the locker and place the transparent laptop bag inside of the non-transparent laptop bag before exiting the facility.
-
-
The use of the camera function on a camera capable mobile device, cell phone, Smartphone, Blackberry is prohibited in the secure remittance processing area. See IRM 10.5.1.6.20, Smart Devices, for more information.
-
Connection of personally owned equipment to IRS systems and networks directly or via Virtual Private Network (VPN) is prohibited. See IRM 10.8.1, Information Technology (IT) Security, Policy and Guidance, for more information.
-
Management or designated employee must conduct monthly random reviews of employee compliance with all security policies as they relate to personal belongings. Management is required to maintain a log documenting results of the review. This includes, but is not limited to, ensuring personal removable media is not connected to IRS systems as stated in (6) above.
-
Managers in Remittance Processing areas must ensure visitors only carry into the restricted area, articles absolutely necessary to conduct their business while working in the area. For example, portfolios, note pads, repair kits or manuals, binders, paper documentation, etc. Inspection of these items is not necessary upon entering the area. However, advise visitors that a member of management or designee is required to screen these items prior to exiting the restricted area to reduce the opportunity of unauthorized disclosure, theft of taxpayer information, or theft of remittances. If the door monitor observes a visitor with an item that is prohibited from the restricted area, they must immediately notify a manager. Management is required to approach the visitor to discuss the policy of prohibited articles and determine whether the item is necessary for conducting business within the restricted area.
-
All IRS personnel must take care and hold a legal responsibility to protect sensitive but unclassified (SBU) data, including personally identifiable information (PII) and Federal Tax Information (FTI). IRM 10.5.1, Privacy and Information Protection, Privacy Policy, provides policy and key privacy definitions, and IRM 10.5.4, Incident Management Program, provides the procedures for handling a data breach and/or loss of SBU data (including PII and FTI). A loss of SBU data could result in information being compromised to perpetuate identity theft. Therefore, when transmission of SBU data via email or facsimile must be done so using IRS IT approved encryption technology such as secure messaging via Outlook and Enterprise Electronics Fax (EEFax), sanitize PII unless there is a business reason. Use secure messaging and encryption. Take care to protect Sensitive but Unclassified SBU data (including PII and tax information). See IRM 10.5.1.6.8, Email, and IRM 10.5.1.6.9.4, Faxing. If you suspect or know of a potential information loss, immediately report it to your manager, the TIGTA Office of Investigations at (800) 366-4484, and the Office of Privacy, Governmental Liaison and Disclosure (PGLD) Incident Management Office (IM) via the PII Breach Reporting Form. Call (267) 466-0777, if you have a problem with the on-line form or a question about completing the on-line form.
-
Enterprise Electronic fax (EEFax) is the standard for faxing IRS wide. Receipt and Control employees must use EEFax to fax documents with Sensitive but Unclassified (including Personally Identifiable Information (PII) and tax information). All faxes must have the confidentiality notice created in the setup process prior to sending any document via EEFax. For more information on EEFax, see Enterprise Electronic Fax (EEFax).
-
All employees with badge access to the restricted area of Receipt and Control must have restrictions on Integrated Data Retrieval System (IDRS) if they have IDRS access at all. Every IRS employee with blank Form 809, Receipt for Payment of Taxes, responsibility must have Command Code RSTRK with Definer R activated. All other individuals with badge access to the restricted area of Receipt and Control must have RSTRK with Definer U activated on their IDRS profile or no IDRS access at all. See Exhibit 10.8.34-10, Restricted Command Codes for Roles: SB/SE Headquarters Analysts (who require command code ESTAB), 809 Receipt Book Users, and Submission Processing employees that issue, verify, or reconcile blank Form 809 (RSTRK Definer R), for information on restricted command codes.
-
Management uses the Deposit Activity Report (DAR) and the Daily Deposit Report (DDR), to monitor the deposit activities and cash management practices. See IRM 3.8.45, Manual Deposit Process, for specific procedures.
-
The deposit function is required to report total dollars and items deposited to National Office on a daily basis. Periods exist when it is necessary to work weekends to meet the deposit requirements or to meet the program completion date (PCD). See IRM 3.8.45, Manual Deposit Process, for specific reporting procedures.
-
When it is necessary to work a holiday, include the dollars and items deposited on the holiday in the next business day's deposit report. See IRM 3.8.45, Manual Deposit Process, for specific reporting procedures.
-
Immediately report a loss, theft or inadvertent, unauthorized disclosure of sensitive information/PII to your manager and to the Office of Privacy, Governmental Liaison and Disclosure(PGLD) via the PII Breach Reporting Form. The scope of the reporting form includes packages lost in shipment, lost/stolen hardcopy records/documents, verbal disclosures and all other non-correspondence related events of inadvertent unauthorized disclosures. Report the loss or theft of an IRS IT asset or an asset in the Bring Your Own Device (BYOD) program to the IRS Computer Security Incident Reporting Center (CSIRC). Report incidents involving a loss or theft of an IRS IT asset or non-IRS IT asset (BYOD device), e.g., computer, laptop, router, printer, removable media, CD/DVD, flash drive, floppy, etc., or a loss or theft of hardcopy records containing sensitive information/PII to TIGTA at (800) 366-4484.
-
Refer to IRM 10.5.4.3.3, Inadvertent Unauthorized Disclosures and Losses or Thefts of IT Assets and Hardcopy Records/Documents, for the reporting requirements for an inadvertent unauthorized disclosure of sensitive information, or the loss or theft of an IRS IT asset or "BYOD" asset or hardcopy record or document containing sensitive information, etc., for more information and guidance. You can also find incident-reporting guidance in the Disclosure and Privacy Knowledge Base, or on IRS Source in the upper middle under Incident Reporting, then Data Protection.
-
Campuses' commercial depositories are selected for a specified period with two one-year renewal options. They are chosen through a competitive bid process initiated by IRS and directed by the Treasury Department, Financial Management Service (FMS). See IRM 3.8.45, Manual Deposit Process, for more information.
-
All campuses must have a licensed/bonded or armored vehicle courier service to BancTec deposits to their designated depositary. See IRM 3.8.45, Manual Deposit Process, for specific requirements.
-
Follow the regular Manual Processing procedures under each document /return type for deposit items not processed through ISRP. See IRM 3.8.45, Manual Deposit Process, for specific information.
-
The information in this section provides instructions for requesting access to the DS Domain and Transaction Management System (TMS) Track Users-ISRP Domain through Business Entitlement Access Request System (BEARS).
-
When requesting access to an application use the ISRP Sub-Application table located in IRM 3.8.44.3.2, Business Entitlement Access Request System (BEARS) ISRP Sub Application Table, to determine the proper sub-application to request. The table shows the Operation, types of users under each operation, and the corresponding sub-application for each site. Make sure you select the correct sub-application for your site.
Note:
ISRP-AUIRSC (ISRP/ISRP-R), ISRP-KIRSC (ISRP/ISRP-R), and ISRP-OIRSC (ISRP/ISRP-R) applications are no longer available. Portal Account Management (PAM) denies all Add User requests for this application. PAM processes Delete requests for this application when the older user profile is listed under the previously used application request.
-
Before submitting any ISRP BEARS request for a new user, ensure all your users have submitted and sign-off on the BEARS application: IRS EMPLOYEE PDS LAN EMAIL SKYPE LIMITED INTERNET (BASELINE STANDARD ACCESS). Failure to activate this application results in a denied request of the ISRP BEARS application.
-
It is required of All Batch Schedulers and Back-up Batch Schedulers request access to RP Batch Scheduler Application.
-
All Users (except TMS Track Users-ISRP Domain, and RP Batch Scheduler DS Domain), must include the following information in the BEARS Previous Special Instruction field:
-
User ID: (such as the User’s SEID. Example bxxxx)
-
-
TMS Track Users - ISRP Domain, must include the following information in the Business Entitlement Access Request System (BEARS) Previous Special Instruction field:
-
User’s SEID
-
User Code: (such as tm67 or tm-id assigned by the site manager)
-
User’s Group: Track User
-
-
For RP Batch Scheduler DS Domain users, include the following information in the BEARS Previous Special Instruction field.
-
User SEID
-
State, “requesting regular PROD SCHED REMIT BATCH USER profile”
-
-
When requesting access to an application use the table in IRM 3.8.44.3.2(3), below to determine the correct sub-application you need to access. The table shows the Receipt and Control Operation, types of users under Remittance Processing (RP), and the corresponding sub-application for each site. Make sure you select the correct sub-application for your site.
-
Following is a list of abbreviations for each site used throughout the Sub-Applications Table:
-
Austin - AUSC
-
Kansas City - KCSPC
-
Ogden - OSC
-
-
The following table provides a list of BEARS Sub-Applications for Receipt and Control Remittance Processing (RP). The table has three columns. The first column lists the Role of the User. The second column shows the BEARS sub-application name. The third column states the access level.
Table of Business Entitlement Access Request System (BEARS) Roles, Sub-Application Names, and Access Levels
ROLE BEARS SUB-APPLICATION NAME ACCESS LEVEL RP Supervisor/Work Leader
(Deposit)PROD MGR AUSC REMIT PROC ISRP
PROD MGR KCSC REMIT PROC ISRP
PROD MGR OSC REMIT PROC ISRPMANAGER RP Data Entry Operator
RCO TMS Correction Operators
(Deposit)PROD OPER AUSC REMIT PROC ISRP
PROD OPER KCSC REMIT PROC ISRP
PROD OPER OSC REMIT PROC ISRPOPERATOR RP BATCH SCHEDULER
DS-DomainPROD SCHED AUSC REMIT PROC BATCH ISRP
PROD SCHED KCSC REMIT PROC BATCH ISRP
PROD SCHED OSC REMIT PROC BATCH ISRPSCHED TMS TRACK USERS - ISRP DOMAIN PROD COORD AUSC ISRP TMS Track User
PROD COORD KCSC ISRP TMS Track User
PROD COORD OSC ISRP TMS Track UserTRACK USER
-
Process all checks, drafts and money orders payable through normal banking channels through the campus deposit activity. Deposit any remittance eligible for perfection to negotiability regardless of the amount.
-
Deposit all items either through the Residual Remittance Processing System (RRPS) or manual processing. See IRM 3.8.45.2.10, for a list of payments processed through manual processing.
-
Deposit remittances received in the Campuses into one of the five types of funds: Revenue Receipts (Master File and Automated Non-Master File), Deposit Funds, General Funds, Repayment of Refund Appropriations, or other Receipts Fund.
-
Remittances received and deposited into the REVENUE RECEIPTS Fund consist of the following items:
-
Internal Revenue taxes, penalties, interest and costs, assessed or assessable against taxpayers,
-
Payments on accepted offers in compromise,
-
Payment of court fines, court costs, forfeitures, penalties incident to or imposed for violation of Internal Revenue laws, from the redemption of property acquired by the government, and
-
Receipts from consummated sales of acquired property.
-
-
Remittances received and deposited into the DEPOSIT Fund (ISRP Program 00002) consist of the following items:
-
Payments tendered as offers in compromise.
Note:
The option for taxpayers to remit deposits with an Offer in Compromise application was discontinued with the publishing of Form 656 revision April 2022. If a payment is designated as a deposit, it will be returned to the taxpayer without processing. See IRM 3.8.45.8.38.1, Centralized Offers in Compromise (COIC), for COIC procedures.
-
Offers of prospective bidders of payments for the sale of seized property.
-
Offers to bid or initialize payments under a deferred payment sale of acquired property.
-
Other payments may be deposited to this account when required by specific instructions. See Exhibit 3.8.44-25, Special Account Funds Table, for accounting fund codes for Deposit Fund deposits.
-
-
Remittances received and deposited into the GENERAL Fund (Integrated Submission and Remittance Processing (ISRP) Program 00003) consist of payments under Federal Firearms Act and fees for the duplication of records. See Exhibit 3.8.44-25 for accounting fund codes for General Fund deposits.
-
Remittances received and deposited into the REPAYMENT TO REFUND APPROPRIATIONS Fund (ISRP Program 00004) consist of recoveries of erroneous, duplicate, or overpaid refunds or fraudulently negotiated checks. See Exhibit 3.8.44-25 for accounting fund codes for Repayment to Refund Appropriations Fund deposits.
-
Remittances received and deposited into the OTHER RECEIPTS Fund consist of special fees and miscellaneous non-revenue receipts. See Exhibit 3.8.44-25, for accounting fund codes for Other Receipt Fund deposits.
-
RPS is a multi-functional remittance processing system for processing payments and the control of related source documents. It computerizes the recap of each day's deposit information, simultaneously preparing tapes to post credits to taxpayers' accounts.
-
The basic steps of the system include: Original Entry (OE), Key Verification (KV), and the BancTec Scanners process. The BancTec Scanners process includes vouchers/remittances corrections, balancing, encoding, endorsing, document locator number (DLN) assignment, remittance imaging, Optical Character Recognition (OCR) reading scan lines from vouchers and the courtesy amounts from remittances, and generation of the end point sorting and deposit reports.
-
Non-Master File (NMF), program 00001, causes an increased workload in Accounting due to not having abstract number on back of Form 813, Document Register, Revenue Accounting Control System (RACS) journalization; error code on Service Center Control File (SCCF) with invalid Document Locator Number (DLN). NMF remittances processed on RPS and not established on the SCCF.
-
During the pilot, Austin determined that the number of split payments one Entry Operator (EOP) should enter is 700 transactions for the same check. Under manual process (manual deposit) procedures, the list can be assigned to multiple clerks for OE. Documents or checks omitted at OE cannot be added to the batch at key verification to balance the batch.
-
Use programs 15500 and 45500 for splits with multiple MFTs or use manual processing procedures. Do not use programs 15510 and 45510 for splits with multiple MFTs.
-
When possible, all Refund Repayments, program 00004, will be processed through ISRP. See IRM 3.8.44.4(7), Exhibit 3.8.44-26, and Exhibit 3.8.44-27 for processing of Refund Repayments. If it is not possible to process Refund Repayments through ISRP, then route to Manual Processing.
-
Each campus MUST establish local procedures for controlling source documents and remittances throughout payment processing. However, the source documents must remain in searchable order until the completion of the correction and balancing processes.
-
After the deposit is balanced and released to the depository, each campus coordinates local procedures for routing and distributing the source documents.
-
Pull all unsigned returns and batched separately. Label transmittal "Unsigned Returns" edit return with "R" or "$" in the upper left corner using green pen and hand carry to Extraction.
-
-
Destroy (classified) source document paper, excluding actual IRS returns, IRS forms and other correspondence or items that do not require pipeline or stop mail handling 5 business days after the deposit date.
. Some examples of items subject to destruction as classified waste include:Note:
Classified waste is documentation containing taxpayer entity or account information that is not part of the case and is not needed for audit trail purposes. Refer to IRM 21.5.1.4.10, Classified Waste, for guidance on handling classified waste to prevent inadvertent/unauthorized destruction of records
-
Paper vouchers and notices
-
Envelopes received with a check only
-
Simple correspondence that requires no further handling
-
Form 4868 or IRS forms that require no further handling or processing and do not bear a taxpayer signature
-
-
Stage items within the Deposit function.
-
Prior to disposal, source document paper must be reviewed/fanned through to ensure no mis-sorted items remain in the bundle.
-
The RPS Pre-Batch/Clerical function is responsible for finalizing the sort of remittances and related source documents and preparing/associating correct control documents for each type of deposit for the Payment Perfection function and the OE/KV function. Although the pre-batch functions may be physically separated, the procedure for preparing and controlling work must be the same for both Payment Perfection and OE/KV.
-
Pre-Batch/Clerical is responsible for reviewing each sort to eliminate any mis-sort condition by spot checking the batch, and for entering information on Batch/Block Tracking System (BBTS).
-
BBTS is a comprehensive integrated batch creation and tracking system used to generate unique block headers, including the six-digit Remittance Processing System Identification (RPSID) number, and other identifying batch information.
-
The Form 1332C, Block Selection Record (Block Header), contains batch information, such as RPSID, tax period, MFT, etc., that is entered by OE/KV operators for generation into individual tax records. Based on the type of source documents, enter information into BBTS by program code, RPSID, transaction code, MFT, tax period, and transaction received date. See Exhibit 3.8.44-19, Pre-Batch/Clerical Preparation of Form 1332C, Block and Section Record.
-
After the batch information is entered into BBTS, BBTS assigns an "ABC" to the batch of work, generates and prints Form 9382, Pre-Batch Transmittal. See Exhibit 3.8.44-21 Pre-Batch/Clerical Preparation of Form 9382, Batch Transmittal, and Form 1332C, Block Selection Record (Block Header).
-
The Form 9382, Batch Transmittal, is used by the OE/KV operators to sign out individual batches of work for original entry and key verification.
-
Form 11355, Batch Header, is associated with each batch of work. The RPSID is pre-printed on the left margin of the Batch Separator in a 1-D barcode for recognition through the BancTec Scanner. The RPSID is also located in the upper right margin of the Batch Header. Also, associate the correct Batch Header, Forms 11356 with scannable vouchers and remittances, that by-pass OE/KV, and process directly on the BancTec Scanner.
-
For each batch of work, to control the source documents and remittances throughout payment processing, associate and place with the batch work prior to OE/KV, Form 11355, Batch Separator, pre-printed with the RPSID, and Form 1332C, and the Block Selection Record (Block Header).
-
On a daily basis, the Lockbox site(s) forwards a shipment of work to their respective campus, which includes unprocessable remittances. The sites receive these shipments in a tamper proof bag(s). The Deposit Clerical area performs the following steps.
-
Verify the bag is sealed and not opened, sliced, torn or any manipulation that would question the integrity of the bag(s).
-
Verify the "alpha numeric" digits printed on the bag(s) match the information recorded on the LDT.
-
Initial the LDT in the "Received" column next to the "With-Remit Unprocessables/Rejects" .
Note:
It is not necessary to manually count the enclosed remittances contained in each labeled bundle. However, contact your Lockbox Field Coordinator (LFC) immediately if the bag is not sealed, alpha/numeric entries do not match, or there appears to be an obvious error in the volume of remittances. For example, header/cover sheets state the volume to be 20 remittances, and the actual volume received is 5.
-
Initial the Acknowledgement page in the correct fields, whether all is correct, or you had to notify the LFC of any discrepancy,
-
Sign and date at the bottom of the Acknowledgement page.
-
Fax, e-fax, or email a copy of the signed Acknowledgement (Page 1) back to the Lockbox site daily, not later than (NLT) 2:00 p.m. local time. For more information on EEFax, see Enterprise Electronic Fax (EEFax).
-
-
The Deposit area is to retain all pages (copy of Page 1 and all "detail pages") of the LDT for your files in chronological order. A managerial review must be performed monthly to ensure IRS acknowledged all to the Lockbox. This is a separate review from the monthly report you provide to your Lockbox coordinator. Keep a log sheet of the managerial review along with the transmittal retention copies and indicate name of reviewer, date and comments. Comments must include your findings of the managerial review. For example, 22 transmittals reviewed; 2 not signed, 1 missing date and time of faxed transmittal. If the reviewer does not find errors during the review, state, "No errors found" . Retention period for the LDT transmittals is one year.
-
Review the following items when conducting a managerial review:
-
Transmittals faxed (employee initials, date and time faxed).
-
Transmittals signed.
-
Proper changes were made to any discovered discrepancies on the transmittal.
-
Lockbox field coordinator notified of any discrepancies.
-
-
Sort all remittances delivered to the Pre-Batch/Clerical function, from Extraction by type of tax and form number.
-
MAINTAIN ALL SORTS from extraction, such as Individual Master File (IMF), Business Master File (BMF), Full Paid, Part Paid, Timely, Delinquent, etc.
-
Extraction function delivers Perfect items directly to Pre-Batch/Clerical. Returns/documents containing:
Legible or barcode masked Taxpayer Identification Number (SSN or EIN)
One name control
One Business Name for BMF
Individual Name for IMF (a secondary name, such as a spouse, may be present. The surnames do not have to match.)
One Remittance
One MFT Code or Form
One Tax Period or multiple (see exception below)
Exception: Consider all notices, excluding Form 668 series (see Imperfect Items below), with multiple tax periods as perfect if all other criteria is met. Apply the payment to the oldest listed tax period.
As applicable, one or more of the following: three-digit plan number (Form 5330, Form 5500 series, Form 5558 only), report number (Form 8038-T, Form 8038-CP), DPC, secondary code/money amount, tertiary code/money amount.
Consider checks and envelopes perfect when the "perfect" criteria are met. -
Imperfect items consist of source documents and remittances that do not meet the criteria of a "perfect" . They include incomplete items, illegible items, attached correspondence, split remittances, etc. These items must be researched and/or perfected by the Payment Perfection function prior to release to the Pre-Batch/Clerical function or deposit processing via InfoConnect.
Installment Agreements, Levies and Garnishments.
If there is an indication the payment is a levy or garnishment received with Form 668 series or written words such as automated collection system, ACS, levy or garnishment abbreviations or similar statements, process the payment as imperfect.
If there is an indication the payment is for an installment agreement received with Form 433-D, Form 2159, Form 9465, or written words such as installment agreement, installment payment, payment plan, monthly payment or similar statement, process the payment as imperfect. -
Whenever possible, process Internal Revenue Code (IRC) 965 installment payments in RPS. IRC 965 payments usually have the following verbiage indicated on the paper check memo, or in the top margin of one of the tax forms listed below: IRC Section 965, Section 965, 965, 965h, 2017 965 Tax, or similar statement.
\Form 990-PF
Form 990-T
Form 1040
Form 1041
Form 1065
Form 1120
Form 1120-C
Form 1120-L
Form 1120-PC
Form 1120-POL
Form 1120-REIT
Form 1120-RIC
Form 1120-S
-
-
To the extent possible, combine small groups of like source documents to create larger batches of work. To maximize batch volumes, different types of work, may be input under a single program number not designated for their specific use. For example, IMF and BMF payments of all types may be entered under program 45500. However, you must input the MFT code and other differing fields for each transaction as they change. Processing work in this manner is acceptable and preferred since the Integrated Submission and Remittance Processing (ISRP) program number is not output to other systems.
-
Non-scannable vouchers must be sorted by MFT when a batch contains different MFT’s from the batch header. Edit the MFT when it differs from the batch header.
-
Sort Splits and Multiples separately from all other types of work.
-
Maintain the FULL PAID/Other Than Full Paid (OTFP) sorts for Form 1040, Form 1040A, Form 1040EZ and Form 1040PC throughout payment processing.
-
Route Form 940V, Form 940VEZ, Form 941V, Form 943V, Form 945V, Form 1040ES, Form 1040V, Form 1041ES, Form 1041V, and Form 2290V preprinted, scannable payment vouchers directly to the BancTec Scanner for processing.
-
Sort scannable vouchers and notices by scan line position. Place the remittances behind the vouchers or notices before delivery to the BancTec Scanner for processing.
-
RPS Pre-Batch is prepares the work for input into the Remittance Processing System (RPS). The clerks perform the following activities:
-
MAINTAIN ALL SORTS from extraction, such as IMF, BMF, Full Paid, OTFP, Timely, Delinquent, etc.
-
Remove check stubs and staples from remittances, if still present, before forwarding to RPS function.
-
Batch returns/documents by current, prior, fiscal year, and/or full paid, and/or part paid.
-
Create batches of work for OE/KV input.
-
Combine small groups of like source documents to create larger batches of work, by combining MFTs. When combining MFTs, keep like MFTs together in a batch. See Exhibit 3.8.44-20, MFT Codes Combined for Batching.
-
Primary transaction code work can be combined under the correct program number, like MFTs. See Exhibit 3.8.44-45, Master File/Non-Master File Processing Form /Program Processing Table.
-
Review batches of work to prevent mis-sorted returns or items that must be pulled from processing so it can be re-batched correctly.
-
Input information into BBTS to generate and print batch transmittals and block headers.
-
Use the RPSID to match the block headers and batch separators to complete the assembly of a batch of work.
-
-
Batch work by RPSID range according to their source of origination for timeliness tracking on Remittance Transaction Research (RTR) as follows:
Category Definition 1. Perfect Remittance
000001-489999A perfect remittance is received directly from Extraction. It requires no perfection or extra handling before batching. 2. ISRP Manual Deposit
490000–496999Manual deposit type work processed through Integrated Submission and Remittance Processing (ISRP) that require perfection or other handling prior to batching. 3. Discovered Remittance/Candling Finds
497000–499999Items received on Form 4287 for remittances discovered outside of Receipt and Control or RRPS area. Item received on Form 13592 for remittances discovered during the Candling function within Receipt and Control. 4. Field Office Payments
500000–589999Perfect and imperfect work received from Field Offices. 5. OIC Fee
590000–599999Application fee for offers in compromise. 6. Lockbox
600000–609999Perfect or imperfect unprocessables work received from Lockbox. 7. Payment Perfection
610000–769999Payments received directly from Extraction that requires perfection or other handling prior to input through Integrated Submission and Remittance Processing (ISRP) InfoConnect or regular OE/KV. 8. Perfect Misdirected
770000–789999Transshipped work received from Submission Processing consolidation Sites (Andover, Atlanta, Brookhaven, Cincinnati, Fresno, Memphis, and Philadelphia). 9. Imperfect Misdirected
790000–799999Transshipped work received from Submission Processing consolidation Sites (Andover, Atlanta, Brookhaven, Cincinnati, Fresno, Memphis, and Philadelphia). 10. Scannable Vouchers (Not assigned by BBTS-listed here as information only)
800000–999999Reserved and assigned by BancTec Scanner for vouchers ran directly on the BancTec equipment, bypassing OE/KV. Range automatically resets daily to 800000. Note:
Specific ranges within BBTS can be reset by category as needed by contacting your local BBTS coordinator.
Note:
Batch any payment received from a consolidated campus under the perfect misdirected or imperfect misdirected RPSID range.
-
Pre-Batch/Clerical Unit controls the supply of pre-printed batch separators.
-
Pre-Batch/Clerical Unit maintains supplies of blank (blue) batch separators and the pre-printed (blue) batch separators.
-
Maintain a logbook for each RPSID range (category). Log the series of numbers used for each category. This allows the user to monitor RPSID category usage and to know the next range to use for a particular category.
-
-
Use BBTS to generate and print the Forms 9382, Batch Transmittal, and Forms 1332C, Block Selection Record, for RPS input, keeping track of the ABCs and RPSIDs to prevent duplication. Use the following Exhibits for preparing the work and entering information into BBTS.
-
Exhibit 3.8.44-27, Masterfile/Non-Masterfile Forms/Program Table.
-
Exhibit 3.8.44-26, Program Codes for RPS Table.
-
Exhibit 3.8.44-20, MFT Codes Combined for Batching.
-
RPSID Ranges listed above.
-
-
Preparing work and entering information into BBTS.
-
Enter the information into BBTS that relates to the batch of work, including the RPSID, tax period, transaction code, transaction received date (actual date IRS received the work), MFT, etc.
Note:
≡ ≡ ≡ ≡ ≡ ≡ ≡ ≡ ≡ ≡ ≡ ≡ ≡ ≡ ≡ ≡ ≡ ≡ ≡ ≡ ≡ ≡ ≡ ≡ ≡ ≡ ≡ ≡ ≡ ≡ ≡ ≡ ≡ ≡ ≡ ≡ ≡ ≡ ≡ ≡ ≡ ≡ ≡ ≡ ≡ ≡ ≡ ≡ ≡ ≡ ≡ ≡ ≡ ≡ ≡ ≡ ≡ ≡ ≡ ≡ ≡ ≡ ≡ ≡ ≡ ≡ ≡ ≡ ≡ ≡ ≡ ≡ ≡ ≡ ≡ ≡ ≡ ≡ ≡ ≡ ≡ ≡ ≡ ≡ ≡ ≡ ≡ ≡ ≡ ≡ ≡ ≡ ≡ ≡ ≡ ≡ ≡ ≡ ≡ ≡ ≡ ≡ ≡ ≡ ≡ ≡ ≡ ≡ ≡ ≡ ≡ ≡ ≡ ≡ ≡ ≡ ≡ ≡ ≡ ≡ ≡ ≡ ≡ ≡ ≡ ≡ ≡ ≡ ≡ ≡ ≡ ≡ ≡ ≡ ≡ ≡ ≡ ≡ ≡ ≡ ≡ ≡ ≡ ≡ ≡ ≡ ≡ ≡ ≡ ≡ ≡ ≡ ≡ ≡ ≡ ≡ ≡ ≡ ≡ ≡ ≡ ≡ ≡ ≡ ≡ ≡ ≡ ≡ ≡ ≡ ≡ ≡ ≡ ≡ ≡
-
Use the RPSID on Form 11356, Batch Separator, for BBTS.
-
Indicate the number of block headers needed for each type of work.
-
Associate the printed Forms 1332C (block headers) with the Forms 11355 (batch separators) using the six-digit RPSID (printed in the DLN area of the block header) and compare it to the RPSID on the batch separator.
-
Attach the batch separator to the block header and place both on the proper batch of work.
-
-
Once the association of the block headers, batch separators, and batch transmittals with the work for RPS processing is complete, the RPS Pre-Batch/Clerical clerk routes the work to the OE/KV function.
-
The following scannable vouchers and notices must be sorted by scan line position and delivered directly to the BancTec Scanner for processing. Place the remittances behind the vouchers or notices before delivering to the BancTec Scanner:
-
Balance due notices
-
Form 940V, Form 940VEZ, Form 941V, Form 943V and Form 945V
-
Form 1040ES, Estimated Tax for Individuals
-
Form 1041ES, Estimated Tax for Trusts and Estates
-
Form 1040V, Payment Voucher
-
-
Several source documents require other actions for the payment to be posted correctly or the source documents to be routed correctly. There may be other source documents not included in the following that require more instructions for routing. In those situations, refer to local procedures for more information on proper routing.
-
DATC–ASTA Letters. Place in a colored folder for routing to DATC–ASTA function
-
CP 2000, Request for Verification of Unreported Income, Payments, or Credits. Place in a colored folder for routing to Underreporter function
-
Block CP 2501, Initial Contact to Resolve Discrepancy Between Income, Credits, and/or Deductions Claimed on Return & Those Reported by Payer separately from CP 2000. Place in colored folder for routing to Underreporter function
-
Exam
-
Collection
-
Windfall Profit Tax (WPT)
-
Automated Lien System (ALS)
-
-
The Payment Perfection function within Deposit Activity performs analysis and research on remittances and returns/documents that require more preparation prior to depositing money. They also code or edit for other function areas to ensure all taxpayer information is available to credit taxpayer's accounts. See IRM 3.8.45, Manual Deposit Process, for specific procedures.
-
Types of possible remittances the IRS may receive can include any of the following.
-
Personal Check
-
Money Order
-
Cashier Check
-
Cash - refer to Payment Perfection technicians
-
Business Check
-
Certified Check
-
Voucher Check
-
Treasury Check
-
Draft/Postcard Type Check
-
Irregular Checks, see IRM 3.8.45, Manual Deposit Process
-
Foreign check drawn on U.S. dollars
-
-
The remittance must remain with its source document; do not staple together. Prior to processing, check stubs and any staples must be removed.
-
If payee is IRS only, CASH, or blank, stamp United States Treasury on payee line. See IRM 3.8.44.6.2, Remittance Not Payable to United States Treasury.
-
When processing remittances intended as payment for photocopies of tax returns, refer to IRM 3.8.45, Manual Deposit Process.
-
When processing a taxpayer's returned refund check, refer to IRM 3.8.45.5.20, Returned Refund/Rebate/Treasury Government Checks for Payment of Taxes.
-
For processing Traveler’s Checks, follow the instructions provided in IRM 3.8.45.5.2(5), Remittance Perfection.
-
Foreign checks will be processed through RPS when payable in US dollars through a US bank. The US bank's routing symbols and a nine-digit routing number must be printed in Magnetic-Ink Character Recognition (MICR) ink in the lower left corner of the check. If the check fails to meet any of these conditions, route to Manual Processing.
-
If remittance is not made payable to the United States Treasury or one of the acceptable payees listed below, pull the remittance and source document and route to the Payment Perfection Unit.
Payee Overstamp Table
Payee Accept/Reject Over stamp/
EndorseInternal Revenue Service Accept No United States Treasury Accept No U.S. Treasury/
US TreasuryAccept No Department of the Treasury/
Department of TreasuryAccept No IRS Accept Over stamp Director (or Commissioner) of Internal Revenue Accept Over stamp Estimated Tax Accept Over stamp Social Security Administration (or SSA) Accept if received with SSA Form 4511 Over stamp FICA Accept Over stamp Blank Accept Over stamp Other U.S. Government Agency Accept Over stamp Taxpayer (personal check or money order) Accept if taxpayer has endorsed. Reject if taxpayer has not endorsed. Endorse "For Deposit Only - United States Treasury" below last endorsement. Third Party Reject unless third party has endorsed. If third party has endorsed the check over to the taxpayer, the taxpayer must also have endorsed. Endorse "For Deposit Only - United States Treasury" below last endorsement. Considered variations of any agency or department of the United States Government to be a payment to the United States Government. Accept Over stamp State Agency or Franchise Tax Board Accept if money amount matches the Federal Document. Over stamp Department of Justice on Form 3244 received from the IRS Accounting function Accept all payees on the Payee line. Over stamp
-
Mutilated remittances may not be accepted by financial institutions. See IRM 3.8.45, Manual Deposit Process, for specific procedures.
-
Totally blank remittances must be forwarded to Payment Perfection. A partially complete remittance may be processed, whether signed or not, if the money amount can be determined. As needed, follow the steps listed below to determine the money amount to use for deposit processing.
-
Use the numeric amount on the remittance for processing unless there is an amount annotated above the remittance date line. When present, use this money amount for processing. There may still be times when the money amount to use is questionable. Use the following table to determine the payment amount:
If... Then... The numeric amount is legible and matches the written amount Process the payment using the numeric amount. The numeric amount is illegible or blank Process the payment using the written amount. Annotate, in pencil, the amount used above the remittance date line. The numeric and written amounts do not match, and the numeric amount matches the source document Process the payment using the numeric amount. The numeric and written amounts do not match, and the written amount matches the source document Process the payment using the written amount from the remittance. Annotate, in pencil, the amount used above the remittance date line. The numeric and written amounts do not match, and neither one matches the source document or there is no source document Pull the source document and related remittance and route to Payment Perfection. Illegible or blank numeric and written amounts or a determination cannot be made Pull the source document and related remittance and route to Payment Perfection. -
Process a canceled check as follows:
If... Then... A canceled check is received with "Endorsement Erased" Process through RPS. A canceled check is received without "Endorsement Erased" Route to Payment Perfection. Check is stamped "Account Closed" Forward to Payment Perfection for handling. Check is stamped "Secured" and no holes punched in the routing number area Process through RPS. Check is stamped "Secured " but has holes punched in routing number Forward to Payment Perfection for handling. -
Seized checks may be processed with proper endorsement. If in doubt or if the endorsement is missing, route to Payment Perfection.
-
Do not process remittances of $100 million or greater through RPS. Give the remittance and related source material to your manager or designee, who is required to hand carry the item to Payment Perfection.
-
Unacceptable Payment of Taxes consists of items the Federal Reserve Bank does not accept as payment. Hand carry any of the following items found in the Payment Perfection Unit to the Extraction Function to secure in a locked safe:
-
Actual Currency
-
MoneyGram Receipts
-
-
Forward a remittance found, with or without a source document, within the work area to the designated Deposit Unit personnel or pull-out cart.
-
Campuses receive questionable remittances that resemble checks and money orders. In most cases, these remittances show the taxpayer and the "United States Bureau of Internal Revenue" as payees. The bogus remittances may include other identifying characteristics. See Exhibit 3.8.44-1, Bogus Check. DO NOT PROCESS ANY REMITTANCES CONTAINING THE FOLLOWING CHARACTERISTICS:
-
Unusual or no financial organization names
-
Monetary instruments printed on check quality paper or photocopying paper
-
Monetary instruments that reference 31 USC 371
-
No bank routing information (All American checks have a nine-digit number surrounded by symbols |:|:,e.g., |:123456789|:.)
-
A lien number
-
The words "Certified Bankers Check" , "Public Office Money Certificate" , or "Certified Documentary Draft" , "Lien Draft" , "Certified Money Certificate" , and "Comptroller Warrant"
-
-
Sites receive the majority of the bogus remittances by certified or registered mail. The bogus remittance may include the following documents:
-
A letter requesting a refund for overpayment or the taxpayer renouncing their U.S. citizenship.
-
Several bogus checks received include a document titled, WARRANT PROCESSING PROCEDURES. THIS IS NOT A LEGAL OR VALID DOCUMENT. DO NOT PROCESS A REMITTANCE BECAUSE IT IS ATTACHED TO THE WARRANT PROCESSING PROCEDURES. See IRM 3.8.45, Manual Deposit Process.
-
-
Upon receipt of a suspicious remittance, process using the following procedures:
-
Avoid removing evidence, such as lifting finger or palm prints. Handle the remittance, envelope, and any correspondence as little as possible. Place remittance in check saver.
-
Immediately contact your manager and the Questionable Refund Coordinator in the Treasury Inspector General for Tax Administration (TIGTA) at your Campus if there is any doubt about the legitimacy of a particular remittance.
-
Do not contact the taxpayer, payer, banking institution or remitter indicated on the remittance to ascertain if the item is legitimate or not.
-
Do not refer to or discuss the questionable remittance with anyone or any agency outside the IRS. This includes supplying photocopies of the item or a fax of the item to anyone other than an authorized IRS employee.
-
In the event the Fraud Detection Center chooses not to pursue the matter, the manager coordinates with the Payment Perfection Unit to return the suspicious remittance to the taxpayer.
-
-
A money order as defined in Treasury Regulation 301.6311–1 is an instrument issued by a United States post office, bank, express, telegraph, or domestic building and loan association, as defined by IRC 7701(a)(19), or by a similar association incorporated under the laws or a possession of the United States, or such other organization as the Commissioner may designate.
-
Do not accept or process a check not drawn on banks and domestic building and loan associations incorporated in the United States and must contain magnetic encoding. IRS personnel cannot accept a check when it is a known fact that the bank or financial institution does not exist. (Banks closed for one reason or another and did not merge with another financial institutions.)
-
A sight/site draft (a form of check negotiable through commercial banks) requires a service charge to process. This fails Treasury Regulation's 301.6311–1 only if there is no deduction for exchange or other charges.
-
Non-legal negotiable remittances include: A Lien Draft, Certified Bankers Check, Public Office Money Certificate, Certified Documentary Draft, Comptroller Warrant and/or Certified Money Certificate. The Internal Revenue Service cannot accept these items.
-
Remember to immediately contact the Questionable Refund Coordinator in the Fraud Detection Center in your Campus upon receipt of a bogus or questionable remittance.
-
Pre-Batch/Clerical unit receives perfect and imperfect remittances and their related returns/documents on a regular basis.
-
Perfect returns/documents are batched directly for RPS data entry. Consider an item "Perfect" when the transaction information includes a legible taxpayer name, TIN, one MFT code, at least one tax period (accept multiple tax periods on notices other than Form 668A and Form 668W. The oldest tax period listed is the one processed for the payment.), and one remittance. As applicable, one of the following is required: plan number (Form 5330, Return of Excise Taxes Related to Employee Benefit Plan, Form 5500 series, Annual Return of A One Participant (Owners and Their Spouses) Retirement Plan and Foreign Plan, and Form 5558, Application of Extension of Time to File Certain Employee Plan Returns, only), one report number (Form 8038-T, Arbitrage Rebate and Penalty in Lieu of Arbitrage Rebate, and Form 8038-CP, Return for Credit Payments to Issuers of Qualified Bonds), Designated Payment Code (DPC), secondary code/money amount, tertiary code/money amount. See IRM 3.8.45, Manual Deposit Process, for specific procedures.
-
Scannable work (voucher with a scanline and associated remittance following, is considered perfect and is delivered to the BancTec Scanner area directly by the Extraction unit.)
-
Imperfect source documents and remittances consist of items that do not meet the criteria of a "perfect" . They include incomplete items, illegible items, attached correspondence, or split or multiple payments. The Payment Perfection Unit researches and secures missing information and inputs the transaction via InfoConnect or routes it to Pre-Batch/Clerical for batching to RPS. If discovered in a batch, pull the item and route to the Payment Perfection Unit.
-
If the remittance amount associated with a timely filed return is under or over the balance due amount, then process the payment as Other Than Full Paid (OTFP). If received with a delinquent return, regardless of whether the remittance matches the balance due line, process as OTFP.
-
Prepare a payment posting voucher or equivalent whenever a source document is not available, and the payment is not processable through RPS. A list of payment posting vouchers follows:
-
Form 3244, Payment Posting Voucher, see Exhibit 3.8.44-16, Form 3244, Payment Posting Voucher, Designated Payment Code (DPC) Present (TOP) and Not Present (Bottom).
-
Form 809, Posting Vouchers.
-
IDRS Printout used in lieu of Form 3244, Payment Posting Voucher, see Exhibit 3.8.44-16, IDRS Printout and Envelope Used as a Source Document.
-
Correspondence, see Exhibit 3.8.44-8, Use of Taxpayer Correspondence as a Source Document.
-
Form 4907, TDA/Taxpayer Delinquent Account, see Exhibit 3.8.44-17, Form 4907, Designated Payment Code Present (TOP) and Not Present (Bottom).
-
Envelope, see Exhibit 3.8.44-6, IDRS Printout and Envelope Used as a Source Document, and Exhibit 3.8.44-15, Automated Collection System (ACS) Printout and Envelope Used as Source Document.
-
-
Preventive maintenance (PM) is a key factor in the performance level of the Scanners. Perform this activity prior to the startup of each shift while the Scanner is in idle mode. It is vital that each step is followed and performed carefully to avoid mechanical malfunction.
-
The following table lists the tools and supplies needed to clean the BancTec Scanners. The first column lists the Description and the second column shows the corresponding number for the item listed in the Description column.
Description Part Number Kim Wipes™ 507954 OfficeDuster 3™ (Canned Air) 653307 Lint Free Cloth (1PAK=Bag of 300) 772193 Vacuum Cleaner with a plastic crevice and brush attachments Purchase locally Foam Tipped Cleaning Swabs 847456 Simple Green™ Cleaning wipes 913967 Isopropyl Alcohol Wipes 653578 XAAR Ink Jet Cleaner 843687 Distilled Water Purchase locally -
DO NOT spray any cleaning solution directly on the BancTec Scanners. Instead, spray the cleaning solution on the lint free cloth, then clean the desired area or item.
-
Before cleaning and daily processing, perform the following tasks.
-
Clear the scanner work service. Remove any documents from the auto feeder.
-
Remove any paper clips, staples, or paper from the work area.
-
Remove any documents in the paper path.
-
Inspect the paper path and remove paper clips, staples or paper.
-
Clean off any ink or dirt using the Simple Green wipes.
-
-
Follow the instructions provided in this subsection for cleaning of the Auto Feeder, Aligner Module, Reader Module, Control Point Module, Image Module, and Stacker Modules. To avoid blowing debris into clean areas of the BancTec Scanners, perform the vacuuming tasks prior to beginning cleaning of the belts and other parts.
-
Do Not spray any cleaning solution directly on the BancTec Scanners. Instead, spray the cleaning solution on the lint free cloth, then clean the desired area or item.
-
Follow the instructions provided in the BancTec IntelliScan XDS IntelliScan Operator Guide provided by Leidos for maintenance and cleaning procedures.
-
Remove the front cover over the separator by grasping the handle and pulling forward. Move the auto feeder tray to the left.
-
Using a vacuum with the crevice tool, vacuum and blow out the areas around the belt, then vacuum and blow out the roller and sensor areas.
-
Use the stiff brush to dislodge any stubborn debris and vacuum the area again.
-
Clean the belts.
-
Vacuum and blow out the paper track using the vacuum crevice tool.
-
Clean the Aligner Entrance and Double Feed Entrance sensors.
-
Check for debris, and re-vacuum, if necessary.
-
Clean all belts.
-
Blow any dust or debris from the keyboard using canned air or vacuum it with the vacuum brush attachment.
-
Use caution with cleaning or touching the monitor screen. The surface of the screen is made of a soft gel type material and is easily damaged by hard or soft objects.
-
Do not spray any cleaning solution on the monitor. Instead, spray the cleaning solution on the lint free cloth, then clean the display area and frame of the monitor.
-
Vacuum with the crevice tool, then blow out the paper track.
-
Use the bristle brush to dislodge stubborn debris, then vacuum the area again.
-
Clean sensors.
-
Clean all 16 belts.
-
Vacuum with the crevice, tool, then blow out the paper track.
-
Use the bristle brush to dislodge stubborn debris, then vacuum the area again.
-
Clean all eight belts.
-
Wipe off the face of the track sensor.
-
Vacuum with the crevice tool, then blow out the paper track.
-
Use the bristle brush to dislodge stubborn debris, then vacuum the area again.
-
Clean the sensors.
-
Clean all 16 belts.
-
Clean the Rear Image Camera glass.
-
Wear gloves to prevent ink transfer to hands.
-
Remove the ink cartridge and wipe all fibers from the bottom of the cartridge with a lint free cloth dampened with distilled water.
-
Repeat this procedure for all cartridges installed.
-
Remove any ink found on the scanners.
-
Clean the Print Head.
-
The BancTec Scanner processes three different types of work.
-
Single remittances with single returns/documents (electronic vouchers)
-
Splits and Multiples
-
Scannable vouchers and notices
-
-
The majority of remittances processed through the BancTec Scanner take the form of single remittances received with single source documents.
-
The Pre-Batch/Clerical function uses a pre-printed batch header for each batch of up to 100 documents.
-
RPS OE’s and KV’s the remittances and documents. Route only the remittances for processing through the BancTec Scanner.
-
Jog each batch of remittances, along with a preprinted batch separator with a RPSID assigned by BBTS, to align the top left-hand corners. This decreases the number of jams in the BancTec Scanner.
-
The remittances pass through the Scanner once.
-
Ensure each bundle of remittances is passed through the staple detector equipment prior to loading them in the hopper. Failure to perform this duty could result in unnecessary and costly scanner downtime.
-
Remove all paper clips, loose tape, and any object that could cause the machine to mis-align a document, a jam, or pocket incorrectly.
-
Paper sticky notes are allowed on documents if the glued edge leads into the direction of the paper travel.
-
-
RPS OEs and KVs Splits and Multiples. Run only the checks through the BancTec Scanners.
-
Run the remittances for splits and multiples separately from other remittances to insure easier balancing, and re-matching of remittances with their corresponding documents in cases of an unbalanced condition.
-
The remittances pass through the Scanner once.
-
-
Route scannable vouchers and notices directly to the BancTec Scanner for processing.
-
Extraction and Pre-Batch/Clerical sorts scannable vouchers and notices according to type and scanline position. Adjust the BancTec Scanner’s scanline position to match the work.
-
Jog remittances/documents to align the lower-right-hand corners. This decreases the number of jams in the BancTec Scanner.
-
Ensure each corresponding remittance is placed behind the corresponding voucher/notice.
-
Use the Batch Header Tool on the workstation to print a substitute batch header on a printer or copy machine.
-
-
Six processes take place in the Remittance Verification Operation:
-
Free/Missing Entry
-
Scanline Fix
-
Stub Amt Entry
-
Check Amt Entry
-
Balancing
-
Suspense Balancing
Note:
Correction Operators must familiarize themselves with Exhibit 3.8.44-1, Exhibit 3.8.44-12, Exhibit 3.8.44-13, Exhibit 3.8.44-14, Exhibit 3.8.44-20, Exhibit 3.8.44-22, Exhibit 3.8.44-23, Exhibit 3.8.44-24, Exhibit 3.8.44-25, Exhibit 3.8.44-26, Exhibit 3.8.44-28, and Exhibit 3.8.44-29 along with all other exhibits that cover deposit reports.
-
-
An operator must not perform both the Check Amount Entry and the Balancing in the remittance verification operation unless authorized by the supervisor.
-
The purpose of the Free/Missing Entry Function is to match checks processed through the BancTec Scanners to their records not matching in the electronic file from OE/KV during the Merge process. The Free and Missing Reconciliation screen displays as much information available to allow matching of the checks to their electronic records.
-
The top right portion of the screen displays a list of "free" checks that do not have an exact match in the electronic file. The list includes sequence number, amount, and match status. Select a check by pressing F8 or clicking the "free item" button at the bottom of the screen. Use the up and down arrow keys to scroll through the list. As the check is selected, its image is displayed on the top left portion of the screen.
-
The bottom half of the screen displays the "missing" records from the electronic file that do not have an exact match from the items ran through the BancTec Scanners. The item, transaction number, amount, and the scanline information display for each item, along with the match status. Select an item from the list by pressing F7, or clicking the "miss item" at the bottom of the screen. Use the up and down arrow keys to scroll through the list.
-
After selecting a "free" check and its associated "missing" electronic record, press F3, or click the "match" button at the bottom of the screen to indicate a match. The match status in the upper part of the screen is updated to YES. The match seq column in the bottom part of the screen is updated with the sequence number from the matched item. The match sequence column in the voucher record in the same transaction is set to YES.
-
Delete any unmatched items. Once matching and deletion of all free and missing items in the batch is complete, the next batch requiring Free/Missing matching is presented.
-
To delete an entire transaction from the "missing items" , press F4, or click the "Delete Miss" button at the bottom of the screen. A confirmation screen appears. Click "yes" to delete the entire transaction containing the highlighted item. Click the "no" button for the transaction to remain.
-
Scanline Fix is used to correct any "misreads" or "can't reads" in the scan line and the Magnetic-Ink Character Recognition (MICR) line of the check.
-
Only items with bad scan lines present for correction. If a transaction is presented in scan line fix, it must be corrected before performing further data entry on the particular voucher.
-
When the Scan Line fix option is selected from the Data Entry Menu, the first transaction requiring correction appears in the scan line fix screen. Only those items that have required fields with errors display for correction.
-
The scanline fix program highlights the first required field containing a "can't read" when the scan line or MICR line is initially displayed. If by chance a field is highlighted and it is not immediately obvious which field is in error, press F10, or Enter to accept the field information.
-
Use the stub or check image to determine the correct value of the field that requires correction.
-
To change an already existing number, use the right and left arrow keys to move the highlighting to the unreadable character. The unreadable characters appear as question marks.
-
The TAB key is used to go to the next field to the right; SHIFT TAB moves to the next field to the left.
-
Enter the correct character in the field and press ENTER to record the number.
-
-
Reject unmatched barcode masked Taxpayer Identifying Numbers and scanline Check Digits that cannot be resolved.
-
When the last item requiring correction is complete, the next transaction is prompted.
-
Several functions display at the top of the screen to assist you.
-
F4 rejects a transaction to allow for separate processing. Before a transaction is rejected, a confirmation window appears.
-
F6 used to turn the image of a stub right side up, if for some reason the image appears upside down.
-
F7 used to change the type of item on the screen from check to stub or vice-versa. Press ENTER to change the item type, and the scan line fields applicable to the new item type appears on the screen below the image. Press ESC to keep from changing the type image.
-
F9 exits from Scanline Fix and returns to the Data Entry Menu. A Confirmation window appears to make sure you really intend to exit.
-
F10 accepts the field information as is.
-
F12 flushes the system of all worked transactions. Use prior to exiting a correction function and transactions still remain that require correction. For example, you exit a function when leaving your workstation for a work break.
-
-
Transactions with a voucher that does not contain an amount in the scan line presents in Stub Amount Entry for correction.
-
When Stub Amount Entry is selected from the Data Entry Menu, the Stub Amount Entry screen displays with the first transaction requiring a stub amount entry. The Stub Amount Entry screen contains the stub (voucher), the CAR amount, and the amount entry field.
-
Enter amounts for vouchers not containing an amount in the scanline. The upper portion of the screen displays the image of the voucher. Below this image is a magnified view of the area of the voucher that contains the amount. A field is provided to enter the amount, verify the stub amount and enter the correct amount in the amount enter field. When the entry is complete, press F10, or Enter.
-
If there is no money amount on the voucher, and you cannot determine the money amount, press ALT F5. This displays the check and the voucher on the View Transaction screen. The View Transaction screen allow for viewing of the transactions, you cannot change a transaction. Press F9 to return to the Voucher Amount Entry screen and enter the amount of the check. If, after going to the View Transaction screen, you cannot determine the amount, enter .01 or skip the voucher. This causes the voucher to proceed to the Balancing function.
-
Following is a list of functions available in the Stub Amount Entry screen:
-
F2 displays the image of the previous item.
-
F4 rejects an item. Before an item is rejected, a confirmation window appears.
-
F5 displays the check and the voucher images for the transaction on the View Transaction screen.
-
F6 displays the Manage Image Menu which allows you to zoom (enlarge), rotate, or flip the image of the currently active check.
-
F9 exits from the Check Data Entry screen. A confirmation window appears to make sure you really intend to exit.
-
F10 or Enter accepts the amount entered.
-
F12 flushes the system of all worked transactions. Use prior to exiting a correction function and transactions still remain that require correction. For example, you exit a function when leaving your workstation for a work break.
-
-
The View Transaction screen has its own function keys.
-
F7 highlights the amount of the displayed voucher. The transaction is viewed here; you cannot change the amount. Use the Voucher Amount Entry screen to make any necessary changes.
-
F8 highlights the amount of the displayed check. As with vouchers, you cannot change the amount on this screen.
-
F9 exits the View Transaction screen and returns to the Voucher Amount Entry screen.
-
-
If the BancTec Scanner cannot read the check amount, the transaction presents in to Check Amount Entry.
-
When Check Amount Entry is chosen from the Data Entry screen, the Check Amount Entry screen displays with the first transaction requiring check amount correction.
-
The upper portion of the screen displays the image of the check. Below the image is a magnified view of the check area that shows the amount. Enter the amount and press F10 or ENTER. When F10 or Enter is pressed, an error message is displayed for any required fields left blank. Press ENTER to remove the message and return to the previous screen.
-
If you cannot determine the amount of the check, enter .02 or reject the item using F4.
-
Following is a list of function keys available in the Check Amount Entry screen:
-
F4 rejects an item, along with the rest of the items in the transaction. Before an item is rejected, a confirmation window displays.
-
F5, View Transaction, displays the check and voucher for the transaction.
-
F6 allows the user to zoom (enlarge), rotate, or flip the image of the check.
-
F9 exits the Check Amount Entry screen.
-
F10 accepts the amount entered.
-
F12 flushes the system of all worked transactions. Use prior to exiting a correction function and transactions still remain that require correction. For example, you exit a function when leaving your workstation for a work break.
-
-
The View Transaction screen has its own function keys.
-
F7 highlights the amount of the displayed voucher. This function is for viewing of the amounts only, it does not allow for changing of the amounts.
-
F8 highlights the amount of the displayed check. This function is for viewing of the amounts, it does not allow for changing of the amounts.
-
F9 exits the View Transaction screen and returns to Check Amount Entry.
-
-
Process unbalanced transactions through the Balancing function from the Data Entry Menu.
-
Only unbalanced transactions present for balancing.
-
When the Balancing option is selected, the Balancing screen displays with the first unbalanced transaction requiring balancing.
-
The voucher and check amount for the transaction display along with the images of the paper items. When necessary, correct the amounts of the vouchers and checks to balance the transaction.
-
Following is a list of options available in the Balancing function:
-
Delete an item from the transaction
-
Insert an item into the transaction
-
Delete the entire transaction
-
-
The transaction is checked for balance when Enter or F10 is pressed. If an amount is zero, that zero is highlighted when Enter or F10 is pressed. When the transaction balances and passes all amount validations, the transaction is posted, and the next unbalanced transaction is displayed.
-
If the voucher amount does not match the check amount, a Data Error Message displays (Transaction unbalanced). Press Enter to remove the message and return to the Balancing screen.
-
If unable to determine the correct amount of the check using the imaged information provided on the "Balancing" screen, suspend the item to the Suspense Balancing function using function F5.
-
When the last transaction is balanced, the next unbalanced transaction is automatically presented for balancing.
-
The following functions are available for use in balancing:
-
F2 brings up the Transaction Summary.
-
F4 rejects a transaction to allow for separate processing. Before a transaction is rejected, a confirmation window displays.
-
F5 suspends a transaction to the Suspense Balancing function.
-
F6 displays the Manage Image Menu which allows you to zoom (enlarge), rotate, or flip the image. Shift F6 displays the image of the batch header.
-
F7 highlights the voucher amount of the currently displayed voucher.
-
F8 highlights the check amount of the currently displayed check.
-
F9 exits from Balancing.
-
F10 posts a transaction.
-
F12 flushes the system of all worked transactions. Use prior to exiting a correction function and transactions still remain that require correction. For example, you exit a function when leaving your workstation for a work break.
-
-
Use the following key combinations to find a specific voucher or check in the Balancing program.
-
Ctrl-A - Allows the user to find a voucher in the current transaction by its amount. A screen is displayed in which the user can enter the amount for which to search.
-
Ctrl-C -Allows the user to find a voucher in the current transaction by its account number. A screen is displayed in which the user enters the account number for which to search.
-
Ctrl-S - Allows the user to find a voucher in the current transaction by its sequence number. A screen is displayed in which the user can enter the sequence number for which to search.
-
Ctrl-O -Allows the user to find a voucher in the current transaction by its amount. A screen is displayed in which the user can enter the amount for which to search.
-
Ctrl-Q - Allows the user to find a check in the current transaction by its sequence number. A screen is displayed in which the user can enter the sequence number for which to search.
-
For any of the above, when a match is found, the amount is highlighted in the voucher or check table. If a match is not found, an error message displays. Press Enter to remove the message and return to the previously highlighted item.
-
-
Use the following key combinations to insert a check or a voucher in the Balancing program.
-
Ctrl-Insert inserts a check. An Enter Scan Line screen is displayed with blank fields according to the check scan line defined in the sort pattern. Fill in the applicable information and press Enter. The check table is highlighted to allow for entry of the check amount.
-
Shift-Insert inserts a voucher. An Enter Stub Line screen is displayed with blank fields according to the voucher scan line defined in the sort pattern. Fill in the applicable information and press Enter. The voucher amount in the voucher table is highlighted to allow for entry of the check amount.
-
Both screens have the same function keys available. F2 switches between displaying the blank fields vertically or horizontally. Set up either one as the default. F4 clears all fields, F8 cancels the insertion process, and F10 inserts the check or voucher. If any of the fields required by the sort pattern remain blank, a warning screen displays. Press Enter to remove the message and return to the previous screen. Then, fill in the required field, or cancel the insertion.
-
-
All checks and/or vouchers suspended to Suspense Balancing display in the Suspense Balancing function. These transactions require research of the paper voucher or check.
-
When the Suspense Balancing option is chosen the Batch Selection screen displays. After the batch number is selected the Balancing Screen displays.
-
Using the paper voucher or check to verify information, follow the Balancing function procedures located in IRM 3.8.44.9.5, Balancing Function, to balance each transaction.
-
In November and December 2020, Austin, Kansas City, and Ogden campus deposit functions received new BancTec check scanners and began electronically processing checks through Over the Counter Network (OTCnet), a secure web-based application. This subsection provides instructions for Electronic Check Processing through OTCnet specific to Austin Submission Processing, Kansas City Submission Processing Center, and Ogden Submission Processing Center. See IRM 3.8.45, Manual Deposit and IRM 3.8.47, Manual Deposit for Field Office Payment Processing, for more information on OTCnet.
-
Batch Schedulers and back-up Batch Schedulers must gain access to OTCnet. Your manager must submit the completed Form 15081, Over the Counter Deposit Reporting Network (OTCnet) User Authorization, digitally signed by their manager, to the local OTCnet Local Security Administrator LSA. IRM 3.8.47.26, Manual Deposit for Field Office Payment Processing, Obtaining User Access to Over the Counter Channel Network (OTCnet),
-
Complete Form 15081, to add users to CIRA VIEWER and VIEW REPORTS roles.
-
List the hierarchy on Form 15081, as follows:
Hierarchy List
Campus Hierarchy Austin Submission Processing Center IRS
AUSPC - Austin Submission Processing Campus
ISRP AUSPC-ISRP Austin SPC-2009180001Kansas City Submission Processing Center IRS
KCSPC - Kansas City Submission Processing Campus
ISRP-KCSPC-Kansas City, MO 2009090003Ogden Submission Processing Center IRS
OSPC - Ogden Submission Processing Campus
ISRP OSPC-ISRP Ogden SPC-2009290026
-
-
Once OTCnet permission is assigned, the employee receives three emails. The first e-mail provides the employee a user ID. The second e-mail provides the employee a temporary password, and the third e-mail provides the employee permission to OTCnet. After receiving a user ID and password, the employee must login to the TWAI to change their temporary password and provide answers to their secondary authentication questions.
-
The user is allowed three consecutive attempts to enter a valid password. After the third attempt, the user is locked out and must answer pre-determined secondary authentication questions or call the Treasury OTC Support Center at (866) 945-7920 for validation of the user’s identity and reset of the password.
-
Users must login to OTCnet at least once every 90 days or access is deactivated on the 90th calendar day since your last access date. For accounts not accessed within 120 days, accounts automatically deactivate on the 120th day from the last access date. Reapply for access if this occurs,
-
If user access is no longer needed or if a user’s access needs modification, notify the LSA within 24 hours.
-
Specific guidance for Deposit Preparers, Deposit Approvers, and Agency Viewers is provided in printable job aids found in the OTCnet Training Overview website.
-
Should the site experience an OTCnet problem the site must contact their Local System Administrator (LSA), notify management, and notify your local Headquarters Analyst via e-mail. If OTCnet unavailability is a result of an IRS network problem the site must open an IRWorks ticket since the Treasury OTC Support Center cannot address an IRS network issue.
-
The following training is required before using OTCnet.
-
New OTCnet Users - Must complete Modules 1, 2, 16, and 18.
-
Current Users - Must complete Modules 16 and 18.
-
Use the following link to access OTCnet training modules. OTCnet Training
-
-
Make several deposit cuts throughout the day, after every 45 - 50 batches.
-
After each deposit cut, run a Deposit Cut Report, cut the batch, and process to OTCnet.
-
Notify the Enterprise Operation (EOps) System Analyst (SA) when making a deposit cut. It takes about 30 minutes to process 45 - 50 batches through OTCnet. Checks and vouchers can continue to process through the scanners once a deposit cut is made.
-
EOps SA transmits the deposit to OTCnet and sends the Batch Deposit Summary Reports to the Batch Scheduler through the Batch Scheduler’s printer.
-
Batch Scheduler balances the Batch Summary and the Batch Deposit Summary Reports throughout the day.
-
EOps SA keeps a running total of deposits transmitted throughout the day.
-
At the end of the day, the Batch Scheduler balances the Batch Summary Reports and Batch Deposit Summary Reports. Money amounts must match.
-
EOps SA’s can identify deposit file errors not seen by the Batch Scheduler.
-
Batch Scheduler performs a CIRA query as soon as the final Batch Deposit Summary Report is received from the EOps SA.
-
Logon OTCnet.
-
Select the Check Processing tab.
-
CIRA query.
-
Search Criteria - Enter the following information: OTC endpoint (Site), ISRP, Site, CHK.
-
Several boxes appear. Enter today’s date into the Deposit Date. All deposit cuts display.
-
Print the package, scan the package and send to Accounting. Retain a hard copy for six months. After six months dispose of the copy as classified waste.
Note:
Classified waste is documentation containing taxpayer entity or account information that is not part of the case and is not needed for audit trail purposes. Refer to IRM 21.5.1.4.10, Classified Waste, for guidance on handling classified waste to prevent inadvertent/unauthorized destruction of records.
-
-
Use the following steps to ensure the deposit is in balance before release of the deposit to the bank.
-
Make deposit cuts every hour and print the Deposit Cut report after each deposit cut is made. During peak periods make a deposit every 30 minutes.
-
Request the Deposit Summary report.
-
Throughout the day, compare the hourly Deposit Cut reports with the Deposit Summary report. The total volumes must match.
-
At the end of the day compare the total hourly Deposit Cut reports with the Deposit Summary report.
-
The following day view the prior day’s Deposit Ticket-215C on OTCnet and compare with the Deposit Summary report. The total volumes must match.
-
If the deposit does not balance, look for failed items. For research and resolution of failed items, see IRM 3.8.44.10.6, OTCnet Failed Items.
-
-
RTR does not balance when failed items show on the deposit. If failed items appear, take the action shown below on the morning following the day of the deposit.
-
Login to RTR using the following link: RTR Login.
-
Pull up the electronically failed item.
-
Click on the Notes button in the lower left of the RTR screen.
-
Add the verbiage “Failed transaction through ISRP. Processed Manually”.
-
-
Check OTCnet daily for failed items from the prior day’s deposit, using OTCnet CIRA query.
-
Logon OTCnet.
-
Select the Check Processing Tab.
-
Select CIRA Query.
-
Scroll down to Settlement Status and select "Failed" from the drop-down menu.
-
Enter the deposit date or deposit date range in the Received Date section using the calendar feature.
-
To display the failed item(s), click on the IRN number and the failed item image appears.
-
Review the item and note the reason the item failed.
-
-
Failed Item Code 184 (Reject Corrupt or Missing Image) send directly to Manual Deposit for resolution. Do not notify Accounting Dishonored Check function.
-
Notify Accounting Dishonored Check function of the failed item(s) via e-mail using the group e-mail address for your site listed below. Use e-mail subject "Remove Failed Deposit Item from Tax Account mm/dd/yyyy." Use the deposit date for the mm/dd/yyyy. Send a separate e-mail for each deposit date. Do not include multiple deposit dates in one e-mail.
Dishonored Check Group E-mail Addresses
Site E-mail Address Austin &TS OTCnet AUSC ACO Kansas City &TS OTCnet KCSC ACO Ogden &TS OTCnet OSC ACO
Include the following information in the body of the e-mail.-
Deposit Ticket Number
-
Deposit Date
-
IRN
-
Trace ID Number
-
Amount of the check
-
-
Track all failed Items using the steps provided below.
-
Print the failed item from OTCnet.
-
Next to the failed item(s), notate the date of the e-mail sent to the Accounting Dishonored Check function.
-
File in a binder labeled “OTCnet Failed Items”. Store binder in a locked cabinet.
-
Send a follow-up e-mail to Accounting Dishonored Check function if you have not received a reply within three days of your initial e-mail.
-
If a response is not received from Accounting Dishonored Check within two days of your follow-up e-mail, contact your Deposit Headquarters Analyst.
-
Failed items stored within a retention box that meets all criteria for destruction except for any failed items, pull the check, notate on the Retention and Destruction Log the check pulled. Associate and retain the check with the printed copy of the failed item within the OTCnet Failed Items binder until notification is received from Accounting the reversal of the transaction on the taxpayer’s account is complete.
-
-
Once an e-mail is received from Accounting Dishonored Check function indicating their action is complete, notate the reply date on the OTCnet failed item print, pull the check from the retention box and notate on the Retention and Destruction Log:
-
Check ID information
-
Check pulled
-
OTCnet failed
-
Brief reason the check failed OTCnet. For example: foreign, invalid RTN, non-negotiable.
-
Disposition of the pulled check. For example: re-deposited on MM/DD/YYYY, Route to Manual Deposit on MM/DD/YYYY for deposit or return to taxpayer.
-
-
Take the proper action as follows.
-
Code 184 (Reject Corrupt or Missing Image) does not require removal from the tax account. Do not route to Accounting Dishonored Check function. Route directly to Manual Deposit for resolution.
-
Code 184 items received from Lockbox - Follow the instructions located in IRM 3.8.45.3.2.1.2(2), OTCnet Failed Item Code 184.
-
Duplicate Transaction (Check number used more than once by taxpayer) - Route check to Manual Deposit for processing.
-
Failed - Examine the item to determine if the sleeve obscured the Magnetic-Ink Character Recognition (MICR) information. If able to re-run, then re-run through the scanner. If unable to reprocess through the scanner, then route check to Manual Deposit for processing.
-
Foreign Check - Route check to Manual Deposit for processing.
-
Invalid Routing Number - Route check to Manual Deposit for return to the taxpayer.
-
Non-Negotiable - Route to Manual Deposit for return to the taxpayer.
-
Suspected fraud - Contact your manager and follow the instruction located in IRM 3.8.44.6.4, Questionable Payments.
-
-
Transaction Management System (TMS) Reports
-
Batch Summary - Select Maintenance Menu, Double Click TMS Reports, Click Standard Reports Menu, Click Batch Summary Report, click Site DropDown box and click Check All, and Click Select, Repeat with Work Group and Work Source DropDown boxes, click Print Report and select your printer settings and print.
-
-
Custom Reports - To access any of the reports below, Select Maintenance Menu, double right click on Custom Reports, then click on the desired report.
-
RRPS General Fund Remittance Recap - Prints the report labeled P/R/F ISR/0546. Print only when copy fees were processed for that day. See Exhibit 3.8.44-32.
-
RRPS Refund Repayment Remittance Recap - Prints the report labeled P/R/F ISR/0548. Print only when Repayments were processed for that day. See Exhibit 3.8.44-30.
-
Deposit Summary - Prints the report labeled P/R/F ISR/0551.
-
Deposit Cut-off - Prints the reports labeled SF215A-C (REV 7-91), along with the following reports.
Deposit Ticket - P/R/F ISR/0544. See Exhibit 3.8.44-40.
RRPS Master File Remittance Recap Report - P/R/F ISR/0435. See Exhibit 3.8.44-29.
RRPS Non-Master File Remittance Recap Report - P/R/F ISR/0546. See Exhibit 3.8.44-33.
RRPS Refund Repayment Remittance Recap Report - P/R/F ISR/0548. See Exhibit 3.8.44-30.
RRPS General Fund Remittance Recap Report - P/R/F ISR/0547. See Exhibit 3.8.44-32.
RRPS Deposit Fund Remittance Recap Report - P/R/F ISR0544. See Exhibit 3.8.44-31.
Transaction Received Date Report - P/R/F ISR/0542. See Exhibit 3.8.44-39.
General Ledger Account Number List Journal Total Report. See Exhibit 3.8.44-34 through Exhibit 3.8.44-38. -
Transport Batch Status Report - Prints the report labeled P/R/F ISR/0440.
-
Export Balance Report - Prints the report labeled P/R/F ISR/0841
-
F4868 Volume and Money - Prints the report labeled P/R/F ISR/0552 - View the report and export to PDF only if Forms 4868 were processed during the day.
-
-
Following is a table that lists the Form Number, Catalog Number, Form Title and RPSID Range for each Batch Header.
Deposit Batch Header Tickets - Scanners
Form
NumberCatalog
NumberForm Title RPSID Range 11356F 74721W Perfect Remit - Scannable 000001 - 489999 11356G 74722H ISRP Manual Deposit 490000 - 4969999 11356H 74723S Discovered Remit 497000 - 499999 11356I 74724D Field Office Remit 500000 - 589999 11356J 74725O OIC Remit 590000 - 599999 11356K 74726Z Lockbox Remit 600000 - 609999 11356L 74727K Payment Perfection Remit 610000 - 7699999 11356M 74728V Perfect Mis-Direct 770000 - 789999 11356N 74729G Imperfect Mis-Direct 790000 - 799999 11356O 74730H Substitute for Non-Scannable Voucher 000001 - 799999 11356P 74731S Scannable Voucher 800000 - 999999 11356Q 74732D Substitute for Scannable Voucher 800000 - 999999
-
ECP payment documents include
-
Paper checks
-
Money orders
-
-
Retain all ECP payments for a period of 60 days.
-
Keep all ECP payment documents in a manner that allows for easy retrieval of stored documents.
-
After deposit and prior to storage, place all payment documents in a 16” x 9 1/2” x 4 1/2”, or similar size, deposit box, sealed, and labeled with the following information.
-
Settlement Date on the SF215, Deposit Ticket.
-
RPSIDs contained within the deposit box.
-
Projected shred date - 60 days from the SF215, Deposit Ticket settlement date.
-
Box number. For example: If five boxes of checks were processed in one day, label the box numbers as follows: Box 1 of 5, Box 2 of 5, Box 3 of 5, Box 4 of 5, Box 5 of 5.
-
Headquarter provided Label templates to each site. See Exhibit 3.8.44-42.
-
-
Each site is responsible for the ordering of retention boxes and labels, and printing of the labels.
-
Store all ECP payment documents in a locked cabinet located within the secured deposit area.
-
Keep key assignments to the locked cabinets used to store the processed ECP payment documents at minimum and limited to the Batch Scheduler(s) and acting Batch Scheduler(s). Maintain one key with the Department Manager.
-
It is the Department Manager’s responsibility to track the ECP locked cabinet key assignments using the ECP Storage Cabinet Key Assignment Spreadsheet. See Exhibit 3.8.44-43.
-
When assigning the ECP storage cabinet key to an employee, the Department Manager and the employee receiving the keys completes Columns A - C, E, and F of the ECP Storage Cabinet Key Assignment Spreadsheet. Column D is completed by the employee.
-
When an employee returns an assigned key to the Department Manager, the Department Manager completes columns I and J, and the employee completes columns F and G of the ECP Storage Cabinet Key Assignment Spreadsheet.
-
Once all checks have been placed in the retention boxes for the day, complete the Campus Deposit Retention/Destruction Tracking Log, columns A-F, and J. Complete this form daily, no exceptions.
-
Column A - Deposit Date from the SF215, Deposit Ticket.
-
Column B - Batch ID.
-
Column C - RPSID.
-
Column D - Batch Location (cabinet number, shelf number, and box #).
-
Column E - Scheduled Destroy Date. Sixty Days from the SF215, Deposit Ticket date.
-
Column F - SEID of employee entering the data.
-
Column J - Comments if required.
-
-
When destroying checks complete the Retention/Destruction Tracking Log Columns G - J.
-
Column G - Actual Destroy Date.
-
SEID of Destroyer.
-
Manager Signature and Date.
-
Comments if required.
-
-
Maintain the Campus Deposit Retention/Destruction Tracking Logs in a binder for three years.
-
Headquarters provided each site with a Microsoft Excel template of the Campus Deposit Retention/Destruction Tracking Log. See Exhibit 3.8.44-44.
-
Retain all ECP payment documents for 60 days from the SF215 deposit settlement date.
-
Do not destroy documents until after the 60-day retention period is up and the Batch Scheduler has cleared all batches of the following
-
all .err files.
-
all missing batches.
-
failed items.
-
resolution of all failed items.
-
-
Complete the Retention/Destruction Tracking Log Columns G - J.
-
Column G - Actual Destroy Date.
-
Column H - SEID of Destroyer
-
Column I - Manager Signature and Date.
-
Column J - Comments if required.
-
-
Place ECP payment documents in large, secured locking bins for disposal with other Secured but Unclassified (SBU) material. Follow local procedures and coordinate with your local Facilities Management and Secured Services (FMSS) for placement and removal of the secured bins. See IRM 10.5.1, Privacy Policy, and IRM 1.15.3, Disposing of Records, for more information on destruction of Secured but Unclassified (SBU) material.
-
When pulling a check from a stored retention batch for the Accounting function, notate the Batch ID and Sequence number in the Comments column of the Campus Deposit Retention/Destruction Tracking Log. For example, Pulled/Acct - Actual Batch ID & Sequence number.
-
Complete the Campus Deposit Storage Pulled Check Log when pulling the check. Headquarters provided each site with a Microsoft Excel template of the Campus Deposit Storage Pulled Check Log. See Exhibit 3.8.44-51.
-
Pull the check, replace the check with a place holder, photocopy or scan the check as requested by your local Accounting function, place the original back in the slot from which you originally pulled the check, and remove the place holder.
-
Complete the Campus Deposit Storage Pulled Log when returning the original Check to the storage box.
-
Maintain the Campus Deposit Storage Pulled Log in a binder for three years.
-
Below is a table of Definition of terms used in and by the Deposit Activity function. The first column lists the term and the second column states the definition of the term.
Definition of Terms Table
Term Definition Account Tax records maintained on magnetic tape in Enterprise Computing Center-Martinsburg (ECC-MTB), identified and controlled by social security number (SSN),individual taxpayer Identification Number (ITIN), employer identification number (EIN), or IRS number (IRSN). Accounting Package Required information, forwarded to Accounting, from each day's deposit taken in from field offices and ramp down campuses (Andover, Atlanta, and Brookhaven), to control and balance the campus revenue receipts. Advance Payment Payment made for a determined or undetermined deficiency prior to more tax assessment. Agency Location Code (ALCs) A numeric symbol used to identify accounting reports and documents prepared by IRS. This code consists of eight digits. The fifth and sixth identify a Submission Processing campus. Amended Return A return filed to correct data submitted on an original return. Annotate To explain or call attention to critical information by marking, coding, or editing. Audit Trail Tax identifying information printed on reverse side of remittance that enables reassociating of payment and source document. Automated Non-Master File (ANMF) A file containing taxpayer information and records of returns not contained on Master file. NMF always requires manual processing. Balance Due A line on tax returns and notices indicating taxpayer owes money to IRS. Batch/ Block Tracking System (BBTS) A comprehensive, integrated batch creation and tracking system. It's used to generate block headers for Original Entry (OE)/Key Verification (KV) input. Batch A group of related tax returns or documents processed in Deposit Activity. A batch can consist of 100 or less items of like returns or documents, or 300 scannable notices/vouchers for the BancTec Scanner. Block Header Record (BHR) The information transcribed by Remittance Processing System (RPS)/Distributed Input System (DIS) to precede each block of documents to introduce balancing and identifying items common to the block. Block Out-of-Balance (BOB) A condition existing in a given block of documents creating an out-of-balance situation. Bureau of Public Debt (BPD) An agency within the Treasury Department whose responsibilities include donations to reduce the public debt and control of Treasury estate bonds. Business Master File (BMF) A Master File of various types of business return data which is maintained under an Employer Identification Number (EIN). Calendar Year (CY) Twelve (12) consecutive months ending December 31. Candling Finds Remittance discovered in the candling function within Receipt and Control. Cash Bonds An advance payment received from a taxpayer that expects a tax deficiency determined at a later date and may become an Appeals or Tax Court case. Now obsolete. Check Digits A two-alpha code, A to Z, computer-generated derived from a mathematical formula applied to the EIN or SSN. It is used in lieu of name control (to reduce keystrokes) when EIN or SSN present as unaltered on IRS preprinted labels. Collection Statute Expiration Date (CSED) The last date IRS has to collect on an outstanding balance due on an account. Usually 10 years from the assessment date. Command Code (CC) A five-character abbreviation for a particular inquiry or action requested through the Integrated Data Retrieval System (IDRS). Each command code is used for a specific purpose. Computer Paragraph (CP) Notice A computer-generated message resulting from an analysis of the taxpayer's account. It is used to notify the taxpayers of a balance due, refund, or no balance status. It is also used for internal research and review. Conscience Fund The account credited of remittances received from taxpayers to ease their consciences. Usually, a note is attached indicating it is for the Conscience Fund. For example: A taxpayer may write a note stating, "I am able to sleep better now." Control Clerk A designated employee who regulates and finalizes the workflow in Deposit Activity. Courtesy Deposit A deposit made for out of area remittances, by location received. Date Stamp The campus received date is stamped "Conscience Fund." tax returns and documents indicating the date received at IRS campus, territory office, area office or by an authorized agent of the IRS. Definer A code following the command code; used to request a more detailed search for information on a file. Delinquent Return Return filed after the relevant due date without an approved extension. Deposit Activity Report (DAR) A continuing report maintained for monitoring the timely deposit of all remittances prescribed by the deposit cycle. Deposit Cycle Report (DCR) Continuing report maintained for monitoring the 90% deposit criteria. Deposit Date The calendar date that coincides with the Julian Date assigned in document locator numbers (DLNs). Depository/Depositary The bank contracted by Treasury's Financial Management Services (FMS) to process IRS deposits and established credit for the Treasury into the Treasury's General Account (TGA). Deposit Release (Pick-Up) The established time each day a balanced deposit is released to courier. Deposit Ticket (DT) The Standard Form SF 215–C, Deposit Ticket, is generated during the final deposit operation. Designated Payment Codes (DPC) Two-digit code used with payments secured by Compliance to identify source of payment (e.g., levy, seizure, installment, etc.). Discovered Remittances Remittances discovered during pipeline processing of the returns found somewhere within the attachments. Employee Plan Master File (EPMF) A Master File maintained at ECC-MTB consisting of various types of tax-sheltered pension/profit sharing plans. Employer Identification Number (EIN) A nine-digit number used to identify a taxpayer's business account. Encode A system of converting and printing the amount of payment shown on remittance into a Magnetic Ink Character Recognition (MICR) font. Endorsement The authorized name of payee on the back of a remittance to obtain the cash or credit represented on the front. Each check deposited must show the IRS endorsement, date of deposit (manual endorsements excluded) and legend, and must contain the same ALC and depositor address as shown on Form SF 215-A, Deposit Ticket. Entity Area The area on source documents where the name, address, account number, tax period and other entity data appear. Entry Code A two-character code assigned to authorized terminal operators access to all command codes. Erroneous Refund Repayment The term used for refund checks issued in error and requiring repayment by the taxpayer. Exempt Organization Master File (EOMF) A Master File maintained consisting of Group Exemption Number, Key District Office, and District Office of Jurisdiction. Federal Reserve Bank (FRB) A bank designated to process IRS bank deposits. File Location Code A two-digit numeric code which identifies each campus. File Source A one-digit code which follows the taxpayer identification number for research on IDRS (D, N, V, W, P, X, or *). This directs the computer to a specific file. Fiscal Year Twelve consecutive months ending on the last day of any month other than December. Flower Bond Terminology occasionally associated with certain Treasury Bonds redeemable for estate taxes. Foreign Operation District (FOD) A District Office with jurisdiction for the IRS Foreign Posts. Freeze Code A freeze code places a taxpayer's account in a condition which requires more action before the account is eligible for settlement. Full Paid (FP) A remittance received equal to the balance due line on timely filed returns. Grace Period A period of time granted beyond the due date of a return or document, before assessing penalties and interest. Green Rocker The editing required to annotate the remittance amount for manual processing. Green rockers represent the amount of money received for that return. Guarantee A written assurance on checks of the payment amount, when the written and numeric amounts differ. Imperfect Source documents and remittances that do not meet the criteria of a "perfect" . They include incomplete items, illegible items, attached correspondence, or split or multiple remittances. Individual Master File (IMF) A Master File of individual tax return data which is accessed by input of a social security number (SSN). Individual Taxpayer Identification Number (ITIN) An ITIN is a nine-digit number (assigned by IRS) to those individuals who do not qualify for a SSN but require an identifying number for tax purposes. Installment Agreement An arrangement set up between taxpayers and IRS, whereby taxpayers make partial payments until their balance of debt is paid in full. Integrated Data Retrieval System (IDRS) A computerized system used throughout IRS for adjusting, researching, ordering, and monitoring tax accounts. Internal Revenue Code (IRC) The tax laws as set forth by Congress. Internal Revenue Manual (IRM) A handbook of procedure and law specifically designed to cover one area of processing. Julian Date A system of numbering days of the year from 001 through 365 (366, if a leap year). Key Verify (KV) A status for Integrated Submission and Remittance Processing (ISRP) terminals to enable verification of data records by KV operators. Law Enforcement Manual (LEM) The part of each manual containing the "OFFICIAL USE ONLY" information for that particular section. Levy Used to collect taxes by seizure of taxpayer's assets. Frequently, funds seized from bank accounts or wages. Lien A claim on the property of a taxpayer as security against payment of taxes due. List Entering green edited money amounts from source documents into listing machines while preparing Form 813(C), Document Register, for manual processing deposits. Lockbox The process of remittances and documents mailed to a designated P.O. Box at a commercial bank. Then deposited in an expedited manner with immediate credit availability for the Treasury. Lockbox processes source documents simultaneously and forwards to campuses. Manual Processing Type of deposit consisting of manually numbering source documents, manually preparing separate documents and remittance registers and separately recapping both the registers. Master File (MF) A magnetic tape record containing entity and accounting information concerning taxpayer tax returns and related documents. Master File Tax Code (MFT) A two-digit number which identifies the type of tax. Magnetic Ink Character Recognition (MICR) Print used in the encoding of the payment amounts, routing transit number, and account number shown on the remittance. Menu System A system used to indicate the type of operation. These include the Normal Operator Menu, Master Menu and Supervisor Menu on the Integrated Submission and Remittance Processing (ISRP) System. Mis-batch/ Mis-batched Returns and documents within a block not of the same type or class of tax. Missing Section Data A section present and transcribed by the OE operator but the document is physically missing at KV. Mis-sorts Returns and documents within a block not of the same type or class of tax. Mixed Data An operator has transcribed the data from one document and the remaining information from another document. Mixed Entity An operator has transcribed entity from one document and the remaining information from another document. Module Part of a taxpayer's account which reflects tax data for one tax class (MFT) and one tax period. Multiple Remittances Two or more remittances applied to the same source document. Name Control (NC) Up to four characters derived from an individual's last name, the corporation’s name, or first listed partner's last name in a partnership to identify the tax account. Non-Negotiable Checks not honored by banks for transfer of funds. Non-Revenue Receipts Payments received for items other than taxes, i.e., bulk forms, photocopy fees, court fines, installment user fee, erroneous refund repayments, etc. Offer in Compromise (OIC) A proposal for settlement of tax liability for an amount less than the assessed tax liability. Payment Sequence Number (PSN) Last three digits of the terminal payment number assigned by the IDRS terminal number identifies a specific remittance input. The PSN carries information used in constructing a true payment DLN. Part Paid (PP) A remittance which does not equal the amount shown on the balance due line of the document. Pending Transaction A transaction input to IDRS but not yet effective at the Master File Account. Perfect Returns/documents and "check only" work batched directly for RPS data entry. Considered "Perfect" only when the transaction information includes a legible taxpayer name, TIN, one MFT code, at least one tax period (accept multiple tax periods on notices other than Form 668A and Form 668W, and apply the payment to the oldest tax period listed), and one remittance. As applicable, one of the following is required: plan number (Form 5330, Form 5500 series, Form 5558 only), one report number (Form 8038-T and Form 8038-CP), DPC, secondary code/money amount, tertiary code/money amount. Perfection A function within deposit activity responsible for researching attachments on source documents and researching the integrated data retrieval system (IDRS), manual accounting replacement system (MARS), or automated collection system (ACS) terminals to perfect documents for payment processing. Photocopy Fees Prepayments received with requests for tax forms and information. Posting Vouchers A source document (posting voucher) containing the required information for input by the deposit activity. Pre-Batch The establishment of batches of work and controls for each group of documents processed through RPS. Pre-Research The act of searching for required data not present on source documents via IDRS, ACS, or MARS terminals prior to actual deposit of remittance. Primary SSN Nine-digit number required on all IMF input documents. Usually located in first Social Security Number box on returns. Masked within a barcode on Computer Paragraph notices and Correspondex notices. Prior Year A tax return with a due date prior to current operating year. Procedure The established way or course of action for processing remittances/source documents. Processing Year The actual calendar year a return is filed and processed, e.g., 2023 tax returns filed and processed in calendar year 2024. Program Number A five-digit number used to identify types of remittance source documents entered into RPS. Quality Review (QR) The appraisal of the quality of work input and output through the deposit function. Recapitulation Balancing summaries of remittances to documents. Received Date The earliest date a source document is received in IRS offices. Redeposits The redeposit of unpaid checks returned as dishonored by banks (not always the designated depositary). Remittance Amount An amount of money received in payment of taxes, such as a check, money order, cashier's check, or cash. Remittance Transaction Research (RTR) A system that uses a researchable database that contains remittance processing data and images from IRS Integrated Submission and Remittance Processing (ISRP) system and Lockbox Bank processing sites. Secondary Amount A second transaction code, with money amount, posted to taxpayer's account and shown on one document. Seized Property Taxpayer possessions IRS secures for lack of payment of delinquent taxes. Slipped Blocks/Mixed Data/Mixed Entity An operator has mixed data or mixed entity on several documents within a block. Social Security Number (SSN) A nine-digit number (assigned by Social Security) used as the account number of a taxpayer on IMF. Also, the identifying number on certain BMF accounts. Masked within a barcode on Computer Paragraph notices and Correspondex notices Split Remittance (Splits) One or more remittances applied to one or more remittance transactions. Statute Cases A delinquent return with the Statute of Limitations in jeopardy. Statute of Limitations A specified period of time for correction of taxes by IRS, usually three years from the due date or received date of the return, whichever is later. STAUP An IDRS Command Code used to delay issuance of taxpayer notices when subsequent payments have not had time to update module. Subsequent Payment (Sub/Pay) A payment on account for a tax return filed but not full-paid. Substitute for Return (SFR) A procedure by which Examination is able to establish accounts and examine the records of taxpayers when taxpayers refuse or cannot file, and information received shows a return requires filing. Taxpayer Delinquent Account (TDA) Taxpayer account showing a return filed for a particular tax period with a remaining balance due. Taxpayer Delinquency Investigation (TDI) A return for a specified prior period is not on file and investigation is underway. Taxpayer Identification Number (TIN) The controlling nine-digit number assigned to identify each taxpayer's master file account. This number is in an SSN or EIN format. Masked within a barcode on Computer Paragraph notices and Correspondex notices. Taxpayer Information File (TIF) A record of tax data under a specific taxpayer identifying number. Tax Receipt (Form 809) official IRS receipt issued for tax payments submitted in cash. Teller The employee designated to process cash payments and issue tax receipts. Temporary SSN/IRS number (IRSN) Assigned by the campus. On ECC-MTB or IDRS transcripts an asterisk (*) appears following the invalid number. The fourth and fifth digit indicate the campus issuing the number. Terminal Payment Number A 13-digit number established each day for each terminal from which remittance is input. The last three digits identify the payment sequence number of the payments input. Tertiary Amounts A third transaction amount for one document. Requires a debit assessment amount. Transaction Code (TC) A three-digit code used to identify credit and debit actions taken on a taxpayer's account. Transaction Date Eight numeric digits in MMDDCCYY format. This date is the actual IRS Received Date. Treasury Bonds Bonds that are redeemable by the Bureau of Public Debt or Federal Reserve Banks when received as payment of a decedents return. Bonds are redeemable where they were purchased. Treasury Checks Checks which may consist of Taxpayer Refund Checks, checks from another government agency in payment of their taxes, and checks from the Bureau of Public Debt for redeemed Treasury Bonds. Unidentified Remittances or documents without necessary identification to apply to master file accounts. Unidentified Remittance File (URF) Source documents that remain unperfected without sufficient information to properly apply to a taxpayer's account, and input into IDRS, using CC URADD. User Fee Remittance (UFR) Non-tax payment made by taxpayers or tax-exempt organizations to secure or reinstate an installment agreement or to retain their fiscal year filing status. With Remittance (W/R) All documents and returns received with a payment delivered to the deposit activity for processing with assigned DLN.

| Form | Due Date | Date Becomes Regular | Date Stamp | Date Becomes Special/Prior |
|---|---|---|---|---|
| 11C | August 30 | N/A | Always | N/A |
| 706 | 15 Months after D.O.D. | N/A | Always | N/A |
| 709 | April 15 | N/A | Always | N/A |
| 720-1st qt., 2nd qt., 3rd qt., 4th qt. | April 30, July 31, October 31, January 31 | April 1, July 1, October 1, January 1 | Always | July 1, October 1, January 1, April 1 |
| 730 (Monthly) | Last day of the following months | N/A | Always | N/A |
| 940 (Family) | January 31 | N/A | Always | N/A |
| 941-1st qt, 2nd qt, 3rd qt, 4th qt | April 30, July 31, October 31, January 31 | April 1, July 1, October 1, January 1 | Always | July 1, October 1, January 1, April 1 |
| 943 | January 31 | N/A | Always | N/A |
| 944 | January 31 | N/A | Always | N/A |
| 945 | January 31 | N/A | Always | N/A |
| 990 | The 15th day of the 5th month after the tax period ending date. | N/A | Always | N/A |
| 990EZ | The 15th day of the 5th month after the tax period ending date. | N/A | Always | N/A |
| 990PF | The 15th day of the 5th month after the tax period ending date. | N/A | Always | N/A |
| 990T (Trust) (401(a), 408(a), 408(e), 220(d), 220(e), 530(a), 529(a), or other Trust |
The 15th day of the 4th month after the tax period ending date. | N/A | Always | N/A |
| 990T (Trust and Corp) | The 15th day of the 5th month after the tax period ending date. | N/A | Always | N/A |
| 1040 Prior | N/A | N/A | Always | N/A |
| 1040 Family | April 15 | N/A | Always | January 1 |
| 1040ES-1st qt, 2nd qt, 3rd qt, 4th qt | April 15, June 15, September 15, January 15 | N/A all qt | N/A | N/A |
| 1041 | April 15 | N/A | Always | N/A |
| 1041ES-1st qt, 2nd qt, 3rd qt, 4th qt | April 15, June 15, September 15, January 15 | N/A all qt | N/A | N/A |
| 1041T | April 15 | N/A | Always | N/A |
| 1120 (Family) | April 15 | N/A | Always | N/A |
| 2290 | Monthly/Aug 30 | N/A | Always | N/A |
| 5330 | Varies depending on type of excise tax | N/A | Always | N/A |
| 8038CP | Line17C - Interest Rate Box Checked "Variable " 45 day after the Interest Payment Date on line 18. "Fixed" 45 days prior to the Interest Payment Date on line 18. |
N/A | Always | N/A |
| 8038T | Varies - within 60 days of line 12 date | N/A | Always | N/A |
| 8752 | May 15 | N/A | Always | N/A |
| Extensions | ||||
| 2350 | April 15 | N/A | Always | N/A |
| 2688 | August 15 | N/A | Always | N/A |
| 2758 | April 15 | N/A | Always | N/A |
| 4768 | 15 Months After D.O.D. | N/A | Always | N/A |
| 4868 | April 15 | N/A | Always | N/A |
| 5558 | July 31, if 5500 or various if 5330, depending on type of excise tax | N/A | Always | N/A |
| 7004 | April 15 (1120 most) March 15 (1041,1065, and 1120-S) |
N/A | Always | N/A |
| 8736 | April 15 | N/A | Always | N/A |
| 8800 | April 15 | N/A | Always | N/A |
| 8868 | The 15th day of the 5th month after the tax period ending date. | N/A | Always | N/A |
| 8892 | April 15 | N/A | Always | N/A |
Note: Based upon the actual year, the due date listed in the preceding table may fall on a weekend or holiday. When this occurs, the due date becomes the first business date following the weekend or holiday date.
| Form | Timely Postmark | ≡ ≡ ≡ ≡ ≡ ≡ ≡ ≡ ≡ ≡ ≡ ≡ ≡ ≡ ≡ ≡ | ≡ ≡ ≡ ≡ ≡ ≡ ≡ ≡ ≡ ≡ ≡ ≡ ≡ ≡ |
|---|---|---|---|
| 720 Q4 | 31–Jan | ≡ ≡ ≡ ≡ | ≡ ≡ ≡ ≡ |
| 940, 940PR | 31–Jan | ≡ ≡ ≡ ≡ ≡ | ≡ ≡ ≡ ≡ |
| 941 Q4 | 31–Jan | ≡ ≡ ≡ ≡ ≡ ≡ | ≡ ≡ ≡ ≡ ≡ ≡ |
| 943, 943PR | 31–Jan | ≡ ≡ ≡ ≡ ≡ | ≡ ≡ ≡ ≡ ≡≡ ≡ ≡ ≡ ≡ ≡ ≡ ≡ |
| 944 | 31–Jan | ≡ ≡ ≡ ≡ ≡ ≡≡ ≡ ≡ ≡ ≡ ≡ ≡ ≡ | ≡ ≡ ≡ ≡ ≡≡ ≡ ≡ ≡ ≡ ≡ ≡ ≡ |
| 945 | 31–Jan | ≡ ≡ ≡ ≡ ≡ ≡ | ≡ ≡ ≡ ≡ |
| 1042, 1042S | 15–Mar | ≡ ≡ ≡ ≡ ≡ ≡ | ≡ ≡ ≡ ≡ ≡ |
| CT-1 | 28–Feb | ≡ ≡ ≡ ≡ | ≡ ≡ ≡ ≡ ≡ ≡ |
| 1065 | 15–Mar | ≡ ≡ ≡ ≡ ≡ | ≡ ≡ ≡ ≡ |
| 7004 Extension for 1065 | 15–Mar | ≡ ≡ ≡ ≡ | ≡ ≡ ≡ ≡ |
| 1120 Series (most) 1120-S |
15–Apr 15-Mar |
≡ ≡ ≡ ≡ ≡ ≡ ≡ ≡ ≡ |
≡ ≡ ≡ ≡ ≡ ≡ ≡ ≡ ≡ |
| 5227 | 15–Apr | ≡ ≡ ≡ ≡ ≡ | ≡ ≡ ≡ ≡ |
| 5227 | 15–Mar | ≡ ≡ ≡ ≡ ≡ | ≡ ≡ ≡ ≡ ≡ |
| 7004 Extension for 1120 1120-S |
15–Apr 15-Mar |
≡ ≡ ≡ ≡ ≡ ≡ ≡ ≡ ≡ |
≡ ≡ ≡ ≡ ≡ ≡ ≡ |
| 990, 990EZ* | The 15th day of the 5th month after the tax period ending date. | ≡ ≡ ≡ ≡ ≡ ≡ ≡ ≡ ≡ ≡ ≡ ≡ ≡ ≡ ≡ ≡ ≡ ≡ ≡ ≡ ≡ ≡ ≡ ≡ ≡ ≡ ≡ ≡ ≡ ≡ ≡ ≡ ≡ ≡ ≡ | |
| 990 PF* | The 15th day of the 5th month after the tax period ending date. | ≡ ≡ ≡ ≡ ≡ ≡ ≡ ≡ ≡ ≡ ≡ ≡ ≡ ≡ ≡ ≡ ≡ ≡ ≡ ≡ ≡ ≡ ≡ ≡ ≡ ≡ ≡ ≡ ≡ ≡ ≡ ≡ ≡ ≡ ≡ ≡ ≡ ≡ | |
| 1040 Series | 15-Apr | ≡ ≡ ≡ ≡ | ≡ ≡ ≡ ≡ ≡ ≡ |
| 1040 Series | 15-Oct | ≡ ≡ ≡ ≡ ≡ ≡ | ≡ ≡ ≡ ≡ |
| 1041 | 15–Apr | ≡ ≡ ≡ ≡ ≡ | ≡ ≡ ≡ ≡ ≡ |
| 7004 Extension for 1041 | 15–Apr | ≡ ≡ ≡ ≡ ≡ | ≡ ≡ ≡ |
| 4868 Extension for 1040 | 15-Apr | ≡ ≡ ≡ ≡ ≡ | ≡ ≡ ≡ |
| 8752 | 15–May | ≡ ≡ ≡ ≡ | ≡ ≡ ≡ ≡ ≡ |
| 8892 | 15–Apr | ≡ ≡ ≡ ≡ ≡ | ≡ ≡ ≡ ≡ |
| 720 Q1 | April 30 | ≡ ≡ ≡ ≡ | ≡ ≡ ≡ ≡ ≡ ≡ |
| 941 Q1 | April 30 | ≡ ≡ ≡ ≡ | ≡ ≡ ≡ ≡ ≡ ≡ |
| 720 Q2 | July 31 | ≡ ≡ ≡ ≡ ≡ | ≡ ≡ ≡ ≡ |
| 941 Q2 | July 31 | ≡ ≡ ≡ ≡ ≡ | ≡ ≡ ≡ ≡ ≡ |
| 720 Q3 | 31–Oct | ≡ ≡ ≡ ≡ ≡ | ≡ ≡ ≡ ≡ ≡ ≡ |
| 941 Q3 | 31–Oct | ≡ ≡ ≡ ≡ ≡ | ≡ ≡ ≡ ≡ |
-
≡ ≡ ≡ ≡"≡ ≡ ≡ ≡ ≡ ≡ ≡ ≡ ≡ ≡ ≡" ≡ ≡ ≡ ≡ ≡ ≡ ≡ ≡ ≡ ≡ ≡ ≡ ≡ ≡ ≡ ≡ ≡ ≡ ≡ ≡ ≡ ≡ ≡ ≡ ≡ ≡ ≡ ≡ ≡ ≡ ≡ ≡ ≡ ≡ ≡ ≡ ≡ ≡ ≡ ≡ ≡ ≡ ≡ ≡ ≡ ≡ ≡ ≡ ≡ ≡ ≡ ≡ ≡ ≡
≡ ≡ ≡ ≡ ≡ ≡ ≡ ≡-
≡ ≡ ≡ ≡ ≡ ≡ ≡ ≡ ≡ ≡ ≡ ≡ ≡ ≡ ≡ ≡ ≡ ≡ ≡ ≡ ≡ ≡ ≡ ≡ ≡ ≡ ≡ ≡ ≡ ≡ ≡ ≡ ≡ ≡ ≡ ≡ ≡ ≡ ≡ ≡ ≡ ≡ ≡ ≡ ≡ ≡ ≡ ≡ ≡ ≡ ≡ ≡ ≡ ≡ ≡ ≡ ≡ ≡ ≡ ≡ ≡ ≡ ≡ ≡ ≡ ≡ ≡ ≡ ≡ ≡ ≡ ≡ ≡ ≡ ≡ ≡ ≡ ≡ ≡ ≡ ≡ ≡ ≡ ≡ ≡ ≡ ≡ ≡ ≡ ≡ ≡ ≡ ≡ ≡ ≡ ≡ ≡ ≡ ≡ ≡ ≡ ≡ ≡ ≡ ≡ ≡ ≡ ≡ ≡ ≡ ≡ ≡ ≡ ≡ ≡ ≡ ≡ ≡ ≡ ≡ ≡ ≡ ≡ ≡ ≡ ≡ ≡ ≡ ≡ ≡ ≡ ≡ ≡ ≡ ≡ ≡ ≡ ≡ ≡ ≡
-
≡ ≡ ≡ ≡ ≡ ≡ ≡ ≡ ≡ ≡ ≡ ≡ ≡ ≡ ≡ ≡ ≡ ≡ ≡ ≡ ≡ ≡ ≡ ≡ ≡ ≡ ≡ ≡ ≡ ≡ ≡ ≡ ≡ ≡ ≡ ≡ ≡ ≡ ≡ ≡ ≡ ≡ ≡ ≡ ≡ ≡ ≡ ≡ ≡ ≡ ≡ ≡ ≡ ≡ ≡ ≡ ≡ ≡ ≡ ≡ ≡ ≡ ≡ ≡ ≡ ≡
-
≡ ≡ ≡ ≡ ≡ ≡ ≡ ≡ ≡ ≡ ≡ ≡ ≡ ≡ ≡ ≡ ≡ ≡ ≡ ≡ ≡ ≡ ≡ ≡ ≡ ≡ ≡ ≡ ≡ ≡ ≡ ≡ ≡ ≡ ≡ ≡ ≡ ≡ ≡ ≡ ≡ ≡ ≡ ≡ ≡ ≡ ≡ ≡ ≡ ≡ ≡ ≡ ≡ ≡ ≡ ≡ ≡ ≡ ≡ ≡ ≡ ≡ ≡ ≡ ≡ ≡ ≡ ≡ ≡ ≡ ≡ ≡ ≡ ≡ ≡ ≡ ≡ ≡ ≡ ≡ ≡ ≡ ≡ ≡ ≡ ≡ ≡ ≡ ≡ ≡ ≡ ≡ ≡ ≡ ≡ ≡ ≡ ≡ ≡ ≡ ≡ ≡ ≡ ≡ ≡ ≡ ≡ ≡ ≡ ≡ ≡ ≡ ≡ ≡ ≡ ≡ ≡ ≡ ≡ ≡ ≡ ≡ ≡ ≡ ≡ ≡ ≡ ≡ ≡ ≡ ≡ ≡ ≡ ≡ ≡ ≡ ≡ ≡ ≡ ≡ ≡ ≡ ≡ ≡ ≡ ≡ ≡ ≡ ≡ ≡ ≡ ≡ ≡ ≡ ≡ ≡ ≡ ≡ ≡ ≡ ≡ ≡ ≡
-
≡ ≡ ≡ ≡ ≡ ≡ ≡ ≡ ≡ ≡ ≡ ≡ ≡ ≡ ≡ ≡ ≡ ≡ ≡ ≡ ≡ ≡ ≡ ≡ ≡ ≡ ≡ ≡ ≡ ≡ ≡ ≡ ≡ ≡ ≡ ≡ ≡ ≡ ≡ ≡ ≡ ≡ ≡ ≡ ≡ ≡ ≡ ≡ ≡ ≡ ≡ ≡ ≡ ≡ ≡ ≡ ≡ ≡ ≡ ≡ ≡ ≡ ≡ ≡ ≡ ≡ ≡ ≡ ≡ ≡ ≡ ≡ ≡ ≡ ≡ ≡ ≡ ≡ ≡ ≡ ≡ ≡
≡ ≡ ≡ ≡ ≡ ≡ ≡ ≡ ≡ ≡ ≡ ≡ ≡ ≡ ≡ ≡ ≡ ≡ ≡ ≡ ≡ ≡ ≡ ≡ ≡ ≡ ≡ ≡ ≡ ≡ ≡ ≡ ≡ ≡ ≡ ≡ ≡ ≡ ≡ ≡ ≡ ≡ ≡ ≡ ≡ ≡ ≡ ≡ ≡ ≡ ≡ ≡ ≡ ≡ ≡ ≡ ≡ ≡ ≡ ≡"≡ ≡ ≡" ≡ ≡ ≡ ≡ ≡ ≡ ≡ ≡ ≡ ≡ ≡ ≡ ≡ ≡ ≡ ≡"≡ ≡ ≡ ≡" ≡ ≡ ≡ ≡ ≡ ≡ ≡ ≡ ≡ ≡ ≡ ≡ ≡ ≡ ≡ ≡ ≡ ≡ ≡ ≡ ≡ ≡ ≡ ≡ ≡ ≡ ≡ ≡ ≡ ≡ ≡ ≡ ≡ ≡ ≡ ≡ ≡ ≡ ≡ ≡ ≡ ≡ ≡ ≡ ≡ ≡ ≡ ≡ ≡ ≡ ≡ ≡ ≡ ≡ ≡ ≡ ≡ ≡ ≡ ≡ ≡ ≡ ≡ ≡ ≡"≡ ≡ ≡ ≡" ≡ ≡ ≡ ≡ ≡ ≡ ≡ ≡ ≡ ≡ ≡ ≡ ≡ ≡ ≡ ≡ ≡ ≡ ≡ ≡ ≡ ≡ ≡ ≡ ≡ ≡ ≡ ≡ ≡ ≡ ≡ ≡ ≡ ≡ ≡ ≡ ≡ ≡ ≡ ≡ ≡ ≡ ≡ ≡ ≡ ≡ ≡ ≡ ≡ ≡ ≡ ≡ ≡ ≡ ≡ ≡ ≡ ≡ ≡ ≡ ≡ ≡ ≡ ≡ ≡ ≡ ≡ ≡"≡ ≡" ≡ ≡ ≡ ≡ ≡ ≡ ≡ ≡ ≡ ≡ ≡ ≡ ≡ ≡ ≡ ≡ ≡ ≡ ≡ ≡ ≡ ≡ ≡ ≡ ≡ ≡ ≡ ≡ ≡ ≡ ≡ ≡ ≡ ≡ ≡ ≡ ≡ ≡ ≡ ≡ ≡ ≡ ≡ ≡ ≡ ≡ ≡ ≡ ≡ ≡ ≡ ≡ ≡ ≡ ≡ ≡ ≡ ≡ ≡ ≡ ≡ ≡ ≡ ≡ ≡ ≡ ≡ ≡ ≡ ≡ ≡ ≡ ≡ ≡ ≡ ≡ ≡ ≡ ≡ ≡ ≡"≡ ≡" ≡ ≡ ≡ ≡ ≡ ≡ ≡ ≡ ≡ ≡ ≡ ≡ ≡ ≡ ≡ ≡ ≡ ≡ -
≡ ≡ ≡ ≡ ≡ ≡ ≡ ≡ ≡ ≡ ≡ ≡ ≡ ≡ ≡ ≡ ≡ ≡ ≡ ≡ ≡ ≡ ≡ ≡ ≡ ≡ ≡ ≡ ≡ ≡ ≡ ≡ ≡ ≡ ≡ ≡ ≡ ≡ ≡ ≡ ≡ ≡ ≡ ≡ ≡ ≡ ≡ ≡ ≡ ≡ ≡ ≡ ≡ ≡ ≡ ≡ ≡ ≡ ≡ ≡ ≡ ≡ ≡ ≡ ≡ ≡ ≡ ≡ ≡ ≡ ≡ ≡ ≡ ≡ ≡ ≡ ≡ ≡ ≡ ≡ ≡ ≡
≡ ≡ ≡ ≡ ≡ ≡ ≡ ≡ ≡ ≡ ≡ ≡ ≡ ≡ ≡ ≡ ≡ ≡ ≡ ≡ ≡ ≡ ≡ ≡ ≡ ≡ ≡ ≡ ≡ ≡ ≡ ≡ ≡ ≡ ≡ ≡ ≡ ≡ ≡ ≡ ≡ ≡ ≡ ≡ ≡ ≡ ≡ ≡ ≡ ≡"≡ ≡ ≡" ≡ ≡ ≡ ≡ ≡ ≡ ≡ ≡ ≡ ≡ ≡ ≡ ≡ ≡"≡ ≡ ≡ ≡" ≡ ≡ ≡ ≡ ≡ ≡ ≡ ≡ ≡ ≡ ≡ ≡ ≡ ≡ ≡ ≡ ≡ ≡ ≡ ≡ ≡ ≡ ≡ ≡ ≡ ≡ ≡ ≡ ≡ ≡ ≡ ≡ ≡ ≡ ≡ ≡ ≡ ≡ ≡ ≡ ≡ ≡ ≡ ≡ ≡ ≡ ≡ ≡ ≡ ≡ ≡ ≡ ≡ ≡ ≡ ≡ ≡ ≡"≡ ≡ ≡" ≡ ≡ ≡ ≡ ≡ ≡ ≡ ≡ ≡ ≡ ≡ ≡ ≡ ≡ ≡ ≡ ≡ ≡ -
≡ ≡ ≡ ≡ ≡ ≡ ≡ ≡ ≡ ≡ ≡ ≡ ≡ ≡ ≡ ≡ ≡ ≡ ≡ ≡ ≡≡ ≡ ≡ ≡ ≡ ≡ ≡ ≡ ≡ ≡ ≡ ≡ ≡ ≡ ≡ ≡ ≡ ≡ ≡ ≡ ≡ ≡ ≡ ≡ ≡ ≡ ≡ ≡ ≡ ≡ ≡ ≡ ≡ ≡ ≡ ≡ ≡ ≡ ≡ ≡ ≡ ≡ ≡ ≡ ≡ ≡ ≡ ≡ ≡ ≡ ≡ ≡ ≡ ≡
Note:
≡ ≡ ≡ ≡ ≡ ≡ ≡ ≡ ≡ ≡ ≡ ≡ ≡ ≡ ≡ ≡ ≡ ≡ ≡ ≡ ≡ ≡ ≡ ≡ ≡ ≡ ≡ ≡ ≡ ≡ ≡ ≡ ≡ ≡ ≡ ≡ ≡ ≡ ≡ ≡ ≡ ≡ ≡ ≡ ≡ ≡ ≡ ≡ ≡ ≡ ≡ ≡ ≡ ≡ ≡ ≡ ≡ ≡ ≡ ≡ ≡ ≡ ≡ ≡ ≡ ≡ ≡ ≡ ≡ ≡ ≡ ≡ ≡ ≡ ≡ ≡ ≡ ≡ ≡ ≡ ≡ ≡
Note:
≡ ≡ ≡ ≡ ≡ ≡ ≡ ≡ ≡ ≡ ≡ ≡ ≡ ≡ ≡ ≡ ≡ ≡ ≡ ≡ ≡ ≡ ≡ ≡ ≡ ≡ ≡ ≡ ≡ ≡ ≡ ≡ ≡ ≡ ≡ ≡ ≡ ≡ ≡ ≡ ≡ ≡ ≡ ≡ ≡ ≡ ≡ ≡ ≡ ≡ ≡ ≡ ≡ ≡ ≡ ≡ ≡ ≡ ≡ ≡ ≡ ≡ ≡ ≡ ≡ ≡ ≡ ≡ ≡ ≡ ≡ ≡ ≡ ≡ ≡ ≡ ≡ ≡ ≡ ≡ ≡ ≡ ≡ ≡ ≡ ≡ ≡ ≡ ≡ ≡ ≡ ≡ ≡ ≡ ≡ ≡ ≡ ≡ ≡ ≡ ≡ ≡ ≡ ≡ ≡ ≡ ≡ ≡ ≡ ≡ ≡ ≡ ≡ ≡ ≡ ≡ ≡ ≡ ≡ ≡ ≡ ≡ ≡ ≡ ≡ ≡ ≡ ≡ ≡ ≡ ≡ ≡ ≡ ≡ ≡ ≡ ≡ ≡ ≡ ≡ ≡ ≡ ≡ ≡ ≡ ≡ ≡ ≡ ≡ ≡ ≡ ≡ ≡ ≡ ≡ ≡ ≡ ≡ ≡ ≡ ≡ ≡ ≡ ≡ ≡ ≡ ≡ ≡ ≡ ≡
| ≡ ≡ ≡ ≡ ≡ | ≡ ≡ ≡ ≡ ≡ ≡≡ ≡ |
|---|---|
| ≡ ≡ ≡ ≡ ≡ ≡ ≡ ≡ ≡ ≡ ≡ ≡ ≡ ≡ ≡ ≡ ≡ ≡ ≡ ≡ ≡ ≡ ≡ ≡ ≡ ≡ ≡ ≡ ≡ ≡ ≡ ≡ ≡ ≡ ≡ ≡ ≡ ≡ ≡ ≡ ≡ ≡ ≡ ≡ ≡ ≡ ≡ ≡ ≡ ≡ ≡ ≡ ≡ ≡ ≡ ≡ ≡ ≡"≡ ≡ ≡ ≡ ≡ ≡ ≡ ≡ ≡ ≡ ≡ ≡ ≡ ≡ ≡ ≡ ≡" ≡ ≡ ≡ ≡ ≡ ≡ | ≡ ≡ ≡ ≡ ≡ ≡ ≡ ≡ ≡ ≡ ≡ ≡ ≡ ≡ ≡"≡ ≡" ≡ ≡ ≡ ≡ ≡ ≡ ≡ ≡ ≡ ≡ ≡ ≡ ≡ ≡ ≡ ≡ ≡ ≡ ≡ ≡ ≡ ≡ ≡ ≡ ≡ ≡ ≡ ≡"≡ ≡" ≡ ≡ ≡ ≡ ≡ ≡ ≡ ≡ ≡ ≡ ≡ ≡ ≡ ≡ ≡ ≡ ≡ ≡ ≡ ≡ ≡ ≡ ≡ ≡ ≡ ≡ ≡ ≡ ≡ ≡ ≡ ≡ ≡ ≡ ≡ |
| ≡ ≡ ≡ ≡ ≡ ≡ ≡ ≡ ≡ ≡ ≡ ≡ ≡ ≡ ≡ ≡ ≡ ≡ ≡ ≡ ≡ ≡ ≡ ≡ ≡ ≡ ≡ ≡ ≡ ≡ ≡ ≡ ≡ ≡ ≡ ≡ ≡ ≡ ≡ ≡ ≡ ≡"≡ ≡ ≡ ≡ ≡ ≡ ≡ ≡ ≡ ≡ ≡ ≡ ≡ ≡ ≡" ≡ ≡ ≡ ≡ | ≡ ≡ ≡ ≡ ≡ ≡ ≡ ≡ ≡ ≡ ≡ ≡ ≡ ≡ ≡ ≡ ≡ ≡ ≡"≡ ≡ ≡" ≡ ≡ ≡ ≡ ≡ ≡ ≡ ≡ ≡ ≡ ≡ ≡ ≡ ≡ ≡ ≡ ≡ ≡ ≡ ≡ |
Document 7071, Name Control Job Aid for Individual Master File (IMF) Taxpayers, temporarily removed pending updates required by PGLD.
Document 7071-A, Name Control Job Aid for Business Master File (BMF) Taxpayers, temporarily removed pending updates required by PGLD.
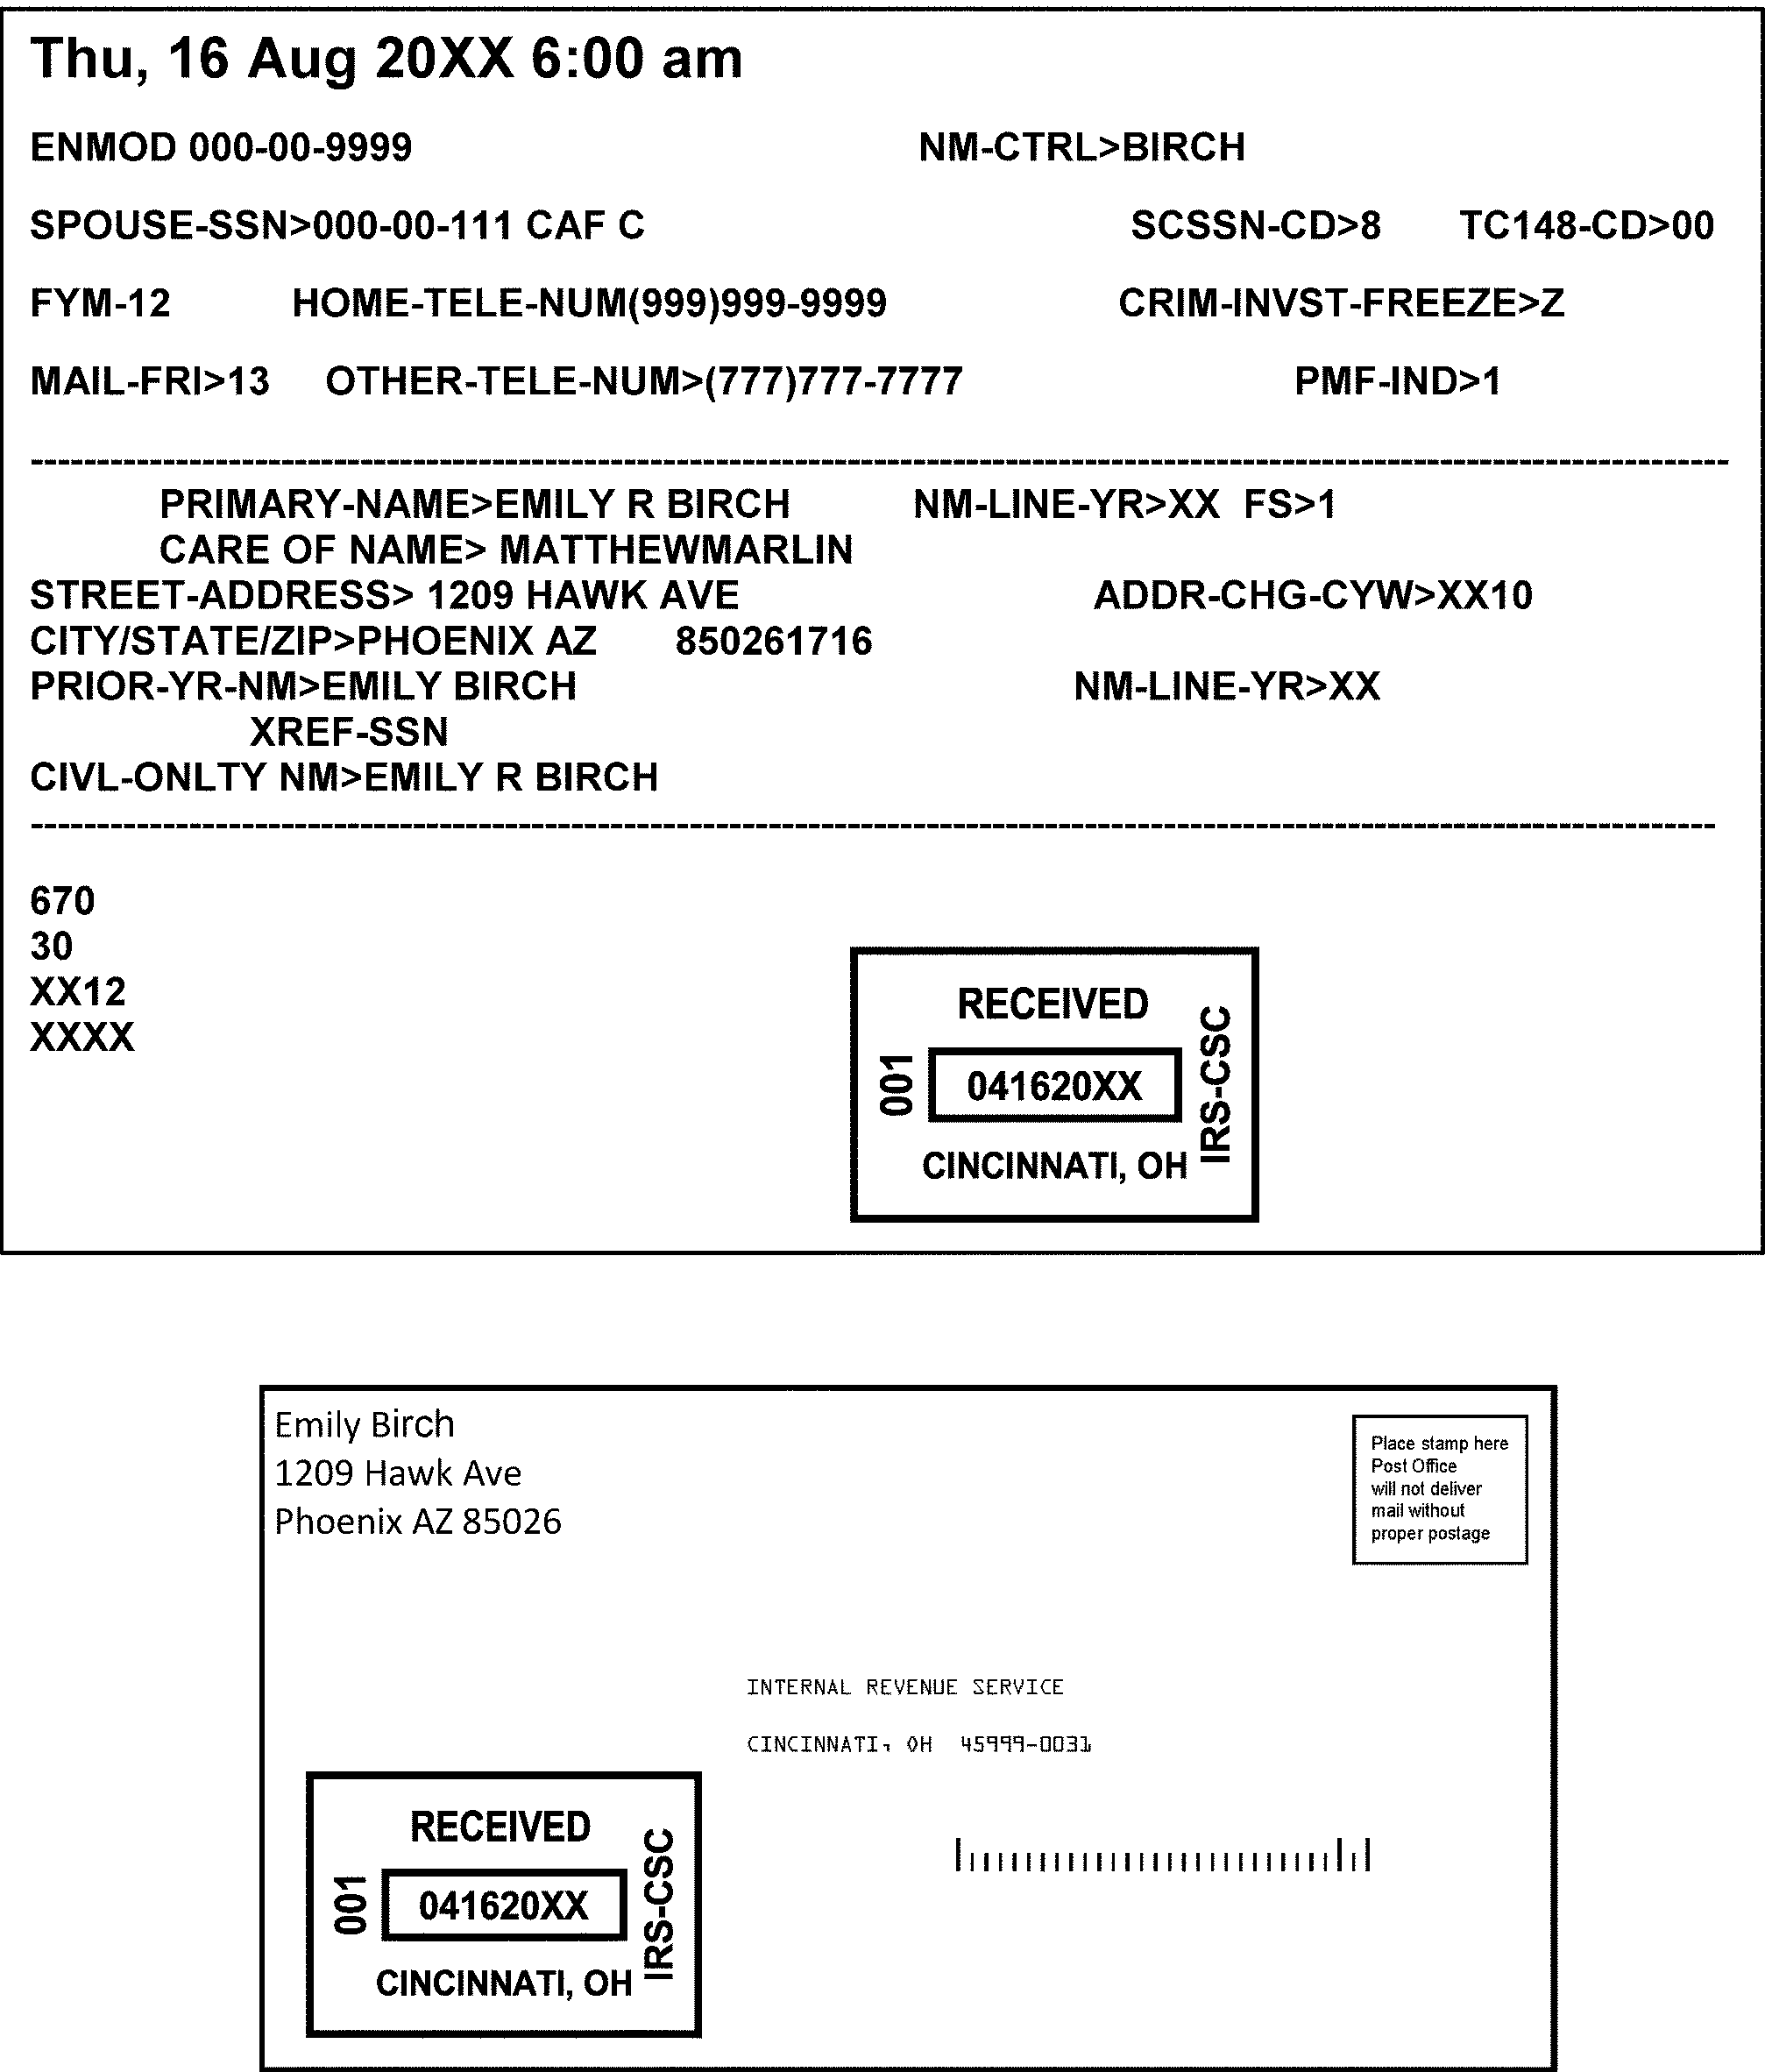
The following table shows a list of Agency Location Codes. The first column lists the agency location. The second column lists the corresponding agency code. Following is a list of Codes broken down by digits:
-
Digits 1 and 2 - Identify Treasury Department
-
Digits 3 and 4 - Identify Internal Revenue Service
-
Digits 5 and 6 - Identify Processing Center
-
Digits 7 and 8 - Identify Field Office
Note:
Processing Centers only use the symbols listed below on all documents requiring such identification.
| Agency Location | Agency Location Code |
|---|---|
| Andover, MA | 20-09-0800 |
| Atlanta, GA | 20–09–0700 |
| Austin, TX | 20–09–1800–2 |
| Brookhaven, NY-For RTR purposes only | 20–09–1900 |
| Cincinnati, OH | 20–09–1700–3 |
| Fresno, CA | 20–09–8900 |
| Kansas City, MO | 20–09–0900 |
| Memphis, TN-For RTR purposes only | 20–09–4900–0 |
| Ogden, UT | 20–09–2900–4 |
| Philadelphia, PA-For RTR purposes only | 20–09–2800–5 |
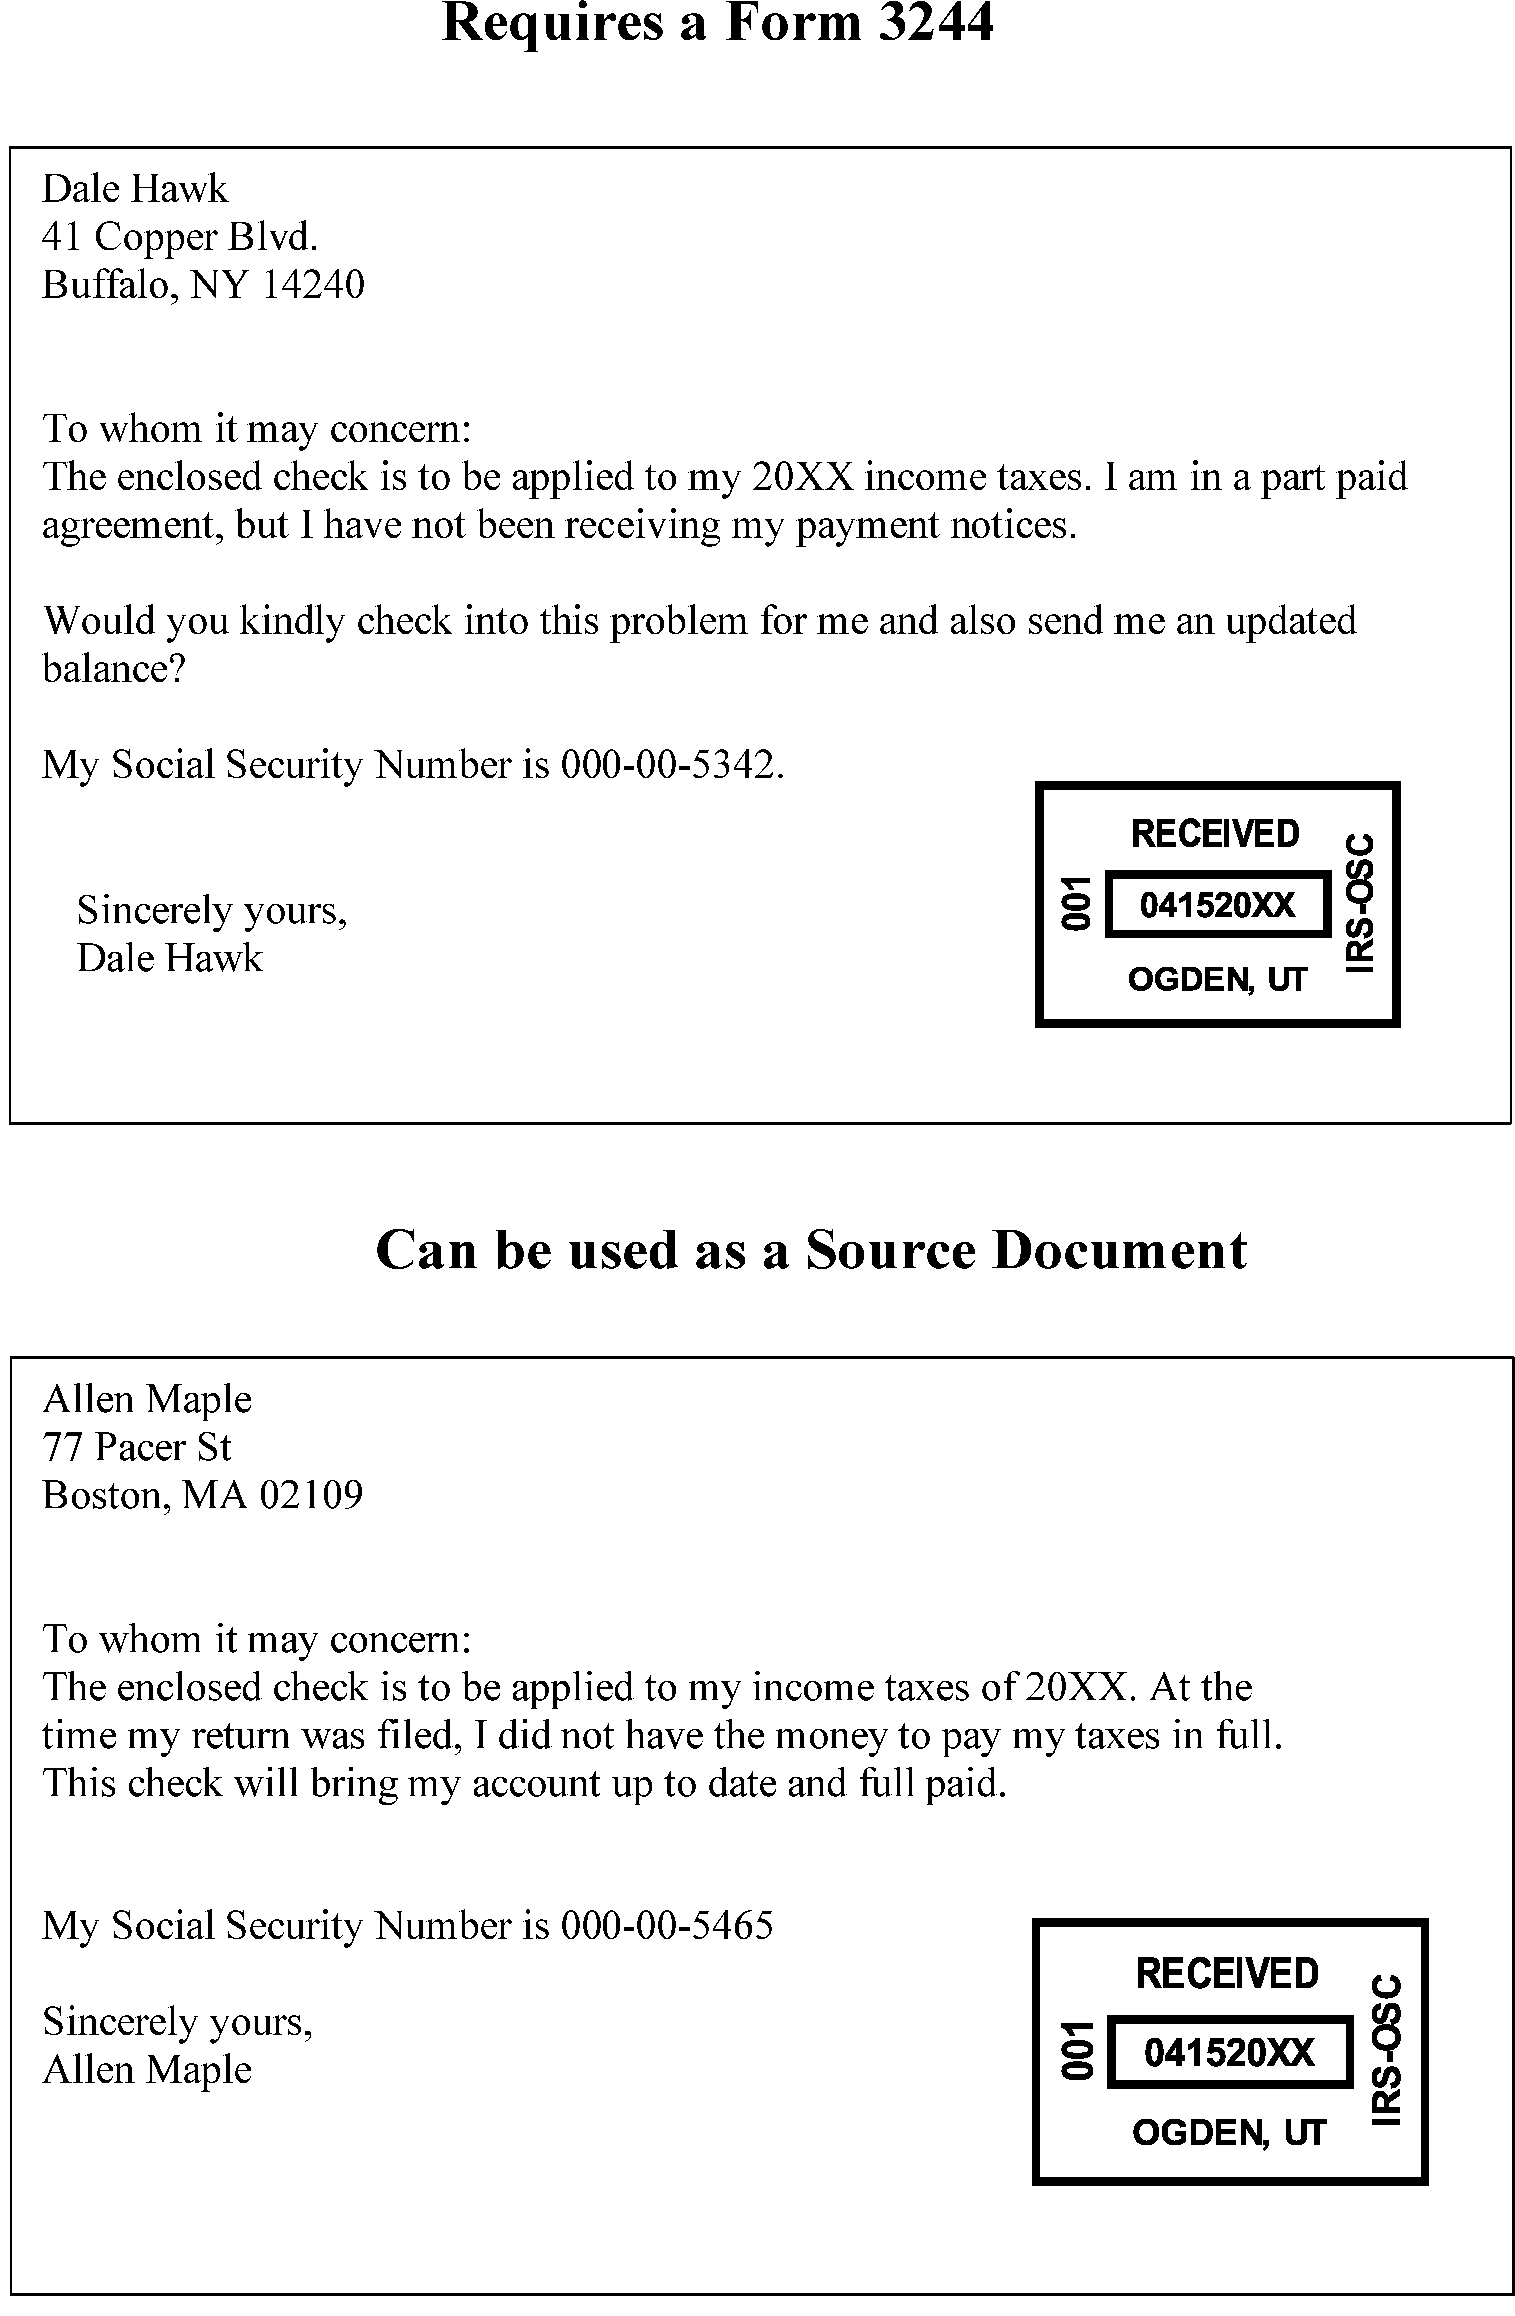
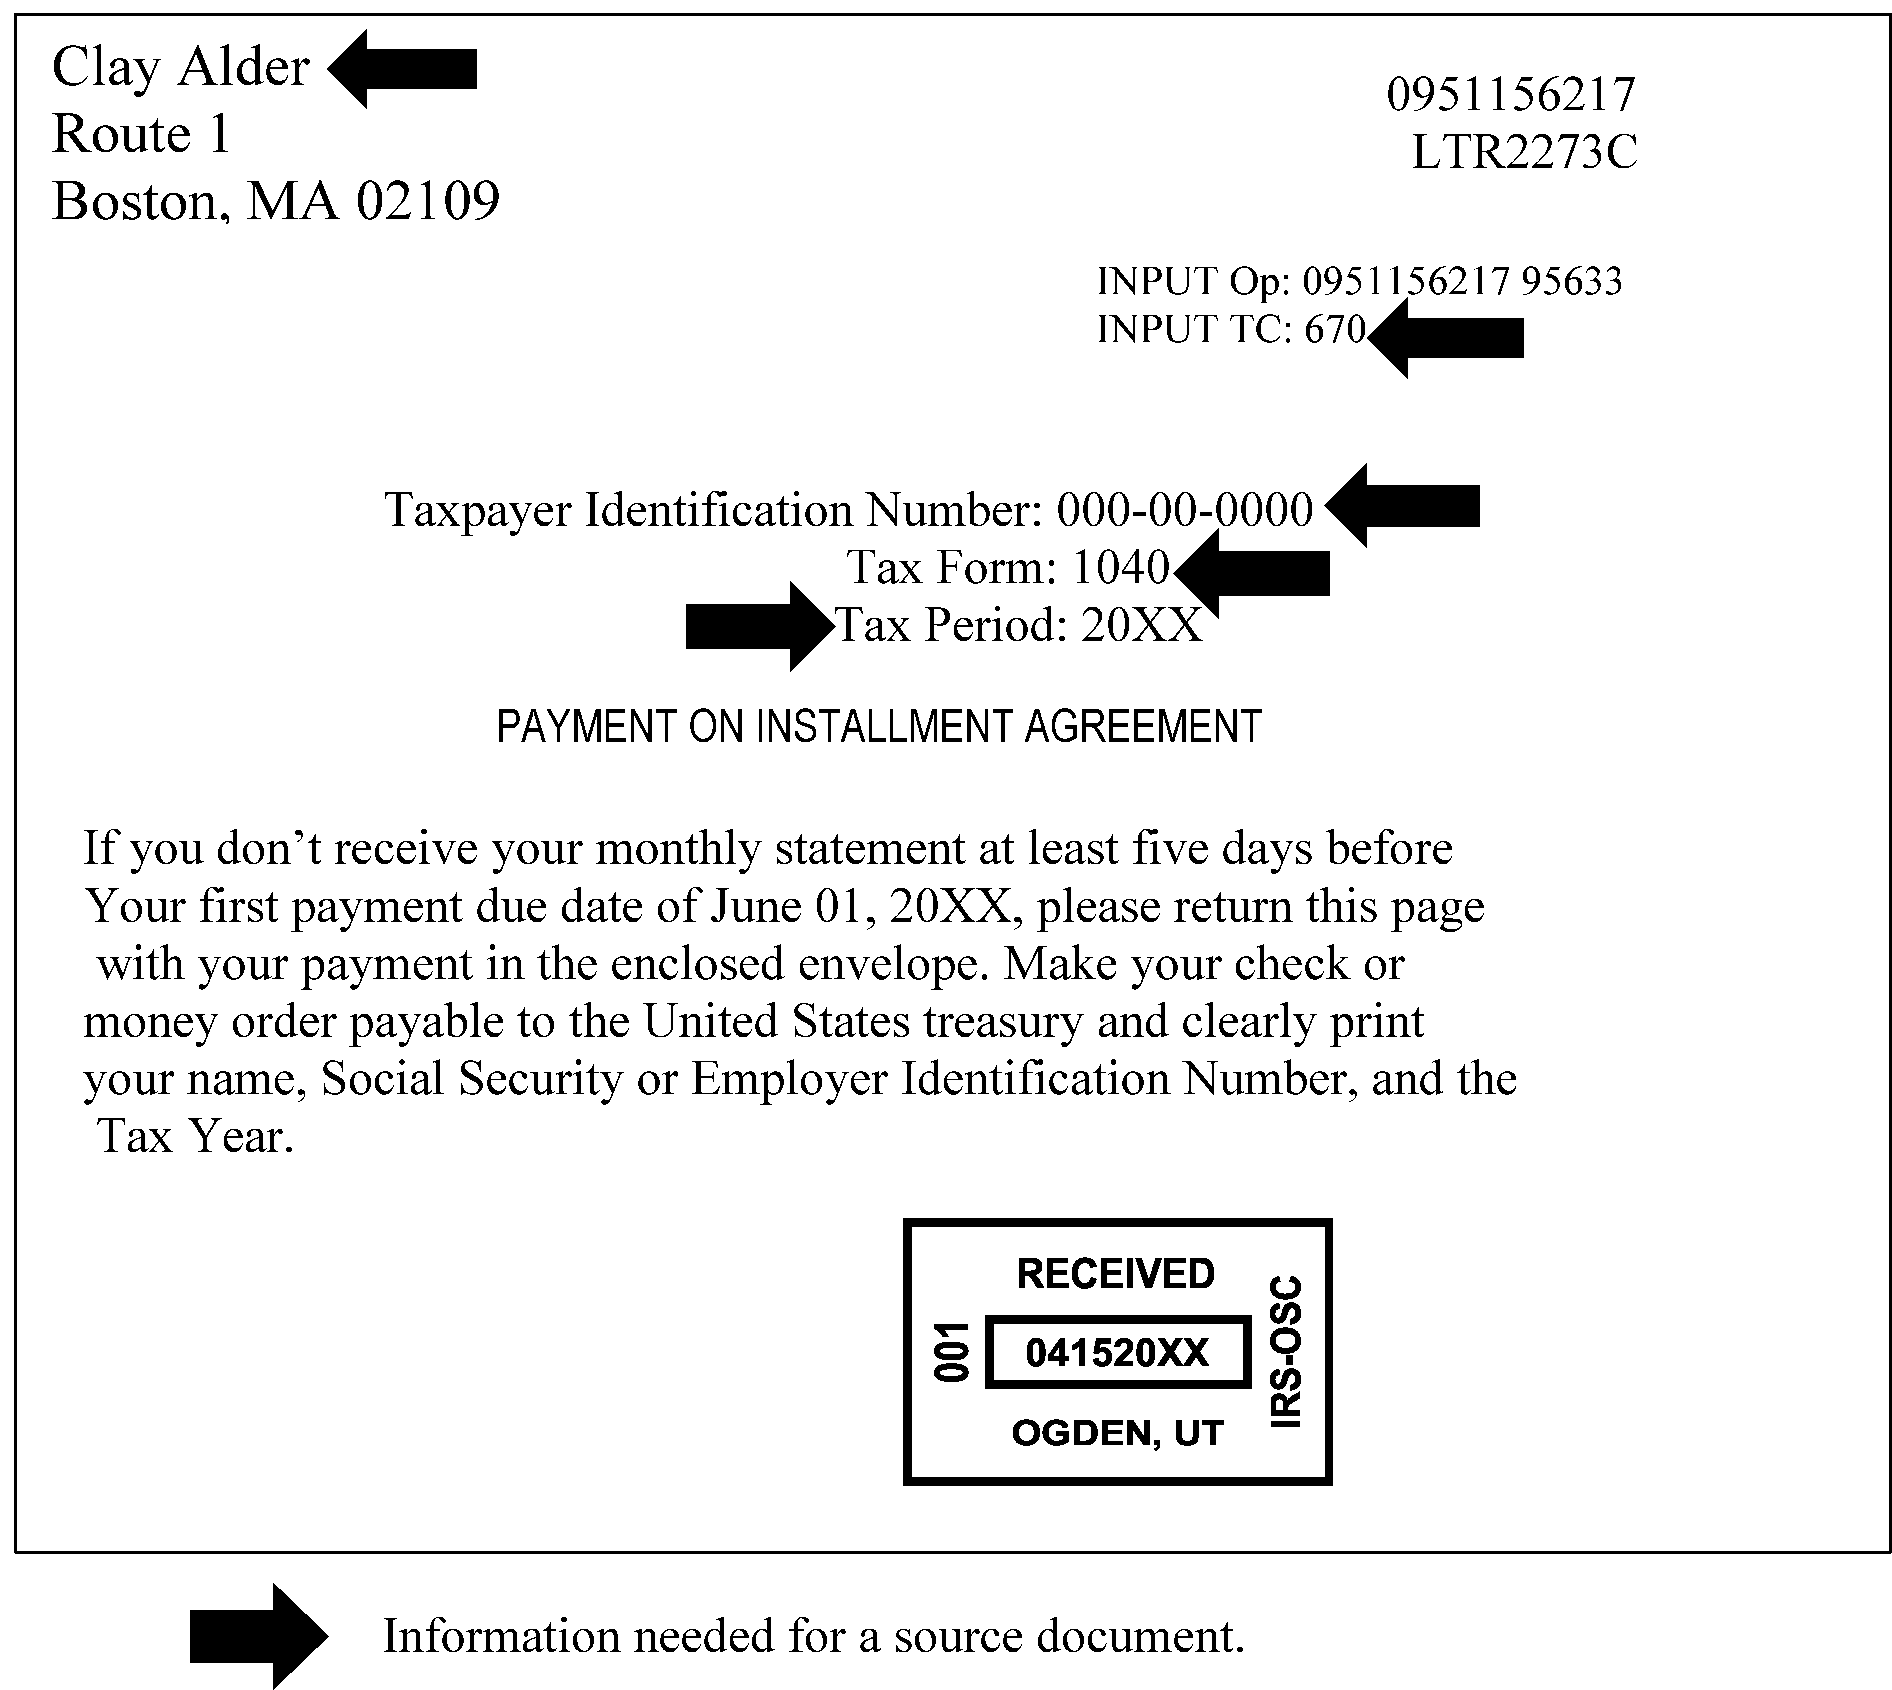
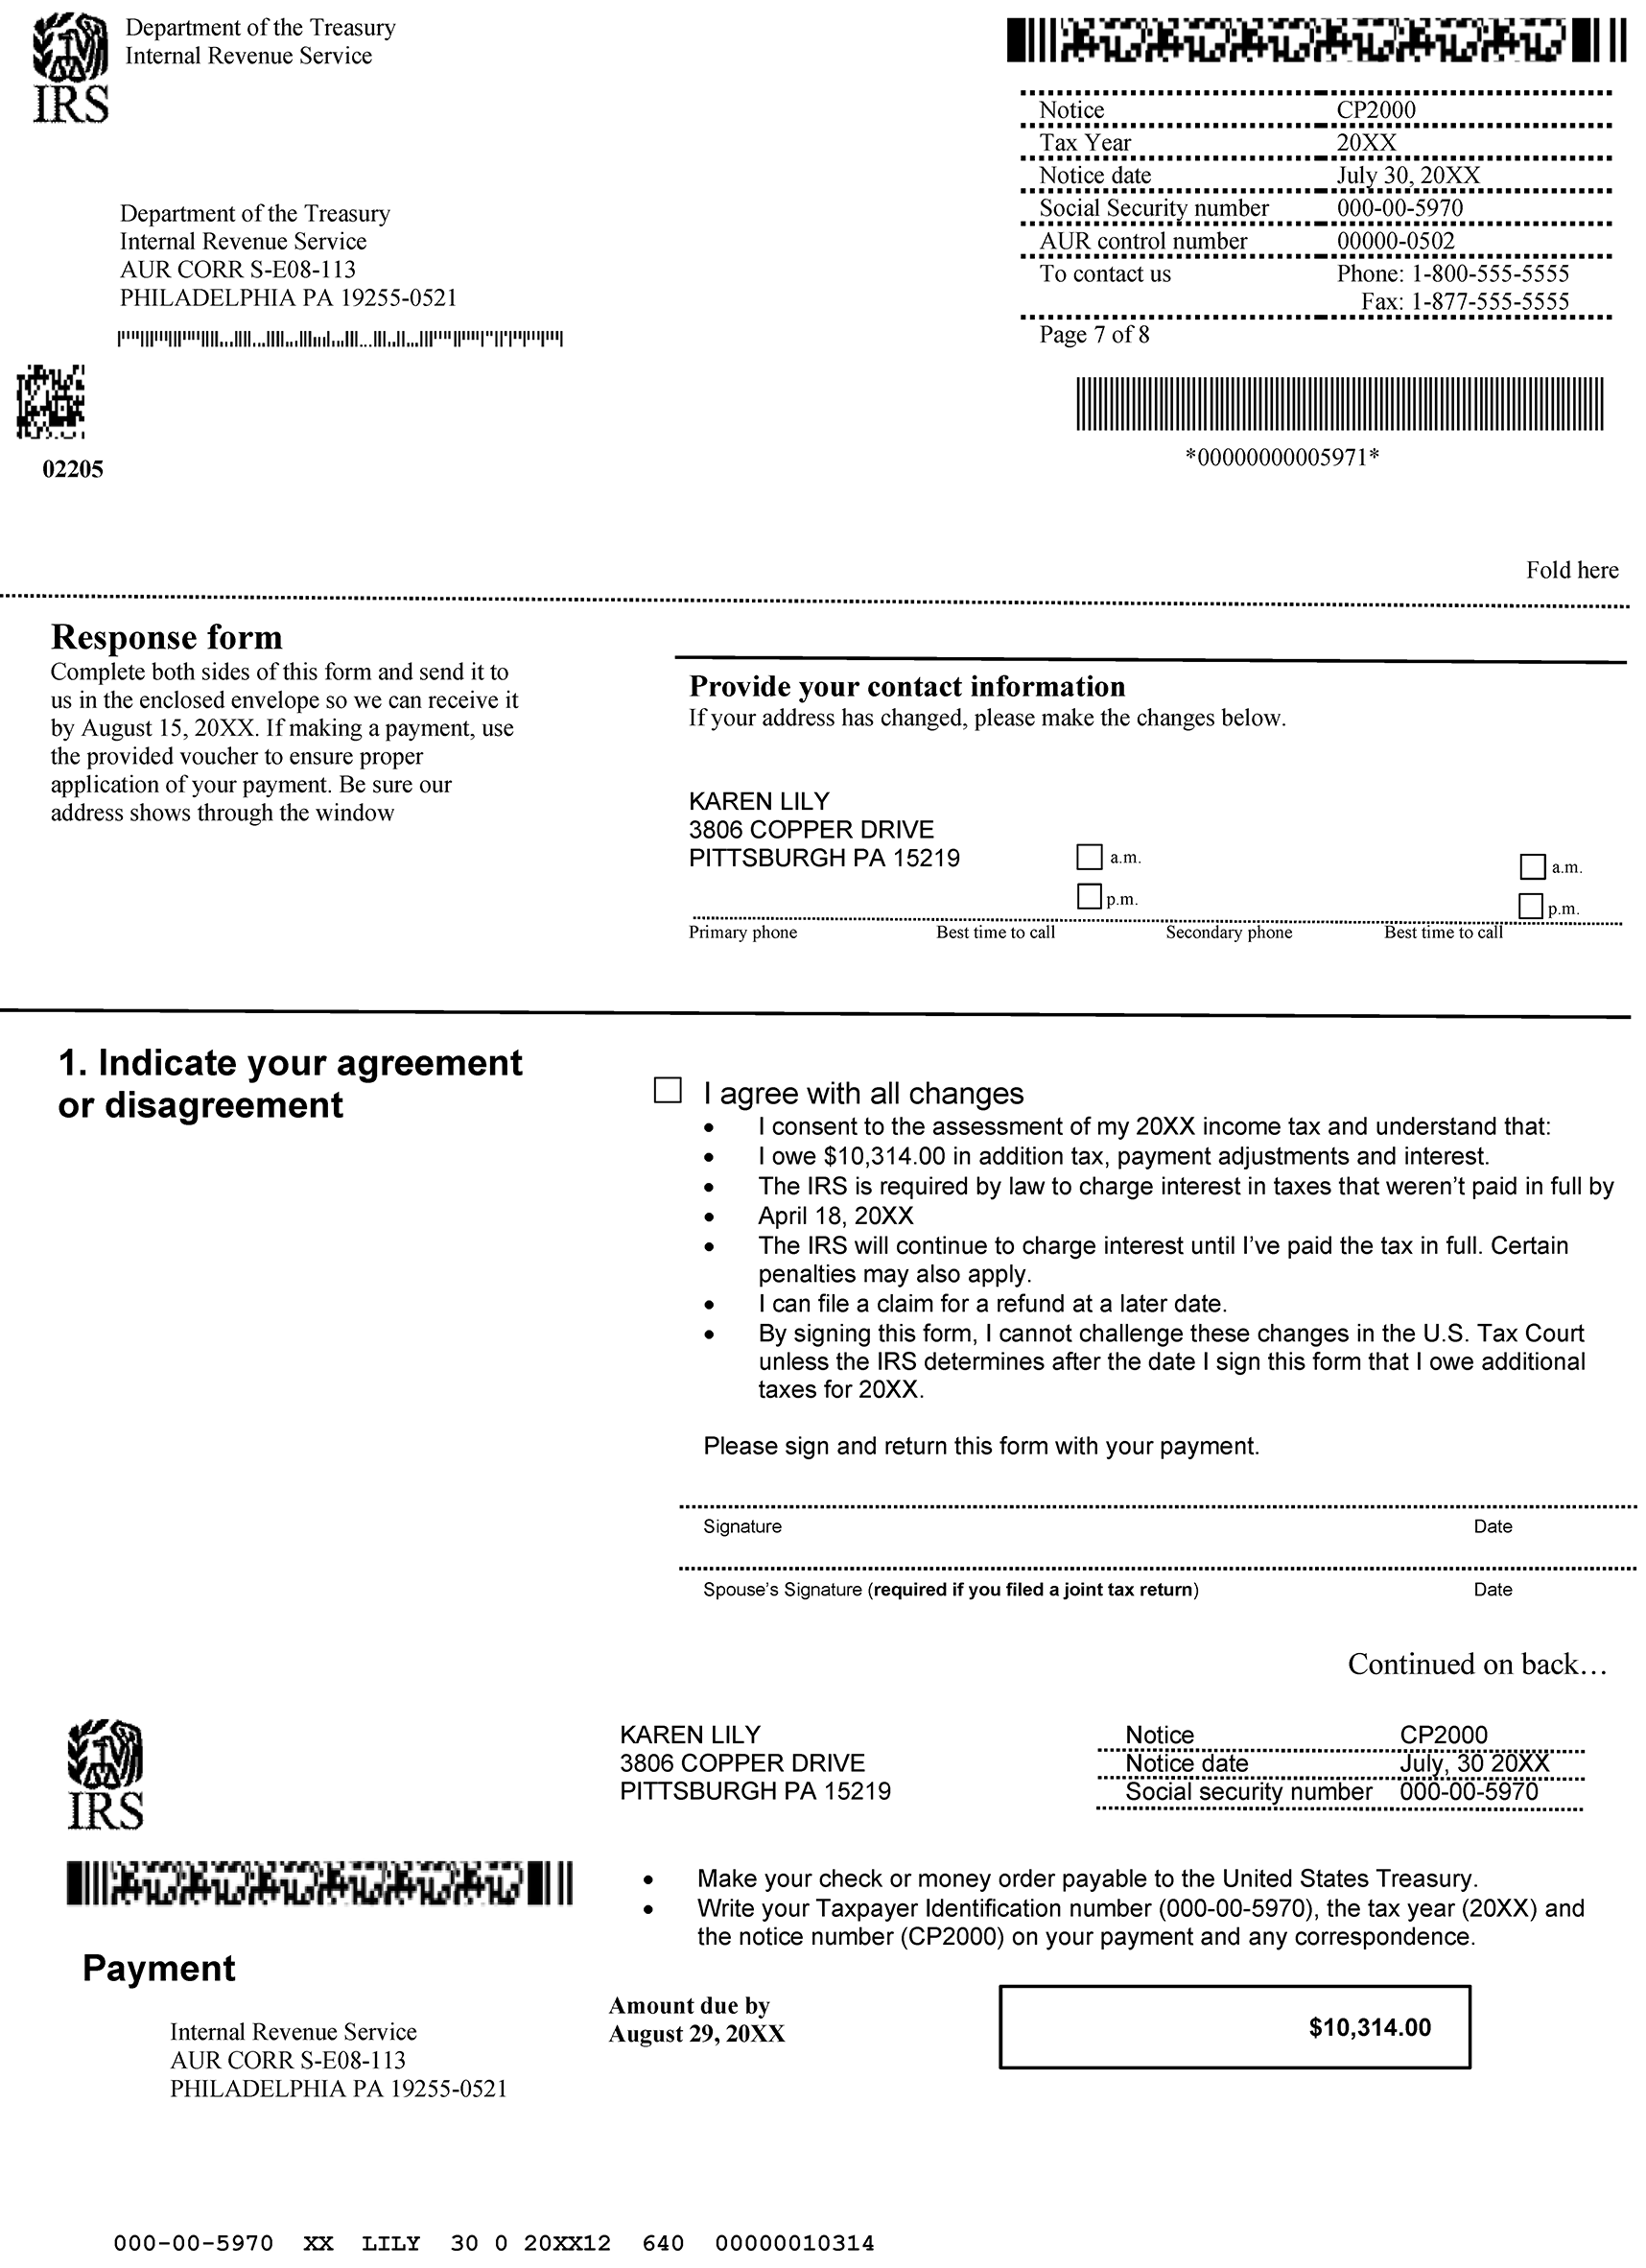
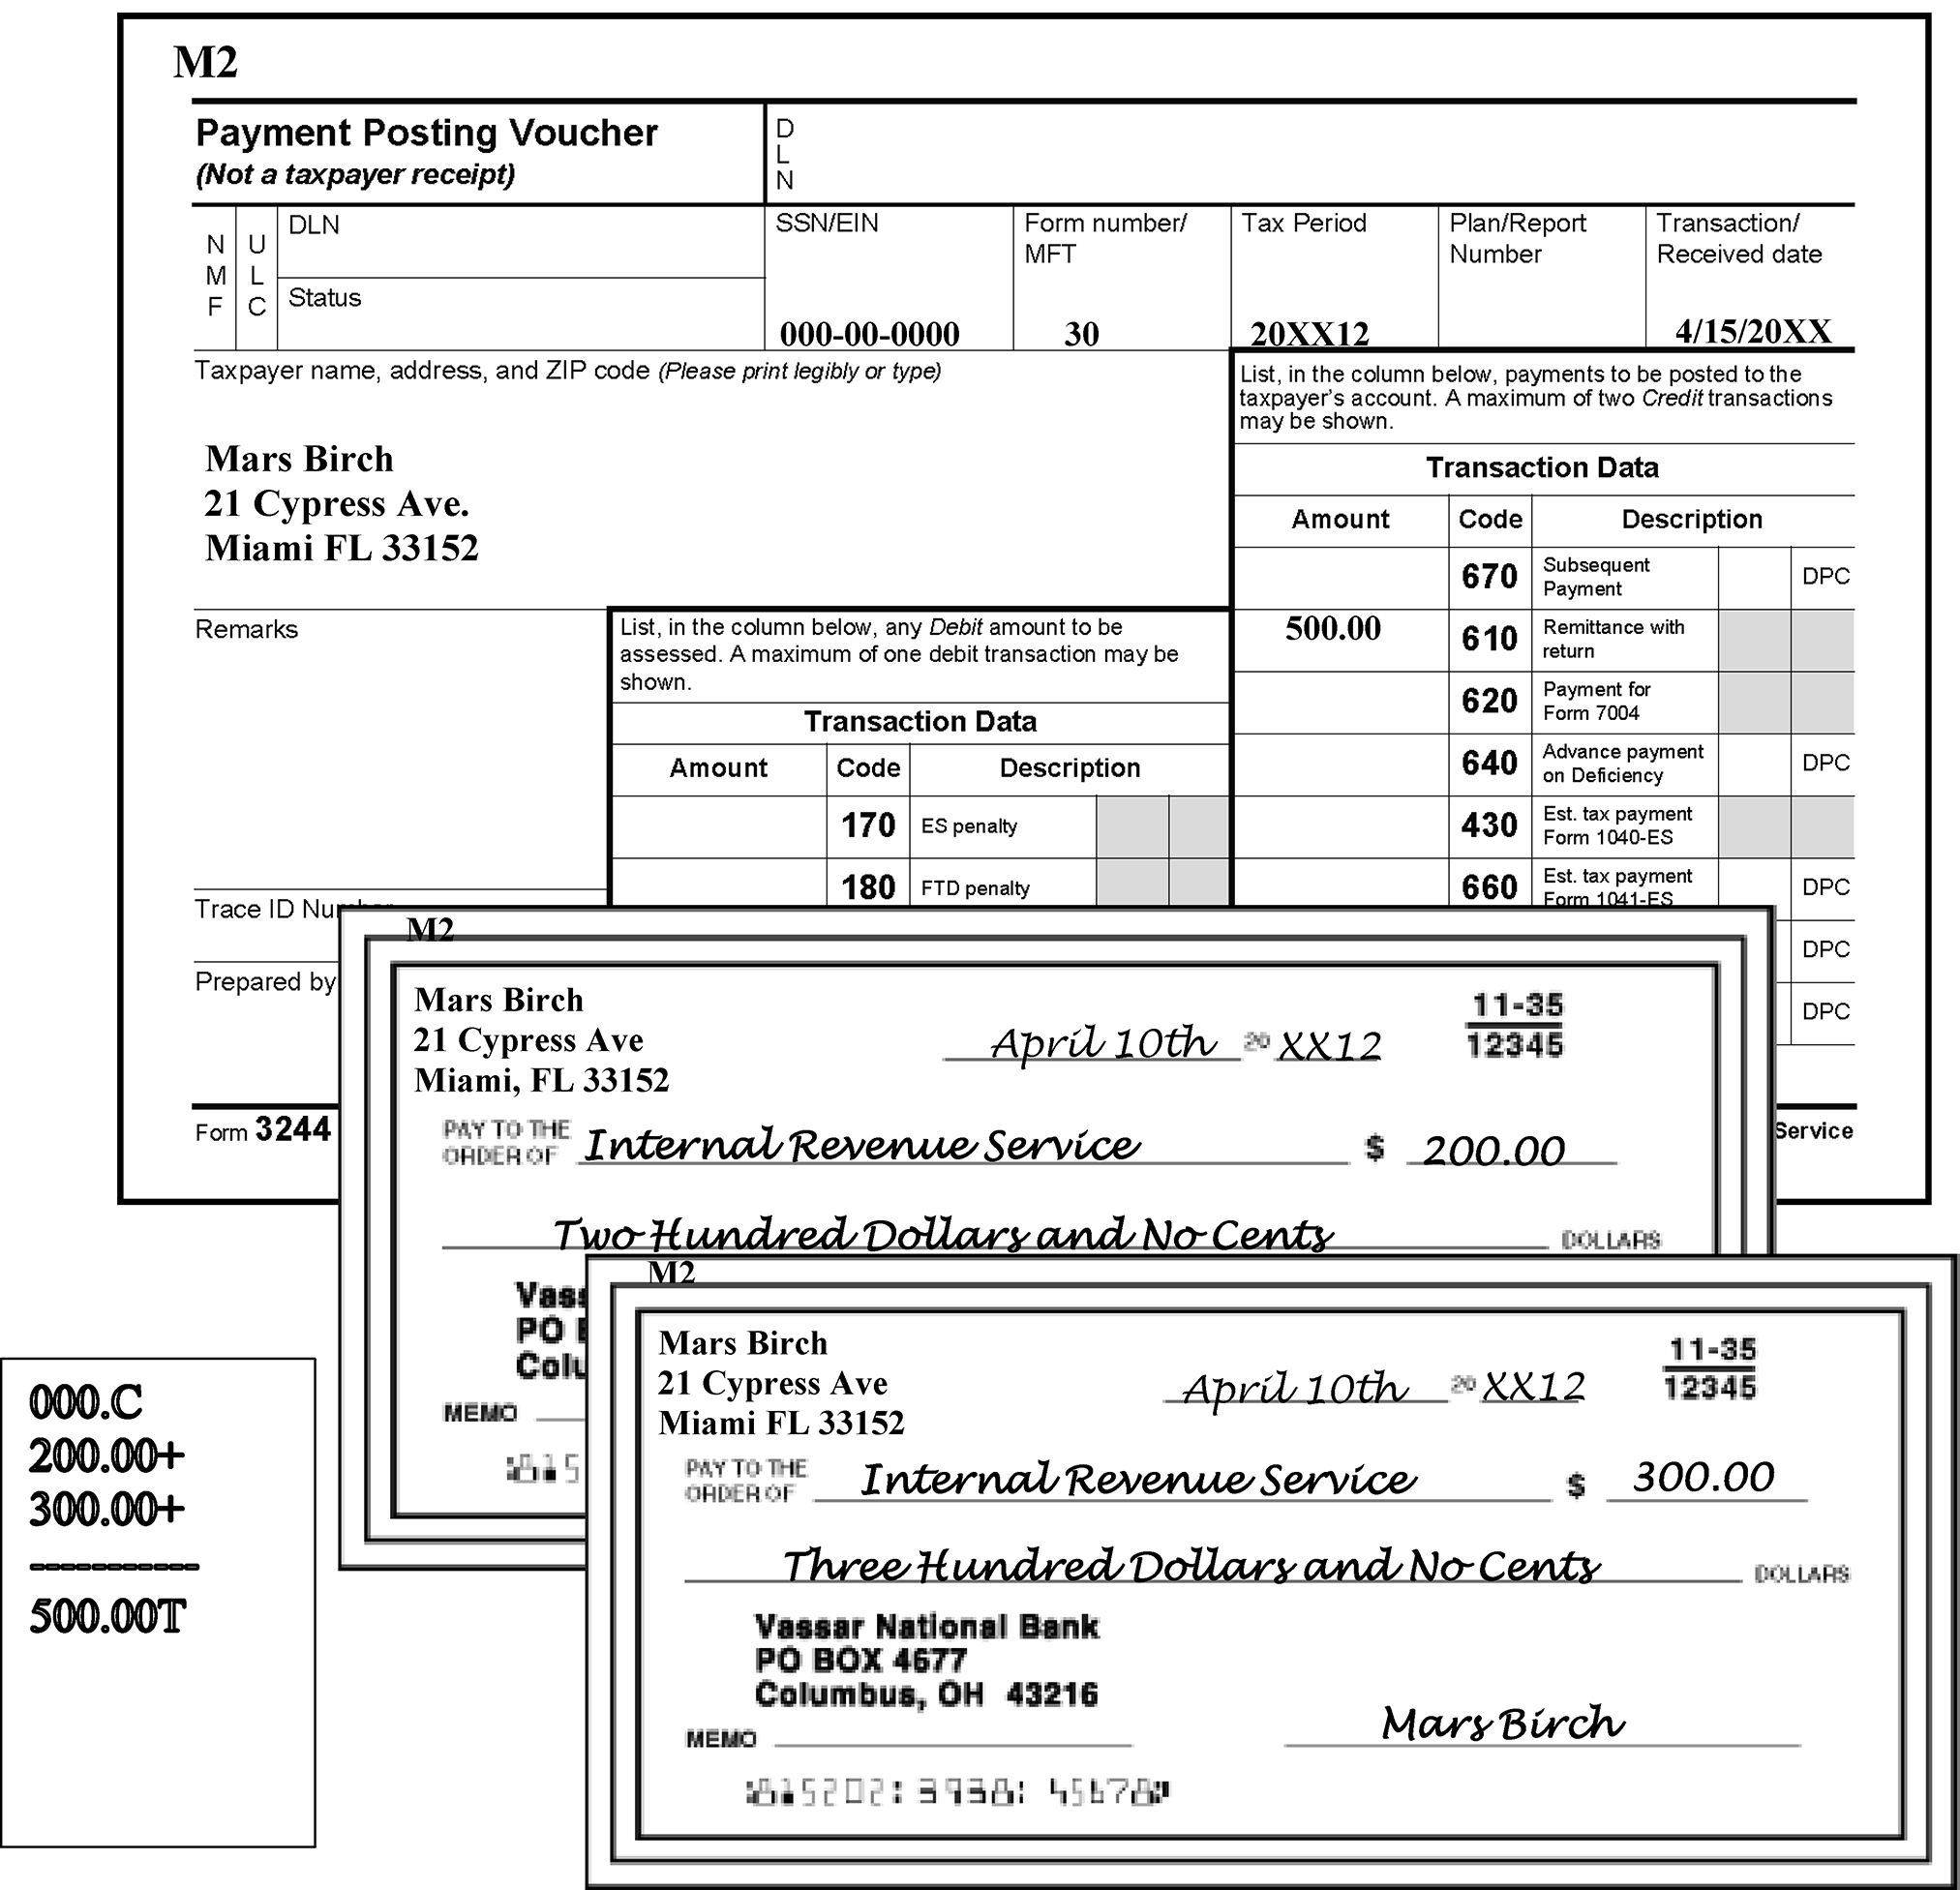
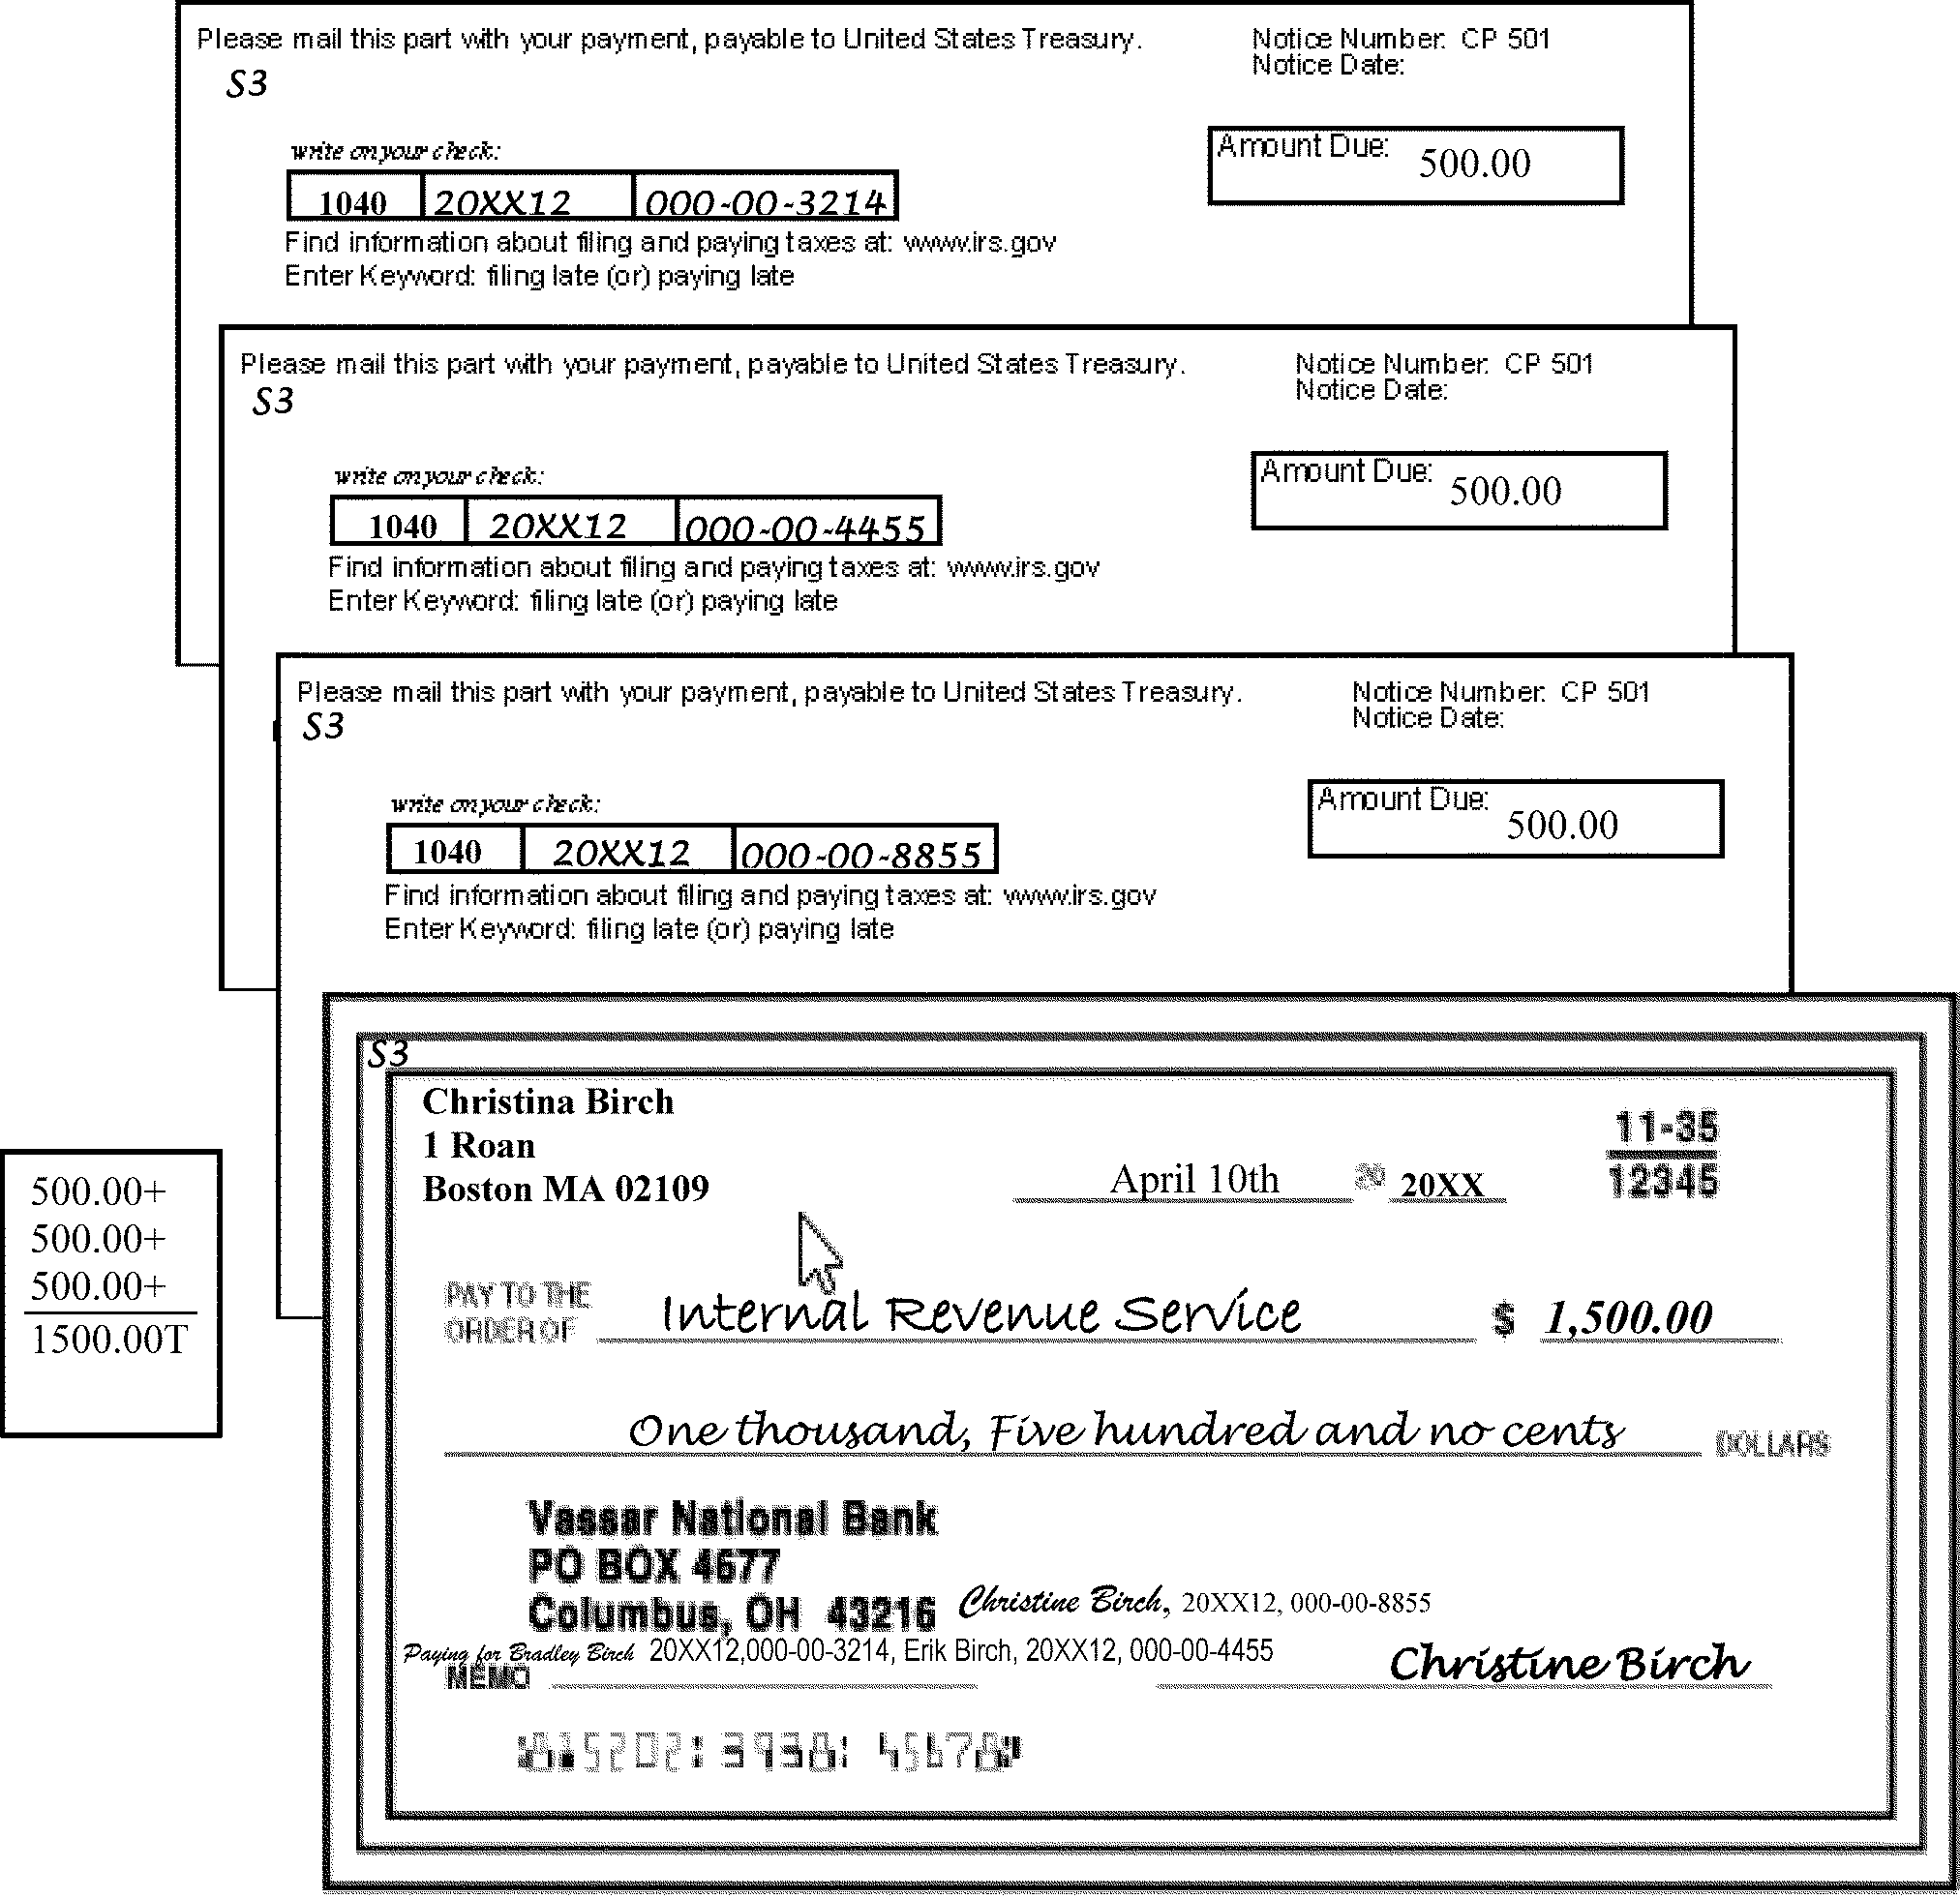
The table below breaks down and explains the DLN components for DLN 28 217 004 123 25 X. The first column lists the digits of the DLN. The second column shows examples of each digit. The third column shows gives the corresponding abbreviation of the name for each digit. The fourth column states the Definition for each digit.
| Digit(s) | Example | Abbreviation | Definition-Location |
|---|---|---|---|
| 1 and 2 | 28 | FLC | File Location Code - Represents the processing center where the return is processed. |
| 3 | 2 | TC | Tax Class - Classifies the type of tax filed by code. |
| 4 and 5 | 17 | Doc Code | Document Code - Identifies the type of document within a tax class. |
| 6, 7, and 8 | 004 | JD | Julian Date- Represents the numeric day of the year. The Julian date corresponds with the deposit date. Example: 004 represents January 4. |
| 9, 10, and 11 | 123 | Bloc No | Block Number - Identifies the numerical order of work processed by category. |
| 12 and 13 | 25 | Ser Num | Serial Number - Represents the document number within the block. |
| 14 | "X" | Y | Year - Represents the year in which the DLN is assigned. |
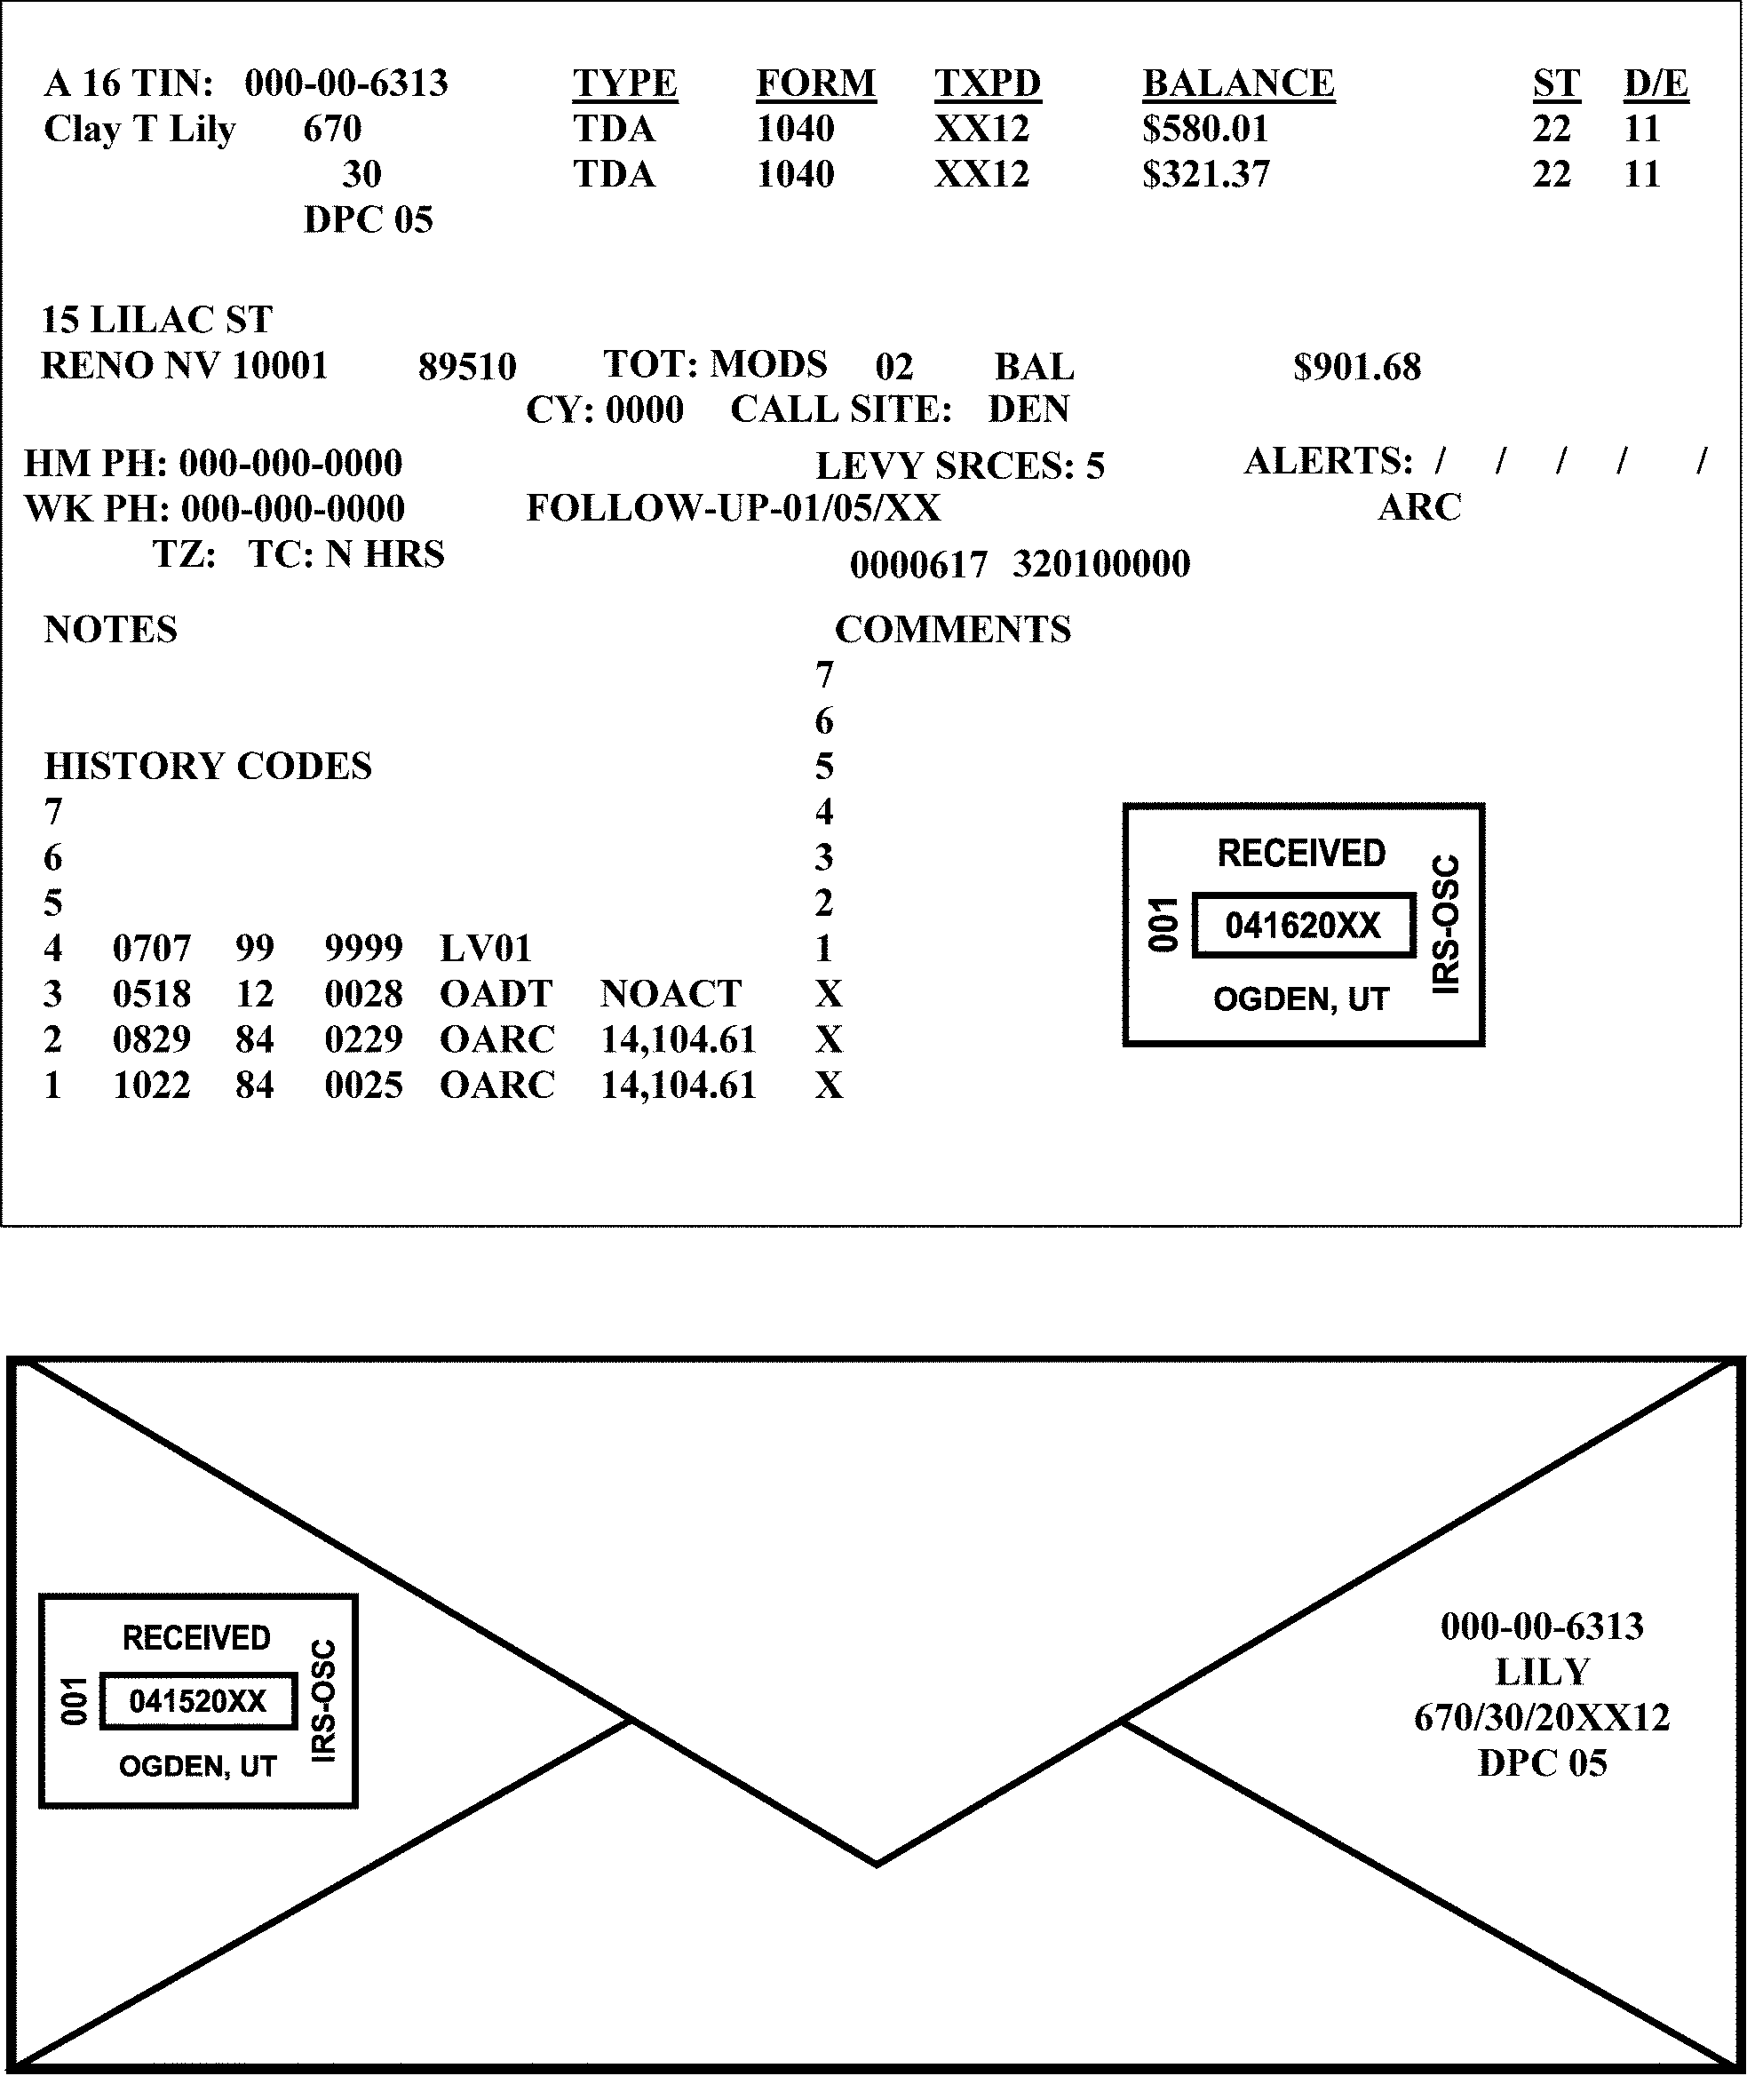
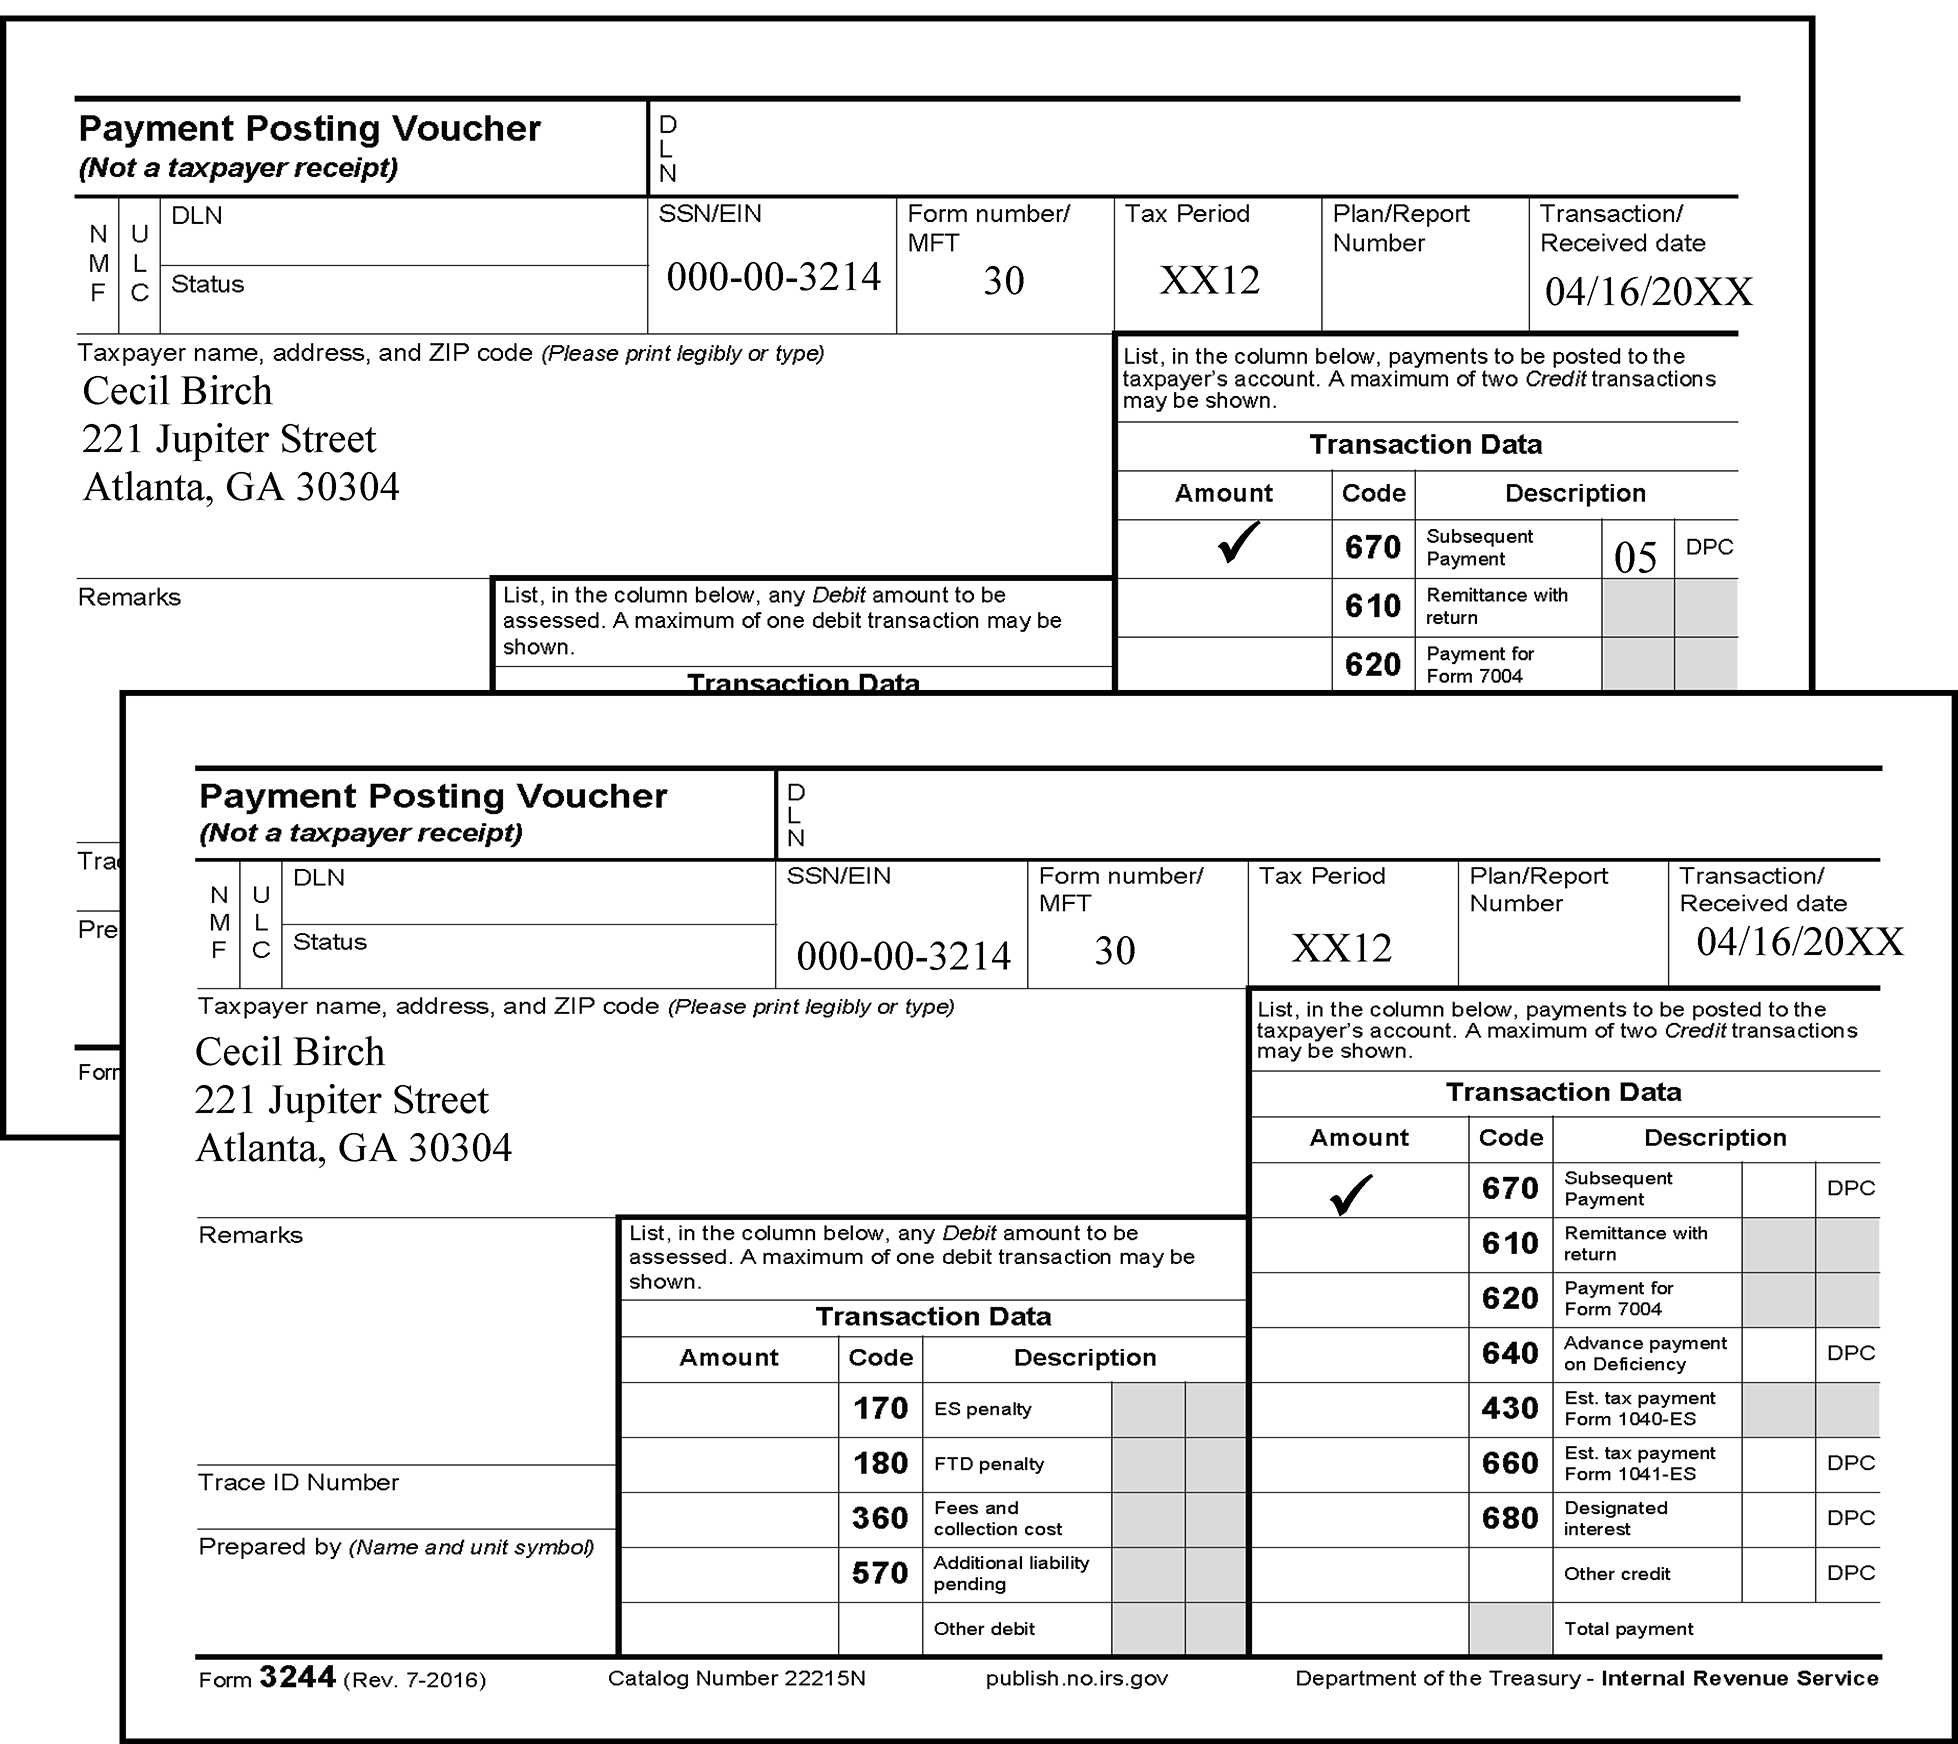
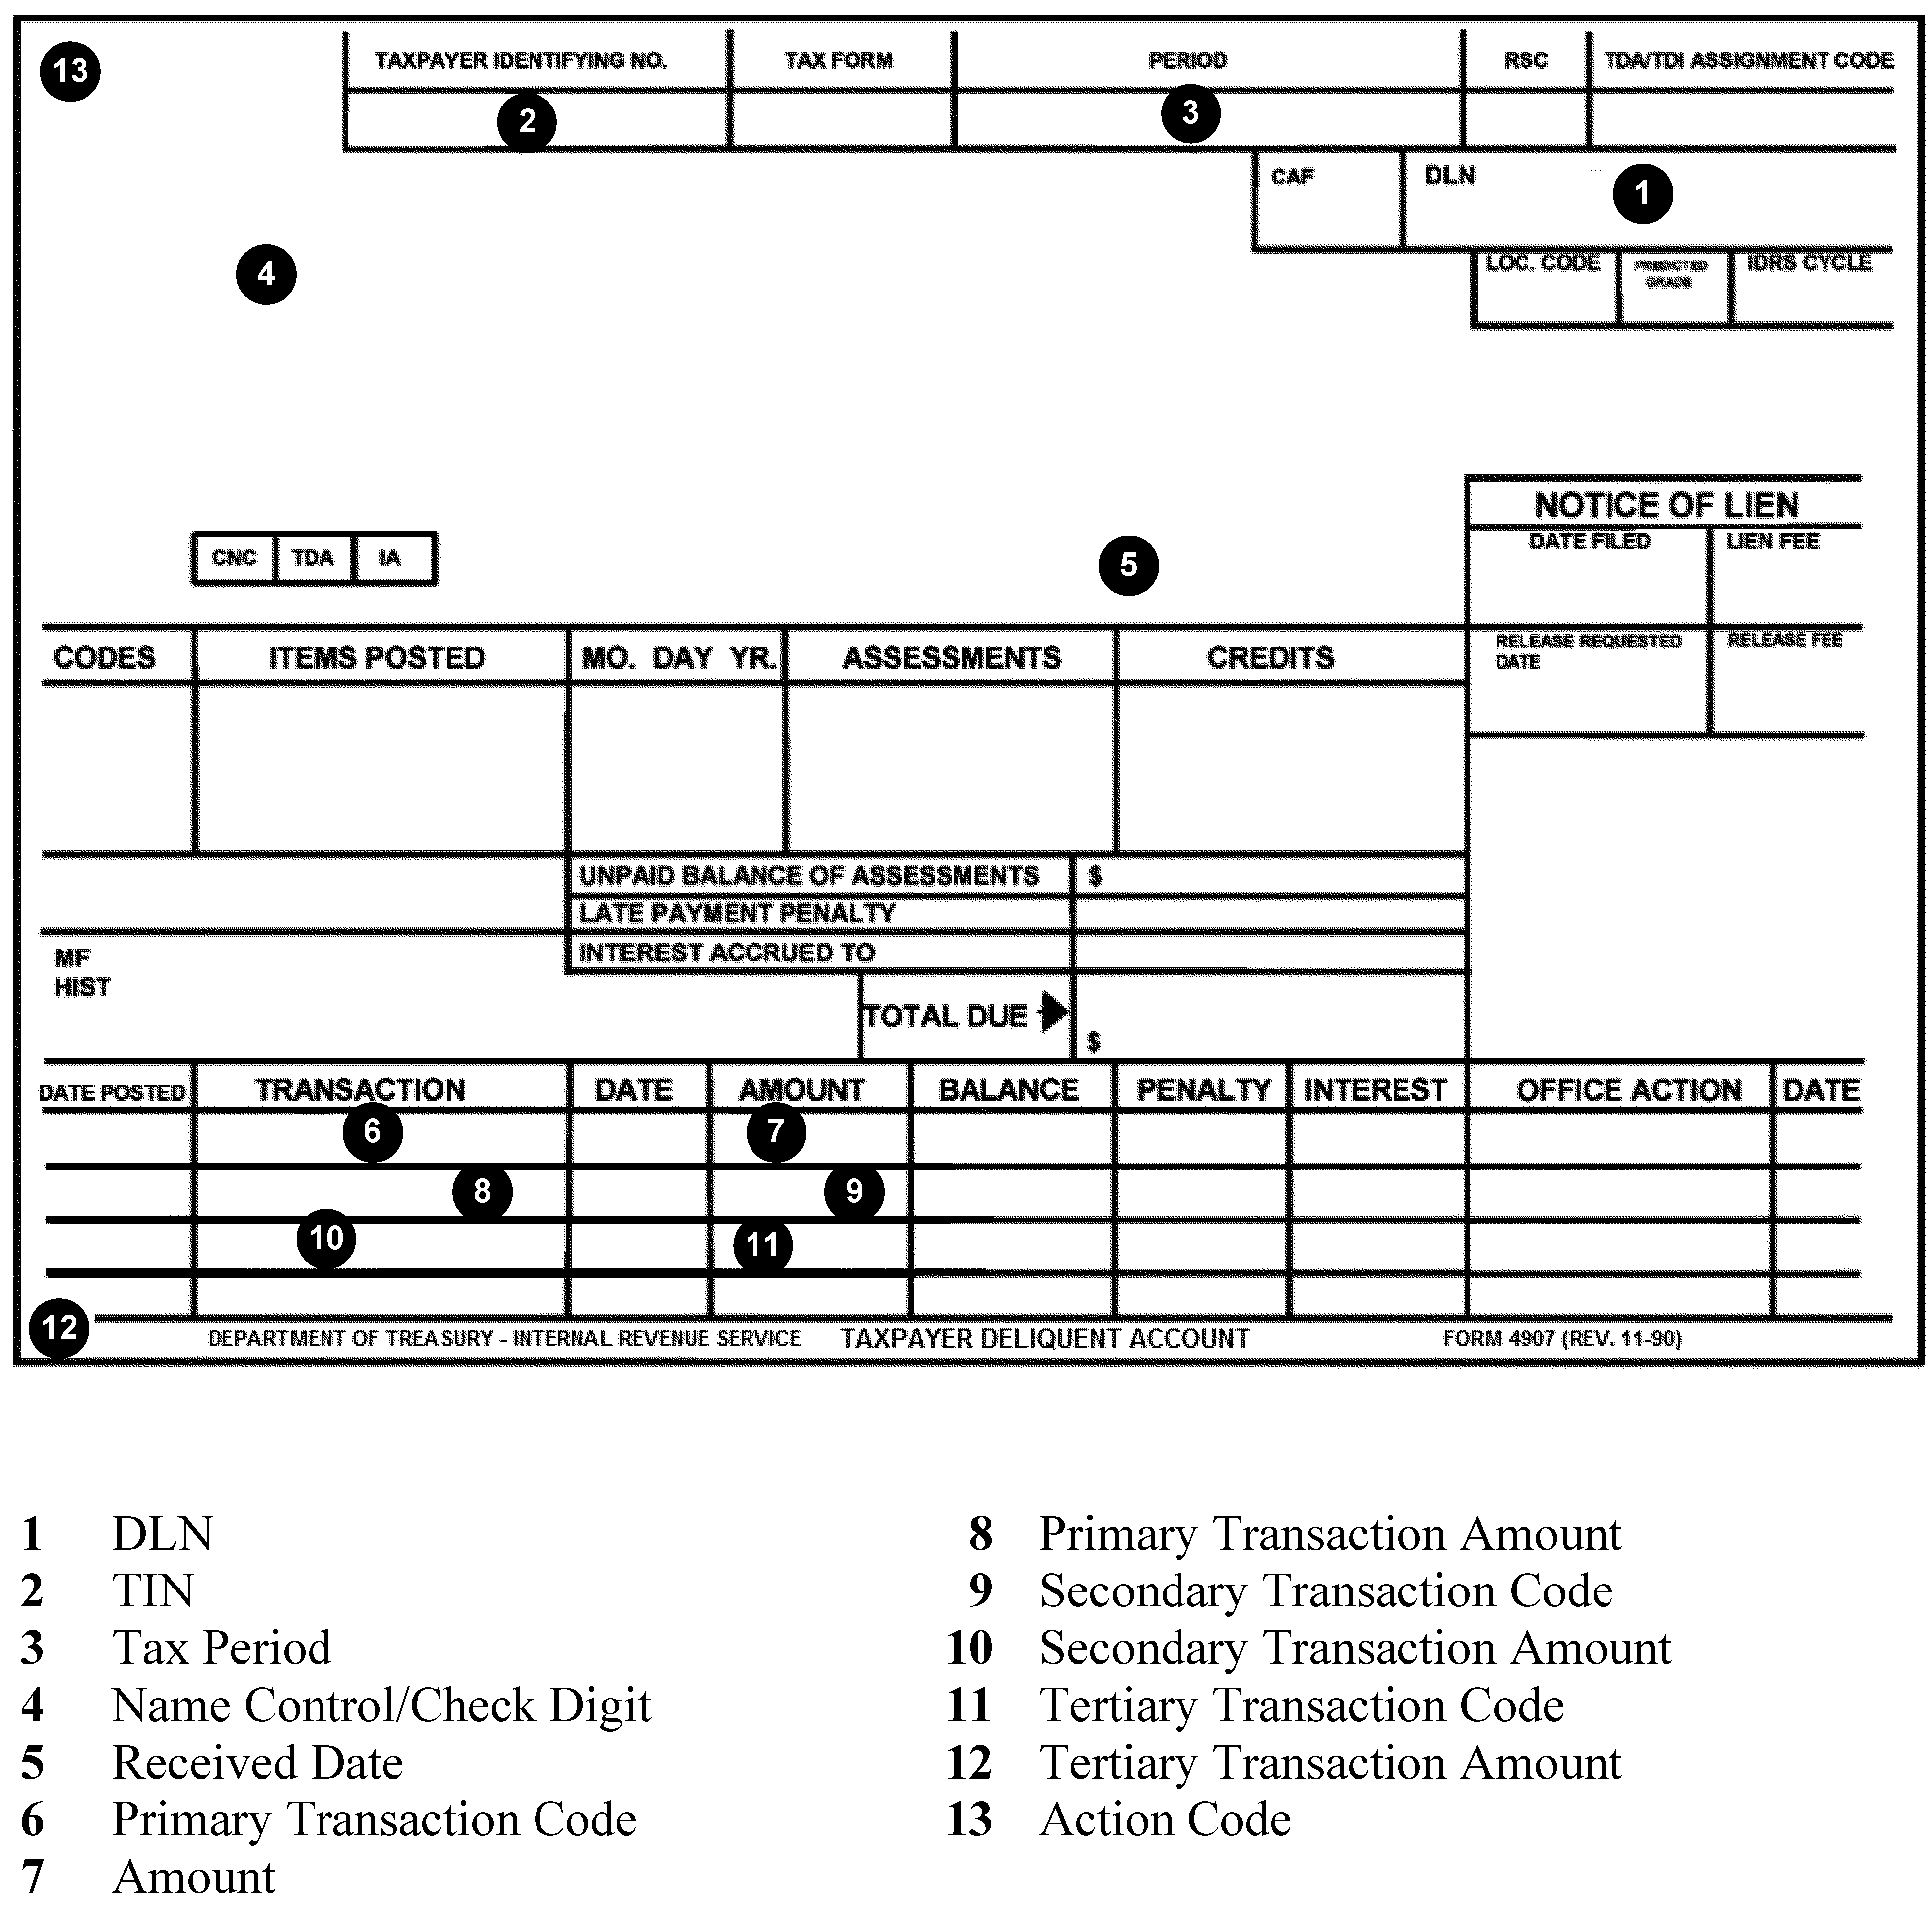
Below is a table that shows the File Location Codes for each site. The first column lists the location. The second column shows the primary code used at each location. The third column shows the overflow codes used.
| Location | Primary Code | Overflow Code(s) |
|---|---|---|
| Andover (for RTR purposes only) | 08 | 01 |
| Atlanta | 07 | 58 |
| Austin | 18 | 74 |
| Brookhaven (for RTR purposes only) | 19 | |
| Cincinnati | 17 | 38 |
| Fresno | 89 | 95 |
| Memphis (for RTR purposes only) | 49 | 57, 61 |
| Kansas City | 09 | 41, 45, 46 |
| Ogden | 29 | 81, 83, 84, 99 |
| Philadelphia (for RTR purposes only) | 28 | 54, 55, 66, 98 |
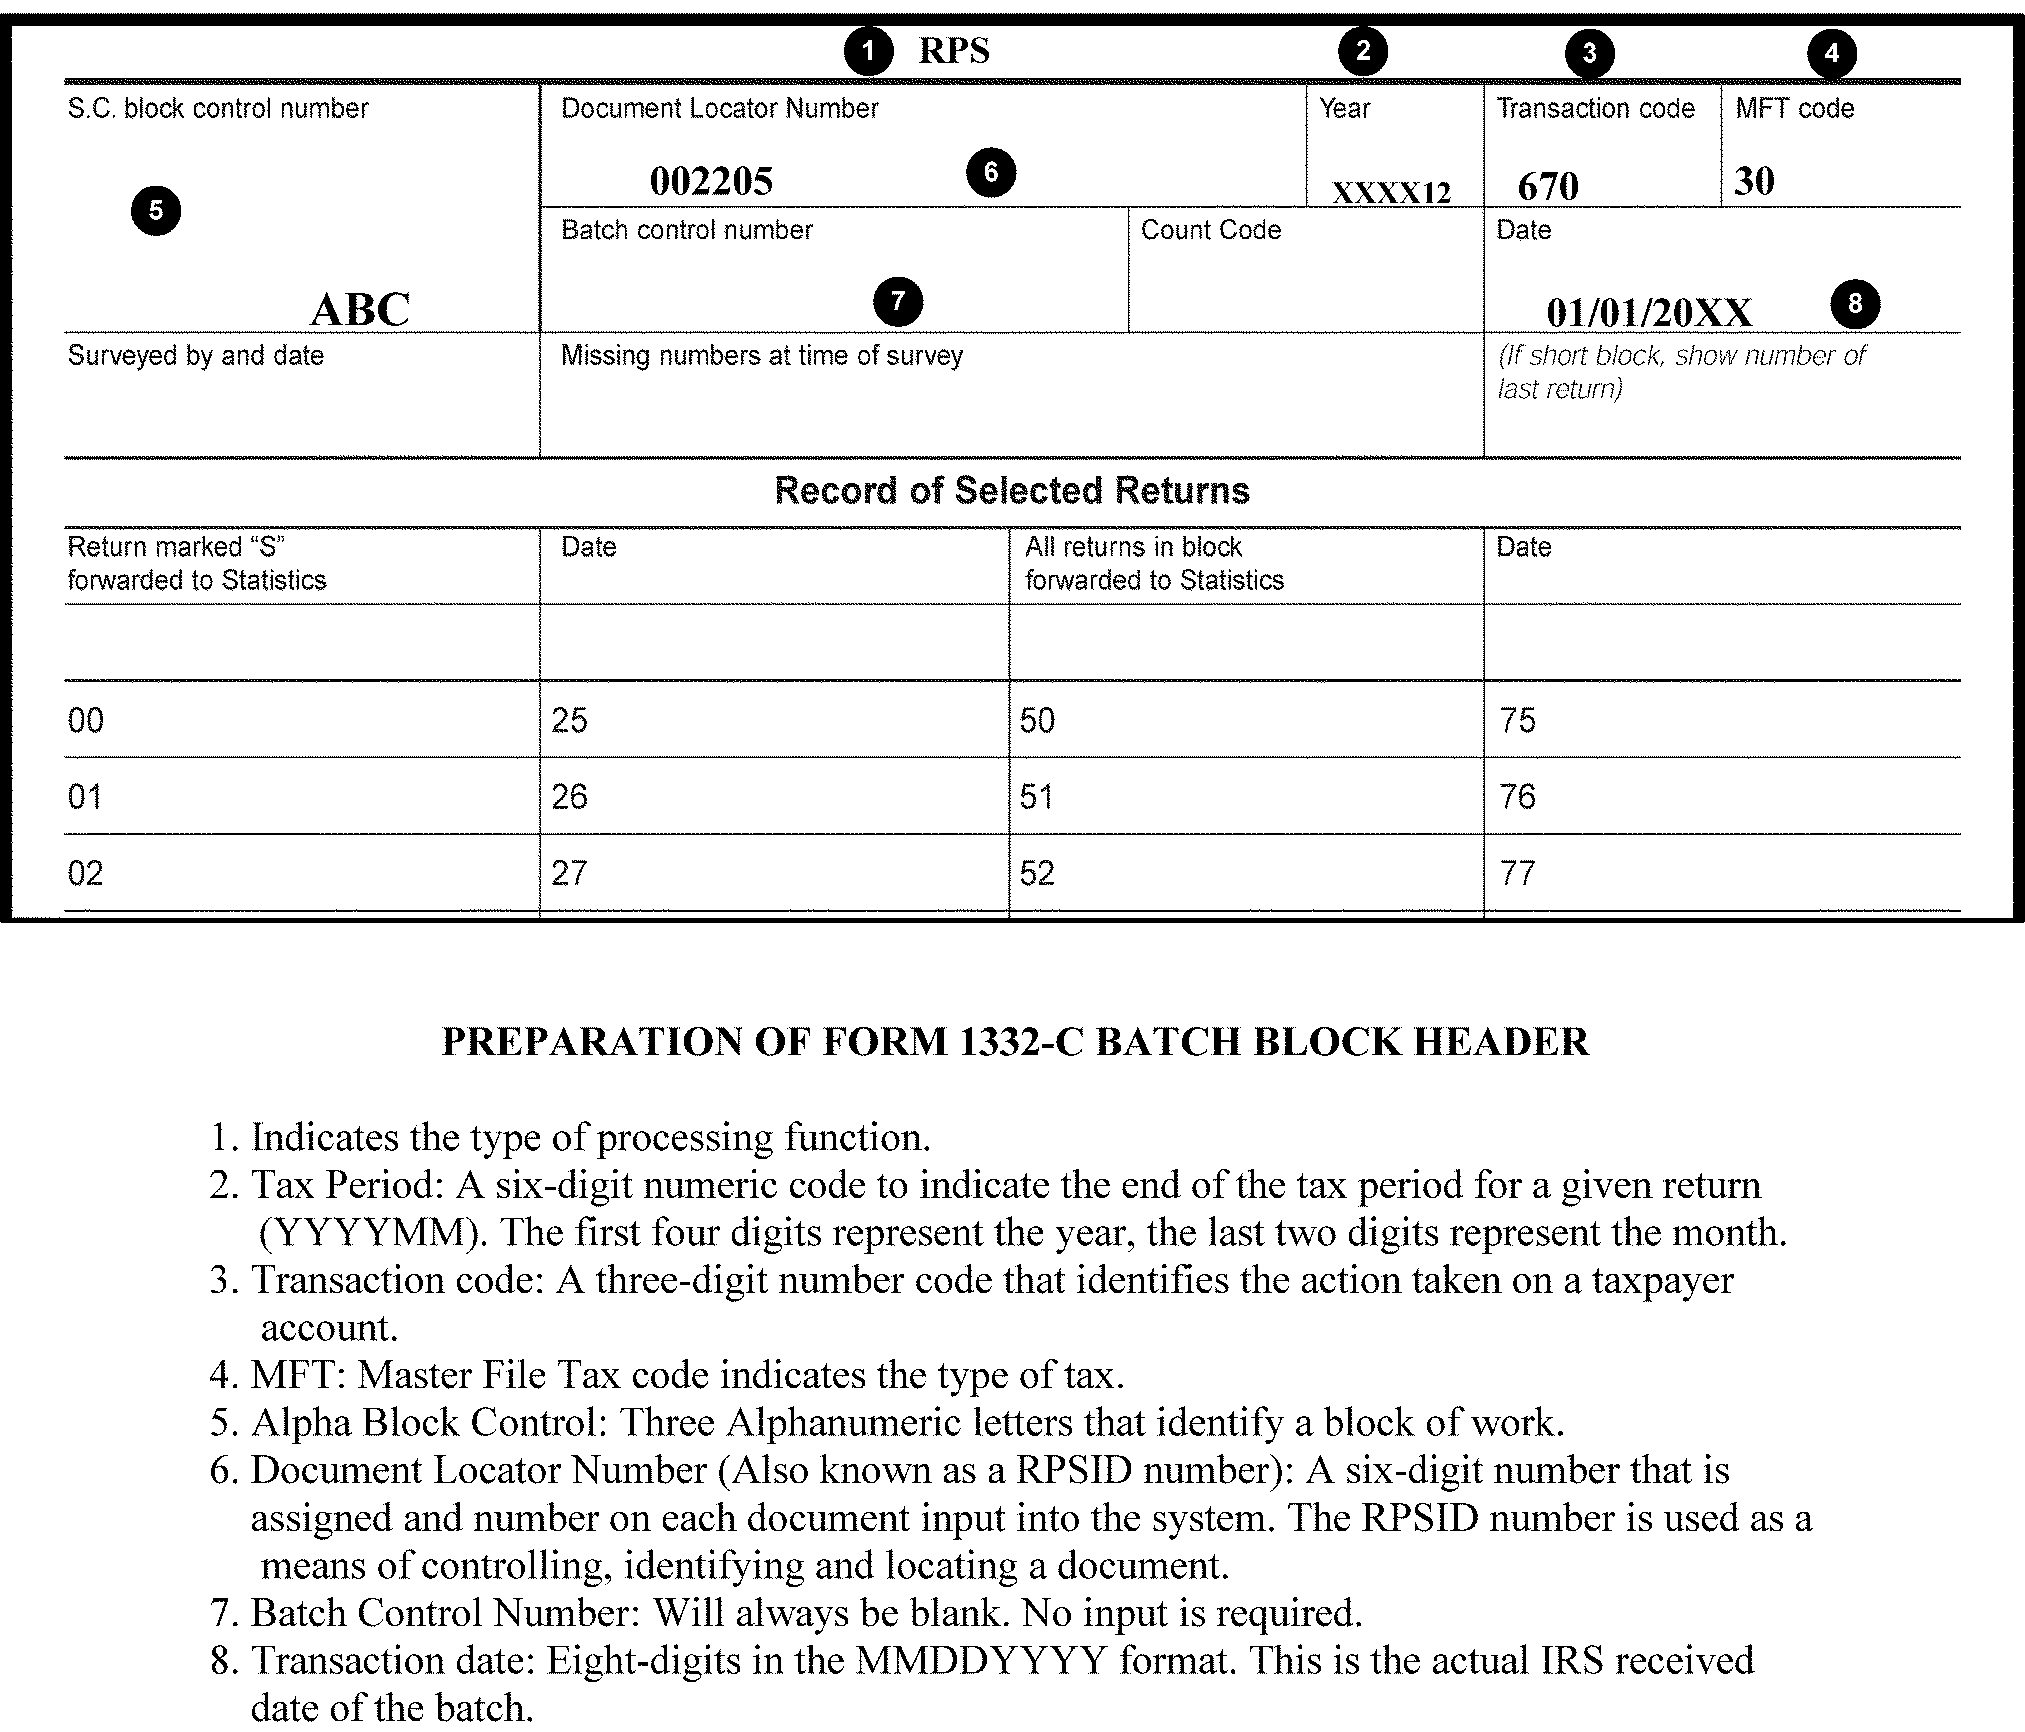
This table shows the combination of Master File Tax codes used when batching checks and documents for payment processing. The first column shows the combination of MFTs. The second column provides instructions. The third column lists the processing tax class. The fourth column lists the processing Doc code.
| Master File Tax Codes (MFT) | Instructions | Processing Tax Class | Processing Doc Code |
|---|---|---|---|
| 01, 04, 08, 11, 12,14,16, 17 | Merge MFTs grouped in numeric order within batch | 1 | 17 |
| 05, 06, 15 | Block imperfect documents separately | 2 | 17 |
| 30, 31, 35, 55, 65 | Block alone | 2 | 17 |
| 02, 07, 33, 34, | Merge MFTs grouped in numeric order within the batch | 3 | 17 |
| 03, 36, 37, 44, 50, 58, 60, 62, 63, 64, 67, 74, 76 | Merge MFTs grouped in numeric order within the batch | 4 | 17 |
| 51, 52, 77, 78 | Block imperfect documents separately | 5 | 17 |
| 09 | Batch alone | 7 | 17 |
| 10 | Batch alone | 8 | 17 |
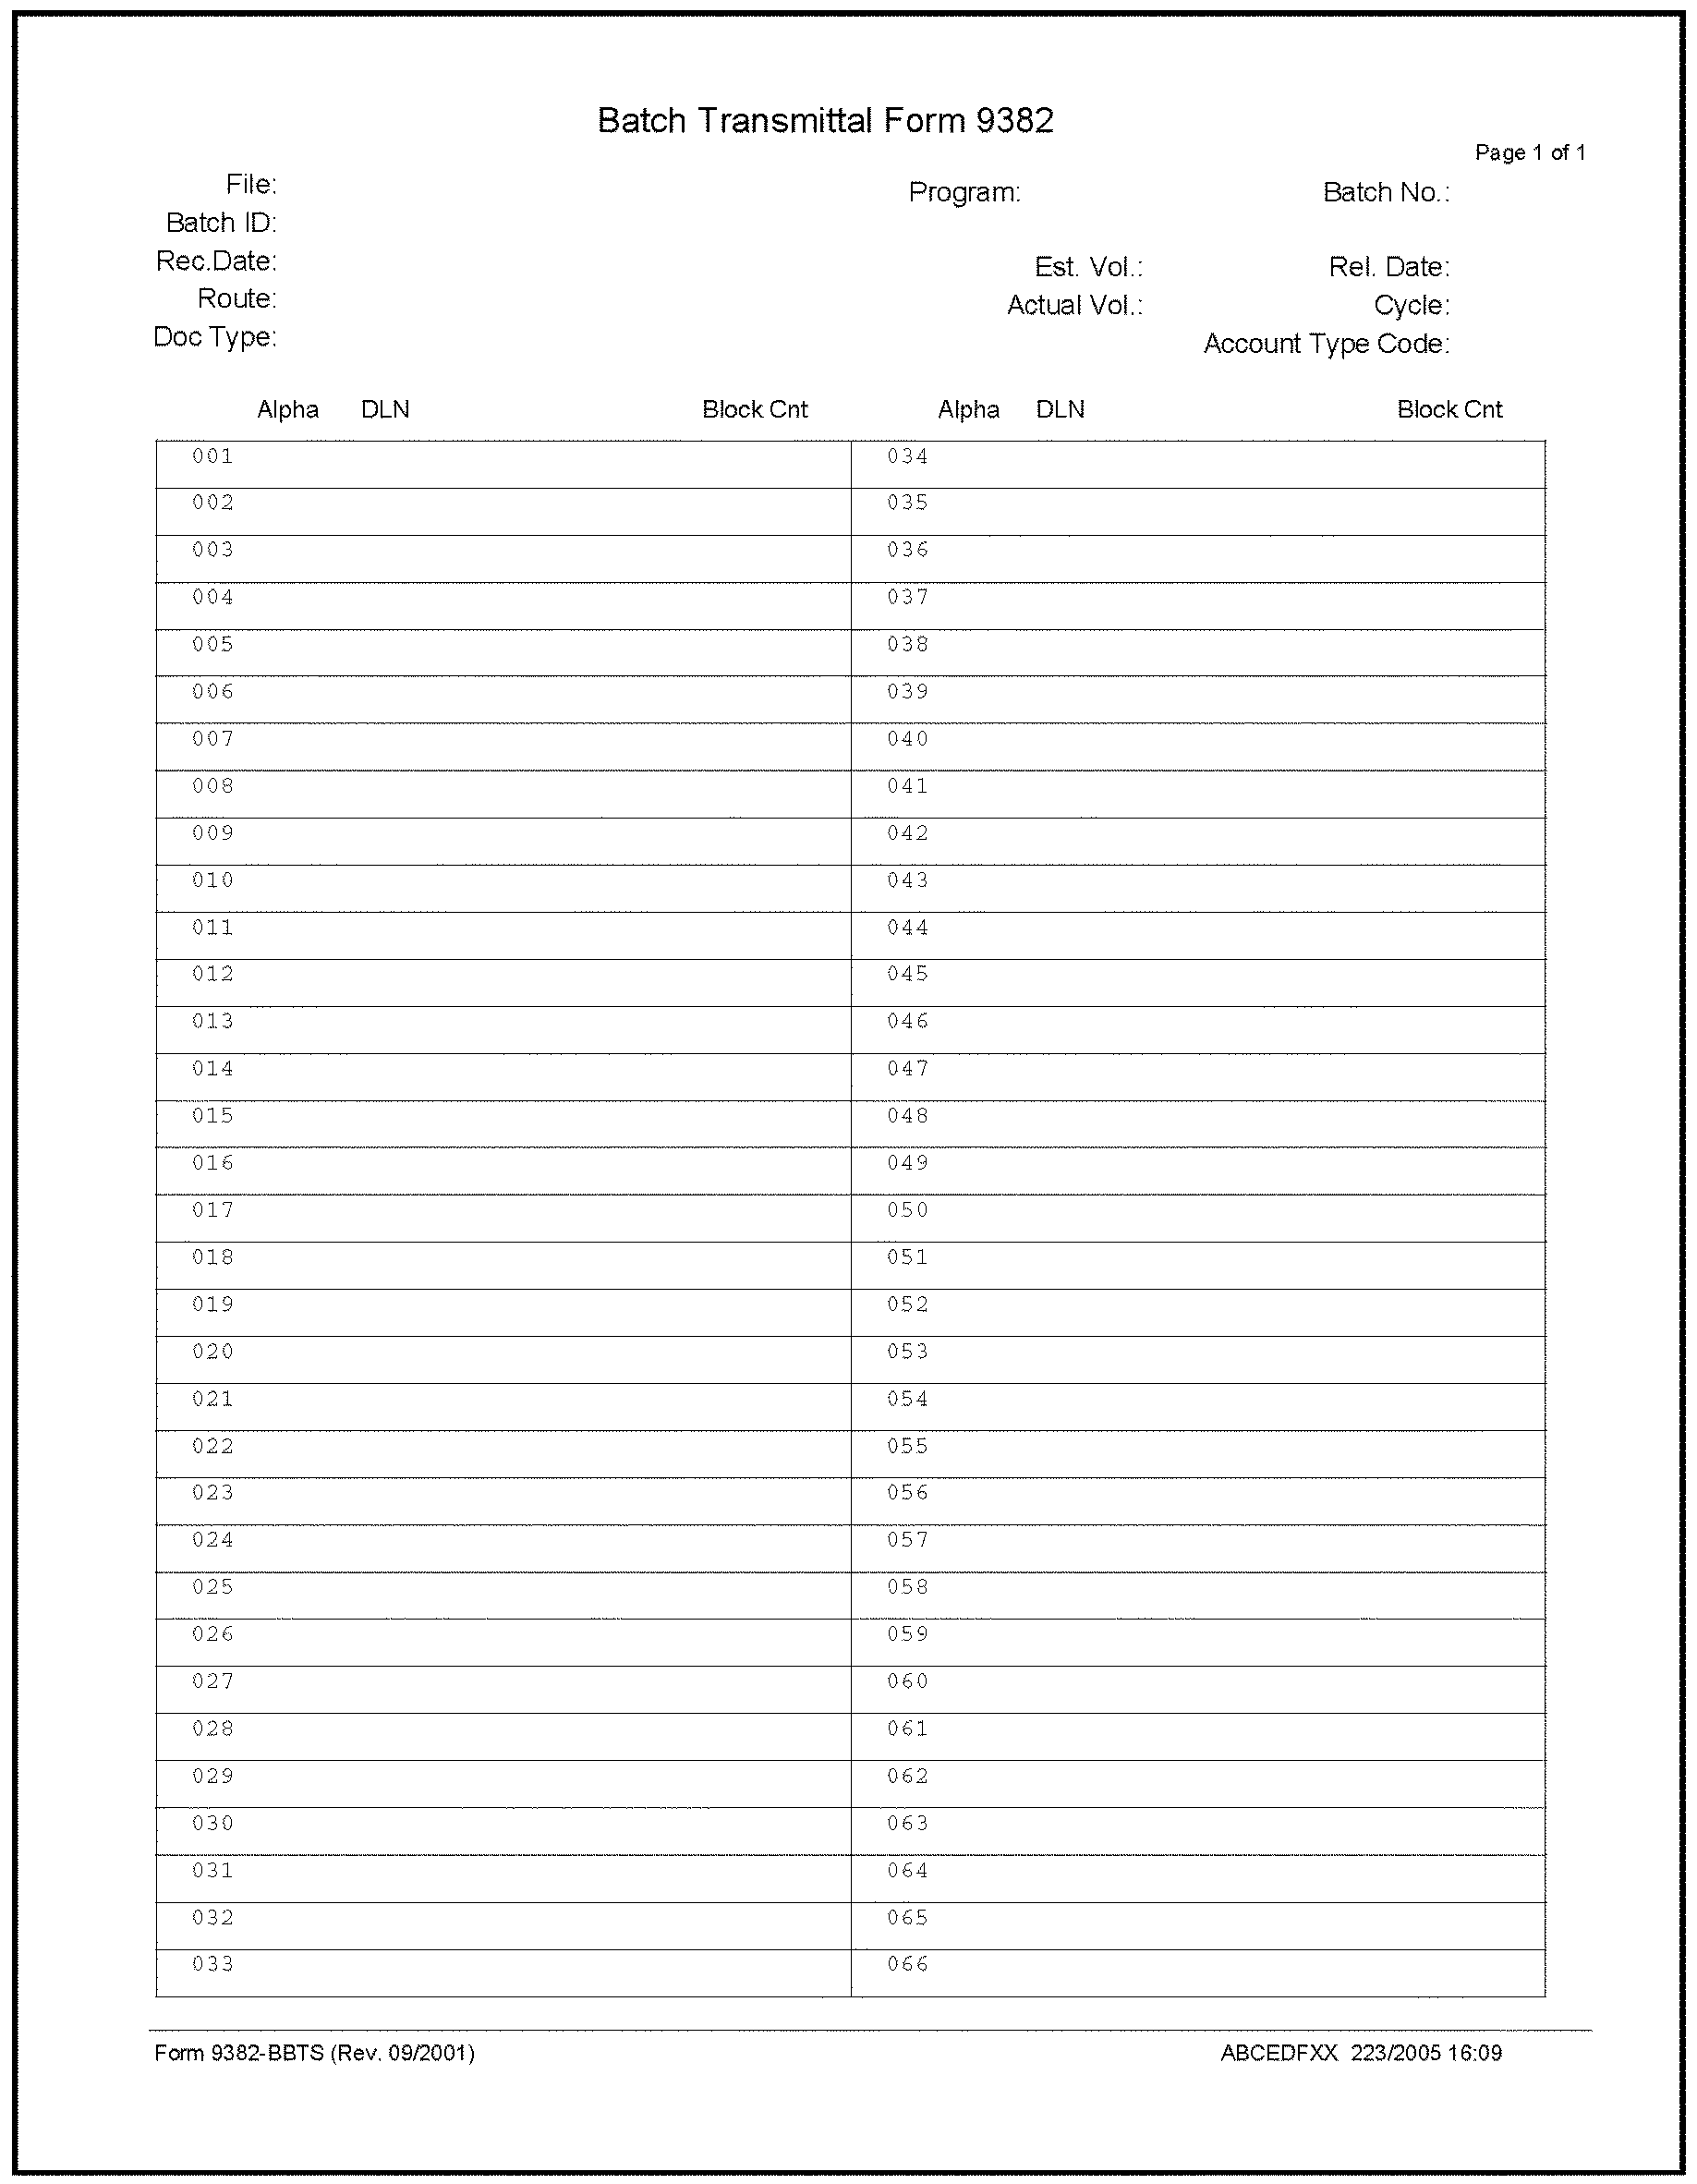
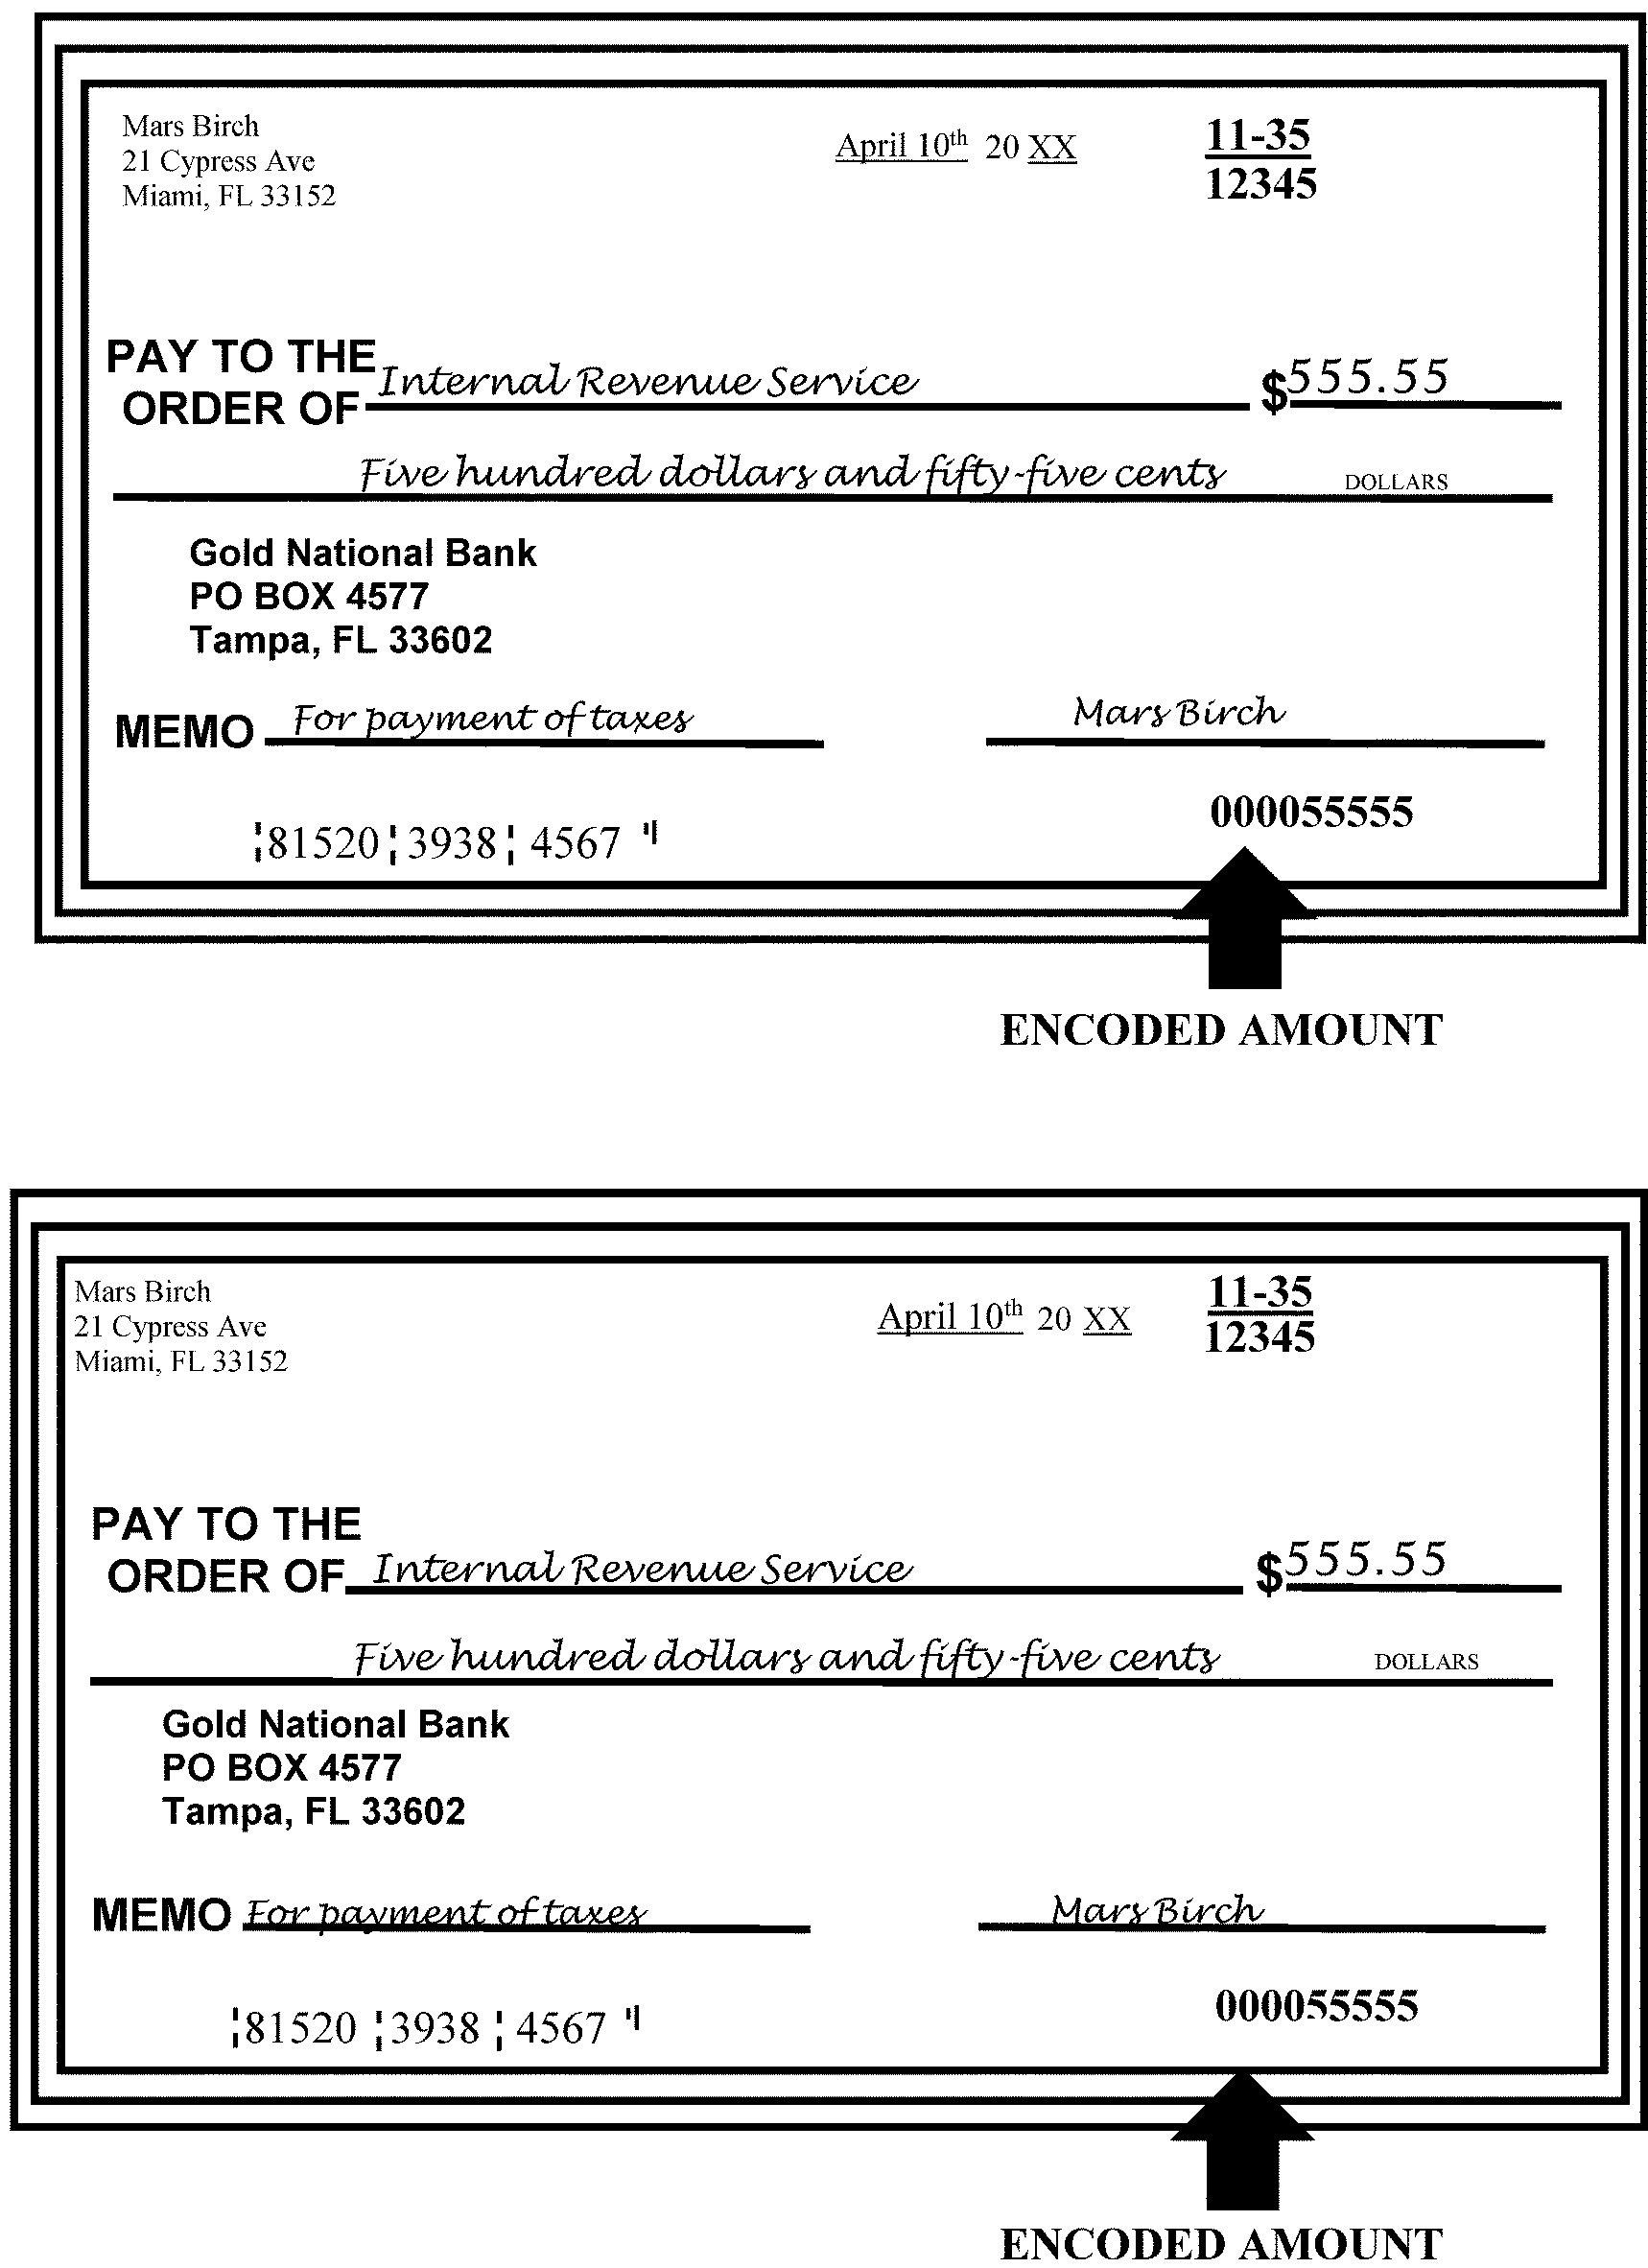
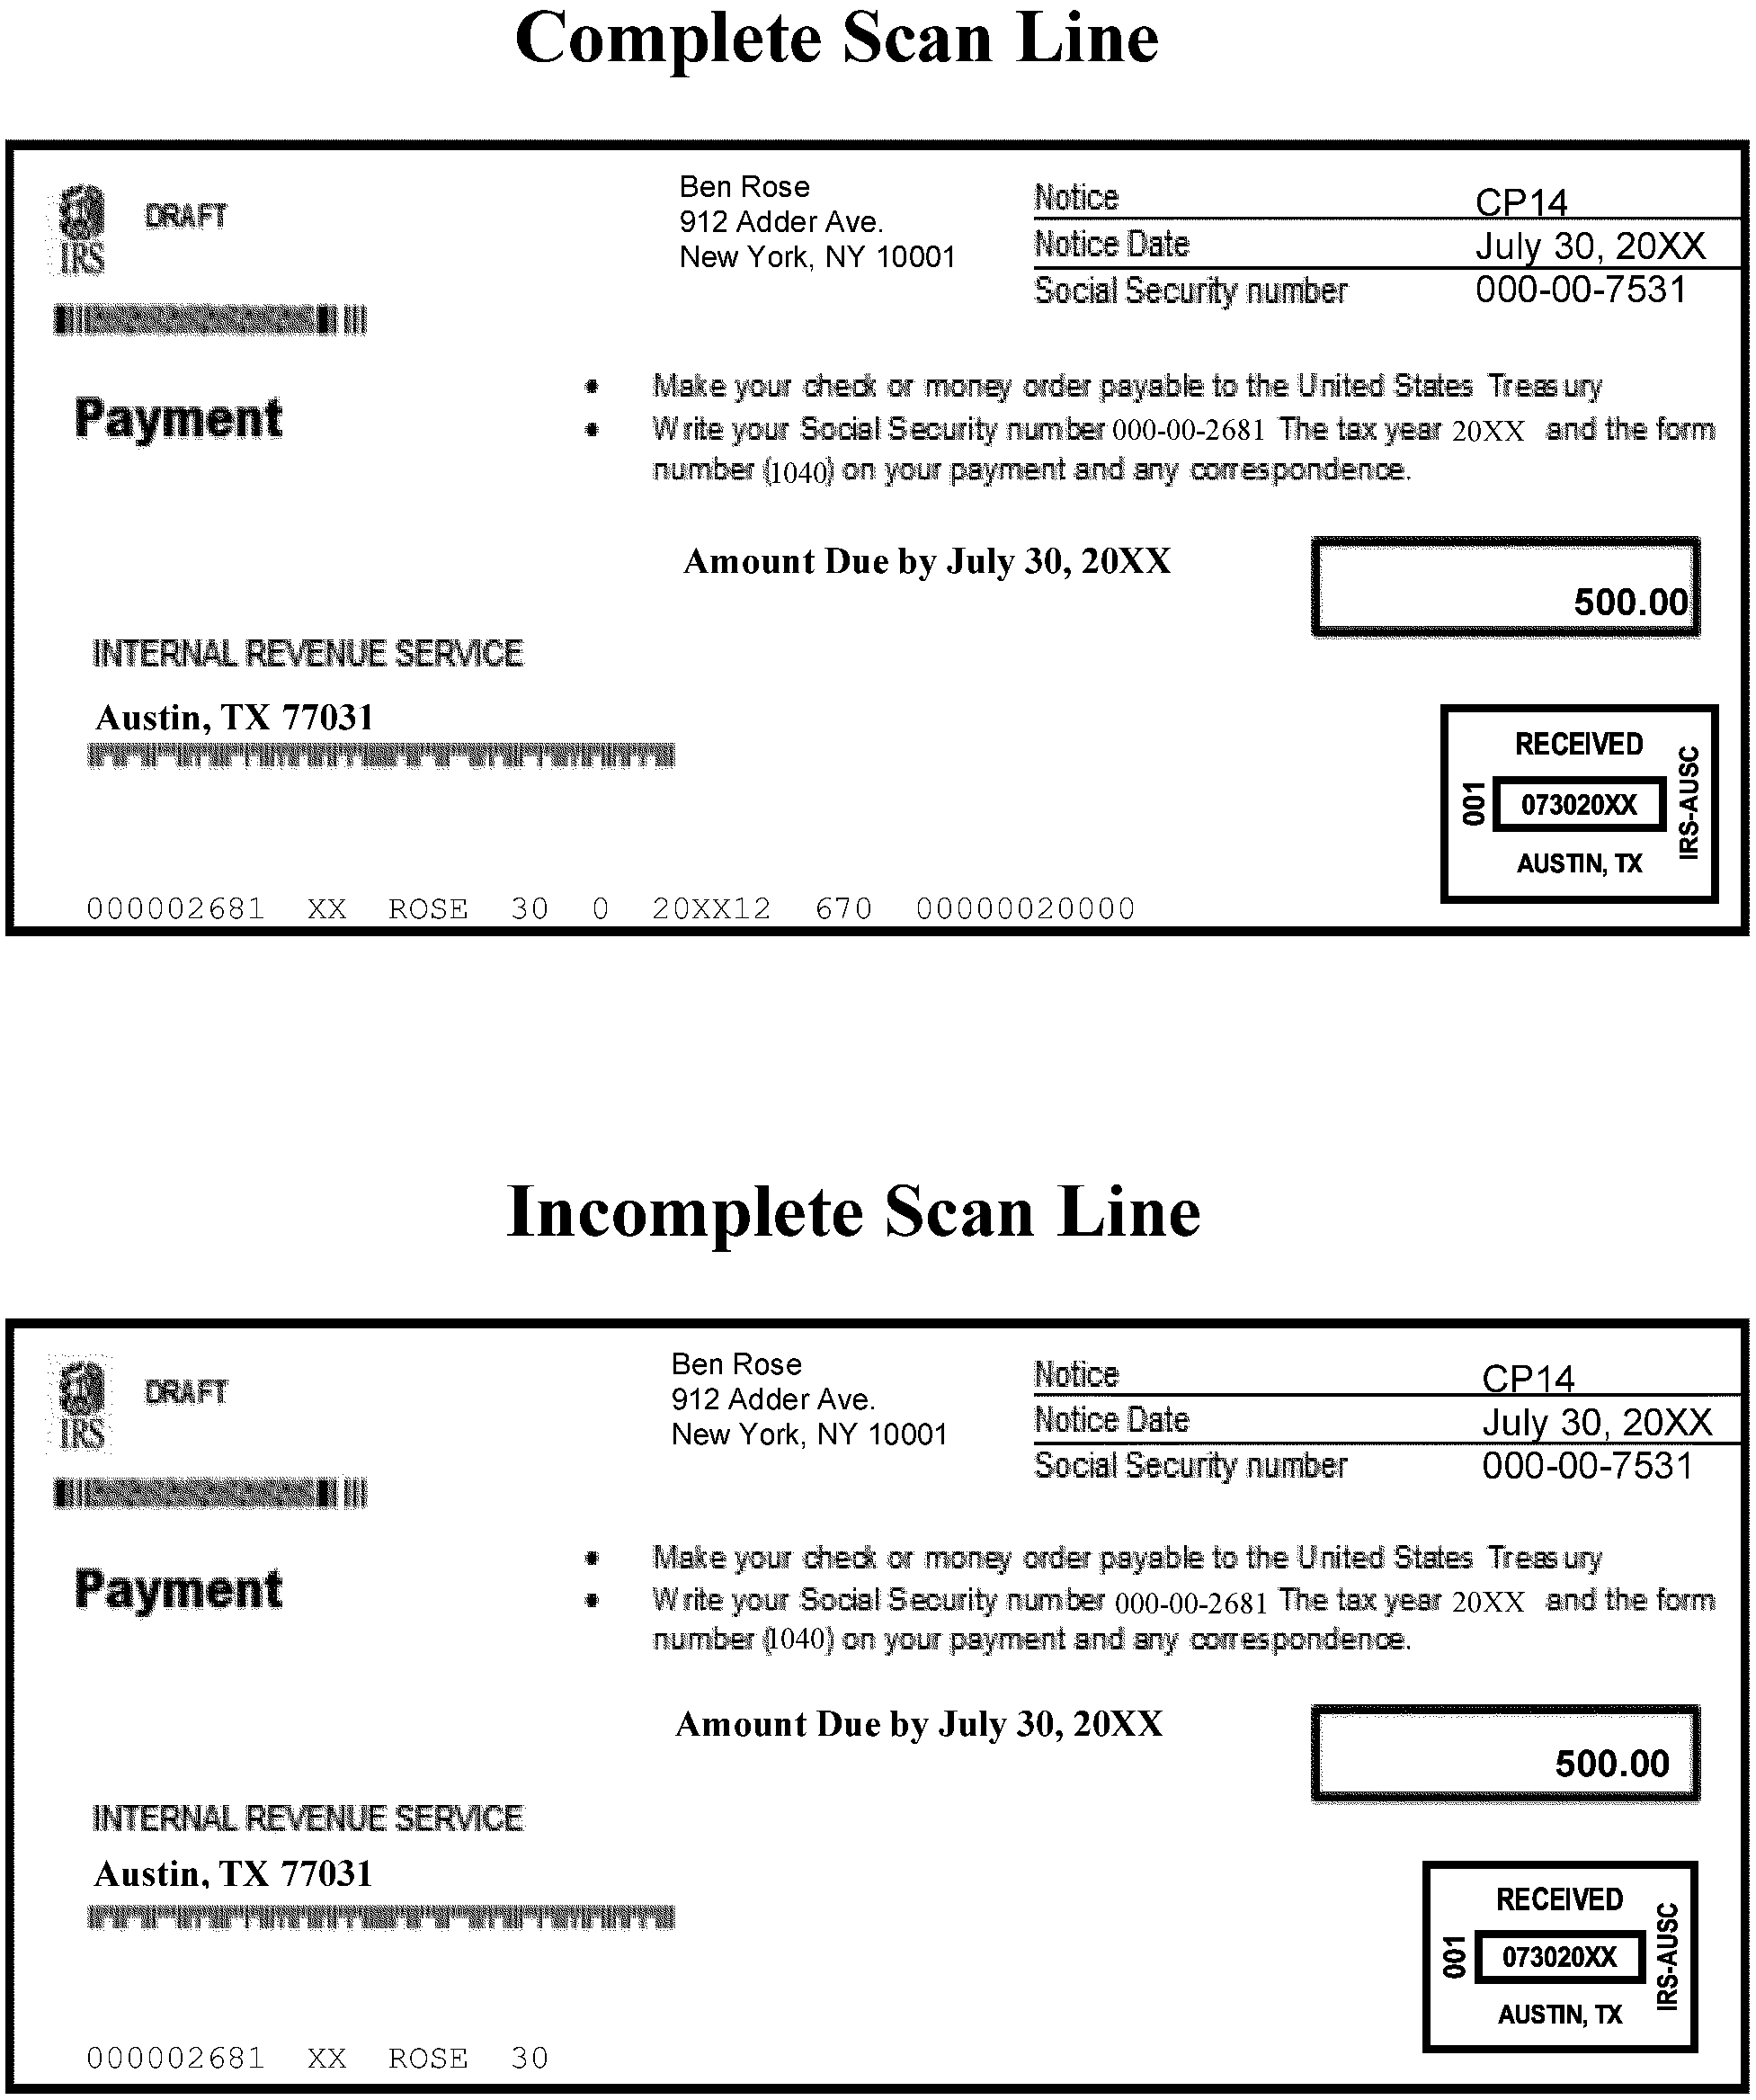
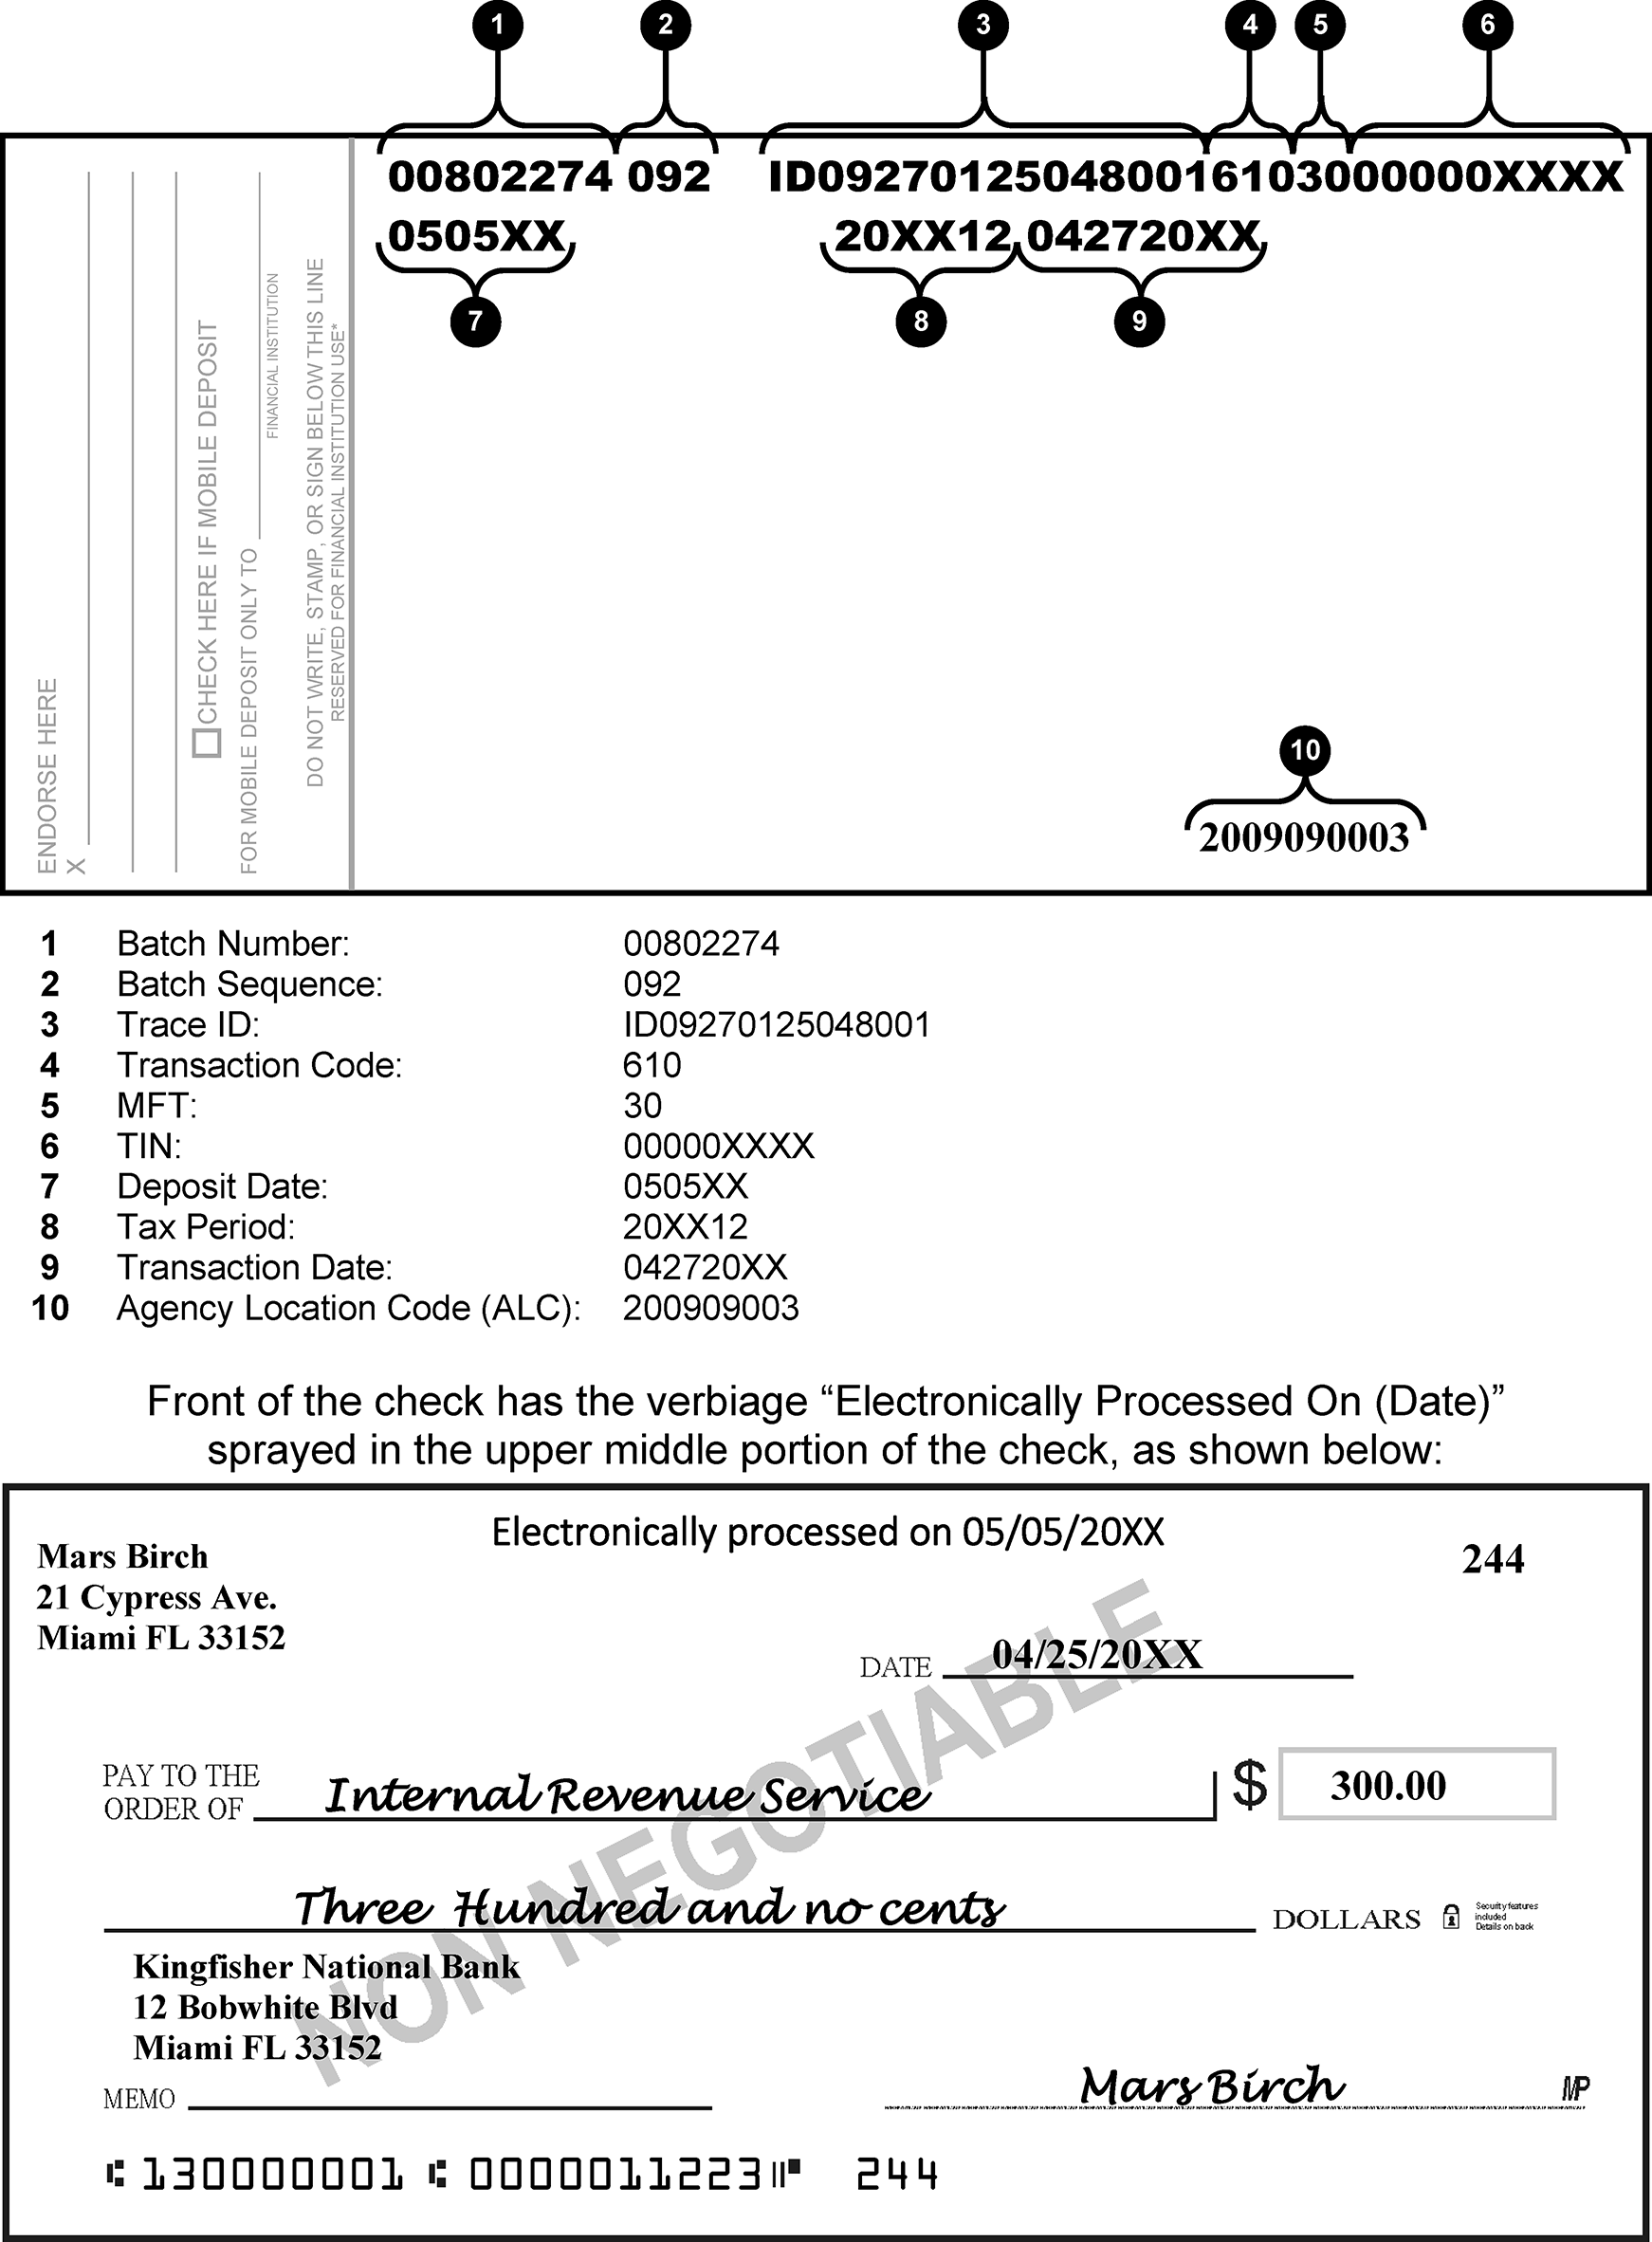
The table below shows the processing codes for special account funds. The first column lists the type of fund. The second column shows the Master File Tax code. The third column states the transaction code. The fourth column shows the tax period. The fifth column lists the program number. The sixth column shows the deposit account.
| Type of Fund | MFT | Transaction Code | Tax Period | Program Number | Deposit Account |
|---|---|---|---|---|---|
| Conscience Fund | 00 | 000 | 00002 | 20-1210 | |
| EP/EO User Fees | 00 | 000 | 00002 | 20X2411 | |
| Bureau of Public Debt (BPD) | 00 | 000 | 00002 | 20X5080.1 | |
| Miscellaneous Receipts (Includes Form 2860 for EO RAIVS) |
00 | 000 | 00002 | 20–3220 | |
| Photocopy Fee | 00 | 000 | 00002 | 20X6877 | |
| Offers in Compromise | 00 | 000 | 00003 | OCX6879 | |
| Seized Property | 00 | 000 | 00003 | SPX6879 | |
| Masterfile Refund Repayments | Various | 720 | 01–12 | 00004 | 20X0903 20X0904 |
| Non-Masterfile Refund Repayments | Various | 720 | 01-12 | 00004 | 20X0903N 20X0904N |
The table below shows the program code used in RPS. The first column shows the type of source document. The second column lists the Individual Master File (IMF) program numbers. The third column lists the Business Master File (BMF) program numbers. The fourth column lists other program numbers.
| Type of Source Document | IMF Program Numbers |
BMF Program Numbers |
Other Program Numbers |
|---|---|---|---|
| Forms 1041ES | 11921 | ||
| Forms 1040ES | 44201 | ||
| Forms 4868(IMF) | 44701 | ||
| Various Receipt forms, notices, LEVIES, etc. | 45500 | 15500 | |
| Subsequent payments, CP2000, etc. | 45503 | 15503 | |
| Various notices with a barcode (masked TIN) | 45505 | 15505 | |
| Tax Returns and Vouchers | 45510 | 15510 | |
| Splits/Multiples | 00000 | ||
| Non-Masterfile Receipts | 00001 | ||
| General Fund Receipts | 00002 | ||
| Deposit Fund Receipts | 00003 | ||
| Refund Repay Receipts | 00004 |
The following table shows the Master File/Non-Master forms, programs, MFT, transaction, and valid tax period for processing payments. The first column lists the form number. The second column shows the Master File Tax (MFT) code. The third column shows the transaction code. The fourth column shows the tax period. The fifth column shows the program code. The sixth column shows the Master File type.
| Form Number | MFT | Tran Code |
Tax Period Ending | Program Code | Master File Type |
|---|---|---|---|---|---|
| 11C | 63 | 610 | 01–12 | 15510 | BMF |
| 11C | 96 | 610 | 0000 | 00001 | NMF |
| 98C | 55/13/01 | 640 | 01–12 | 15500 15505 45500 45505 |
BMF IMF |
| 99C | 01 | 640 | 01–12 | 15500 15505 45500 45505 |
BMF IMF |
| 656PPV | Various | 670/570 | 01–12 | 45500 45505 15500 15505 |
IMF BMF |
| 668A(C) | Various | 670/570, 640, 690, 694 | 01–12 | 45500 45505 15500 15505 |
IMF BMF |
| 668W(C) | Various | 670/570,640,690, 694 | 01–12 | 45500 45505 15500 15505 |
IMF BMF |
| 706 | 52 | 610 | 0000 | 15510 | BMF |
| 706(Sch S) | 52 | 670/570 | 0000 | 15500 15505 |
BMF |
| 706(Sch R) | 53 | 670/570 | 0000 | 00001 | NMF |
| 706A | 53 | 610 | 0000 | 00001 | NMF |
| 706B | 52 | 610 | 0000 | 15510 | BMF |
| 706GS(D) | 78 | 610 | 12 | 15510 | BMF |
| 706GS(T) | 77 | 610 | 12 | 15510 | BMF |
| 706NA | 52 | 610 | 0000 | 15510 | BMF |
| 706NA | 53 | 610 | 0000 | 00001 | NMF |
| 706QDT | 53 | 610 | 12 | 00001 | NMF |
| 709 | 51 | 610 | 12 | 15510 | BMF |
| 709 | 54 | 610 | 12 | 00001 | NMF |
| 709A | 51 | 610 | 12 | 00001 | BMF |
| 720 | 03 | 610 | 03/06/09/12 | 15510 | BMF |
| 720 | 45 | 610 | 03/06/09/12 | 00001 | NMF |
| 720 | 03 | 670 | 03/06/09/12 | 15503 | BMF |
| 720M | 45 or 03 | 670 | 03/06/09/12 | 00001 | NMF |
| 730 | 64 | 610 | 01–12 | 15510 | BMF |
| 730 | 64 | 670 | 01–12 | 15503 | BMF |
| 730 | 97 | 610 | 01–12 | 00001 | NMF |
| 809 | Various | 670 | 01–12 | 45503 45505 15503 15505 |
IMF BMF |
| 809 | Various | 670/570, 640, 690, 694 | 01–12 | 45500 15505 15500 15505 |
IMF BMF |
| 809 | Various | 670/570, 640, 690, 694 | 01–12 | 00001 | NMF |
| 843 | Various | 670/570 | 01-12 | 45503 45505 15503 15505 |
IMF BMF |
| 870P | 30 | 640 | 01–12 | 45500 45505 |
IMF |
| 870P(AD) | 30 | 640 | 01–12 | 45500 45505 |
IMF |
| 926 | 81 | 610 | 12 | 00001 | NMF |
| 940 | 10 | 610 | 12 | 15510 | BMF |
| 940 | 10 | 670 | 12 | 15500 15503 15505 |
BMF |
| 940 | 80 | 610 | 12 | 00001 | NMF |
| 940EZ | 10 | 610 | 12 | 15510 | BMF |
| 940PR | 10 | 610 | 12 | 15510 | BMF |
| 940V | 10 | 610 | 12 | 15510 | BMF |
| 940VEZ | 10 | 610 | 12 | 15510 | BMF |
| 941 | 01 | 610 | 03/06/09/12 | 15510 | BMF |
| 941 | 01 | 670 | 03/06/09/12 | 15500 15503 15505 |
BMF |
| 941C | 01, 04 or 11 | 670/570 610 |
03/06/09/12 | 15500 15505 |
BMF |
| 941M | 01 | 670 Only | 03/06/09/12 | 15510 | BMF |
| 941PR | 01 | 610 | 03/06/09/12 | 15510 | BMF |
| 941SS | 01 | 610 | 03/06/09/12 | 15510 | BMF |
| 941V | 01 | 610 | 03/06/09/12 | 15510 | BMF |
| 941X/941PRX | 01 | 670/570` | 03/06/09/12 | 15500 | BMF |
| 943 | 11 | 610 | 12 | 15510 | BMF |
| 943 | 11 | 670 | 12 | 15500 15503 15505 |
BMF |
| 943A | 11 | 670/570 | 12 | 15500 15505 |
BMF |
| 943PR | 11 | 610 | 12 | 15510 | BMF |
| 943V | 11 | 610 | 12 | 15510 | BMF |
| 944 and Series | 14 | 610 | 12 | 15510 | BMF |
| 944 and Series | 14 | 670 | 12 | 15500 15503 15505 |
BMF |
| 945 | 16 | 610 | 12 | 15510 | BMF |
| 945 | 16 | 670/570 | 12 | 15503 15505 |
BMF |
| 945V | 16 | 610 | 12 | 15510 | BMF |
| 990 | 67 | 610 | 01–12 | 15510 | BMF |
| 990 | 67 | 670/570 | 01–12 | 15500 15505 00001 |
BMF NMF |
| 990C | 33 | 610 | 01–12 | 15510 00001 |
BMF NMF |
| 990EZ | 67 | 610 | 01–12 | 15510 | BMF |
| 990EZ | 67 | 670/570 | 01–12 | 15510 | BMF |
| 990PF | 44 | 610 | 01–12 | 15510 | BMF |
| 990PF | 44 | 670/570 | 01–12 | 15500 15505 00001 |
BMF NMF |
| 990T | 34 | 610 | 01–12 | 15510 | BMF |
| 990T | 34 | 670/570 | 01–12 | 15500 15505 00001 |
BMF NMF |
| 990T IRC 965, IRC 965h |
83 | 670/360, 680, 690, 694 | 01-12 First valid tax period 201712 |
15500 15505 |
BMF |
| 990T - Partner Pymt Share BBA IU - Ltr 6547 | 34 | 670 | 01-12 | 15500 15505 |
BMF |
| 990W | 44 | 670 | 01-12 | 15500 15505 |
BMF |
| 1040 Returns | 30 | 610 | 01–12 | 45510 | IMF |
| 1040 IRC 965, IRC 965h |
82 | 670/360, 680, 690, 694 | 01-12 First valid tax period 201712 |
45500 45505 |
IMF |
| 1040 - Partner Pymt Share BBA - IU Ltr 6547 | 30 | 670 | 01-12 | 45500 45505 |
IMF |
| 1040 Unsigned Returns | 30 | 670 | 01–12 | 45503 | IMF |
| 1040 Notices | 30 | 670 | 01–12 | 45503 | IMF |
| 1040 Notices | 30 | 670/570, 640, 690, 694 | 01–12 | 45500 45505 |
IMF |
| 1040 Returns | 20 | 610 | 01–12 | 00001 | NMF |
| 1040 Notices | 20 | 670 | 01–12 | 00001 | NMF |
| 1040 Notices | 20 | 670/570, 640, 690, 694 | 01–12 | 00001 | NMF |
| 1040 Innocent Spouse | 31 | 610 | 01–12 | 45510 | IMF |
| 1040 Innocent Spouse Notices | 31 | 670 | 01–12 | 45503 45505 |
IMF |
| 1040 Innocent Spouse Notices | 31 | 670/570, 640, 690, 694 | 01–12 | 45500 45505 |
IMF |
| 1040ES | 30 | 430 | 12 | 44201 | IMF |
| 1040 Voucher | 30 | 610 | 01–12 | 45510 | IMF |
| 1040VTEL | 30 | 670 Only | 01–12 | 45503 45505 |
IMF |
| 1040X | 30 | 670/570 | 01–12 | 45500 45505 |
IMF |
| 1040XV | 30 | 670/570 | 01–12 | 45500 45505 |
IMF |
| 1041 | 05 | 610 | 01–12 | 15510 | BMF |
| 1041 | 05 | 670 | 01–12 | 15500 15505 |
BMF |
| 1041 IRC 965, IRC 965h |
83 | 670/360, 680, 690, 694 | 01-12 First valid tax period 201712 |
15500 15505 |
BMF |
| 1041 - Partner Pymt share BBA IU - Ltr 6547 | 05 | 670 | 01-12 | 15500 | BMF |
| 1041 | 21 | 610 | 01–12 | 00001 | NMF |
| 1041A | 36 | 610 | 01–12 | 15510 00001 |
BMF NMF |
| 1041ES | 05 | 660 | 01–12 | 11921 | BMF |
| 1041T | 05 | 610 | 01–13 | 15510 | BMF |
| 1041V | 05 | 610 | 01-12 | 15510 | BMF |
| 1042 | 12 | 610 | 12 | 15510 00001 |
BMF NMF |
| 1042 | 12 | 670 | 12 | 15500 15503 15505 00001 |
BMF NMF |
| 1042S/T | 12 | 670 | 12 | 00001 | NMF |
| 1065 | 06 | 610, 670 | 01–12 | 15510 | BMF |
| 1065 IRC 965, IRC 965h |
83 | 670/360, 680, 690, 694 | 01-12 First valid tax period 201712 |
15500 15505 |
BMF |
| 1065 - Partner Pymt Share BBA IU - Ltr 6547 | 06 | 670 | 01-12 | 15500 15505 |
BMF |
| 1066 | 07 | 670 | 12 | 15503 15505 00001 |
BMF NMF |
| 1096 | 13 | 640 | 12 | 15503 15505 |
BMF |
| 1096 | 55 | 640 | 12 | 45503 45505 |
IMF |
| 1098 | Route to Paymt Per- fection |
||||
| 1099 | Route to Paymt Per- fection |
||||
| 1120 Returns | 02 | 610 | 01–12 | 15510 | BMF |
| 1120 Notices | 02 | 670 Only | 01–12 | 15503 | BMF |
| 1120 Notices | 02 | 670/570, 640, 690, 694 | 01–12 | 15500 15505 |
BMF |
| 1120 IRC 965, IRC 965h, |
83 | 670/360, 680, 690, 694 | 01-12 First valid tax period 201712 |
15500 15505 |
BMF |
| 1120-L IRC 965, IRC 965h |
83 | 670/360, 680, 690, 694 | 01-12 First valid tax period 201712 |
15500 15505 |
BMF |
| 1120-PC IRC 965, IRC 965h |
83 | 670/360, 680, 690, 694 | 01-12 First valid tax period 201712 |
15500 15505 |
BMF |
| 1120-REIT IRC 965, IRC 965h |
83 | 670/360, 680, 690, 694 | 01-12 First valid tax period 201712 |
15500 15505 |
BMF |
| 1120-RIC IRC 965, IRC 965h, |
83 | 670/360, 680, 690, 694 | 01-12 First valid tax period 201712 |
15500 15505 |
BMF |
| 1120-S IRC 965, IRC 965(h) |
83 | 670/360, 680, 690, 694 | 01-12 First valid tax period 201712 |
15500 15505 |
BMF |
| 1120 - Partner Pymt Share BBA IU - Ltr 6547 | 02 | 670 | 01-12 | 15500 | BMF |
| 1120 Returns | 32 | 610 | 01–12 | 00001 | NMF |
| 1120 Notices | 32 | 670 | 01–12 | 00001 | NMF |
| 1120 Notices | 32 | 670/570, 640, 690, 694 | 01–12 | 00001 | NMF |
| 1120-IC-DISC | 23 | 610 | 01–12 | 00001 | NMF |
| 1120X | 02 | 670/570 | 01–12 | 15500 15505 |
BMF |
| 1120W | 02 | 670 | 01–12 | 15500 15505 |
BMF |
| 1128 | Route to Paymt Per- fection |
||||
| 1902B | 30 | 640 | 01–12 | 45503 45505 |
IMF |
| 2030 | 02, 05 | 640 | 01-12 | 15500 15505 |
BMF |
| 2158 with Form 5330 | 01–12 | 00001 | EPMF Cr Trans Vou- chers |
||
| 2210 | 30 | 670 | 01–12 | 45503 45505 |
IMF |
| 2210 | 05 | 670 | 01–12 | 15503 15505 |
BMF |
| 2220 | 02 | 670 | 01–12 | 15503 15505 |
BMF |
| 2290 | 60 | 610 | 01–12 | 15510 | BMF |
| 2290 | 60 | 670 | 01–12 | 15503 15505 |
BMF |
| 2290 | 93 | 610 | 01–12 | 00001 | NMF |
| 2290V | 60 | 610 | 01–12 | 15510 | BMF |
| 2350 | 30 | 670 | 01–12 | 45503 45505 |
IMF |
| 2350 | 51 | 670 | 12 | 15503 15505 |
BMF |
| 2438 | 38 | 610 | 12 | 00001 | NMF |
| 2555 | 30 | 610 | 01–12 | 45510 | IMF |
| 2688 | 30 | 670 | 01–12 | 45503 45505 |
IMF |
| 2688 | 51 | 670 | 12 | 15503 15505 |
BMF |
| 2758 | 08 | 670 | 01–12 | 15503 15505 |
BMF |
| 2758 | 34 | 670 | 01–12 | 15503 15505 |
BMF |
| 2758 | 12 | 670 | 01–12 | 15503 15505 |
BMF |
| 2758 | 08, 33, 36, 37, 40, 50, 67, 77, 78 | 670 | 01–12 | 15503 15505 |
BMF |
| 2758 | 36, 56, 57 | 670 | 01–12 | 00001 | NMF |
| 2758 | 89, 14 | 670 | 01–12 | 00001 | NMF |
| 3244 | Various | 670/570, 640, 690, 694 | 01–12 | 45500 45505 15500 15505 |
IMF BMF |
| 3244 | Various | 640 | 01–12 | 45503 45505 15503 15505 |
IMF BMF |
| 3244A | Various | 640 | 01–12 | 45500 45505 15500 15505 |
IMF BMF |
| 3244A | Various | 640 | 01–12 | 00001 | NMF |
| 3244A | 17, 20, 21 | 640 | 01–12 | 00001 | NMF |
| 3244A | 30, 05, 15, 55 | 640 | 01–12 | 45503 45505 15503 15505 |
IMF BMF |
| 3244/A | 35, 65 | 640/670 | 01–12 first valid tax period 201412 |
45500 45505 |
IMF |
| 3244/A | 43 | 640 | 12 first valid tax period 201512 |
15500 15505 |
BMF |
| 3465 | Route to Adj. Br. | ||||
| 3552 | Various | 670/570 | 01–12 | 45500 45505 15500 15505 |
IMF, IRAF, BMF |
| 4089 | 02, 05 | 640 | 01-12 | 15500 15505 |
BMF |
| 4219 | 01 | 610 | 03/06/09/12 | 15510 | BMF |
| 4219 | 01 | 670 | 03/06/09/12 | 15503 15505 |
BMF |
| 4666 | 01, 10 | 640 | 03/06/09/12 | 15503 15505 |
BMF |
| 4667 | 10 | 640 | 12 | 15503 15505 |
BMF |
| 4668 | 01, 04, 11 | 640 | 03/06/09/12 | 15503 15505 |
BMF |
| 4720 | 50 | 610 | 01–12 | 15510 | BMF |
| 4720 | 50 | 670 | 01–12 | 15503 15505 |
BMF |
| 4768 | 52 | 670 | 0000 | 15503 15505 |
BMF |
| 4768 | 53 | 670 | 0000 | 00001 | NMF |
| 4868 (Timely) | 30 | 670 | 01–12 | 44701 | IMF |
| 4868 (Delinquent) | 30 | 670 | 01–12 | 45503 45505 |
IMF |
| 4868 (Timely) | 51 | 670/460 | 01–12 | 15500 15505 |
BMF |
| 4868 (Delinquent) | 51 | 670 | 01–12 | 15503 | BMF |
| 4868V | 30 | 670 | 01–12 | 44701 | IMF |
| 5000.24 | Route to AT&F | ||||
| 5227 | 37 | 610 | 01–12 | 00001 15500 |
NMF BMF |
| 5227 | 37 | 670/570 | 01–12 | 00001 15503 |
NMF BMF |
| 5329 | 29 | 670 | 01–12 | 45503 | IMF |
| 5330 1984 and prior |
76 | 610 | 01–12 If nothing indicated input date that is in "F". |
00001 | NMF |
| 5330 1984 and prior |
76 | 670 | 01–12 | 00001 | NMF |
| 5330 1985 and subsequent-received with EIN (If SSN-process manually) |
76 | 610 | 01–12 If nothing indicated input date that is in "F". |
15500 15505 |
EO/ BMF |
| 5330 1985 and subsequent-received with EIN (If SSN-process manually) |
76 | 670 | 01–12 | 15500 15503 15505 |
BMF |
| 5498 | 74 | 670 | 01–12 | 45500 45505 |
EP/IMF |
| 5500 Series | 74 | 670 | 01–12 | 45500 45505 |
EP/IMF |
| 5500EZ | 74 | 670 | 01–12 | 45500 45505 |
EP/IMF |
| 5558 | Route to Paymt Perfection | ||||
| 5564 | Various | 640 | 01–12 | 45503 45505 15503 15505 |
IMF BMF |
| 5630.5 | Route to AT&F | ||||
| 6069 | 57 | 610 | 12 | 00001 | NMF |
| 6069 | 57 | 670 | 12 | 00001 | NMF |
| 5248 | 03 | 670 | 12 | 15503 15505 |
BMF |
| 7004 | Various | 670 | 01–12 | 15500 15505 |
BMF |
| IRC7803(c) | 20 | 670/570 | 01–12 | 00001 | NMF |
| 8038/ 8038CP 8038T |
46 | 610 or 670 | 01–12 | BMF NMF |
|
| 8082 | 30 | 670/570 | 01–12 | 45500 15505 |
IMF |
| 8109/ 8109B |
01, 02, 03, 09, 10, 11, 12, 14, 16, 17, 33, 34, 44 | 670 | 01–12 | 15503 15505 |
BMF |
| 8288 2004 and Prior |
17 | 610 | 01–12 | 00001 | BMF |
| 8288 2004 and Prior |
17 | 670 | 01-12 | 00001 | BMF |
| 8288 2005 and Subsequent-received with EIN (W/SSN-process manually) |
17 | 610 | 01–12 | 15510 | BMF |
| 8288 2005 and Subsequent-received with EIN (W/SSN-process manually) |
17 | 670 | 01-12 | 15500 15003 15505 |
BMF |
| 8379 | 30 | 670/570 | 01–12 | 45500 45505 |
IMF |
| 8404 | 23 | 610 | 01–12 | 00001 | NMF |
| 8453 | 30 | 670 | 01–12 | 45503 45505 |
IMF |
| 8453C | 02 | 670 | 01-12 | 15503 15505 |
BMF |
| 8453F | 05 | 670 | 01-12 | 15500 15505 |
BMF |
| 8489 | 13 | 670 | 01–12 | 15503 15505 |
BMF |
| 8489 | 55 | 670 | 01–12 | 45503 45505 |
IMF |
| 8519 | Various | 670/570, 640, 690, 694 | 01–12 | 45500 45505 15500 15505 |
IMF BMF |
| 8612 | 89 | 610 | 01–12 | 00001 | NMF |
| 8613 | 14 | 610 | 01–12 | 00001 | NMF |
| 8615 | 30 | 670/570 | 01–12 | 45500 45505 |
IMF |
| 8697 | Various | 670/570 | 01–12 | 00001 | NMF |
| 8716 | Route to Paymt Per- fection |
||||
| 8725 | 27 | 670 | 01–12 | 00001 | NMF |
| 8736 | 05, 06 | 670 | 01–12 | 15500 45505 |
BMF |
| 8736 | 07 | 670 | 01–12 | 15500 15505 |
BMF |
| 8752 | 15 | 610 | 12 | 15500 15505 |
BMF |
| 8752 | 15 | 670 | 12 | 15500 15505 |
BMF |
| 8800 | 05, 06 | 670 | 01–12 | 15503 15505 |
BMF |
| 8800 | 07 | 670 | 01–12 | 15503 15505 |
BMF |
| 8804 2003 and Prior |
08 | 610 | 01–12 | 00001 | NMF |
| 8804 TY 2004 and Subsequent |
08 | 610 or 670 | 01–12 | 15503 15505 |
BMF |
| 8805 2003 and Prior |
08 | 610 | 01–12 | 15503 15505 |
BMF |
| 8805 TY 2004 and Subsequent |
08 | 670 | 01–12 | 00001 | NMF |
| 8813 2003 and Prior |
08 | 670 | 01–12 | 00001 | NMF |
| 8813 TY 2004 and Subsequent |
08 | 670 | 01–12 | 15503 15505 |
BMF |
| 8820 | 13 | 640 | 01–12 | 15503 15505 |
BMF |
| 8831 | Various | 670 | 01–12 | 15500 15505 |
BMF |
| 8831 | 89 | 610 | 01–12 | 00001 | NMF |
| 8868 | Various | 670 | 01–12 | 15500 15505 |
BMF |
| 8872 | 49 | 610 | 01–12 | 15510 | BMF |
| 8879 | 30 | 670 | 01–12 | 15503 15505 |
IMF |
| 8879C | 02 | 670 | 01–12 | 15503 15505 |
BMF |
| 8879-EO | Various | 670 | 01-12 | 15500 15505 |
BMF |
| 8879S | 02 | 670 | 01–12 | 15503 15505 |
BMF |
| 8879F | 05 | 670 | 01–12 | 15503 15505 |
BMF |
| 8892 | 51 | 670 | 01–12 | 15500 15505 |
BMF |
| 9465 | Various | 670 or 640 |
01–12 | 45503 45505 15503 15505 |
IMF BMF |
| 14764 Employer SRP |
43 | 640 | 12 | 15500 15505 |
BMF |
| 14765 Employer SRP |
43 | 640 | 12 | 15500 15505 |
BMF |
| CT-1 | 09 | 610 | 12 | 15510 | BMF |
| CT-2 | 72 | 610 | 12 | 00001 | NMF |
| CP14H ACA SRP |
35, 65 | 670 | 01–12 First valid tax period 201412 |
45500 45505 |
IMF |
| CP21H ACA SRP |
35, 65 | 670 | 01-12 First valid tax period 201412 |
45500 45505 |
IMF |
| CP22H ACA SRP |
35, 65 | 670 | 01-12 First valid tax period 201412 |
45500 45505 |
IMF |
| CP45 | 30 | 430 | 12 | 44201 | IMF |
| CP45 | 30 | 670 | 01–12 | 45503 45505 |
IMF |
| CP56 | 82 | 670 | 01-12 | 45500 45505 |
IMF |
| CP56V | 30 | 670 | 01-12 | 45500 45505 |
IMF |
| CP59 | Various | 610 670/570 |
01–12 | 45500 45505 15500 15505 |
IMF BMF |
| CP215 | 13 | 670 | 01–12 | 15503 | BMF |
| CP215 | 55 | 670 | 01–12 | 45500 45505 |
IMF |
| CP251 | 01 | 640 | 01–12 | 15500 15505 |
BMF |
| CP251 | 13 | 640 | 01–12 | 45500 15505 |
IMF |
| CP251 | 17 | 640 | 01–12 | 00001 | NMF |
| CP252 | 01 | 670 | 01–12 | 15500 15505 |
BMF |
| CP252 2005 and subsequent |
17 | 670/570 | 01–12 | 15500 15505 |
BMF |
| CP252 TY 2004 and prior |
17 | 670/570 | 01–12 | 00001 | NMF |
| CP253 | 13 | 640 | 01–12 | 15503 | BMF |
| CP256 | 83 | 670 | 01-12 | 15500 15505 |
BMF |
| CP256V | 01/02 | 670 | 01-12 | 15500 15505 |
BMF |
| CP501H ACA SRP |
35, 65 | 670 | 01–12 first valid tax period 201412 |
45500 45505 |
IMF |
| CP503H ACA SRP |
35, 65 | 670 | 01–12 first valid tax period 201412 |
45500 45505 |
IMF |
| CP 523H ACA SRP |
35, 65 | 670 | 01–12 first valid tax period 201412 |
45500 45505 |
IMF |
| CP515–518 | Various | 670–570 | 01–12 | 45500 45505 15500 15505 |
IMF BMF |
| CP543 | 16 | 670/570 | 01–12 | 15500 15505 |
BMF |
| CP972CG | 13 | 640 | 01–12 | 15500 15505 |
BMF |
| CP756V | 30 | 670 | 01-12 | 15500 15505 |
IMF |
| CP956V | 01/02 | 670 | 01-12 | 15500 15505 |
BMF |
| CP972CG | 55 | 640 | 01–12 | 45500 15505 |
IMF |
| CP2000 | 30 | 640 | 01–12 | 45500 15505 |
IMF |
| CP2100 | 13 | 640 | 01–12 | 15500 15505 |
BMF |
| CP2100 | 55 | 640 | 01–12 | 45500 45505 |
IMF |
| CP2102 | 13 | 640 | 01–12 | 15500 15505 |
BMF |
| CP2102 | 55 | 640 | 01–12 | 45500 45505 |
IMF |
| CP2501 | 30 | 640 | 01–12 | 45500 45505 |
IMF |
| EUR CP2000 | 30 | 640 | 01–12 | 45500 45505 |
IMF |
| Letter 226J Employer SRP |
43 | 640 | 12 | 15500 45505 |
BMF |
| Letter 227J Employer SRP |
43 | 640 | 12 | 15500 15505 |
BMF |
| Letter 227K Employer SRP |
43 | 640 | 12 | 15500 15505 |
BMF |
| Letter 227L Employer SRP |
43 | 640 | 12 | 15500 15505 |
BMF |
| Letter 227M Employer SRP |
43 | 640 | 12 | 15500 15505 |
BMF |
| Letter 227N Employer SRP |
43 | 640 | 12 | 15500 15505 |
BMF |
| Letter 5040J Employer SRP |
43 | 640 | 12 | 15500 15505 |
BMF |
| Letter 6547 BBA IU - Partner Pymt Share |
02, 05, 06, 30, 34, | 670 | 1-12 | 15500 15505 45500 45505 |
BMF IMF |
| Sch. H | 30, 05 | 670/570 | 12 | 45500 15500 |
IMF BMF |
Note:
Exhibit 3.8.44-27: Tax periods ending showing 01-12 in processing table end with 12, unless taxpayer states differently.
Note:
During April peak, if a tax period is not indicated on Form 1040V or Form 1041V, apply payment to the current year due. For example, a payment is received on April 19, 2025, with Form 1041V. A tax period is not indicated on the Form 1041V or the payment document. Apply the payment to tax period ending December 31, 2024. Do not send the payment to PPU for research of the tax period unless other research is necessary.
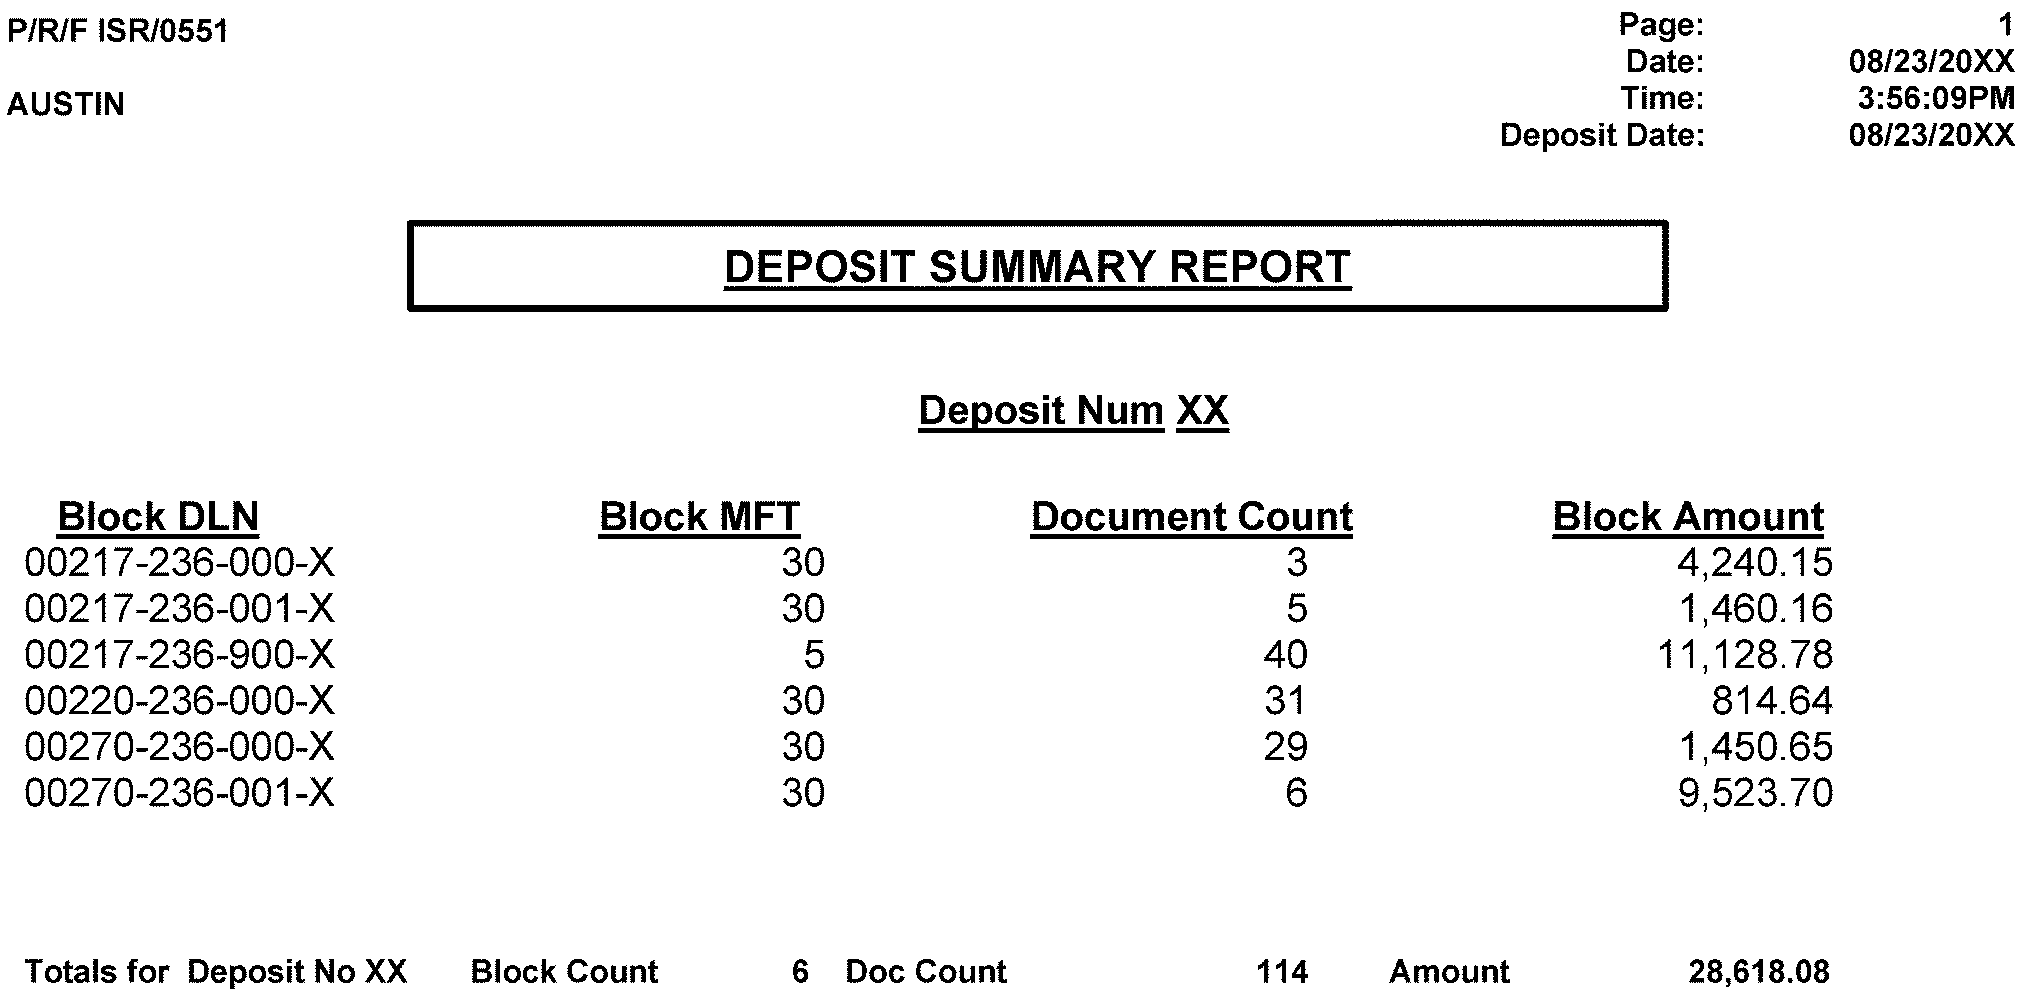
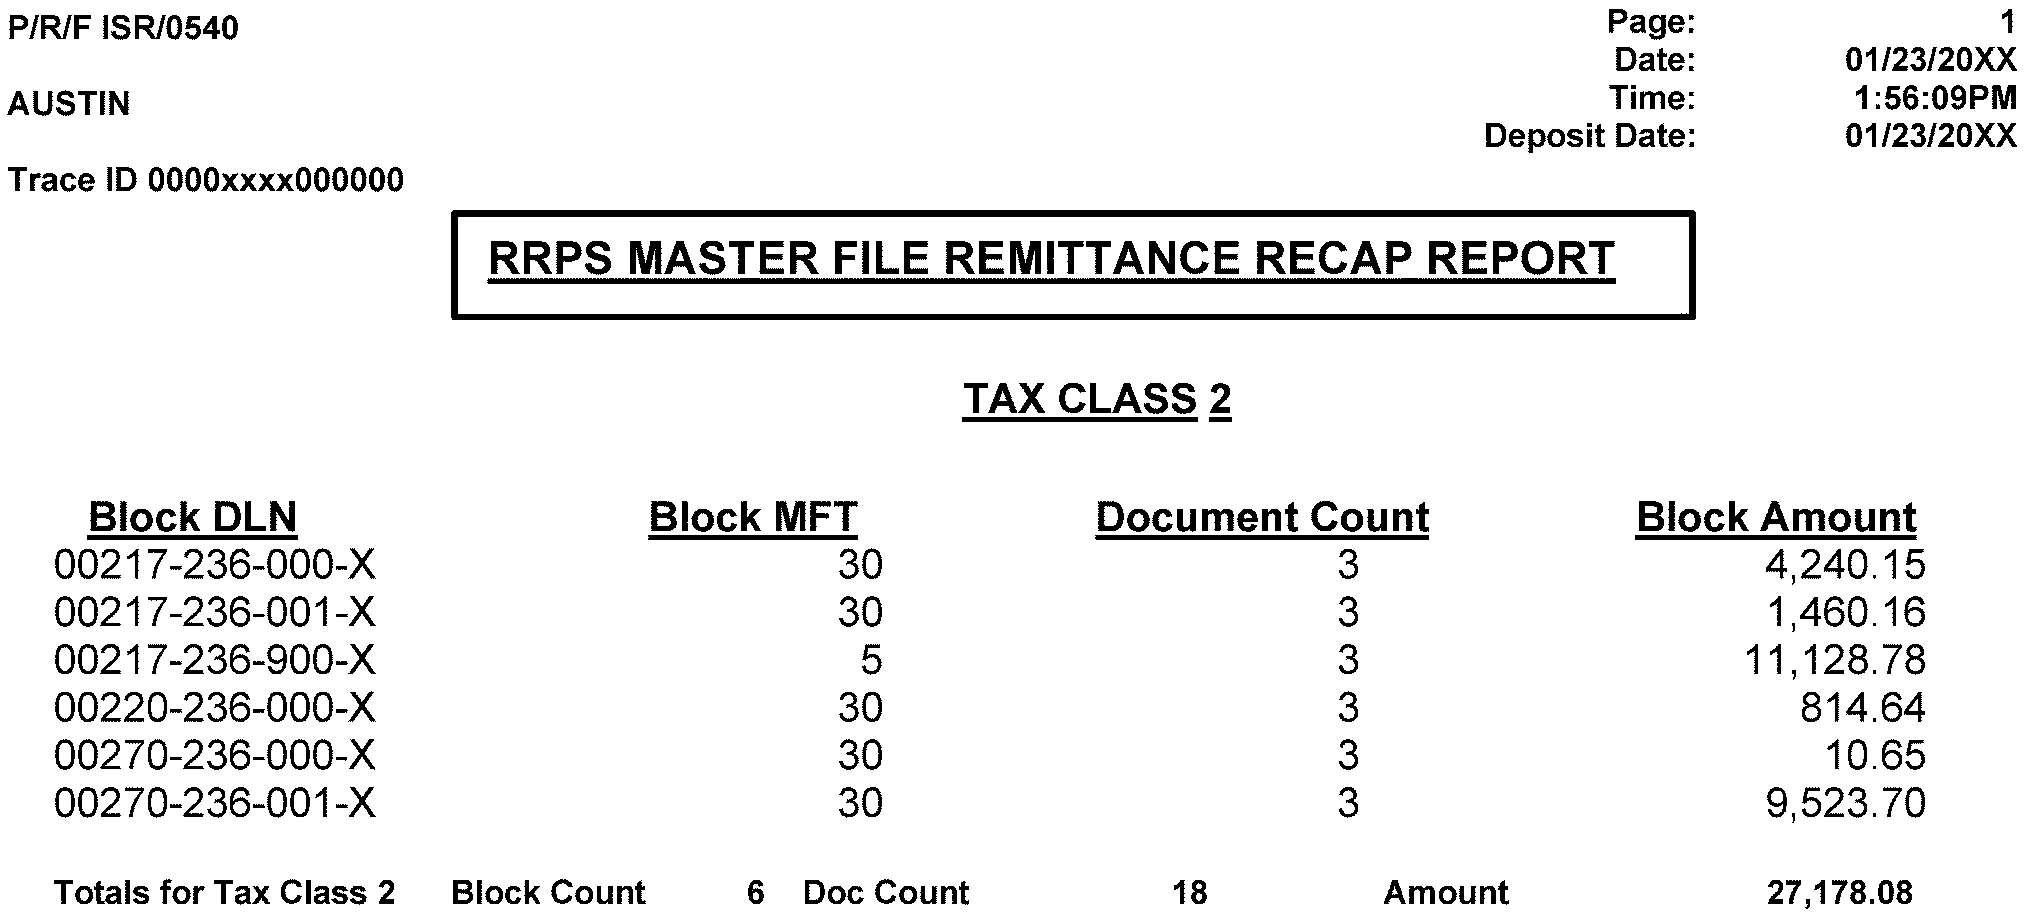
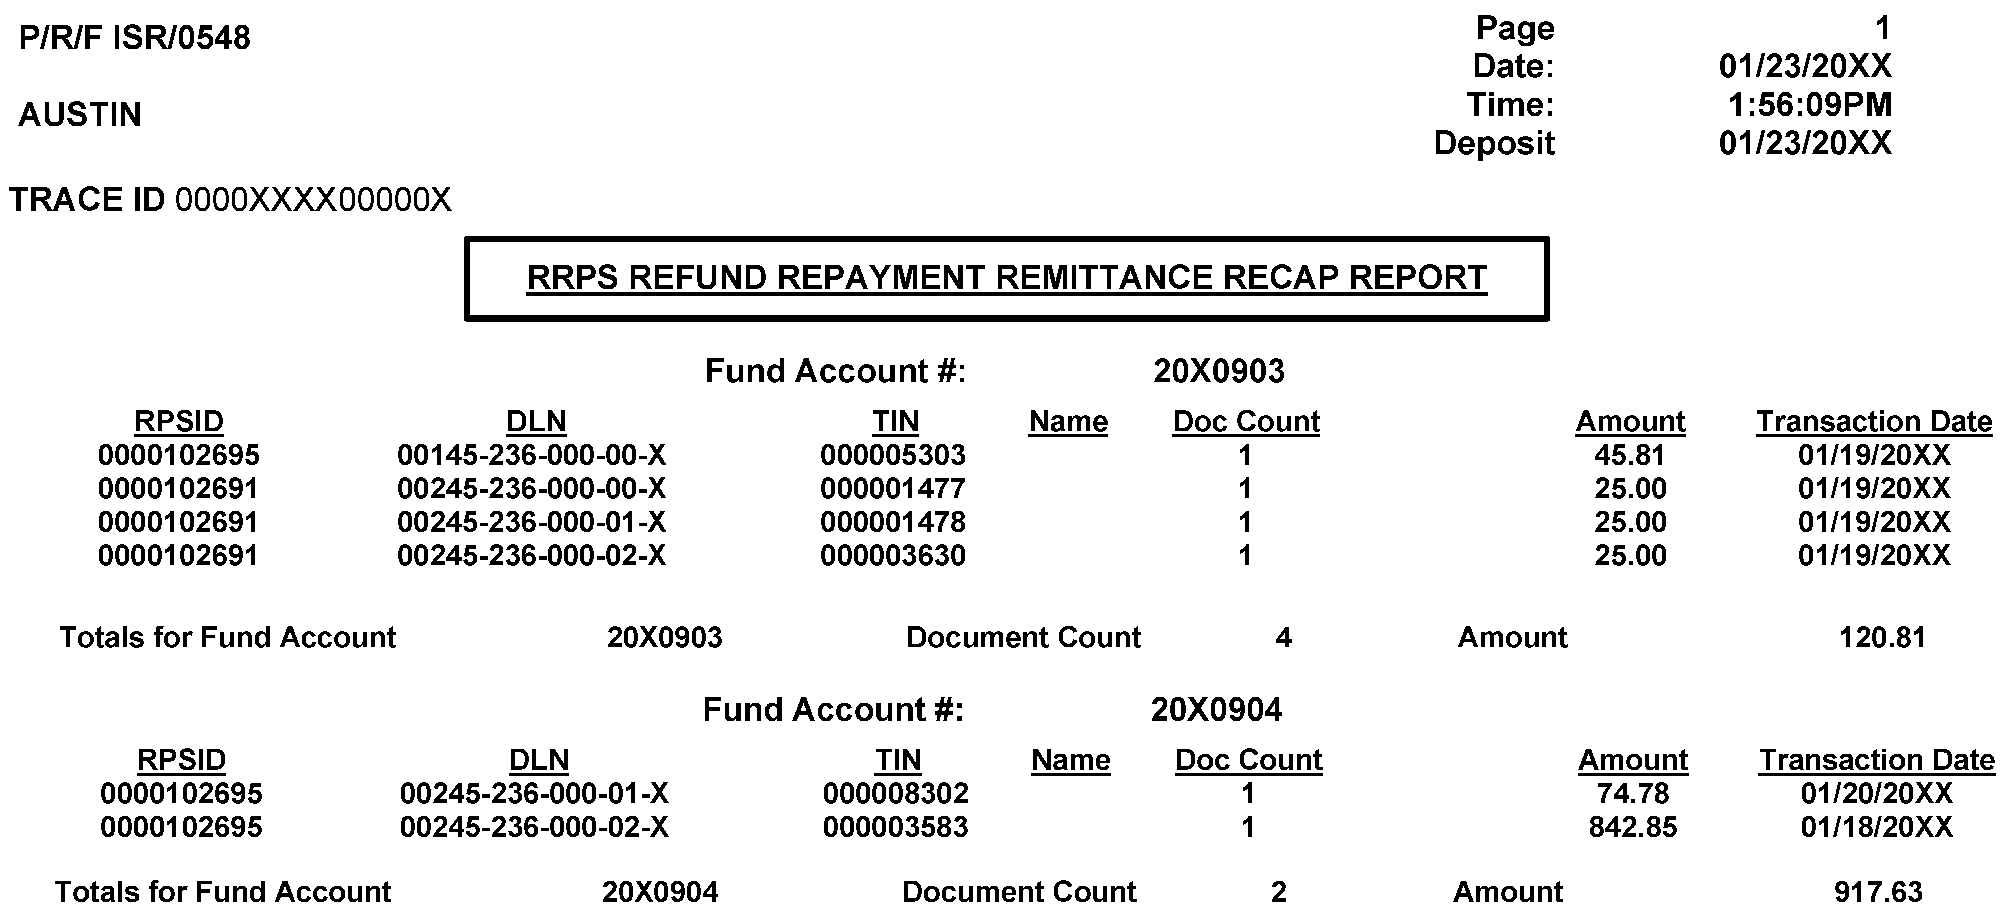
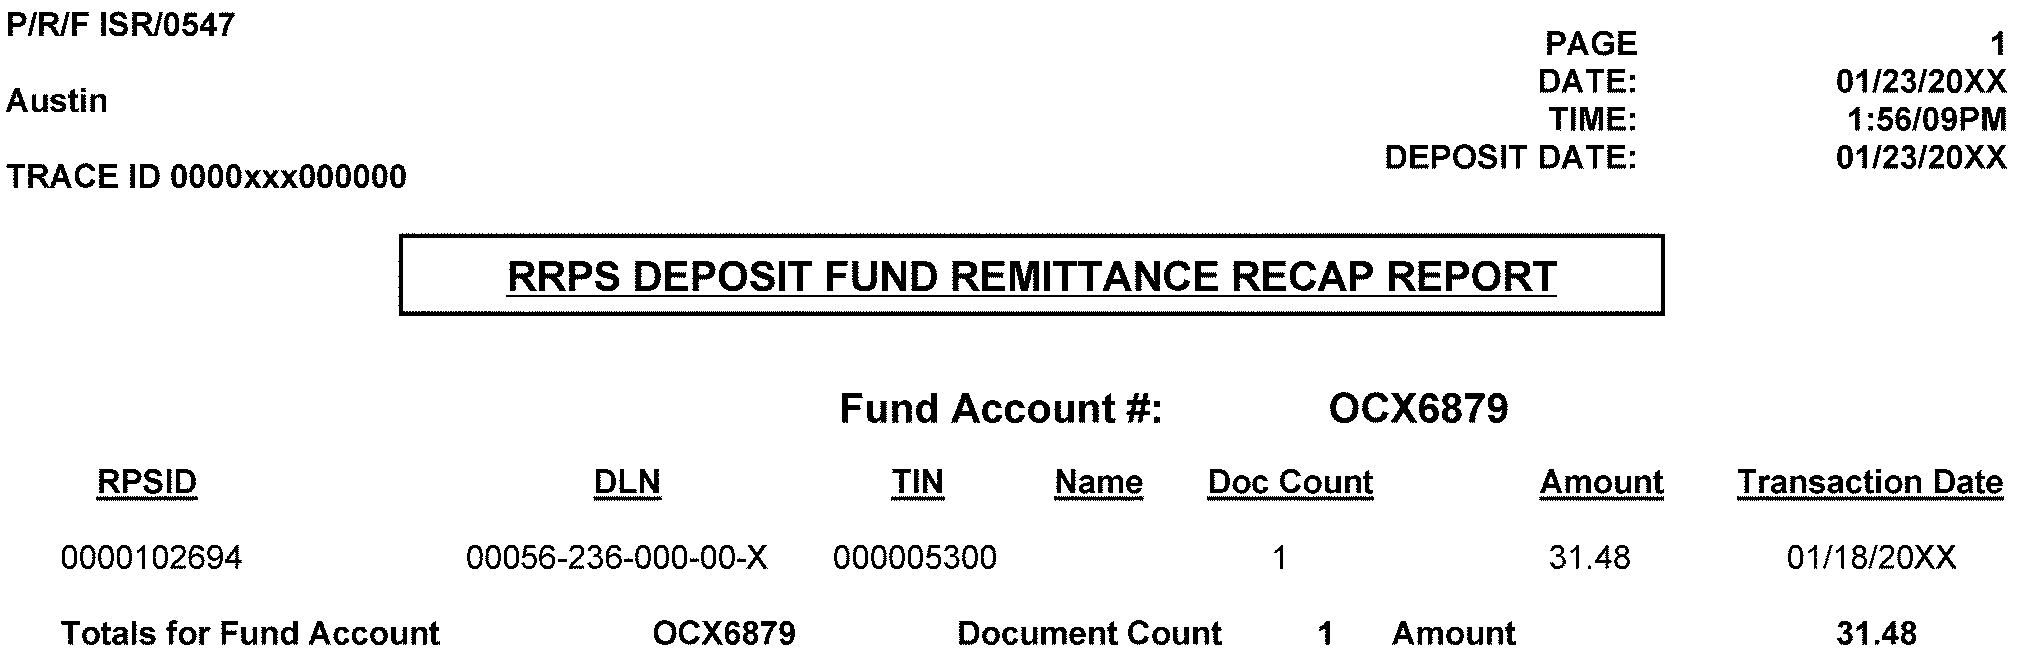
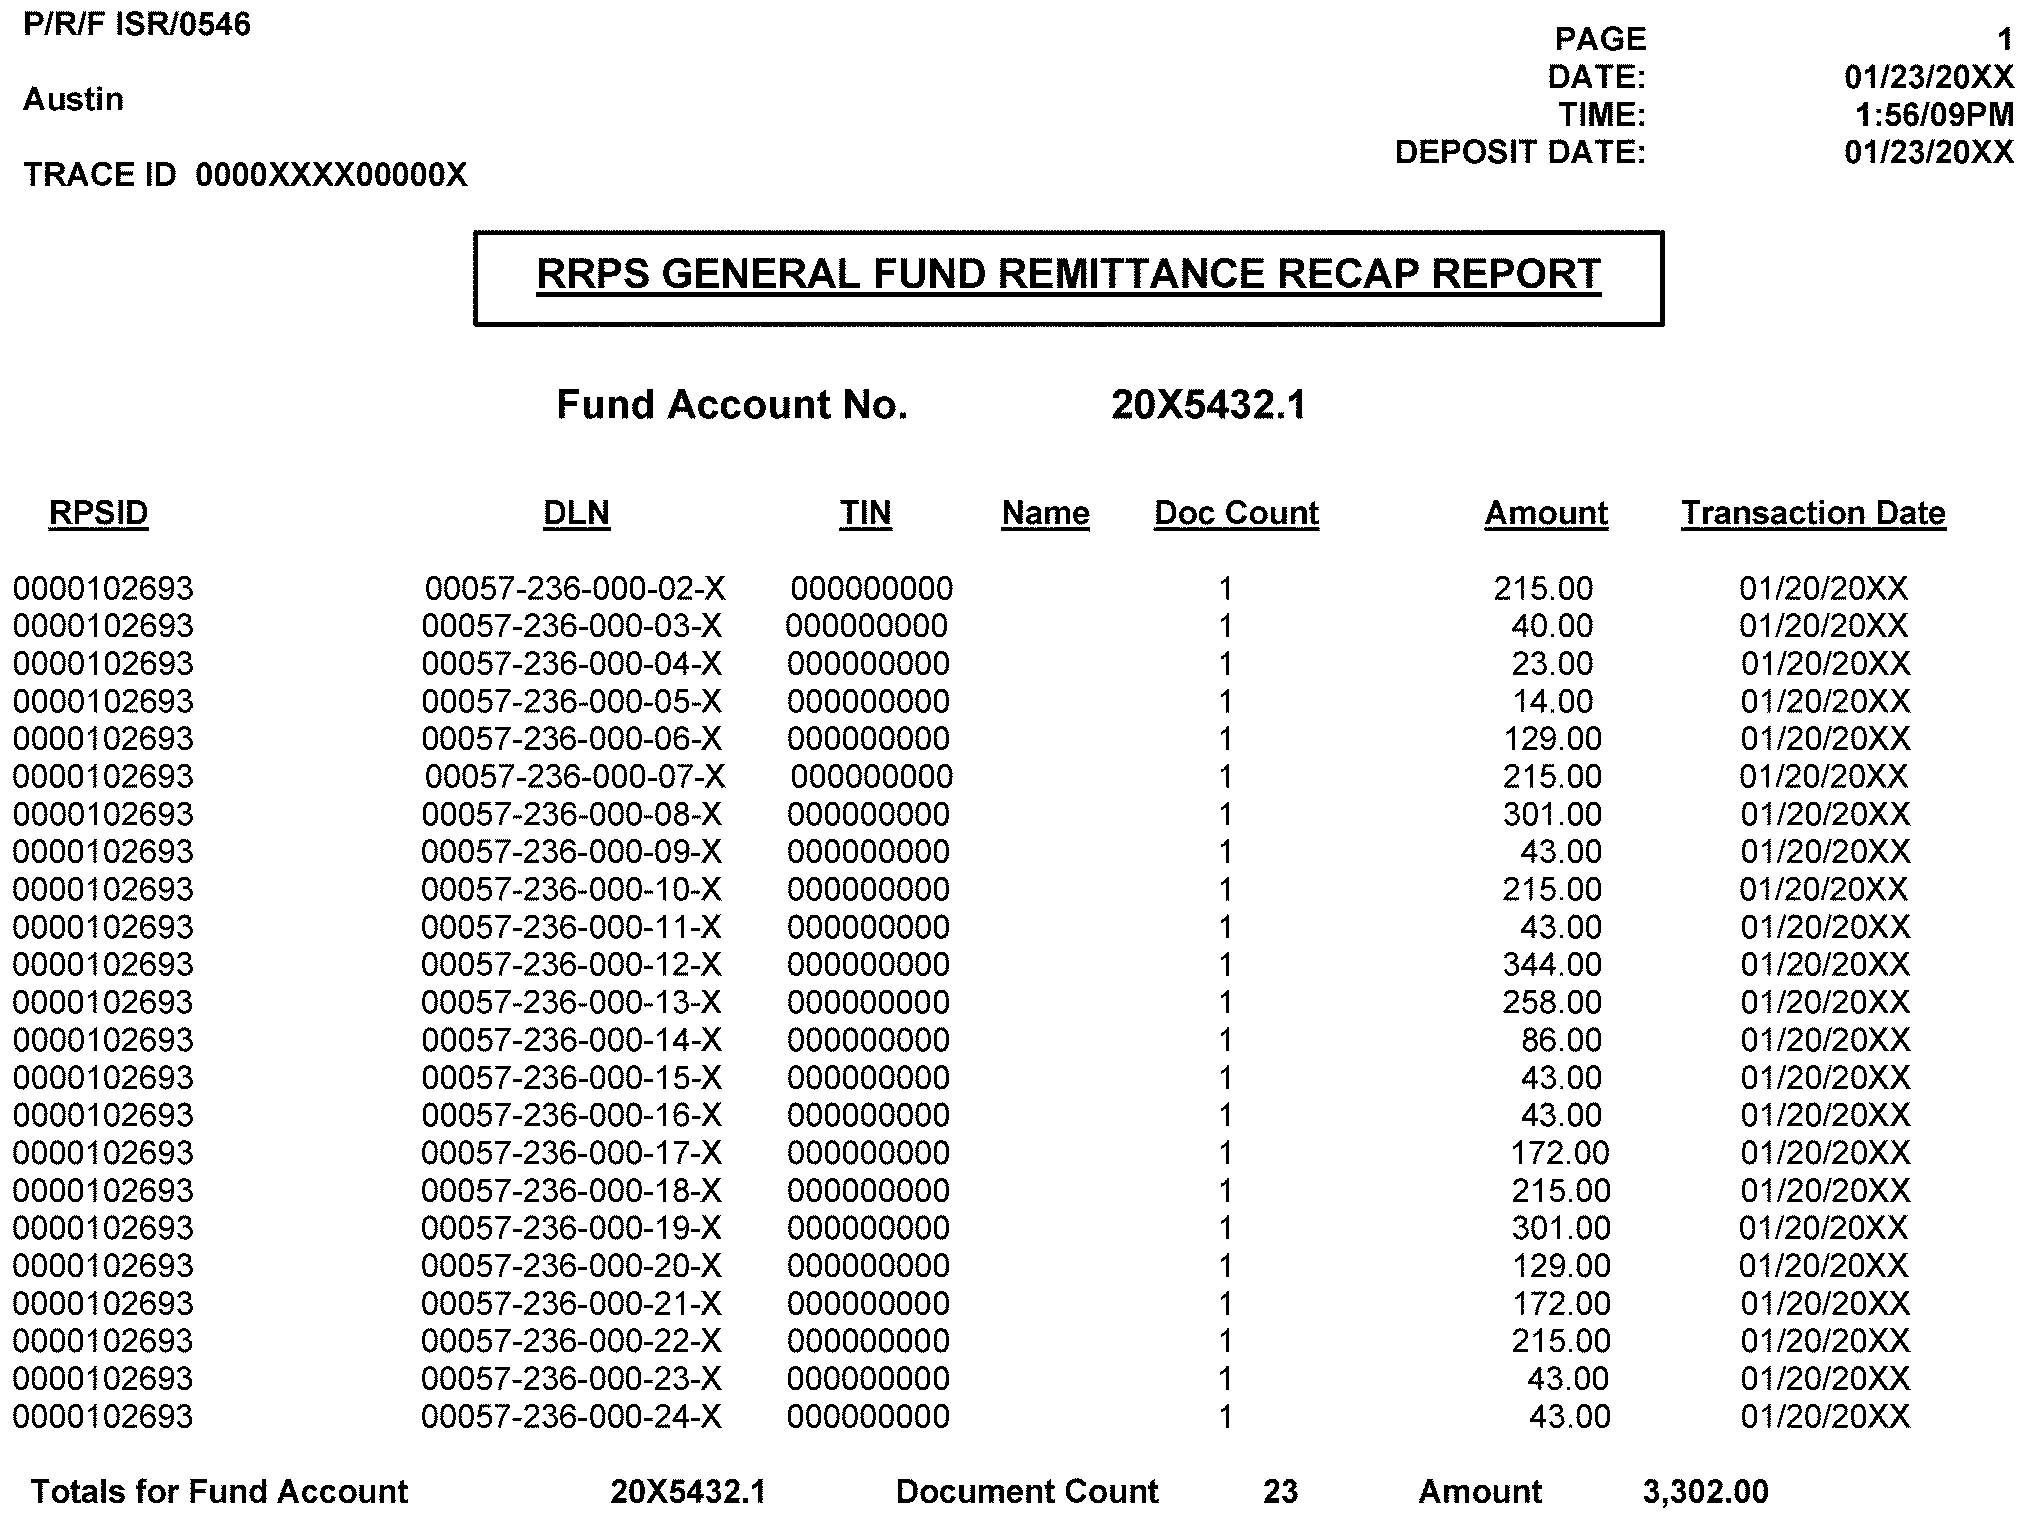
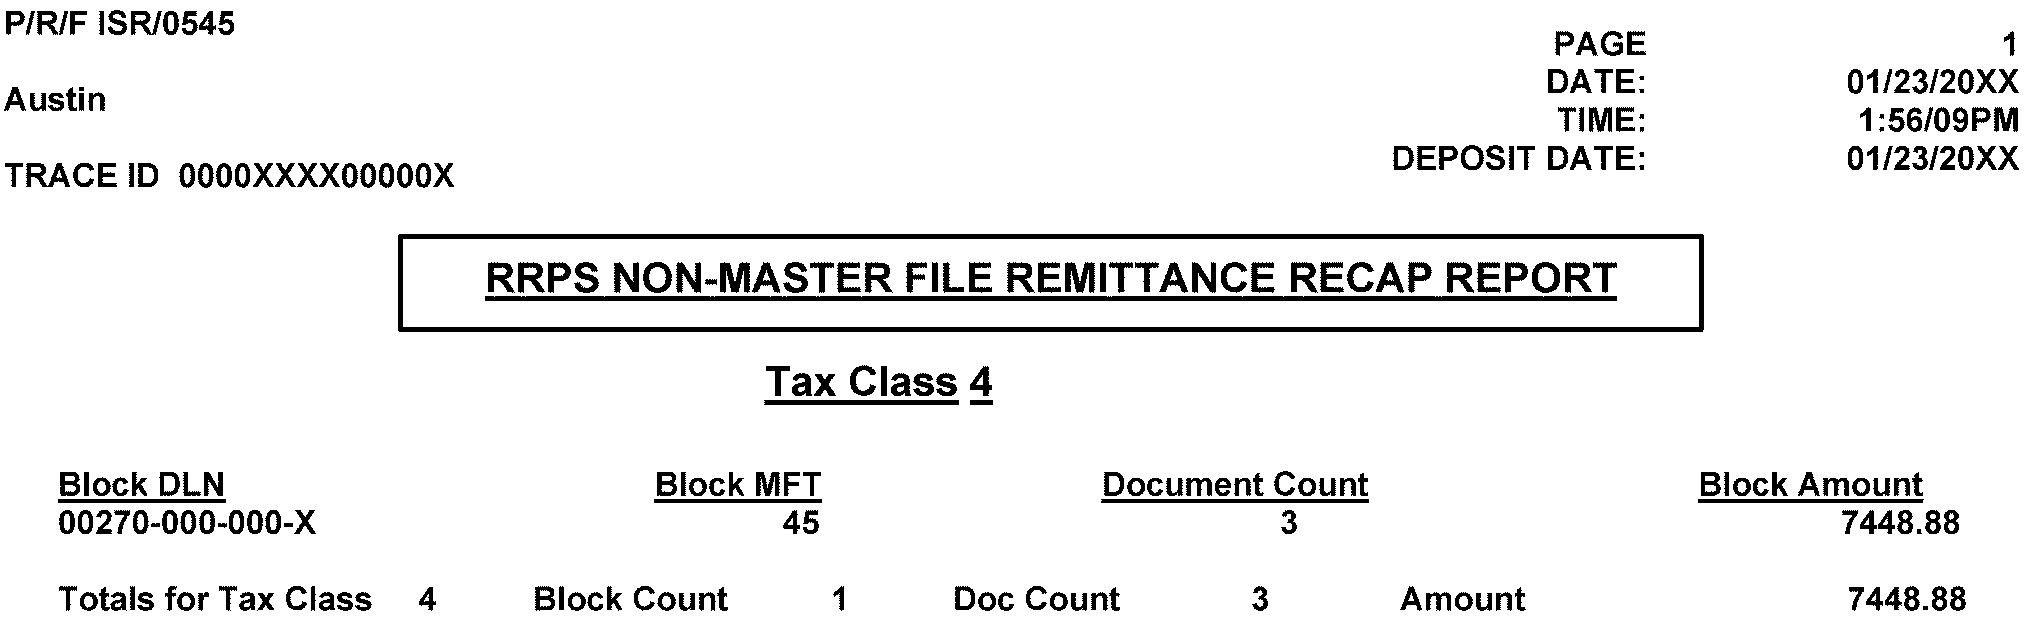
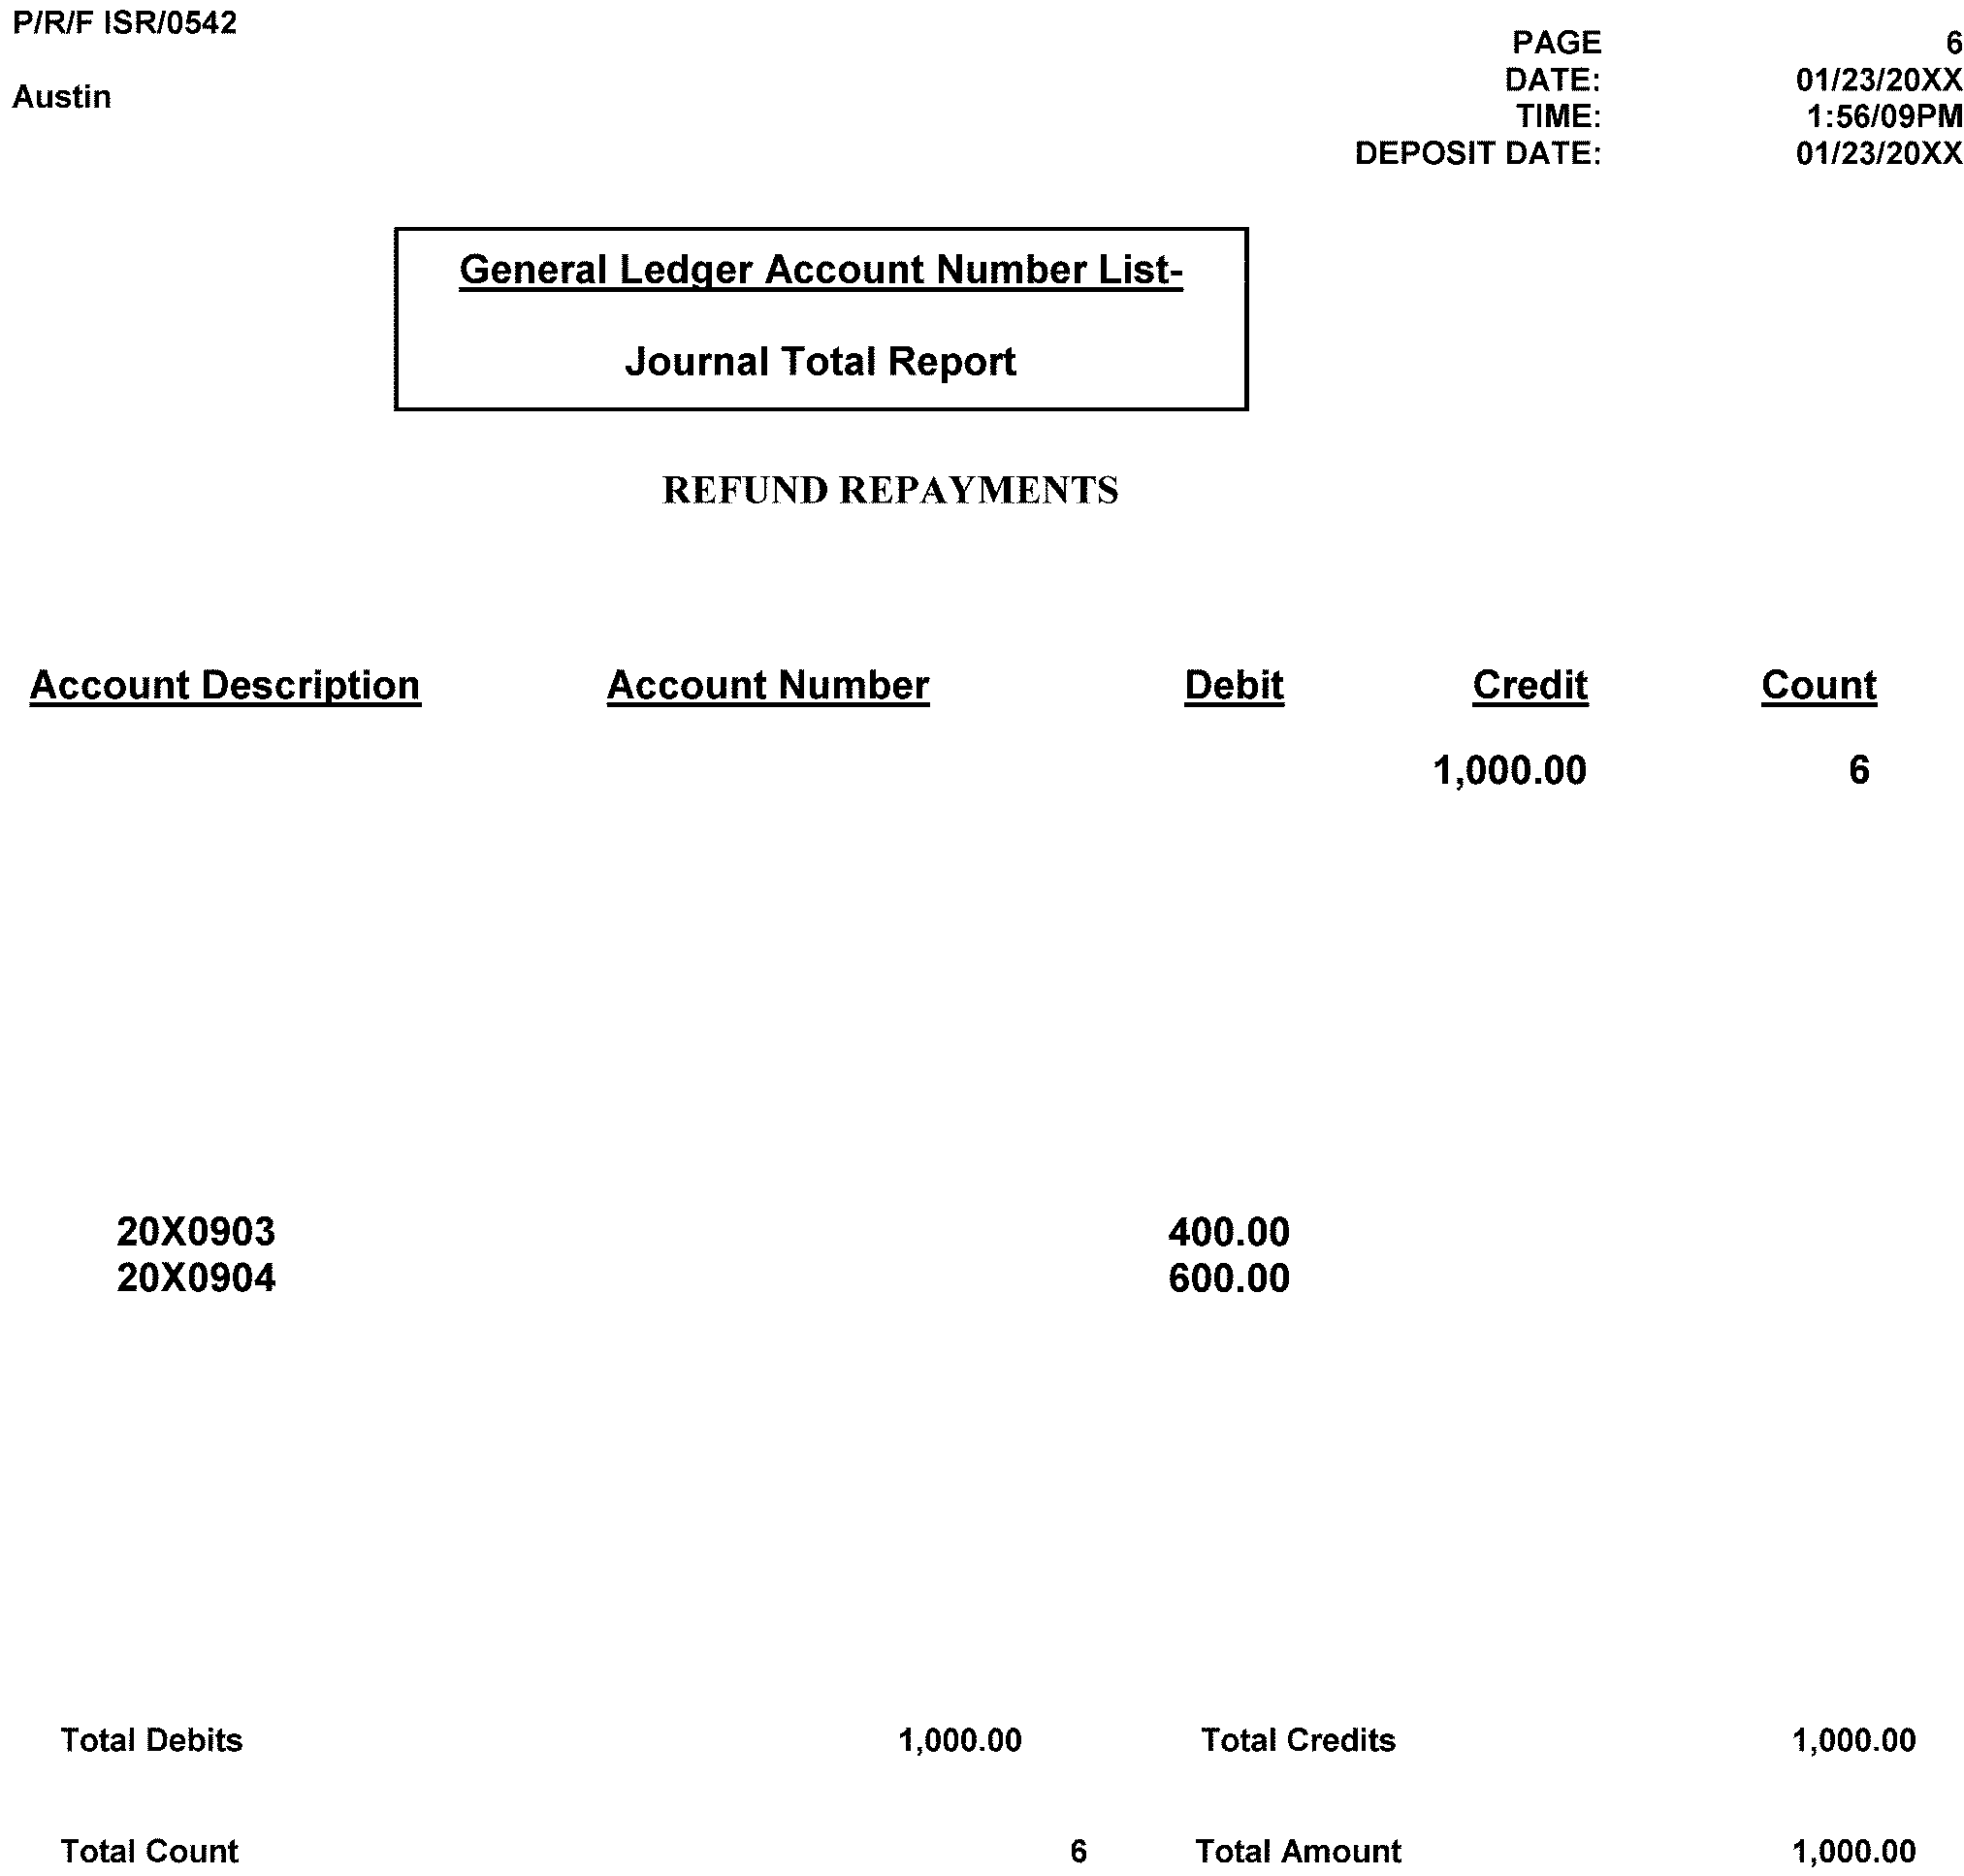
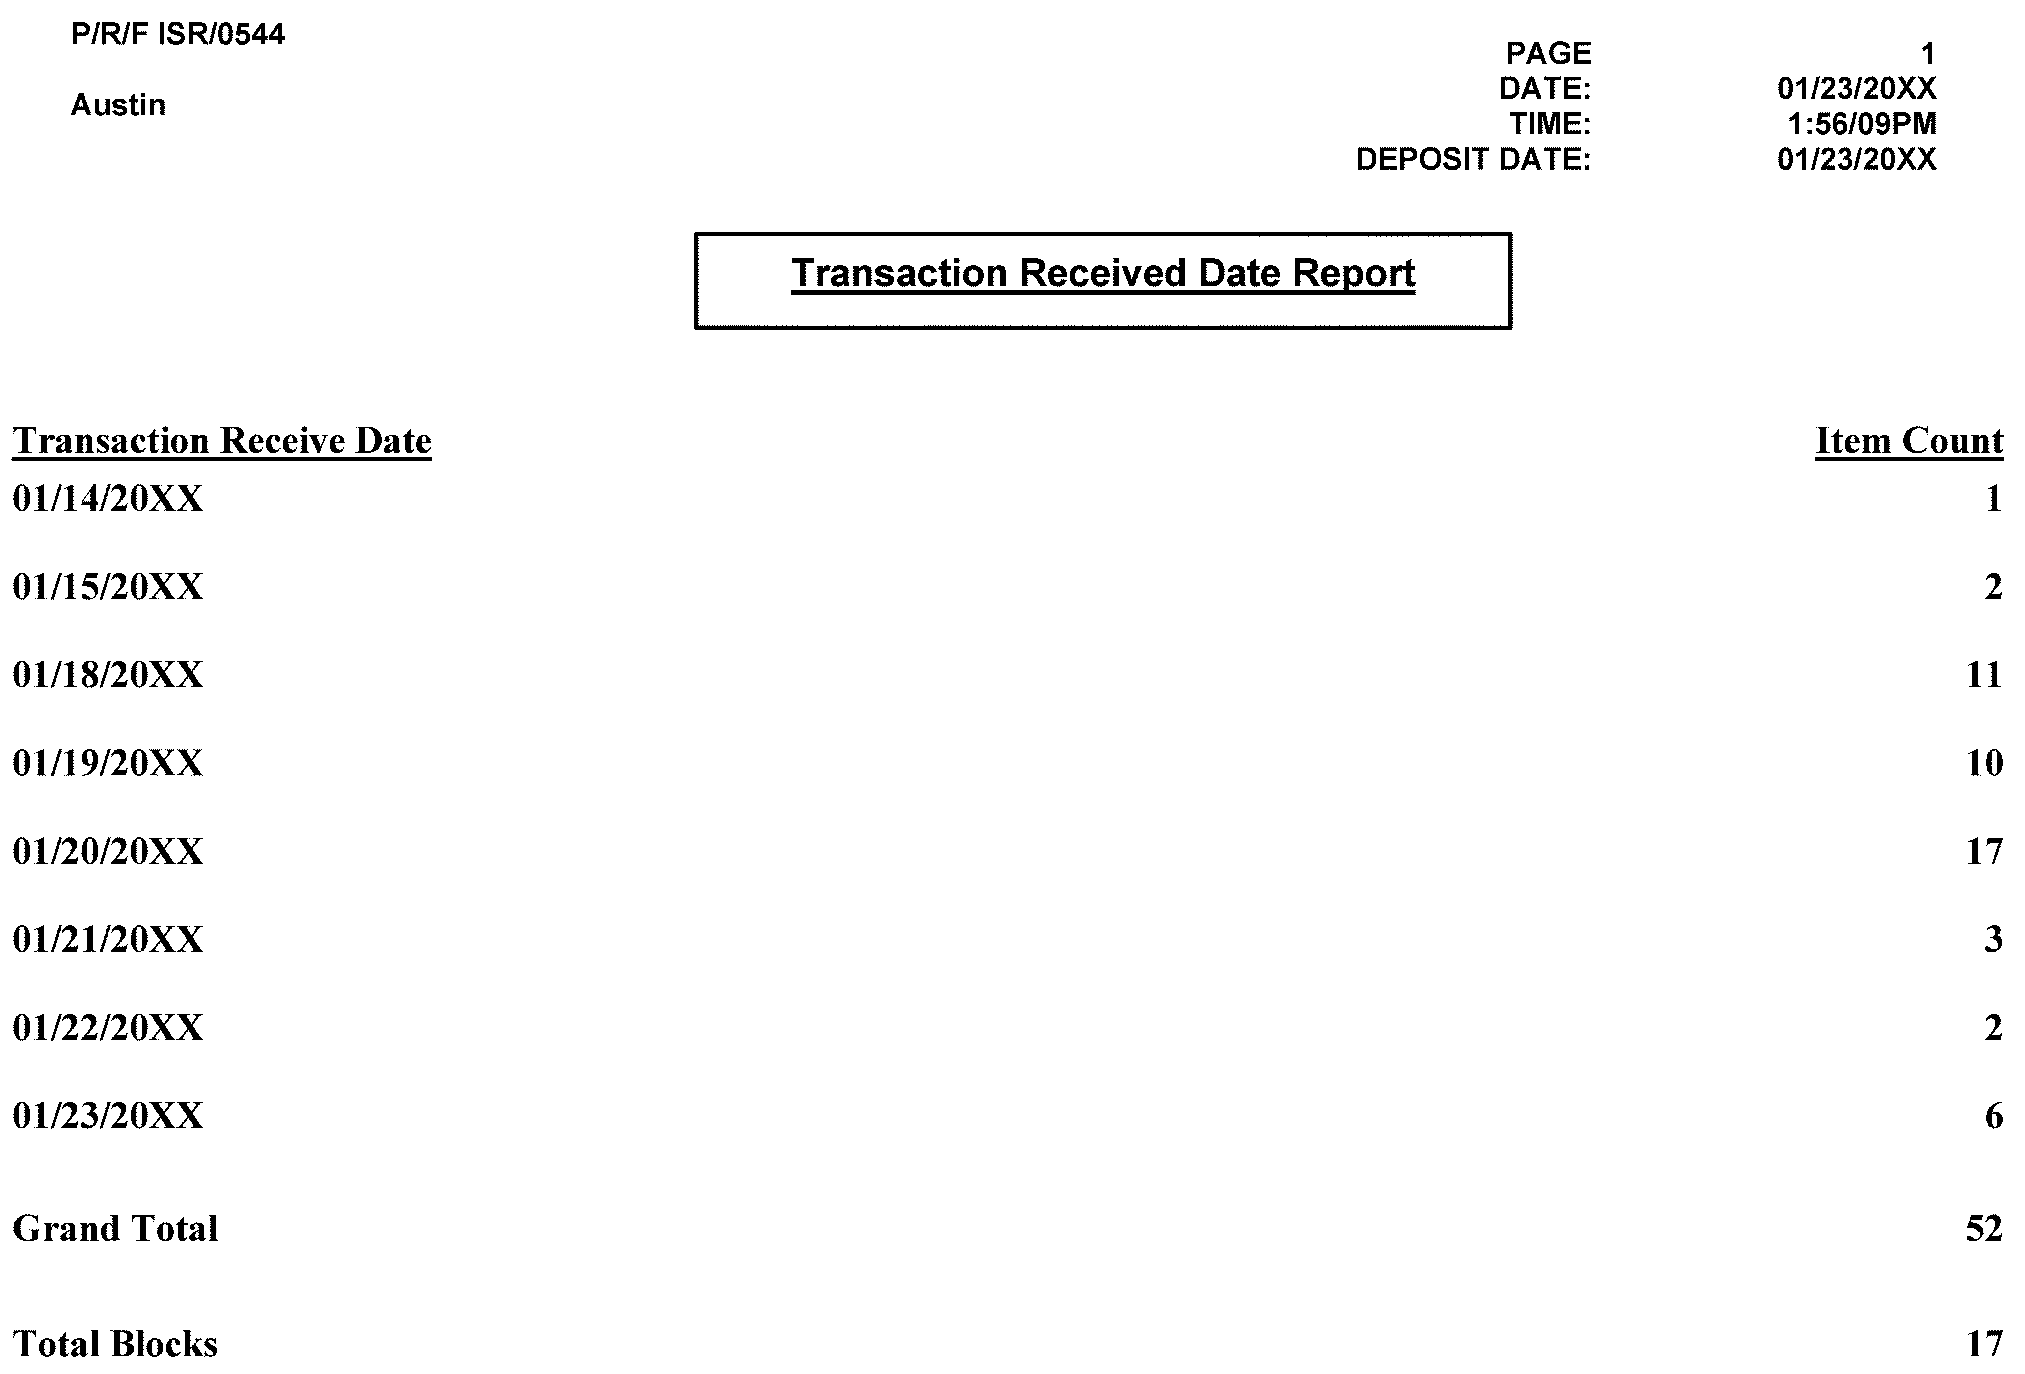
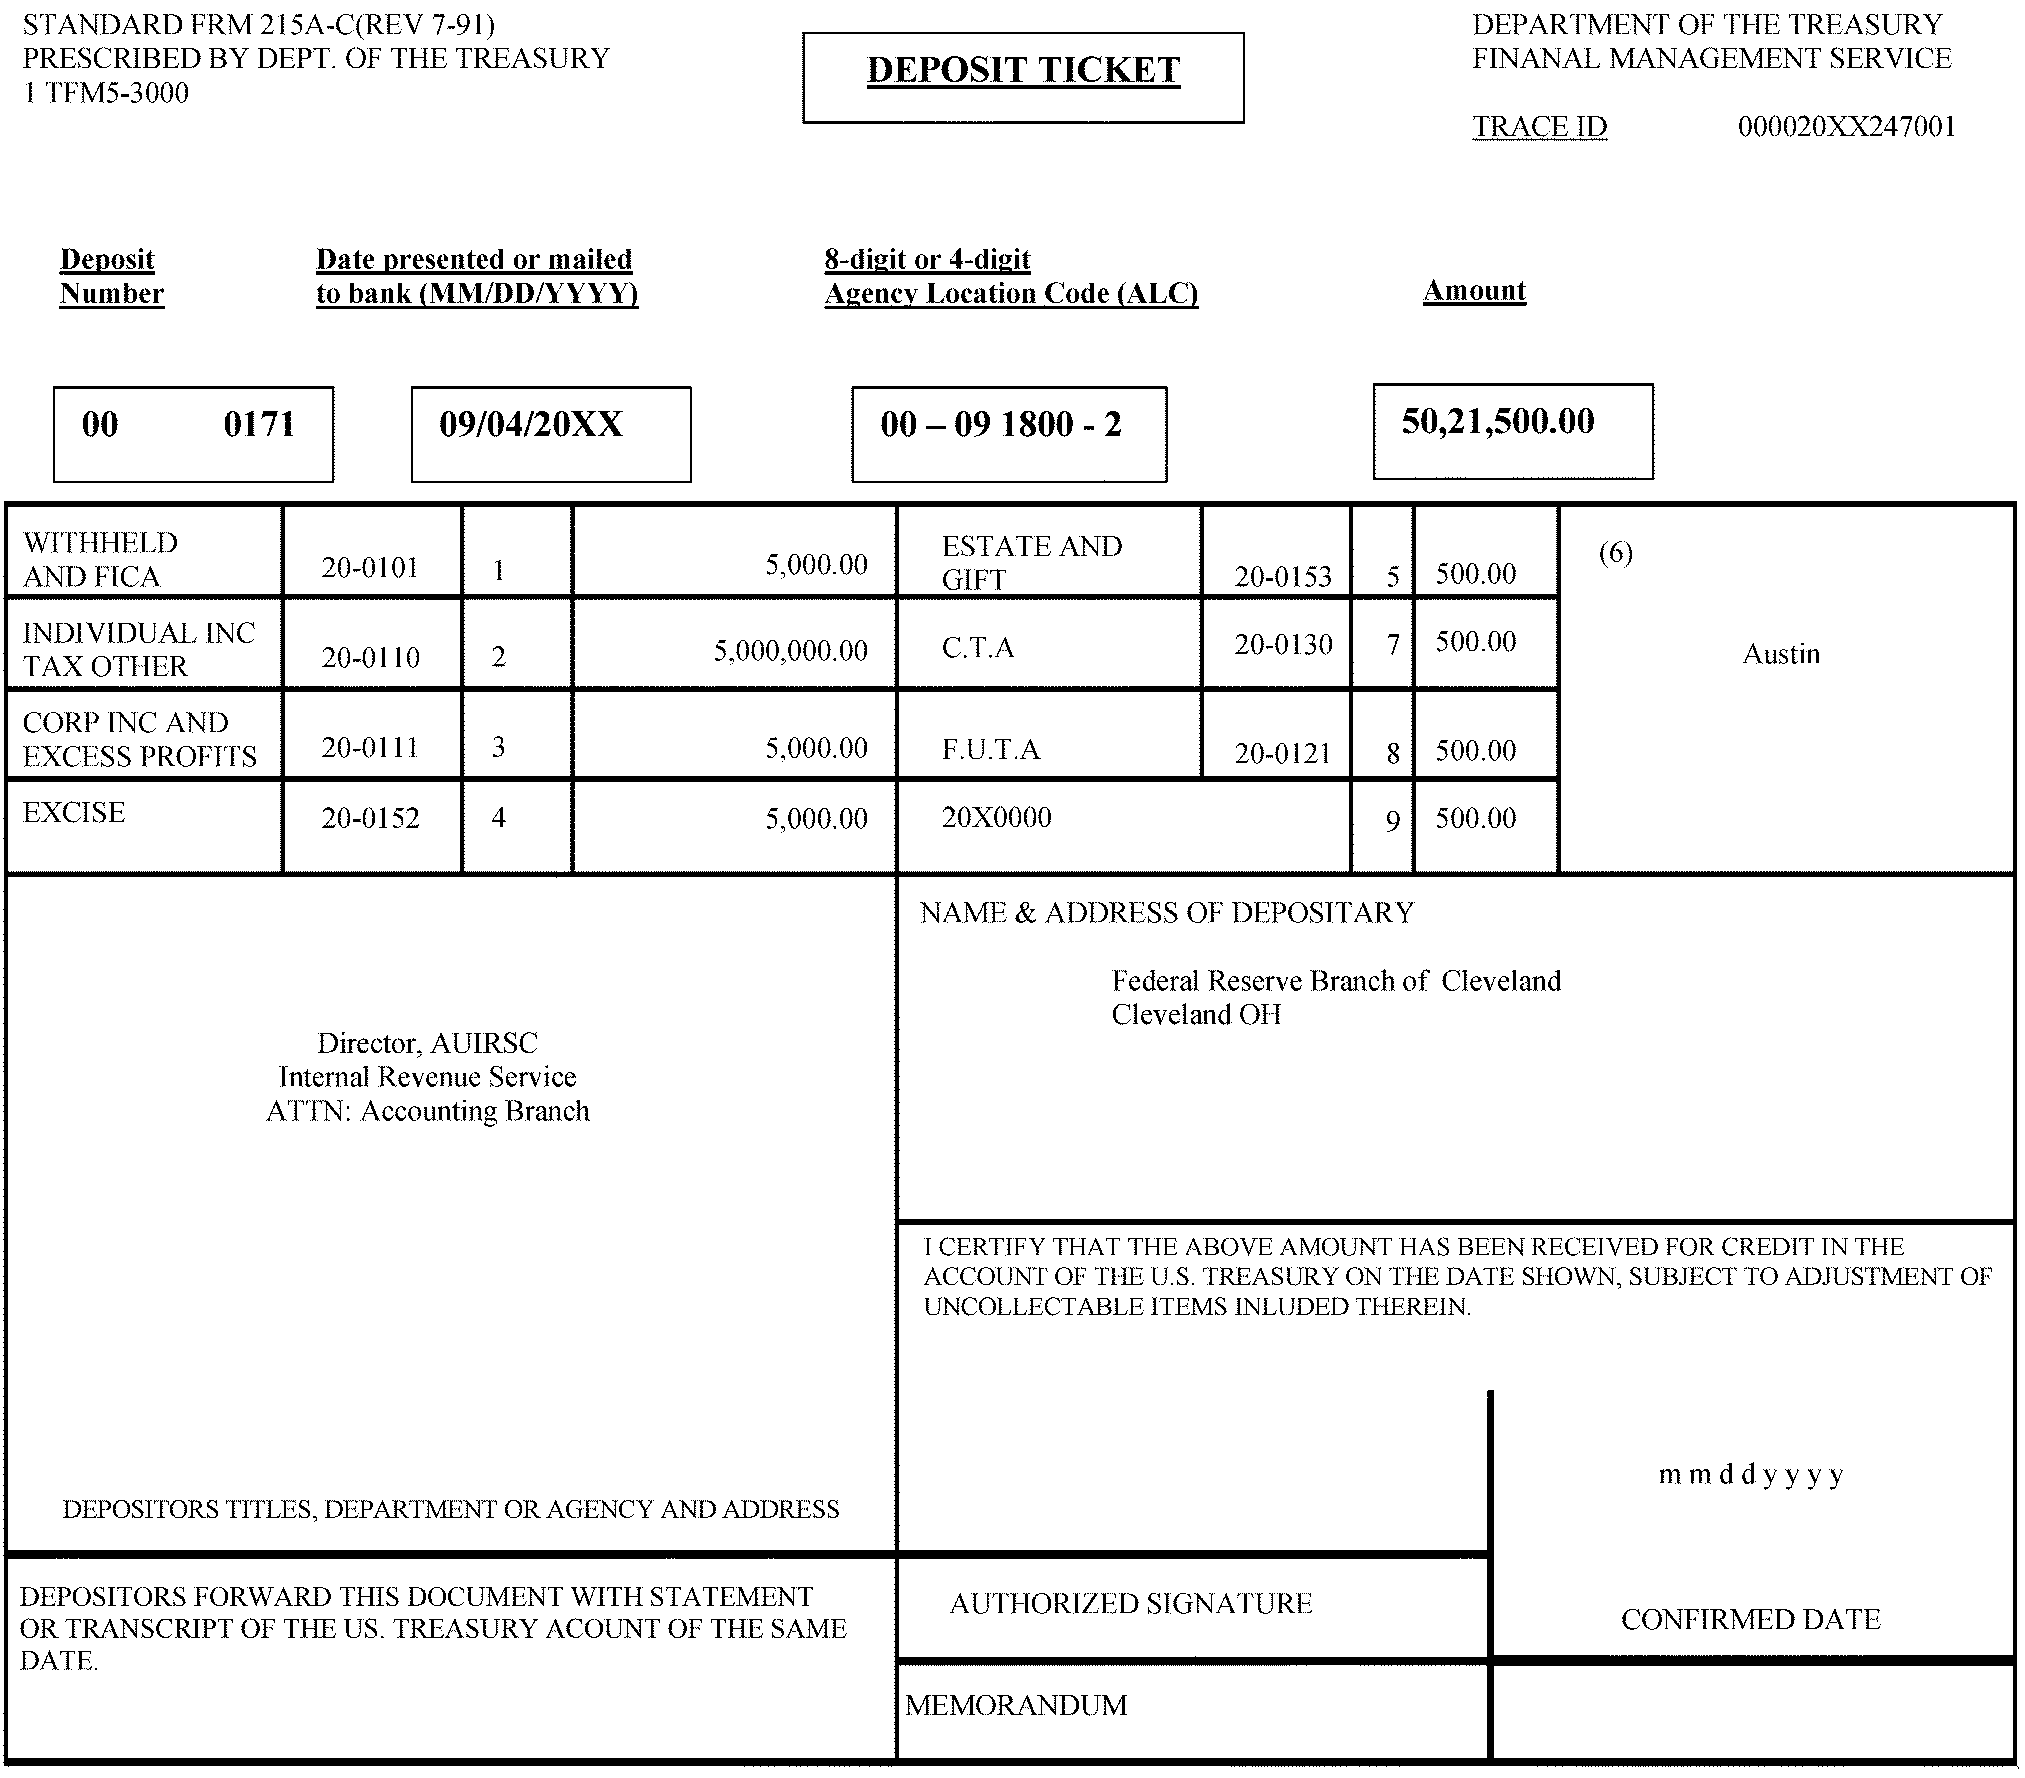
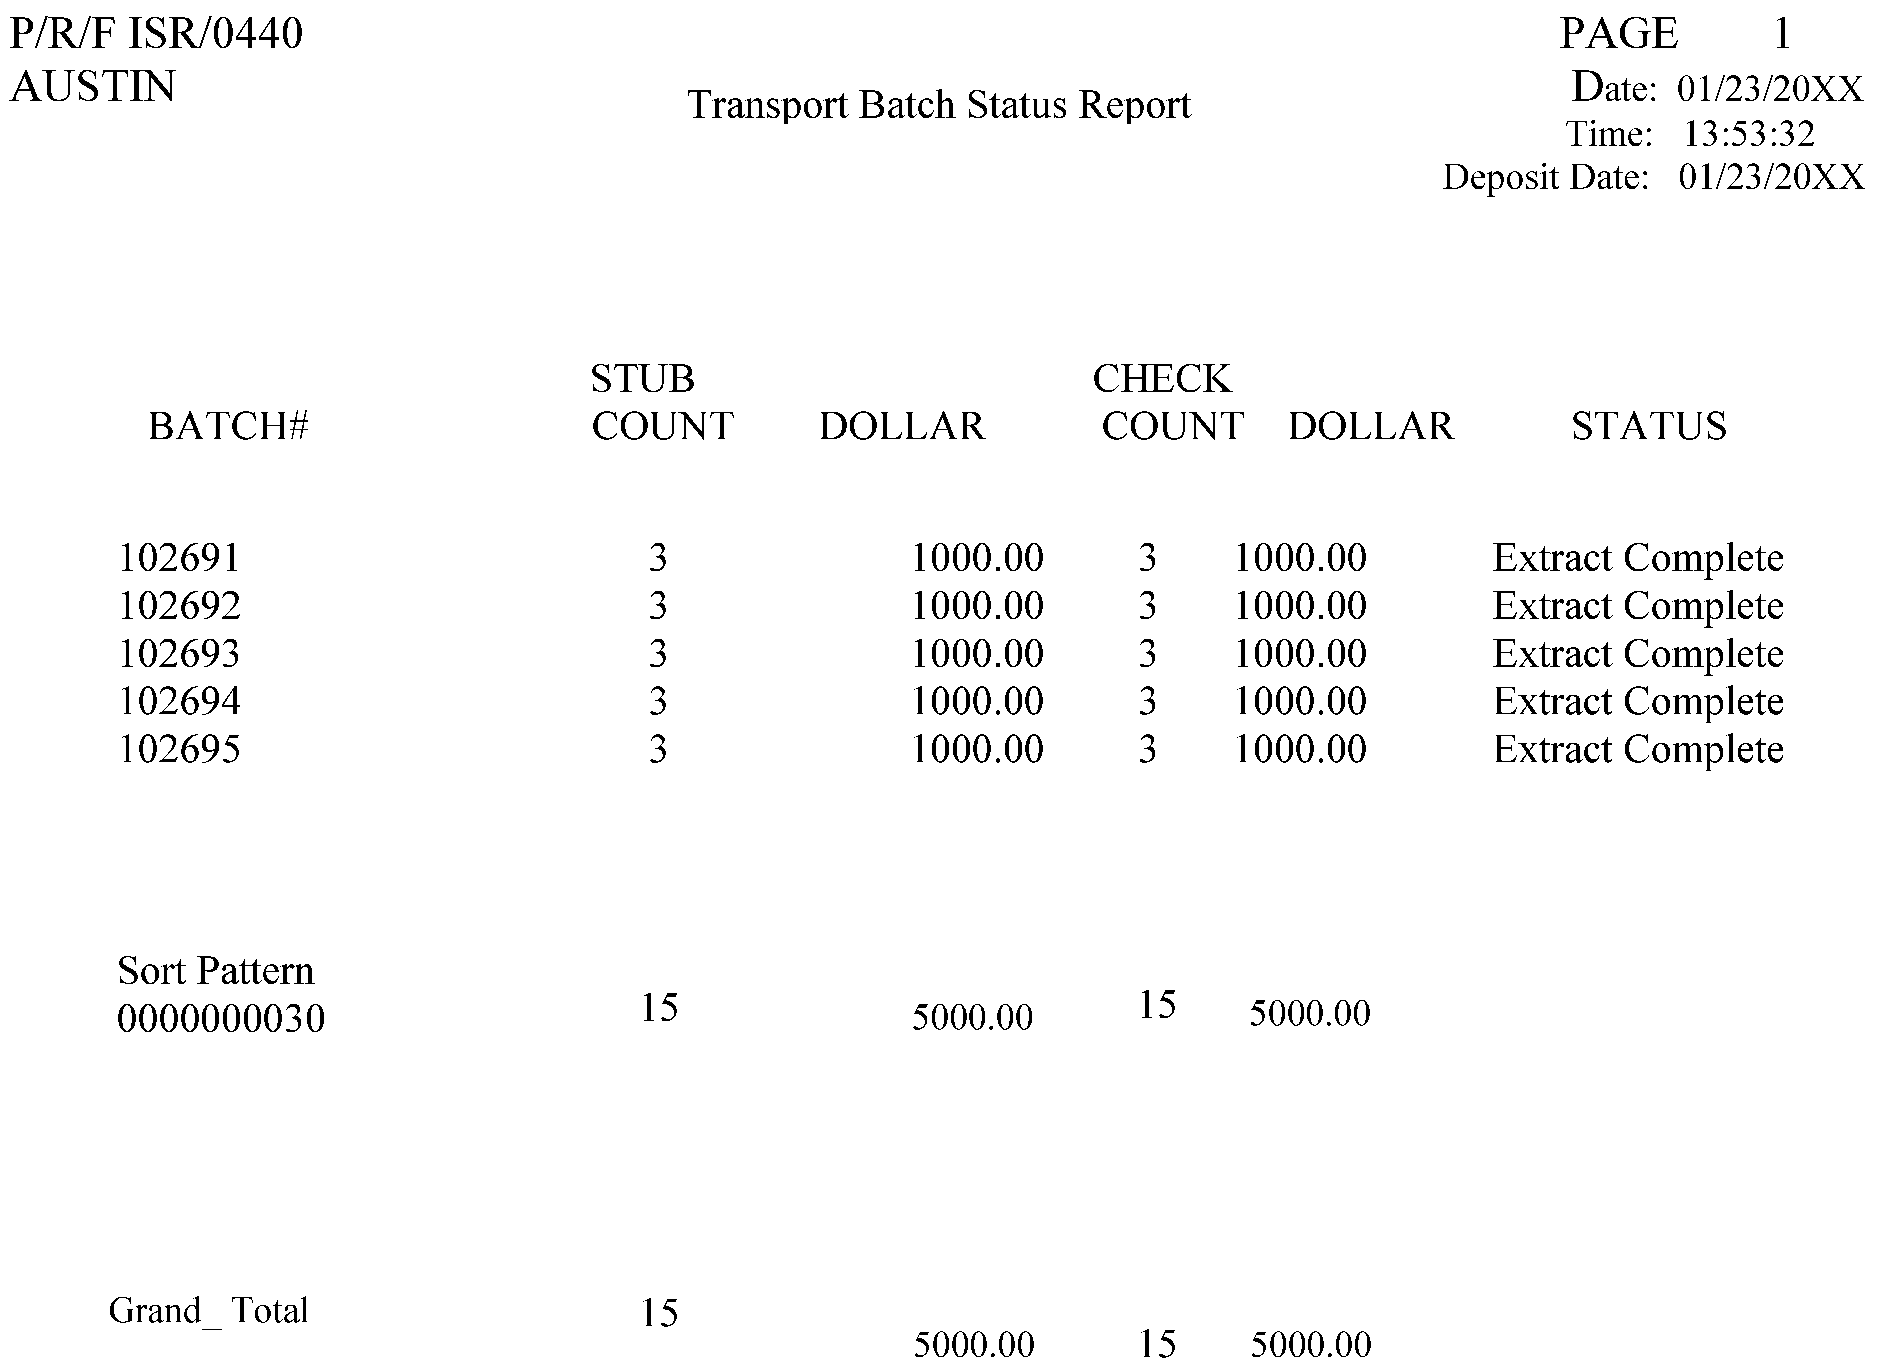

The following table shows the Master File/Non-Master File Processing Form by Category Table. The first column lists the category. The second column shows the MFT. The third column lists the tax class. The fourth column shows the Doc code. The fifth column lists the transaction code. The sixth column shows the document locator number blocking range.
| Category | MFT | Tax Class |
Doc Code |
Trans Code |
DLN Blk Range |
|---|---|---|---|---|---|
| 01 | 01, 04, 08, 11, 12, 14, 16, 17 | 1 | 17, 19 | 640, 670, 680, 690, 694 | 000–999 |
| 02 | 30 | 2 | 20 | 430 | 000–999 |
| 03 | 30, 31, 55, 82 | 2 | 17, 19 | 640, 670, 680, 690, 694 | 000–899 |
| 04 | 05 | 2 | 17, 19 | 660 | 900–949 |
| 05 | 05, 06, 15 | 2 | 17, 19 | 640, 670, 680, 690, 694 | 950–999 |
| 06 | 02, 07, 33, 34, 83 | 3 | 17, 19 | 640, 670, 680, 690, 694 | 000–999 |
| 07 | 03, 36, 37, 44, 49, 50, 60, 63, 64, 67, 74, 76 | 4 | 17, 19 | 640, 670, 680, 690, 694 | 000–999 |
| 08 | 51, 52, 77, 78 | 5 | 17, 19 | 640, 670, 680, 690, 694 | 000–999 |
| 09 | 09 | 7 | 17, 19 | 640, 670, 680, 690, 694 | 000–999 |
| 10 | 10 | 8 | 17, 19 | 640, 670, 680, 690, 694 | 000–999 |
| 11 | Reserved | ||||
| 12 | 01, 04, 08, 11, 12, 14, 16, 17 | 1 | 70, 76 | 610 | 000–999 |
| 13 | 30, 31 | 2 | 70, 76 | 610 | 000–799 920–974 |
| 14 | 05, 06, 15 | 2 | 70, 76 | 610 | 800–999 |
| 15 | 02, 07, 33, 34 | 3 | 70, 76 | 610 | 000–999 |
| 16 | 03, 36, 37, 44, 50, 60, 63, 64, 67, 76 | 4 | 70, 76 | 610 | 000–999 |
| 17 | 51, 52, 77, 78 | 5 | 70, 76 | 610 | 000–999 |
| 18 | 09 | 7 | 70, 76 | 610 | 000–999 |
| 19 | 10 | 8 | 70, 76 | 610 | 000–999 |
| 20 | 29 | 0 | 17, 19 | 670 | 000–999 |
| 21 | 12, 18 | 6(1) | 27 | 640, 670, 680, 690, 694 | 100-199 |
| 22 | 20, 21 | 6(2) | 27 | 640, 670, 680, 690, 694 | 200-299 |
| 23 | 07, 23, 32, 33, 34, 46 | 6(3) | 27 | 640, 670, 680, 690, 694 | 300-399 |
| 24 | 27, 36, 37, 44, 45, 56, 57, 67, 70, 89, 96, 97 | 6(4) | 27 | 640, 670, 680, 690, 694 | 400–499 |
| 25 | 53, 54 | 6(5) | 27 | 640, 670, 680, 690, 694 | 500–599 |
| 26 | 80 | 6(8) | 27 | 640, 670, 680, 690, 694 | 800–899 |
| 27 | 12, 18 | 6(1) | 70, 76 | 610 | 100–199 |
| 28 | 20, 21, 69 | 6(2) | 70, 76 | 610 | 200–299 |
| 29 | 23, 32, 33, 34, 38, 46 | 6(3) | 70, 76 | 610 | 300–399 |
| 30 | 37, 45, 56, 57, 66, 67, 70, 81, 89, 93, 96, 97 | 6(4) | 70, 76 | 610 | 400–499 |
| 31 | 53, 54 | 6(5) | 70, 76 | 610 | 500–599 |
| 32 | 71, 72 | 6(7) | 70, 76 | 610 | 700–799 |
| 33 | 80 | 6(8) | 70, 76 | 610 | 800–899 |