
 )
or https:// means you've safely connected to the .gov website. Share sensitive information only on official, secure websites.
)
or https:// means you've safely connected to the .gov website. Share sensitive information only on official, secure websites.
- 3.41.275 Scanner Operations on Service Center Recognition Image/Processing System
- 3.41.275.1 Program Scope and Objectives
- 3.41.275.1.1 Background
- 3.41.275.1.2 Authority
- 3.41.275.1.3 Roles and Responsibilities
- 3.41.275.1.4 Program Management and Review
- 3.41.275.1.5 Program Controls
- 3.41.275.1.6 Acronyms/Terms and Definitions
- 3.41.275.1.7 Related Resources
- 3.41.275.2 Local Desk Procedures
- 3.41.275.3 Introduction
- 3.41.275.4 Operating System
- 3.41.275.4.1 Overview
- 3.41.275.4.2 Character Recognition and Image Capture
- 3.41.275.4.2.1 Peripheral Server Software
- 3.41.275.4.3 Image Processing
- 3.41.275.4.3.1 Image Controller (IC) Set Up
- 3.41.275.4.3.2 Image Controller (IC) Functions
- 3.41.275.4.4 System Control and Data Management
- 3.41.275.4.5 Character Recognition
- 3.41.275.4.6 Archival Storage
- 3.41.275.5 Scanner Operations
- 3.41.275.5.1 Scanner Parts
- 3.41.275.5.2 Scanner Functions
- 3.41.275.5.3 Stacker Buttons
- 3.41.275.5.4 Image Controller Preparation
- 3.41.275.5.5 Scanner Operator Tasks
- 3.41.275.5.6 Reading/Updating the Scanner Communication Log
- 3.41.275.5.7 Performing Maintenance/Housekeeping Checks
- 3.41.275.5.7.1 Checking the Ink Supply
- 3.41.275.5.8 Logging onto the Scanner Operator Console
- 3.41.275.5.9 Selecting and Running a Job
- 3.41.275.5.9.1 Selecting a Job
- 3.41.275.5.9.2 Running a Job
- 3.41.275.5.10 Adjusting the Scanner
- 3.41.275.5.10.1 Adjusting the Feeder
- 3.41.275.5.10.1.1 Adjusting the Feeder Speed
- 3.41.275.5.10.1.2 Double Document Detect Sensors
- 3.41.275.5.10.1.3 Adjusting the Serializer
- 3.41.275.5.10.2 Checking the Universal Stacker
- 3.41.275.5.10.3 Checking the Printer
- 3.41.275.5.10.1 Adjusting the Feeder
- 3.41.275.5.11 Perfecting the Documents
- 3.41.275.5.12 Loading Documents in the Feeder Tray
- 3.41.275.5.13 Scanning the Documents
- 3.41.275.5.13.1 Scanning IRP
- 3.41.275.5.13.1.1 Information Returns Program (IRP)1096 Image Only
- 3.41.275.5.13.2 Scanning Affordable Care Act (ACA) IRP
- 3.41.275.5.13.2.1 Affordable Care Act (ACA) IRP 1094 Image Only
- 3.41.275.5.13.3 Scanning Schedule K-1
- 3.41.275.5.13.4 Scanning Form 941
- 3.41.275.5.13.5 Scanning Form 940
- 3.41.275.5.13.6 Scanning Stand-Alone Schedule R (include Schedule R with 943 attached)
- 3.41.275.5.13.7 Interrupting/Resuming a Job
- 3.41.275.5.13.1 Scanning IRP
- 3.41.275.5.14 Recovering from Scanner Failure
- 3.41.275.5.15 Responding to a Jam
- 3.41.275.5.15.1 Removing Documents after a Jam
- 3.41.275.5.16 Peripheral Server Window
- 3.41.275.5.17 Removing the Documents from the Stacker Bins
- 3.41.275.5.18 Ending a Job
- 3.41.275.5.19 Completing Reports
- 3.41.275.5.20 End of Shift Housekeeping Tasks
- 3.41.275.5.21 Contacting Systems Analyst (SA) or System Subject Matter Expert (SSME) for Problems
- 3.41.275.5.22 Changing the Federal Tax Deposit (FTD) Cycle
- 3.41.275.5.22.1 Logging onto a Workstation Terminal
- 3.41.275.5.22.2 Incrementing and Updating the FTD Cycle
- 3.41.275.5.22.3 Exiting from the Workstation Terminal
- 3.41.275.6 Scanner Error Message
- 3.41.275.6.1 Feeder Error Messages
- 3.41.275.6.2 Stacker Error Message
- 3.41.275.6.3 Application Specific Error Messages
- 3.41.275.6.3.1 IRP Error Messages
- 3.41.275.6.3.2 ACA IRP Error Messages
- 3.41.275.6.3.3 K-1 Error Messages
- 3.41.275.6.3.4 941 Error Messages
- 3.41.275.6.3.5 940 Error Messages
- 3.41.275.6.3.6 Stand-Alone Schedule R Error Messages
- 3.41.275.1 Program Scope and Objectives
Part 3. Submission Processing
Chapter 41. OCR Scanning Operations
Section 275. Scanner Operations on Service Center Recognition Image/Processing System
3.41.275 Scanner Operations on Service Center Recognition Image/Processing System
Manual Transmittal
August 06, 2025
Purpose
(1) This transmits revised IRM 3.41.275, Optical Character Recognition Scanning Operations, Scanner Operations on Service Center Recognition Image/Processing System.
Material Changes
(1) IRM 3.41.275.5.13.1, Line 6 (a) Table, Updated to include the 3 additional forms to be processed through SCRIPS.
(2) Editorial corrections and consistency changes made throughout including spelling, grammar, punctuation and formatting, removing italics, updating titles, correcting IRM links, Plain Language updates to improve readability, etc.
Effect on Other Documents
IRM 3.41.275, dated November 27, 2024 (effective January 01, 2025) is superseded.Audience
Taxpayer Services, Submission Processing Site, Data Conversion Operation EmployeesEffective Date
(01-01-2026)James L. Fish
Director, Submission Processing
Customer Account Services
Taxpayer Services
-
Purpose: Daily scanning of processable paper filed documents, returns or schedules on the Service Center Recognition/Image Processing System (SCRIPS) are covered in this IRM. This processing converts the taxpayer data reported to electronic data records to fulfill the filing requirement.
-
Audience: Submission Processing Data Conversion Operation personnel and their support staff, including: peripheral scanner operators, clerks, leads and supervisors. These instructions apply to all campuses.
-
Policy Owner: The Director of Submission Processing, Taxpayer Services.
-
Program Owner: Mail Management Data Conversion, Return Processing Branch (an Organization within Submission Processing).
-
Primary Stakeholders: Those affected by these procedures or have input to the procedures, including a change in workflow, additional duties, change in established time frames, and similar issues include:
-
Accounts Management (AM)
-
Affordable Care Act (ACA) Implementation
-
Chief Counsel
-
Chief Financial Officer (CFO)
-
Compliance Strategy and Policy
-
Information Technology (IT) Programmers
-
Large Business and International (LB&I)
-
Office of Servicewide Penalties
-
Operations Business Support
-
Small Business/Self Employed (SB/SE)
-
Statistics of Income (SOI)
-
Submission Processing (SP)
-
Tax Exempt/Government Entities (TEGE)
-
Taxpayer Advocate (TAS)
-
-
Program Goals: This IRM provides instruction for accurate scanning of data into the SCRIPS system. The SCRIPS system uses optical character recognition and imaging technology to accumulate the Information Returns Processing (IRP), Affordable Care Act Information Returns Processing (ACA IRP), Form 94X and Schedule K-1 information for electronic transmission to master file. The returns are scanned and the data transferred electronically into the SCRIPS system.
-
SCRIPS uses the latest in high-speed scanning and imaging technology. Documents are scanned, numbered, imaged, and sorted through one pass on the scanner. Once the paper documents are scanned and the minimum read accuracy rate is met, all remaining processing is performed from the captured electronic data.
-
Authority for these procedures is found in Title 26 of the United States Code (USC) or more commonly known as the Internal Revenue Code (IRC). The IRC is amended by acts, public laws, treasury determinations, rules, and regulations such as the following:
-
American Taxpayer Relief Act (ATRA)
-
Consolidated Appropriations Act (Extenders)
-
Failure to File a Correct Information Return (Section 6721)
-
Health Care and Education Reconciliation (HCERA) Act
-
Hiring Incentives to Restore Employment (HIRE) Act
-
Information Reporting on Health Coverage by Employers (Section 6056)
-
Information Reporting on Health Coverage by Insurers (Section 6055)
-
The Protecting Americans from Tax Hikes (PATH) Act
-
-
All policy statements for Submission Processing are found in IRM 1.2.1.4, Servicewide Policies and Authorities, Policy Statements for Submission Processing Activities:
-
Code sections that provide the IRS with the authority to issue levies.
-
Congressional Acts that outline additional authorities and responsibilities like the Travel and Transportation Reform Act of 1998 or the Tax Act of 1986.
-
Policy Statements that provide authority for the work done.
-
-
The Director, Submission Processing approves and authorizes issuance of this IRM.
-
The Planning and Analysis staff provides feedback and supports local management to monitor and achieve scheduled goals.
-
The Operation Manager secures, assigns, and provides training for the staff needed to perform the duties presented in this IRM.
-
The Team Manager assigns, monitors, and controls the workflow to complete the work timely.
-
The Employee applies the instruction for the duties presented in this IRM on the SCRIPS system to accurately convert paper data to an electronic data record for proper posting for use by the IRS.
-
Program Reports: Management uses these reports to monitor daily (IPS0698 throughout each workday) and weekly status of the program to completeness. Below is a list of reports used:
-
IPS0083, Workstation Operator Statistics Program and Function Summary Report
-
IPS01119, Run Balance Report
-
IPS06440, Throughput Statistics Report
-
PCC 2240, Daily Production Report - Program Sequence
-
PCC 6040, SC WP&C Performance and Cost Report
-
PCC 6240, SC WP&C Program Analysis Report
-
PCB 0440, Daily Workload and Staff hours Schedule
-
PCB 0540, Weekly Workload and Staffing Schedule
-
-
Program Effectiveness: Management measures weekly goals using the above reports for each function compared to the established completion schedule. Each function must complete the inventory on or before the program completion, and to retain or exceed schedule prior to the program completion date stated in IRM 3.30.123, Work Planning and Control Processing Timeliness: Cycles, Criteria, and Critical Dates. Local Management conducts and monitors quality reviews and takes corrective action to ensure quality products. A managerial or product review in the Data Validation function is performed each week on every employee and entered into Embedded Quality for Submission Processing System (EQSP). Managerial and product reviews supplement the quality review process.
-
Annual Review: Management reviews the processes in this manual annually to ensure accuracy and promote consistent tax administration.
-
Management can use local reports to establish additional information for maintaining daily program control. Local reports never replace the established official reports.
-
The following acronyms are used throughout this IRM:
Acronym Definition ACA IRP Affordable Care Act Information Return Processing ALE Applicable Large Employer CPU Central Processing Unit CR Character Recognition DLN Document Locator Number DV Data Validation ESC Escape FE Field Engineer IC Image Controller ICR Intelligent Character Recognition IICR Imaging and Intelligent Character Recognition IRM Internal Revenue Manual IRP Information Returns Processing IRS Internal Revenue Service OCR Optical Character Recognition OE Original Entry SA System Administration SCRIPS Service Center Recognition/Image Processing System SN Sequence Number SSME System Software Maintenance Engineer UMR Unscheduled Maintenance Report UW Unit-of-Work -
The following terms are used throughout this IRM.
Term Definition Alignment Edge A guide edge of a form, that serves to correctly position the document to be scanned. The guide edge for IRP, Schedule K-1 and Form 94X is the right side of the document. Application The type of tax forms processed by SCRIPS. SCRIPS currently processes IRP, ACA IRP, Schedule K-1, Form 940 and Form 941 documents. Bleached Image One of two images created by the scanner software. This is an image where any drop-out ink is filtered so that only printed or handwritten data is captured. The bleached image is used for character recognition. Also see "True and Complete Image." Block Returns or documents grouped together for processing purposes. Capture The process of obtaining images of a document for character recognition and operator use. Conveyor Belts Belts that feed paper through the document transport. Cycle One week processing at the Submission Processing Site and Enterprise Computing Center at Martinsburg. The cycle is expressed by a four-digit code; the first two digits are the processing year, and the second two digits are the processing week in that year. Document A form or return within a block or unit-of-work. Can be a Form 1099, Schedule K-1, Form 941, etc. Document Feeder The area of the scanner where documents are placed to be processed through the scanner. Document Locator Number (DLN) A controlled number is assigned to each , Form 940, Form 941, Information Returns Processing (IRP) forms, or Schedule K-1 forms. Elevator A stacker mechanism that moves up and down to allow the stacker bins to fill properly. Error Messages Computer responses to unacceptable information or conditions. These messages may appear on the computer console or may be printed as reports. Filters Filters are done internally by software. Flip Wheel A stacker mechanism in the front of each stacker bin that rotates, grabbing each individual document within one of its slots and dropping it onto the document stacker. Also referred to as "money wheel." Form Any IRS document that has a form number, e.g., Form 940, Form 941, Form 1096, etc. Image A digital picture of a paper document that is stored electronically on SCRIPS. Information Returns Processing (IRP) The application that processes Form 1096, Form 1098 (series), Form 1099 (series), Form 5498 (series) and allow the IRS to identify unreported income, excess deductions, and non-filers of tax returns. Information Returns Processing (IRP) Sequence Number (SN) A six-digit number that prints in lieu of a DLN on unrecognized IRP forms, also known as "FI" number. Inkjet Serializer This is a high speed audit trail device, that operates under software control, to print the DLN or Sequence Number (SN). Jogger A device used to align documents uniformly in preparation for scanning. Julian Date The numeric day of the year that the return or document is numbered. The sixth, seventh, and eighth digits of the DLN represent the Julian date. Login Signing on the terminal with a User ID and password. The login tells the system who is using the terminal. Main Menu The Main Menu (on the Operator System Console) gives the BancTec IntelliScan XDS Scanner operator access to the Operations Menu. Any item on these menus may give access to more submenus for various system tasks. Menu A list of options that allow the Scanner Operator to make a selection. Money Wheel A slotted rotating device used to grab, and then drop into the stacker bins, individual documents as they enter the Stacker area. Also referred to as a "flip wheel." MMDDYY The format used for most IRS dates (Month, Day, Year). Operator Console A Windows 7 workstation used by the Scanner Operator to interface with the scanner, peripheral server software, and jam assist software. Over-Length Document Condition This occurs when two or more overlapped sheets of paper cover a sensor longer than expected for the page size specified to the software application for a given job run. Re-image For IRP documents, the process of imaging the document again when the previous image was of poor quality. Reject Bin Documents that are invalid within a submission or documents that are caught in a jam condition are rejected to this bin. The reject bin is also referred to as a "Runout Bin" , "Flush Bin" , or "Mailbox." Rescans A unit-of-work that must be reprocessed through the scanner because of a problem that occurred during initial scanning. Stacker Bins Bins that hold the documents after they have been successfully scanned. The BancTec IntelliScan XDS Scanner is configured with two single bin stackers that stack accepted documents horizontally. (also see "Reject Bin" ) Statistics Facts or data about the system. Sub-menu A window where a list of options is displayed when an option from a previous menu has been selected. Transport Used to refer to the scanner or scanner mechanism. True and Complete Image The image that is generated for data entry or validation purposes. The drop-out ink is not filtered so the image is a true representation of the document. If available, it is always displayed on the right side of the monitor screen. Also see "Bleached Image." Ultrasonic Double Detector and Wheel Double Detector Two double detectors, an ultrasonic double detector and a wheel double detector to detect double feeds. These are to the right of the AUTOFEED START. The Ultrasonic sensor determines if there is an air gap between two sheets of paper, and the Wheel double detector determines slippage between two pieces of paper. When a double feed occurs, the transport stops, and the documents DO NOT get sent to the stations along the transport. Unit-of-work (UW) A group of one or more Form 940, Form 941, IRP forms, ACA IRP forms or Schedule K-1 forms.
-
IRM 3.41.274, Optical Character Recognition Scanning Operations-General Instructions for Processing via Service Center Recognition/Image Processing System.
-
These instructions apply to the following applications for SCRIPS:
-
ACA IRP - Affordable Care Act Information Return Processing
-
IRP - Information Returns Processing
-
Form 1041 Schedule K-1, Form 1065 Schedule K-1, and Form 1120-S Schedule K-1
-
Form 941 - Employer's Quarterly Federal Tax Return
-
Form 941 - Schedule B and Schedule R
-
Form 940 - Employer's Annual Federal Unemployment (FUTA) Tax Return
-
Form 940 - Schedule A and Schedule R
-
Stand-Alone Schedule R (including the 943 with Schedule R)
-
-
You can find IRM’s on the Servicewide Electronic Research Program (SERP) at the following site: SERP. Specific instructional links available on the BMF Data Conversion Research Portal.
-
Some Submission Processing Campuses have developed local use Desk Procedures. These procedures must only supplement existing Headquarters’ procedures or convey local routing procedures.
-
All existing local procedures require review by the Operation Manager or designated employee upon receipt of Information Alerts, Questions and Answers (SERP Feedback) or a new IRM revision to ensure conformance with Headquarters Procedures.
-
Team Managers must have a signed approval, on file, from the responsible Operation Manager for all Submission Processing Local Desk Procedures.
-
This IRM provides instructions for scanning, Affordable Care Act Information Returns Processing (ACA IRP), Information Returns Processing (IRP), Share of Income, Deductions, Credits, etc. (Schedule K-1) documents, Allocation Schedule for Aggregate Form 94X filers (Schedule R), Form 940, Employer's Annual Federal Unemployment (FUTA) Tax Return returns and Form 941, Employer’s Quarterly Federal Tax Return returns through the Service Center Recognition/Image Processing System (SCRIPS).
Note:
There are three types of Schedule K-1 processed on SCRIPS. Each schedule type has a different program number:
-
Form 1041 Schedule K-1, Beneficiary's Share of Income, Credits, Deductions, etc.
-
Form 1065 Schedule K-1, Partner's Share of Income, Credits, Deductions, etc.
-
Form 1120-S Schedule K-1, Shareholder's Share of Income, Credits, Deductions, etc.
-
-
Submit IRM deviations in writing following instructions from IRM 1.11.2.2, Internal Management Documents System - Internal Revenue Manual (IRM) Process Standards, and elevate through proper channels for executive approval. No deviations.
-
The IRS adopted the Taxpayer Bill of Rights (TBOR) lists rights that already existed in the tax code, putting them in simple language and grouping them into 10 fundamental rights. Employees are responsible for being familiar with and acting in accord with taxpayer rights. See IRC 7803(a)(3), Execution of Duties in Accord with Taxpayer Rights. For more information about the TBOR, see Taxpayer Bill of Rights.
-
This section provides information about the Service Center Recognition/Image Processing System (SCRIPS) operating system.
-
The operating system environment consists of the hardware and software that make up SCRIPS. This equipment consists of five functional subsystems that include:
-
Character Recognition and Image Capture
-
Image Processing
-
System Control and Data Management
-
Character Recognition
-
Storage
-
-
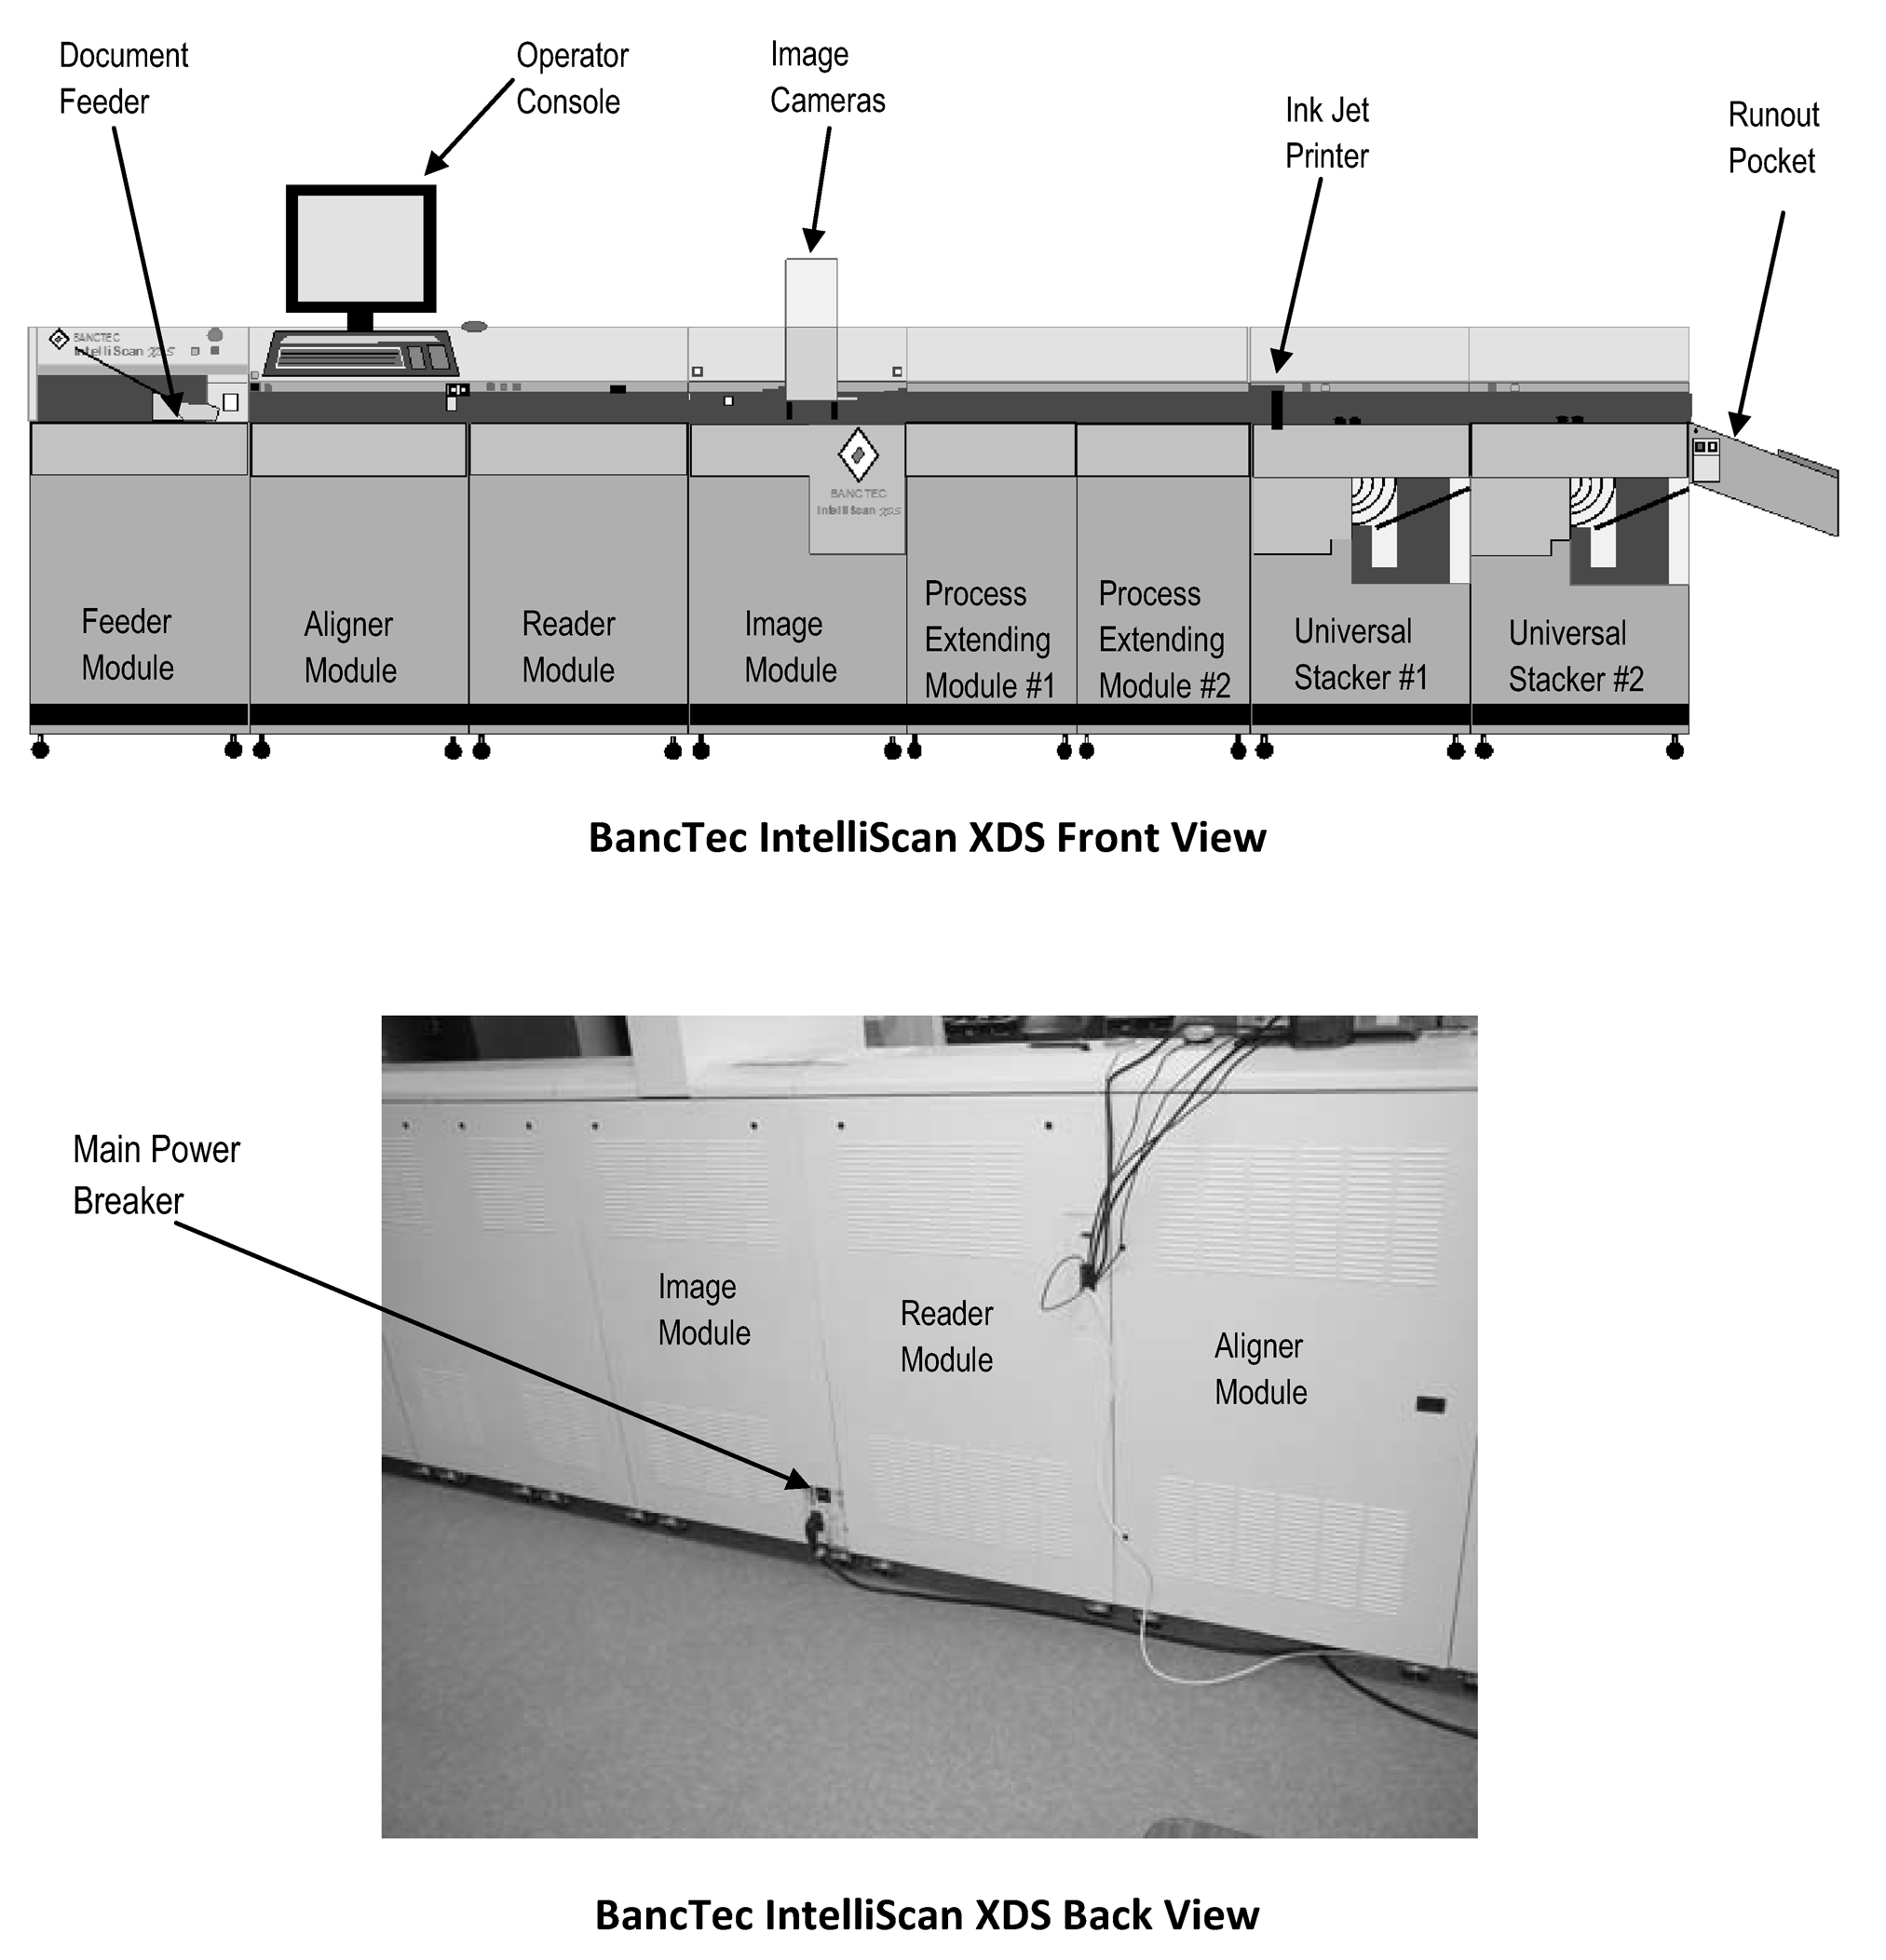
The Character Recognition (CR) and Image Capture subsystem consists of up to three BancTec IntelliScan XDS Scanners that can operate independently of each other. The BancTec IntelliScan XDS Scanner is an Imaging and Intelligent Character Recognition (IICR) page and document scanner. See Figure 3.41.275-1.
-
As each document travels through the scanner transport bed, the scanner performs the following functions:
-
A bleached image of the document is captured. This is an image where any drop-out ink is filtered so that only printed or handwritten data is captured. A true and complete image is captured.
-
Character Recognition is performed.
-
The Document Locator Number (DLN) or Sequence Number (SN) is printed in the proper place on the document by an inkjet printer.
-
The documents are then directed to one of the two stacker bins or the reject bin.
-
A monitor and keyboard provide an interface between the scanner and the operator.
-
The scanner system displays messages on the "Operator Console" screen and the Scanner Operator can enter commands through the keyboard.
-
-
Although SCRIPS no longer has a "Peripheral Server Monitor" , the peripheral server functions are now provided via software. This software directs the scanned image files from the Scanner to the "Image Controller" (IC) and is an integral part of the run-to-run balancing process, that is used on SCRIPS to track documents as they move through the system.
-
The system status and error messages that were previously displayed on the "Peripheral Server Monitor" are now displayed in the "Peripheral Server Window" on the "Operator Console" , lower left corner of scanning screen.
-
The "Image Processing Subsystem" consists of up to three "Image Controllers" and their associated multiple disk drives. Each "Image Controller" and its associated disk drives is called an IC.
-
There is one IC connected to each scanner.
-
The IC performs operational functions for the "BancTec IntelliScan XDS Scanner" such as the following:
-
Run-To-Run Balancing document tracking
-
Batch and form controls
-
System and status/error checking
-
Transmission of image files to the "Multiprocessor Server"
-
Transmission of log files to the "Multiprocessor Server"
-
-
There is a 19-inch monitor and keyboard attached to the "Image Controller" that provides an interface between the scanner and the operator.
-
The connection between the IC and the Scanner and Server is controlled on the IC.
-
All three ICs are able to be connected to the server simultaneously.
-
The IC lifts image data into form specific strips and transmits these, together with the Character Recognition (CR) data, to the "Recognition Engines" and then to the "Multiprocessor Server."
-
The IC performs additional quality control of imaged documents and writes the images to its temporary disk storage to support data integrity and provide backup.
-
The IC disk drives can normally store more image files than can be scanned in one day. The maximum recommended image file storage capacity of an IC is listed below:
Form Stored Images Affordable Care Act(ACA) IRP Approximately 2,000,000 documents IRP Approximately 600,000 image files
Approximately 2,000,000 documentsK-1 Approximately 1,000,000 documents 940 /941/Stand-Alone Schedule R Approximately 2,200,000 documents -
The IC automatically synchronizes the processing of documents read by the scanner and processed by the "Multiprocessor Server" to ensure integrity of data.
-
The Scanner and IC operate as a single unit with automatic system monitoring and synchronization. The IC monitors the scanner and allows the scanner to operate independently of the "Multiprocessor Server."
-
The "System Control and Data Management Subsystem" performs the following:
-
Receives images from the "Image Controller" and writes them to the data base
-
Manages the data base where the images and image data are stored
-
Manages DLN/SN assignment and tracking
-
Automatically routes work to the workstations
-
Automatically passes images that require character recognition to the "Recognition Engines"
-
-
The Character Recognition is performed by the following:
-
"Recognition Engines" to identify data
-
Workstation Operators to identify those characters not recognized by the "Recognition Engines"
-
-
The "Archival Storage Subsystem" stores true and complete electronic images of all Stand-Alone Schedule R (including Form 943 with Schedule R), Form 940, Employer's Annual Federal Unemployment (FUTA) Tax Return, Form 941, Employer's Quarterly Federal Tax Return, Schedule K-1 (Form 1041 Schedule K-1, Form 1065 Schedule K-1, and Form 1120-S Schedule K-1), ACA IRP (Form 1094-B and Form 1094-C), and IRP (Form 1096).
-
This section describes the SCRIPS scanner operations.
-
The "BancTec IntelliScan XDS Scanner" consists of the following:
-
Transport (conveyor belts)
-
Power On/Off Button
-
Image Camera (there are 2)
-
Document Feeder
-
Serializer
-
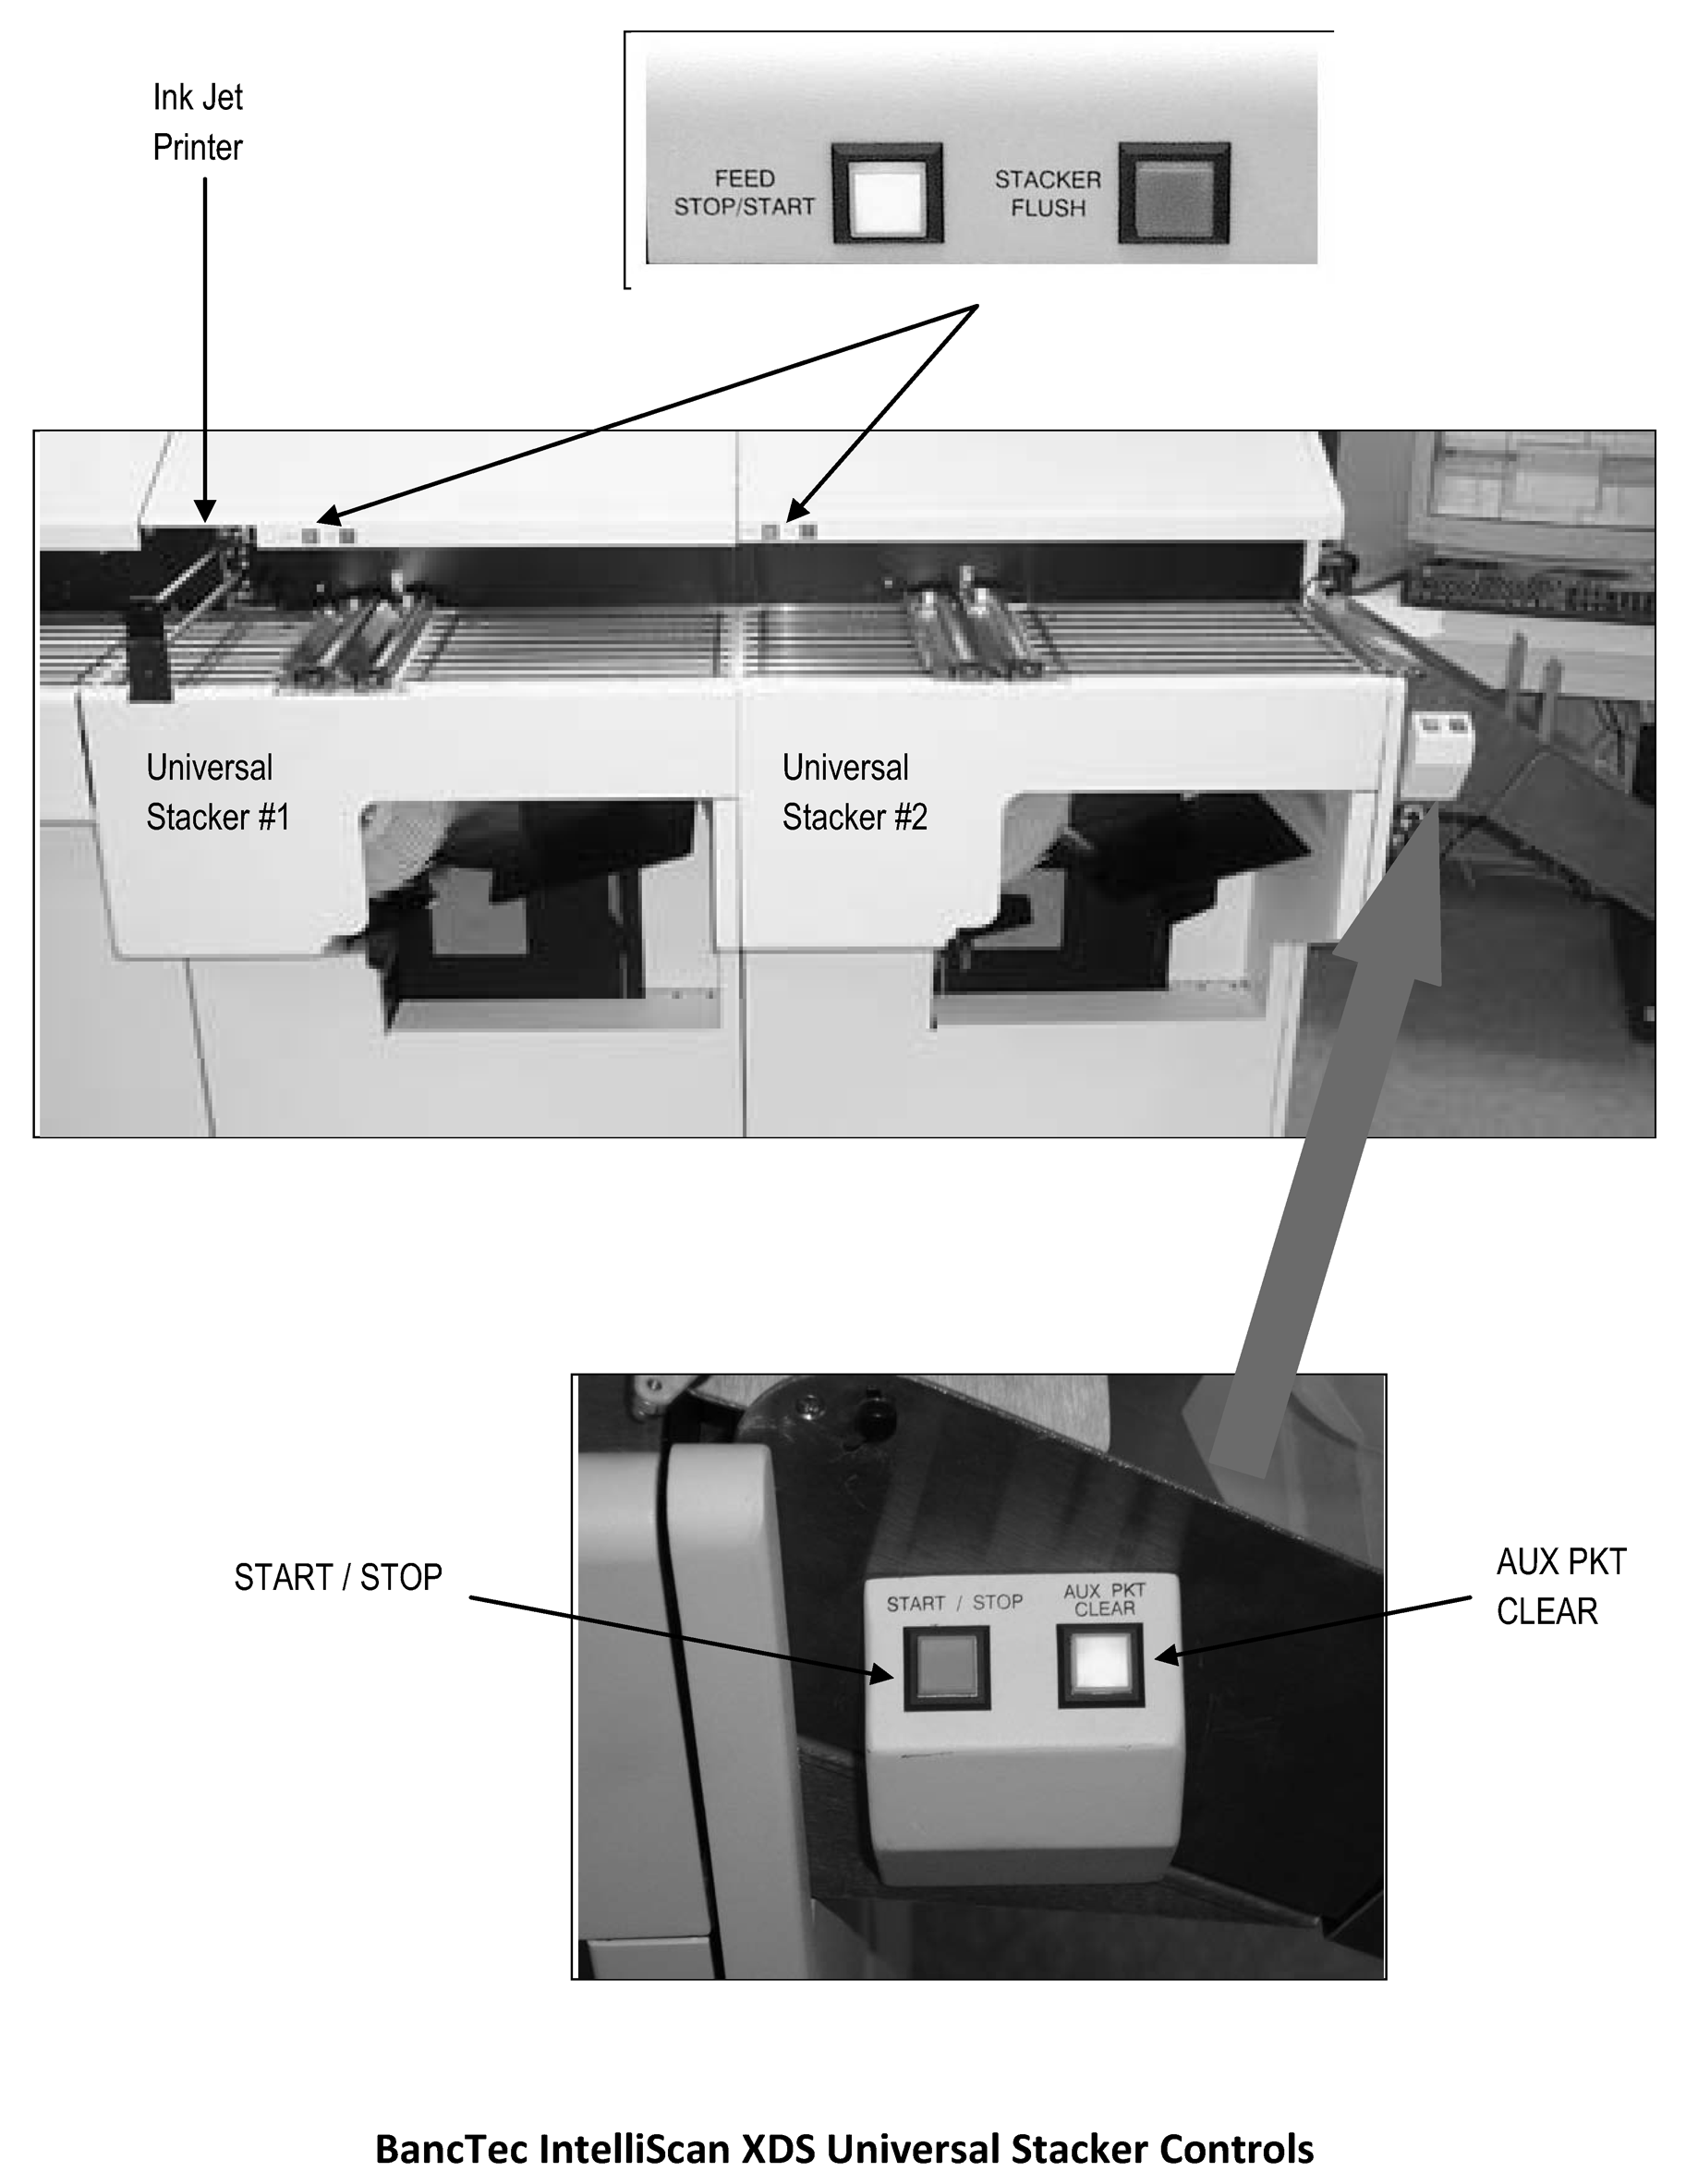
Stacker Bins
-
Reject Bin
-
Stacker Buttons
-
Red Emergency Stop Button (Shuts off power to the scanner, not just the conveyor)
-
Main Panel Switches
-
-
The "BancTec IntelliScan XDS Scanner" performs the following functions:
-
Captures one picture of the document (creates a bleached image that is used for CR and a true and complete image that is used for further processing such as DV, Quality Review (QR), Archive, etc.)
-
Prints an identifying number on the documents
-
Archives images
-
Transmits document images and data for further processing
-
Produces a list of errors
-
Provides error reports
-
Generates scanner reports at end of processing
-
-
The "Stacker Control Panel" has the following switches to communicate conditions of the stacker bins and the reject bin to the operator:
-
REJECT BIN - AUX PKT CLEAR button lights up when there are one or more documents in the "Reject Pocket."
-
Bin 1 - When the FEED STOP/START and STACKER FLUSH buttons are flashing, the bin is full.
-
Bin 2 - When the FEED STOP/START and STACKER FLUSH buttons are flashing, the bin is full.
-
-
Check the IC to determine if it is ready to accept scanned work and monitor it to ensure the work is moving through the IC into the database.
-
The "IC Main Window" displays on the monitor. If it is not, contact the Systems Administrator (SA).
-
There are four major areas on the screen:
-
Command Area
-
Counter Area
-
Indicator Area
-
Log Area
-
-
Check to make sure the "Image Controller" is connected to the Scanner and the Server by verifying that the buttons/options in the "Command Area" displays "Scanner Disconnect" and "Server Disconnect." If they display, "Scanner Connect" or "Server Connect" place the mouse pointer over the button and click once to connect them.
-
Check the "Indicator Area" to ensure the indicators for each process are green. The boxes should be green in color and have a "G" displayed on them. If any process indicator is anything other than green, contact the SA.
-
Periodically during scanning, the "Counter Area" should be observed to ensure the counters are advancing. The counts in the Next to Scan, Next to Load, Next to Process, and Next to Send should be changing rapidly. If you are scanning and the counts are not changing, contact the SA.
-
If a message window appears on the IC monitor screen indicating a serious problem (i.e., File Not Found, File is Missing), contact an SA or System Software Maintenance Engineer (SSME) immediately.
-
The Scanner Operator uses screen menus to perform the day-to-day functions while operating the transport. They are responsible for the following functions:
-
Reading/Updating the scanner communication log
-
Performing maintenance/housekeeping checks
-
Logging on to the operator console
-
Adjusting the scanner for daily operations
-
Perfecting the documents for scanning
-
Selecting and running a job
-
Loading the documents into the feeder tray
-
Scanning the documents
-
Monitoring the IC
-
Monitoring image quality by periodically viewing the images in the job window on the "Operator Console"
-
Monitoring inkjet quality
-
Rescanning
-
Re-Imaging
-
Interrupting/Resuming a job
-
Recovering from scanner failure
-
Responding to jam conditions
-
Removing documents from the stacker and reject bins
-
Ending the job
-
Completing reports
-
Completing end of shift housekeeping tasks
-
Contacting the System Administrator (SA) or Systems Software Maintenance Engineer (SSME) for problems
-
Changing the FTD cycle on the system
-
-
The "Scanner Communication Log" is updated by Scanner Operators to inform other operators about the scanners.
-
The Scanner Operator must read and update the "Scanner Communication Log" for information on:
-
How the scanners are running
-
How the ICs are draining
-
What type of documents were scanned on the previous shift
-
What type of documents should be scanned on this shift
-
Any reoccurring error messages
-
Any other information relevant to the scanning operation
-
-
You should perform the following housekeeping and preventive maintenance at the beginning of the shift and on an as needed basis prior to running the scanner:
-
Check for foreign objects (staples, register tapes, and page corners).
-
Clear area under the paper guides.
-
Clean glass and bars above the camera with a soft, dry, lint-free cloth.
-
Check for missing, broken, loose, or excessively worn parts (LED lamps, transport belts, rollers, etc.).
-
Dust the scanner with the air gun.
-
Clean the feed wheel. (Check with SSME for further instructions.)
-
-
As part of the maintenance/housekeeping checks, check and replace serializer ink supply.
-
An inkjet cartridge is to the left of Bin 1.
-
To replace an inkjet cartridge, push the cartridge eject button, lift cartridge out and replace with new cartridge.
-
You must log onto the "Operator Console" to access applications and jobs.
-
After the scanner has been powered up, the "Warning Window" is displayed.
Figure 3.41.275-2
THIS U. S. GOVERNMENT SYSTEM IS FOR AUTHORIZED USE ONLY! Use of this system constitutes consent to monitoring, interception, recording,
reading, copying or capturing by authorized personnel of all activities. There is no
right to privacy in this system. Unauthorized use of this system is prohibited and
subject to criminal and civil penalties, including all penalties applicable to
willful unauthorized access (UNAX) or inspection of taxpayer records
(under 19 U.S.C. 1030 and 26 U.S.C. 7213A and 26 U.S.C. 7431).Press <Esc> to continue -
Read the entire warning message and press the <Esc> key to continue with the login process.
-
The "Warning Window" closes and a "SCRIPS - Server Login" window opens in the center of the screen.
-
At the SEID (Standard Employee Identifier) prompt, type an upper case "S" followed by your SEID and press the <Enter> key.
-
Type your assigned password and press the <Enter> key.
-
Press the <Alt>-L key combination or click the Login command button.
-
If you made an error entering either your SEID or password, or your password has expired, an "Error Message Window" opens in the center of the screen informing you of the error. To correct the error, you must do the following:
-
Press the <Enter> key to "OK" the message. The "Error Message Window" closes leaving the "SCRIPS - Server Login" window on the screen.
-
Try steps (5) and (6) again.
-
If you make an error in typing and decide you want to clear everything and start again, you can do this by pressing the <Alt>-C key combination to activate the "CLEAR" command button. The SEID and password are cleared, and you can re-enter them.
-
There is a limit as to how many times you can try to login and fail (this parameter is set locally by your SA). If you exceed the number of allowable login attempts, you are locked out of the system database, but the workstation is not locked. An "Error Message Window" opens informing you that you are locked out and instructs you to contact your Supervisor. If this occurs, press the <Enter> key to acknowledge the message and contact your Supervisor or SA to unlock your profile to regain access to the system.
-
If you forget your password or have problems logging onto the scanner, contact the SA.
-
If you type your password in the "SCRIPS - Server Login" window and press the <Alt>-L key combination and a message window opens and informs you that your password has expired, you must select a new password. First, press the <Enter> key to "OK" the message. The message window closes and the "SCRIPS Password List" window opens. The "SCRIPS Password List" window has a list of five passwords, and each is composed of eight alphanumeric and special characters. You must pick one from the list, type it in and press the <Enter> key. The system will then prompt you to retype the password a second time to verify your choice. Type the same password in again and press the <Enter> key. The "SCRIPS Password List" window closes, and a message window opens informing you that your password has been changed. Press the <Enter> key to acknowledge this message. The message window closes and the "Authorization Disclaimer" window opens.
-
-
If your login is correct, the "Authorization Disclaimer" window opens.
Figure 3.41.275-3
AUTHORIZATION DISCLAIMER This system is for the use by authorized users only. Individuals using
this computer system without authority, or in excess of their authority, are
subject to having all of their activities on this system monitored and
recorded by system personnel.In the course of monitoring individuals who are improperly using this
system, or in the course of systems maintenance, the activities of authorized
users may also be monitored.Anyone using this system expressly consents to such monitoring, and is
advised that if such monitoring reveals possible evidence of criminal
activity, system personnel may provide the evidence of such monitoring
to law enforcement officials.Press <Enter> or click OK to continue OK -
Read the entire "Authorization Disclaimer" .
-
Press the <Enter> key or click OK to exit the "Authorization Disclaimer" window.
-
The "SCRIPS Run Selections" screen displays.
-
To scan, you must first click "SCRIPS" on the left of the screen to display the "SCRIPS Run Selections Menu" which lists the seven different applications available.
-
There are seven applications listed in the "SCRIPS Run Selections Menu" . They are listed as follows:
-
940
-
941
-
IRP
-
IRP-ACA
-
K-1
-
RE-IMAGE
-
94X Stand-Alone
-
-
Select the option number of the application you want to scan or use the <↑>, <↓>, <←>, <→> arrow keys or mouse to highlight the application you want to scan and press the <Enter> key.
-
A message is then displayed to confirm the selection. Type "Y" or click "Yes" to continue and the loading application screen displays. Type "N" or click "No" to return to the "SCRIPS Run Selections Menu" to make a different selection.
-
After the selected application software is loaded, the "SCRIPS - Category Selection Menu" for the selected application displays.
-
The RE-IMAGE application does not utilize a "SCRIPS - Category Selection Menu" . When scanning RE-IMAGE, the application sends a message to the IC that re-image is invoked and requests a pick list from the Server of DLNs that need to be re-imaged. The IC suspends all current applications that are running and gets the "RE-IMAGE PICK LIST FILE" from the Server. Once the pick list is loaded, the Scanner Operator is presented with the "Re-Image DLN Selection" screen to select the document to be imaged. The DLN Number is matched to the pick list to verify there is a match within the file. Upon selection of a DLN Number, the Scanner Operator is prompted to handfeed the document selected for re-image.
-
When scanning IRP and ACA IRP, use the mouse, the <↑>, <↓>, <←>, <→> arrow keys or <Tab> key to highlight the correct application category in the "SCRIPS - Category Selection Menu" and press <Enter>. Then <Tab> to the "OK" button and press <Enter> or click the "OK" button and the "Loading Application" screen displays. When the application is loaded, the associated "Scanning Window" opens.
-
When scanning 940 and 941, use the mouse, the <↑>, <↓>, <←>, <→> arrow keys or <Tab> key to highlight the correct application category in the "SCRIPS - Category Selection Menu" and press <Enter>. Press <Tab> and enter the two-digit Cycle Number; then press <Tab> again and re-enter the two-digit Cycle Number in the Confirm Cycle Number box. Press <Tab> and enter the Batch Number; then press <Tab> again and re-enter the Batch Number in the Confirm Batch Number box. Then <Tab> to the OK button and press <Enter> or click on the "OK" button and the "Loading Application" screen displays. When the application is loaded, the associated Scanning Window opens.
-
When scanning K-1, use the mouse, the <↑>, <↓>, <←>, <→> arrow keys or <Tab> key to highlight the correct application category in the "SCRIPS - Category Selection Menu" and press <Enter>. Press <Tab> and enter the Cycle Number; then press <Tab> again and re-enter the Cycle Number in the Confirm Cycle Number box. Press <Tab> and enter the Batch Number; then press <Tab> again and re-enter the Batch Number in the Confirm Batch Number box. Press <Tab> and enter the Tax Year; then press <Tab> again and re-enter the Tax Year in the Confirm Tax Year box. Then <Tab> to the "OK" button and press <Enter> or click on the "OK" button and the "Loading Application" screen displays. When the application is loaded, the associated Scanning Window opens.
-
When scanning 94X Stand-Alone Schedule R, use the mouse, the <↑>, <↓>, <←>, <→> arrow keys or <Tab> key to highlight the correct application category in the "SCRIPS - Category Selection Menu" and press <Enter> Press <Tab> and enter the Tax Year; then press <Tab> again and re-enter the Tax Year in the Confirm Tax Year box. When scanning 943 with Schedule R attached, Enter the 14-digit DLN stamped in the top right corner of the Form 943. Then <Tab> to the "OK" button and press <Enter> or click on the "OK" button and the "Loading Application" screen displays. When the application is loaded, the associated Scanning Window opens.
-
For all programs, the "Serializer" automatically moves to the correct "Page Location" .
-
The scanner is ready to start scanning. Load the appropriate batches into the feeder and either press the <AUTOFEED START> button or <Spacebar> key to begin scanning when ready.
-
While scanning, it may be necessary to adjust the scanner.
-
Check the feeder to see if adjustments are necessary.
-
Front Stack Guide - with documents face up and top of document towards back of scanner, adjust the front stack guide in alignment with the bottom of the documents.
-
-
The feeder speed is adjusted by pressing and holding the AUTOFEED START button to the left of the FEED STOP/FLUSH button.
-
The feeder speed can only be adjusted while the feeder is stopped.
-
Each run job is started using the default maximum feeder speed.
-
Initially, the feeder speed can only be decreased.
-
If the feeder speed has been decreased during the run job, then it can be increased to the default maximum level.
-
-
The "Application Software" automatically sets the correct double document detect sensor for the job loaded.
-
If numerous double detect error messages are encountered, contact SSME or SA.
-
If there are numerous false double detect error messages, contact the SSME or SA.
-
Retrieve the documents to be scanned from the staging area for your Submission Processing Site.
-
Make sure the documents are perfected before placing them in the feeder to ensure the system runs smoothly.
-
Remove the IRP, ACA IRP, Schedule K-1, Stand-Alone Schedule R, Form 940, or Form 941 documents that are in boxes or on trucks.
-
Check the documents for the following:
-
Staples
-
Folded edges
-
Perforated side edges that have not been detached
-
Continuous sheets that have not been separated
-
Holes and/or tears
-
Attachments (bank tapes, correspondence, scotch tape, envelopes, etc.)
-
Upside down or backward documents
-
-
Use the jogger to straighten edges and reduce static.
-
Place the documents in the jogger.
-
Rotate the documents 90 degrees at a time until the edges are straight.
-
Remove the documents from the jogger.
-
-
Place the documents in the feeder face up with the bottom of the form closest to you.
-
Ensure that all documents in the feeder are straight.
-
The feeder draws from the top document when scanning. Documents added to the feeder should be placed under the stack currently loaded.
-
Begin to process the documents through the scanner.
-
Periodically during scanning, monitor the IC to ensure the counters are advancing and all indicator area boxes are green.
-
Also, while running a job, periodically monitor image quality of the documents being scanned by looking at the "BancTec IntelliScan XDS Job" window, that is continually displayed on the "Operator Console."
-
When scanning IRP, follow the procedures listed below.
-
There are four menu options for IRP, select one of the following:
-
IRP—Regular—Use this option for scannable submissions of Form 1096 with their associated Form 1097 series, Form 1098 series, Form 1099 series, Form 3921, Form 3922, Form 5498 series and Form W-2G. This option accepts nonconforming forms, including photocopies and homemade forms, as long as the form is scannable (i.e., the form is 8″ or 8 1/1″ x 11″ and is not torn or otherwise mutilated). These constitute the bulk of IRP processing.
-
IRP—Original Entry—Use this option to force all documents to OE Image at the workstations.
-
IRP—1096 Image Only—Use this option for any Form 1096 that are input on Integrated Remittance Processing System (ISRP) as well as Form 1096 scanned on SCRIPS but need to be re-imaged. These are scanned only for purposes of capturing an image for archive.
-
IRP—Manual Feed (Key DocId) Use this option for nonconforming forms/submissions that were rejected under the "IRP–Regular" option. These may include photocopies, homemade forms, and forms without a document code at the top of the page, etc. With changes made to the "IRP–Regular" process, this option is no longer necessary. However, it may still be used in some circumstances.
-
-
The first document imaged MUST be a drop-out ink Form 1096.
-
<Tab> to the "OK" button and press <Enter> or click on the "OK" button. The "Serializer" automatically moves to the correct "Page Location." Verify that the "Serializer" is in the correct position (See IRM 3.41.275.5.13.1.1). Press the <AUTOFEED START> button or <Spacebar> to continue.
-
If you selected "IRP-Regular" , "IRP-Original Entry" , or "IRP-1096 Image Only" in (2) above, the feeder then begins sending the documents through the transport.
-
If you select "IRP-Manual Feed (Key DocId)" in (2) above, you must enter a document code for each manual entry.
-
Click on the correct form type from the drop down window click on the four character 1099, 1098, or 5498 document code for the submission you are scanning from the table below:
Form Document Code 1096 6969 1097-BTC 5050 1098 8181 1098-C 7878 1098-E 8484 1098-F 0303 1098-Q 7474 1098-T 8383 1099-A 8080 1099-B 7979 1099-C 8585 1099-CAP 7373 1099-DA 7A7A 1099-DIV 9191 1099-G 8686 1099-INT 9292 1099-K 1010 1099-LS 1616 1099-LTC 9393 1099-MISC 9595 1099-NEC 7171 1099-OID 9696 1099-PATR 9797 1099-Q 3131 1099-QA 1A1A 1099-R 9898 1099-S 7575 1099-SA 9494 1099-SB 4343 3921 2525 3922 2626 5498 2828 5498-ESA 7272 5498-QA 2A2A 5498-SA 2727 W-2G 3232 -
Then feed the Form 1096 and associated forms from that submission through the Scanner.
-
-
The "Serializer" prints a 14-digit DLN on the Form 1096, 16-digit DLN on IRP forms that are two to a page, or 18-digit DLN on IRP forms that are three to a page. If the form type code was not recognized, a six-digit number is assigned, and the document goes to Form Identification (FI) Function.
-
Continue putting the documents into the feeder until you have completed a box or tub, except when scanning "IRP-Manual Feed (Key DocId)."
-
If you selected "IRP-Regular" , "IRP-Original Entry" , or "IRP-1096 Image Only" in (2) above, press the <F3> key when you have completed scanning. The "End Batch Menu" prompts:
-
Start a New Batch
-
Quit Scanning – Close out the Run
-
-
If you selected "IRP-Manual Feed (Key DocId)" in (2) above, press the <F3> key to get the message "Enter Next Form Type to Process: nn or Q to Quit" , then press "Q" to quit, and <Enter> when you have completed scanning.
-
When selecting "Quit" , the "IRP Assigned DLN Report" and the "Scanner Statistics Report" generate but do not automatically print. The reports are available for print on demand.
-
Per local procedures, list the julian date and the starting/ending block numbers of each tub or box scanned.
-
Select IRP from the "Job Selection Menu."
-
The "IRP Category Selection Menu" appears.
-
Select "IRP– 1096 Image Only" from the "IRP Category Selection Menu" .
-
The message "Receiving DLN Confirmation" appears.
-
Load the feeder with the IRP Form 1096 that need to be re-imaged.
-
Press the <AUTOFEED START> button or <Spacebar> to feed the Form 1096 through the transport. Once the scanner has finished loading the information, it automatically starts feeding documents and scanning. Be sure documents are in the feeder by this time.
-
The re-imaged Form 1096 is sent to the Workstation Operators. The Workstation Operator enters the DLN from the imaged Form 1096.
-
After all the Form 1096 are re-imaged for the day, press the <F3> key to end the job.
-
The "End Batch Menu" prompts:
-
Start a New Batch
-
Quit Scanning – Close out the Run
-
-
When scanning ACA IRP, follow the procedures listed below.
-
There are four menu options for ACA IRP, select one of the following:
-
ACA IRP - Use this option for scannable submissions of Form 1094 series with their associated Form 1095 series. This option accepts nonconforming forms as long as the form is scannable (i.e., the form is "8 ½ x 11" and is not torn or otherwise mutilated). These constitute the bulk of ACA IRP processing.
-
ACA IRP - Original Entry - Use this option to force all documents to OE Image at the workstations.
-
ACA IRP - 1094 Image Only - Use this option for any Form 1094 series that are input on ISRP as well as Form 1094 scanned on SCRIPS, but that need to be re-imaged. These are scanned only for purposes of capturing an image for archive.
-
ACA IRP - Manual Feed - Use this option for nonconforming forms/submissions that were rejected under the "ACA IRP – Regular" option. These may include forms that were scanned backwards, forms without a clear image in the 1094 series.
-
-
The first document imaged must be a Form 1094 series.
-
<Tab> to the "OK" button and press <Enter> or click on the "OK" button. The "Serializer" automatically moves to the "Page Location" . Verify that the "Serializer" is in the correct position (See IRM 3.41.275.5.10.1.3). Press the <AUTOFEED START> button or <Spacebar> to continue.
-
If you selected "ACA IRP-Regular" , "ACA IRP-Original Entry" , or "ACA IRP- 1094 Image Only" in (2) above, the feeder begins sending the documents through the transport.
-
The "Serializer" prints a 14-digit DLN on the Form 1094 and the Form 1095 series returns. If the form identifier (Form ID) was not recognized, a six-digit number is assigned, and the document goes to Forms Identification (FI).
-
Continue putting the documents into the feeder until you have completed a box or tub.
-
If you selected "ACA IRP-Regular" , "ACA IRP-Original Entry" , or "ACA IRP-1094 Image Only" in (2) above, press the <F3> key when you have completed scanning. The "End Batch Menu" prompts:
-
Start a New Batch
-
Quit Scanning – Close out the Run
-
-
If you selected "ACA IRP Manual Feed" in (2) above, press the <F3> key to get the message "Enter Next Form Type to Process: nn or Q to Quit" , then press "Q" to quit, and <Enter> when you have completed scanning.
-
When selecting "Quit" , the "Scanner Statistics Report" is sent to the printer and the "ACA IRP Assigned DLN Report" generates but does not automatically print. The report is available for print on demand.
-
Per local procedures, list the julian date and the starting/ending block numbers of each tub or box scanned.
-
Select ACA IRP from the "Job Selection Menu" .
-
The "ACA IRP Category Selection Menu" appears.
-
Select "ACA IRP- 1094 Image Only" from the "ACA IRP Category Selection Menu" .
-
The message "Receiving DLN Confirmation" appears.
-
Load the feeder with the ACA IRP Form 1094 that need to be re-imaged.
-
Press the key to feed the Form 1094 through the transport. Once the scanner has finished loading the information, it automatically starts feeding documents and scanning. Be sure documents are in the feeder by this time.
-
The re-imaged Form 1094 is sent to the Workstation Operators. The Workstation Operator enters the DLN from the imaged Form 1094.
-
After all the Form 1094 are re-imaged for the day, press the <F3> key to end the job.
-
The "End Batch Menu" prompts:
-
Start a New Batch
-
Quit Scanning – Close out the Run
-
-
When scanning Schedule K-1, follow the procedures listed below.
-
Select the proper form type from the "Schedule K-1 Category Selection Menu" . There are three options:
-
Form 1041 Schedule K-1 (44386)
-
Form 1065 Schedule K-1 (44387)
-
Form 1120-S Schedule K-1 (44388)
-
-
<Tab> to the "Cycle Number" and enter the two-digit cycle in the "Cycle Number" and "Confirm Cycle Number" fields. This require two consecutive matching entries.
-
<Tab> to the "Batch Number" and enter the four-digit batch number into the "Batch Number" and "Confirm Batch Number" fields cycle. This requires two consecutive matching entries.
-
Enter the two-digit "Tax Year" and "Confirm Tax Year" . This requires two consecutive matching entries. "Tax Year" must be current TY to current TY minus 2 (TY-2).
-
<Tab> to the "OK" button and press <Enter> or click the "OK" button. The "Serializer" automatically moves to the "K-1 Page Location" . Verify that the "Serializer" and "Stacker" are in the correct position.
-
Place documents into the feeder. The first document scanned must be a Form 1332-SC, Block and Selection Record. Press the <AUTOFEED START> button or <Spacebar> to continue. The feeder begins sending the documents through the transport.
-
The "Serializer" prints a 14-digit DLN on each page 1 document. If the form type code was not recognized, a six-digit number is assigned, and the document goes to Form Identification (FI).
-
Continue putting the documents into the feeder tray until you have completed a box or tub.
-
Monitor the stacker bins. When they are full, remove documents. Place documents back into their boxes or tubs.
-
When you have completed scanning the batch, or if you are ready to stop scanning, and you have an empty feeder, press <F3> to end the job.
-
The "End Batch Menu" prompts:
-
Start a New Batch
-
Quit Scanning – Close out the Run
-
-
When selecting "Quit" , the "K-1 Assigned DLN Report with additional Summary Page" and "Scanner Statistics Report" is generated and sent to the printer.
-
When scanning Form 941, follow the procedures listed below.
-
Select the proper form type from the "941 Category Selection Menu" window. There are six options:
Batch Type Description Program Number 941 Perfects Refunds 11206 941 Perfects Non-Refund/Others 11205 941 Perfects Non-Refund/With Remit 11208 941 Imperfects Refunds 11206 941 Imperfects Non-Refund/Other 11205 941 Imperfects Non-Refund/With Remit 11208 -
<Tab> to the "Cycle Number" and enter the two-digit cycle in the "Cycle Number" and "Confirm Cycle Number" fields. This requires two consecutive matching entries.
-
Use the criteria in the table below to determine when the cycle needs to be entered.
IF THEN The Batch ID (on the left side of the Form 9382, Batch Transmittal, below the File indicator) is notated "Program Completion Date (PCD)" or "Timely (T)" Press <Enter> to leave the cycle blank The Batch ID (on the left side of the Form 9382, Batch Transmittal, below the File indicator) is notated other than"PCD" or "Timely (T)" Input the last two-digits of the cycle on the right side of Form 9382, Batch Transmittal, below the Batch No and Rel. Date. -
<Tab> to the "Batch Number" and enter the four-digit batch number into the "Batch Number" and "Confirm Batch Number" fields. This requires two consecutive matching entries.
-
<Tab> to the "OK" button and press <Enter> or click the "OK" button. The "Serializer" automatically moves to the "941 Page Location" . Verify that the "Serializer" and "Stacker" are in the correct position.
-
Place documents into the feeder. The first document scanned must be a Form 941 Page 1 if scanning "Perfects" or a Form 1332-SC if scanning "Imperfects" . Press the <AUTOFEED START> button or <Spacebar> to continue. The feeder begins sending the documents through the transport.
-
The "Serializer" prints a 14-digit on each page that is recognized. If the form type code was not recognized, a six-digit number is assigned, and the document goes to Forms Identification (FI).
-
Continue putting the documents into the feeder tray until you have completed a box or batch.
-
Monitor the stacker pockets. When they are full, remove documents. Place documents back into their boxes or gusset folders.
-
Documents sent to the "Reject Bin" should be placed in a colored folder in the first slot on the batch cart or the first stat box for each batch with the Batch Transmittal.
-
When you have completed scanning the batch, or if you are ready to stop scanning, press the <F3> key to end the job.
-
The "End Batch Menu" prompts:
-
Start a New Batch
-
Quit Scanning - Close out the Run
-
-
When selecting "Quit" , a "941 Assigned DLN Report and additional Summary Page" is sent to the printer and a "Scanner Statistics Report" generates but does not print. The report is available for print on demand.
-
When scanning Form 940, follow the procedures listed below.
-
Select the proper form type from the "940 Category Selection Menu" window. There are six options:
Batch Type Description Program Number 940 Perfect All Others 11140 940 Perfect Refund 11141 940 Perfect With Remit/Lockbox 11142 940 Imperfect All others 11145 940 Imperfect Refund 11146 940 Imperfect With Remit/Lockbox 11147 -
<Tab> to the "Cycle Number" and enter the two-digit cycle in the "Cycle Number" and "Confirm Cycle Number" fields. This requires two consecutive matching entries. The cycle is in the top right corner of the Form 9382, Batch Transmittal, below the Batch Number and Release Date.
-
Use the criteria in the table below to determine when the cycle needs to be entered.
IF THEN The Batch ID (on the left side of the Form 9382, Batch Transmittal, below the File indicator) is notated "Program Completion Date (PCD)" or "Timely (T)" Press <Enter> to leave the cycle blank. The Batch ID (on the left side of the Form 9382, Batch Transmittal, below the File indicator) is notated other than"PCD" or "Timely (T)" Input the last two-digits of the cycle on the right side of Form 9382, Batch Transmittal, below the Batch No and Rel. Date. -
<Tab> to the "Batch Number" and enter the four-digit batch number in the "Batch Number" and "Confirm Batch Number" fields. This requires two consecutive matching entries.
-
<Tab> to the "OK" button and press <Enter> or click the "OK" button. The "Serializer" automatically moves to the "940 Page Location" . Verify that the "Serializer" and "Stacker" are in the correct position.
-
Place documents into the feeder. The first document scanned must be Form 940 Page 1 if scanning "Perfects" or a Form 1332-SC if scanning "Imperfects" . Press the <AUTOFEED START> button or <Spacebar> to continue. The feeder begins sending the documents through the transport.
-
The "Serializer" prints a 14-digit page that is recognized. If the form type code was not recognized, a six-digit number is assigned, and the document goes to Forms Identification (FI).
-
Continue putting the documents into the feeder tray until you have completed a box or batch.
-
Monitor the stacker bins. When they are full, remove the documents. Place documents back into their boxes or gusset folders.
-
Documents sent to the "Reject Bin" should be placed in a colored folder in the first slot on the batch cart or the first stat box for each batch with the Batch Transmittal.
-
When you have completed scanning the batch, or if you are ready to stop scanning, press the <F3> key to end the job.
-
The "End Batch Menu" prompts:
-
Start a New Batch
-
Quit Scanning – Close out the Run
-
-
When selecting "Quit" , a "Form 940 Assigned DLN Report and additional Summary Page" is sent to the printer and a "Scanner Statistics Report" is generated, but not printed. The report is available for print on demand.
-
When scanning Stand-Alone Schedule R, follow the procedures listed below.
-
Select the proper form type from the "Stand-Alone Schedule R Category Selection Menu" window. There are four options:
Batch Type Program Number 943 with Schedule R 11620 940 Schedule R 11620 941 Schedule R 11620 943 Schedule R 11620 -
Enter the two-digit "Tax Year" in the "Tax Year" and "Confirm Tax Year" fields. This requires two consecutive matching entries.
-
Enter the 14-digit DLN stamped in the top right corner of the Form 943 when scanning 943 with Schedule R attached.
-
<Tab> to the "OK" button and press <Enter> or click the "OK" button. The "Serializer" automatically moves to the "941 Page Location" . Verify that the "Serializer" and "Stacker" are in the correct position.
-
Place documents into the feeder. The first document scanned must be a Page 1 of Form 941, Form 940 or Form 943. Press the <AUTOFEED START> button or <Spacebar> to continue. The feeder begins sending the documents through the transport.
-
The "Serializer" prints a 14-digit DLN on each page that is recognized. A six-digit number is assigned if the form type code was not recognized, and the document goes to Form Identification (FI).
-
Continue putting the documents into the feeder tray until you have completed a box, tub or gusset.
-
Monitor the stacker pockets. When they are full, remove documents. Place documents back into their boxes, tubs or gusset folders.
-
Documents sent to the "Reject Bin" should be placed in a colored folder in the first slot on the batch cart or the first stat box for each batch with the Batch Transmittal.
-
When you have completed scanning the batch, or if you are ready to stop scanning, press the <F3> key to end the job.
-
The "End Batch Menu" prompts:
-
Start a New Batch
-
Quit Scanning - Close out the Run
-
-
When selecting "Quit" , a "Schedule R Assigned DLN Report and additional Summary Page" is sent to the printer and a "Scanner Statistics Report" is generated, but not printed. The report is available for print on demand.
-
On occasion while scanning you may need to temporarily pause the feeding of documents. To do this press the <Spacebar>, the orange FEEDSTOP/FLUSH button or either of the FEEDSTOP/START buttons at the stackers. The feeder stops and the transport clears.
-
To resume scanning, press the <Spacebar>, either AUTOFEED START button, or FEEDSTOP/START button at the stackers (this is helpful when you are emptying the stacker bins, you can restart the feeder from here instead of having to walk back to the front of the scanner).
-
After a scanner failure, the SA notifies you when you may continue scanning. Follow procedures to Login (See IRM 3.41.275.5.8) and Running a Job (See IRM 3.41.275.5.9.2).
-
If the scanner was in the middle of scanning a Block/Unit-of-work (UW) when it failed, you must:
-
Go to the stacker bin and find the last transmittal document scanned (DLN/SN present) and all the documents associated with it.
-
Check the "Reject Bin" for any documents and remove them.
-
Always check the last block scanned from the scanner failure (freeze, crash, etc.) to see if it is on the system. If the block is not there, send the block back through for rescan. Make sure the block before that is on the system. Most of the time, failures only involve the block it crashed on, but there are occasions, if the blocks are small, it could involve more than one block.
-
Tape over or line through the old DLN on IRP, K-1, 940, 941, Schedule R documents prior to rescanning.
-
Rescan the Block/UW.
-
-
Regular scanning may be resumed with the next completely unscanned Block/UW (no DLNs/SNs are on the documents).
-
A jam condition occurs when there is an irregularity with one of the processes or when a document gets caught somewhere in the transport.
-
When a jam occurs perform the following:
-
Remove the documents
-
Use the "BancTec Viewer Screen" on the "Operator Console" to help in recovering from the jam
-
-
Use the following steps to remove documents after a jam.
-
Remove the documents from the reject pocket.
-
Check the stacker pockets for documents that have not been numbered.
-
Locate and manually remove the documents from the transport by pressing the FEEDSTOP/FLUSH button to clear the transport.
-
-
The "Peripheral Server" software runs without operator intervention and manages the flow of data from the scanner image capture to a disk on the scanner and then over to the IC.
-
The "Peripheral Server Window" , in the bottom left corner on the "Operator Console" should always display the status, "Waiting for Data from the Scanner" . If it does not, contact the SA.
-
Periodically removing the documents from the stacker bins prevents the scanner from stopping because the pockets are full. Remove the documents as follows:
-
Remove the documents by pulling them straight towards you.
-
Ensure that the documents stay in the order they were scanned.
-
Straighten the documents.
-
Fan the documents to ensure all documents have a legible DLN/SN.
-
-
Place the documents as follows:
-
IRP in boxes.
-
ACA IRP in boxes.
-
Schedules K-1 in boxes or in gusset folders on batch carts.
-
Form 941 in boxes or in gusset folders on batch carts.
-
Form 940 in boxes or in gusset folders on batch carts.
-
Stand-Alone Schedule R in boxes or in gusset folders on batch carts.
-
-
Return the scanned documents to the area where your Submission Processing Site stores completed work.
-
You end your job when:
-
You complete a batch of (Stand-Alone Schedule R/K-1/940/941) or box or tub of IRP/ACA IRP.
-
You want to scan a different type of document.
-
You want to scan a different category of documents.
-
You need to leave the scanner for an extended time (lunch, meeting, etc.).
-
You need to generate a report.
-
Your shift has ended.
-
-
You end your job by doing the following:
-
Ensure that the feeder is empty.
-
Press the <F3> key. The "End Batch Menu" prompts to either Start a New Batch or Quit Scanning - Close out the Run.
-
If you answer "Quit" the following reports generate:
Form Type Printed Reports ACA IRP ACA IRP Scanner Statistics Report IRP IRP Scanner Statistics Report K-1 K-1 Assigned DLN Report, Summary page, and Scanner Statistics Report 941 941 Assigned DLN Report and Summary Page 940 940 Assigned DLN Report and Summary Page Stand-Alone Schedule R Stand-Alone Assigned DLN Report and Summary Page -
The "Scanner Jam Report" is also generated; however, it can only be printed from the back-end menus.
-
-
If you want to logoff the scanner, do the following:
-
You must first end your job, as described above, before you can logoff.
-
In the "Run Selection Window" click on the "Close TRP" icon in the lower right corner of the screen. A "Yes or No box" is displayed. Answer "Yes" to close the application and logoff.
-
-
If you want to shut down the scanner, do the following:
-
You must first end your job and log off before you can shut down the scanner.
-
On the "Operator Console" , press the <Ctrl>, <Alt> and the <Del> keys all at the same time.
-
The "Windows 7 Security Window" is displayed. Using the <↑>, <↓>, <←>, <→> Arrow keys or the <Tab> key, highlight the Shut Down button and press the <Enter> key. If it is already highlighted, press the <Enter> key.
-
The "Windows 7 Shut Down Window" is then displayed. Select Shut Down in the selection scroll window box. Highlight the "OK" button and press <Enter> key.
-
Press the ON/OFF POWER button underneath the RED STOP button. This turns off the lights and vacuum.
-
Click once on the "Scanner Disconnect" button in the "Command Area" of the IC monitor screen to disconnect the Scanner from the IC.
-
-
Reports are used to keep a record of problems and production.
-
Fill out Unscheduled Maintenance Reports (UMRs).
-
Get DLN/SN assigned reports from the laser printer.
-
Fill out the customer evaluation performance sheet when requested.
-
Distribute all the reports to the proper personnel.
-
You should perform the following housekeeping tasks at the end of your shift.
-
Use the air gun to dust off the desk rollers in the document feeder and image camera.
-
Put the materials that you used back where they belong.
-
Wipe down the glass of the camera with a lint free cloth.
-
-
You must contact the Systems Analyst (SA) or (System Subject Matter Expert) SSME with any scanning problems or concerns.
-
Contact the SA for software problems.
-
Contact the SSME for transport and hardware problems.
-
-
Notify the manager that there is a problem.
-
Record problem on an UMR.
-
Switch to another scanner if available (check with your Manager).
-
Follow local procedures to ensure the FTD (Federal Tax Deposit) Cycle Number has been changed. Even though FTDs are not processed any longer, the Cycle Number is needed for the BMF processing sites. From DLN Maintenance window, tab down to the FTD Cycle.
-
Changing the FTD Cycle is accomplished from a workstation terminal.
-
To log onto a workstation terminal, do the following:
-
Read the "Warning Screen" and press the <Esc> key to continue.
-
Enter your Login ID. ("S" followed by your SEID)
-
Enter your password.
-
Press the <Alt>–L key combination.
-
Read the "Authorization Disclaimer" window and press the< Esc> key to continue.
-
The "Workstation Main Menu" appears.
-
-
Tab down to the "FTD Current Cycle" selection. The current cycle and the date it was last updated is highlighted.
-
To change the cycle, press the <Alt>-R key combination.
-
The message "Are you sure you want to roll over the current FTD processing Cycle Number Y/N" displays. Make sure the cycle needs to be rolled forward before you continue because it cannot be rolled back.
-
Press "Y" for yes. The "FTD Cycle Number" increments by one.
-
To exit from the workstation terminal, use the following procedures:
-
Press the <Alt>-X key combination to go to the "Additional Function Selection Menu."
-
Press the <Alt>-X key combination to go to the "Workstation Main Menu."
-
Press the <Alt>-X key combination to exit from the "Workstation Main Menu."
-
-
This section provides instructions for responding to error messages.
-
Feeder Empty - If the feeder hopper is empty, place new documents in the feeder and press <Spacebar> to continue. If there are no more documents, press <F3> to end the job.
-
Document Late to Aligner Entrance Sensor (1.1) - A document is late arriving to the sensor after being detected at the previous sensor. Check the paper path leading to the sensor and remove any obstructions, then clean both sides of the sensor. Check the condition of the document, then correct any problems found. Check the transport for debris. Clean the transport around the sensor. Hand feed remaining documents and restart the feeder.
-
Gap too Narrow at the Aligner Entrance Sensor (2.71) - This message means the gap between the documents as they passed through the area is too small. Remove all documents from the track and flush the transport. Hand feed remaining documents and restart the feeder.
-
Double feed detected. Documents held at the handfeed track (0.125) - The double feed sensors have detected two pieces of paper are trying to go through the sensors at one time. Remove all paper from track and verify the documents are not stapled, paper clipped, or otherwise stuck together. Hand drop all removed documents and restart the feeder.
-
Unexpected Item Detected at Dbl Feed exit sensor (3.2) - This jam occurs when the current sensor sees a document the previous sensor did not see. Remove all documents from the track and flush the transport. Clean both sides of the sensor before the sensor displayed in the message. Hand feed remaining documents and restart the feeder.
-
Bin Full - Check the "Bin Full Indicator" buttons above the stacker or the graphic figure on the console to identify the stacker that is full.
-
Remove the documents from the full stacker bin(s).
-
Press one of the FEED STOP/START buttons or the <Spacebar> or AUTOFEED START button to restart the transport.
-
The scanner prints a one-character reject code to the left of the DLN area on any form that is rejected. The reject codes and descriptions are shown below. If more than one code is printed, you must decide whether the submission can be corrected and re-scanned or routed to the Pre-Document Preparation (Pre-Doc Prep) function. Although each truly rejected page has a reject code printed on it, not all the pages in the reject bin have a reject code. At the time a page is rejected with a reject code, any pages within the transport mechanism may be flushed to the reject bin as well. These flushed pages do not have a reject code.
-
This section covers error messages specific to each application.
-
The "Regular" , "Original Entry" , and "1096 Image Only" scanner applications accept nonconforming forms. A nonconforming form is any form that the scanner cannot recognize, and therefore cannot assign a DLN. For nonconforming forms, a six-digit FI sequence number prints in lieu of a DLN. The sequence number, like the DLN, is used by the scanner operator to identify rejected forms that need to be re-fed.
-
IRP error messages are as follows:
Error Message Explanation Action Invalid Submission—Consecutive 1096 check Reject and Accept bin Reject Code = "X" —There is a Form 1096 immediately following a Form 1096.
A transmittal immediately followed by another transmittal.-
Remove the Form 1096 from the stacker bins. Remove all documents down to the Form 1096 in the reject bin that have an "X" printed in the upper middle of the document.
-
If a determination can be made that one of the Form 1096 belongs to the Form 1099 (or any IRP Form) for the submission, route the unrelated Form 1096 to the Pre-Doc Prep function, and re-feed the related Form 1096 along with any rejected documents.
-
If a determination cannot be made, route both Form 1096 and Form 1099 (or any IRP Form) that were behind the Form 1096 in the reject bin to the Pre-Doc Prep function.
Document (XXXX) is rejected, incorrect form type Reject Code = "M" , the scanner rejects a document when the document type does not match selected form type. If there is a mixture of form types, route the rejected documents to the Pre-Doc Prep function. -
-
The "ACA IRP" , "Original Entry" , and "1094 Image Only" scanner applications accept nonconforming forms. A nonconforming form is any form that the scanner cannot recognize, and therefore cannot assign a DLN. For nonconforming forms, a six-digit FI sequence number prints in lieu of a DLN. The sequence number, like the DLN, is used by the scanner operator to identify rejected forms that need to be re-fed.
-
ACA IRP error messages are as follows:
Error Message Explanation Action Invalid Submission—Consecutive 1094 check Reject and Accept bin Reject Code = "X" - When there is a Form 1094 series immediately following a Form 1094 series.
A transmittal immediately followed by another transmittal.-
Remove the Form 1094 from the stacker bins. Remove all documents down to the Form 1094 in the reject bin that have an "X" printed in the upper middle of the document.
-
If a determination can be made that one of the Form 1094 belongs to the Form 1095 for the submission, route the unrelated forms to the Pre-Doc Prep function, and re-feed the related Form 1094 along with any rejected documents.
-
If a determination cannot be made, route both Form 1094 and Form 1095 that were behind the Form 1094 in the reject bin to the Pre-Doc Prep function.
Invalid Submission—Missing Page 1 Reject Code = "X"
A Form 1094-C page 2 or page 3-
Remove the returns from the reject stacker bin. Remove all documents down to the page in error in the reject bin that have an "X" printed in the upper middle of the document.
-
If a determination can be made that one of the pages is blank and not needed, remove the page from the submission and continue scanning.
-
If pages are present that are not part of the submission, route the unrelated forms to the Pre-Doc Prep function, and re-feed the related Form 1094 along with any rejected documents.
-
If a determination cannot be made, route both Form 1094 and Form 1095 that were behind the Form 1094 in the reject bin to the Pre-Doc Prep function.
Waiting to Resolve Invalid Submission Reject Code = "X" Resolve the invalid condition by examining the UW and determining what actions to take listed above. -
-
The "Form 1041 Schedule K-1" , "Form 1065 Schedule K-1" , and "Form 1120S Schedule K-1" scanner applications accept nonconforming forms. A nonconforming form is any form that the scanner cannot recognize, and therefore cannot assign a DLN. For nonconforming forms, a six-digit FI sequence number prints in lieu of a DLN. The sequence number, like the DLN, is used by the scanner operator to identify rejected forms that need to be re-fed.
-
K-1 error messages are as follows:
Error Message Explanation Action Document rejected, breaker sheet is missing The first scanned document was not recognized as a Form 1332, Transmittal/Breaker Sheet. Remove document from Reject Bin and ensure the first scanned document is a Form 1332. Document is rejected, received consecutive breaker sheets There is a Form 1332 immediately following a Form 1332. Remove the document from Reject Bin. Document (XXXX) is rejected, incorrect form type Reject Code = "M" , the scanner rejects a document when the document type does not match selected form type. If there is a mixture of form types, route the rejected documents to the Pre-Doc Prep function. Document is rejected, UW exceeds 100 There are more than 100 documents in this block of work. Remove documents from Reject Bin, and insert breaker sheet.
-
The Form 941 scanner applications accept nonconforming forms. A nonconforming form is any form that the scanner cannot recognize, and therefore cannot assign a DLN. For nonconforming forms, a six-digit FI sequence number prints in lieu of a DLN. The sequence number, like the DLN, is used by the scanner operator to identify rejected forms that need to be re-fed.
-
941 Error Messages are as follows:
Error Message Explanation Action Document is rejected, first document must be a Page 1 or breaker sheet The first scanned document was not recognized as a Form 941 Page 1 or a Form 1332, Transmittal/Breaker Sheet. Remove document from Reject Bin and ensure the first scanned document is a Form 941 Page 1 or a Form 1332. If necessary, insert a blank Page 1 or Form 1332. Document is rejected, received consecutive breaker sheets There is a Form 1332 immediately following a Form 1332. Remove the document from Reject Bin. Document is rejected, UW exceeds 100 There are more than 100 documents in this block of work. Remove documents from Reject Bin, matching up all Page 1’s and Page 2’s (and Page 3’s for 2020 2nd Qtr and later revisions). Insert breaker sheet (Form 1332). Note:
If you are unable to correct the rejected condition, drop a delete sheet. During scanning, certain documents may reject because the submissions are invalid. The function routes these submissions to the Pre-Doc Prep function for disposition. The Pre-Doc Prep function is responsible for correcting the submissions and returning them for scanning. When returns are missing pages (page 1 or 2 (or page 3 for 2020 2nd Qtr and later revisions)), route them to Code and Edit for correspondence.
-
The Form 940 scanner applications accept nonconforming forms. A nonconforming form is any form that the scanner cannot recognize, and therefore cannot assign a DLN. For nonconforming forms, a six-digit FI sequence number prints in lieu of a DLN. The sequence number, like the DLN, is used by the scanner operator to identify rejected forms that need to be re-fed.
-
940 Error Messages are as follows:
Error Message Explanation Action Document is rejected, first document must be a Page 1 or breaker sheet The first scanned document was not recognized as a Form 940 Page 1 or a Form 1332, Transmittal/Breaker Sheet. Remove document from Reject Bin and ensure the first scanned document is a Form 940 Page 1 or a Form 1332. If necessary, insert a blank Page 1 or Form 1332. Document is rejected, received consecutive breaker sheets There is a Form 1332 immediately following a Form 1332. Remove the document from the Reject Bin. Document is rejected, UW exceeds 100 There are more than 100 documents in this block or work. Remove documents from Reject Bin, matching up all Page 1’s and Page 2’s. Insert breaker sheet (Form 1332). -
If you are unable to correct the rejected condition, drop a delete sheet. During scanning, certain documents may reject because the submissions are invalid. The function routes these submissions to the Pre-Doc Prep function for disposition. The Pre-Doc Prep function is responsible for correcting the submissions and returning them for scanning. When returns are missing pages (page 1 or 2), route them to Code and Edit for correspondence.
-
The Stand Alone Schedule R scanner applications accept nonconforming forms. A nonconforming form is any form that the scanner cannot recognize, and therefore cannot assign a DLN. For nonconforming forms, a six-digit FI sequence number prints in lieu of a DLN. The sequence number, like the DLN, is used by the scanner operator to identify rejected forms that need to be re-fed.
-
Stand-Alone Schedule R Error Messages are as follows:
Error Message Explanation Action Document is rejected, first document must be a 94x Page 1 The first scanned document was not recognized as a Form 94x Page 1. Remove document from Reject Bin and ensure the first scanned document is a Form 94x Page 1. If unable to find Page 1, insert a blank Page 1. Document is rejected, UW exceeds 100 There are more than 100 documents in this block or work. Remove documents from Reject Bin, matching up all Page 1’s and Continuation Sheets. -
If you are unable to correct the rejected condition, drop a delete sheet. During scanning, certain documents may reject because the submissions are invalid. The function routes these submissions to the Pre-Doc Prep function for disposition. The Pre-Doc Prep function is responsible for correcting the submissions and returning them for scanning.