- 7.15.8 Tax Exempt Determinations Systems (TEDS) Routing Slip Features
- 7.15.8.1 Program Scope and Objectives
- 7.15.8.1.1 Background
- 7.15.8.1.2 Authority
- 7.15.8.1.3 Roles and Responsibilities
- 7.15.8.1.4 Program Management and Review
- 7.15.8.1.5 Program Controls
- 7.15.8.1.6 Terms and Acronyms
- 7.15.8.1.7 Related Resources
- 7.15.8.2 Routing Slip Features
- 7.15.8.3 Creating A Routing Slip
- 7.15.8.3.1 Routing Slip Information Tab
- 7.15.8.3.2 Routing Slip Attachments Tab
- 7.15.8.3.3 Users Tab (Router Only)
- 7.15.8.4 Accessing the Routing Slip
- 7.15.8.5 Completing a Routing Slip (Routee)
- 7.15.8.6 Tracking Routing Slip Progress
- 7.15.8.7 Inbox Notification Progress Tab
- 7.15.8.8 Open vs. Closed Routing Slip
- 7.15.8.9 Terminating - Routing Slip
- 7.15.8.10 Closing - Routing Slip
- Exhibit 7.15.8-1 Create Routing Slip
- Exhibit 7.15.8-2 Routing Slip Information Tab
- Exhibit 7.15.8-3 Attachment Tab- Adding an Attachment
- Exhibit 7.15.8-4 Import to Add Attachment
- Exhibit 7.15.8-5 Attachments Tab - Removing an Attachment
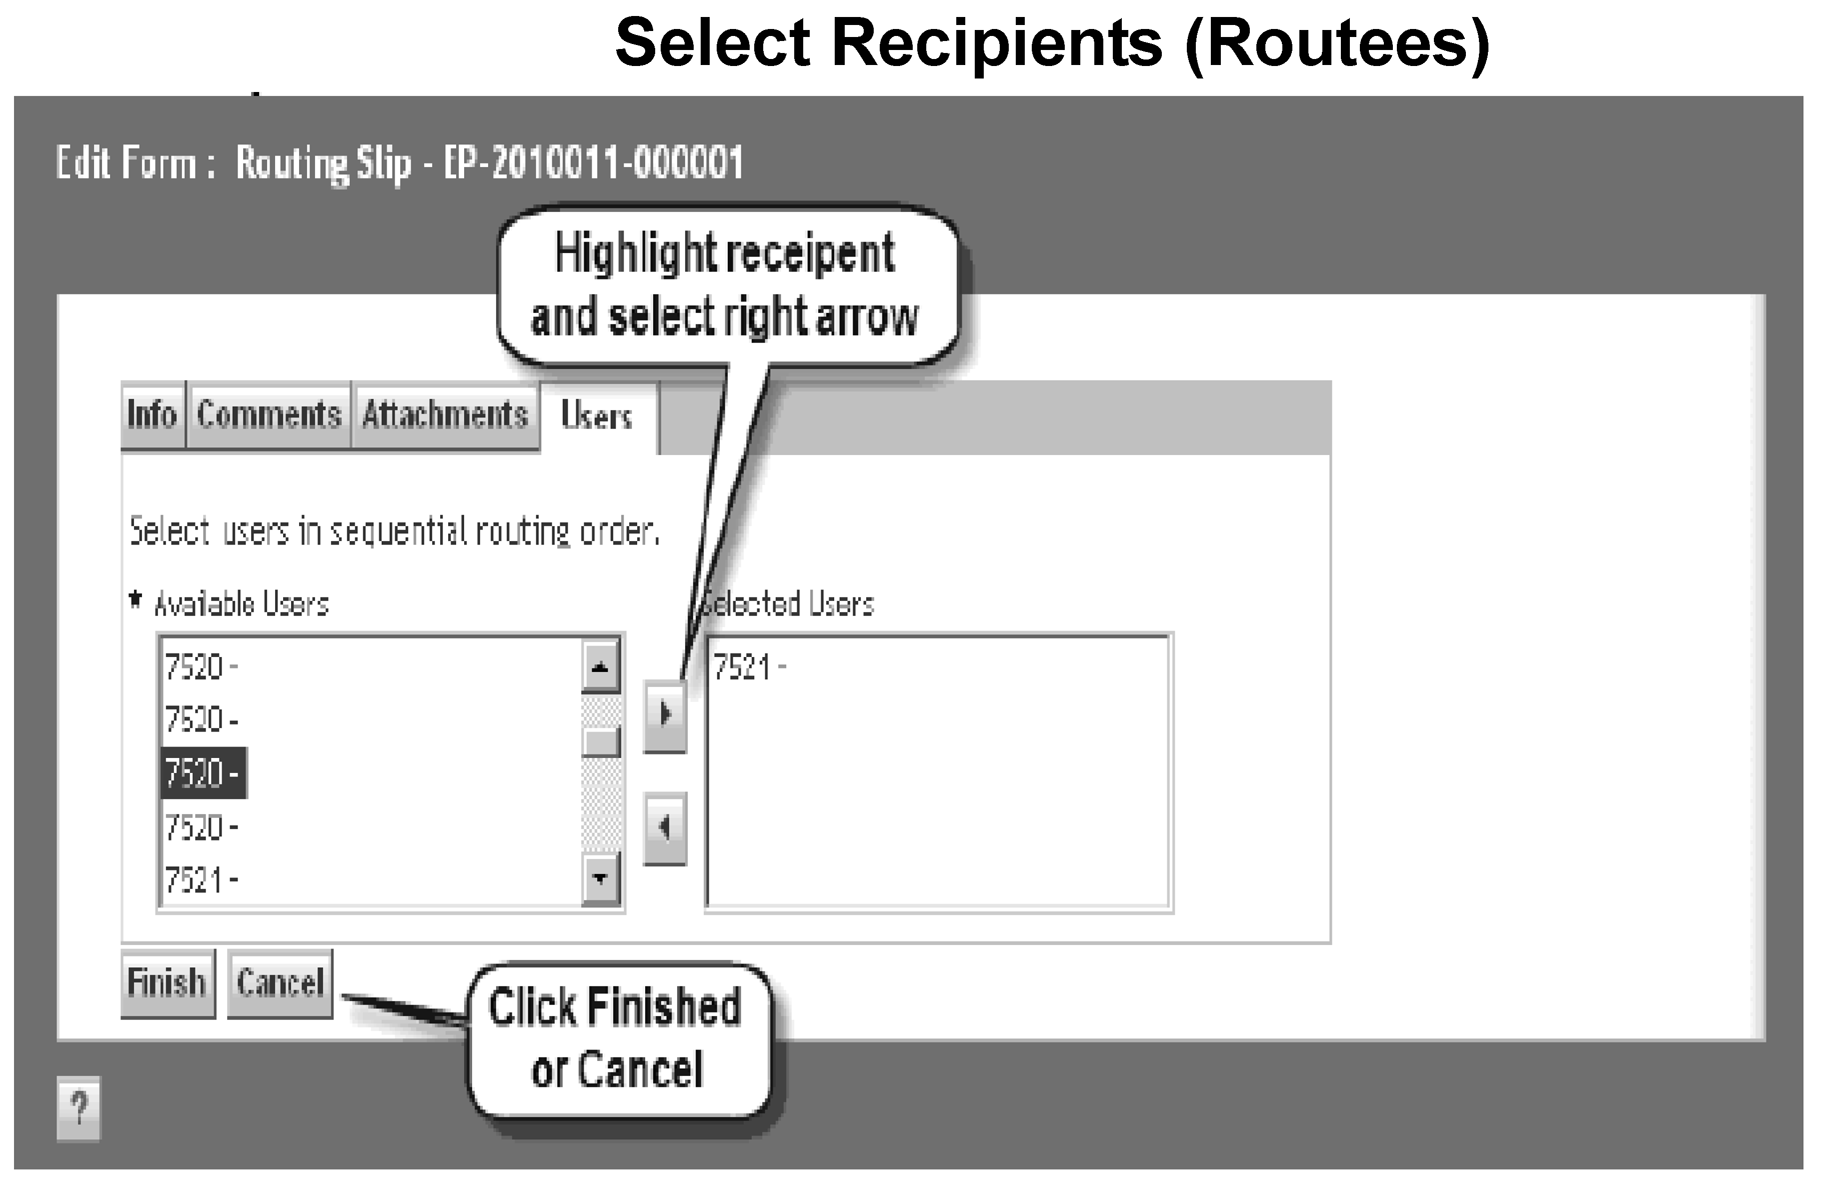
- Exhibit 7.15.8-6 Select Recipients (Routees)
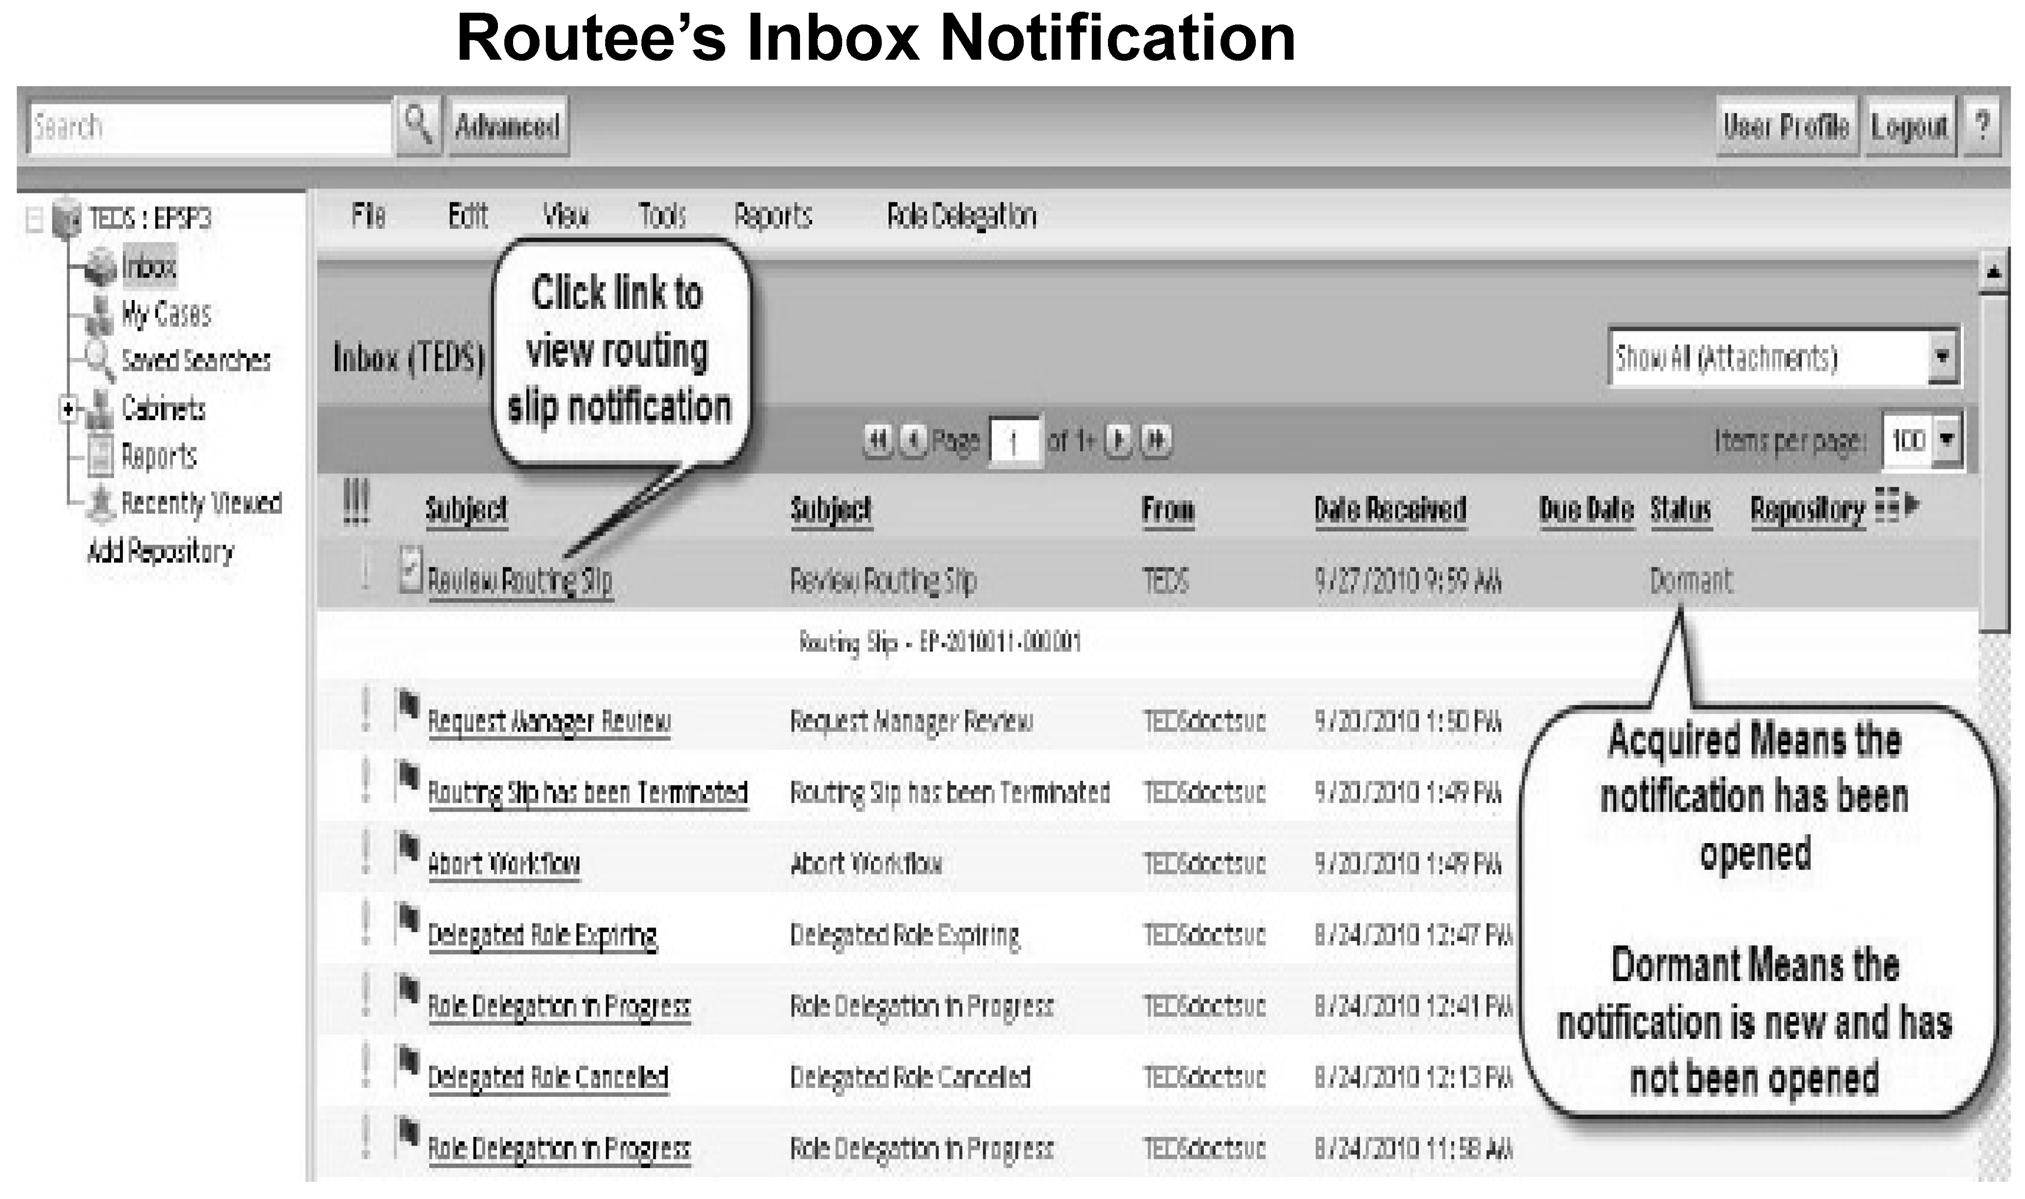
- Exhibit 7.15.8-7 Routee's Inbox Notification
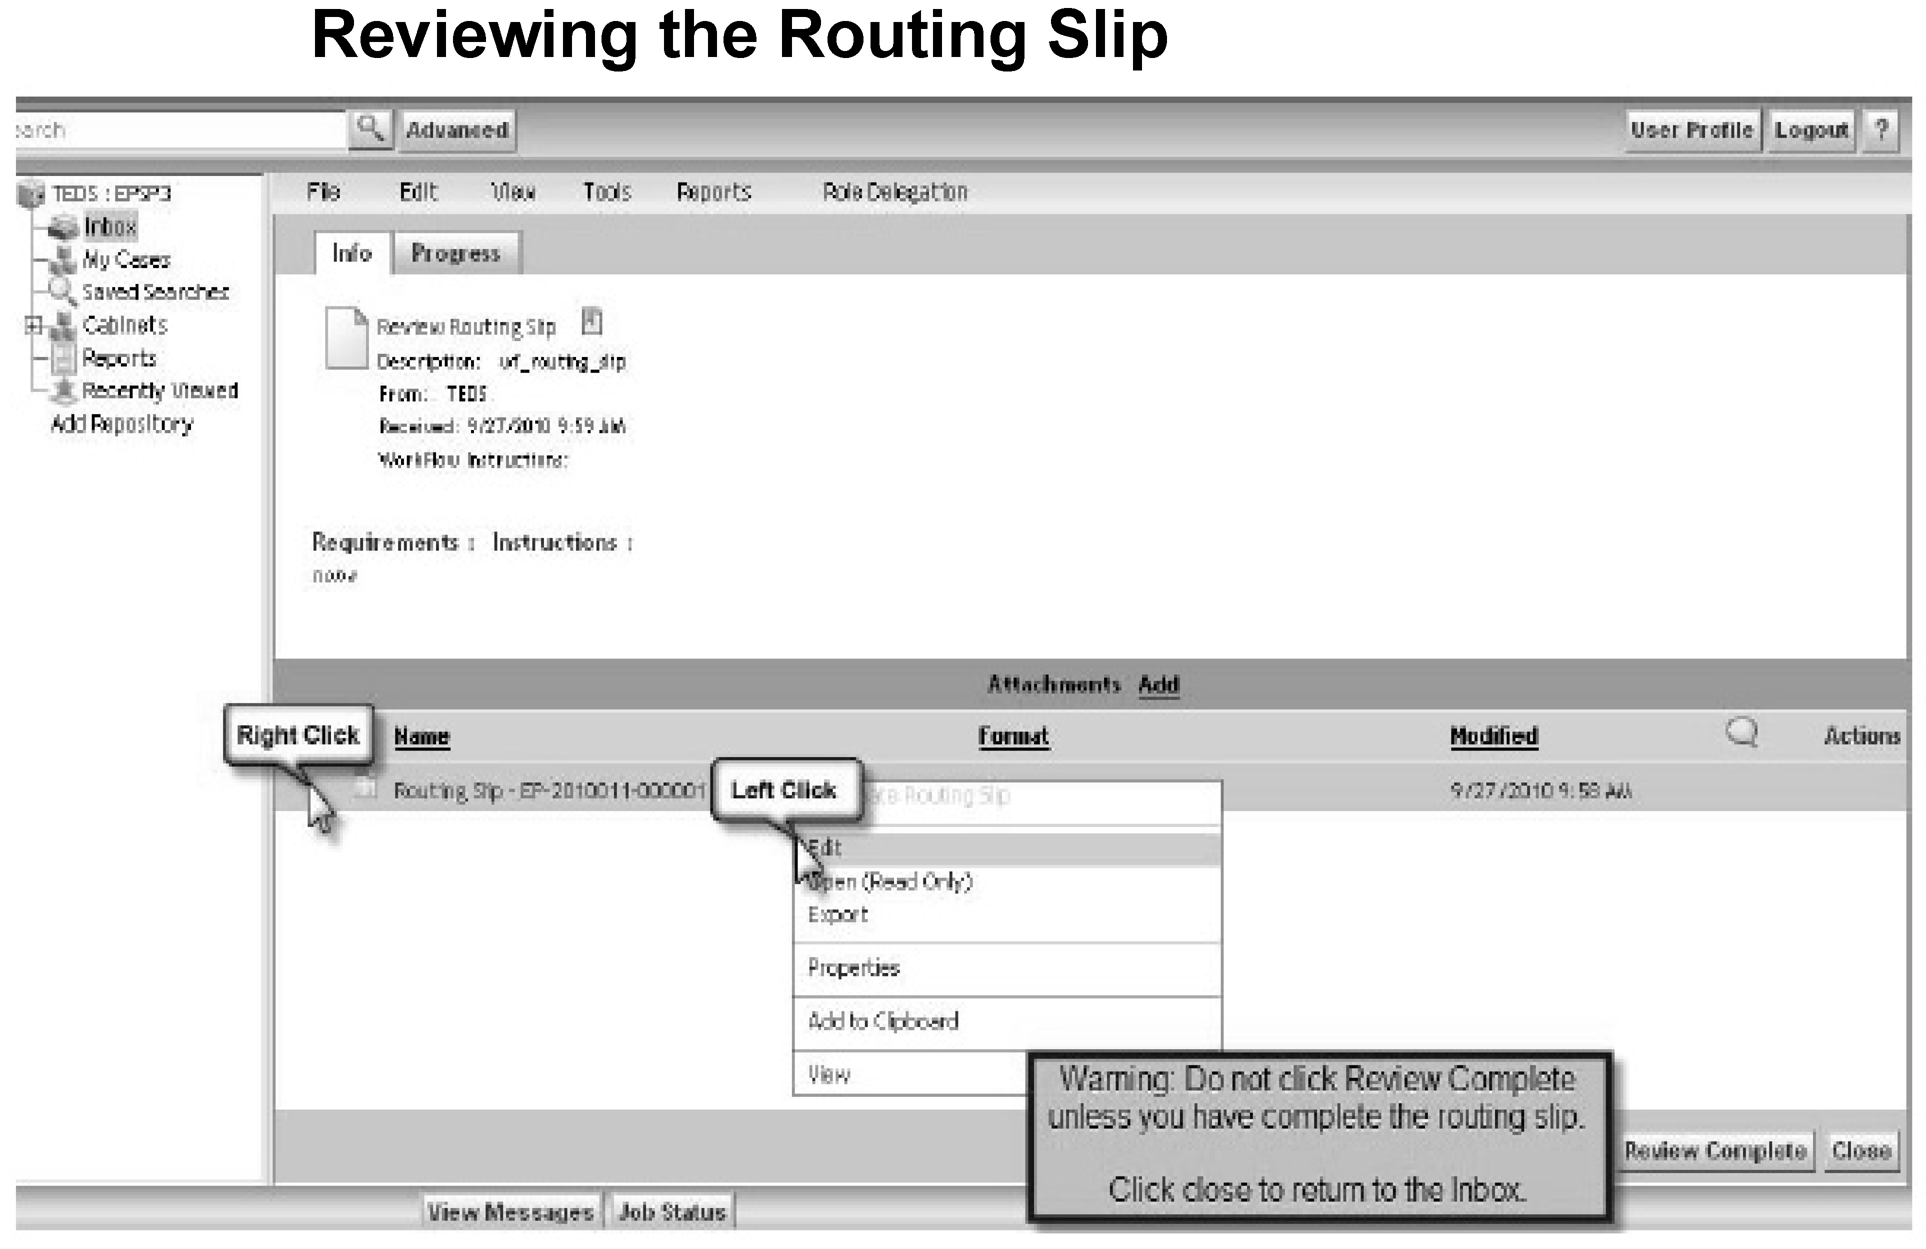
- Exhibit 7.15.8-8 Reviewing the Routing Slip
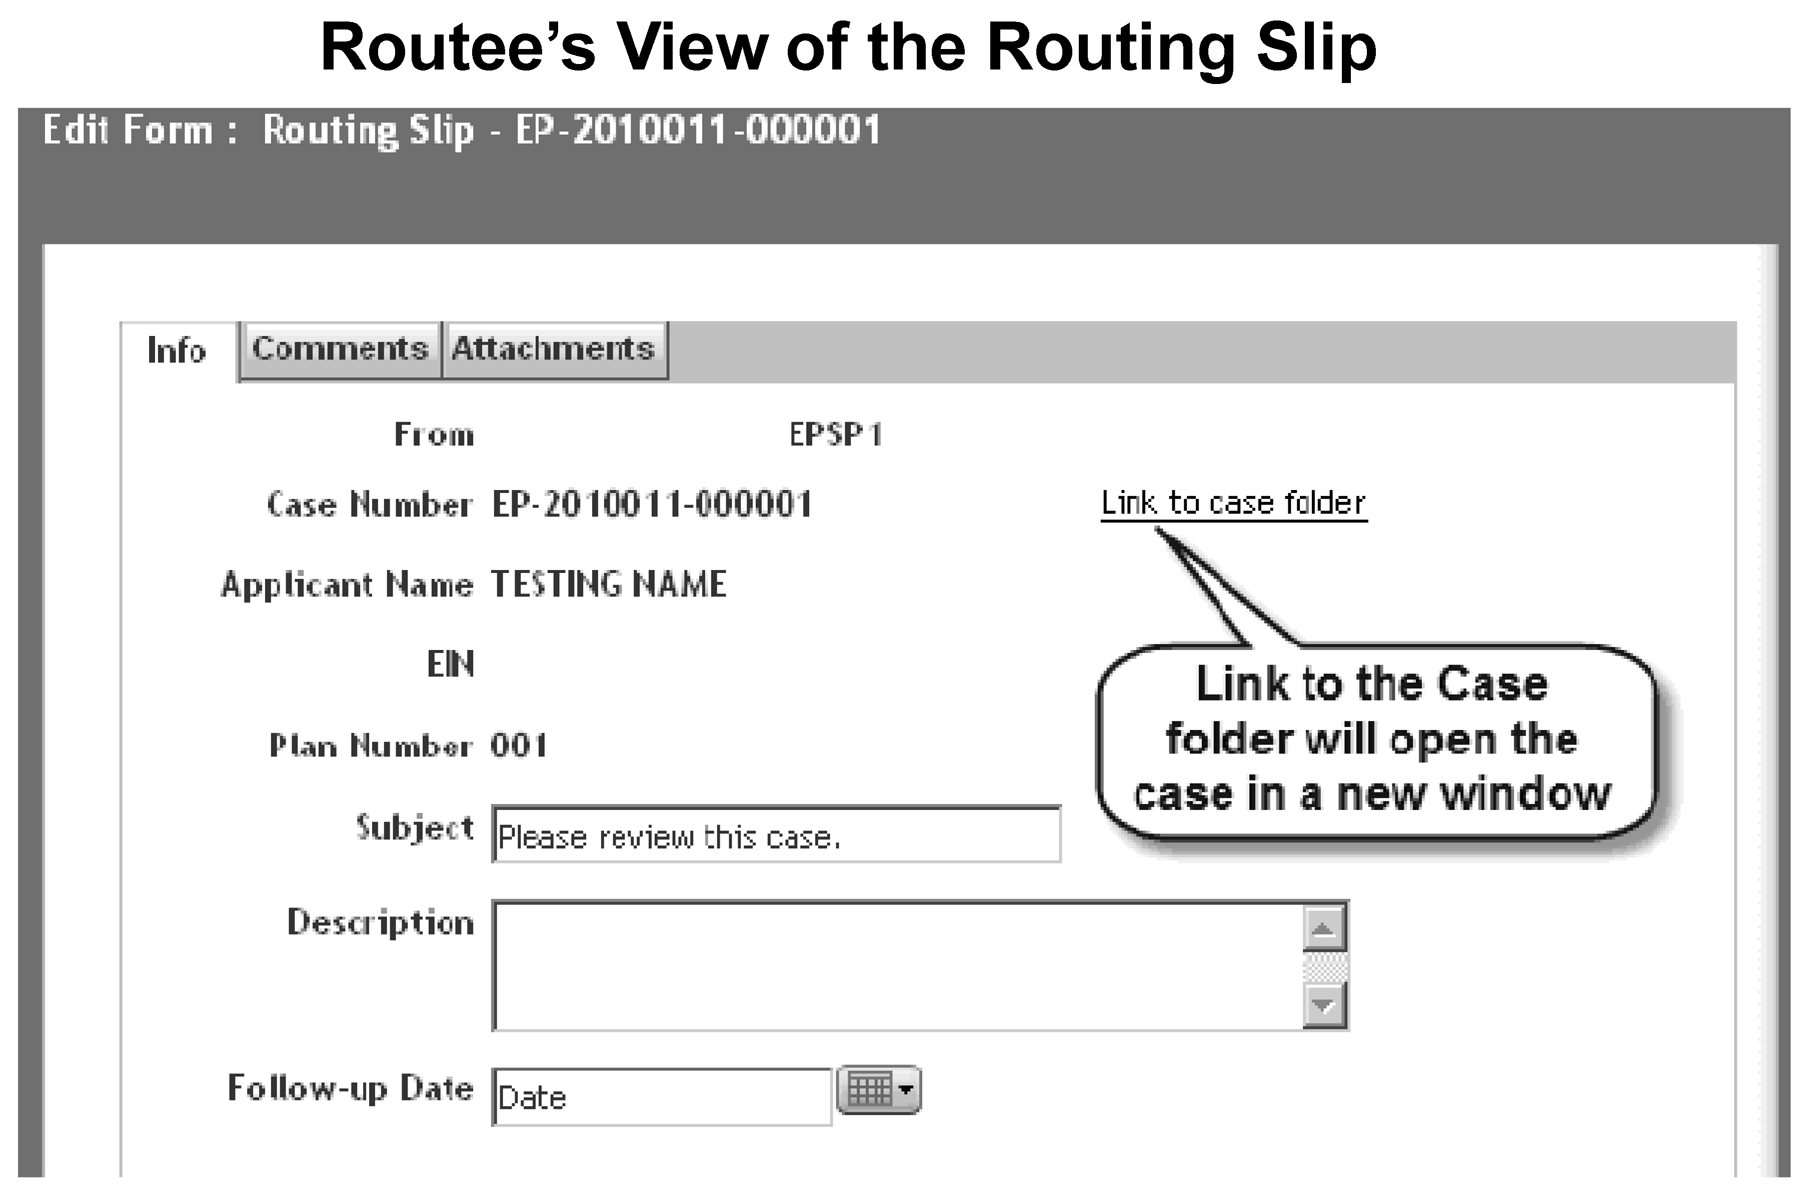
- Exhibit 7.15.8-9 Routee's View of the Routing Slip
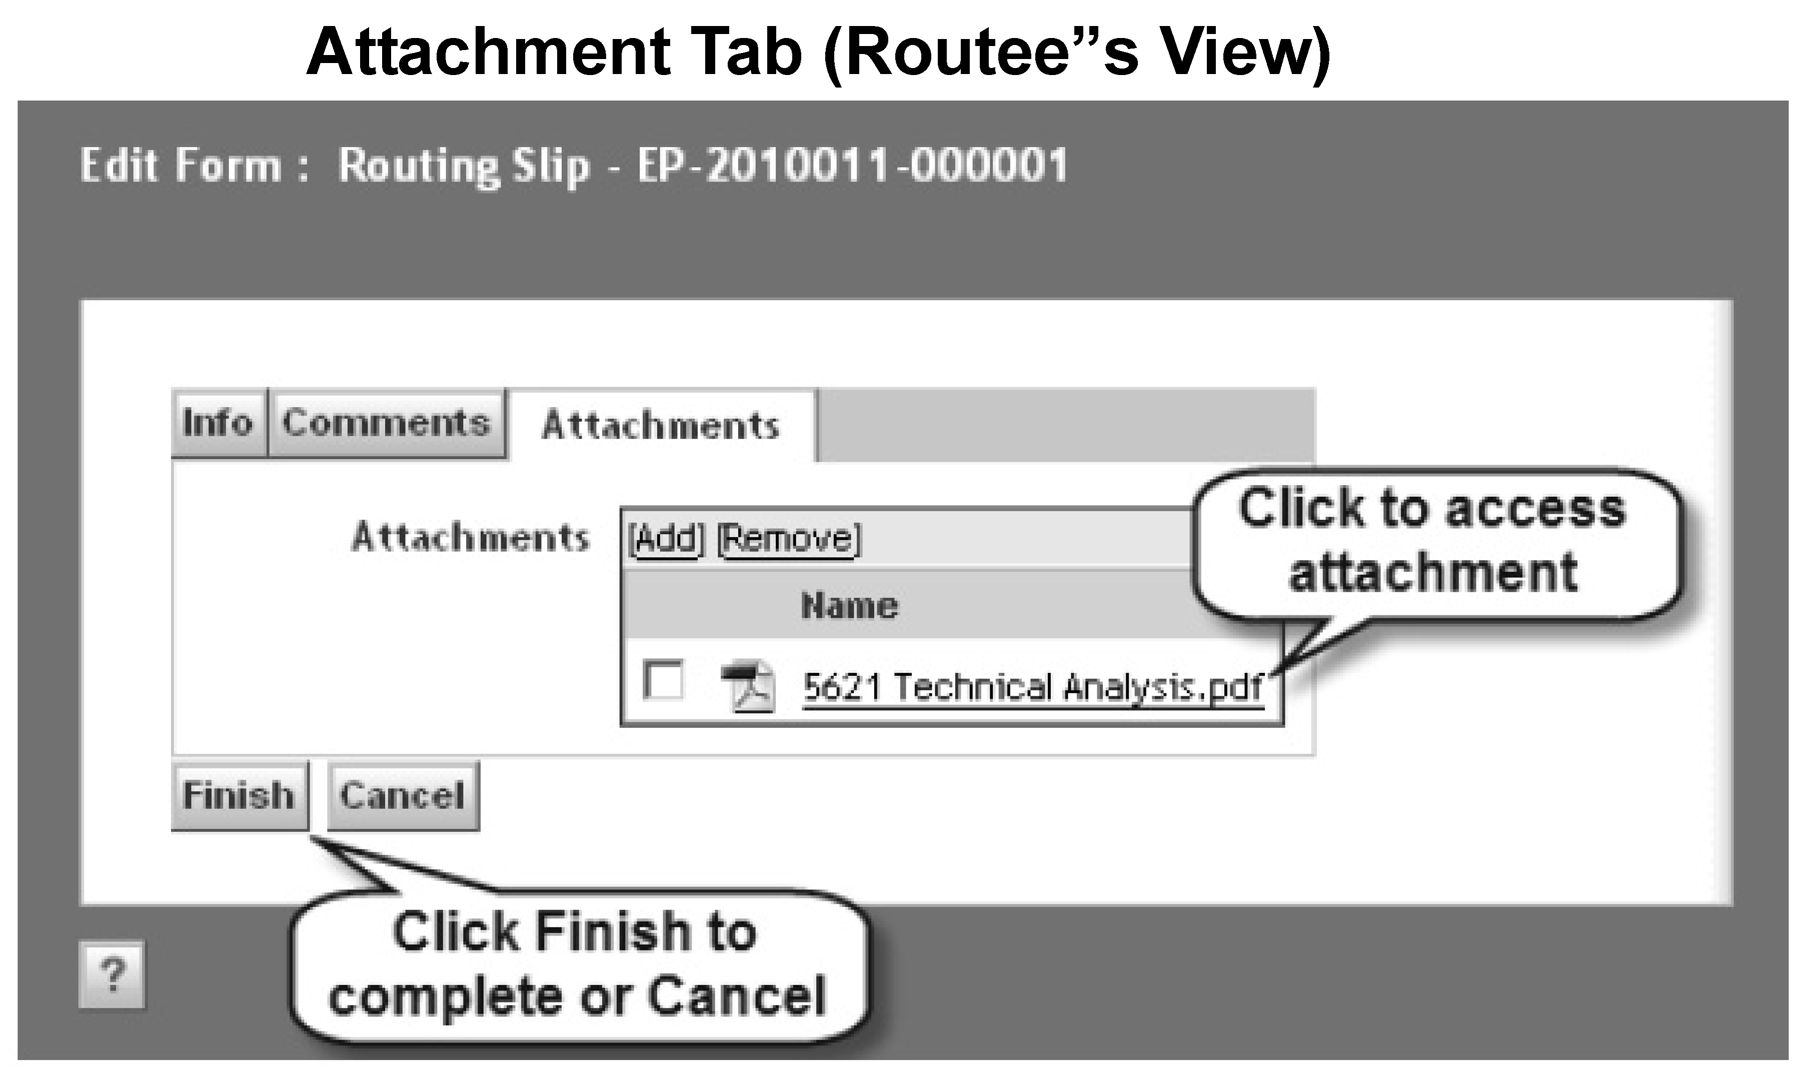
- Exhibit 7.15.8-10 Attachments Tab (Routee's View)
- Exhibit 7.15.8-11 Routee Comments Tab
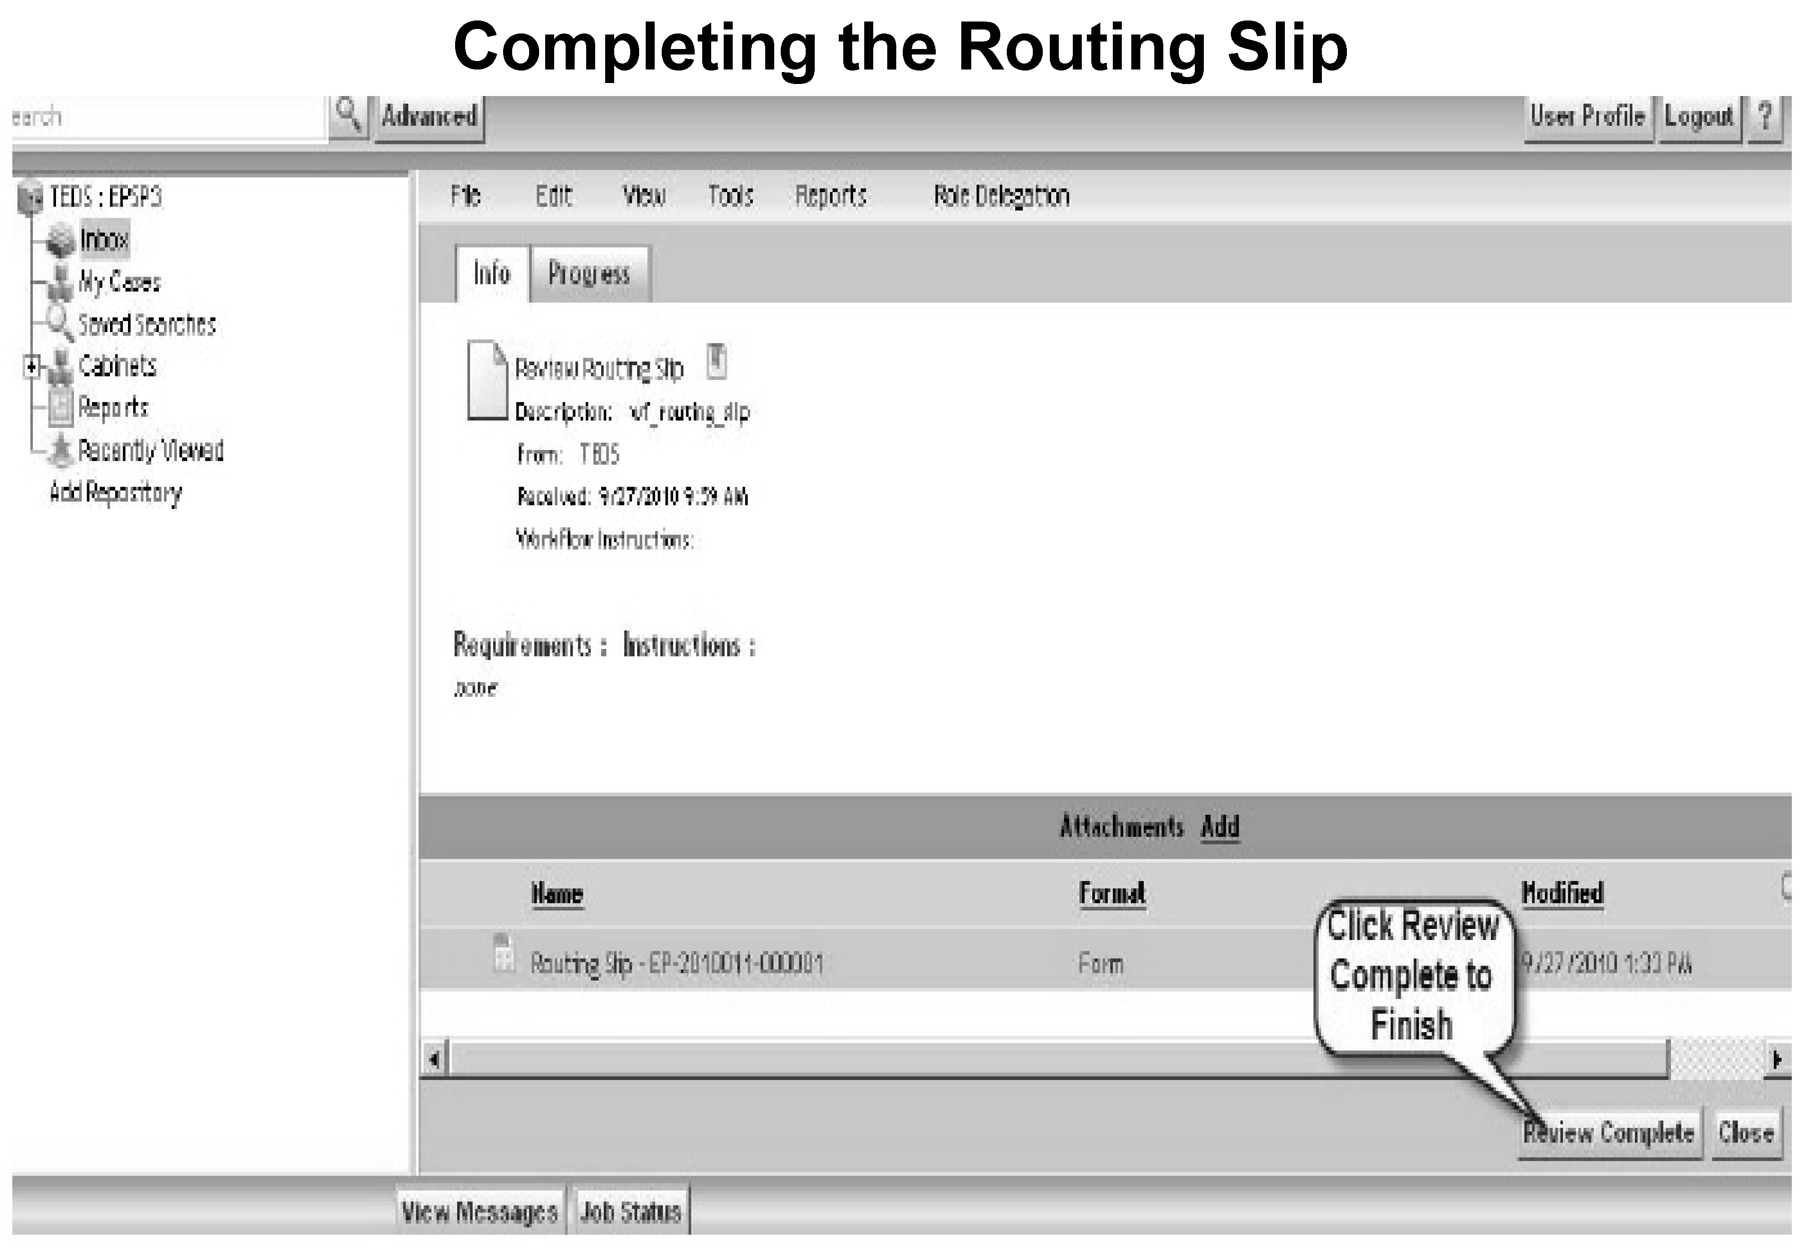
- Exhibit 7.15.8-12 Completing the Routing Slip
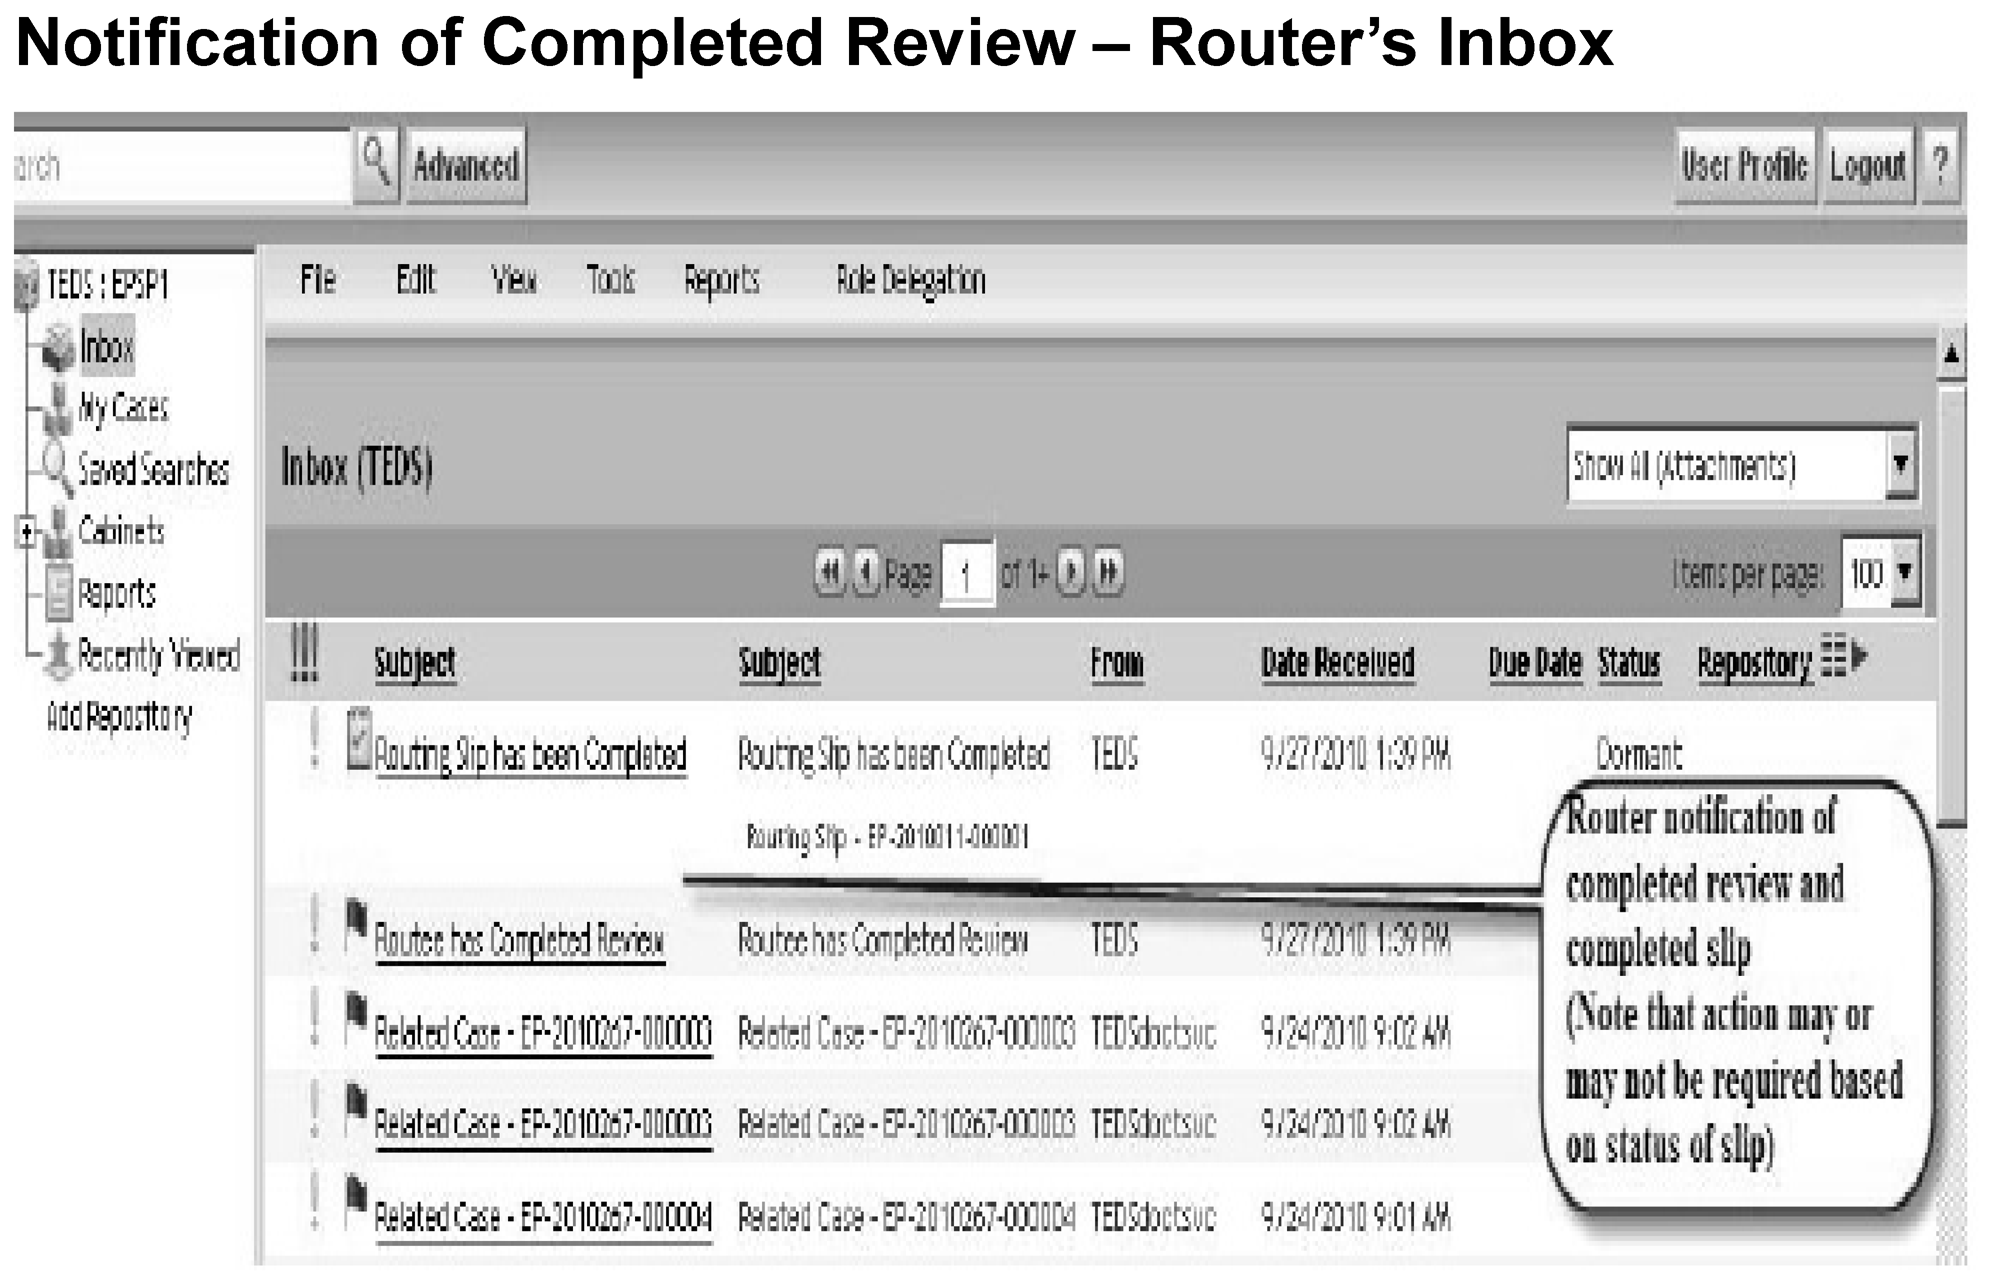
- Exhibit 7.15.8-13 Notification of Completed Review - Router's Inbox
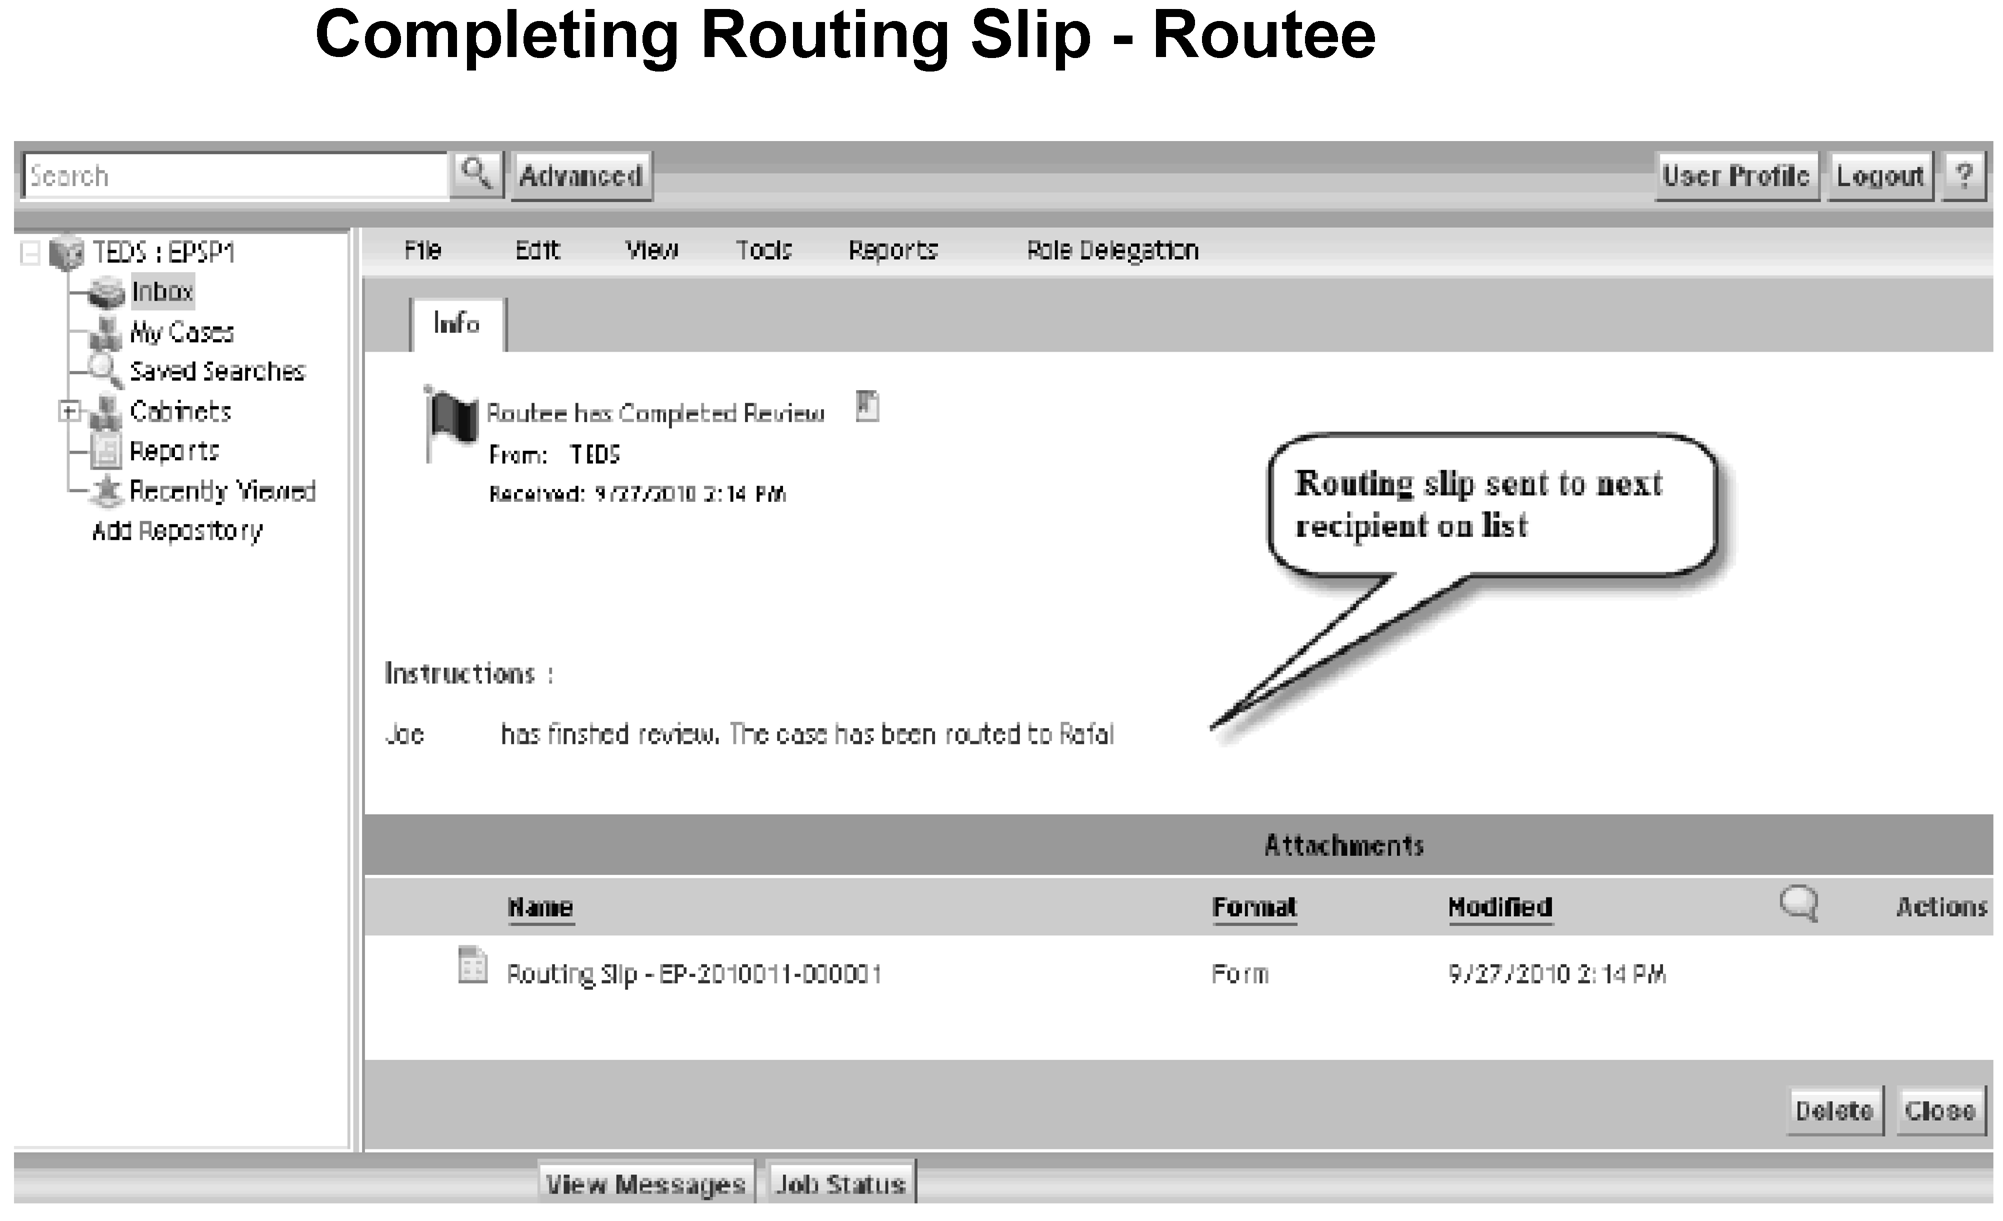
- Exhibit 7.15.8-14 Completing Routing Slip - Routee
- Exhibit 7.15.8-15 Case History Folder
- Exhibit 7.15.8-16 Inbox Notification - Progress Tab
- Exhibit 7.15.8-17 Case Information - General Case Info. Tab
- Exhibit 7.15.8-18 Terminating - Routing Slip
- Exhibit 7.15.8-19 Routing Slip Completed Notification
- Exhibit 7.15.8-20 Closing the Routing Slip
- 7.15.8.1 Program Scope and Objectives
Part 7. Rulings and Agreements
Chapter 15. Employee Plans TEDS User Manual
Section 8. Tax Exempt Determinations Systems (TEDS) Routing Slip Features
7.15.8 Tax Exempt Determinations Systems (TEDS) Routing Slip Features
Manual Transmittal
July 31, 2025
Purpose
(1) This transmits revised IRM 7.15.8, Employee Plans TEDS User Manual, Tax Exempt Determination System (TEDS) Routing Slip Features.
Material Changes
(1) Updated IRM 7.15.8.1.6 to change the name from Acronyms to Terms and Acronyms.
(2) Added IRM 7.15.8.1(5), Primary Stakeholders.
(3) Added IRM 7.15.8.1.3, Roles and Responsibilities.
(4) Added IRM 7.15.8.1.4, Program Management and Review.
(5) Added IRM 7.15.8.1.5, Program Controls.
(6) Updated IRM 7.15.8.1.6 to include Office of Associate Chief Counsel (Employee Benefits, Exempt Organizations and Employment Taxes) (EEE), Information Tab (Info.) and Rulings and Agreements (R&A).
(7) Added IRM 7.15.8.1.7, Related Resources.
(8) Made editorial edits throughout the IRM for clarity.
Effect on Other Documents
This supersedes IRM 7.15.8 dated November 23, 2021.Audience
Tax Exempt Government Entities TE/GEEmployee Plans PersonnelEffective Date
(07-31-2025)Eric D. Slack
Director, Employee Plans
Tax Exempt Government Entities Division
-
Purpose: This IRM provides guidance to Employee Plans (EP) Determinations employees on the use and purpose of the routing slip in the Tax Exempt Determination System (TEDS). The material in this IRM comes from the Tax Exempt Determinations System (TEDS) Student Guide. The screenshots are taken directly from TEDS. The routing slip feature in TEDS allows a user to share a case with one or more users for review without transferring or otherwise changing the case ownership.
-
Audience: The determination application processing procedures in this manual are for employees in Employee Plans (EP) who work in TEDS.
-
Policy Owner: Director, EP.
-
Program Owner: EP.
-
Primary Stakeholders:
-
Internal - Director, Employee Plans; Director, Employee Plans Rulings and Agreements; EP Tax Law Specialists and Agents; Actuaries; Associate Chief Counsel (EEE), TE/GE Division.
-
External - Plan sponsors, plan representatives, and plan participants.
-
-
Tax Exempt Determination System (TEDS) is a web-based information system that provides an electronic case and inventory management system that Tax Exempt and Government Entities (TE/GE) Determinations business units use to manage cases.
-
TEDS was launched as a pilot in 2003, and from that time on, with a few exceptions, the EP Determination applications have been processed using this electronic system. EP Determination applications are uploaded to TEDS and, using on-screen capabilities, specialists review and process cases in TEDS.
-
Delegation Order 7-1, under IRM 1.2.2.8.1, states the Director, Employee Plans has authority to issue favorable DLs on the qualified status of:
-
Pension, profit-sharing, stock bonus, annuity, and employee stock ownership plans under IRC 401, IRC 403(a), IRC 409, IRC 4975(e)(7).
-
The status for exemption of any related trusts or custodial accounts under IRC 501(a).
-
-
Find a complete list of delegation orders governing EP Rulings and Agreements at Delegation Orders and Policy Statements by Process.
-
The mission of Employee Plans is to provide EP’s customers top-quality service by helping them understand and comply with applicable tax laws and to protect the public interest by applying the tax laws with integrity and fairness to all.
-
The Director, EP, reports to the Deputy Commissioner, TE/GE, and is responsible for planning, managing, directing and executing nationwide EP activities.
-
EP responsibilities include:
-
Employee plans (including the qualification of pension, annuity, profit-sharing, and stock bonus plans, simplified employee pensions, saving incentive match plans for employees, and tax-sheltered annuities) and related trusts.
-
Tax treatment of participants and their beneficiaries and deductions for employer contributions.
-
Procedural and administrative provisions with respect to such plans.
-
-
The Director, EP R&A, reports to the Director, EP, and is responsible for three types of services for retirement plans - voluntary compliance, determination letters, and technical guidance.
-
Responsibilities of the EP R&A staff include:
-
Processing determination letter requests from employers regarding the qualified status of their pension, annuity, profit sharing and stock bonus plans.
-
Issuing opinion and advisory letters to specific requestors regarding preapproved pension, annuity, and profit-sharing plans, including individual retirement accounts, simplified employee pensions and savings incentive match plans for employees, and tax-sheltered annuities.
-
Developing and operating voluntary correction programs, such as the Employee Plans Compliance Resolution System (EPCRS) program and issuing compliance statements or entering into closing agreements under these programs.
-
Processing requests for changes in funding method and making other actuarial determinations and interpretations.
-
Coordinating with Chief Counsel on requests for funding waivers.
-
Developing and maintaining responsibility for actuarial publications and other standards for the valuation of transfers of future interests for income, estate and gift tax purposes.
-
Coordinating with TE/GE Division Counsel, Associate Chief Counsel and the DOJ on litigation issues and declaratory judgment cases under the Internal Revenue Code. (IRC 7476).
-
-
Program reports:
-
The EP Determinations program uses Business Objects to view, create, and modify inventory and employee records. Business Objects uses tools to provide a built-in interface to query and analyze data and to build reports.
-
Monthly reports detailing the current inventory of cases by area and their status are produced and provided to the Director, EP R&A, Area Managers, and frontline managers.
-
Ad-hoc reports are produced as requested by determinations personnel with appropriate permission.
-
Each quarter, EP Determinations Quality Assurance issues reports to summarize the results of their TEQMS reviews. See IRM 7.11.3, Tax Exempt Quality Measurement System (TEQMS).
-
-
Program effectiveness:
-
EP Determinations monitors business unit progress toward completing and closing cases in inventory. They provide status and progress reports to IRS leadership on a regular, recurring basis. Effectiveness is measured by analysis of compliance trends and results.
-
-
The IRS receives EP determination letter applications and user fees from taxpayers on Pay.gov.
-
The user fee information is then transferred to LINUS to ensure it is properly recorded.
-
The application information from Pay.gov is transferred to Tax Exempt Determination System (TEDS) and EP/EO Determination System (EDS), which are the systems that EP Determinations uses to control their inventory.
-
TEDS contains roles and permissions to ensure proper separation of duties. See IRM 7.15.4.
-
The EP Determinations Area Managers coordinate the assignment of inventory.
-
In order to ensure a consistent level of managerial engagement in the process of making key strategic decisions during a determination letter review, the specialist submits requests for approval by their manager through TEDS.
-
The manager approves or rejects any request through TEDS.
-
EP Determinations QA reviewers perform reviews on mandatory review cases and for cases selected for the Tax Exempt Quality Measurement System (TEQMS) to ensure that specialists are conducting their determination letter reviews per technical, procedural and administrative requirements. See IRM 7.11.3 and IRM 7.11.9 for more information.
-
The IRS is fully committed to protecting the privacy rights of taxpayers and employees. Privacy laws are included in the IRC, the Privacy Act of 1974, the Freedom of Information Act, and IRS policies and practices. For more information about these laws, visit the FOIA Library|Internal Revenue Service.
-
For questions about privacy, email *Privacy.
-
For questions about disclosure, email *Disclosure.
-
-
The table lists commonly used acronyms and their definitions.
Acronym Term DL Determination Letter EEE Office of Associate Chief Counsel (Employee Benefits, Exempt Organizations and Employment Taxes) EP Employee Plans Info. Information Tab R&A Rulings and Agreements TE/GE Tax Exempt and Government Entities TEDS Tax Exempt Determination System
-
A routing slip:
-
Gives a link to the case folder.
-
Gives the recipient (routee) the ability to read the entire case file including non-disclosable items.
-
Allows the routee to create a case chronology entry or import a document into the file.
-
-
EP Determinations employees can use the routing slip to refer a case to:
-
An on-the-job instructor.
-
A peer reviewer.
-
An actuary.
-
-
Using the routing slip characteristics:
-
The originator/case owner (router) or routee can attach a document to the routing slip.
-
Router/routees receive Inbox notifications of routing slip status.
-
Users can make comments.
-
Case owners can terminate a routing slip at any time.
-
-
Using the routing slip, a router can:
-
Route a case to a single user.
-
Route a case to several users in a predetermined order.
-
Route multiple routing slips simultaneously on the same case.
-
-
A router can only create a routing slip on a case assigned to them.
-
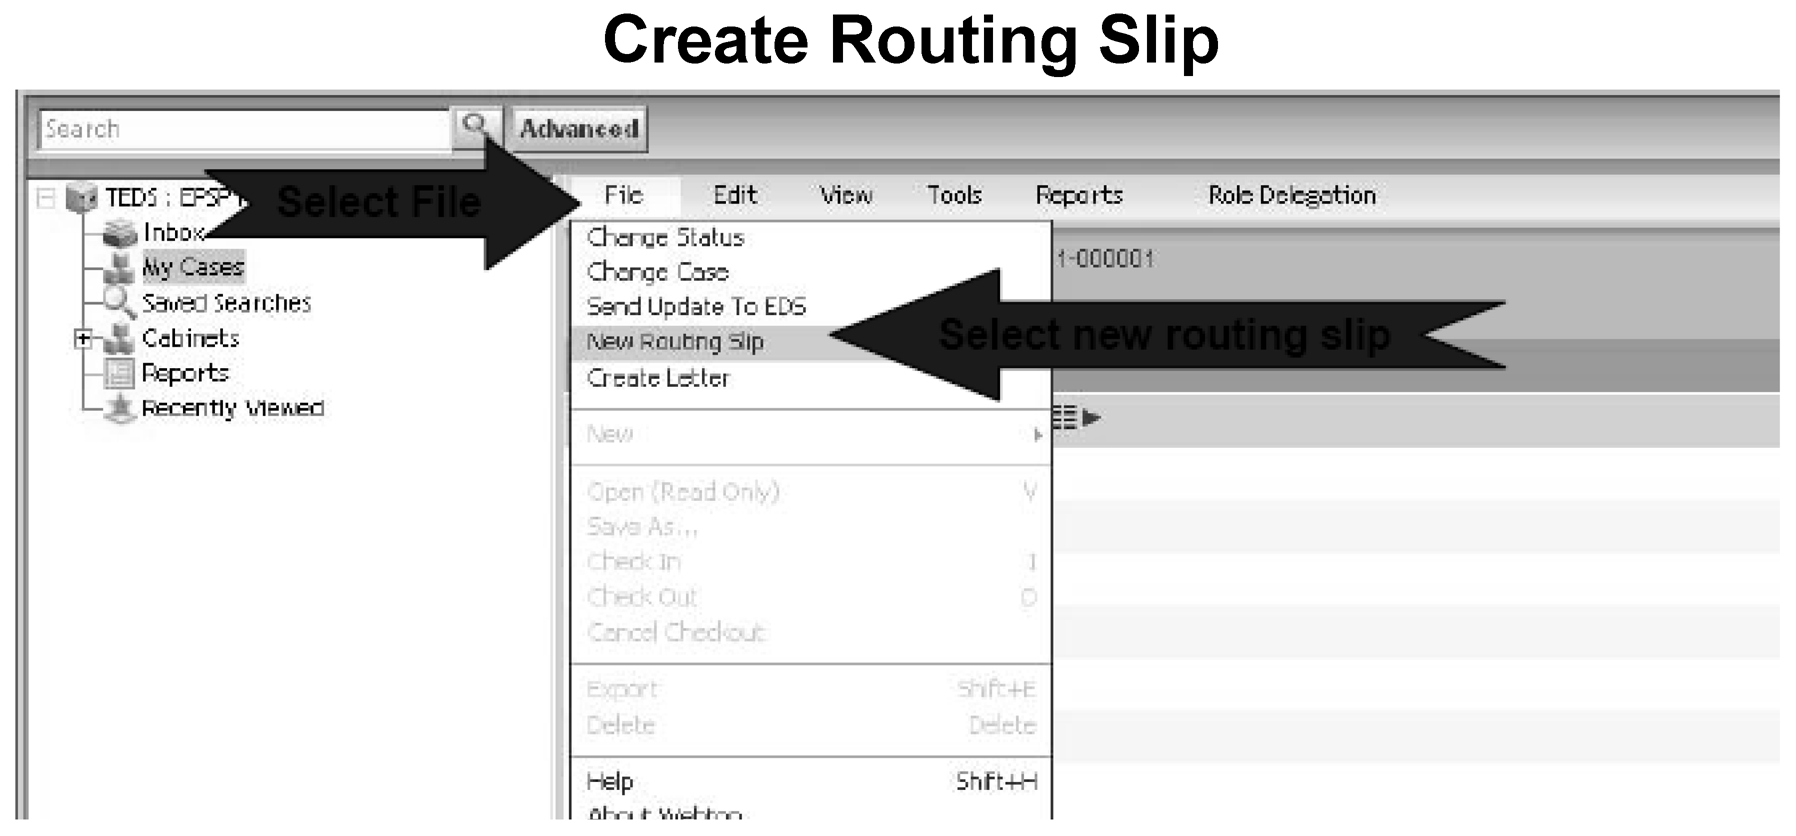
The router can create a routing slip in TEDS by following these steps:
-
Open the case that is to be routed.
-
Select File.
-
Click New Routing Slip from the drop-down menu.
-
-
See Exhibit 7.15.8-1, Create Routing Slip.
-
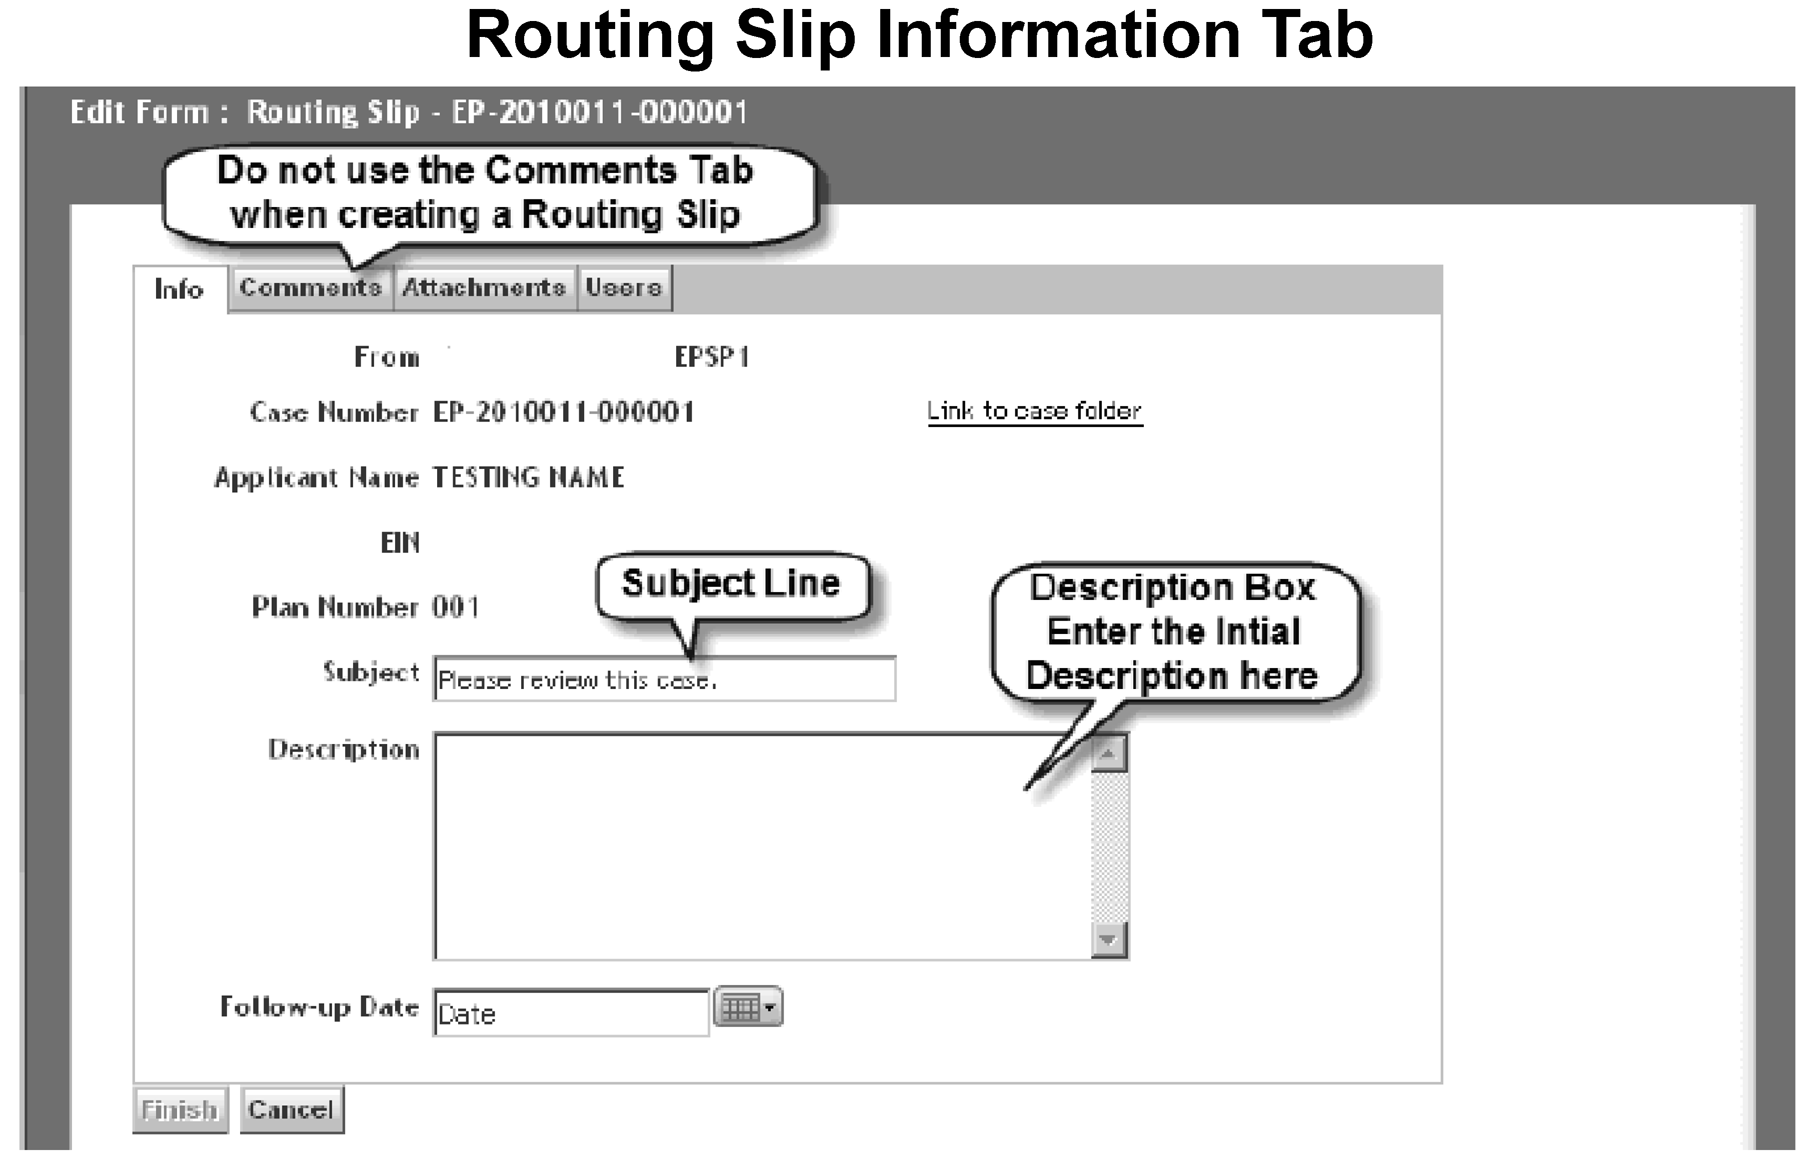
On the routing slip Info. Tab, a router can change the default subject line using up to 50 characters. The router can also enter a description of up to 300 alphanumeric characters in the description box.
-
The Info. Tab Description box is used by the router for their comments when first creating the routing slip.
-
The comment tab (within the Info. Tab) is used by the routee for comments. The router may also add comments in this tab.
-
The router or routee may attach or remove additional documents from the routing slip. Imported document(s) are in the working folder.
-
The router should NOT select Finish until all desired information has been entered on all tabs (including routee).
-
See Exhibit 7.15.8-2, Routing Slip Information Tab.
-
After all information is entered on the Info. tab, the router can attach additional documents.
-
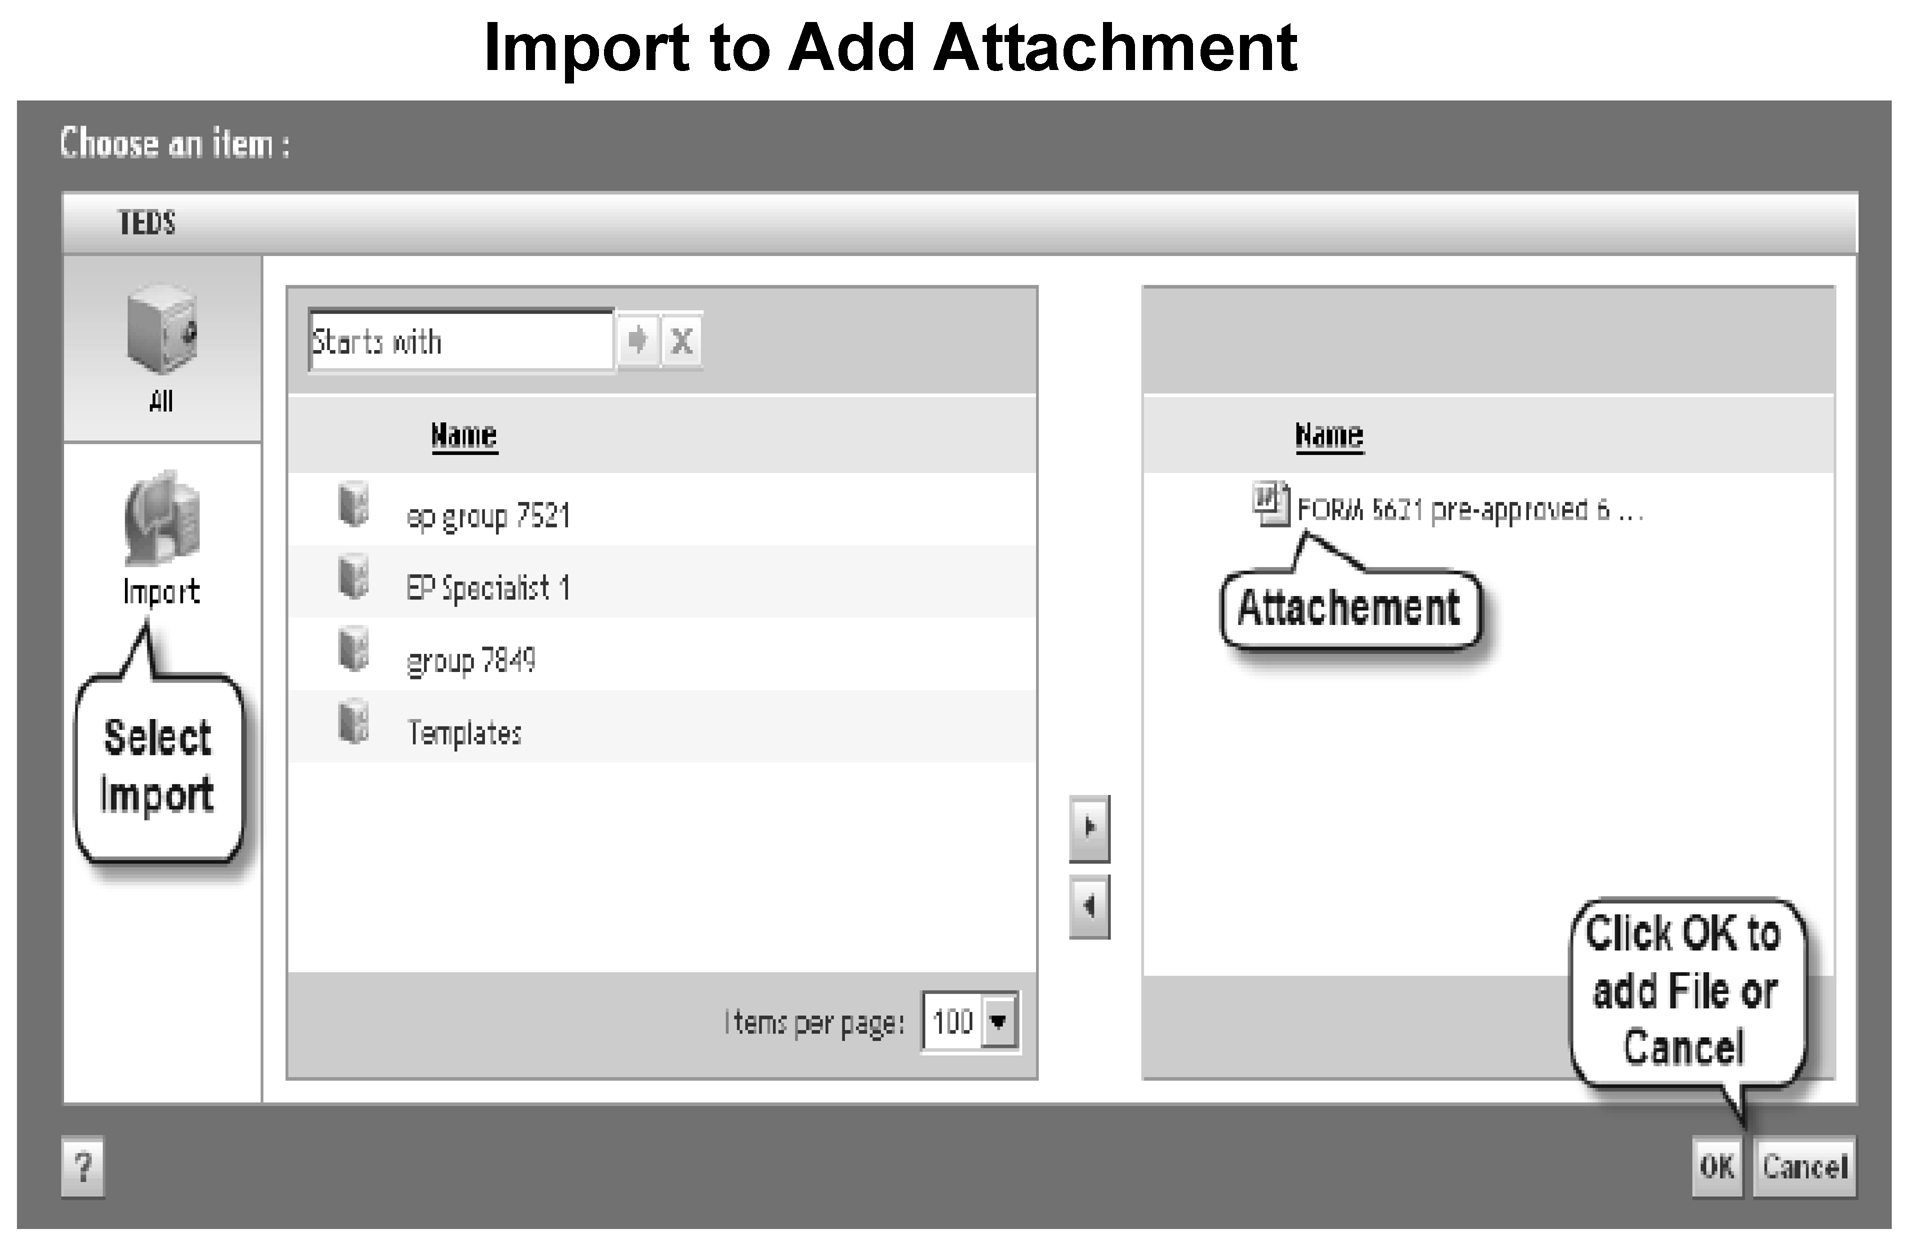
To attach one or more documents to the routing slip:
-
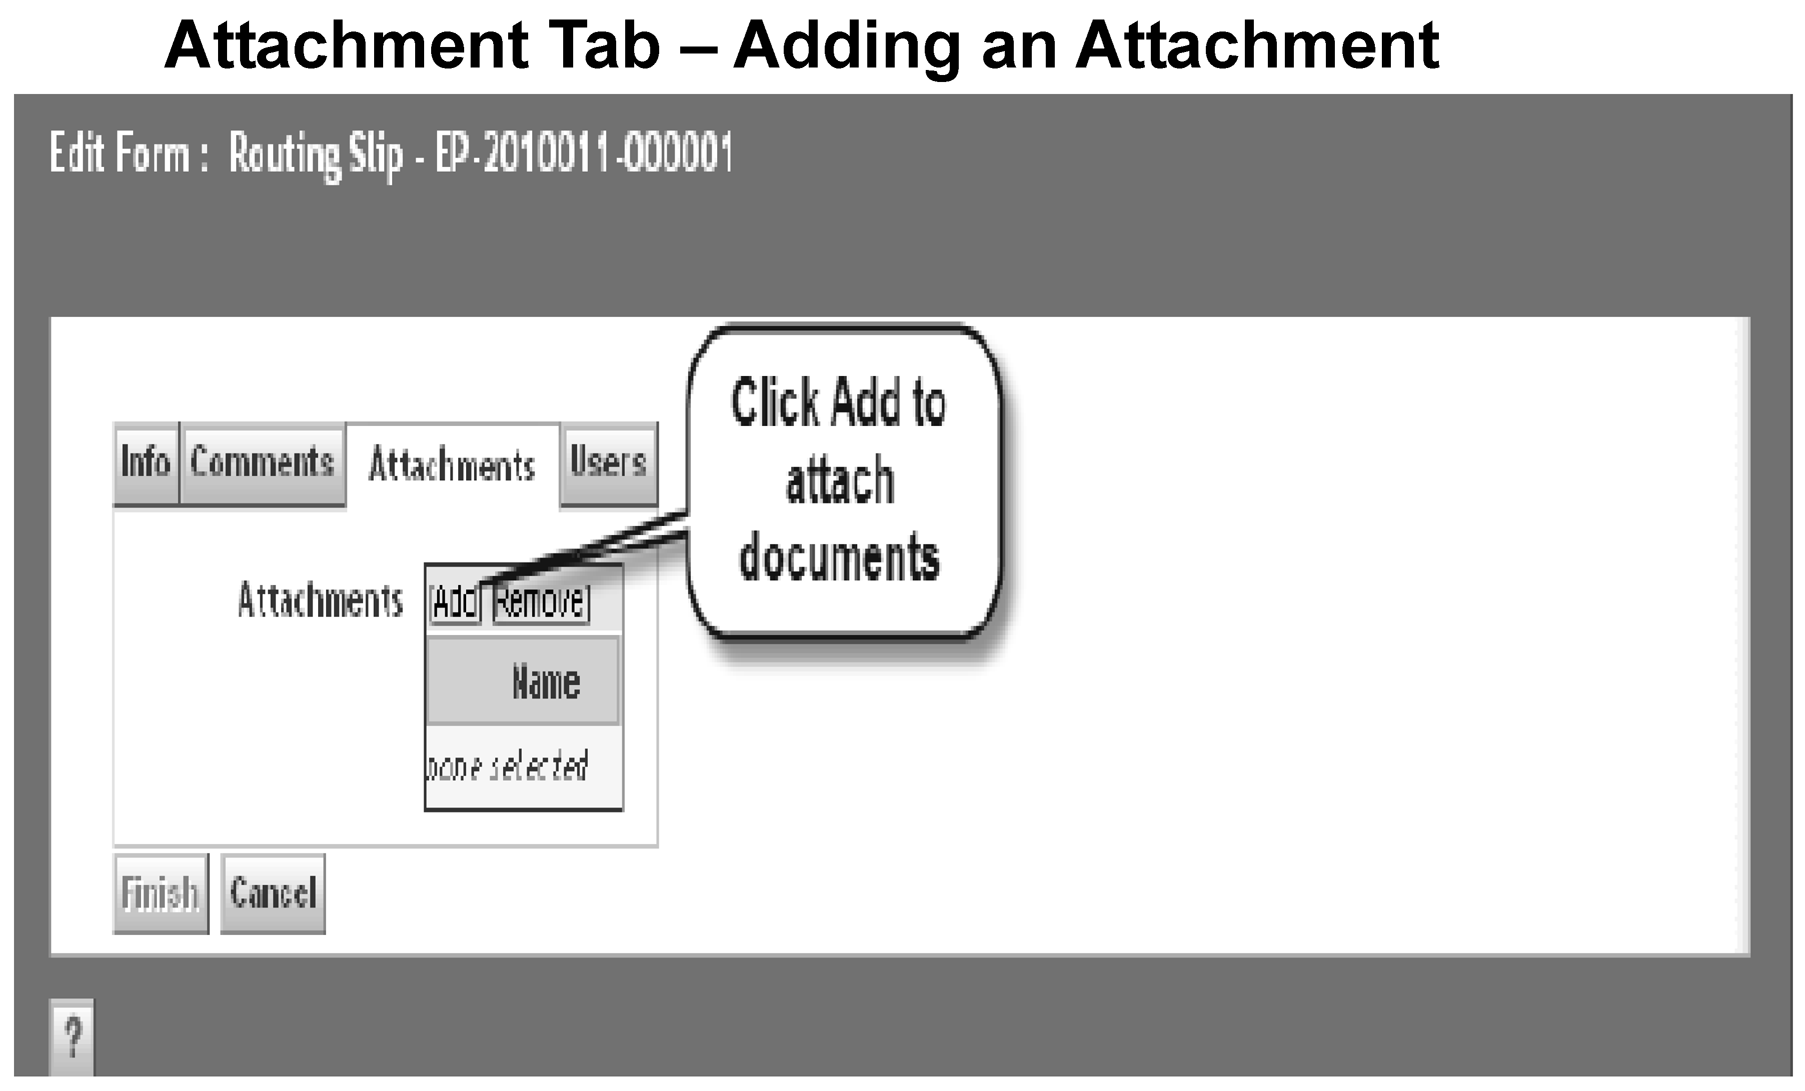
Click the Attachments tab and click Add to attach a document.
-
Click Import on the left pane to attach a document from the user's computer. This will bring up the Import screen. The importing procedures are described in IRM 7.15.6, Navigating the Tax Exempt Determination System (TEDS).
-
Click OK.
-
-
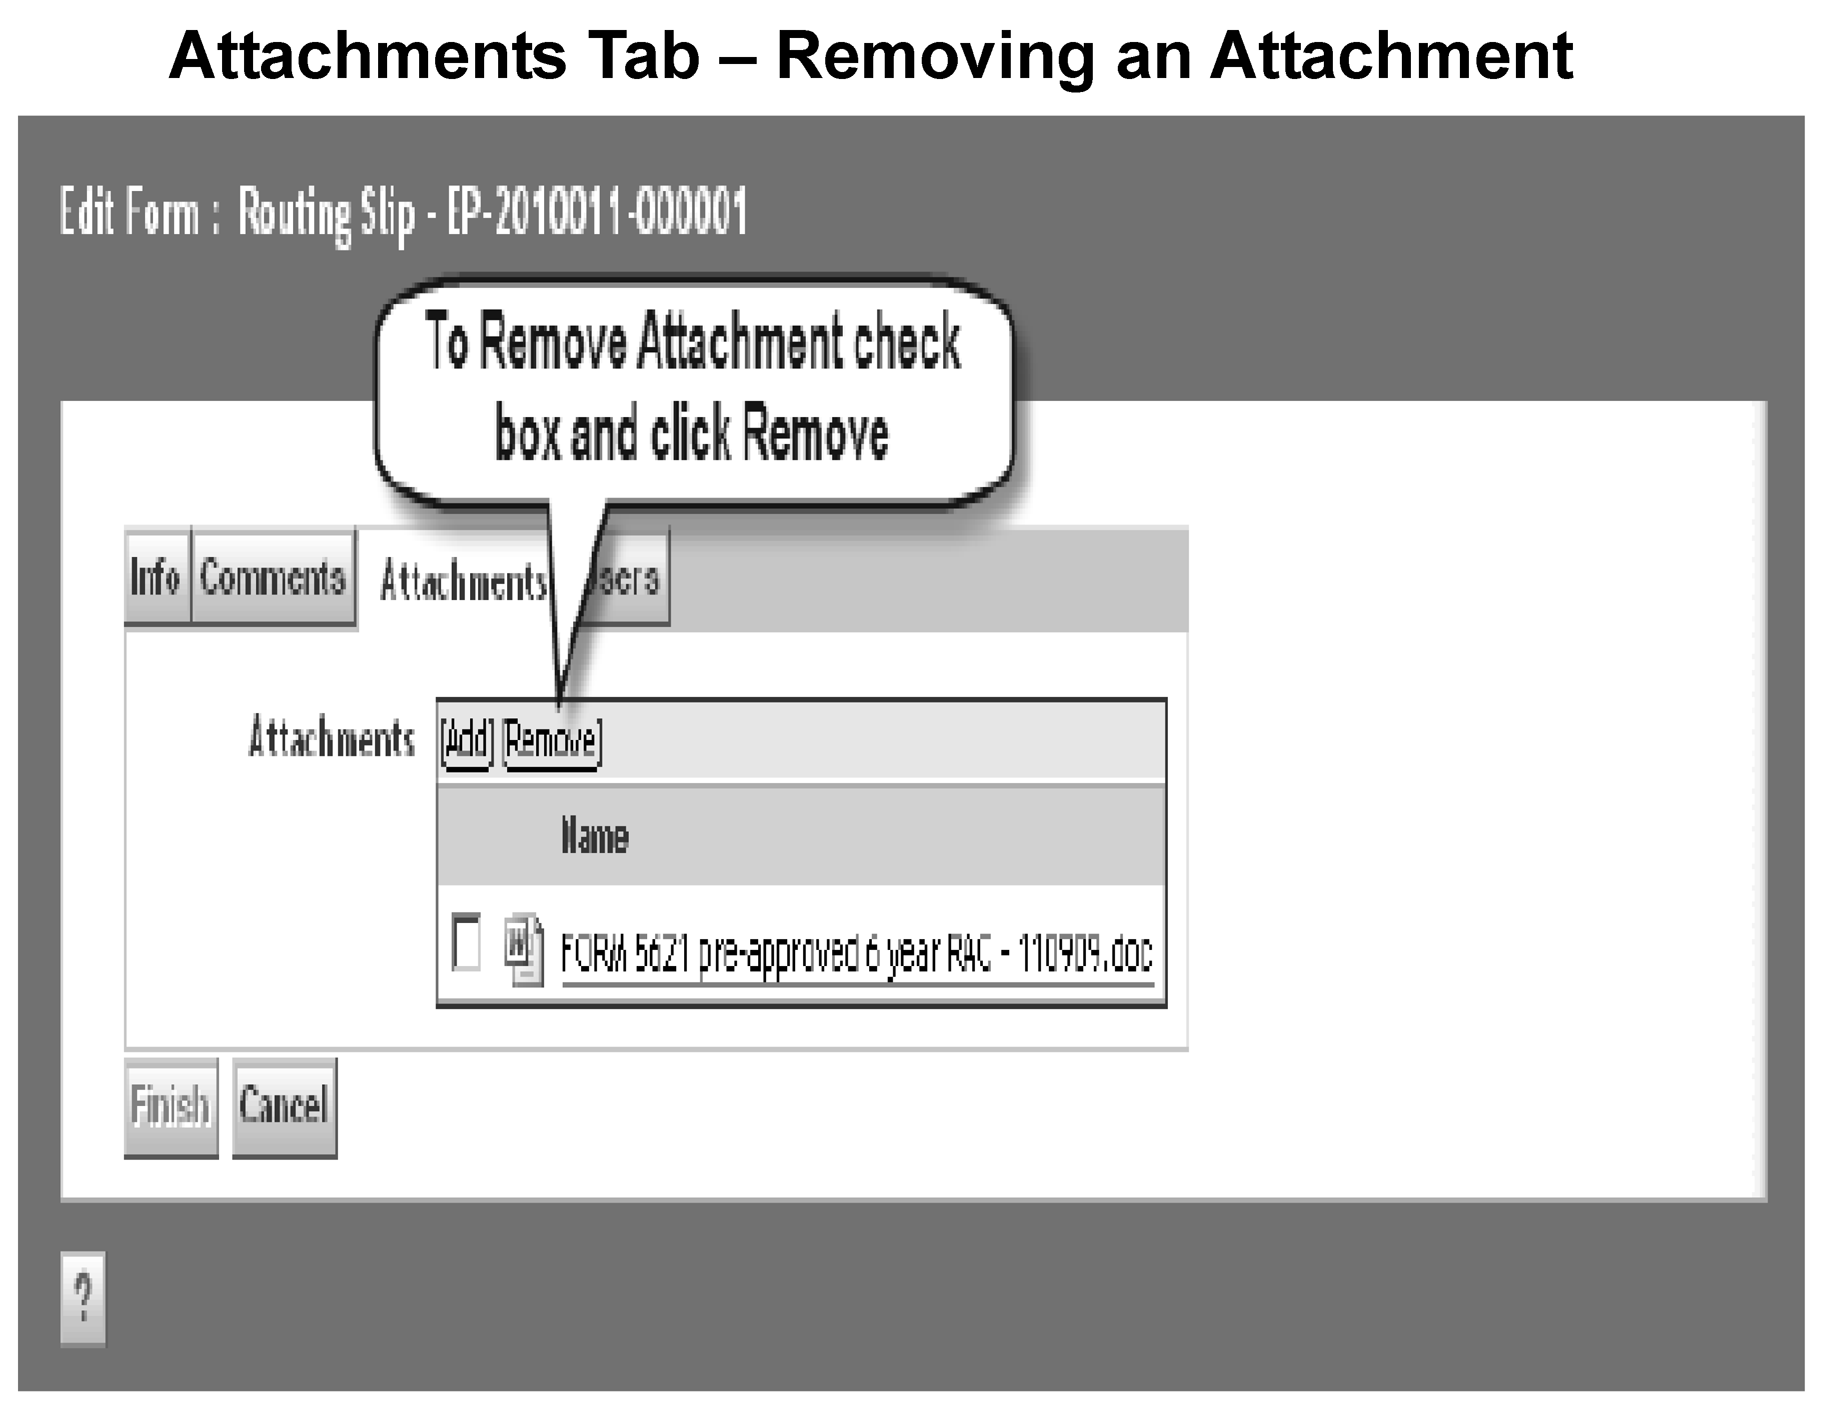
To remove attached documents, click on the box next to the attachment and click Remove. See Exhibit 7.15.8-5, Attachment Tab - Removing an Attachment.
-
After selecting recipients and you’re ready to send the routing slip, select Finish.
-
The users tab allows the router to choose the routee(s) and to send the routing slip to users in a specific order. Only the router’s routing slip will contain a users tab.
-
To select routee(s):
-
TEDS sends a message to the routee’s Inbox. See Exhibit 7.15.8-7,Routee’s Inbox Notification.
-
The sent copy of the routing slip includes a link to the case. The "Routing Slip Notification" icon (check mark ✓) indicates an action is required. The "red flag" icon indicates a simple notification.
-
To access the routing slip:
-
Click Review Routing Slip notification in the Inbox. See Exhibit 7.15.8-8, Reviewing the Routing Slip.
-
Right-click on the Routing Slip Line with the case number on the opened notification or highlight Routing Slip Line and click File on the TEDS toolbar menu.
-
Select Edit from the options in the dialogue box.
-
The routing slip will open. Click Link to Case Folder.
-
TEDS opens the case folder in a new window. See Exhibit 7.15.8-9, Routee's View of the Routing Slip.
-
-
Each routee can review all the case folders and the routing slip attachments. Routees can’t make changes to the case data but may add/delete documents attached to the routing slip. The routee can also create a case chronology entry and input time on the case.
-
Each routee can view, add or delete attachments to the routing slip.
-
View any attachments to the routing slip in the Routing Slip AttachmentsTab.
-
Click the Attachment Link to view the attachment or view the attachment in the working folder.
-
Note that if you remove documents from the Attachments Tab, they will remain in the working folder.
-
-
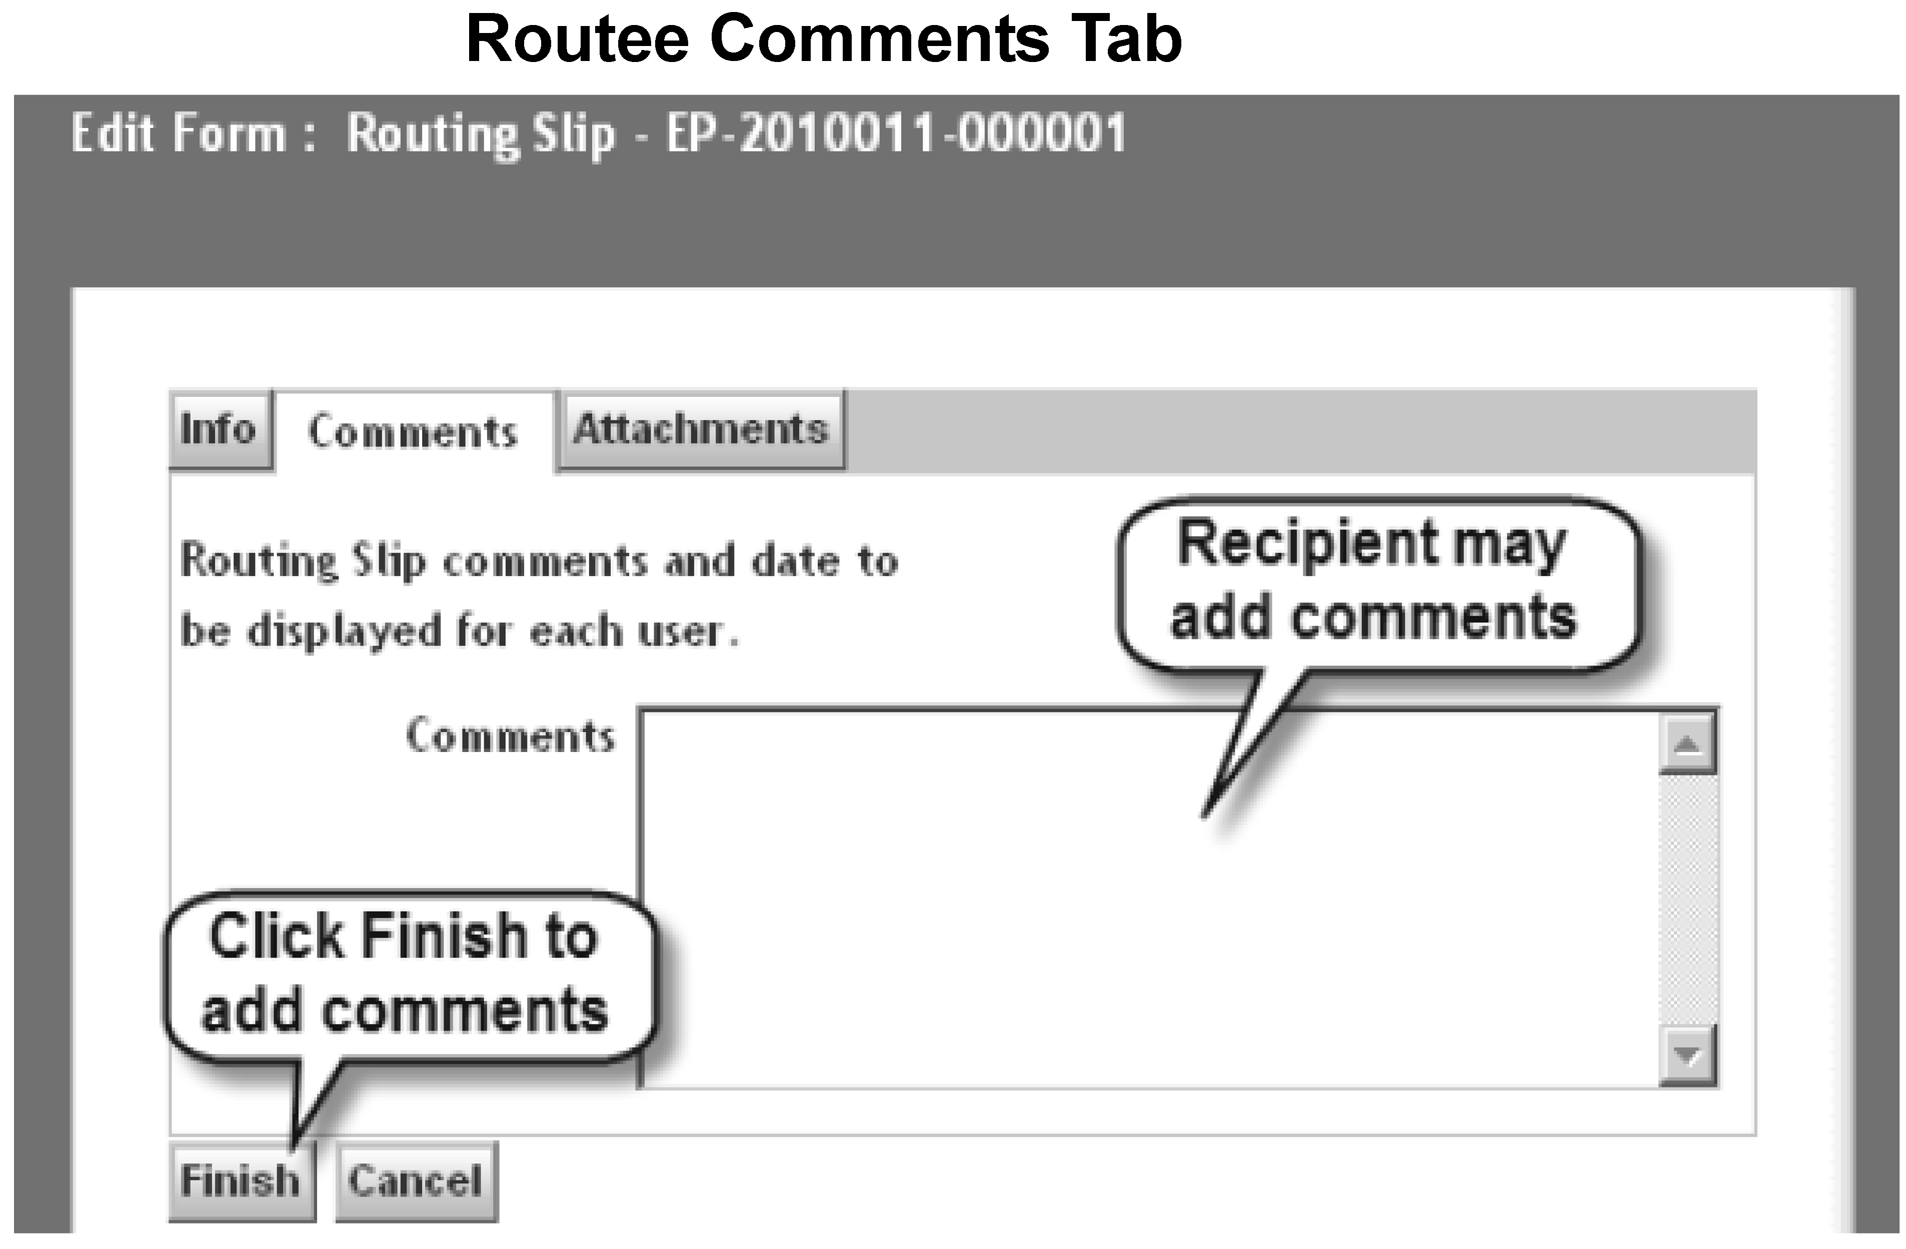
Each routee of a routing slip can enter comments before completing the routing slip, on the Comments tab. Previous comment entries are shown on the Comments tab.
-
After the routee has completed the review, added or deleted the desired attachments, and entered any comments, the routing slip is ready to be completed.
-
From the open Inbox notification, click Review Complete.
-
Click OK to finish or Cancel to abort on the verification screen.
-
-
TEDs sends a message to the router's Inbox when the routee has completed the review.
-
If the case was routed to more than one routee, the completed slip will inform the router the routee has completed the review and the case has been routed to the next routee.
-
The below exhibits contain example screenshots of the routing slip completion process:
-
Exhibit 7.15.8-11, Routee Comments Tab.
-
Exhibit 7.15.8-12, Completing the Routing Slip.
-
Exhibit 7.15.8-13, Notification of Completed Review - Router's Inbox.
-
Exhibit 7.15.8-14, Completing Routing Slip - Routee.
-
-
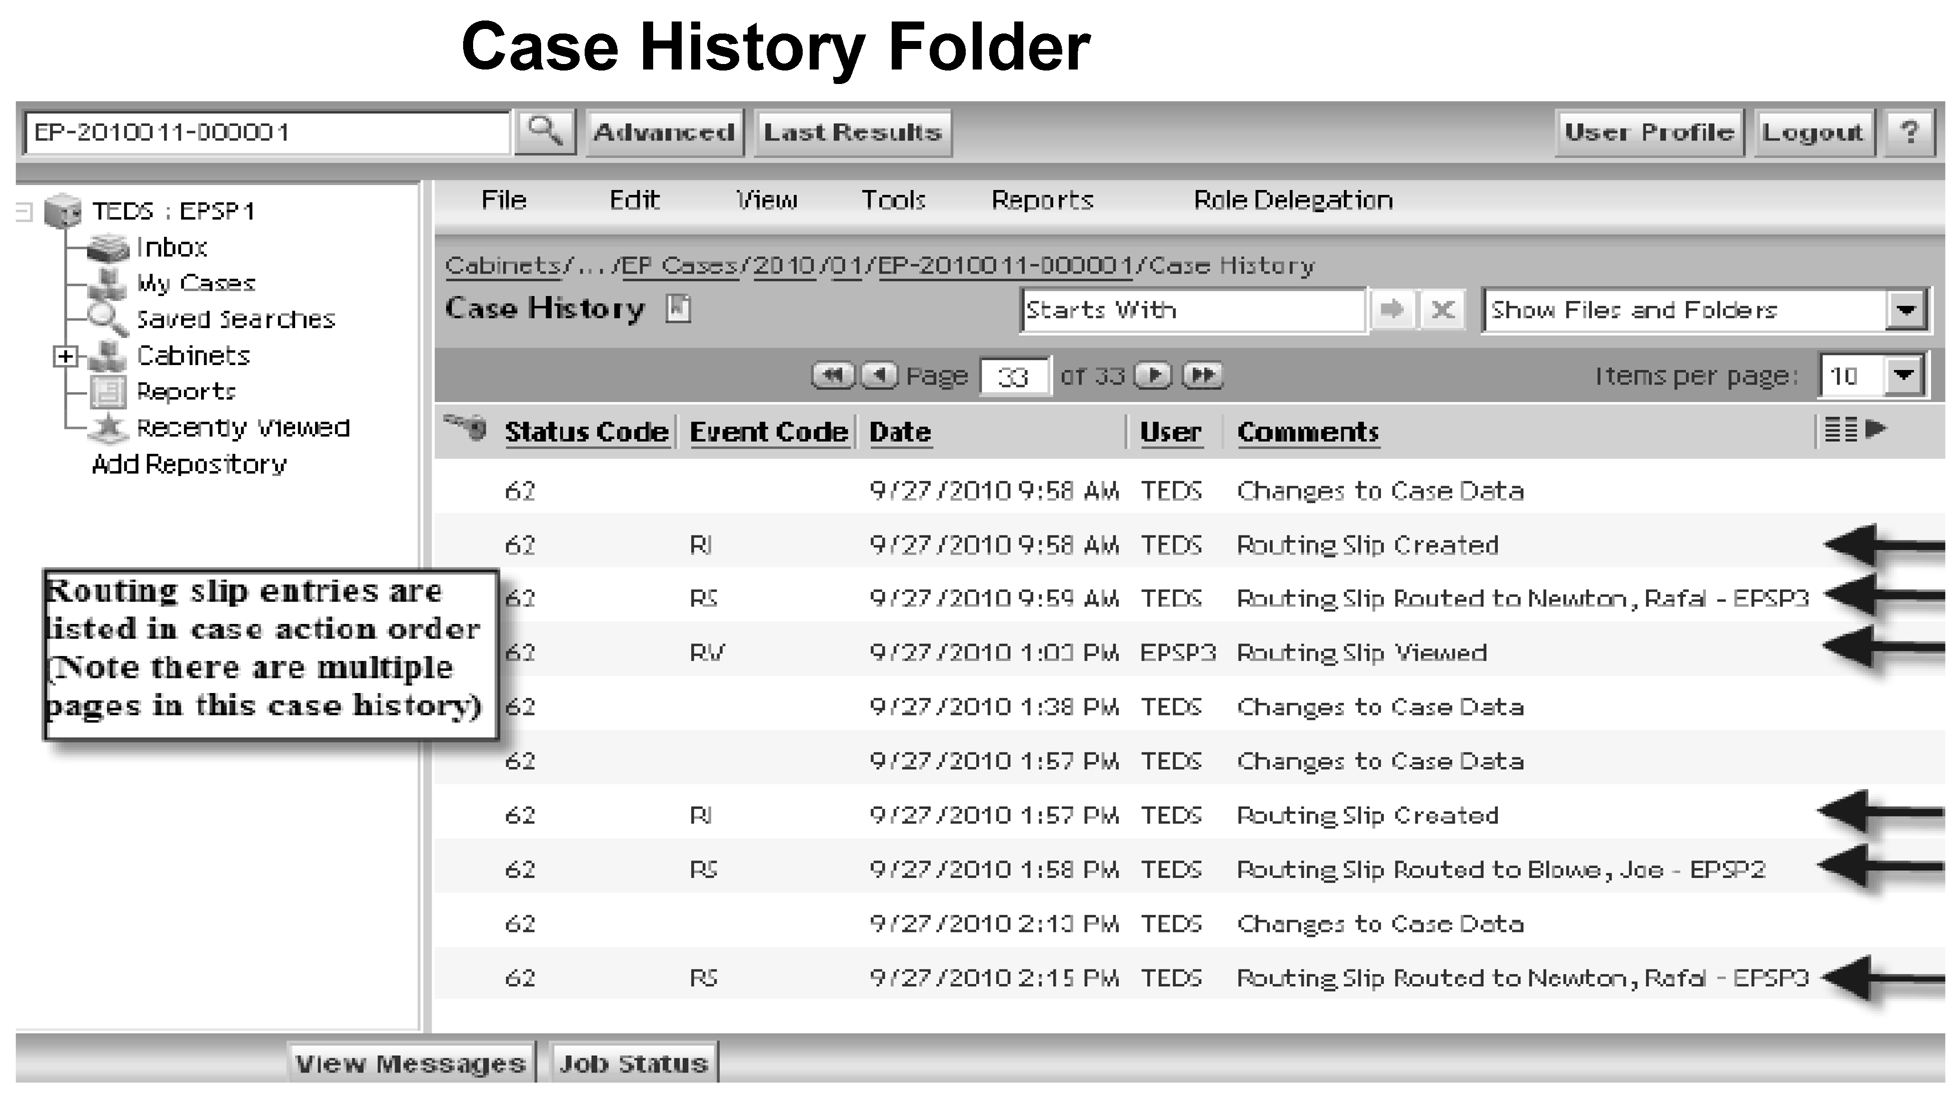
You may review a routing slip’s progress through the Case History folder or the router’s Inbox notifications.
-
The Case History folder displays all case actions including those related to the routing slip. Entries are listed in chronological order regardless of action taken.
-
Exhibit 7.15.8-15, Case History Folder, shows a screenshot of routing slip entries listed in case action order. In this example, the case history has multiple pages.
-
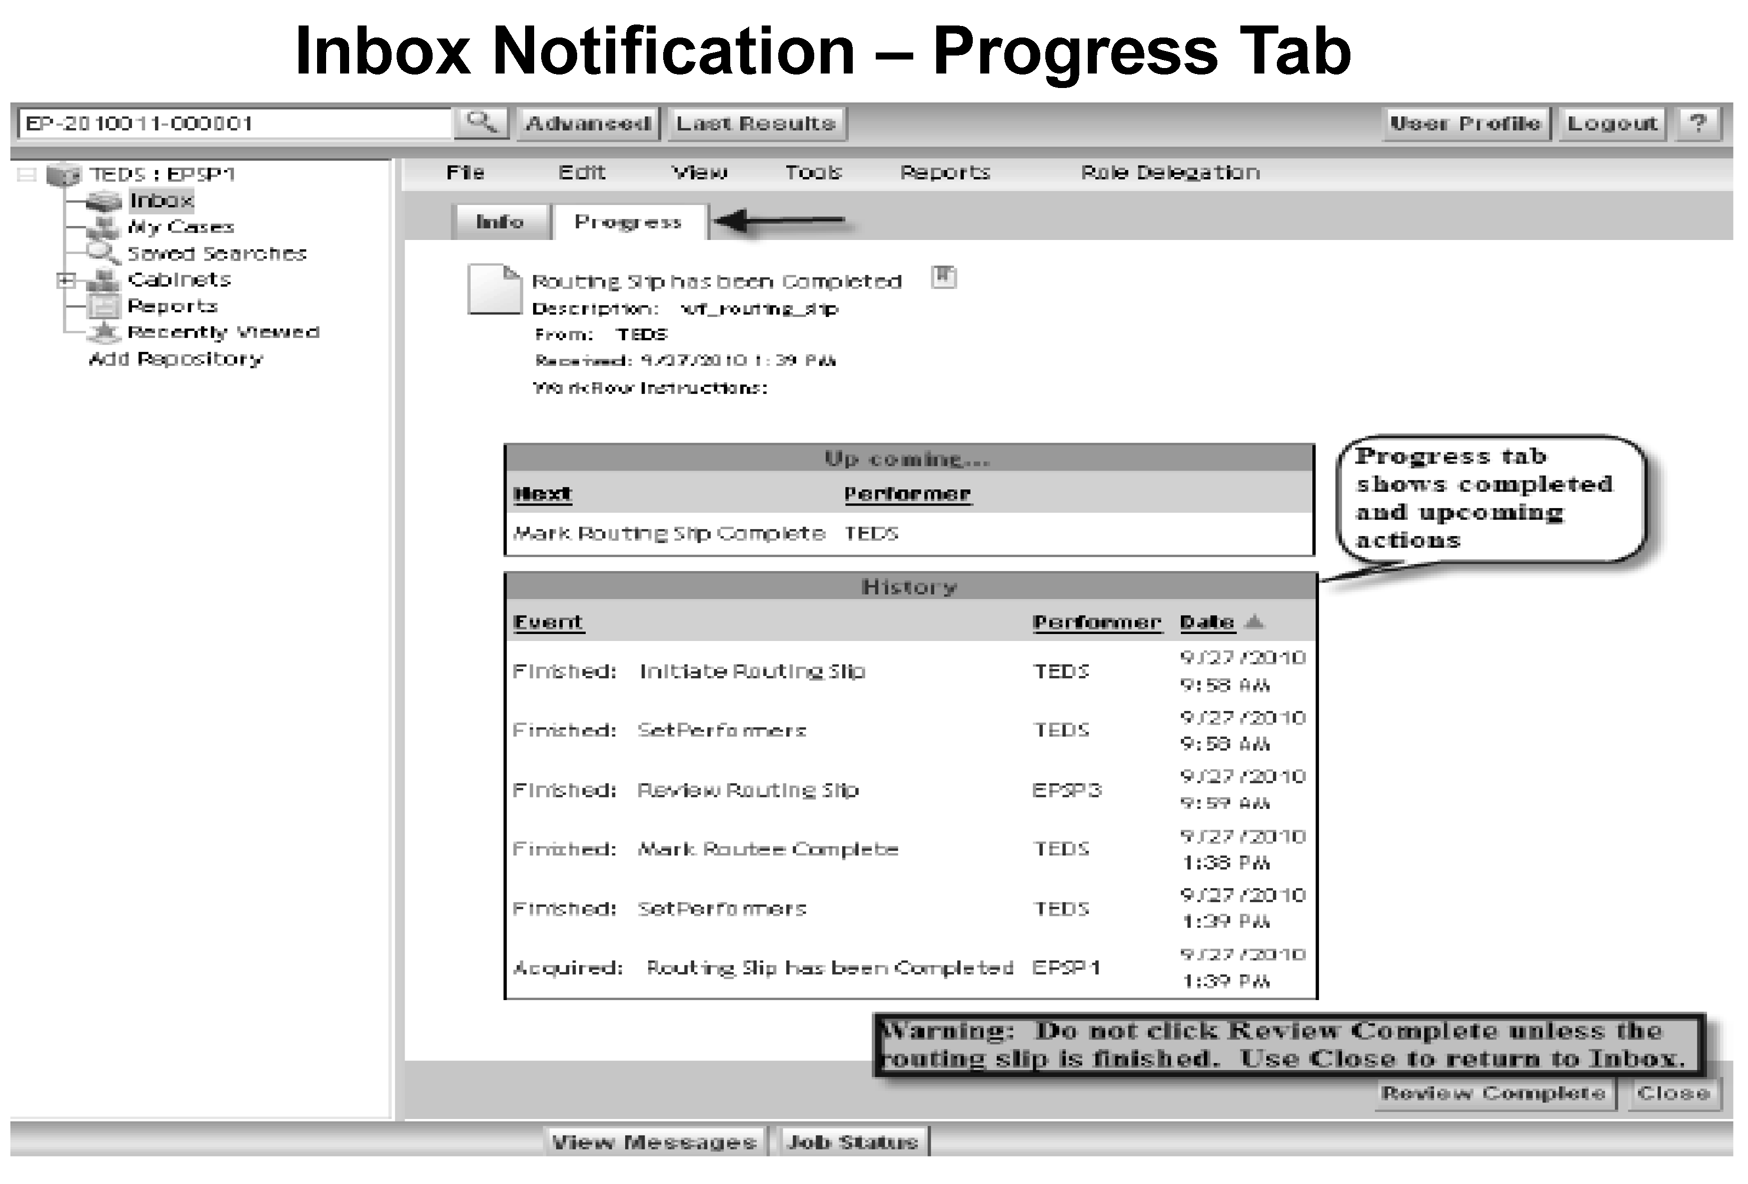
You can track an open routing slip’s progress through Inbox notifications. The Progress tab on the Inbox message gives a status update on the routing slip.
-
To view the Progress tab information, open the Inbox notification message and click the Progress tab at the top of the message.
-
Exhibit 7.15.8-16., Inbox Notification - Progress Tab shows a screenshot of completed and upcoming actions.
-
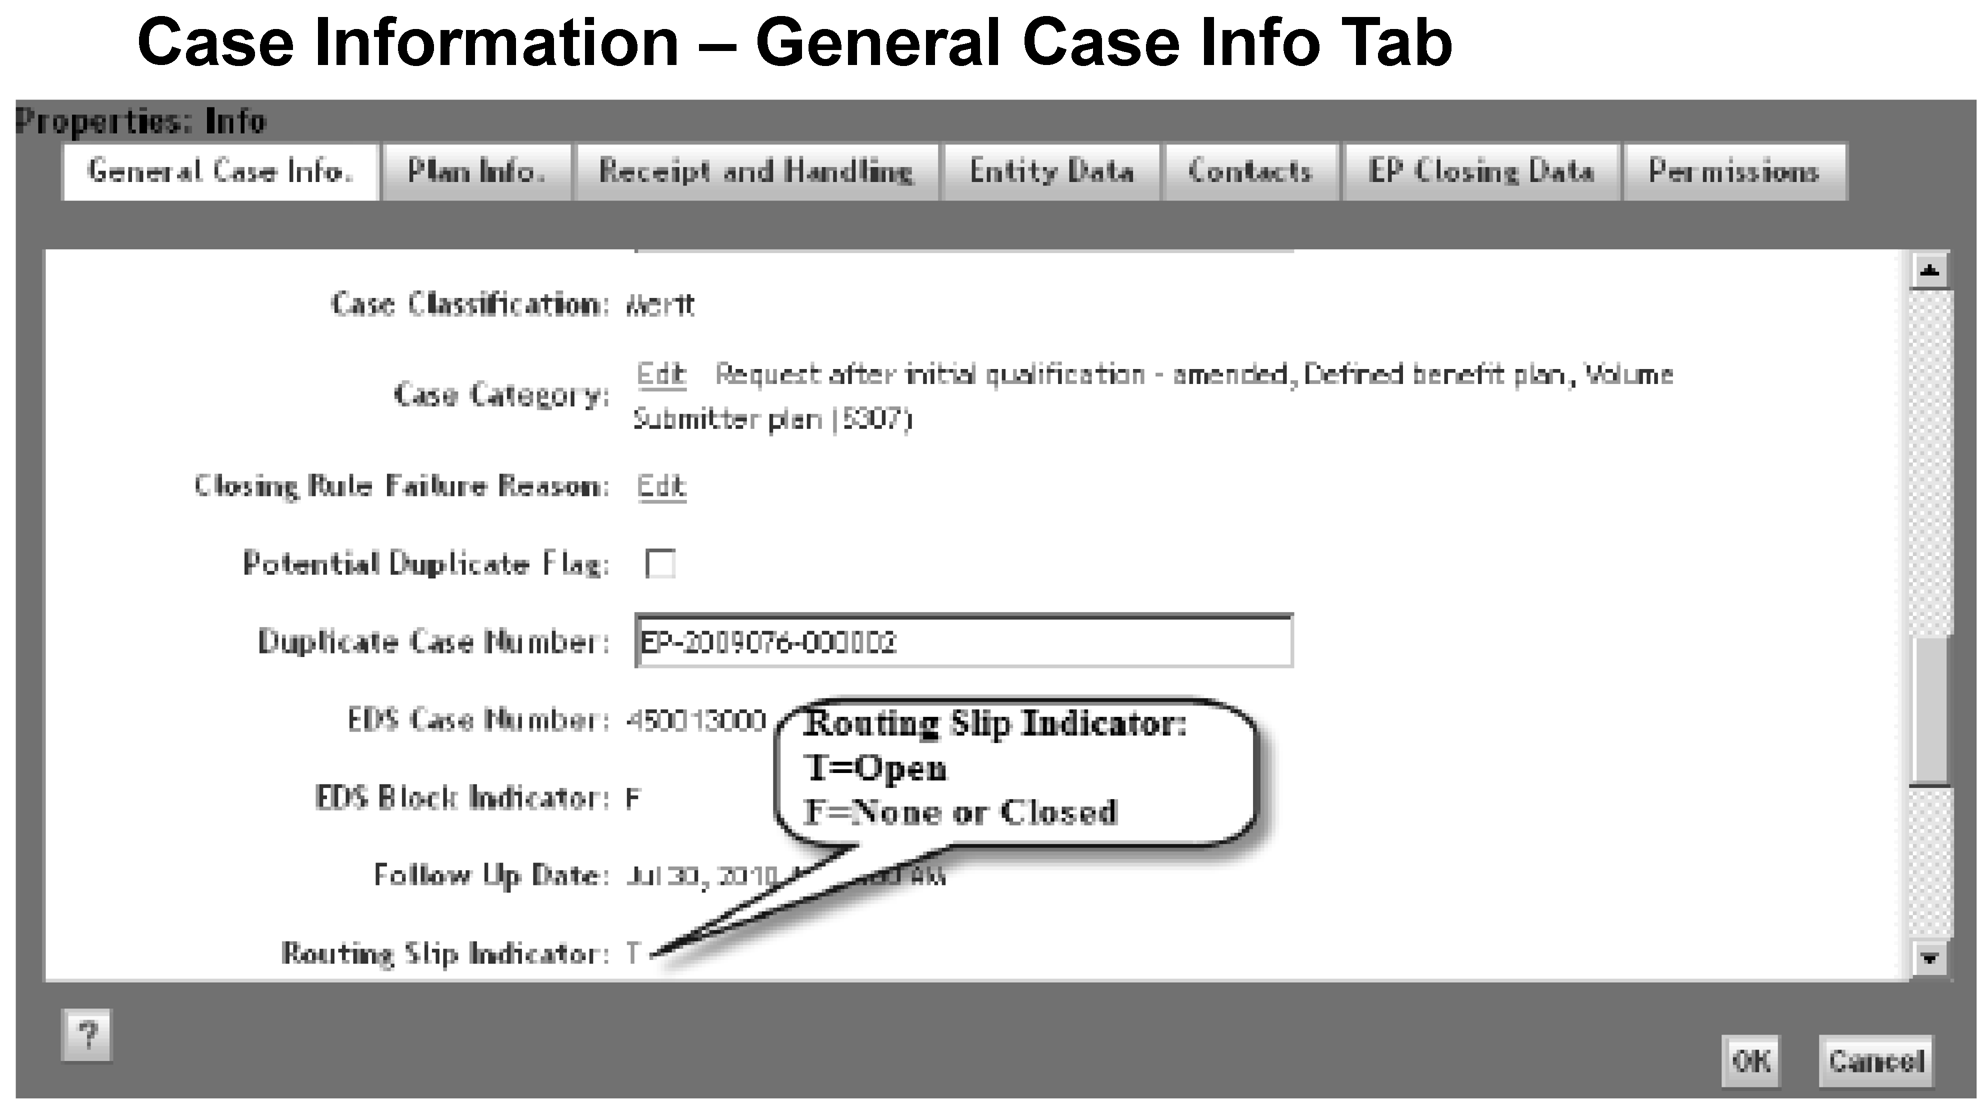
The routing slip indicator is located on the General Case Information Tab on the case Properties Info. screen at the bottom of the page.
-
The indicator shows case routing slips’ open or closed status.
-
An open routing slip and its attachments are located in the Working folder. When a routing slip has been closed or terminated, it automatically moves to the Non-Disclosable folder. However, you must move the routing slip attachments in the Working folder manually to the appropriate folder before case closing because attachments don’t move automatically with the closed routing slip. Once you close the routing slip and it’s in the Non-Disclosable folder, it can’t be moved to the Purge folder.
-
An open routing slip will prevent a case from being transferred or updated to status 74PC OR 57.
-
See Exhibit 7.15.8-17, Case Information - General Case Info. Tab.
-
The router's manager or router may terminate a routing slip at any time.
-
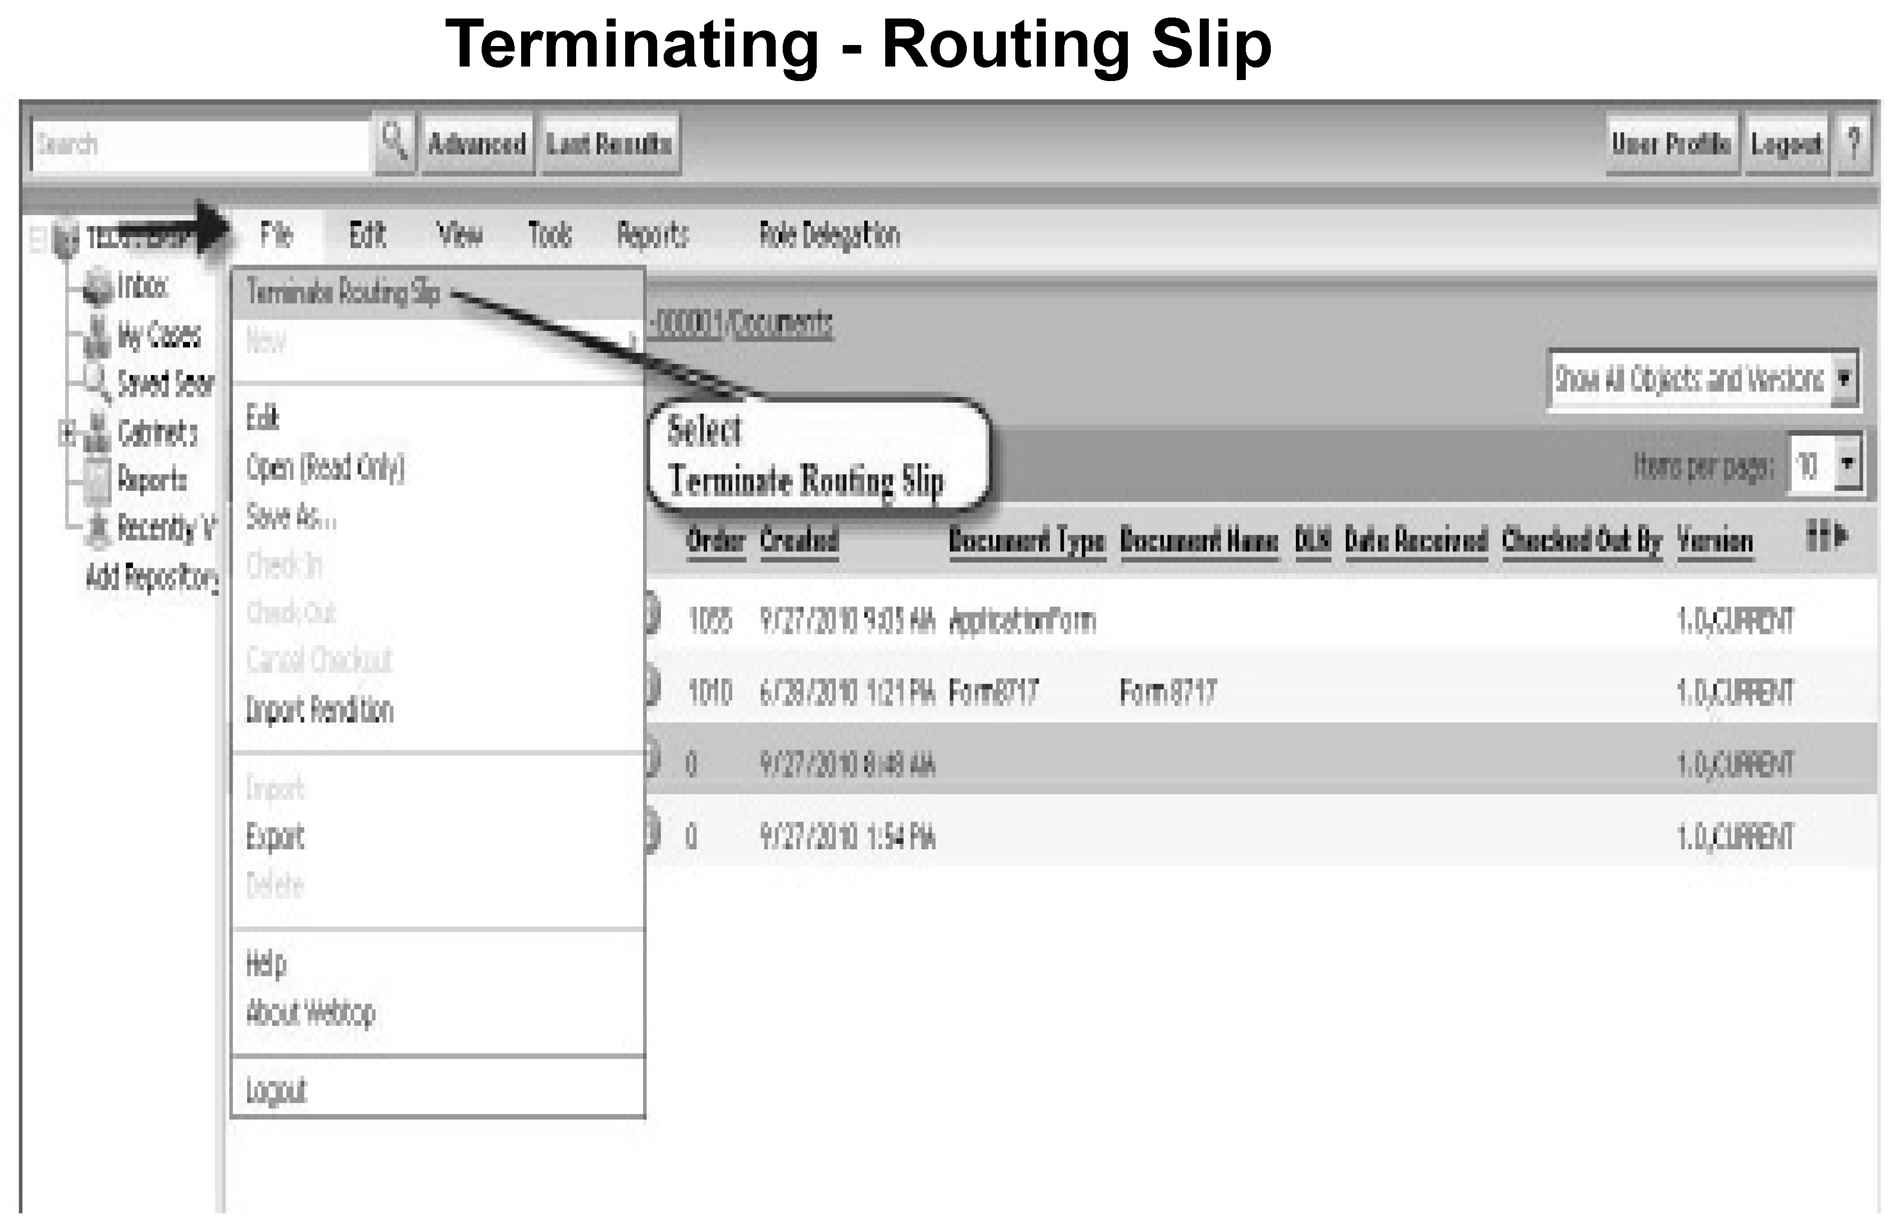
To terminate an open routing slip, do the following:
-
Open the Working Folder.
-
Click on the line of the routing slip to be terminated.
-
Click File.
-
Select Terminate Routing Slip from the drop-down menu.
-
Click OK on the termination verification screen to complete the action.
-
-
See Exhibit 7.15.8-18, Terminating - Routing Slip.
-
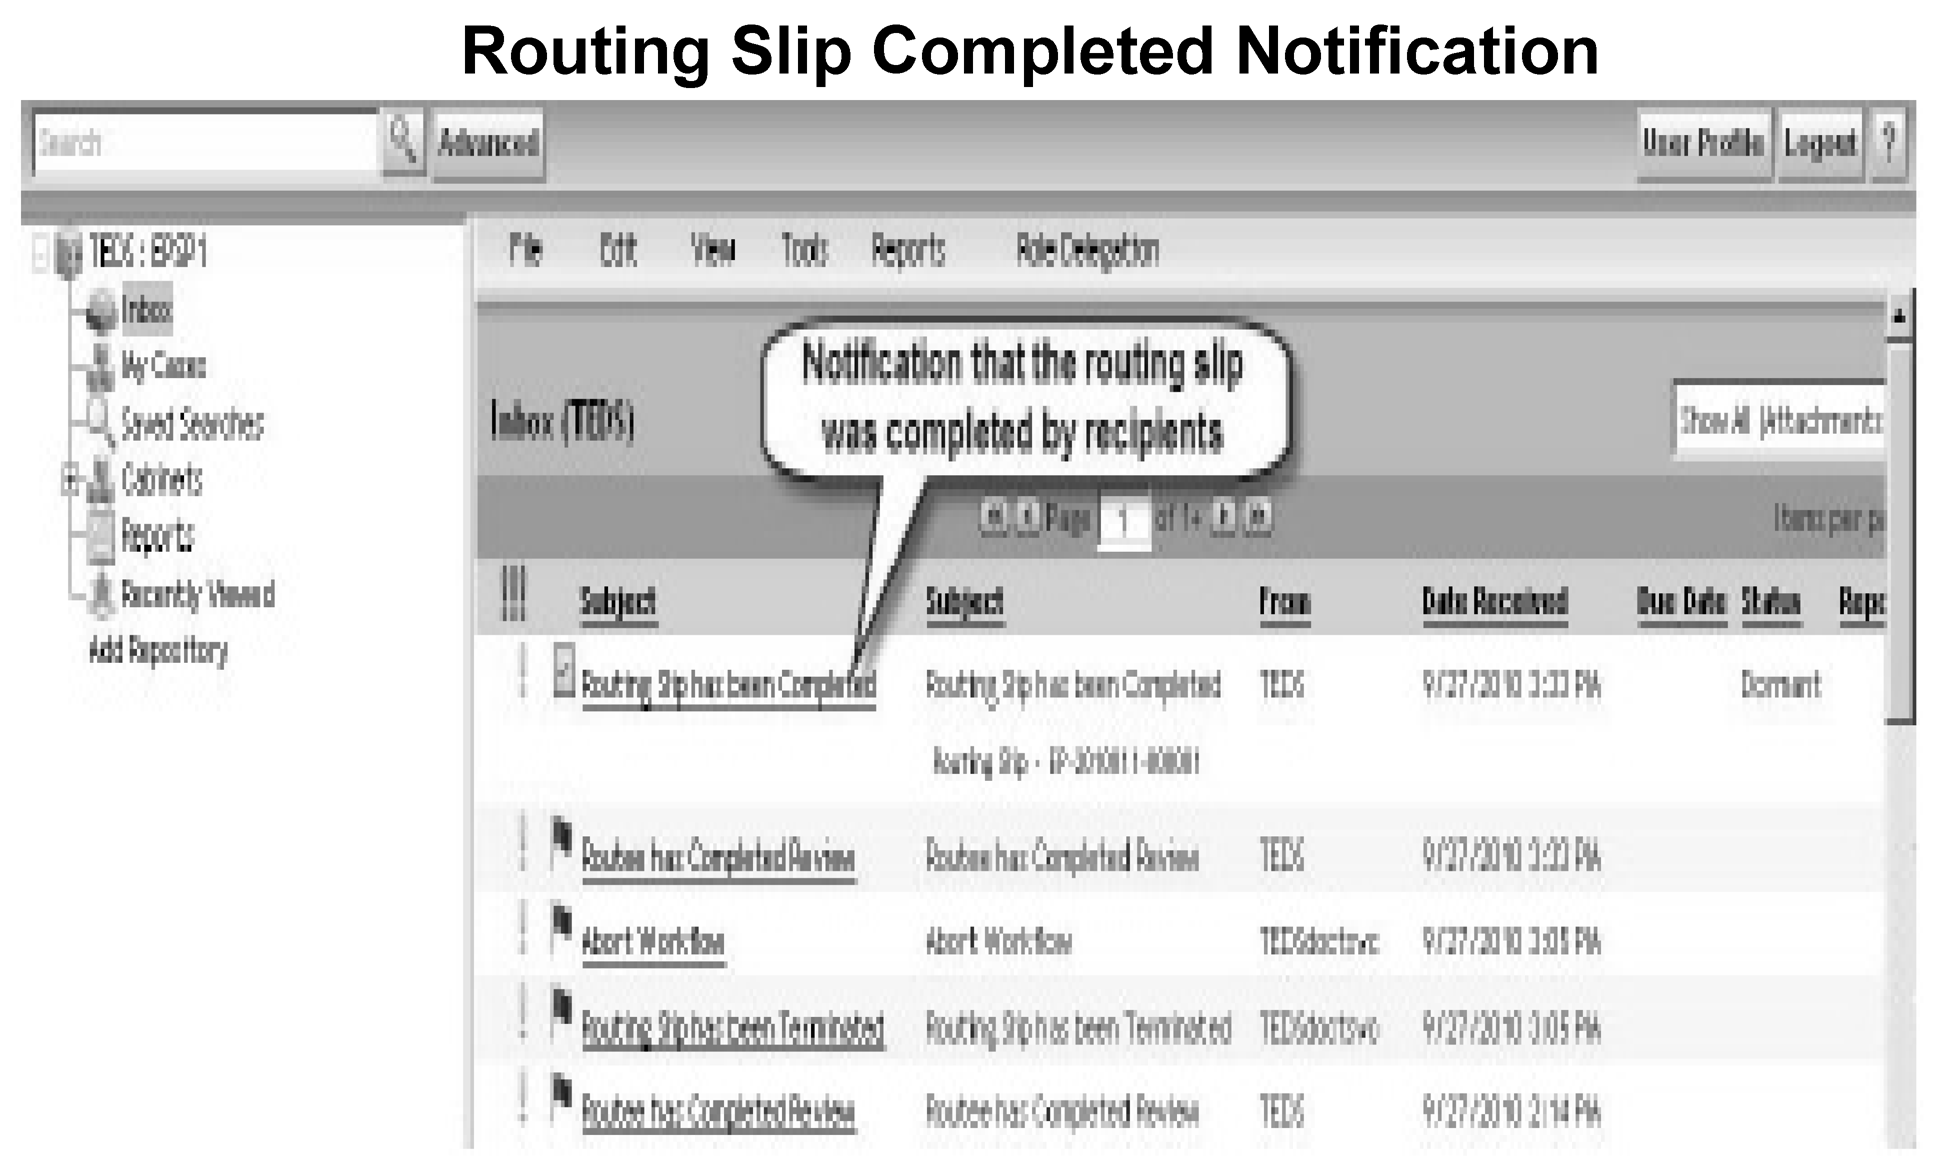
When the routee/router's/router completes the routing slip, TEDS sends a message to the router's Inbox indicating an action is required. The router should review the routing slip and comments.
-
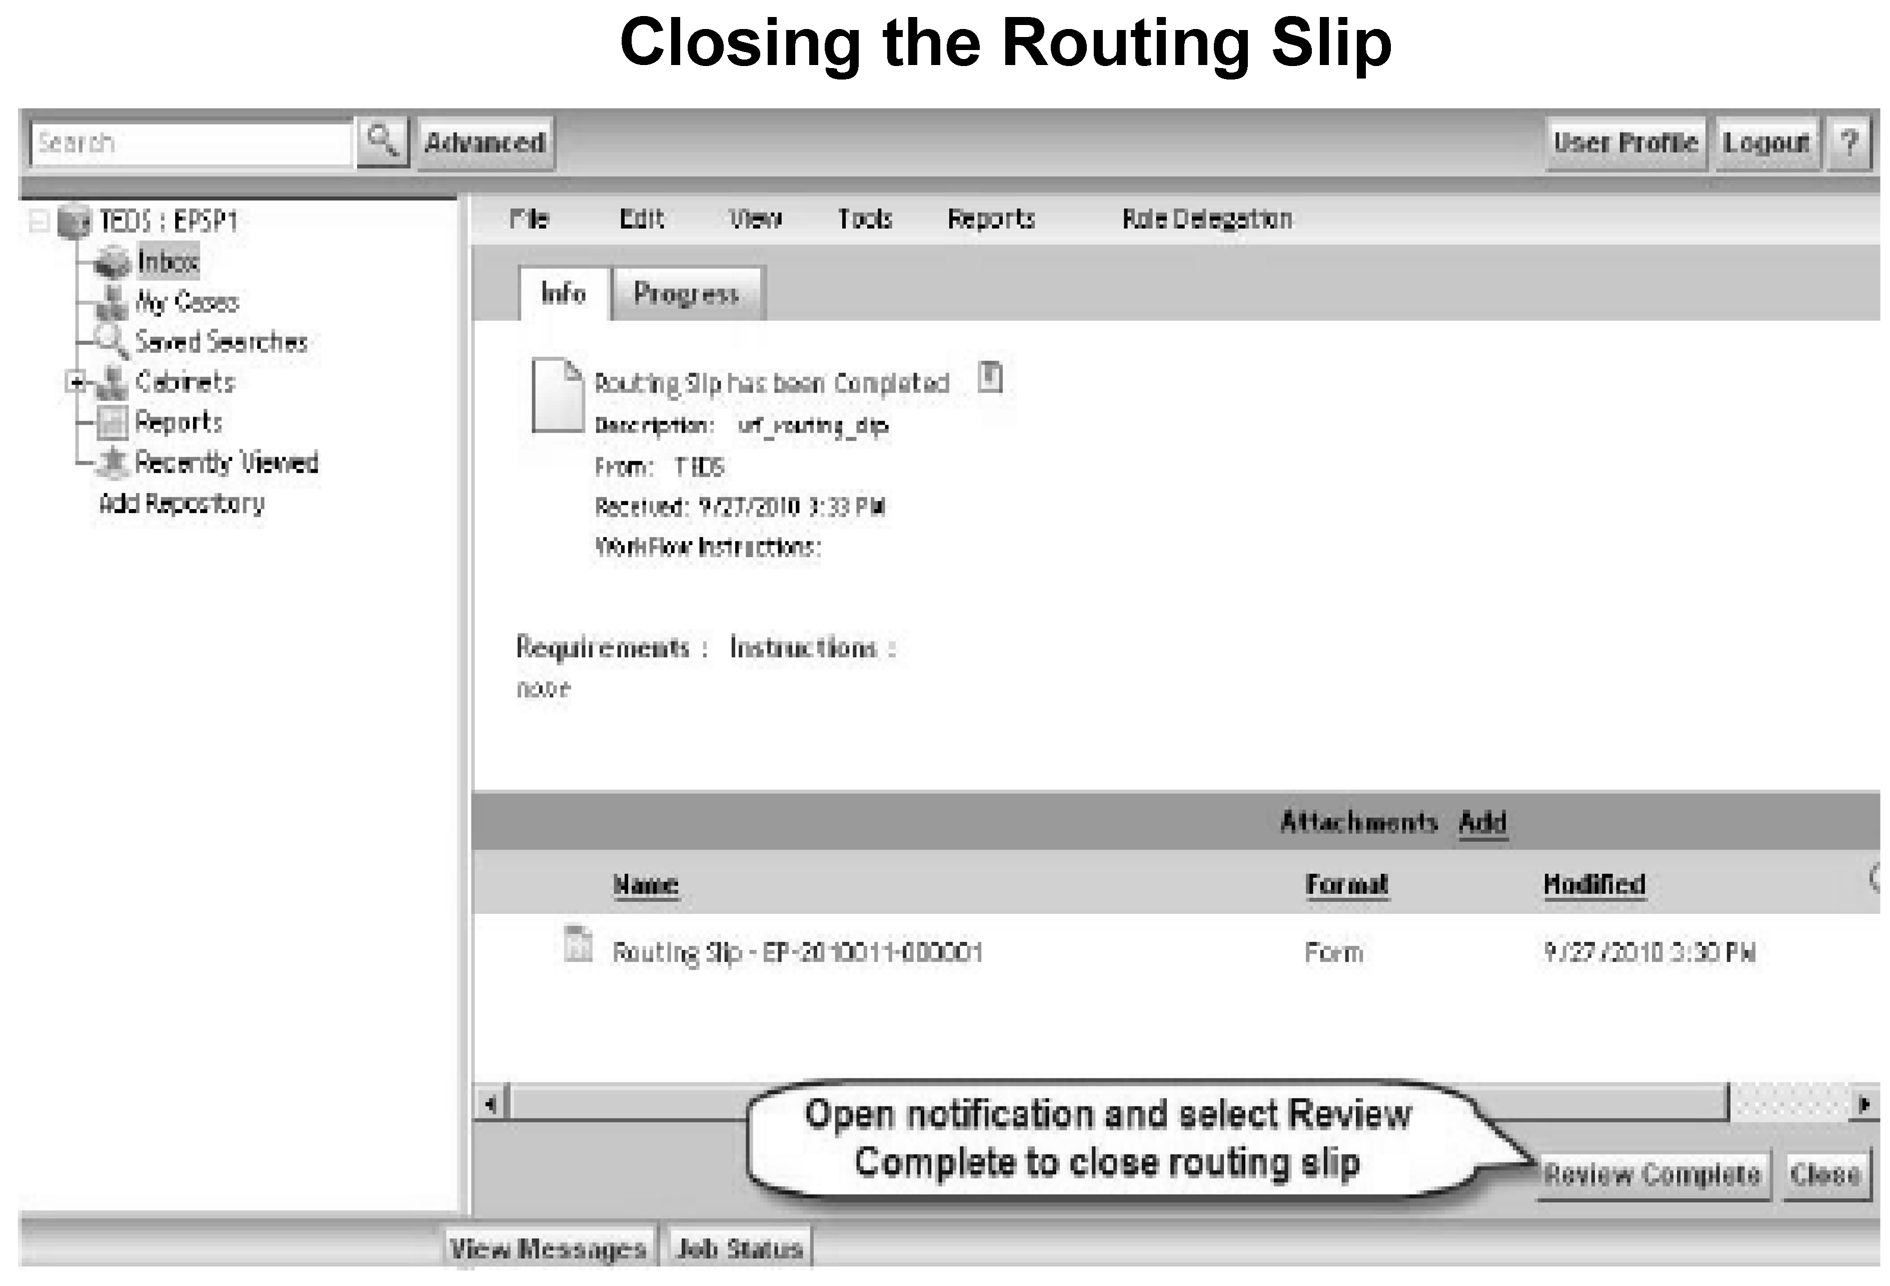
To close the routing slip notification, the router must open the completed routing slip notification and click Review Complete. Closing the routing slip is a TEDS case closure requirement.
-
See Exhibit 7.15.8-19, Routing Slip Completed Notification and Exhibit 7.15.8-20, Closing the Routing Slip.

 )
or https:// means you've safely connected to the .gov website. Share sensitive information only on official, secure websites.

