)
또는 https:// 는 안전하게 .gov 웹사이트에 접속했다는 뜻입니다. 오직 공식, 보안 웹사이트 상에서만 민감한 정보를 공유하십시오.
)
또는 https:// 는 안전하게 .gov 웹사이트에 접속했다는 뜻입니다. 오직 공식, 보안 웹사이트 상에서만 민감한 정보를 공유하십시오.
- 7.15.6 Navigating the Tax Exempt Determination System (TEDS)
- 7.15.6.1 Program, Scope and Objectives
- 7.15.6.1.1 Background
- 7.15.6.1.2 Authority
- 7.15.6.1.3 Roles and Responsibilities
- 7.15.6.1.4 Program Management and Review
- 7.15.6.1.5 Program Controls
- 7.15.6.1.6 Terms and Acronyms
- 7.15.6.1.7 Related Resources
- 7.15.6.2 Document Repository
- 7.15.6.2.1 Screen Selection Options
- 7.15.6.3 Cabinets
- 7.15.6.3.1 Universal Cabinets
- 7.15.6.3.2 Personal Cabinets
- 7.15.6.3.2.1 Inbox Cabinet
- 7.15.6.3.2.2 My Cases Cabinet
- 7.15.6.3.2.3 Saved Searches Cabinet
- 7.15.6.3.2.4 Reports Cabinet
- 7.15.6.3.2.5 Recently Viewed Cabinet
- 7.15.6.4 Accessing a Case File
- 7.15.6.5 Case Information File
- 7.15.6.6 Viewing Documents in TEDS
- 7.15.6.7 Display Screen Options
- 7.15.6.7.1 Page Display
- 7.15.6.7.2 Column Headers
- 7.15.6.7.3 Removing Column Headers
- 7.15.6.7.4 Re-ordering Column Headers
- 7.15.6.8 User Profile
- 7.15.6.8.1 TEDS Roles
- 7.15.6.8.2 Group Profile Screen
- 7.15.6.9 Query and Search Capabilities
- 7.15.6.9.1 Query Options
- 7.15.6.9.1.1 Simple Search Query
- 7.15.6.9.1.2 Advanced Search Query
- 7.15.6.9.1.2.1 Selecting Object Type
- 7.15.6.9.1.2.2 Properties
- 7.15.6.9.1.2.2.1 Add Additional Property
- 7.15.6.9.1.2.2.2 Removing Property
- 7.15.6.9.1.2.3 Searching by Date
- 7.15.6.9.1.2.4 Searching by Size
- 7.15.6.9.2 Search Results and Editing Search Criteria
- 7.15.6.9.2.1 Count Results
- 7.15.6.9.2.2 Editing Searches
- 7.15.6.9.2.3 Saving Searches
- 7.15.6.9.2.4 Finding Saved Searches
- 7.15.6.9.2.5 Run a Saved Search Query
- 7.15.6.9.3 Exporting Search Results
- 7.15.6.9.1 Query Options
- 7.15.6.10 Viewing TEDS Documents Using Optical Character Recognition (OCR)
- Exhibit 7.15.6-1 Screen Selection Options
- Exhibit 7.15.6-2 TEDS Case File Main Screen
- Exhibit 7.15.6-3 Removing Column Headers
- Exhibit 7.15.6-4 Re-order Column Headers
- Exhibit 7.15.6-5 Advanced Search Query Screen
- Exhibit 7.15.6-6 Preferences: Display Settings: Classic Columns for Search
- Exhibit 7.15.6-7 Selecting Object Type
- Exhibit 7.15.6-8 Searching by Properties' Field
- Exhibit 7.15.6-9 Adding Additional Property Values
- Exhibit 7.15.6-10 Removing Search Properties
- Exhibit 7.15.6-11 Searching by Date
- Exhibit 7.15.6-12 Searching by Size
- Exhibit 7.15.6-13 Query Results Count Only
- Exhibit 7.15.6-14 Sample Search Results/How to Begin Edit Search
- Exhibit 7.15.6-15 Methods of Saving a Search
- Exhibit 7.15.6-16 Naming the Saved Search
- Exhibit 7.15.6-17 Finding a Saved Search
- Exhibit 7.15.6-18 Running a Saved Search
- Exhibit 7.15.6-19 Remove and Add Column Preferences
- Exhibit 7.15.6-20 Exporting to an Excel Worksheet
- 7.15.6.1 Program, Scope and Objectives
Part 7. Rulings and Agreements
Chapter 15. Employee Plans TEDS User Manual
Section 6. Navigating the Tax Exempt Determination System (TEDS)
7.15.6 Navigating the Tax Exempt Determination System (TEDS)
Manual Transmittal
August 20, 2025
Purpose
(1) This transmits revised IRM 7.15.6, Employee Plans TEDS User Manual, Navigating the Tax Exempt Determination System (TEDS).
Material Changes
(1) IRM 7.15.6.1(5) Added Primary Stakeholders.
(2) IRM 7.15.6.1.3 Added Roles and Responsibilities.
(3) IRM 7.15.6.1.4 Added Program Management and Review.
(4) IRM 7.15.6.1.5 Added Program Controls
(5) IRM 7.15.6.1.6 Renamed Acronyms to Terms and Acronyms.
(6) IRM 7.15.6.1.7 Added Related Resources.
(7) Various edits have been made throughout the IRM for clarity.
Effect on Other Documents
This supersedes IRM 7.15.6, dated November 21, 2021.Audience
Tax Exempt and Government EntitiesEmployee Plans
Effective Date
(08-20-2025)Eric D. Slack
Director, Employee Plans
Tax Exempt and Government Entities
-
Purpose: This IRM discusses guidance on navigating the Tax Exempt Determination System (TEDS).
-
Audience: Employee Plans (EP) employees involved in the issuance of determination letters.
-
Policy Owner: Director, EP.
-
Program Owner: EP.
-
Primary Stakeholders:
-
Internal - Director, Employee Plans; Director, Employee Plans Rulings and Agreements; EP Tax Law Specialists and Agents; Actuaries; Associate Chief Counsel (EEE), TE/GE Division.
-
External - Plan sponsors, plan representatives, plan participants.
-
-
Program Goal: To explain:
-
How to use the TEDS Repository to search, retrieve and view case data and images.
-
How to change TEDS case data and entity information.
-
How to create, edit and execute (run) search queries.
-
How to use Optical Character Recognition (OCR).
-
How TEDS interacts with Employee Plans-Exempt Organizations Determination System (EDS) in the case closing process.
-
-
The Tax Exempt Determination System (TEDS) is the primary system Employee Plans (EP) uses to process Determination Letter (DL) applications. Generally, EP will establish and work DL applications in TEDS but create the final DL in the EP/EO Determination System (EDS).
-
TEDS stores in an electronic Records Repository:
-
Images of original determination applications and associated data.
-
Subsequent related documentation.
-
-
Delegation Order 7-1, IRM 1.2.2.8.1, states the Director, Employee Plans has authority to issue favorable DLs on the qualified status of:
-
Pension, profit-sharing, stock bonus, annuity, and employee stock ownership plans under IRC 401, IRC 403(a), IRC 409, and IRC 4975(e)(7).
-
The status for exemption of any related trusts or custodial accounts under IRC 501(a).
-
-
Find a complete list of delegation orders governing EP Rulings and Agreements at Delegation orders and policy statements by process.
-
The mission of Employee Plans is to provide EP’s customers top-quality service by helping them understand and comply with applicable tax laws and to protect the public interest by applying the tax laws with integrity and fairness to all.
-
The Director, EP, reports to the Deputy Commissioner, TE/GE, and is responsible for planning, managing, directing and executing nationwide EP activities.
-
EP responsibilities include:
-
Employee plans (including the qualification of pension, annuity, profit-sharing, and stock bonus plans, simplified employee pensions, saving incentive match plans for employees, and tax-sheltered annuities) and related trusts.
-
Tax treatment of participants and their beneficiaries and deductions for employer contributions.
-
Procedural and administrative provisions with respect to such plans.
-
-
The Director, EP R&A, reports to the Director, EP, and is responsible for three types of services for retirement plans - voluntary compliance, determination letters, and technical guidance.
-
Responsibilities of the EP R&A staff include:
-
Processing determination letter requests from employers regarding the qualified status of their pension, annuity, profit sharing and stock bonus plans.
-
Issuing opinion and advisory letters to specific requestors regarding preapproved pension, annuity, and profit-sharing plans, including individual retirement accounts, simplified employee pensions and savings incentive match plans for employees, and tax-sheltered annuities.
-
Developing and operating voluntary correction programs, such as the Employee Plans Compliance Resolution System (EPCRS) program and issuing compliance statements or entering into closing agreements under these programs.
-
Processing requests for changes in funding method and making other actuarial determinations and interpretations.
-
Coordinating with Chief Counsel on requests for funding waivers.
-
Developing and maintaining responsibility for actuarial publications and other standards for the valuation of transfers of future interests for income, estate and gift tax purposes.
-
Coordinating with TE/GE Division Counsel, Associate Chief Counsel and the DOJ on litigation issues and declaratory judgment cases under the Internal Revenue Code. (IRC 7476).
-
-
Program reports:
-
The EP Determinations program uses Business Objects to view, create, and modify inventory and employee records. Business Objects uses tools to provide a built-in interface to query and analyze data and to build reports.
-
Monthly reports detailing the current inventory of cases by area and their status are produced and provided to the Director, EP R&A, Area Managers, and frontline managers.
-
Ad-hoc reports are produced as requested by determinations personnel with appropriate permission.
-
Each quarter, EP Determinations Quality Assurance issues reports to summarize the results of their TEQMS reviews. See IRM 7.11.3, Tax Exempt Quality Measurement System (TEQMS).
-
-
Program effectiveness:
-
EP Determinations monitors business unit progress toward completing and closing cases in inventory. They provide status and progress reports to IRS leadership on a regular, recurring basis. Effectiveness is measured by analysis of compliance trends and results.
-
-
The IRS receives EP determination letter applications and user fees from taxpayers on Pay.gov
-
The user fee information is then transferred to LINUS to ensure it is properly recorded.
-
The application information from Pay.gov is transferred to Tax Exempt Determination System (TEDS) and EP/EO Determination System (EDS), which are the systems that EP Determinations uses to control their inventory.
-
TEDS contains roles and permissions to ensure proper separation of duties IRM 7.15.4.
-
The EP Determinations Area Managers coordinate the assignment of inventory.
-
In order to ensure a consistent level of managerial engagement in the process of making key strategic decisions during a determination letter review, the specialist submits requests for approval by their manager through TEDS.
-
The manager approves or rejects any request through TEDS.
-
EP Determinations QA reviewers perform reviews on mandatory review cases and for cases selected for the Tax Exempt Quality Measurement System (TEQMS) to ensure that specialists are conducting their determination letter reviews per technical, procedural and administrative requirements. See IRM 7.11.3 and IRM 7.11.9 for more information.
-
The IRS is fully committed to protecting the privacy rights of taxpayers and employees. Privacy laws are included in the IRC, the Privacy Act of 1974, the Freedom of Information Act, and IRS policies and practices. For more information about these laws, visit the FOIA Library\Internal Revenue Service (irs.gov).
-
For questions about privacy, email *Privacy.
-
For questions about disclosure, email *Disclosure.
-
-
The table lists commonly used acronyms and their definitions.
Acronym Term BRE Business Rules Engine DL Determination Letter EDS EP/EO Determination System EP Employee Plans EP/EO Employee Plans-Exempt Organizations NAI National Assigned Inventory NUI National Unassigned Inventory OCR Optical Character Recognition TEDS Tax Exempt Determination System
-
The document repository is a virtual storehouse. It contains:
-
Electronic cabinets.
-
Individual case folders that store images of documents, reports, templates, messages, and personal files.
-
-
The document repository enhances EP Determinations ability to:
-
Organize work processes.
-
Manage case inventory.
-
Identify and associate documents with the correct case folder.
-
Ease determination applications processing.
-
Research open and closed inventory.
-
-
Use the documents repository to search, retrieve and view data and images. Access the different system components through the "Navigation" screen. As a user, you are given roles and permissions that allow you to access specific aspects of the system. Your permissions are based on your role(s). (See IRM 7.15.4, Tax Exempt Determination System (TEDS) Roles and Delegations.)
-
The following terms are used to describe the different parts of the TEDS screen:
Term Description Navigation Pane Contains your Inbox, My Cases, Templates, etc. and allows you to navigate through the repository. Data Grid Displays case information. Column Labels Lists the case attributes. You can sort and display in any order, and customize. -
From the Navigation Pane, select any of the following options to navigate through the system:
-
Inbox.
-
Saved Searches.
-
My Cases.
-
Cabinets.
-
Reports.
-
Recently Viewed.
-
-
The data screen is located in the lower center of the screen. It displays the case information when you select My Cases from the Navigation Pane.
-
The function buttons are located above the "column labels." You can sort and display them in any order and customize them. The following options allow different actions based on your location in TEDS:
-
File.
-
Edit.
-
View.
-
Tools.
-
Reports.
-
-
Cabinets are the highest level of organization in the repository. Cabinets store and organize file folders and provide easy access to case files and templates.
-
The two types of cabinets are:
-
Universal.
-
Personal.
-
-
TEDS Universal Cabinets:
Cabinet Description TEDS Inventory Cabinets -
Highest levels of organization for TEDS cases are:
-
National Unassigned Inventory.
-
National Assigned Inventory.
-
Archived Cases.
-
-
Cases are sorted by Employee Plans (EP) or Exempt Organization (EO), by year and by month.
-
EP cases display for EP users.
-
EO cases display for EO users.
-
Cases move from one cabinet to another based on status code changes.
-
Group 7849 - The queue for printing Repository Notices and Letters.
National Unassigned Inventory (NUI) -
NUI cabinets store unassigned cases.
National Assigned Inventory (NAI) -
NAI cabinets store cases that are assigned to a group or a specialist.
Archived Cases -
Archived Cases "year" cabinets store closed cases, including cases that have been scanned into TEDS after closing on EDS. Currently, TEDS closed cases stay in the National Assigned Inventory in Status 57 or 59. (A case closed on TEDS moves from the NAI to the Archived Cases when updated to status 21.)
-
-
Only the Records Manager and the National Unassigned Inventory Manager can see the National Unassigned Inventory (NUI), the National Assigned Inventory (NAI) and the Archived Cabinet.
-
Personal cabinets are unique to each TEDS user’s roles.
-
Examples of TEDS personal cabinets include:
-
Inbox.
-
My Cases.
-
Saved Searches.
-
Cabinets.
-
User Group Number.
-
Group 7849.
-
Templates.
-
Reports.
-
Recently Viewed.
-
-
The Inbox cabinet alerts you of system events or received receipt.
-
The Inbox cabinet receives notifications of:
-
New case assignments or cases returned from the manager.
-
Receipt of new documents.
-
A related case.
-
Case sent to manager for review or proposed closing.
-
Routing slip.
-
Role delegation.
-
-
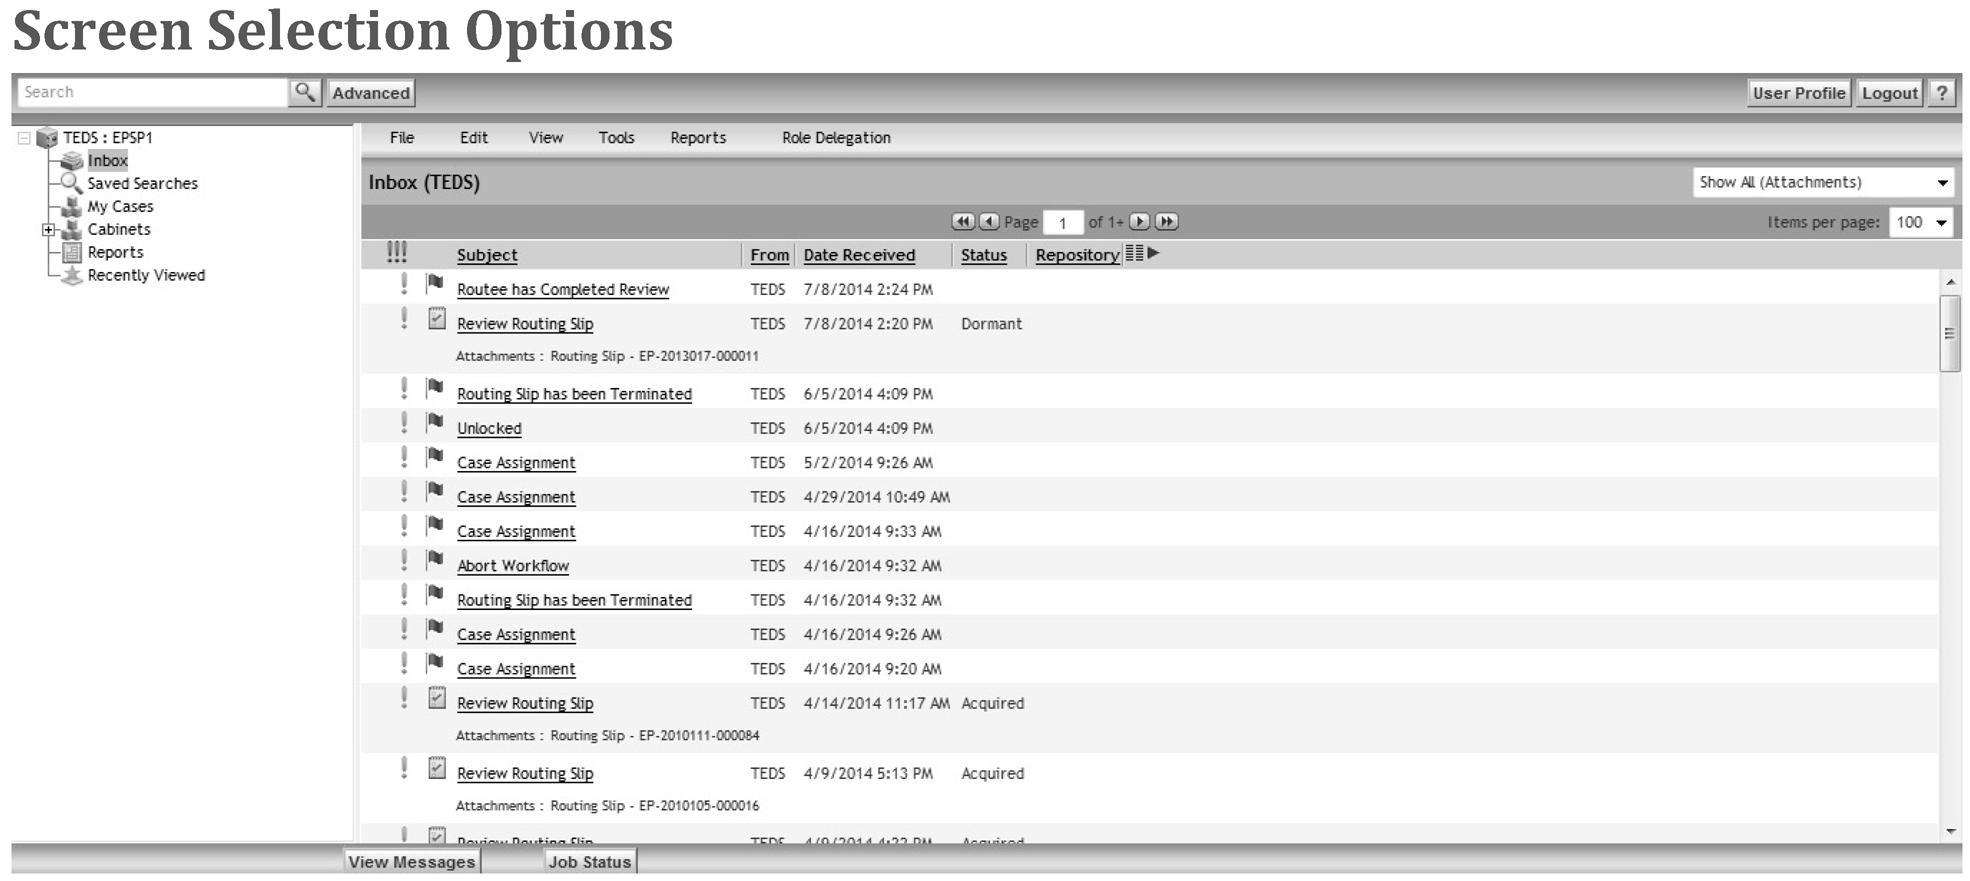
To open a notification, double-click on the link. You’ll find additional information when you open a notification. See Exhibit 7.15.6-1, Screen Selection Options.
-
The My Cases cabinet:
-
Contains cases assigned to you.
-
Provides easy access to your inventory.
-
-
By clicking on My Cases, you can access and work assigned TEDS cases.
-
View case data.
-
View case file images.
-
Create a case chronology entry.
-
View payment information.
-
View case reports.
-
-
A manager’s My Cases cabinets contain all cases assigned to the group including unassigned group inventory or group suspense.
-
Managers also have a cabinet titled "User Cases." The User Cases allows the manager to select and display a specific group member’s case listing. It contains links to each case assigned to direct reports (so both the specialist and the group manager own a case).
-
The Saved Searches cabinet allows you to access a saved search. The cabinet appears after you have saved one or more searches.
-
The Reports cabinet allows you to generate various reports, such as:
-
Cases by Power of Attorney Report.
-
Multiple Case Summary.
-
Case Progress.
-
Individual Case Information.
-
TEDS Case Processing Reports.
-
TE/GE Case Reconciliation Report.
-
Case Status Report.
-
Case History Record.
-
-
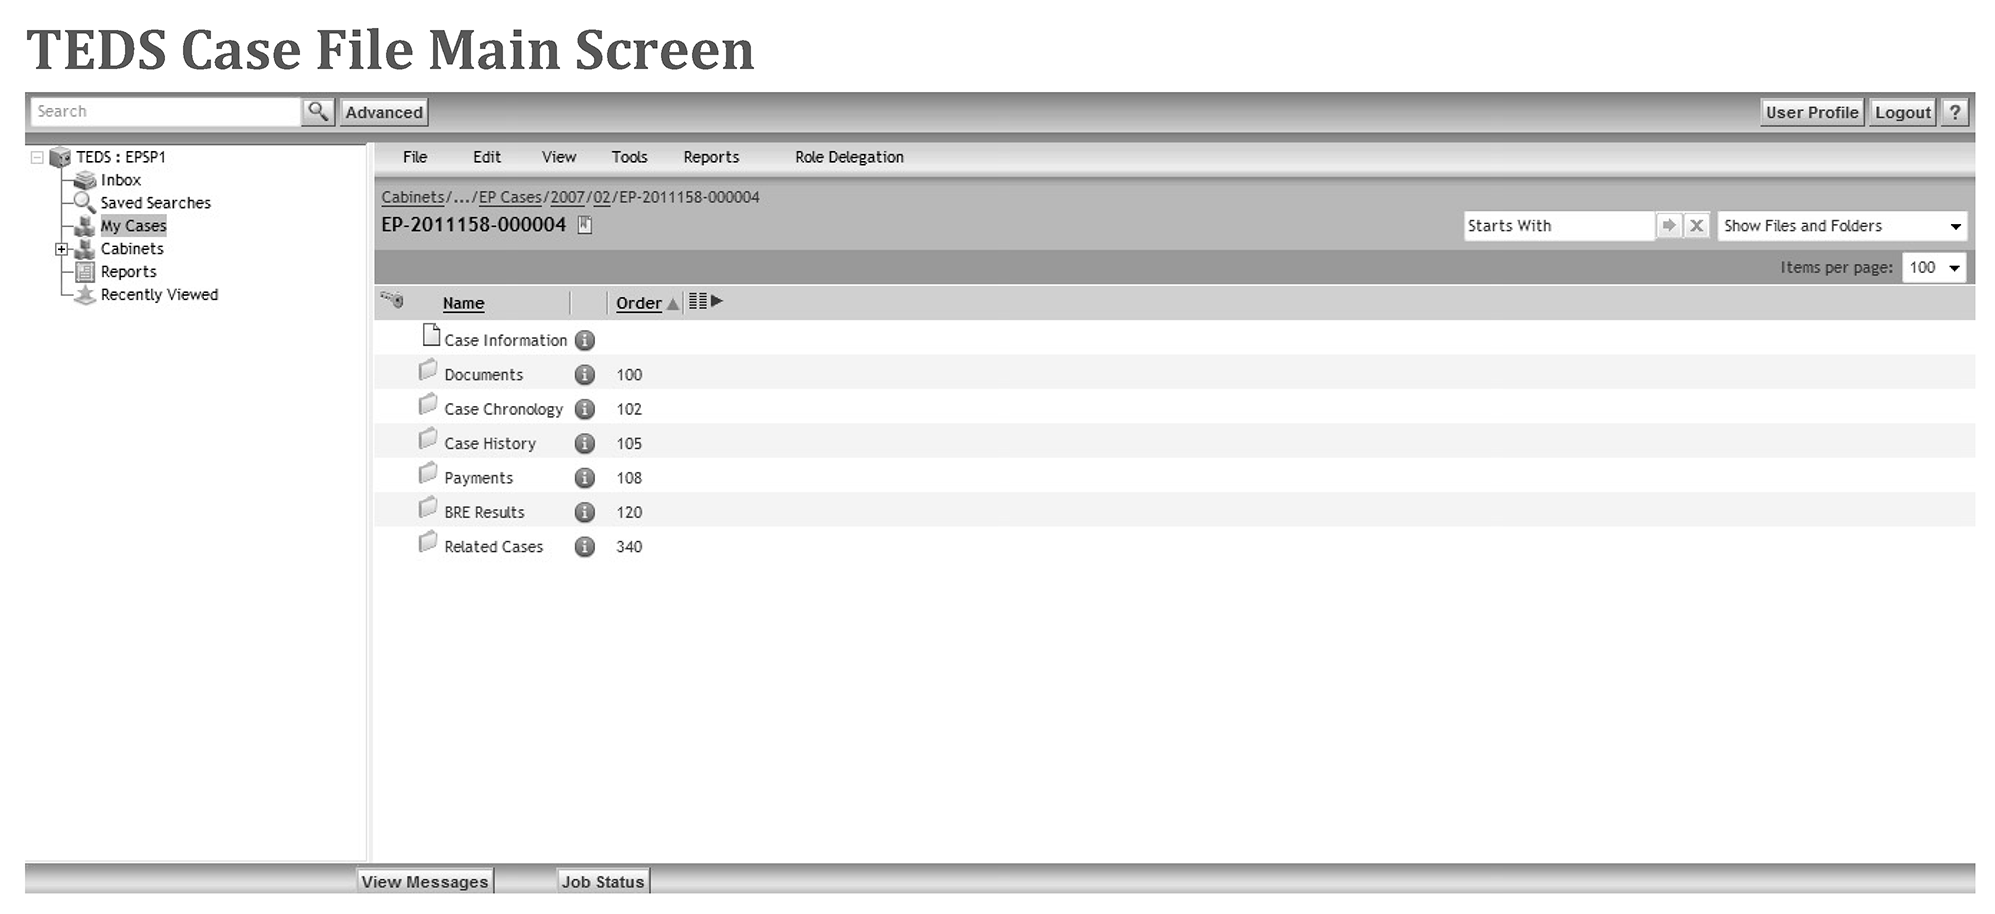
Click on the “My Cases” cabinet. Choose the case you want to access by clicking on "Case Information" or clicking on the yellow folder. You see the various files and folders contained within the case.
-
Files are designated by an icon of a piece of paper. Access by clicking on the little blue “i”.
-
Folders are designated by a file folder icon. Access a folder by clicking the folder name.
-
The following table lists the folders and information contained:
Folder Contains Case Information Entity specific data such as Document Locator Number (DLN), applicant name, contacts, address, control date, user fee, etc. Documents Documents related to case (application, organizing document(s), work papers, etc.). Case Chronology Case chronology entries that have been created for the case. Case History Information on all the status code changes made to the case. Payments User fee payment information. BRE Results View results of the Business Rules Engine. Related Cases Cases with the same Employer Identification Number (EIN) and plan number. -
The TEDS case file "main screen" is shown in Exhibit 7.15.6-2, TEDS Case File Main Screen.
-
Case information is shown on several different tabs within the Case Information File. Information in this file includes:
-
Data transcribed at scanning.
-
Information derived from opening business rules.
-
Receipt and handling information.
-
Information users enter throughout case processing.
-
-
The Documents folder contains all documents the applicant submitted and documents the specialist prepared and imported.
-
Open the Documents folder by double-clicking Documents.
-
When the Documents folder opens, you’ll see the below subfolders and their contents:
Subfolder Contains New Documents Documents received in TEDS after the original case was established. (When TEDS receives new document(s), the number of documents will be in parentheses.) Working Open routing slip(s), final draft letters. Disclosable Documents scanned in when the case is first established, subsequently imported or moved from another document subfolder. Non-Disclosable Documents the specialist has determined are non-disclosable. Purge Items the specialist determines are immaterial to the administrative case file. -
Access and view individual subfolders and the documents or files within the subfolders by double-clicking the folder or by clicking the underlined document name(s).
-
You can customize the display screens.
-
Items per page are set to a default of 10, but you can change the setting to 50 or 100. (If you can’t see the option to change items per page, scroll to the far right of the screen.)
-
To change the number of items displayed per page, click on the Items per page drop-down arrow on the column label bar and select the desired display setting. The suggested items per page setting is 50.
-
If there are more items available to view on the items per page, use the single arrow on the toolbar to move from one page to the previous or next page. Use the double arrows to go to the first or last page of the list.
-
Each data grid display contains unique column headers for specific information displayed in the data grid. You can change the information displayed on the screen by adding, reordering or removing column headers.
-
Follow these steps to change the column header:
Step Action 1. Click on My Cases. 2. Click on the Column Preferences icon in the column header field on the far right of the screen. 3. Scroll to the right if the icon isn't shown. -
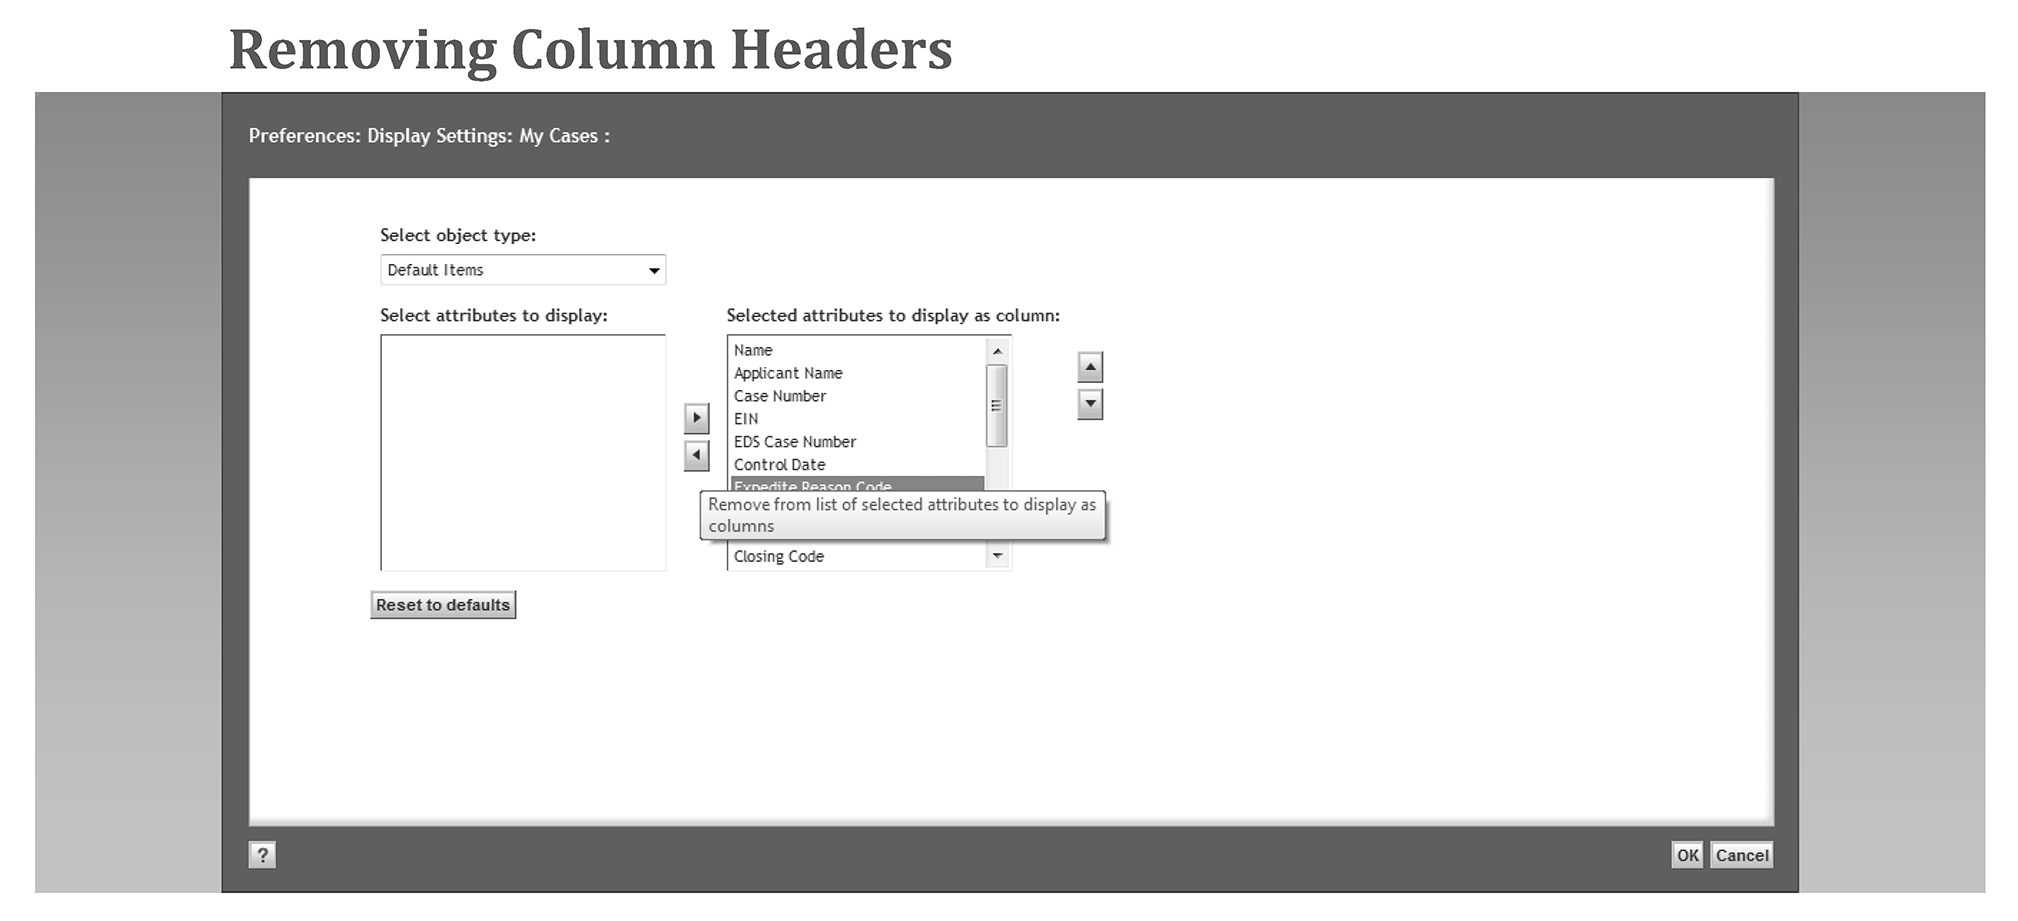
After you click on the Column Preferences icon, the Preferences: Display Settings menu appears.
-
Delete column headings from the display by removing them from the default items list.
-
Follow these steps to remove a column header:
Step Action 1. Click on the column attribute located in the Selected attributes to display as column: box on the right. 2. Click on the left arrow to move the attribute into the Select attributes to display box on the left. 3. Click OK to accept the changes.
-
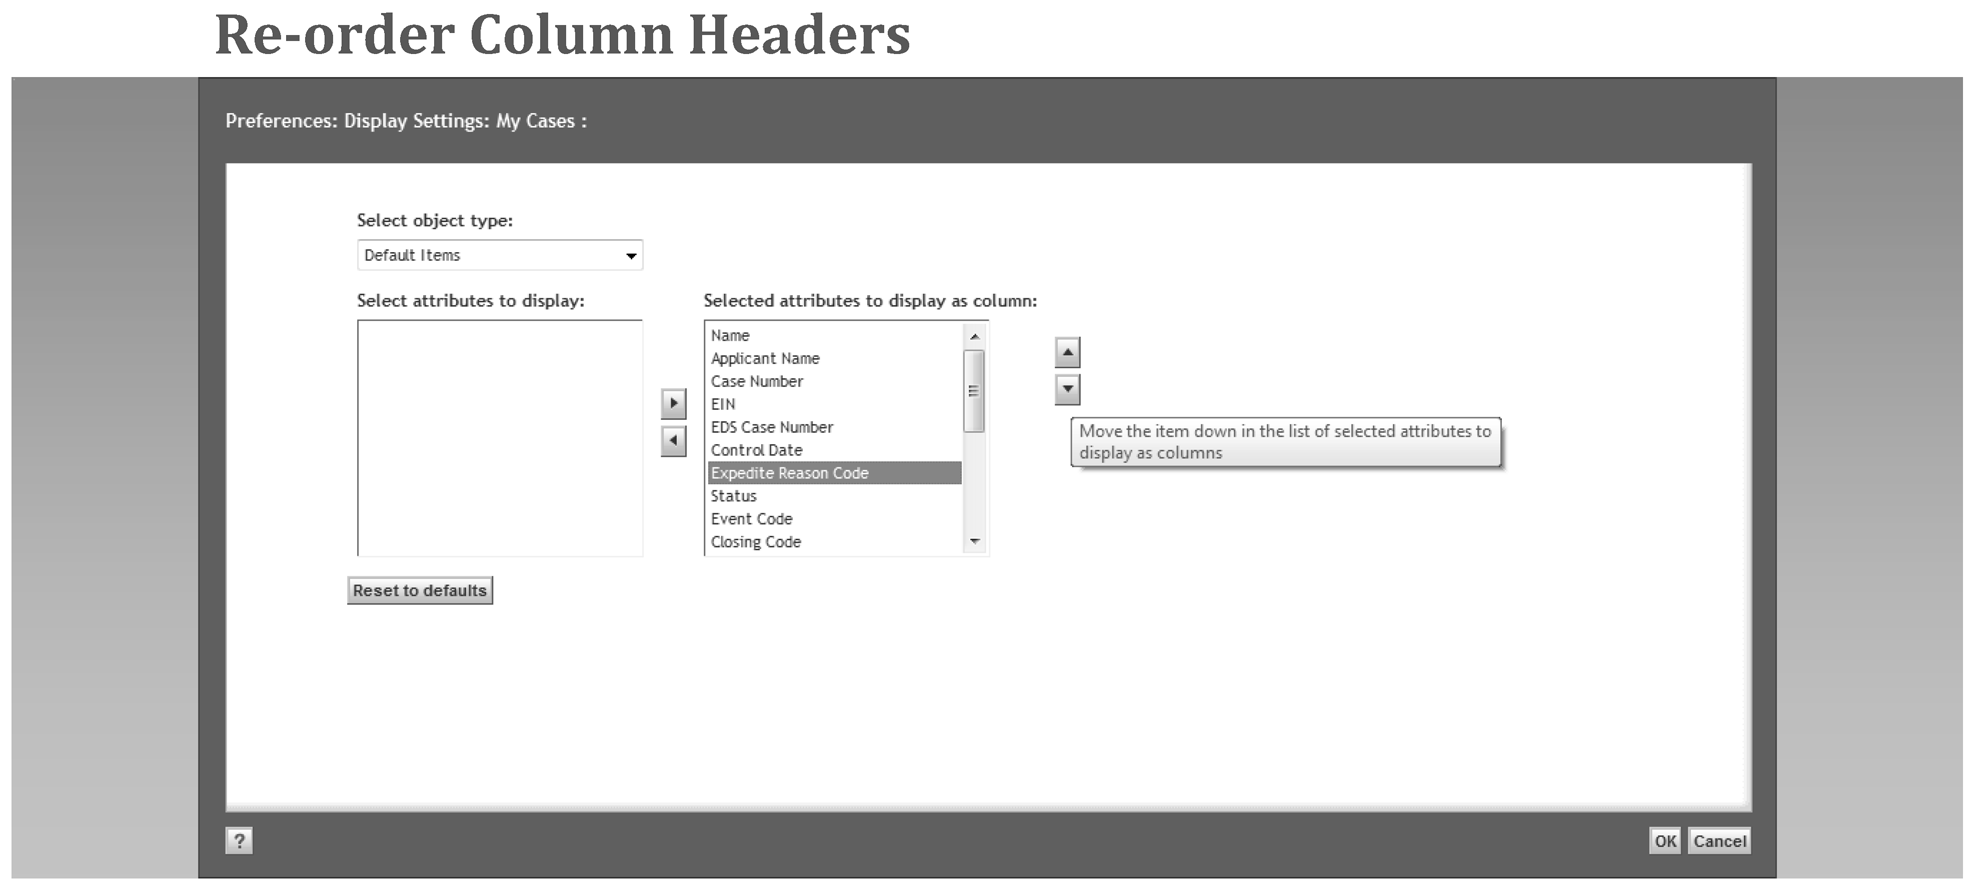
You can organize the information on the data grid by choosing the order in which the columns display. The Re-order function is available for most cabinets.
-
The following table shows the steps to move a column header:
Step Action 1. Click on the column header you want to re-order in the Selected attributes to display as column: box on the left. 2. Click on the up or down arrow to move the column header to the desired location. 3. Click OK to accept the changes. -
The attributes are displayed in the "Selected attributes to display as column:" box in the order that they appear as column headers on the data grid from left to right. You can’t use the Re-order function for the Inbox.
-
The User Profile stores:
-
Your profile information.
-
Group information.
-
Information about roles that are assigned to you.
-
-
Access the User Profile screen by clicking User Profile next to the Logout button at the top of the screen.
-
One of the items listed in your profile is your TEDS role(s). You are assigned specific roles based on your position and needs.
-
See IRM 7.15.4, Tax Exempt Determination System (TEDS) Roles and Delegation for additional information.
-
TEDS query and search features are used to locate a case, find a power of attorney or do general research.
-
Query and search makes it easier to research determination case information.
-
TEDS has three query options:
-
Simple Search.
-
Advanced Search.
-
Reports.
-
-
Begin each query with the menu options on the top of the web page.
-
Use the Search to perform a simple query with the TEDS case number.
-
Use the Advanced Search to perform a query based on specific property or multiple properties. You can also use advanced search to generate a simple case listing report.
-
Use the advanced search to locate a TEDS case number or search for more than one case.
-
To start an advanced search, click Advanced Search at the top of the Web page.
-
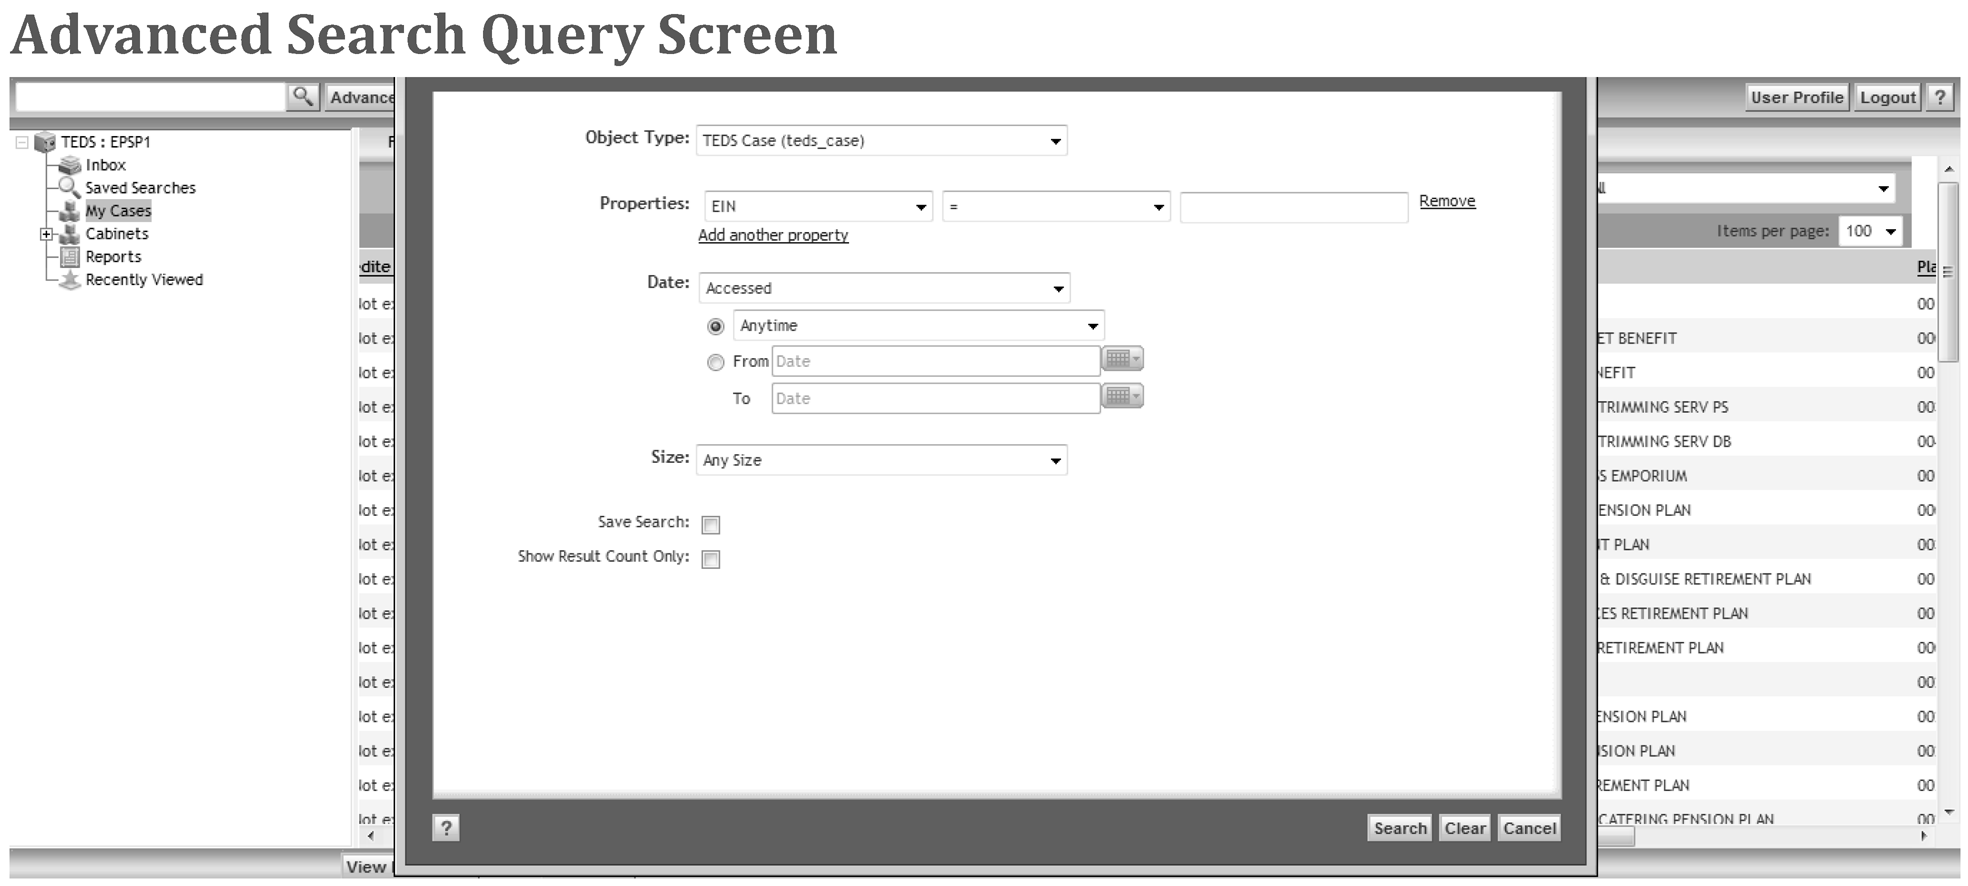
The Advanced Search page opens to the Advanced Search General tab, which displays the different search options. Use advanced search to customize a query based on:
-
Predetermined location(s) in which to search (Object Type).
-
Single property value or multiple property values (Properties).
-
Specific actions that occurred during specific time frames (Date).
-
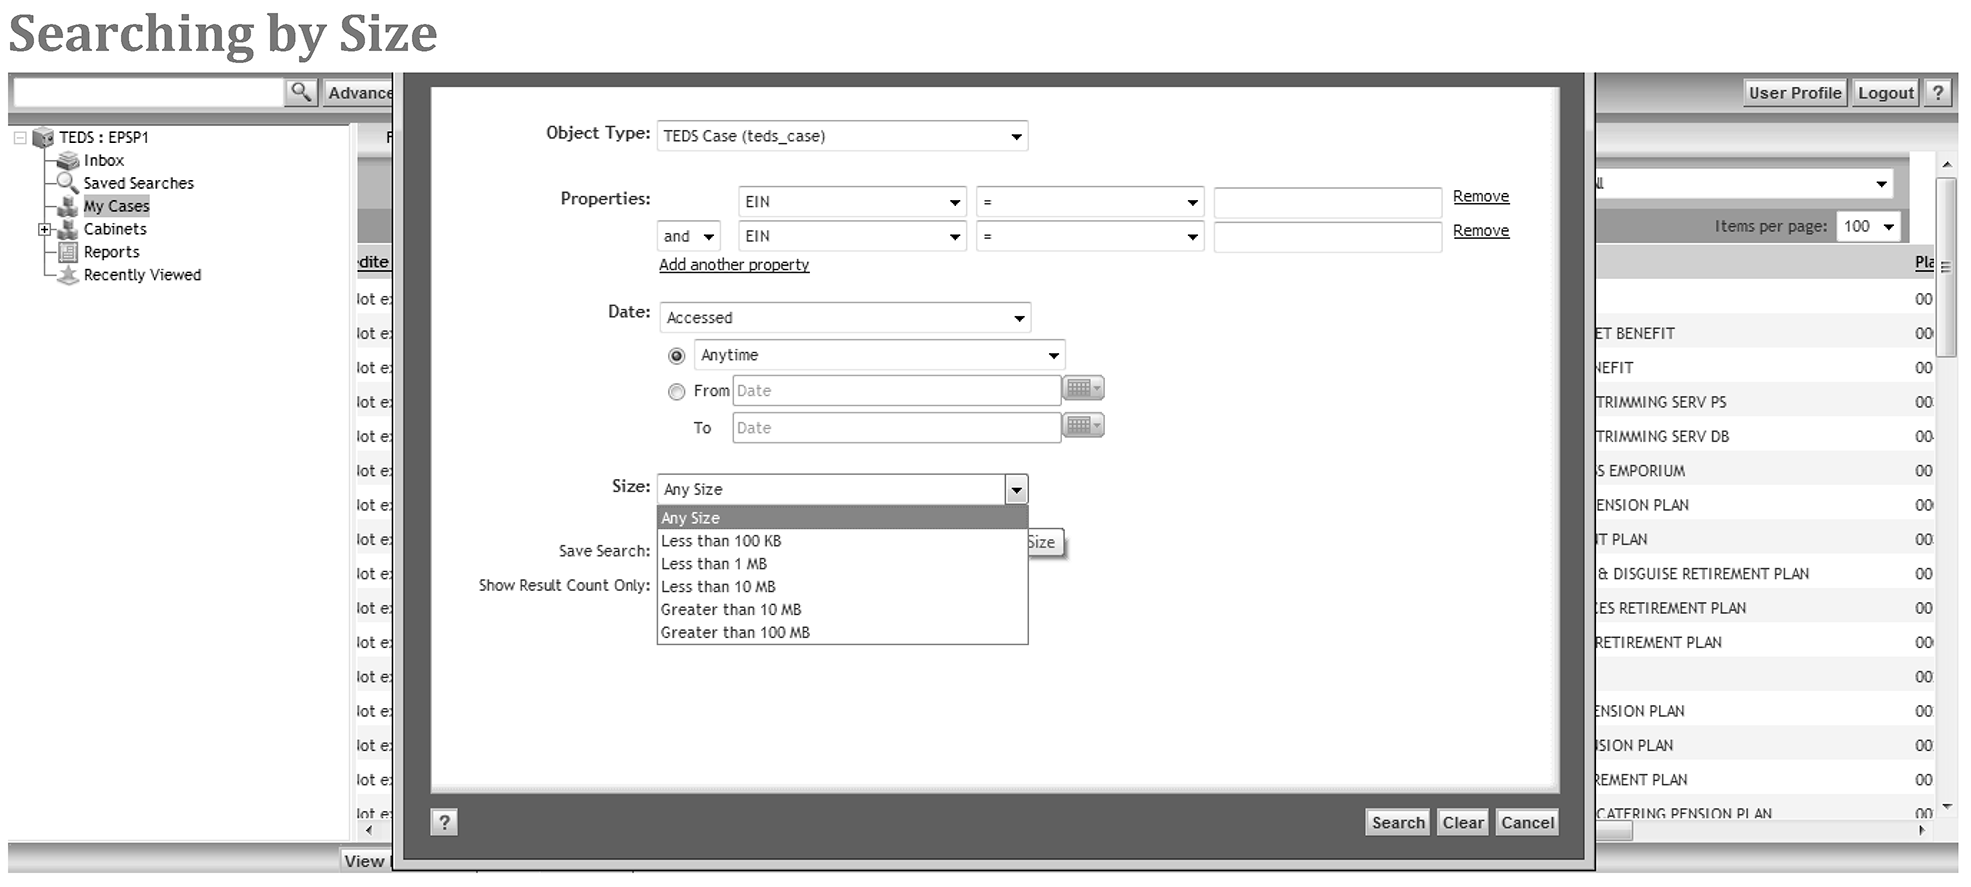
File size (Size).
-
-
After you enter the desired search criteria, all queries, run by clicking "Search" at the bottom of the page. See Exhibit 7.15.6-5, Advanced Search Query Screen.
-
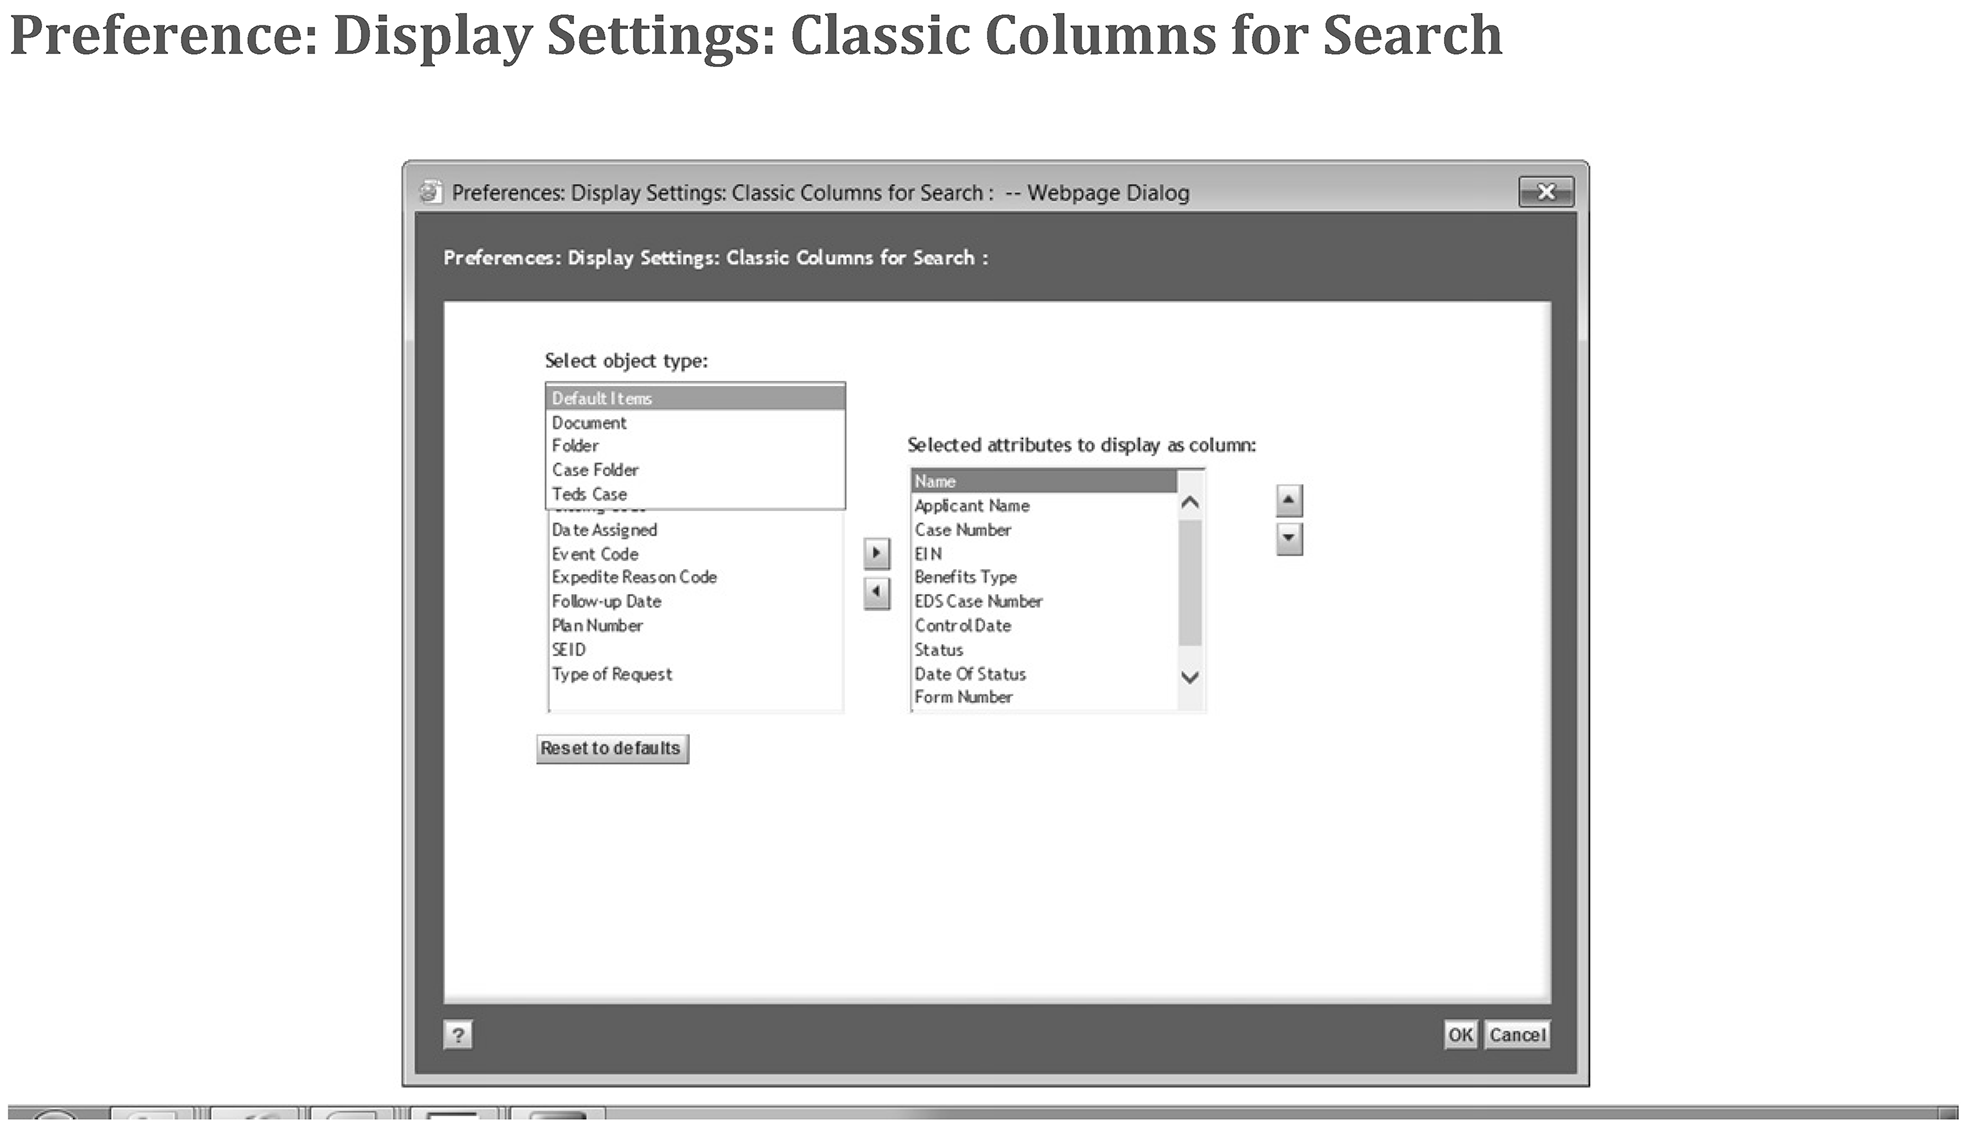
After you do an advanced search, you can add more attributes to the search display by using the Preference Tables.
Step Action 1. Go to Select Object. 2. Select TEDS Case. 3. Highlight the attribute you need. 4. Click on the right arrow.
-
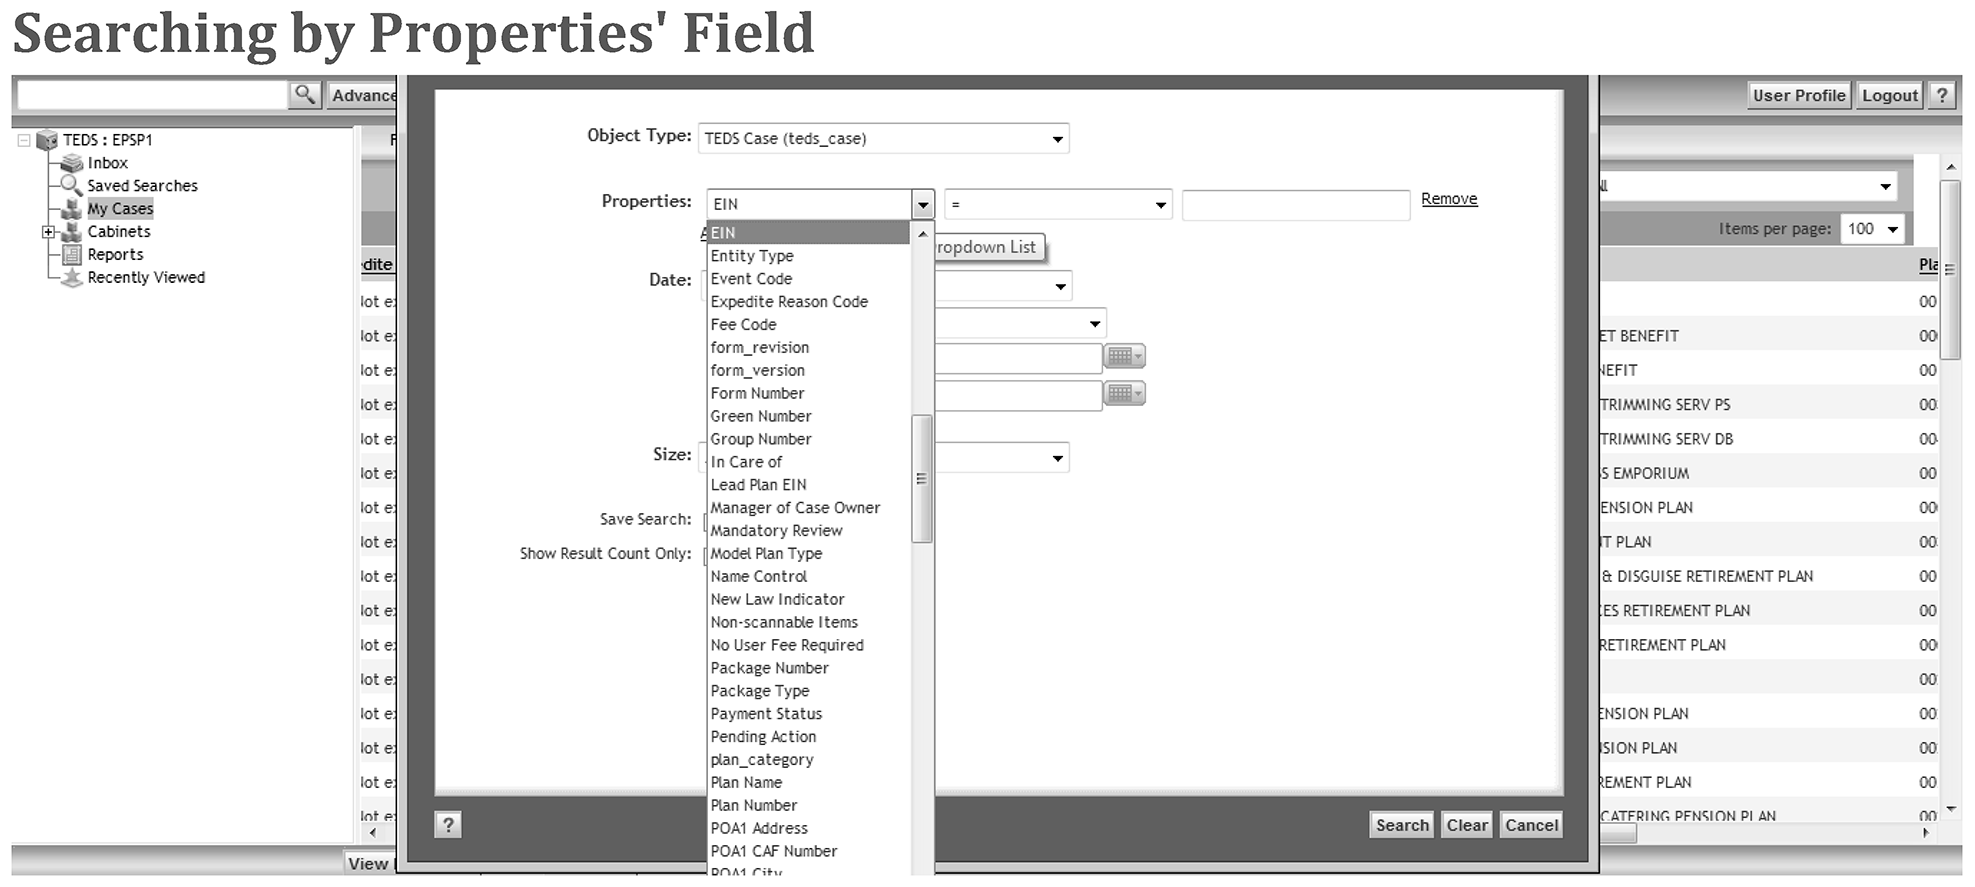
Using the advanced search query, select the search location by clicking on the Object Type drop-down arrow. Each Object Type will have a different set of Property values. See Exhibit 7.15.6-7, Selecting Object Type.
-
Search on these object types:
-
EP Cases.
-
Routing Slips.
-
TEDS users.
-
-
Perform advanced searches using the Properties button. See Exhibit 7.15.6-8, Searching by Properties' Field.
-
To search using Properties, perform these steps:
Step Action 1. First field: click on the drop-down arrow to select a property. 2. Third field: enter the search value (e.g., EIN, applicant name, etc.). -
If you use this search option with the = used, it will only return an exact match (such as, status = 62). Results won’t include cases with sub status codes. If the status contains 62, then cases with sub statuses will be returned (62AD, 62AI, etc.).
-
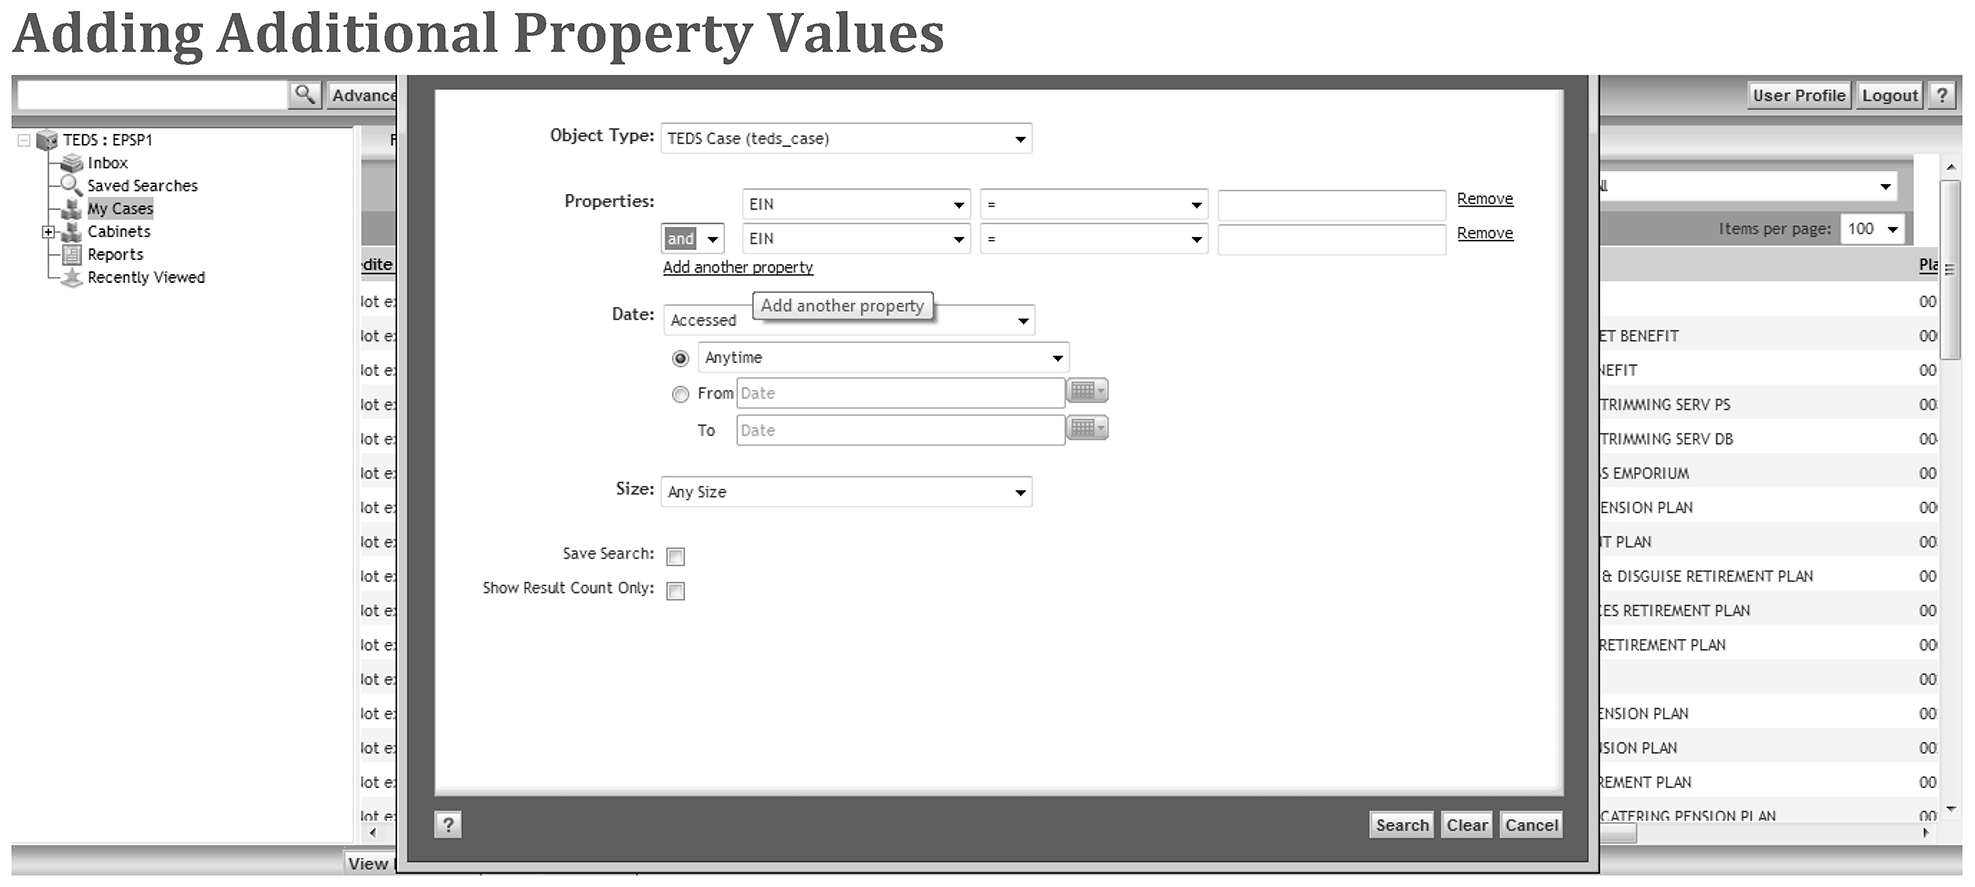
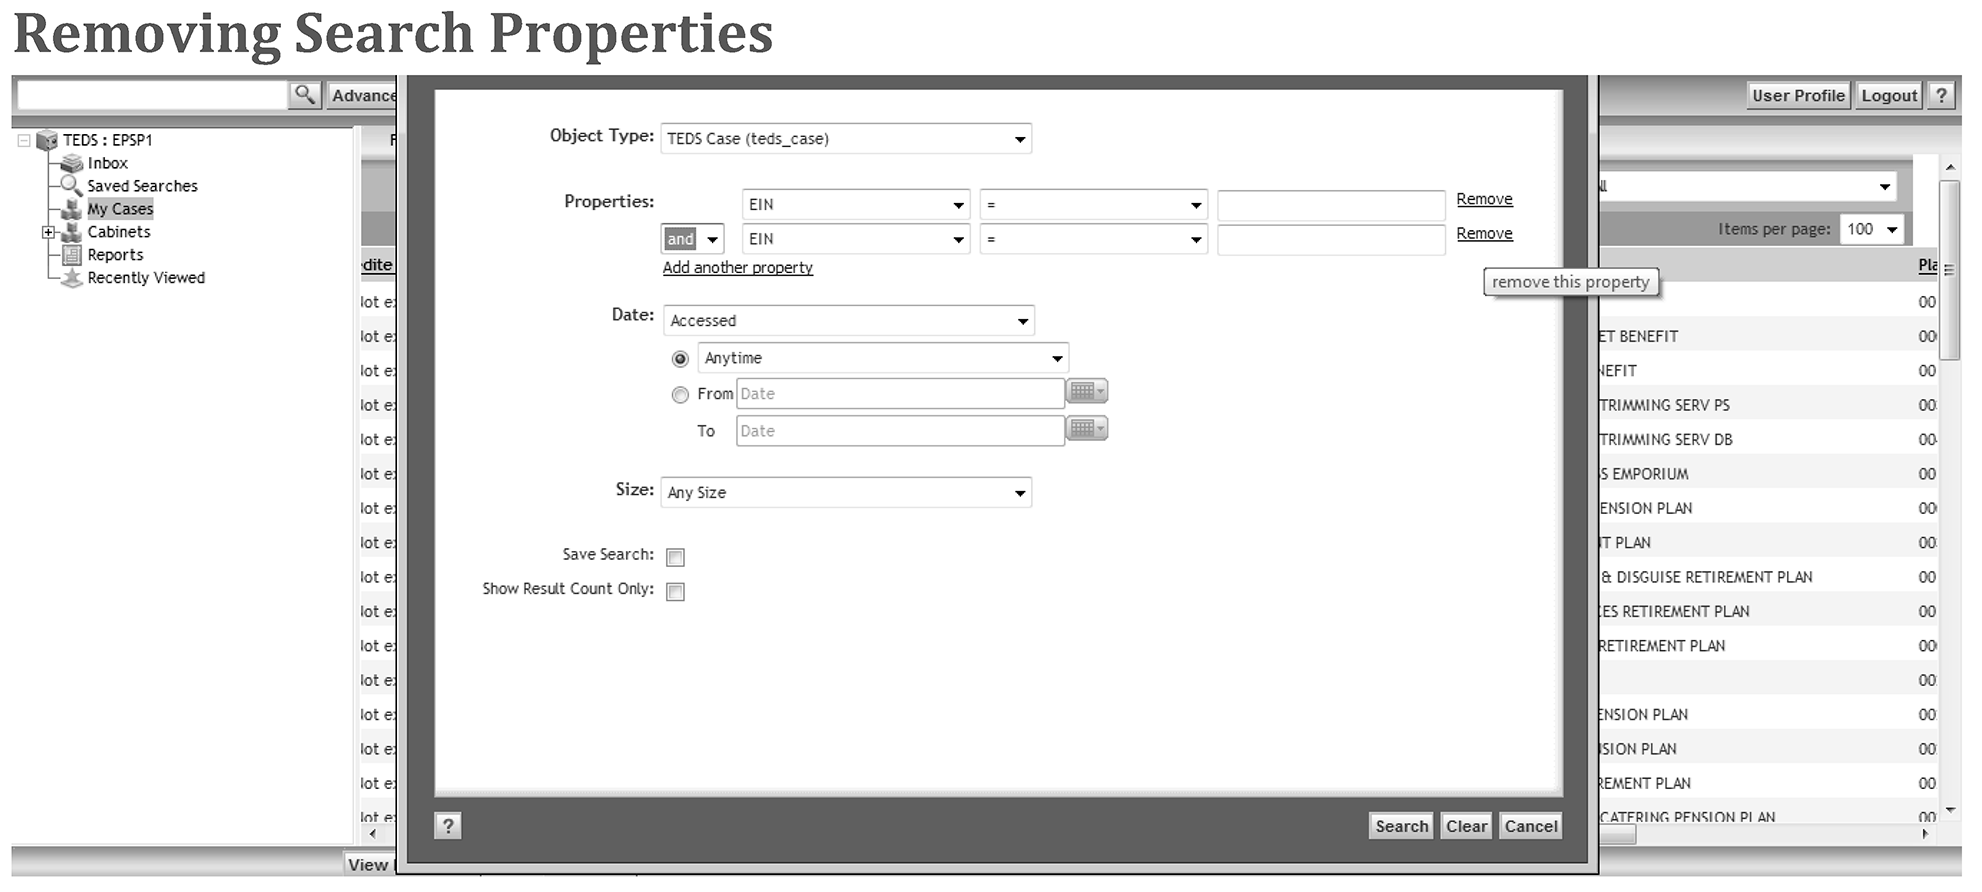
You can search on more than one property. See Exhibit 7.15.6-9, Adding Additional Property Values.
-
Search using multiple properties by clicking "Add another property" and selecting one of the following options:
-
"And" will return search results that match this property value and the property value on the previous line. This limits the search.
-
"Or" will return search result that match this property value or the property value on the previous line. This expands the search.
-
-
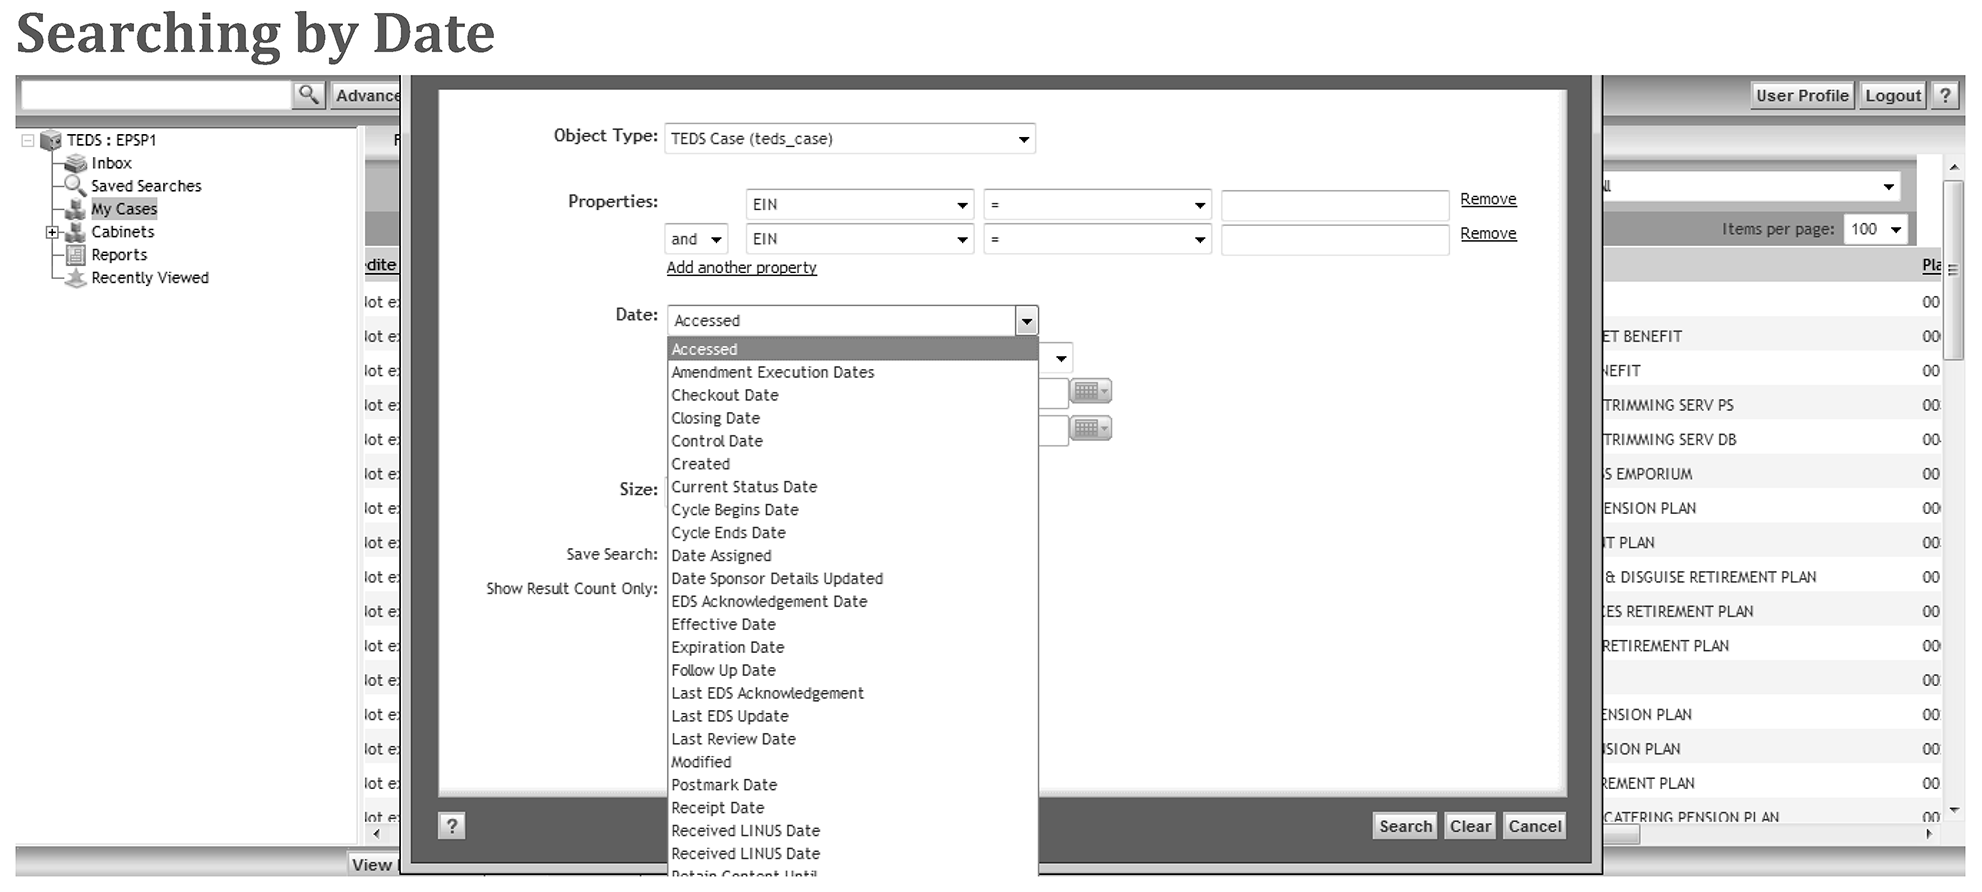
Use the Date field to search using various date elements for a specified time period. See Exhibit 7.15.6-11, Searching by Date.
-
To search using the Date field:
-
Select case requirements in the Properties line.
-
Select the date and time period in the remaining fields.
-
-
Search results display the cases that match the search criteria.
-
If the query is a text-based property, such as" name," the words that match the search value(s) are highlighted.
-
The search result will list the cases in control date order.
-
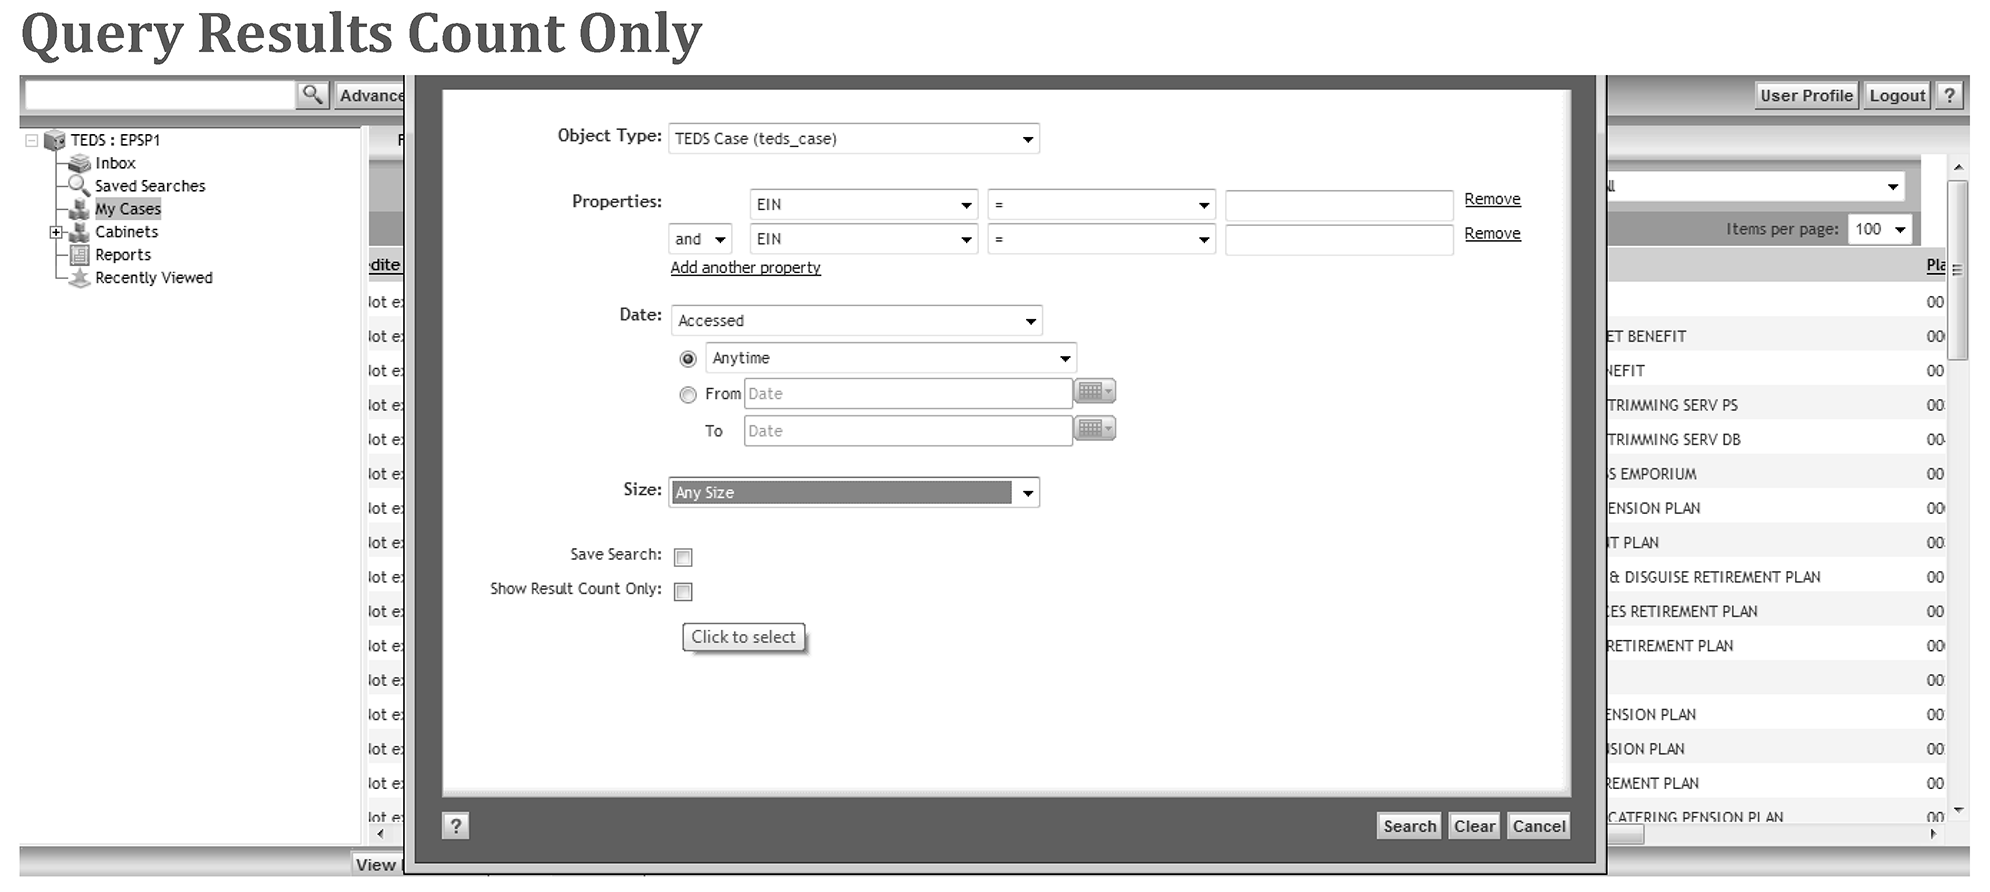
If the query produces a large result list or if you only need the case, click the magnifier to get the number of case results. The query will continue to process. See Exhibit 7.15.6-13, Query Results Count Only.
-
If you only need to search for the number of cases results, place a check in the Show Result Count box.
-
You can edit and rerun the query if the query didn't return the expected outcome. See Exhibit 7.15.6-14, Sample Search Results/How to Begin Edit Search.
-
Use the following steps to edit a query:
Step Action 1. Click on Edit Search. 2. Modify the search criteria. 3. Click Search to rerun the query.
-
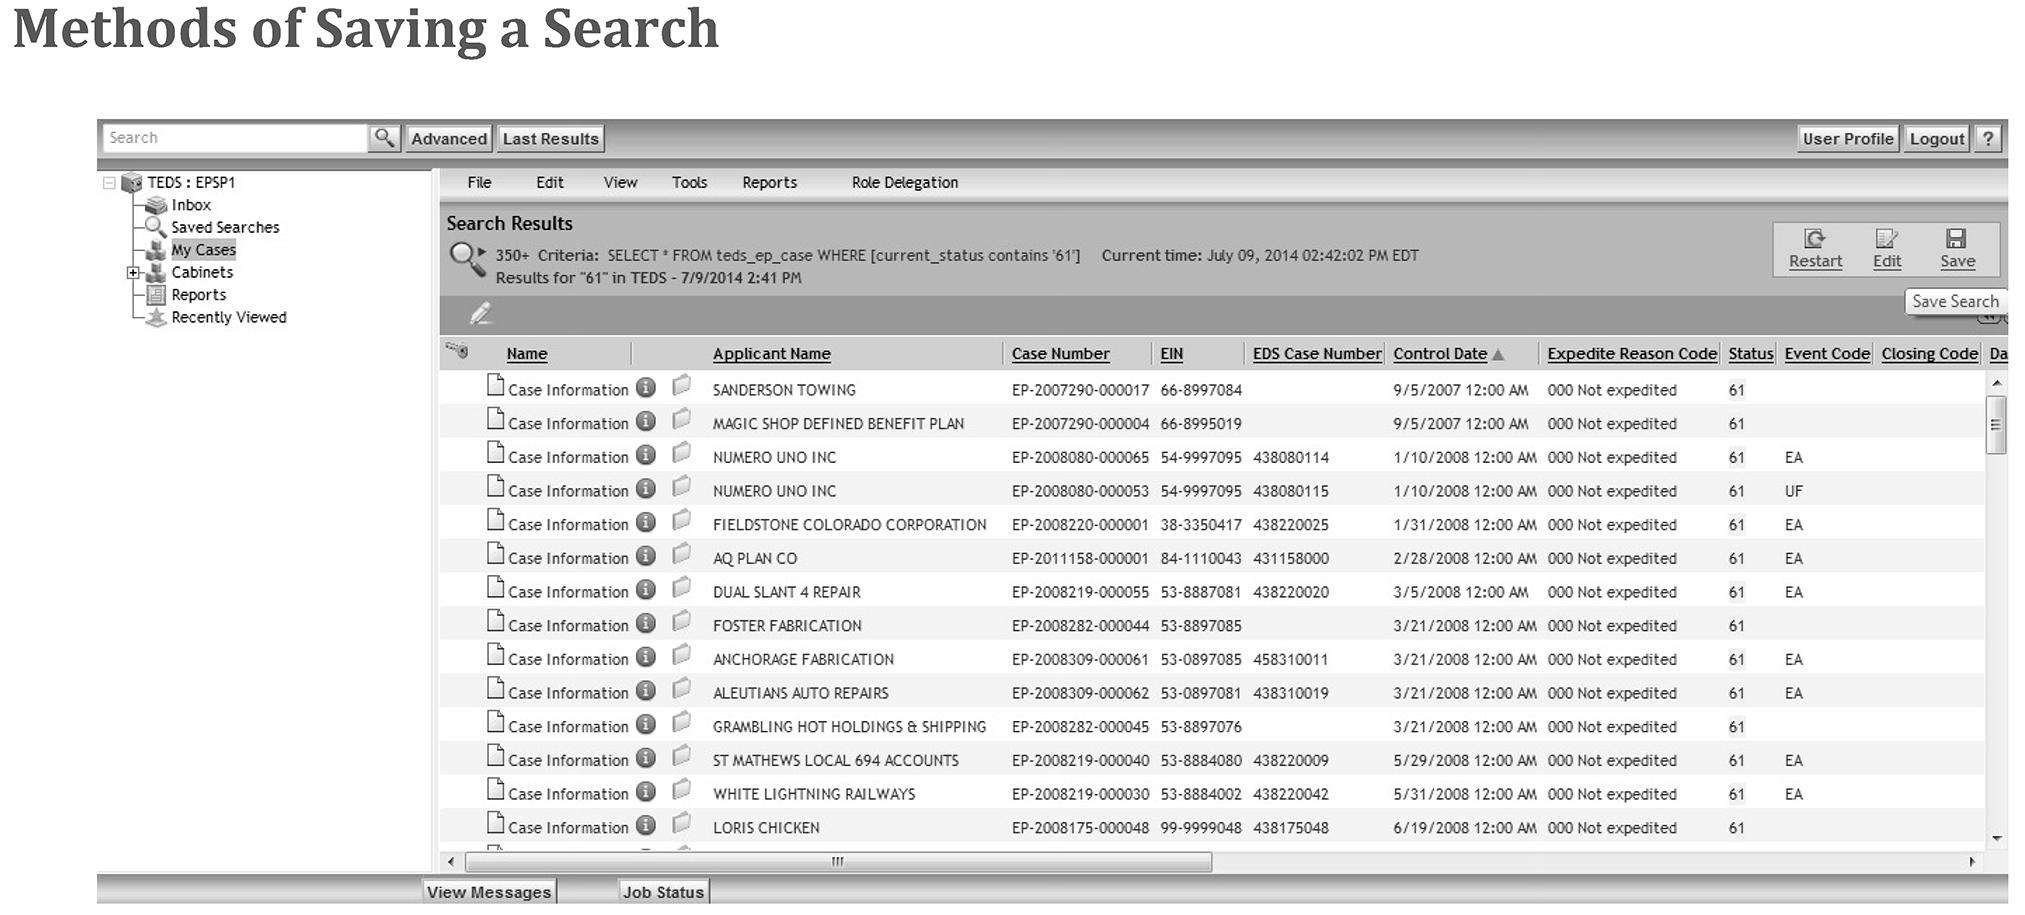
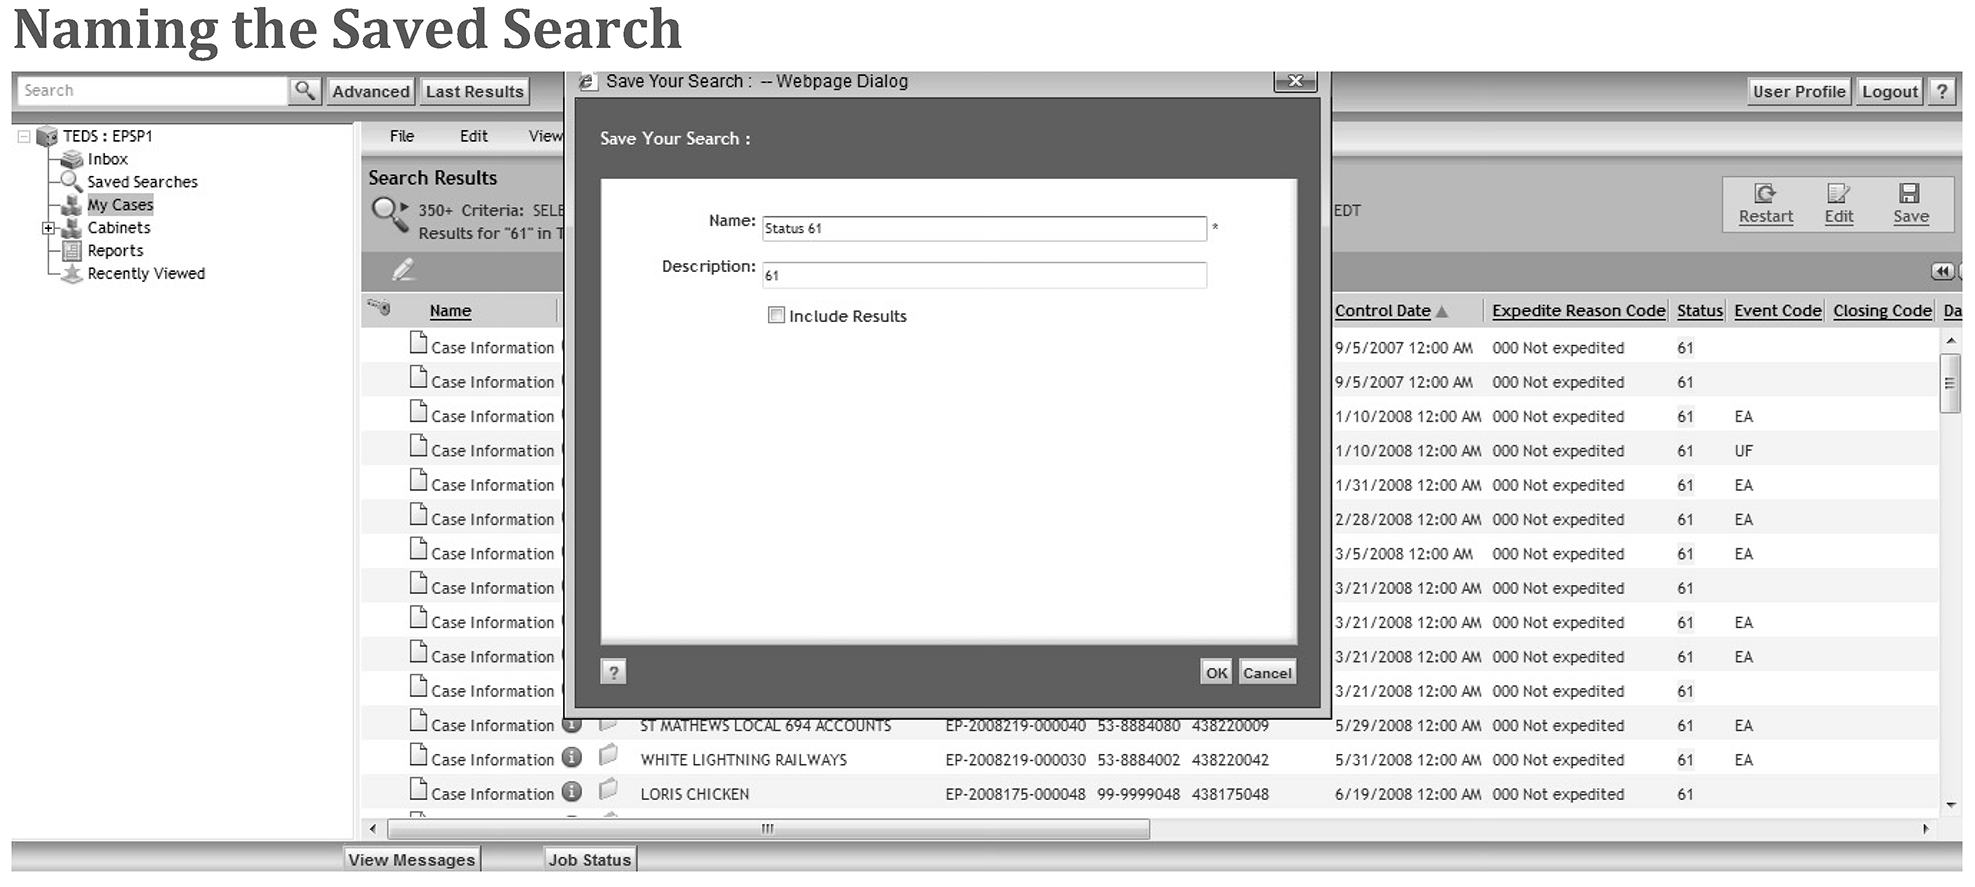
Save advanced search query criteria to view or run again. See Exhibit 7.15.6-15, Methods of Saving a Search and Exhibit 7.15.6-16, Naming the Saved Search.
-
To identify the saved search, complete the "Name and Description" fields:
Step Action 1. Click OK to save the search. 2. Click box to uncheck Include Results.
-
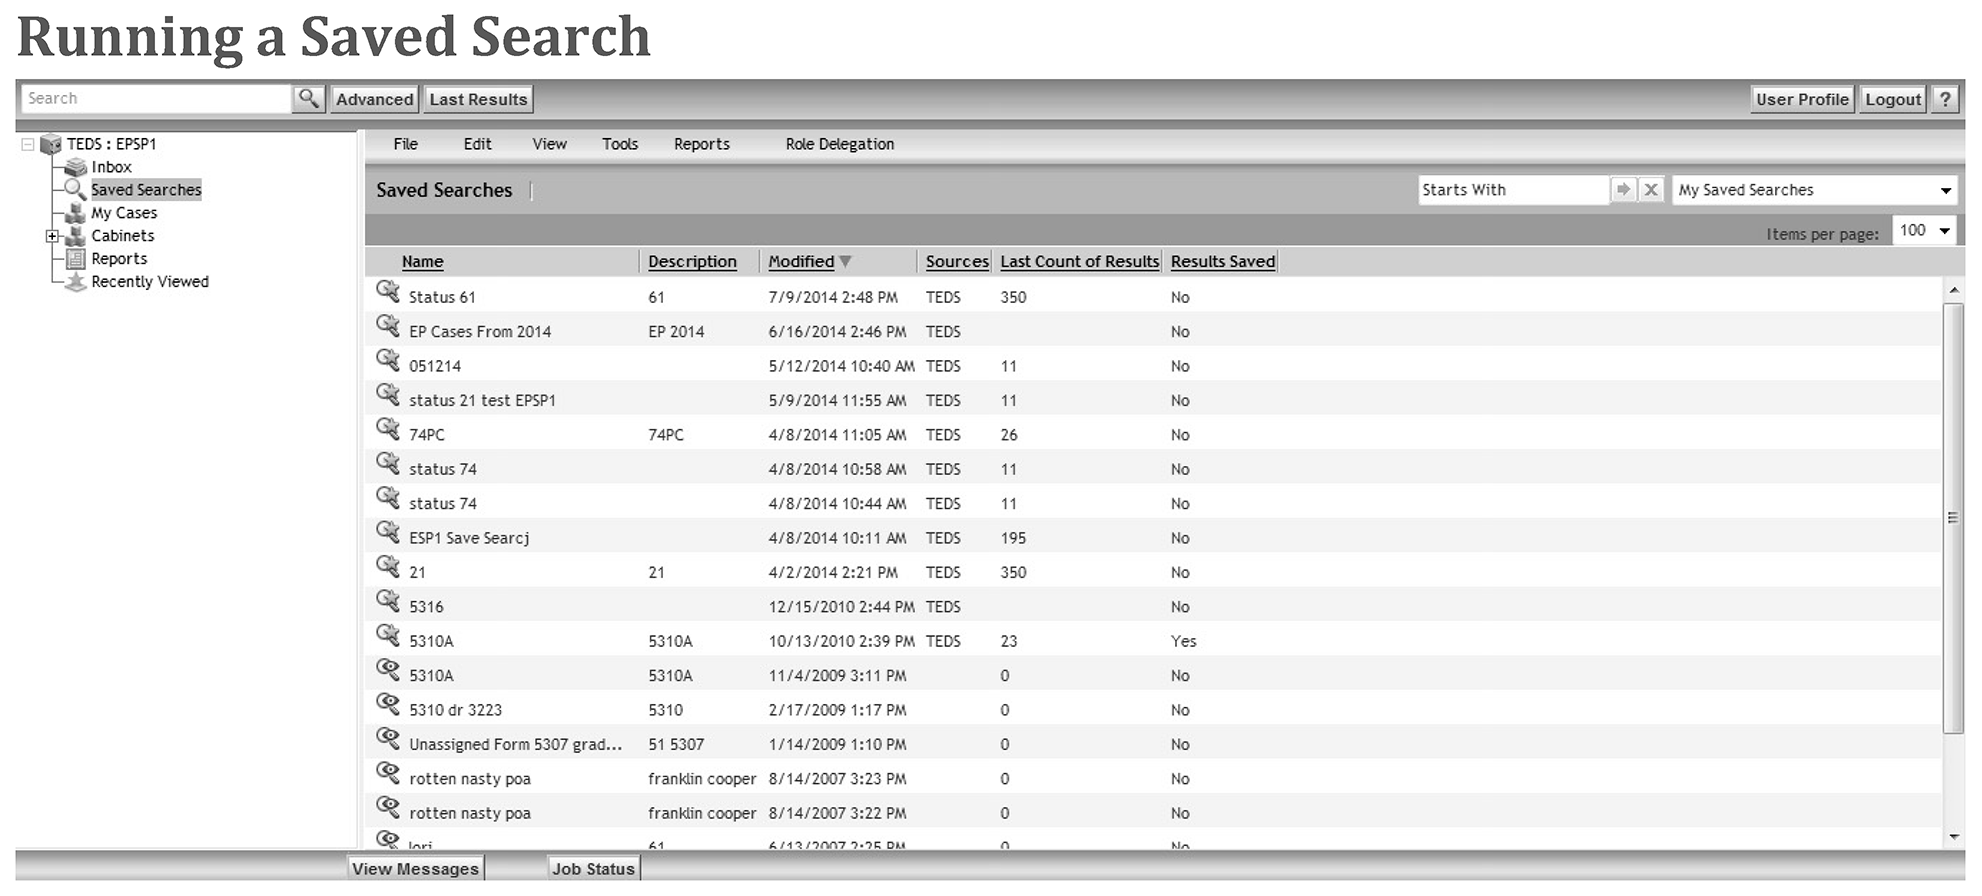
Access saved searches by clicking Saved Searches in the Navigation Pane. See Exhibit 7.15.6-17, Finding a Saved Search.
-
You can revise, rerun or delete your own saved searches. See Exhibit 7.15.6-18, Running a Saved Search.
-
When you rerun a saved search query, the search uses the same parameters but returns updated results.
-
Follow these steps to run a saved search:
Step Action 1. Click Saved Search. 2. Right-click on the selected search, click Run Search. -
Before running the search, you can modify the search parameters by following these steps:
Step Action 1. Right-click on the selected search, click Edit. 2. Edit the desired criteria. 3. Click Search to rerun the search.
-
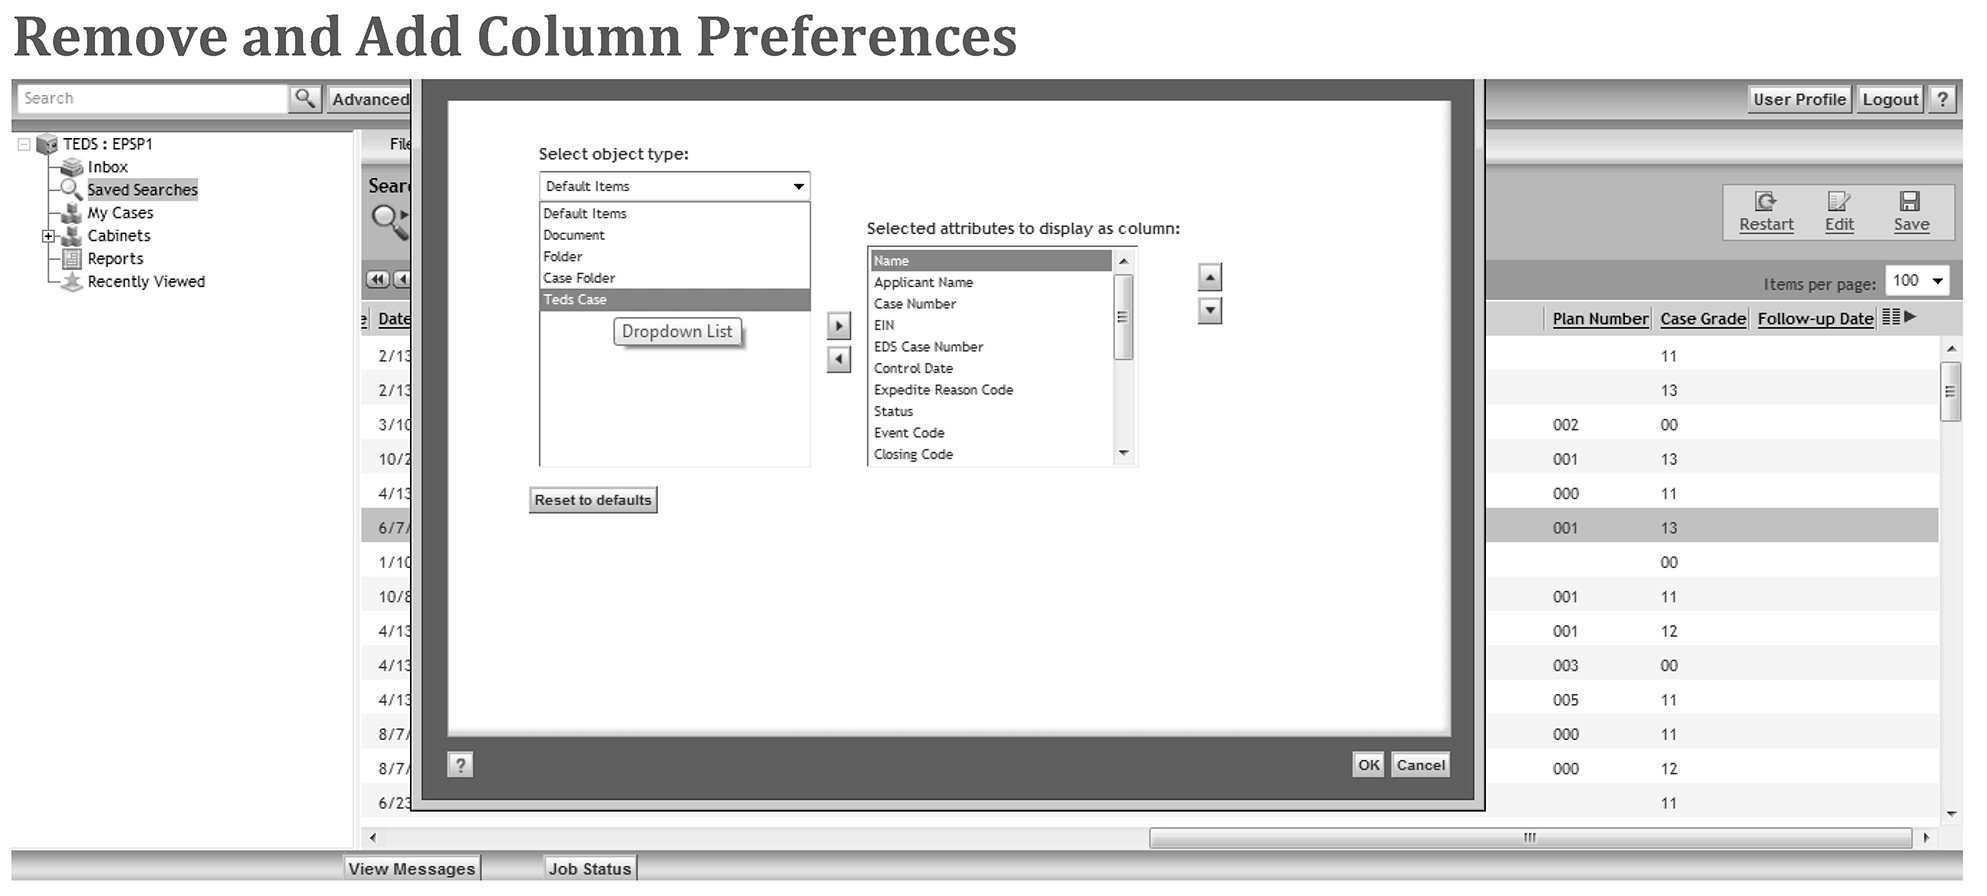
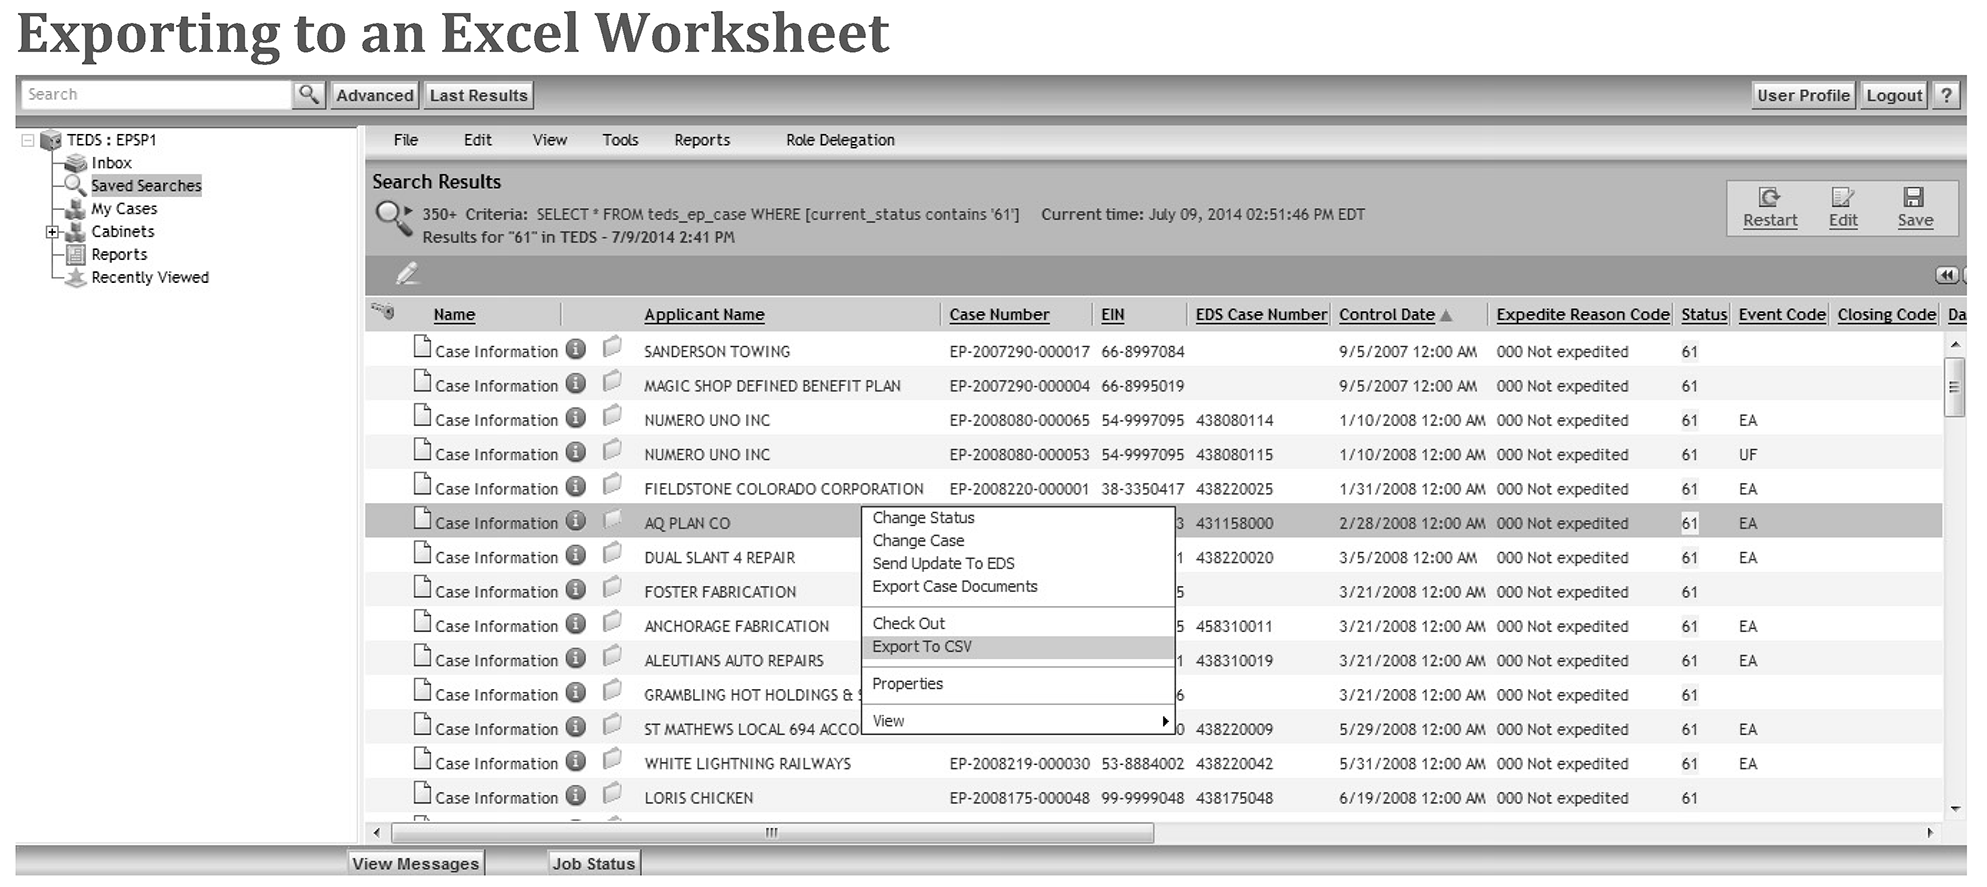
After completing a search, you can export the search results to Excel. You can export all of the results or only the specific columns. See Exhibit 7.15.6-19, Remove and Add Column Preferences, and Exhibit 7.15.6-20, Exporting to an Excel Worksheet.
-
Follow these steps to export a completed search:
Step Action 1. Right-click on the Search Results, click Export to CSV. This opens a second window. 2. All columns will be selected by default. Select and remove any unwanted columns by clicking on the column name and clicking on the “Left Arrow” to remove. 3. Click OK. 4. A file download box will open, click Open. The results are displayed as an Excel spreadsheet. 5. Right-click on Export to CSV. -
To add column headers from the Preferences Display Settings menu:
Step Action 1. Click on the desired column attribute in the Select attributes to display box on the left. 2. Click on the right arrow to move the desired attribute into the Selected attributes to display as column box on the right. -
The new column header attribute moved from the "Select attributes to display" box on the left to the "Selected attributes to display" column box on the right.
-
Click OK to accept the changes.
-
You can search TEDS documents for words or phrases using Optical Character Recognition (OCR).
-
OCR is computer software that reads text from paper and translates images into a form the computer can manipulate. It translates handwritten or typed scanned text into language the machine understands and text that it can edit.
-
Once OCR is applied to a document, you can search for words or phrases using the binocular icon.