)
or https:// means you've safely connected to the .gov website. Share sensitive information only on official, secure websites.
)
or https:// means you've safely connected to the .gov website. Share sensitive information only on official, secure websites.


- 3.30.30 Embedded Quality for Submission Processing (EQSP) System
- 3.30.30.1 Program Scope and Objective
- 3.30.30.1.1 Background
- 3.30.30.1.2 Authority
- 3.30.30.1.3 Responsibilities
- 3.30.30.1.4 Program Management and Review
- 3.30.30.1.5 Program Controls
- 3.30.30.1.6 Acronyms
- 3.30.30.1.7 Related Resources
- 3.30.30.2 Embedded Quality for Submission Processing (EQSP) System Overview
- 3.30.30.2.1 IRM Deviation
- 3.30.30.2.2 Operations and Functions in the EQSP System
- 3.30.30.2.3 Quality Review Objectives
- 3.30.30.2.4 Quality Reviewer Training
- 3.30.30.2.5 Quality Reviewer Requirements
- 3.30.30.2.6 Research Tools
- 3.30.30.2.7 Quality Review Types
- 3.30.30.2.8 Time Reporting
- 3.30.30.3 Roles
- 3.30.30.4 System Requirements
- 3.30.30.4.1 Accessing the EQSP System
- 3.30.30.5 System Profiles (Permissions)
- 3.30.30.6 Employee Profile Management
- 3.30.30.6.1 Manager Main Menu Screen
- 3.30.30.6.1.1 Creating an Employee’s Profile
- 3.30.30.6.1.2 Searching for an Employee’s Profile
- 3.30.30.6.1.3 Generating and Reviewing User Access Listing
- 3.30.30.6.2 Proxy Role
- 3.30.30.6.2.1 Proxy Role Hierarchy
- 3.30.30.6.2.2 Time Limitations for a Proxy Role
- 3.30.30.6.2.3 Manage Proxy Screen
- 3.30.30.6.2.3.1 Granting a Proxy
- 3.30.30.6.2.3.2 Terminating a Proxy
- 3.30.30.6.2.4 Using a Proxy Role Overview
- 3.30.30.6.2.4.1 Use Proxy Screen
- 3.30.30.6.2.4.2 Selecting a Proxy Role
- 3.30.30.6.2.4.3 Returning to the Assigned Role
- 3.30.30.7 Data Collection Instrument (DCI) Overview
- 3.30.30.7.1 Reviewer's Main Menu Screen
- 3.30.30.7.1.1 Create Sample
- 3.30.30.7.1.2 Search Reviews
- 3.30.30.7.1.3 Review Header Screen
- 3.30.30.7.1.4 Manage Sample Screen
- 3.30.30.7.1.5 Review Details Screen
- 3.30.30.7.1.6 Instructions and Guidelines for Coding the DCI
- 3.30.30.7.1.7 Review Summary Screen
- 3.30.30.7.1.8 Searching for a Review
- 3.30.30.8 Quality Review Sampling
- 3.30.30.8.1 Individual Review Sampling
- 3.30.30.8.2 High Quality Work Sampling
- 3.30.30.9 EQSP Reports
- 3.30.30.9.1 Single Event/Sample Pull
- 3.30.30.9.2 Employee Report
- 3.30.30.9.3 Team Report
- 3.30.30.9.4 Department Report
- 3.30.30.9.5 Operation Report
- 3.30.30.9.6 Site Report
- 3.30.30.9.7 EQSP Defect Summary Report
- 3.30.30.9.8 EQSP Site Program Summary Report
- 3.30.30.9.9 EQSP Blank DCI Report
- 3.30.30.10 EQSP Web Site
- 3.30.30.11 Issue Resolution Process (IRP)
- 3.30.30.11.1 EQSP Opportunity Change Request Template (Excel spreadsheet)
- 3.30.30.11.1.1 Reviewing and Resolving the Opportunity Issue Log
- 3.30.30.12 Exhibits
- Exhibit 3.30.30-1 SOI Operation (12) - Guidelines for Coding Opportunities
- Exhibit 3.30.30-2 Receipt & Control Operation (31) - Guidelines for Coding Opportunities
- Exhibit 3.30.30-3 ITIN Operation (32) - Guidelines for Coding Opportunities
- Exhibit 3.30.30-4 Document Perfection Operation (34) - Guidelines for Coding Opportunities
- Exhibit 3.30.30-5 Data Conversion Operation (35) - Guidelines for Coding Opportunities
- Exhibit 3.30.30-6 Input Correction Operation (36) - Guidelines for Coding Opportunities
- Exhibit 3.30.30-7 Accounting Control Services Operation (37) - Guidelines for Coding Opportunities
- Exhibit 3.30.30-8 Glossary
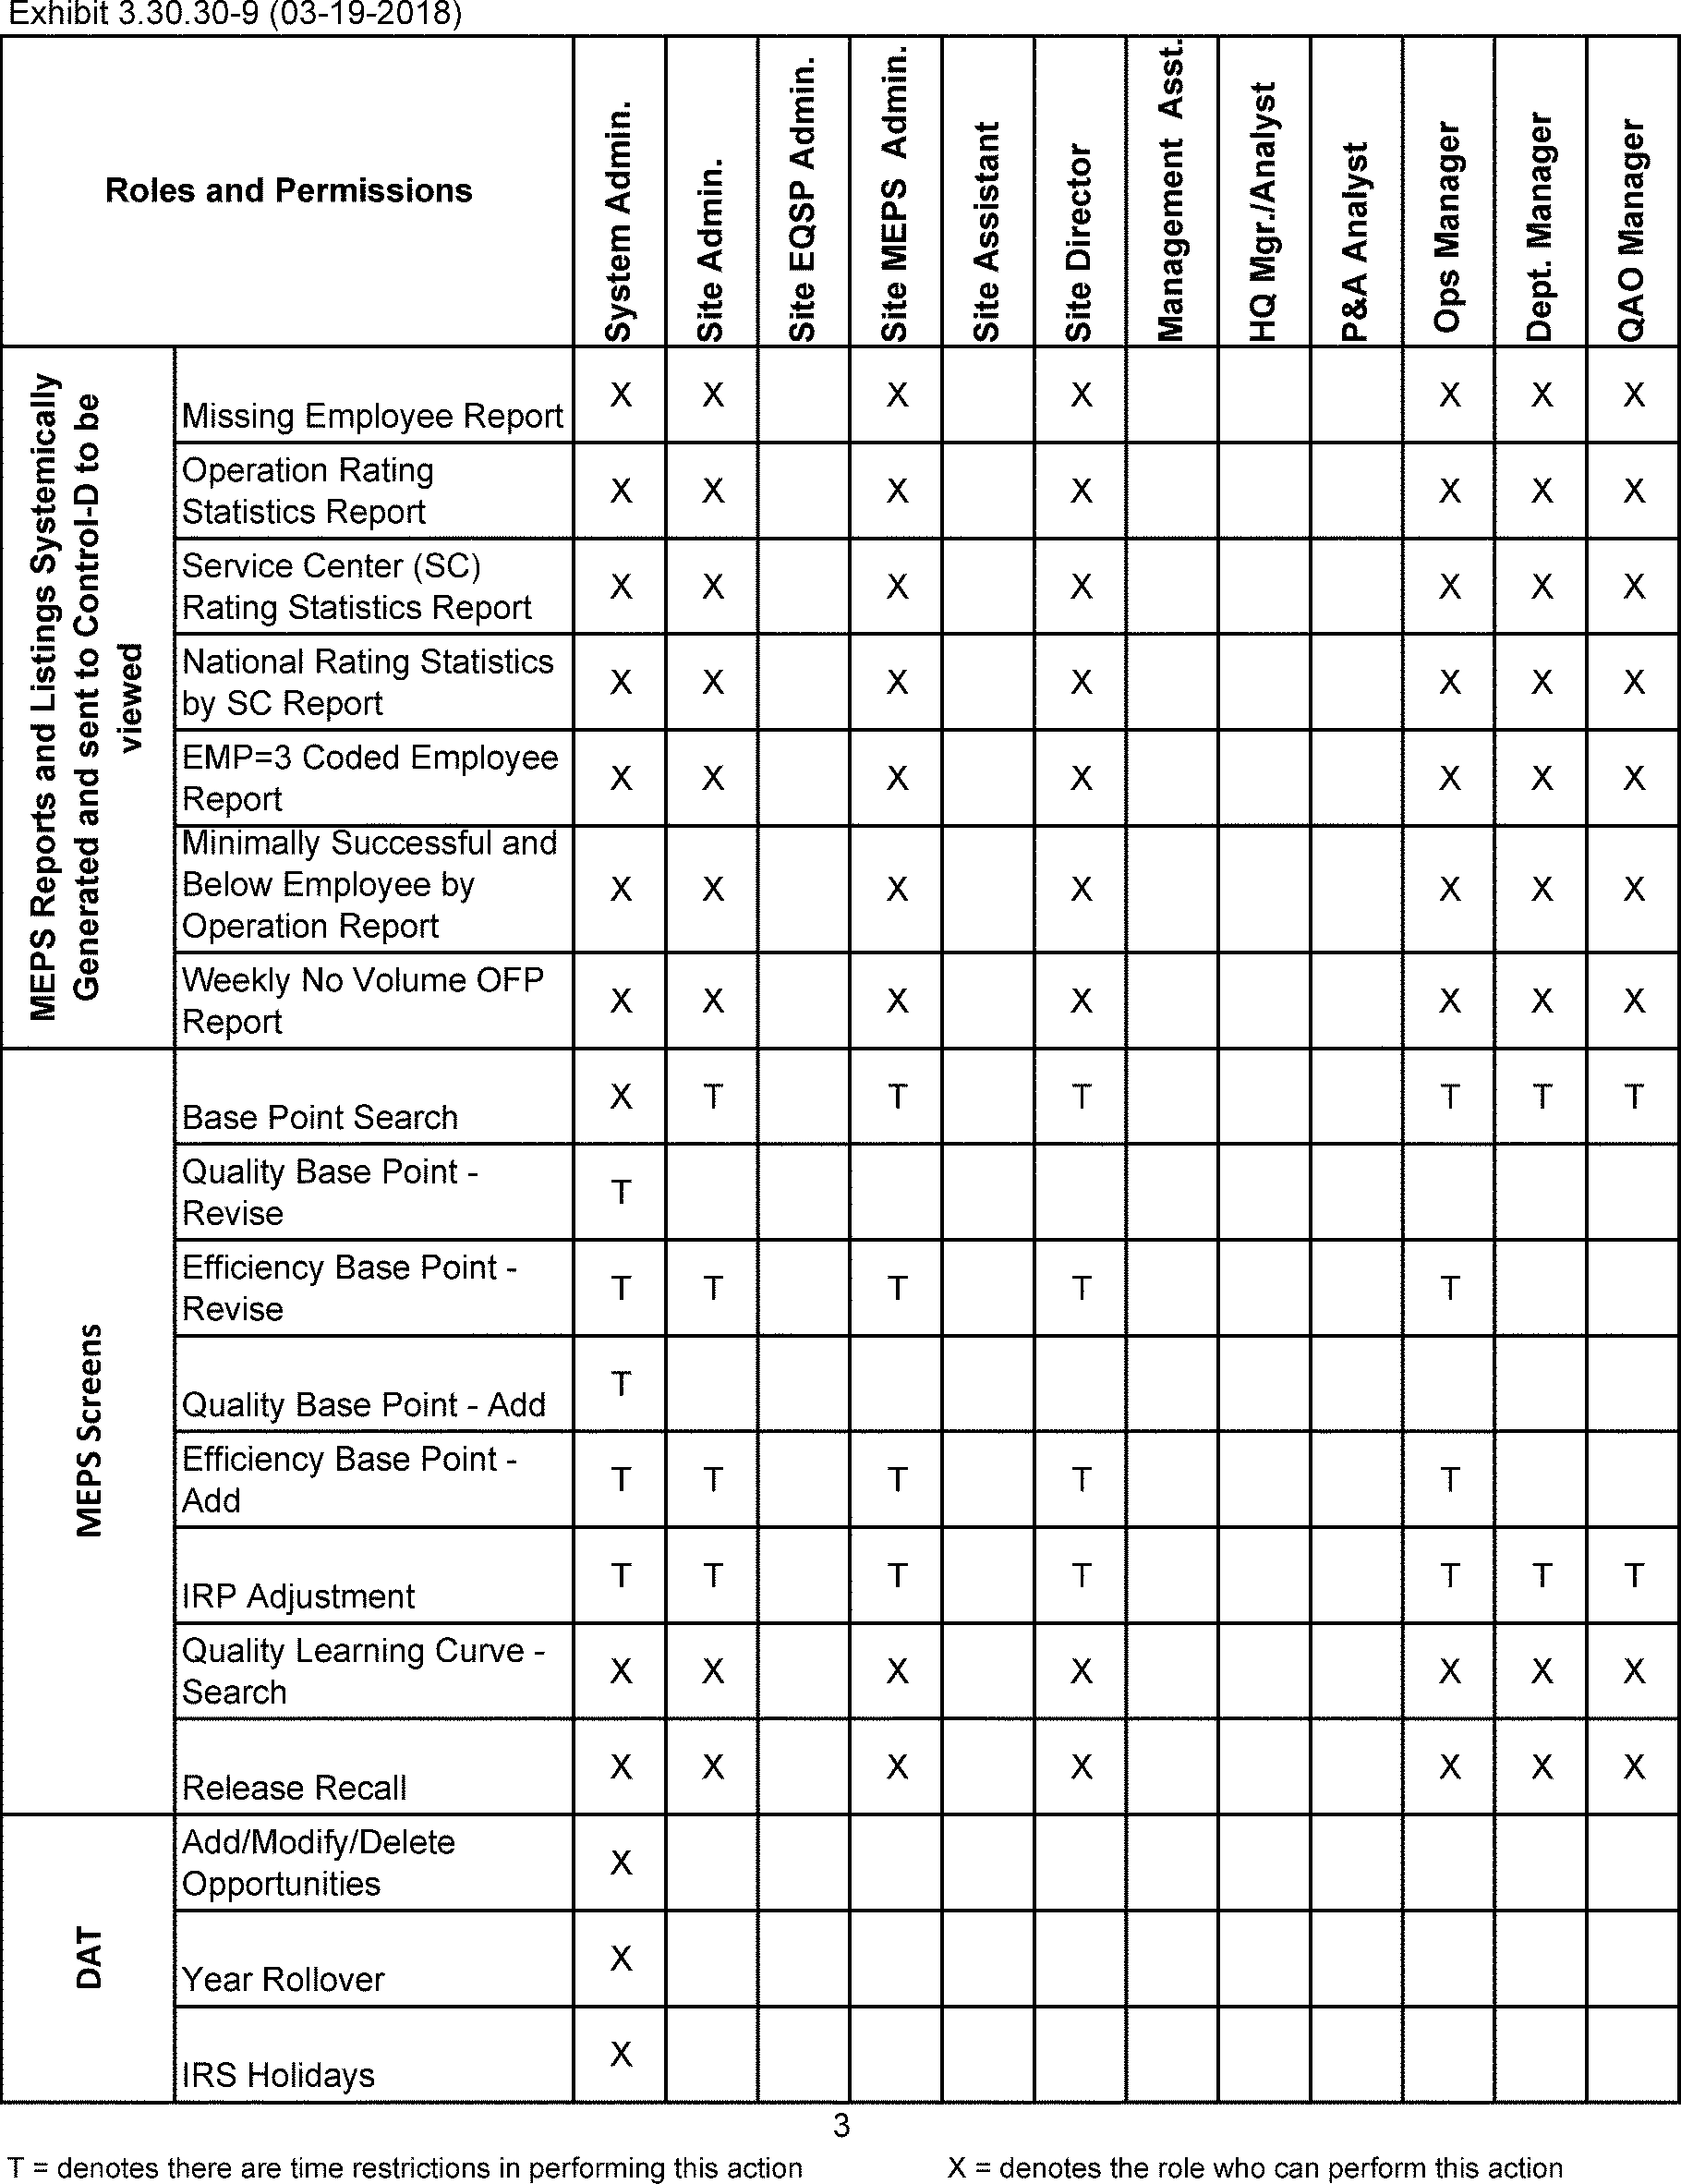
- Exhibit 3.30.30-9 Roles and Permissions - Responsibilities
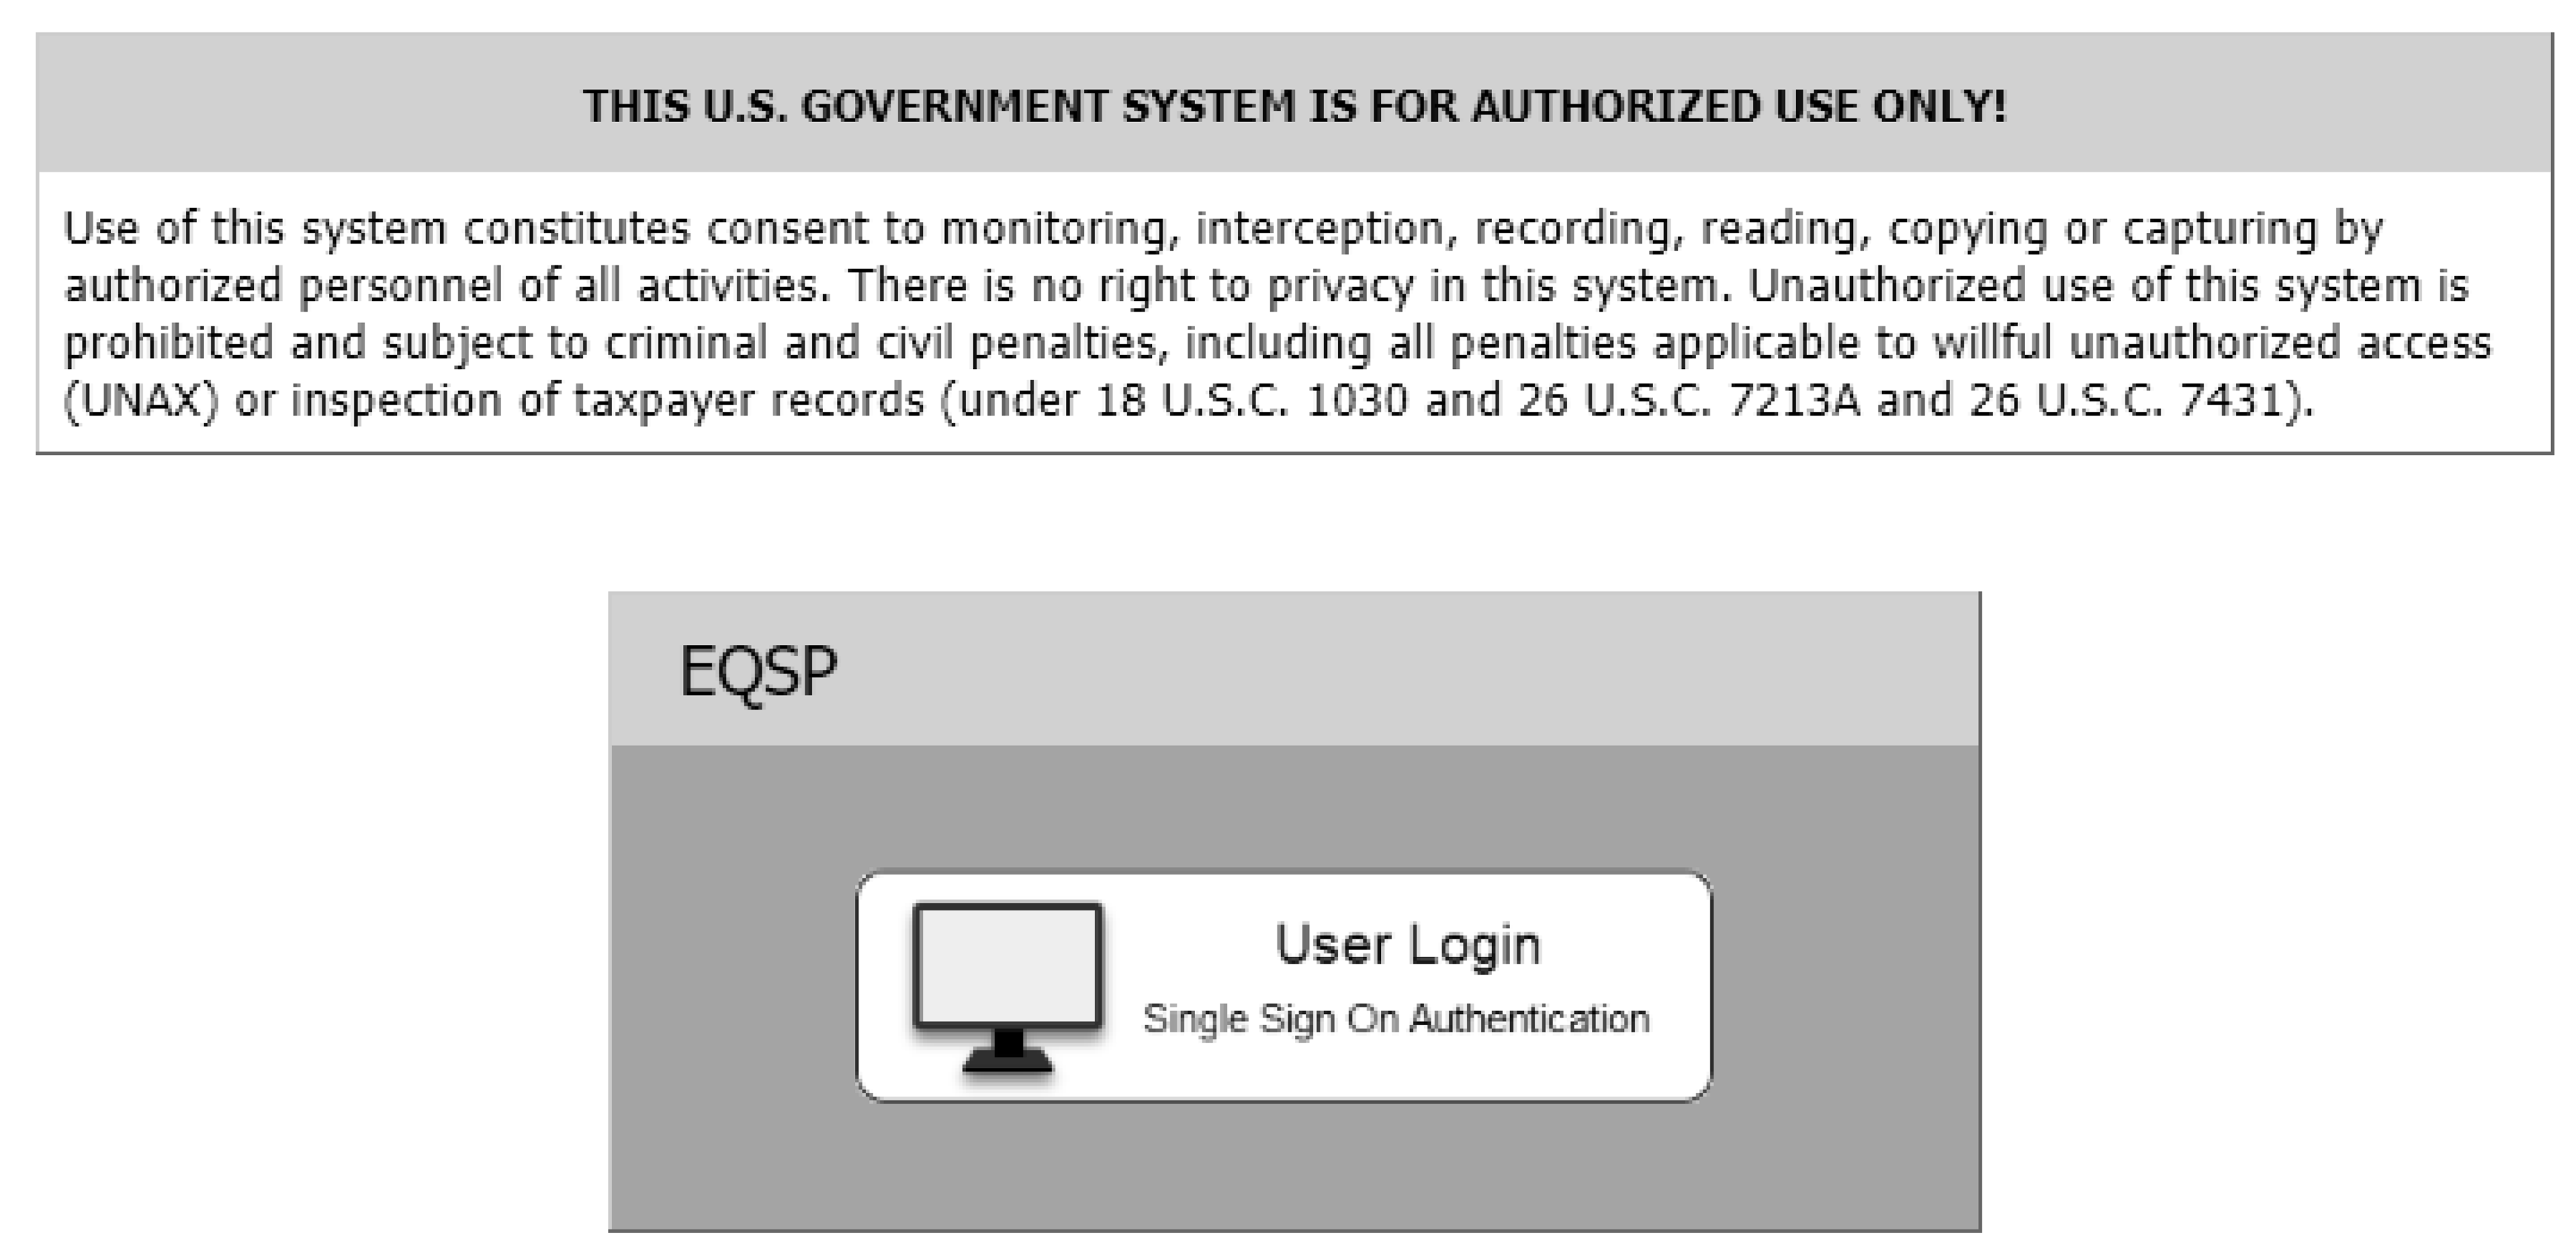
- Exhibit 3.30.30-10 Single Sign On Authentication User Login Screen
Part 3. Submission Processing
Chapter 30. Work Planning and Control
Section 30. Embedded Quality for Submission Processing (EQSP) System
3.30.30 Embedded Quality for Submission Processing (EQSP) System
Manual Transmittal
July 14, 2026
Purpose
(1) This transmits a revision to IRM 3.30.30, Work Planning and Control - Embedded Quality for Submission Processing (EQSP) System.
Scope
IRM 3.30.30 is intended to be used by Quality Reviewers, all levels of management, and authorized third-party users that use the EQSP database to input or review data.
Material Changes
(1) IRM 3.30.30.1.1 - Background. Added SharePoint to the background statement.
(2) IRM 3.30.30.1.2 - Authority. Added new subsection to the IRM.
(3) IRM 3.30.30.1.3 - Responsibilities. Renumbered subsection from 3.30.30.1.2 to 3.30.30.1.3 due to adding new subsection to the IRM.
(4) IRM 3.30.30.1.3(1) - Responsibilities. Editorial Changes: Revised text, titles, tables, and acronyms that are relevant to the section.
(5) IRM 3.30.30.1.4 - Program Management and Review. Renumbered subsection from 3.30.303.1.3 to 3.30.30.1.4 due to adding new subsection to the IRM.
(6) IRM 3.30.30.1.5 - Program Controls. Added new subsection to the IRM.
(7) IRM 3.30.30.1.6 - Acronyms. Renumbered subsection from 3.30.30.1.4 to 3.30.30.1.6 due to adding new subsection to the IRM.
(8) IRM 3.30.30.1.6 - Acronyms. Added new commonly used acronyms and their definitions to the Acronym table list.
(9) IRM 3.30.30.1.7 - Related Resources. Renumbered subsection from 3.30.30.1.5 to 3.30.30.1.7 due to adding new subsection to the IRM.
(10) IRM 3.30.30.1.7 - Related Resources:
Paragraph 1, updated the EQSP Production website link and supporting text.
Paragraph 2, updated the Servicewide Electronic Research Program (SERP) website link and supporting text.
Paragraph 3, updated the Submission Processing manuals website link and supporting text.
(11) IRM 3.30.30.2.2(6) - Operations and Functions in the EQSP System. Editorial Changes: Revised text and table format for Operation 36, Input Correction, Functions.
(12) IRM 3.30.30.2.6 - Research Tools:
Paragraph 1, updated the IRM Numerical Index website link and supporting text.
Paragraph 2, updated the Servicewide Electronic Research Program (SERP) website link and supporting text.
Paragraph 3, updated the IRM Numerical Index Part Two website link and supporting text.
(13) IRM 3.30.30.4 - System Requirements:
Paragraph 1; list item "a" , removed the word "minimum" from the system memory sentence.
Paragraph 3, updated the BEARS Login website link and supporting text.
(14) IRM 3.30.30.4.1(1) - Accessing the EQSP System. Updated the EQSP Production website link and supporting text.
(15) IRM 3.30.30.5(2) - System Profiles (Permissions). Editorial Changes: Revised System Profiles text, titles, and table formats.
(16) IRM 3.30.30.6.1.1(3)(b)(Note) - Creating an Employee’s Profile. Editorial Changes: Revised "data base" to "database" .
(17) IRM 3.30.30.6.1.2(1)(Note) - For "Searching for an Employee’s Profile" deleted. IPU 24U0995 issued 10-03-2024.
(18) IRM 3.30.30.6.1.2(5)(d) - Searching for an Employee’s Profile. Editorial Changes: Updated organizational terms and text.
(19) IRM 3.30.30.6.2(1)(Note) - Proxy Role. Changed "active’" to "active" .
(20) IRM 3.30.30.6.2.4.2(2)(d)(Note) - Selecting a Proxy Role. Editorial Changes: Updated example note for grantee using an Operation Manager’s role.
(21) IRM 3.30.30.7.1.1(1) - Create Sample. Editorial Changes: Removed repeated text "of the" from descriptor paragraph.
(22) IRM 3.30.30.7.1.5(3)(g) - Review Details Screen. Revised the Defect Type definitions for Incorrect and Omitted.
(23) IRM 3.30.30.7.1.7(2)(k)(Note)- Review Summary Screen. Editorial Changes: Added quote marks to Program Type "a" .
(24) IRM 3.30.30.8(6) - Quality Review Sampling. IPU 25U0449 issued 04-15-2025.
(25) IRM 3.30.30.8(6) - Quality Review Sampling. Changed EQSP Website to EQSP SharePoint site in the Randomizer location instructions and added the EQSP SharePoint site link.
(26) IRM 3.30.30.10(1) - EQSP Web Site. IPU 25U0449 issued 04-15-2025.
(27) IRM 3.30.30.10(2) - EQSP Web Site. Changed EQSP Website to EQSP SharePoint site.
(28) IRM 3.30.30.11(1)(Note) - Issue Resolution Process (IRP). Editorial Changes: Updated the IRP - New EQSP DCI development request instructions.
(29) IRM 3.30.30.11(2) - Issue Resolution Process (IRP). IPU 25U0449 issued 04-15-2025.
(30) IRM 3.30.30.11.1(1) - EQSP Opportunity Change Request Template (Excel spreadsheet). IPU 25U0449 issued 04-15-2025.
(31) IRM 3.30.30.11.1(4)(g)(Note) - EQSP Opportunity Change Request Template (Excel spreadsheet). Updated the EQSP Opportunity Change Request Template "Multiple entries" instructions.
(32) IRM 3.30.30.11.1.1(1)(c) - Reviewing and Resolving the Opportunity Issue Log. IPU 25U0451 issued 04-17-2025.
(33) IRM 3.30.30.11.1.1(1)(c)(Note) - Reviewing and Resolving the Opportunity Issue Log. Added Note about the "Inform the Submitter" time frame.
(34) Exhibit 3.30.30-1 - SOI Operation (12) - Guidelines for Coding Opportunities. Changed Specific Guidance for Functions.
(35) Exhibit 3.30.30-2 - Receipt & Control Operation (31) - Guidelines for Coding Opportunities. Changed Specific Guidance for Functions.
(36) Exhibit 3.30.30-3 - ITIN Operation (32) - Guidelines for Coding Opportunities. Changed Specific Guidance for Functions.
(37) Exhibit 3.30.30-4 - Document Perfection Operation (34) - Guidelines for Coding Opportunities. Changed Specific Guidance for Functions.
(38) Exhibit 3.30.30-5 - Data Conversion Operation (35) - Guidelines for Coding Opportunities. Changed Specific Guidance for Functions.
(39) Exhibit 3.30.30-6 - Input Correction Operation (36) - Guidelines for Coding Opportunities. Changed Specific Guidance for Functions.
(40) Exhibit 3.30.30-7 - Accounting Control Services Operation (37) - Guidelines for Coding Opportunities. Changed Specific Guidance for Functions.
(41) Exhibit 3.30.30-8 - Glossary. Editorial Changes: Updated and added organizational terms and titles that are relevant to the section.
(42) Exhibit 3.30.30-9 - Roles and Permissions - Responsibilities. Added Team Lead and Team Manager roles to the table.
(43) Editorial IRM changes made for clarity throughout:
reviewed and updated grammar and punctuation,
plain language,
passive voice phrasing changed to active voice phrasing,
SharePoint site links,
website links,
IRM references,
business terms and titles.
Effect on Other Documents
IRM 3.30.30 dated 08-16-2024 is superseded. This IRM also incorporates Interim Guidance IPU 24U0995 issued 10-03-2024, IPU 25U0449 issued 04-15-2025, and IPU 25U0451 issued 04-17-2025.Audience
All Submission Processing (SP) operations at each campus that perform SP Embedded Quality reviews.Effective Date
(07-14-2026)
Scott Wallace
Director, Submission Processing
Customer Account Services
Taxpayer Services Division
Purpose: Quality Review program's primary objective is to identify problems and eliminate potential for errors in the Submission Processing System. Quality Review data provides the basis for:
Measuring and improving program effectiveness
Identifying defects resulting from individual actions or inactions
Analyzing the reason(s) for defect occurrence
Identifying defect trends
Recommending and initiating corrective action
Following up with process review and analysis to ensure the corrective action was effective
Identifying training needs
Planning workload distribution
Purpose: Individual Performance Review process is designed to collect data from employee work and provide feedback for individual performance evaluations (ratings), ranking for promotions, awards, and release/recall.
Audience: All Submission Processing Operations on each Campus that perform Embedded Quality for Submission Processing.
Policy Owner: The Director of Submission Processing.
Program Owner: Quality Section (an Organization in Submission Processing).
Primary Stakeholders: The primary stakeholders are Site Management and Headquarters to determine site-specific quality level and identify best practices.
Program Goals: The information in the IRM provides a method to monitor, measure and improve the quality of work throughout Submission Processing. The review data is used to identify trends, problem areas, training needs, and opportunities for improvement to each process.
IRM 3.30.30 provides a method to monitor, measure, and improve the Quality of Work throughout Submission Processing using a web-based and SharePoint EQSP systems that are accessed through the IRS Intranet.
The Submission Processing’s Quality Section is responsible for the information in the IRM. The Quality Section makes the necessary changes on a biennial basis.
The Director of Submission Processing is responsible for policy related to this IRM.
Policy Statements for Submission Processing are found in IRM 1.2.1, Servicewide Policy Statements.
The Submission Processing’s Quality Section is responsible for the information in the IRM. The Quality Section makes the necessary changes on a yearly basis.
The Director of Submission Processing is responsible for policy related to this IRM.
The team manager is responsible for ensuring the IRM is submitted to Publishing each year.
Program Reports: The EQSP reports in this IRM capture specific defect information. The reports provide data to assist with SP work process improvements initiatives. A list of the reports on EQSP are listed below:
Single Event Sample Pull
Employee
Employee (by Team)
Team
Department
Operation
Site
Defect Summary
Site/Program Summary
Blank DCI
Program Effectiveness: The Program Effectiveness is determined by measuring and improving program effectiveness for Submission Processing by identifying problems and eliminating the potential for errors.
The SP Embedded Quality process is a statistically valid review of specific defect information for SP programs.
EQSP primary objective is to track quality program data and to maintain the data for internal and external stakeholders.
-
The table lists commonly used acronyms and their definitions.
Acronyms Definition ACO Accounting Operation AMA Automated Manual Assessment ANMF Automated Non-Master File BBTS Batch/Block Tracking System BEARS Business Entitlement Access Request System BMF Business Master File CADS Corporate Authoritative Directory System CC Command Code CDS Centralized Delivery Services CII Correspondence Imaging Inventory CJE Critical Job Element CP Computer Paragraph CQ&S Coordination, Quality, and Support CSR Customer Service Representative DAT Data Analysis Tool DCI Data Collection Instrument DCO Data Conversion Operation DCF Dishonored Check File DLN Document Locator Number DOT Department of the Treasury DPO Document Perfection Operation DT Data Transcriber DV Data Validation EFTPS Electronic Federal Tax Payment System EIN Employer Identification Number EMF Employee Master File EO Exempt Organization EOD Enter on Duty EOP Entry Operator EP Employee Plan EQSP Embedded Quality Submission Processing ER Erroneous Refund ERS Error Resolution System ES Estimated Tax FRC Federal Records Center GAO Government Accountability Office HQ Headquarters HQF High Quality Function HQW High Quality Work ICO Input Correction Operation ICT Image Control Team IDRS Integrated Data Retrieval System IMF Individual Master File IPR Individual Performance Report or Individual Performance Review IPU Interim Procedure Update IRM Internal Revenue Manual IRP Issue Resolution Process ISRP Integrated Submission and Remittance Processing ITIN Individual Taxpayer Identification Number ITM Integrated Talent System LC Learning Curve MEPS Measured Employee Performance System MF Master File MFT Master File Transaction MSIRSDAT Microsoft IRS Data Capture ODT Operation Department Team OE Original Entry OF Operation Function OFP Organization Function Program OJT On-the Job Training P&A Planning & Analysis PCD Program Completion Date POA Power of Attorney QR Quality Review or Quality Reviewer RACS Revenue Accounting Control System RAIVS/IVES Return and Income Verification Services/Income Verification Express Service RAS Recommended Annual Sample RCO Receipt and Control Operation RPC Return Processing Code RPSID Remittance Processing System Identification RRACS Redesigned Revenue Accounting Control System RRPS Residual Remittance Processing System RTS Real Time System SC Service Center SCCF Service Center Control File SCD Service Computation Date SCRIPS Service Center Recognition Input System SCRS Service Center Replacement System SEID Standard Employee Identifier SERP Servicewide Electronic Research Program SME Subject Matter Expert SOI Statistics of Income SP Submission Processing SSN Social Security Number SSO Single Sign On TDS Transcript Delivery System TE Tax Examiner TIN Taxpayer Identification Number TPNC Taxpayer Notice Code TS Taxpayer Services UAL User Access Listing UNID Unidentified UPC Unpostable Code URC Unpostable Resolution Code URF Unidentified Remittance File WP&C Work Planning & Control
The EQSP Production system is accessed through the Microsoft’s Edge browser at the following website: EQSP Production System.
The Servicewide Electronic Research Program (SERP) web page which contains revisions and updates to the IRM procedures is at the following website: Servicewide Electronic Research Program (SERP).
The website for the Submission Processing manuals is at the following website: IRM Numerical Index.
The EQSP system provides a method to monitor, measure, and improve the quality of work throughout Submission Processing. Review data is used to identify trends, problem areas, training needs, and opportunities for improvement to each process.
Measured Employee Performance system (MEPS) collects data through the EQSP system; the data is used to measure employees on the quality critical job element (CJE).
EQSP is used by Site Management and Headquarters to determine site-specific quality level and identify potential best practices.
Managers use this system to create and edit profile information for employees they manage. See IRM 3.30.30.6.1.1, Creating an Employee's Profile.
EQSP supports Treasury’s goals and Taxpayer Services (TS) strategy by creating an objective and valid system for measuring the quality of products provided to taxpayers and other customers.
Release Recall Listings are created utilizing Release Recall Screens accessed through the EQSP system.
EQSP is a web-based system accessed through the IRS Intranet. The system:
Creates a Sample (input Quality Review Samples into EQSP).
Captures data on reviews performed by Quality Reviewers, Managers, and Analysts.
Gathers data, detailing the opportunities, defects, defect types, and defect descriptions.
Generates employee and organizational reports from the data collected during the review process.
Gathers Individual Performance Reviews, High Quality Work Reviews, Learning Curve Reviews, and Team Defects for MEPS.
It is important that all campuses adhere to the policy and procedures set forth in this IRM to ensure EQSP is administered consistently at all sites.
An IRM deviation request must be submitted in writing following instructions in IRM 1.11.2.2, Internal Management Documents System- Internal Revenue Manual (IRM) Process, IRM Standards, and elevated through the appropriate channels for executive approval.
Operation 12, Statistics of Income, Functions include:
Function 220 - SOI Editing
Function 360 - Imaging
Operation 31, Receipt and Control, Functions include:
Function 130 - Pre-Batching
Function 140 - Extraction
Function 140 - Second Sort
Function 160 - Remittance Perfection
Function 170 - Manual Deposit
Function 180 - Batching
Function 210 - Code and Edit
Function 360 - Imaging
Function 440 - Residual Remittance Processing System (RRPS) - Site Specific (Ogden)
Function 460 - ICT Validation
Function 550 - Document Preparation
Function 720 - Receiving, Sorting, and Miscellaneous
Function 790 - Tax Accounts Support Activity
Operation 32, ITIN, Functions include:
Function 180 - ITIN Batching
Function 380 - ITIN Real Time System (RTS)
Function 720 - Receiving, Sorting and Miscellaneous
Function 790 - Tax Accounts Support Activity
Operation 34, Document Perfection, Functions include:
Function 190 - Numbering
Function 210 - Code and Edit
Function 220 - SOI Editing
Function 390 - Entity
Function 550 - Pre-Doc Preparation
Function 710 - Tax Account Activity-1040X
Function 770 - Correspondence
Function 780 - Correspondence
Operation 35, Data Conversion, Functions include:
Function 230 - Data Conversion (ISRP)
Function 440 - Residual Remittance Processing System (RRPS)
Function 470 - Service Center Recognition Input System (SCRIPS) DB
Function 480 - SCRIPS OE
Function 550 - Post-Doc Preparation
Function 790 - Tax Accounts Support Activity (RAIVS/IVES)
Operation 36, Input Correction, Functions include:
Function 270 - Error Resolution System (ERS)
Function 290 - Notice Review (ID Theft)
Function 290 - Unpostables
Function 310 - Research
Function 340 - ERS (Error Correction)
Function 350 - Rejects
Function 360 - Imaging
Function 390 - Entity Control
Function 510 - Cycle Control and Servicing
Function 520 - Central File Control
Function 530 - Pulling Returns and Documents
Function 540 - Re-filing Returns and Documents
Function 550 - Document Preparation
Function 590 - Special Search
Function 710 - Notice Review
Function 710 - Tax Account Activity
Function 770 - Correspondence
Function 780 - Correspondence
Function 790 - Tax Account Support Activity
Operation 37, Accounting, Functions include:
Function 340 - ERS (EFTPS)
Function 410 - Accounting Activity
Function 420 - Account Services
Function 420 - Manual Refunds
Function 420 - ANMF
Function 420 - Dishonored Checks
Function 630 - Balancing
Function 710 - Erroneous Refunds
Function 710 - Unidentified Remittance
Function 710 - Tax Account Activity
Function 790 - Tax Account Support Activity
Quality Review program's primary objective is to identify problems and eliminate potential for errors in the Submission Processing System. Quality Review data provides the basis for:
Measuring and improving program effectiveness
Identifying defects resulting from individual actions or inactions
Analyzing the reason(s) for defect occurrence
Identifying defect trends
Recommending and initiating corrective action
Following up with process review and analysis to ensure the corrective action was effective
Identifying training needs
Planning workload distribution
Individual Performance Review process is designed to collect data from employee work and provide feedback for individual performance evaluations (ratings), ranking for promotions, awards, and release recall.
Annually, employees selected for the quality reviewer role must complete the most recent Integrated Talent Management (ITM) Course 12182, "Embedded Quality for Submission Processing (EQSP) Reviewer Training".
The annual training must be completed between January 1 and March 31 or prior to the reviewer performing quality reviews.
The quality manager (or designee) will conduct an “Embedded Quality for Submission Processing (EQSP) Reviewer Training” session annually for all quality reviewers (including quality lead) on their assigned team to complete ITM course 12182. The quality manager (or designee) will submit a listing of the attendees to Centralized Delivery Services (CDS) for employees’ recordation in the ITM system.
Quality Reviewers are required to complete individual review and record review results in the EQSP system.
Quality Reviewers should:
Have a good working knowledge of the work in the particular area that is being reviewed.
Receive training for individual review procedures.
Sit with an experienced reviewer and observe how the reviewer performs the duties associated with the Quality Reviewer Role.
Review employees’ work.
Have a good working knowledge of the EQSP system.
Identify defects.
Prepare the necessary forms pertaining to the review process.
Ask the manager/lead questions about the work process.
Have basic personal computer knowledge.
The quality reviewer should completely review the designated sample of an employee’s work to determine how well they have followed IRM procedures and guidelines.
Reviews must be accurate, valid, and consistent.
Reviewers must record all defects found.
Reviewers must establish a climate of integrity, efficiency, and fairness.
Reviewers must ensure all defects identified are supported by an IRM reference and included in the “IRM Reference” text box located on the Quality Reviews Detail Screen when the review results are recorded in EQSP. The IRM reference appears with the “Defect Details” on the “Individual Employee Report (Single Event Sample Pull)”.
"Tax Period," or for any Data Conversion Operation obvious transcription defect.
Several IRMs impact the work done by employees in the Submission Processing Centers. Refer to IRM Numerical Index Part Three. Visit IRM Numerical Index website for a list of Submission Processing IRMs.
The Servicewide Electronic Research Program (SERP) - Submission Processing (SP) Portal web page, which contains revisions and updates to the IRM procedures is located at: Servicewide Electronic Research Program (SERP) website.
Reviewers use various IDRS command codes to review cases. Refer to IRM Numerical Index Part Two. Visit the Website IRM Numerical Index Part Two website: IRM 2.3, Terminal Responses, and IRM 2.4, Terminal Input, for a complete list and instructions of all IDRS command codes.
Local procedures are deviations from the IRM. Only local procedures approved by Headquarters Program Management can be considered when evaluating quality.
The Quality Review Results are entered into the EQSP system as the following Review Types:
Individual Performance Review (measured employee performance review; may only be input for employee profiles assigned to a measured performance plan with a review date within the measured quality plan date range).
Product Feedback Review (Does not require an employee SEID).
Team Defect Review (Defect(s) removed from an employee and charged to the team and/or when multiple identical defects are present).
Managerial/OJT Review (requires an employee SEID).
Individual Performance reviews are samples of an employee’s completed work for measured sample plans including High Quality Work (HQW).
Product reviews are used when work sampled for feedback does not need to be associated with an individual. The results are provided to groups of employees, managers, and management officials for analysis, trending, and process improvements.
Team Defect review type is used to record defective documents identified in an employee's completed sampled work when charging defects to a team. Team Defects include Multiple Identical Defects and procedural or systemic defects removed from the employee and charged to the team. Team Defects do not count towards an employee's measured performance rating.
Defects are considered multiple identicals when a quality reviewer identifies the same error on every document that the opportunity for error is available on within the sample. Multiple identical defects are entered into EQSP as follows:
One defect is entered as Individual Performance Review for the employee.
The remaining like defect(s) is entered as a Team Defect Review(s) for the team.
All defects must be entered as an Individual Performance Review for the employee if at least one document within the sample with the same opportunity for error is worked correctly.
Any additional defect(s) identified within the sample that is not considered a multiple identical is entered as Individual Performance Review for the employee.
Note:
If a Team Defect (multiple identical, procedural, or systemic) and a defect other than the Team Defect are identified on the same document, the document remains part of the employees’ sample and review results are entered as Individual Performance Review rather than Team Defect. The document is considered one defective document with two defects.
Procedural or Systemic defects are removed from the employee and charged to the team when defects are attributed to training program deficiencies, incurred due to procedural changes not shared with the employee, or a result of systemic deficiencies rather than a result of employee actions or inactions.
In these cases:The Individual Performance Review is deleted from the employee’s sample and entered as a Team Defect review.
The employee neither receives credit for the document as part of the sample nor credit for a document reviewed.
Managerial/OJT reviews are used to assess an employee job performance, identify training needs, determine job readiness, and monitor employee's procedural skill. These samples are typically 100 percent reviewed during an initial training or when additional coaching is required (samples are reviewed after the work has been subject to Individual Performance Review).
See IRM 3.30.20, OFP Code List, for appropriate Work Planning & Control (WP&C) Organization, Function, and Program (OFP) time reporting codes.
See the table below for a list of valid OFP codes for EQSP.
Organization Function Program Description 23000 990 08030 Improvement Specialist - For use by employees officially acting in this position Valid for all Organizations 990 59250 Training Valid for all Organizations 990 59300 Briefing/Meetings Valid for all Organizations 880 08030 Measured Review- Individual Performance Review/ Team Defect Review- Time spent performing the review and entering measured review in the EQSP system. Valid for all Organizations 880 08031 Unmeasured Review- Time spent performing the review and entering review for any unmeasured areas/functions in the EQSP system. Valid for all Organizations 880 08032 Measured Review - Managerial/OJT and Product Feedback Review - Time spent performing these reviews and entering reviews in the EQSP system. Valid for all Organizations 880 08033 Clerical Duties- Time spent on all clerical duties related to EQSP, such as selecting samples, filing, and any other clerical activities.
There are several specific roles in the EQSP system. The roles are listed below:
Management Assistant:
Create and edit employee profile information within their span of control.
Add, search and view employee profiles within their site and Operation.
Move and assign employees to correct Team, Department and/or Organization.
Quality Reviewer (QR):
Effectively use IRM 3.30.30, Embedded Quality for Submission Processing System, and all relevant IRMs to perform an unbiased, consistent, accurate review of all work.
Protect the documents that are being reviewed.
Create Samples (input Quality Review Samples) using the EQSP system.
Identify and code defective opportunities appropriate for a particular work product.
Identify changes needed to the Data Collection Instruments (DCIs).Provide recommendations for corrections/ improvements for IRM 3.30.30, Embedded Quality for Submission Processing System, and EQSP Training Material.
Generate and print Single Event Sample Pull Reports for reviews performed. Identify and report all problems to the Quality Review (QR) Manager.
Quality Review (QR) Lead:
Create an employee review sample for all review types for any employee within their assigned Site and Operation and for any Quality reviewer within their assigned Site, ODT (exception of their own SEID).
Create a Product feedback review for any Operation, Department, Team and Function/Program within their assigned Site and Operation.
Search/View any DCI within their assigned Site and Operation they created by any Quality Reviewer within their assigned Site and Operation.
Edit high quality Individual Performance (the delete and edit time frame is 15 days).
Delete high quality work, Individual Performance, Team Defect, and Managerial /OJT DCI that they created or created by a Quality Reviewer within their assigned Site.
Delete Learning Curve (LC) Review Types they created or LC reviews created on the same day the DCI was created.
Delete Product feedback DCI they created or created by a Quality Reviewer in their assigned Site.
View and print Quality Reports (Core Reports) Single Event sample Pull Report for sample pull ID created by any Quality Reviewer in assigned site.
Quality Review (QR) Manager:
Review access permissions regularly for users within span of control.
In sites that do not have a QR Manager, the Team Manager is responsible for this role.
Maintain the integrity and quality of the EQSP system by monitoring and reviewing work performed by a Quality Reviewer.
Effectively use IRM 3.30.30, Embedded Quality for Submission Processing System, and all relevant IRMs to ensure an unbiased, consistent, accurate review of all work.
Protect the documents being reviewed.
Ensure the QR Team receives complete training in the quality review process and related systems used in reviewing.
Monitor the sampling techniques to meet internal guidelines.
Ensure all work is sampled and reviewed within prescribed guidelines.
Identify opportunities for a particular work product.
Identify and elevate EQSP issues to the Site Improvement Specialist.
Provide timely feedback and relevant EQSP information to all managers in the operation or function.
Enter adjustments to quality review results.
Create and maintain accurate profiles for assigned employees.
Team Manager:
Review access permissions regularly for users within span of control.
Ensure all completed work is available for sampling.
Create and maintain accurate profiles for assigned employees.
Use individual and team reports to identify error trends and take corrective actions.
Timely share Single Event Sample Pull Reports.
Identify and elevate EQSP issues to the Site Improvement Specialist.
Communicate QR and relevant EQSP information to all team members.
Input adjustments to erroneously reported employee performance data (hours and/or volume) through the EQSP IPR Adjustment Screen.
Team Lead:
Ensure all completed work is available for sampling.
Use individual and team reports to identify error trends and take corrective actions.
Timely share Single Event Sample Pull Reports.
Identify and elevate EQSP issues to the Site Improvement Specialist.
Communicate QR and relevant EQSP information to all team members.
Department Manager:
Confirm completion of reviews for access permissions regularly for users within span of control.
Identify and elevate EQSP issues to the Site Improvement Specialist.
Assist in creating and maintaining accurate employee profiles.
Communicate QR and relevant EQSP information to all team members.
Initiate improvement activities.
Create a Release Recall.
Request a Release Recall final listing.
Operation Manager:
Confirm completion of reviews for access permissions regularly for users within span of control.
Ensure error trends are shared with the P&A/Improvement Team.
Ensure operations comply with EQSP procedures and guidelines.
Coordinate improvement activities with the Site Improvement Specialists.
Initiate improvement activities.
Request Release Recall final listing.
Site Director:
Monitor all EQSP site activities.
Provide support for national improvement strategies.
Site Administrator (Improvement Specialist):
Troubleshoot, problem solve, and elevate system issues to the System Administrator.
Coordinate with site Operations to identify Subject Matter Experts (SMEs) to work with HQ for support (e.g., roll out of new functions/programs).
Implement "EQSP Issue Resolution Process."
Identify and resolve calibration issues within Operations.
Provide input to HQ regarding defect calibration issues.
Ensure defect identification guidance is communicated to all affected reviewers.
Monitor profile maintenance issues at site and resolve issues as necessary.
Monitor and maintain EQSP profiles utilizing the EQSP User Access Listing (UAL)
Report system issues (e.g., system outage, slow response, missing DCIs or opportunities) to HQ.
Provide training assistance to Operations.
Use MEPS and EQSP data to monitor accuracy.
Use EQSP data to identify defect trends.
Monitor Quality Review Sampling to ensure compliance with sampling plan.
Partner with stakeholders to address identified improvement opportunities within functions.
Site Assistant (Functional Coordinator or EQSP Business Entitlement Access Request System (BEARS) Site approver):
Approve BEARS request and establish or modify profiles using the EQSP system.
Monitor and maintain EQSP profiles utilizing the EQSP User Access Listing (UAL).
Planning and Analysis (P&A) Analyst:
Communicate findings and recommendations to management on local and national issues.
Work in conjunction with the Site Improvement Specialists regarding improvement activities.
Headquarters Manager / Analyst:
Create and validate DCIs for new functions/programs.
Review all applicable IRM changes for impact on the EQSP system.
Implement "EQSP Issue Resolution Process" .
Alert field to calibration issues regarding defect coding.
Provide guidance to facilitate defect calibration.
Obtain field input to maintain the EQSP IRM and training materials.
Use EQSP data to monitor document accuracy by function on a weekly basis.
Use EQSP data to identify specific defects.
Monitor EQSP sampling.
Prepare National Quality reports.
Through analysis and drill-down, identify improvement opportunities within assigned functions – both within a site and across sites.
Partner with stakeholders to address improvement opportunities.
Communicate system updates, changes, and revisions to Management and Improvement Specialists.
Maintain the EQSP system.
Provide program and procedural guidance.
Coordinate program development/realignment activities.
Provide support and guidance to Site Improvement Specialists.
Ops MEPS Administrator:
Create Product Feedback DCIs for employees at their site.
View, edit, and delete Product Feedback DCIs created at their site at any time
View employee profile information for their site.
Complete employee time/volume IPR adjustments for employees.
View Quality Base Points
View, add and revise Efficiency Base Points
View Employee Learning curve status and search for Learning Curve status and search for Learning Curve requirements (sample pulls and documents per sample) for the Site.
Request Release/Recall Final listing for the Site.
View EQSP Core/MEPS reports as listed in Exhibit 3.30.30-9, Roles and Permissions - Responsibilities.
Release/Recall (Only):
View Information pertaining to the Release/Recall for the Operation/Site in which they are assigned.
Add or Modify information for the Release/Recall for their assigned Site.
See Exhibit 3.30.30-9.
Access to the EQSP Database System requires a personal computer with at least:
A Pentium-based processor with a of 32 megabytes of system memory
Windows 2000/NT or greater operating system
Microsoft Edge, version 99 or higher
Connection to the IRS Intranet
Users need to know their Standard Employee Identifier (SEID).
Users need to submit a BEARS request to gain access to the EQSP system. To get access, use the BEARS application. Visit the website: BEARS Login. Follow the on-line instructions to complete the application request. EQSP applications are:
EQSP- TS HQ
EQSP- Austin
EQSP- Kansas City
EQSP- Ogden
Enter the information listed below in the Special Instructions section of the BEARS request:
The Site
The five-digit Organization Code
The EQSP’s Role requested for the employee. Options include Site Director, Operations Manager, Department Manager, Quality Manager, Team Manager, Quality Reviewer, Site Administrator, Management Assistant, Site Assistant, and P&A Analyst.
The Roles for EQSP - TS HQ include Site Admin, Site Assistant, and Release Recall only
Once the manager approves the employee's BEARS request, it will be routed automatically to the EQSP Site Administrator who will verify the requestor’s information.
When the BEARS request process is complete, an E-mail will be received from BEARS asking for an acceptance signature.
Users who have not logged into EQSP for 60 days will automatically have their account locked. If users attempt to login to EQSP after a 60-day period of inactivity, they will receive an account locked message on the EQSP Login screen.
Users who have not logged into EQSP at least once every 60 days will automatically have their account deactivated. If users attempt to login EQSP after a 60-day period of inactivity, they will receive a message on the EQSP Login screen that says, "Your account has been removed from BEARS. Please submit a BEARS Add request to regain access to the EQSP Application."
Submit a BEARS request to modify profile if users’ roles or Organization change.
Submit a BEARS delete request when access to EQSP is no longer required. If the employee is going to remain in the SP organization, special instructions should address a role change to an "employee" role.
The first step to accessing the EQSP Production system is to open the Edge browser, and go to the following website: EQSP Production System.. Then click the "Enter" key on the keyboard. Then the User may login by clicking on the User Login Single Sign On Authentication button, see: Exhibit 3.30.30-10.
The system role is determined by job function. Your specific profile determines which actions you are allowed to perform in EQSP. See Exhibit 3.30.30.9, Roles and Permissions - Responsibilities, and IRM 3.30.30.5, System Profile (Permissions).
Listed below are some navigational shortcuts:
Left mouse button: Use to select the fields you want to enter.
Tab key: Use this key to move forward from one field to the next.
Shift Tab key: To use this key combination, you must hold down both keys to move backward to previous fields.
Page Up: Use this key to scroll up in the DCI.
Page Down: Use this key to scroll down in the DCI.
Hyperlinks: Use links to move from page to page within a DCI or to go to another screen to perform various actions, i.e., coding repeated opportunities, generating reports, searching for profiles or reviews, etc. Links appear in blue underlined text or numbers.
If you have problems accessing or using EQSP, contact your Site Improvement Specialist.
System Profiles define the level of access a user is allowed, and the activities granted by that access.
For specific System Profiles, refer to the table below.
Role System Profile (Permissions) Management Assistant Search/view employee profiles within their site.
Create/edit employee profiles with span of control.
Change a manager profile to an employee profile.
Move employees to the correct Organization, Department and/or Team.
Quality Reviewer Create a DCI within assigned Site and Operation.
View a DCI they created within their Site and Operation.
Edit and delete DCIs they created within five business days from the start of the review. Exception: Learning Curve
View the Single Event Sample Pull Report for a review they created.
Quality Review Lead Create an Employee review sample product for all review types.
Search/View any DCI within their assigned Site
Search/View any DCI within their assigned Site and Operation.
Delete High Quality, Individual Performance Team Defect, and Managerial/OJT DCI.
View and Print Quality Reports (Core Reports) Single Event Sample Pull Reports.
View/Print/Export to Excel Learning Curve sample report, and sampling report within Site/Operation.
Quality Review Manager Create and edit the profile information of EQSP Employee roles within their span of control.
Edit profile information of EQSP Quality Reviewer roles within their span of control.
Create a DCI within assigned Site and Operation.
View, add or modify information pertaining to the Release/Recall for the Team in which they are assigned.
View any DCI they created at any time.
View any DCI created by a Quality Reviewer, who they manage, at any time.
View any DCI created by a Quality Reviewer for an employee they manage.
Edit any DCI they created within 14 calendar days. Except LC = five calendar days of the completion of that review.
Edit any DCI created by a Quality Reviewer or for an employee, who they manage, within 14 calendar days of the completion of that review.
Delete Product Reviews.
Delete any DCI they created within 14 calendar days of the completion of that review.
Delete any DCI created by a Reviewer or for an employee, they manage, within 14 calendar days from the start of that review.
Request an Ad-hoc Individual Performance Report (IPR) for employees they manage.
View CORE/MEPS reports and listings systemically generated and sent to Control-D as indicated in Exhibit 3.30.30-9, Roles and Permissions - Responsibilities.
Search and view Quality Base Points for employees in their site.
Search and view Efficiency Base Points for employees in their site.
Search or view learning curve information for the employee and programs in which the employees work by program or SEID.
Create and view the Single Event Individual Employee and Cumulative Individual Performance reports on reviews created by a Quality Reviewer they manage.
Manage Sample Screen.
View Team, Department, Operations, and Director’s Reports.
Team Manager Create and view Individual Performance, Product, and Managerial/OJT reviews for employees they manage.
View any reviews performed by a Quality Reviewer they manage.
Edit and delete for 14 calendar days of the completion of that review.
View EQSP Core/MEPS Reports as listed in Exhibit 3.30.30-9, Roles and Permissions - Responsibilities.
Complete employee time/volume IPR adjustments for employees they manage.
View, add or modify information pertaining to the Release/Recall for the Team in which they are assigned.
Search and view Quality Base Points for employees in their site.
Search and view Efficiency Base Points for employees in their site.
View Employee Learning Curve status and search for Learning Curve requirements (sample pulls and documents per sample) for the Operation and Function.
Department Managers Create DCIs for Managerial/OJT or Product Feedback review on an employee within their span of control.
View any DCI created for employees within their span of control.
Edit Managerial/OJT and Product Feedback DCIs they created within 14 calendar days.
Delete DCIs they created for Managerial/OJT, and Product Feedback review within five business days of the completion of that review without considering holidays and weekends.
Create employee profile and edit the profile information of any employee within their span of control.
View EQSP Core/MEPS Reports as listed in Exhibit 3.30.30-9, Roles and Permissions - Responsibilities.
Complete employee time/volume IPR adjustments for employees they manage.
Search and view Quality Base Points for employees in their site.
Search and view Efficiency Base Points for employees in their site.
View, add or modify information pertaining to the Release/Recall for the Department in which they are assigned.
View Employee Learning Curve status and search for Learning Curve requirements (sample pulls and documents per sample) for the Operation and Function.
Operation Manager and Site Director View any DCI created for employees within their span of control.
Create employee profile and edit the profile information of any employee within their span of control.
View EQSP Core Reports as listed in Exhibit 3.30.30-9, Roles and Permissions - Responsibilities.
Complete employee time/volume IPR adjustments for employees they manage.
View, add, or modify information pertaining to the Release/Recall for the Operation/Site in which they are assigned.
Request Release/Recall Final Listing for the Operation in which they are assigned (Operation Manager only).
View Employee Learning Curve status and search for Learning Curve requirements (sample pulls and documents per sample) for the Operation and Function.
View EQSP Core/MEPS Reports as listed in Exhibit 3.30.30-9, Roles and Permissions - Responsibilities.
View, add, and revise Efficiency Base Points within their span of control.
Search and view Quality Base Points for employees in their site.
Search and view Efficiency Base Points for employees in their site.(Operation Managers can add and revise Efficiency Base Points for their Operation).
Create Release Recall.
Planning and Analysis Create DCIs for Product Feedback review.
View Product Feedback review DCIs they created.
View EQSP Core Reports as listed in Exhibit 3.30.30-9, Roles and Permissions - Responsibilities.
Planning & Analyst Staff Manager only: Create and edit the profile information of an employee that they manage, including assigning permission to that employee.
Headquarters’ Manager/Analyst View EQSP Core Reports as listed in Exhibit 3.30.30-9, Roles and Permissions - Responsibilities.
Search and view Efficiency Base Points for employees in their site.
Site Assistant Add, view, modify, delete, and lock profile information for employees in their site. Release/Recall Only View, add or modify information pertaining to the Release/Recall for the Operation/Site in which they are assigned. Site EQSP Administrators Create DCIs for Individual Performance, Product, Team Defect, Managerial/OJT reviews for employees at their site.
View, edit, and delete DCIs they created or created by employees at their site at any time.
Add, modify, and lock employee profile information for their site.
Create and edit the profile information for any employee at their site.
View EQSP Core/MEPS Reports as listed in Exhibit 3.30.30-9, Roles and Permissions - Responsibilities.
Ops MEPS Administrator Create Product Feedback DCIs for employees at their site.
View, edit, and delete Product Feedback DCIs created at their site at any time.
View employee profile information for their site.
Complete employee time/volume IPR adjustments for employees they manage.
View Quality Base Points.
View, add and revise Efficiency Base Points.
View Employee Learning Curve status and search for Learning Curve requirements (sample pulls and documents per sample) for the Site.
View Learning curve sample and Sample report.
Request Release/Recall Final Listing for the Site.
View EQSP Core/MEPS Reports as listed in Exhibit 3.30.30-9, Roles and Permissions - Responsibilities.
System Administrator/MEPS Coordinator Create DCIs for Individual Performance, Product, Team Defect, Managerial/OJT reviews for employees at all sites.
View, edit, and delete DCIs created at any site at any time.
Add, modify and lock employee profile information at all sites, including headquarters.
Unlock an employee's account at all sites including headquarters, if they fail to login after three attempts.
Reset an employee’s access at all sites including headquarters.
Create and edit the profile information for any employee at all sites including headquarters.
View EQSP Core/MEPS Reports as listed in Exhibit 3.30.30-9, Roles and Permissions - Responsibilities.
Complete employee time/volume IPR adjustments as requested.
View, add, and revise Quality Base Points.
View, add and revise Efficiency Base Points.
View Employee Learning Curve status and search for Learning Curve requirements (sample pulls and documents per sample) for all sites.
Request Release/Recall Final Listing for any site.
Add, modify, and delete EQSP DCIs (including End of Year form changes).
It is necessary to create a profile for an employee before reviews are input into EQSP.
To ensure the information for the employee is correct, managers and/or site administrators should:
Input information under the correct SEID.
Note:
If an error exists in the SEID field, Administrators can correct the SEID. Do not create a second profile for the employee or review data may be lost. Continue to use the existing profile and request an SEID correction through your local Site Improvement Specialist. All reviews will transfer to the correct SEID profile once updated.
Validate employee’s Operation, Department, Team, Function, and Program information.
Correct any information that needs to be corrected.
Contact your Site Improvement Specialist if you need assistance.
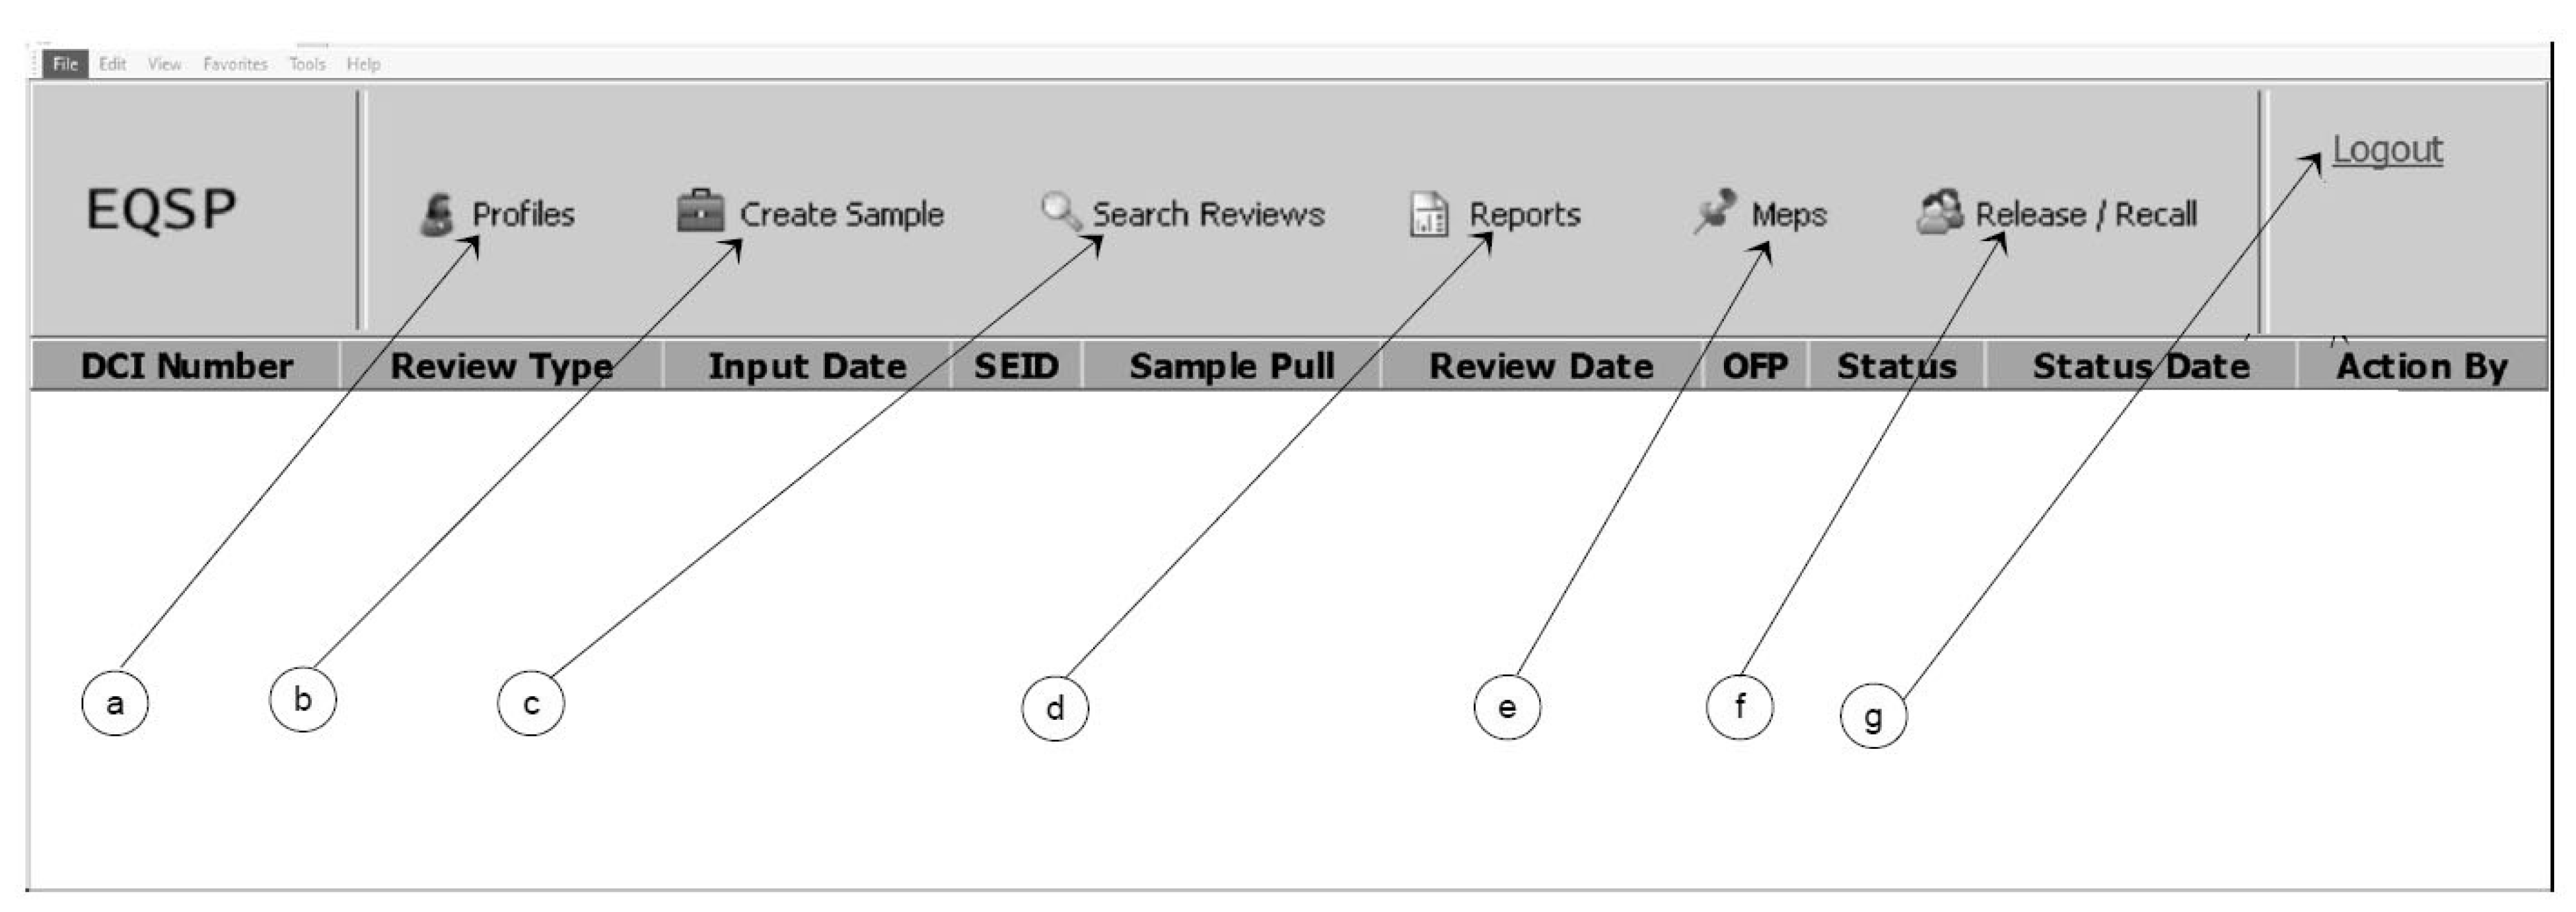
To access the Manager Main Menu Screen (Figure 3.30.30-1), login to the EQSP system. For instructions see IRM 3.30.30.4.1, Accessing the EQSP system.
-
The Manager Main Menu Screen contains a menu option for managers to enter and edit employee's information, e.g., SEID, Work Status Code, Operation, Department. This information is the Employee’s Profile.
The Manager's action buttons and hyperlinks are listed below:
Profiles hyperlink
Create Sample hyperlink
Search Reviews hyperlink
Reports hyperlink
MEPS hyperlink
Release/Recall hyperlink
Logout
-
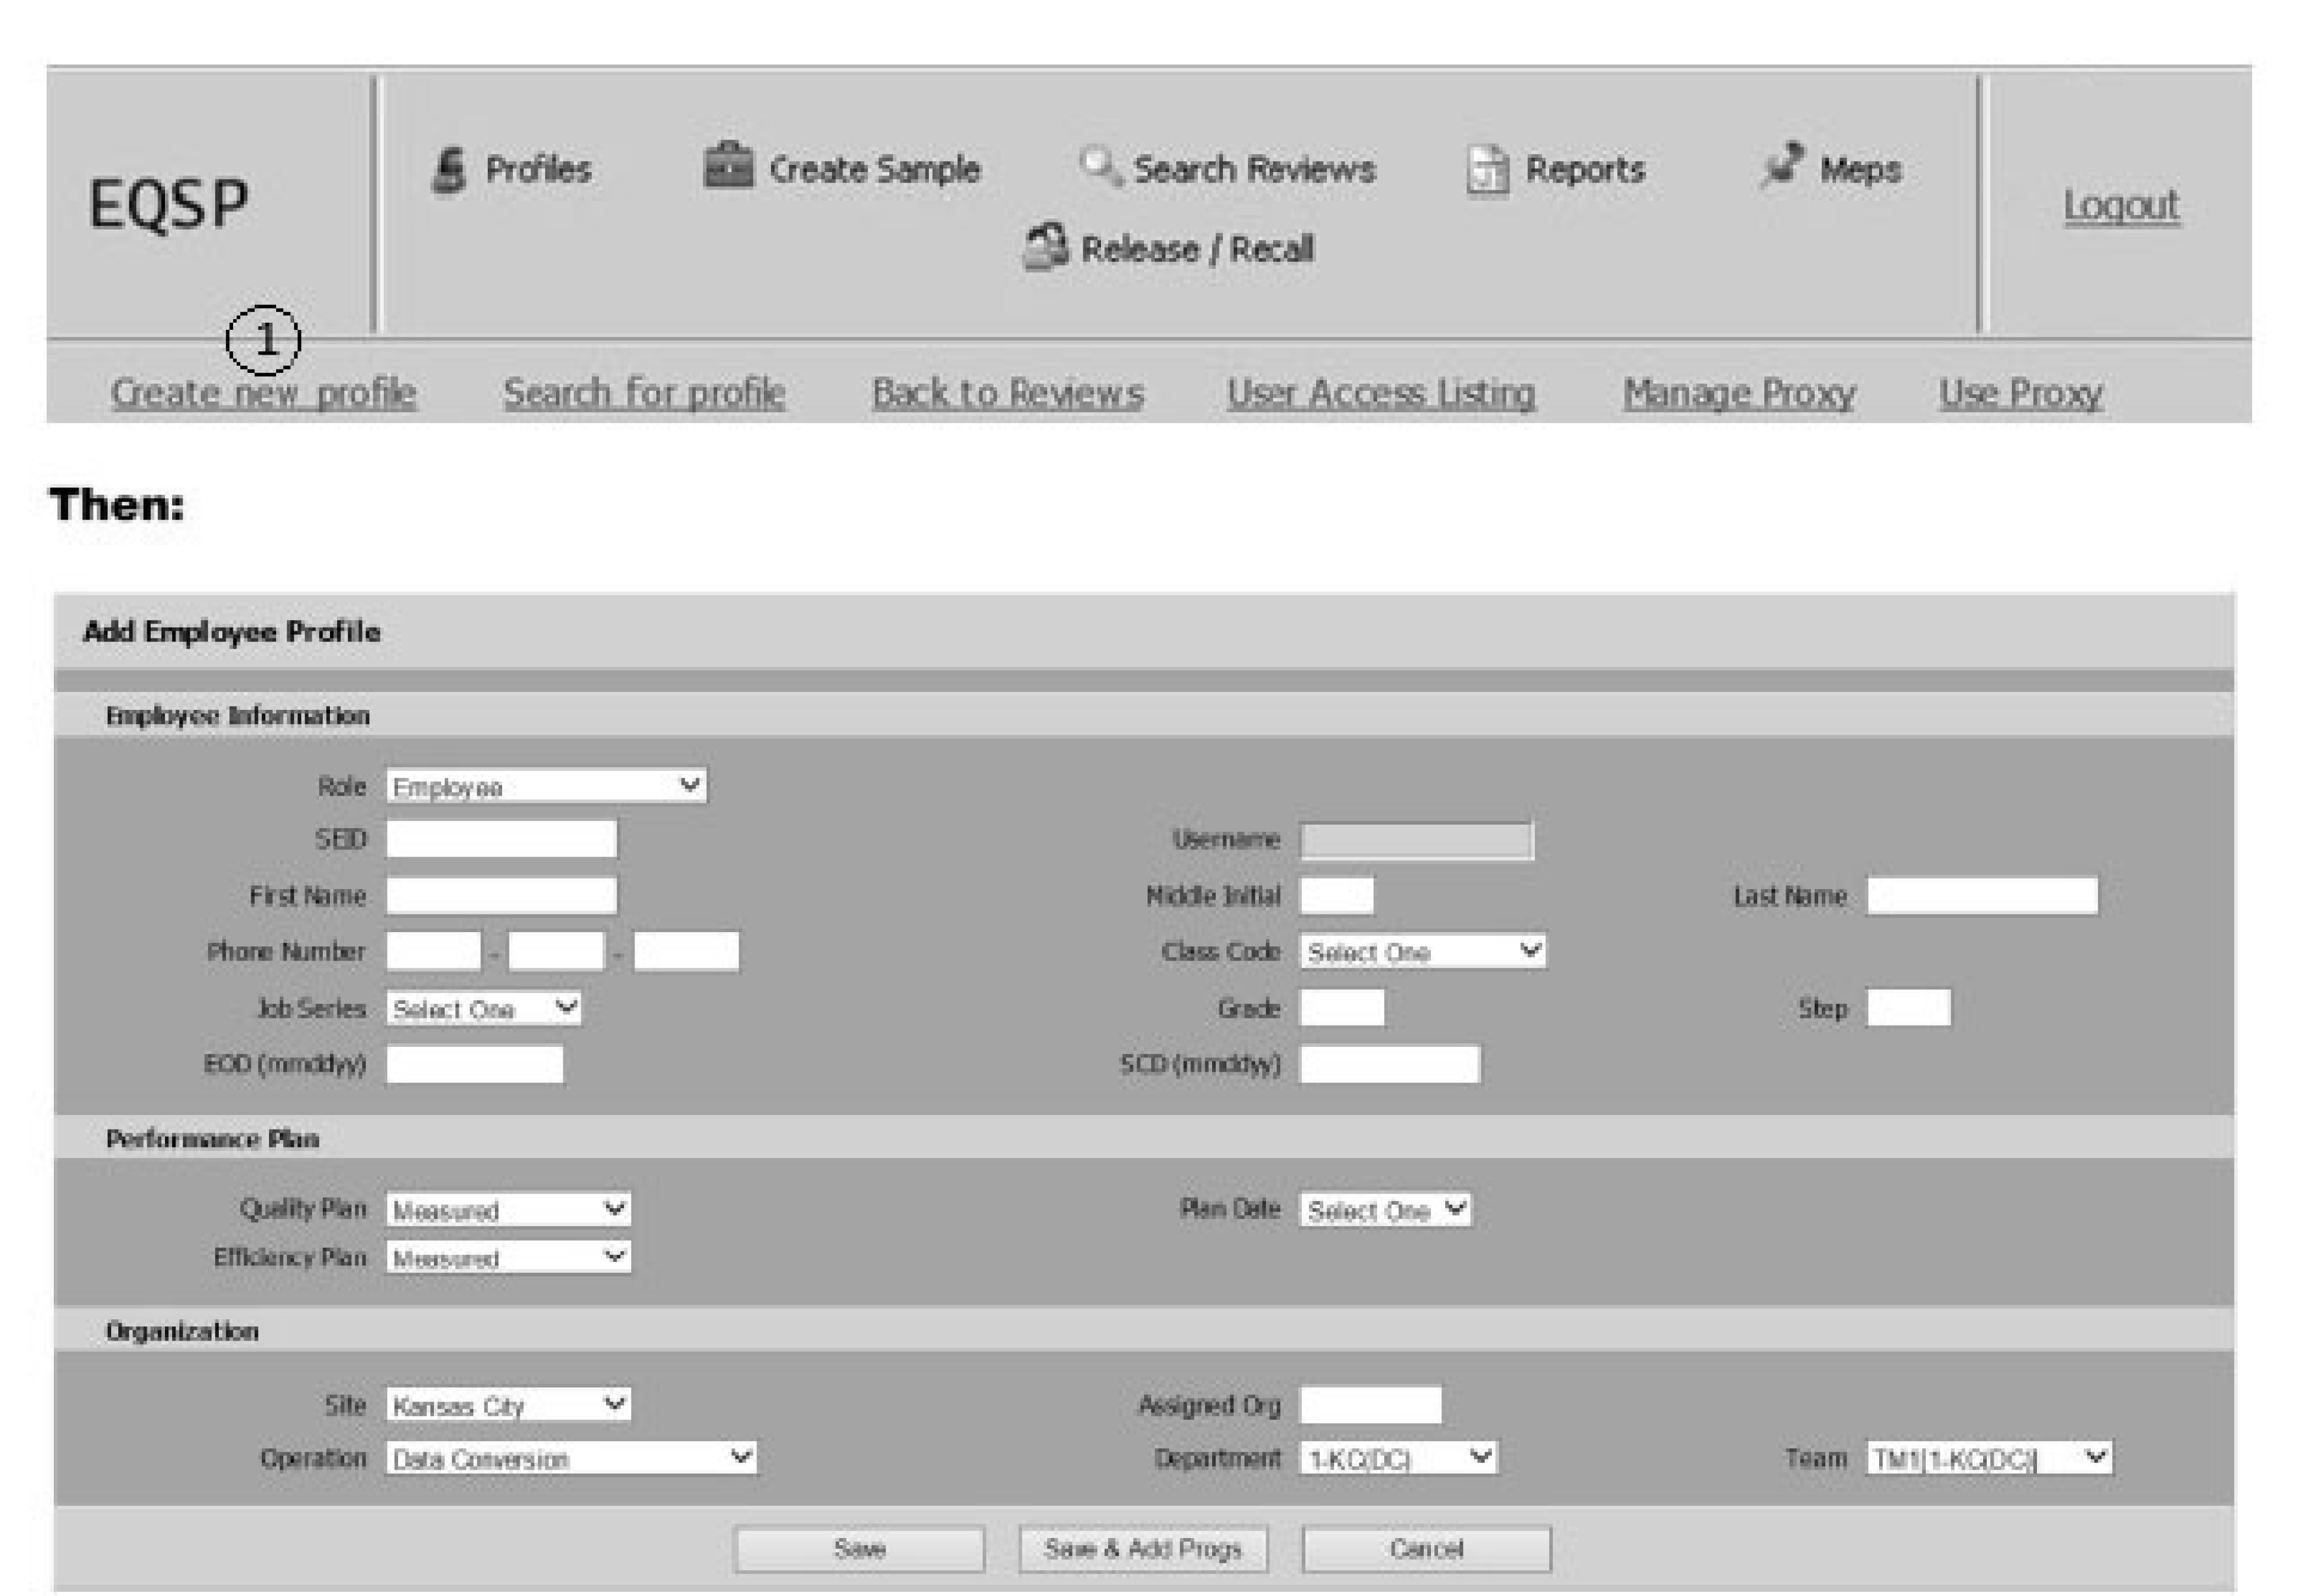
Managers will enter their employee's profile information on the create new Profile Screen.
See Figure 3.30.30-2. To generate the Add Employee Profile Screen, select the Create new profile hyperlink on the Manager’s Main Menu Screen. The Add Employee Profile Screen has several fields and action buttons in which the manager has to either enter or select information.
To enter employee information:
Enter the employee's SEID. The SEID will default to all CAPS. The Username will populate with the employee's SEID.
Note:
Once entered and saved, the SEID cannot be edited. If an employee is profiled with an incorrect SEID the SEID field can be updated by a Site Administrator and all data associated with the incorrect SEID moves to the correct SEID. However, if the employee is profiled to an incorrect SEID, and a correct SEID, and reviews have been completed on the incorrect SEID the profiles cannot be merged.
Enter the employee's First Name, Middle Initial, and Last Name.
Note:
The system will display a warning message if the first and last name of the user they are creating is already in the database. "That name already exists with SEID XXXXX." This will prevent creating more than one profile for an employee. The manager will have the option to continue to create the profile or return to the profile screen. If multiple users are returned with the same name, the manager will have the capability to review the names that are the same before they save the user.
Enter the employee’s or manager’s Phone Number.
In the Class Code field, click the down arrow and select either Permanent, Seasonal, Temp Intermediate (Career), Temp Intermediate (Non-Career), or Term.
The Profile screen displays a Quality Performance Plan field with a Quality Plan Date field, and an Efficiency Performance Plan field.
Note:
The Efficiency Performance Plan defaults to "Measured" for Employee Role and Unmeasured for Quality Reviewer Role. Once the profile has been created and saved, the Quality and Efficiency Performance Plans may only be modified by accessing the Manage Employee Performance Plans screen by clicking the Manage Plans hyperlink on the Edit Employee Profile screen.
The day counter increases seven calendar days for every Form 3081 submitted. If the date is changed and the 63-day requirement has not been met, the day counter recalculates.
Employees cannot receive evaluations until they have been on their CJEs for at least 60 calendar days in their annual rating period. If measured is selected for the Quality and/or Efficiency Performance Plan, the counter increases seven days for each Form 3081 submitted until the 60 days are reached and resets at the beginning of the employee's rating period.
It is critical that managers ensure the Performance Plan is updated and Unmeasured is selected if an employee is placed on an Unmeasured Performance Plan. Plan Dates must also be changed to coincide with the date the employee became unmeasured. Likewise, Plans and Plan Dates must be changed when an employee returns to a Measured Performance Plan. See IRM 3.43.405 for additional information.
In the Work Status Code field, click the down arrow and select the employee's Work Status Code.
Enter the employee’s Grade and Step.
Enter the employee's Assigned Organization code (EMF updates this field).
Enter the employee's EOD (Enter on Duty) date.
Enter the employee's SCD (Service Computation Date).
The Site field defaults to your site.
In the Organization: Operation, Department, and Team fields, click the down arrows and select the appropriate information.
There are three action buttons located at the bottom of this screen:
Save
Save and Add Programs
Cancel
If you want to save the information entered on the Add User Profile Screen before adding the Employee's assigned programs, select the "Save" button.
If information is missing or entered incorrectly an error message will generate.
If all the information is correct, a screen will generate which states, "The user was saved."
Select the "Continue" button to return to the Manager's Main Menu Screen. Select the "Back to Profile" button and the Edit Employee Profile Screen will generate (see IRM 3.30.30.6.1.2, Searching for an Employee's Profile).
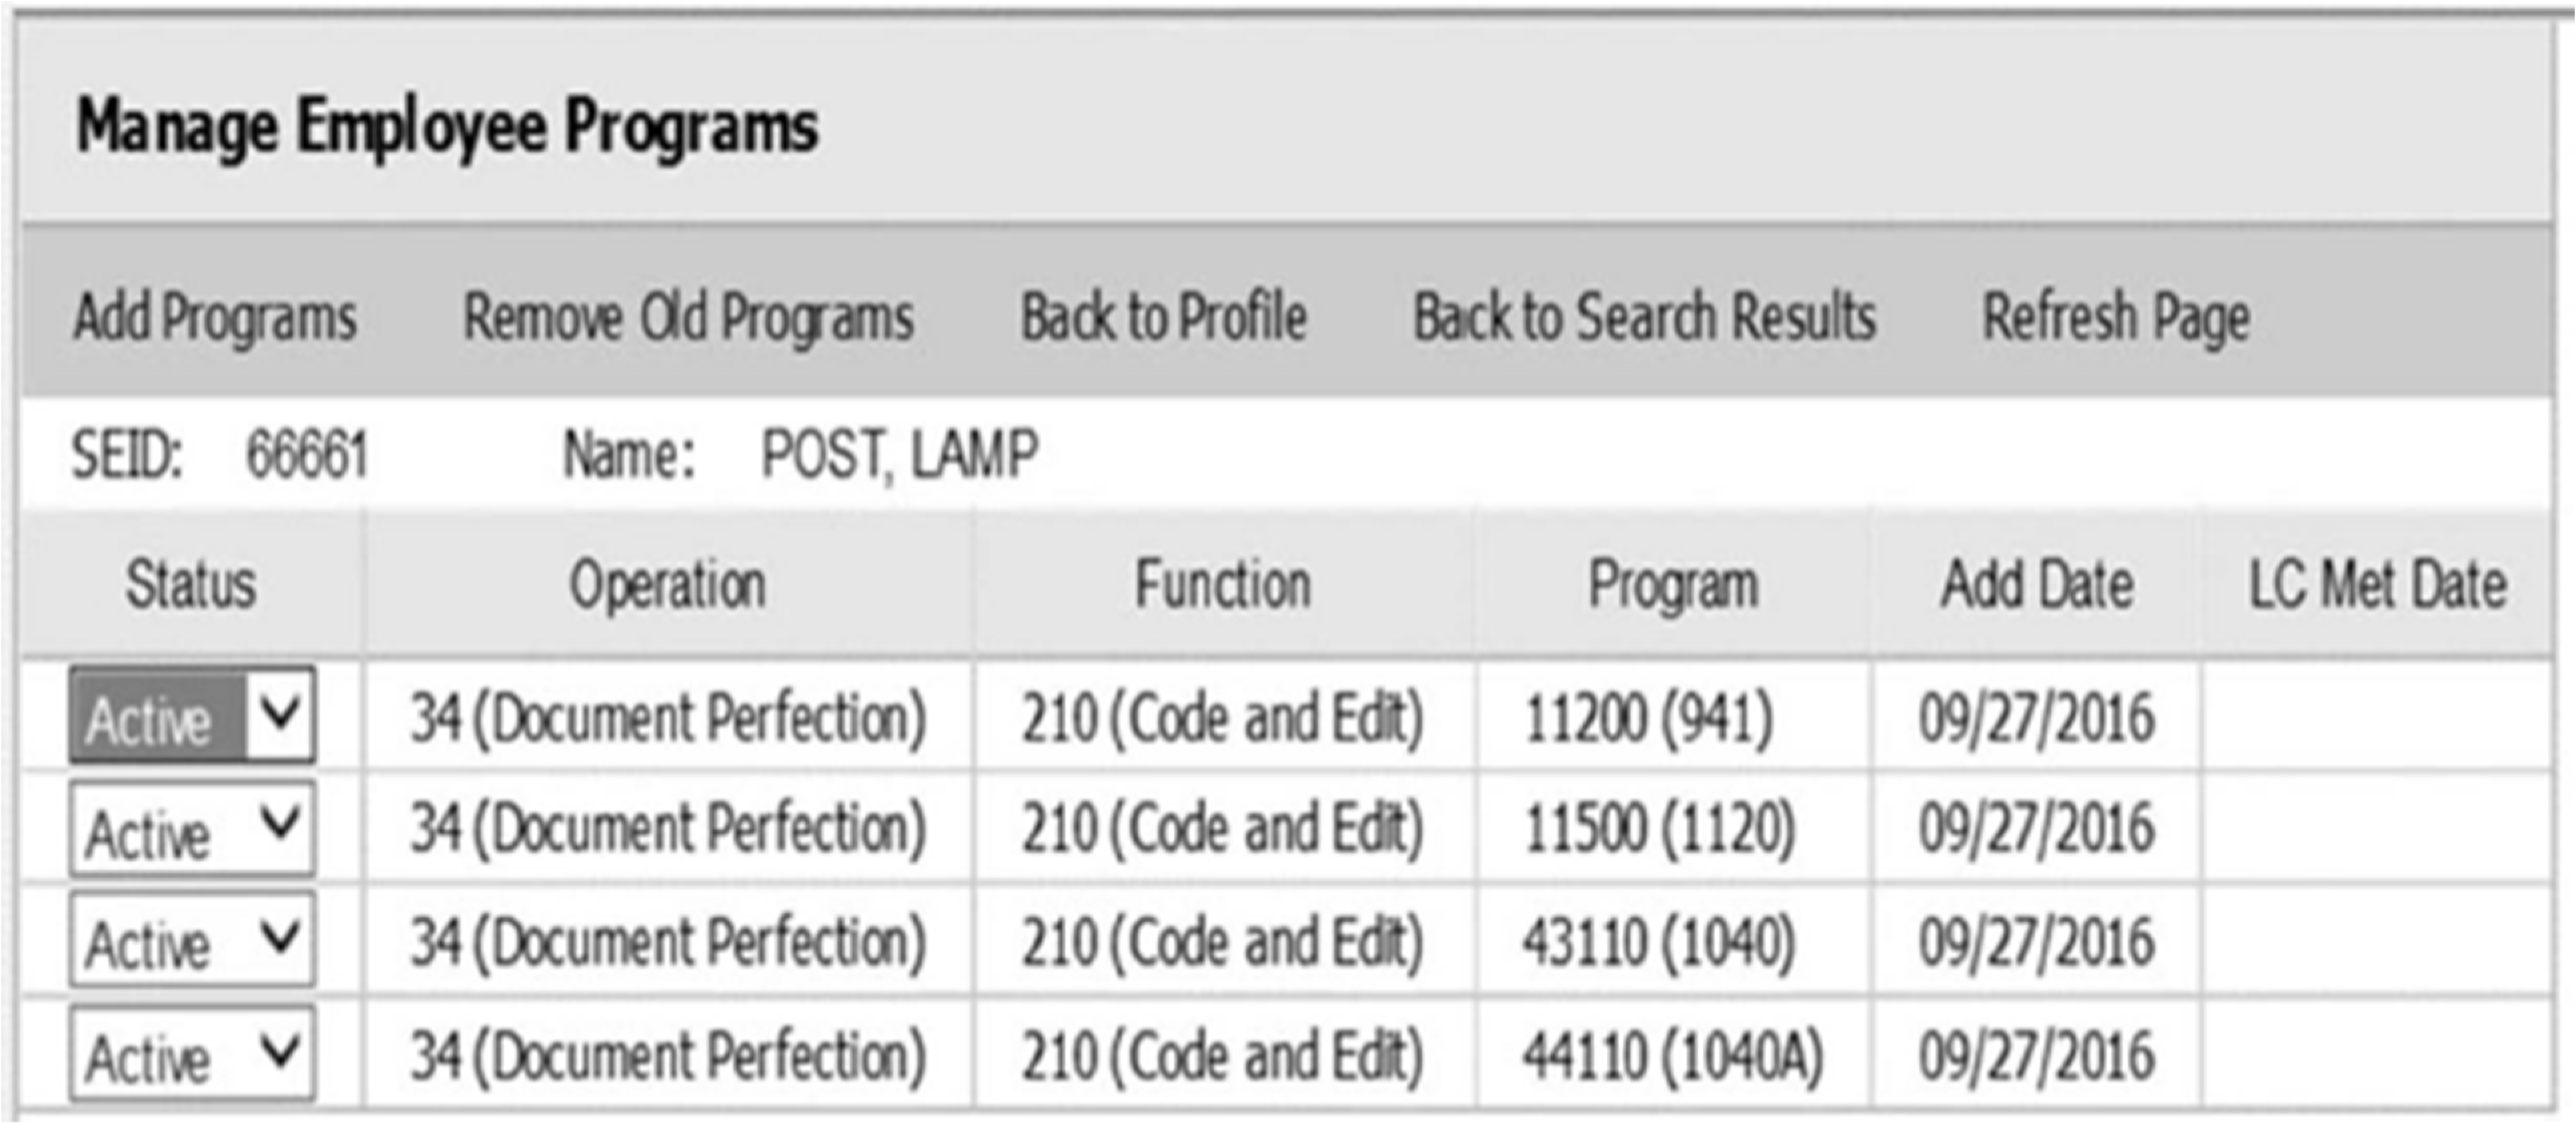
To enter the Employee's assigned programs, select the "Manage Programs" button and the Manage Employee Programs Screen will generate. See Figure 3.30.30-3.
Follow the instructions below:Note:
Quality Review cannot be entered into EQSP for the employee's SEID until the program is added on the employee Program Status Screen. Efficiency Learning Curve does not begin until the applicable OFP (fourth-digit) is added on the Employee Program Status Screen. (See IRM 3.43.405)
Select Employee.
Select the Function.
A list of all valid programs will generate in the program box. Check all programs the employee works to see if any needs to be added.
When finished, select the "Save" button. "The user's program(s) were saved" confirmation screen will generate.
Select the Cancel button to disregard unsaved changes and to return to the Manage Employee Programs.
If an added program is no longer worked by the employee, the status arrow provides an inactive option. If Inactive is selected, the program will not be available for quality review input.
The "LC Date Met" displays after the reviews entered for the OFP meets the Learning Curve sampling requirements which is determined by the Quality level of the OFP.
Managers are responsible for ensuring their employees' profile information is correct. To validate this information, managers will use the "Search for Profile" hyperlink to search for the employee's profile.
-
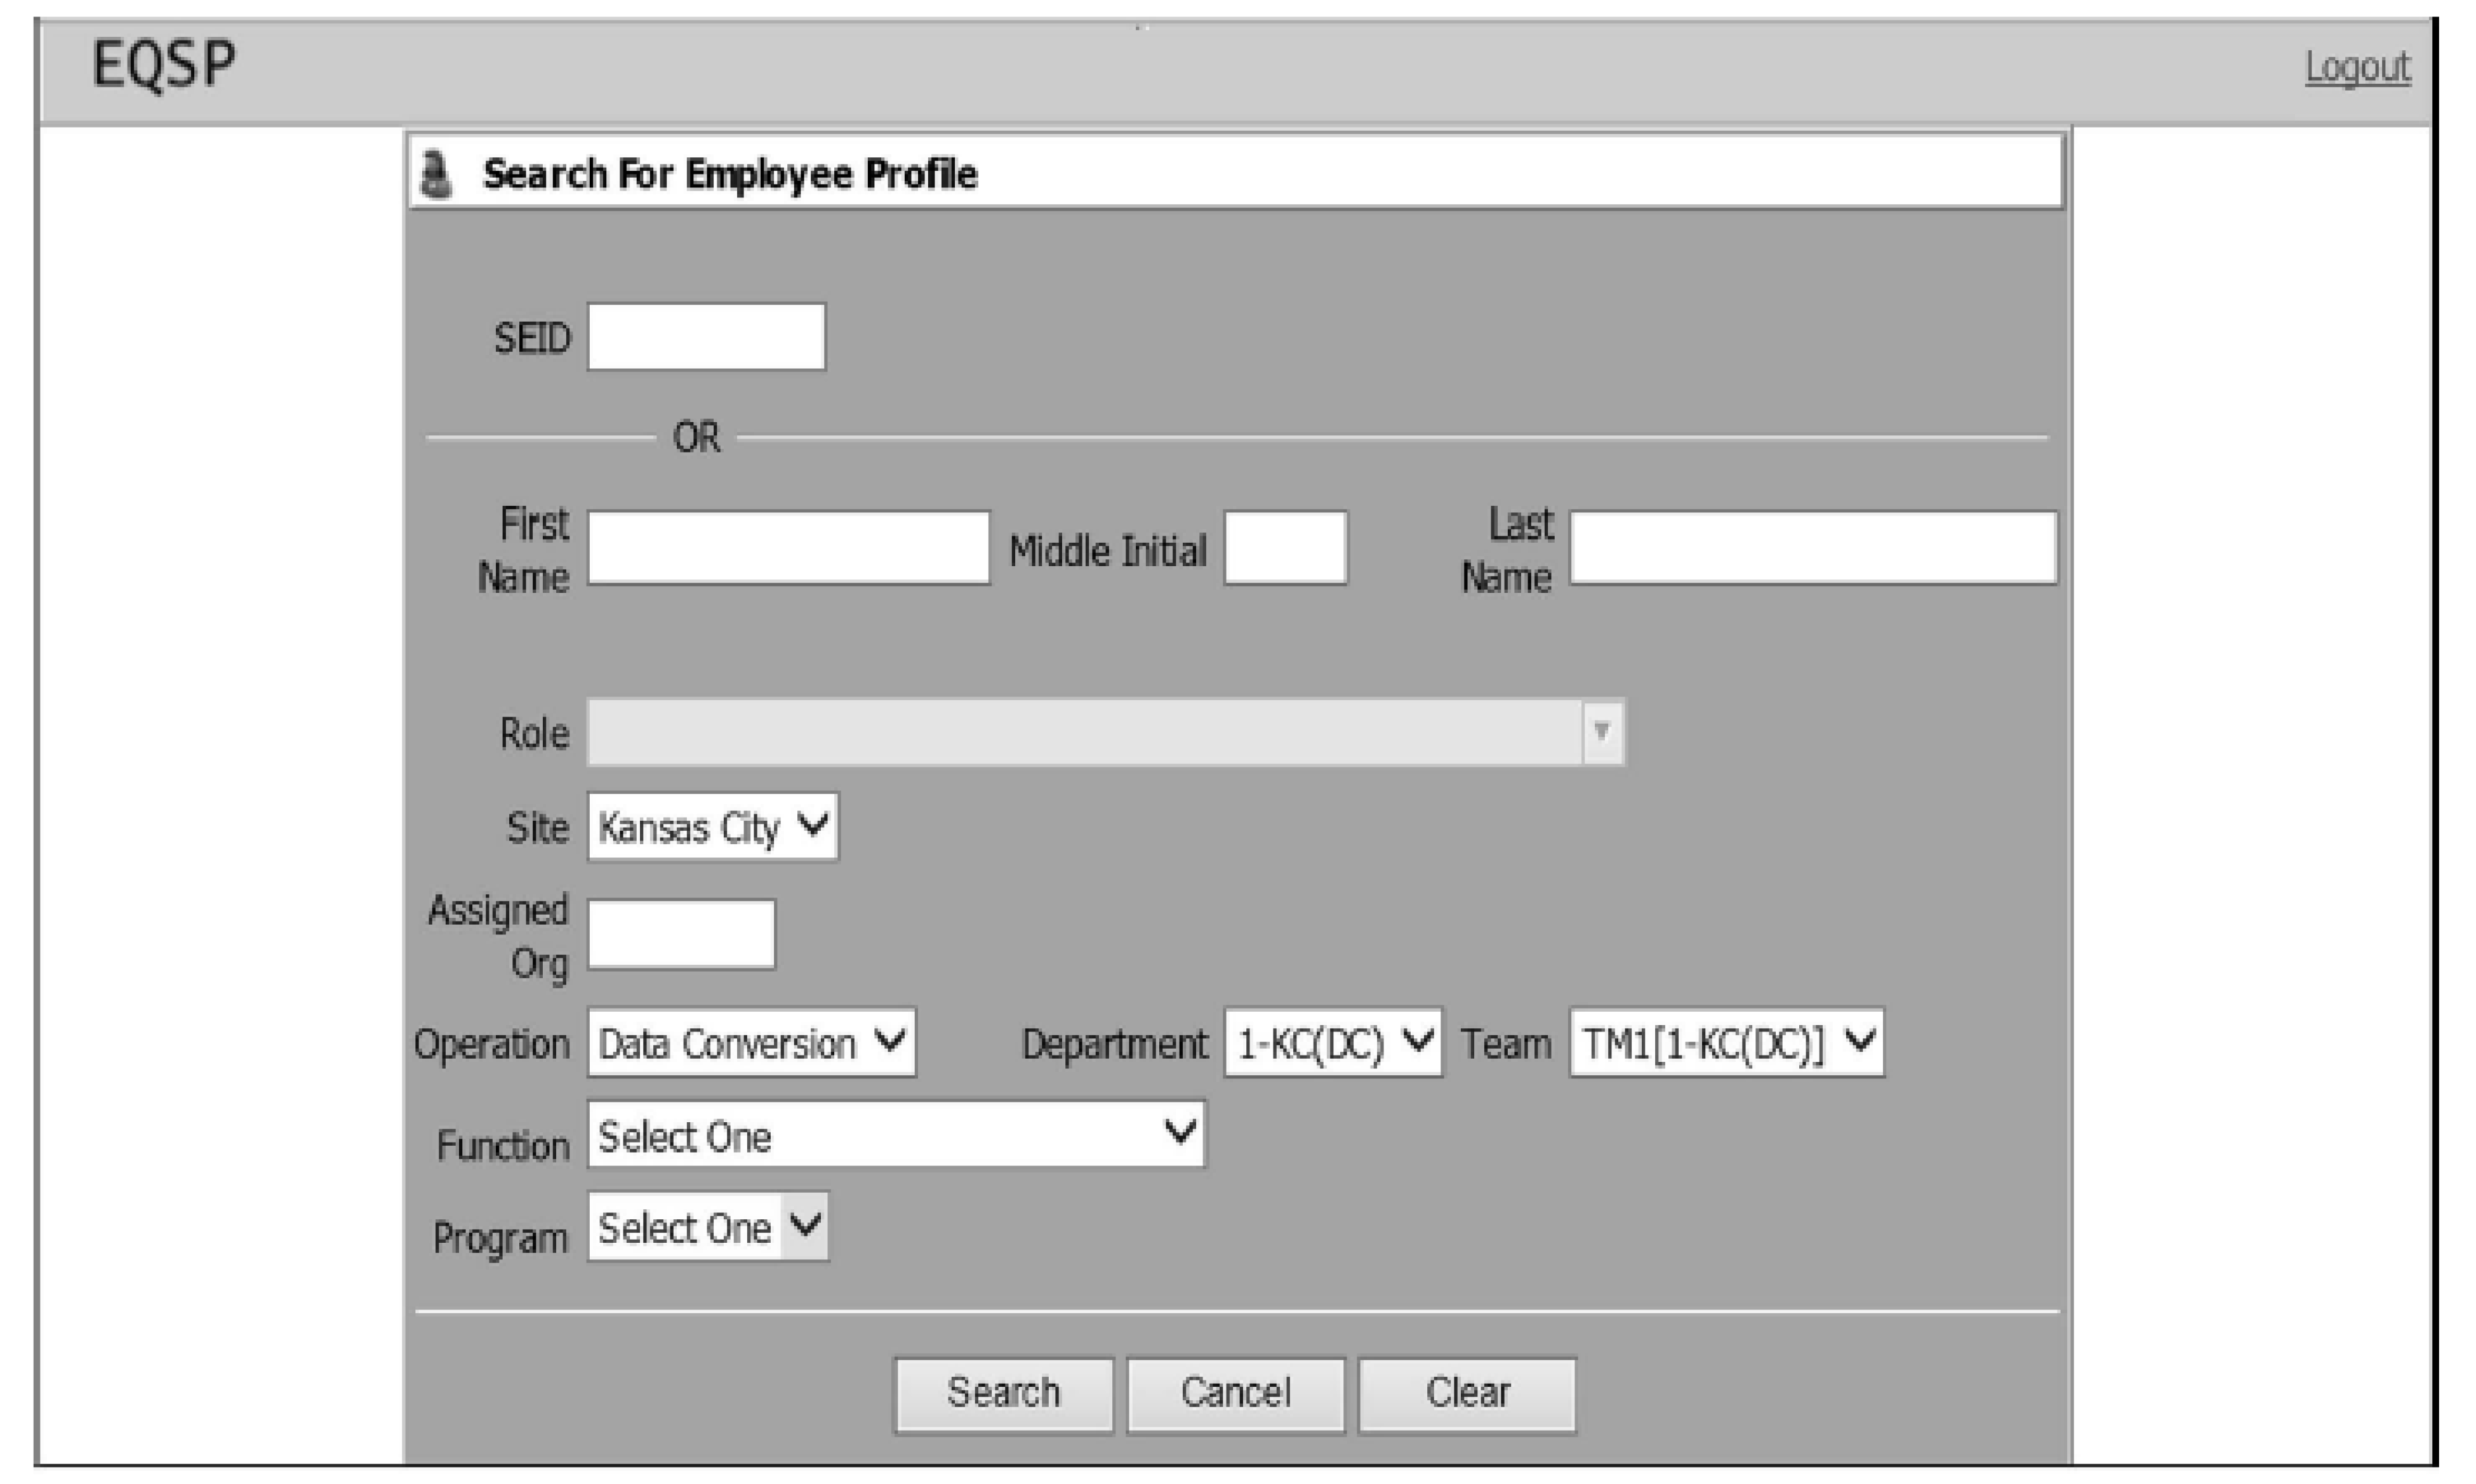
Select the "Search for Profile" hyperlink (located on the Manager's Main Menu Screen). The Search for Employee Profile Screen will generate. See Figure 3.30.30-4.
The searchable parameters are listed in the table below:
Searchable Parameters Subject Parameter SEID (the employee's) If you enter the employee's SEID, you do not have to enter any other information. Employee’s First Name, Middle Initial, and Last Name If you enter the employee's first or last name, you do not have to enter any other information. Role Select one (or more) roles to generate a list of all employees by role(s) within the Operation, Department, Team (based on the user’s permissible span of control). Site Select the Site only to generate a list of all site employees and their Operation, Department and Team. Assigned Organization; Operation, Department, and Team Select the Site and Assigned Organization to generate a list of your employees in that organization.
Select the Site and Operation to generate a list of your employees in that operation.
Select the Site, Operation, and Department to generate a list of your employees in that department.
Select the Site, Operation, Department, and Team to generate a list of your employees in that team.
Function Select the Site, Operation and Function to get a list of your employees in that function. Program Select the Site, Operation, Function and Program to get a list of your employees assigned to that program. -
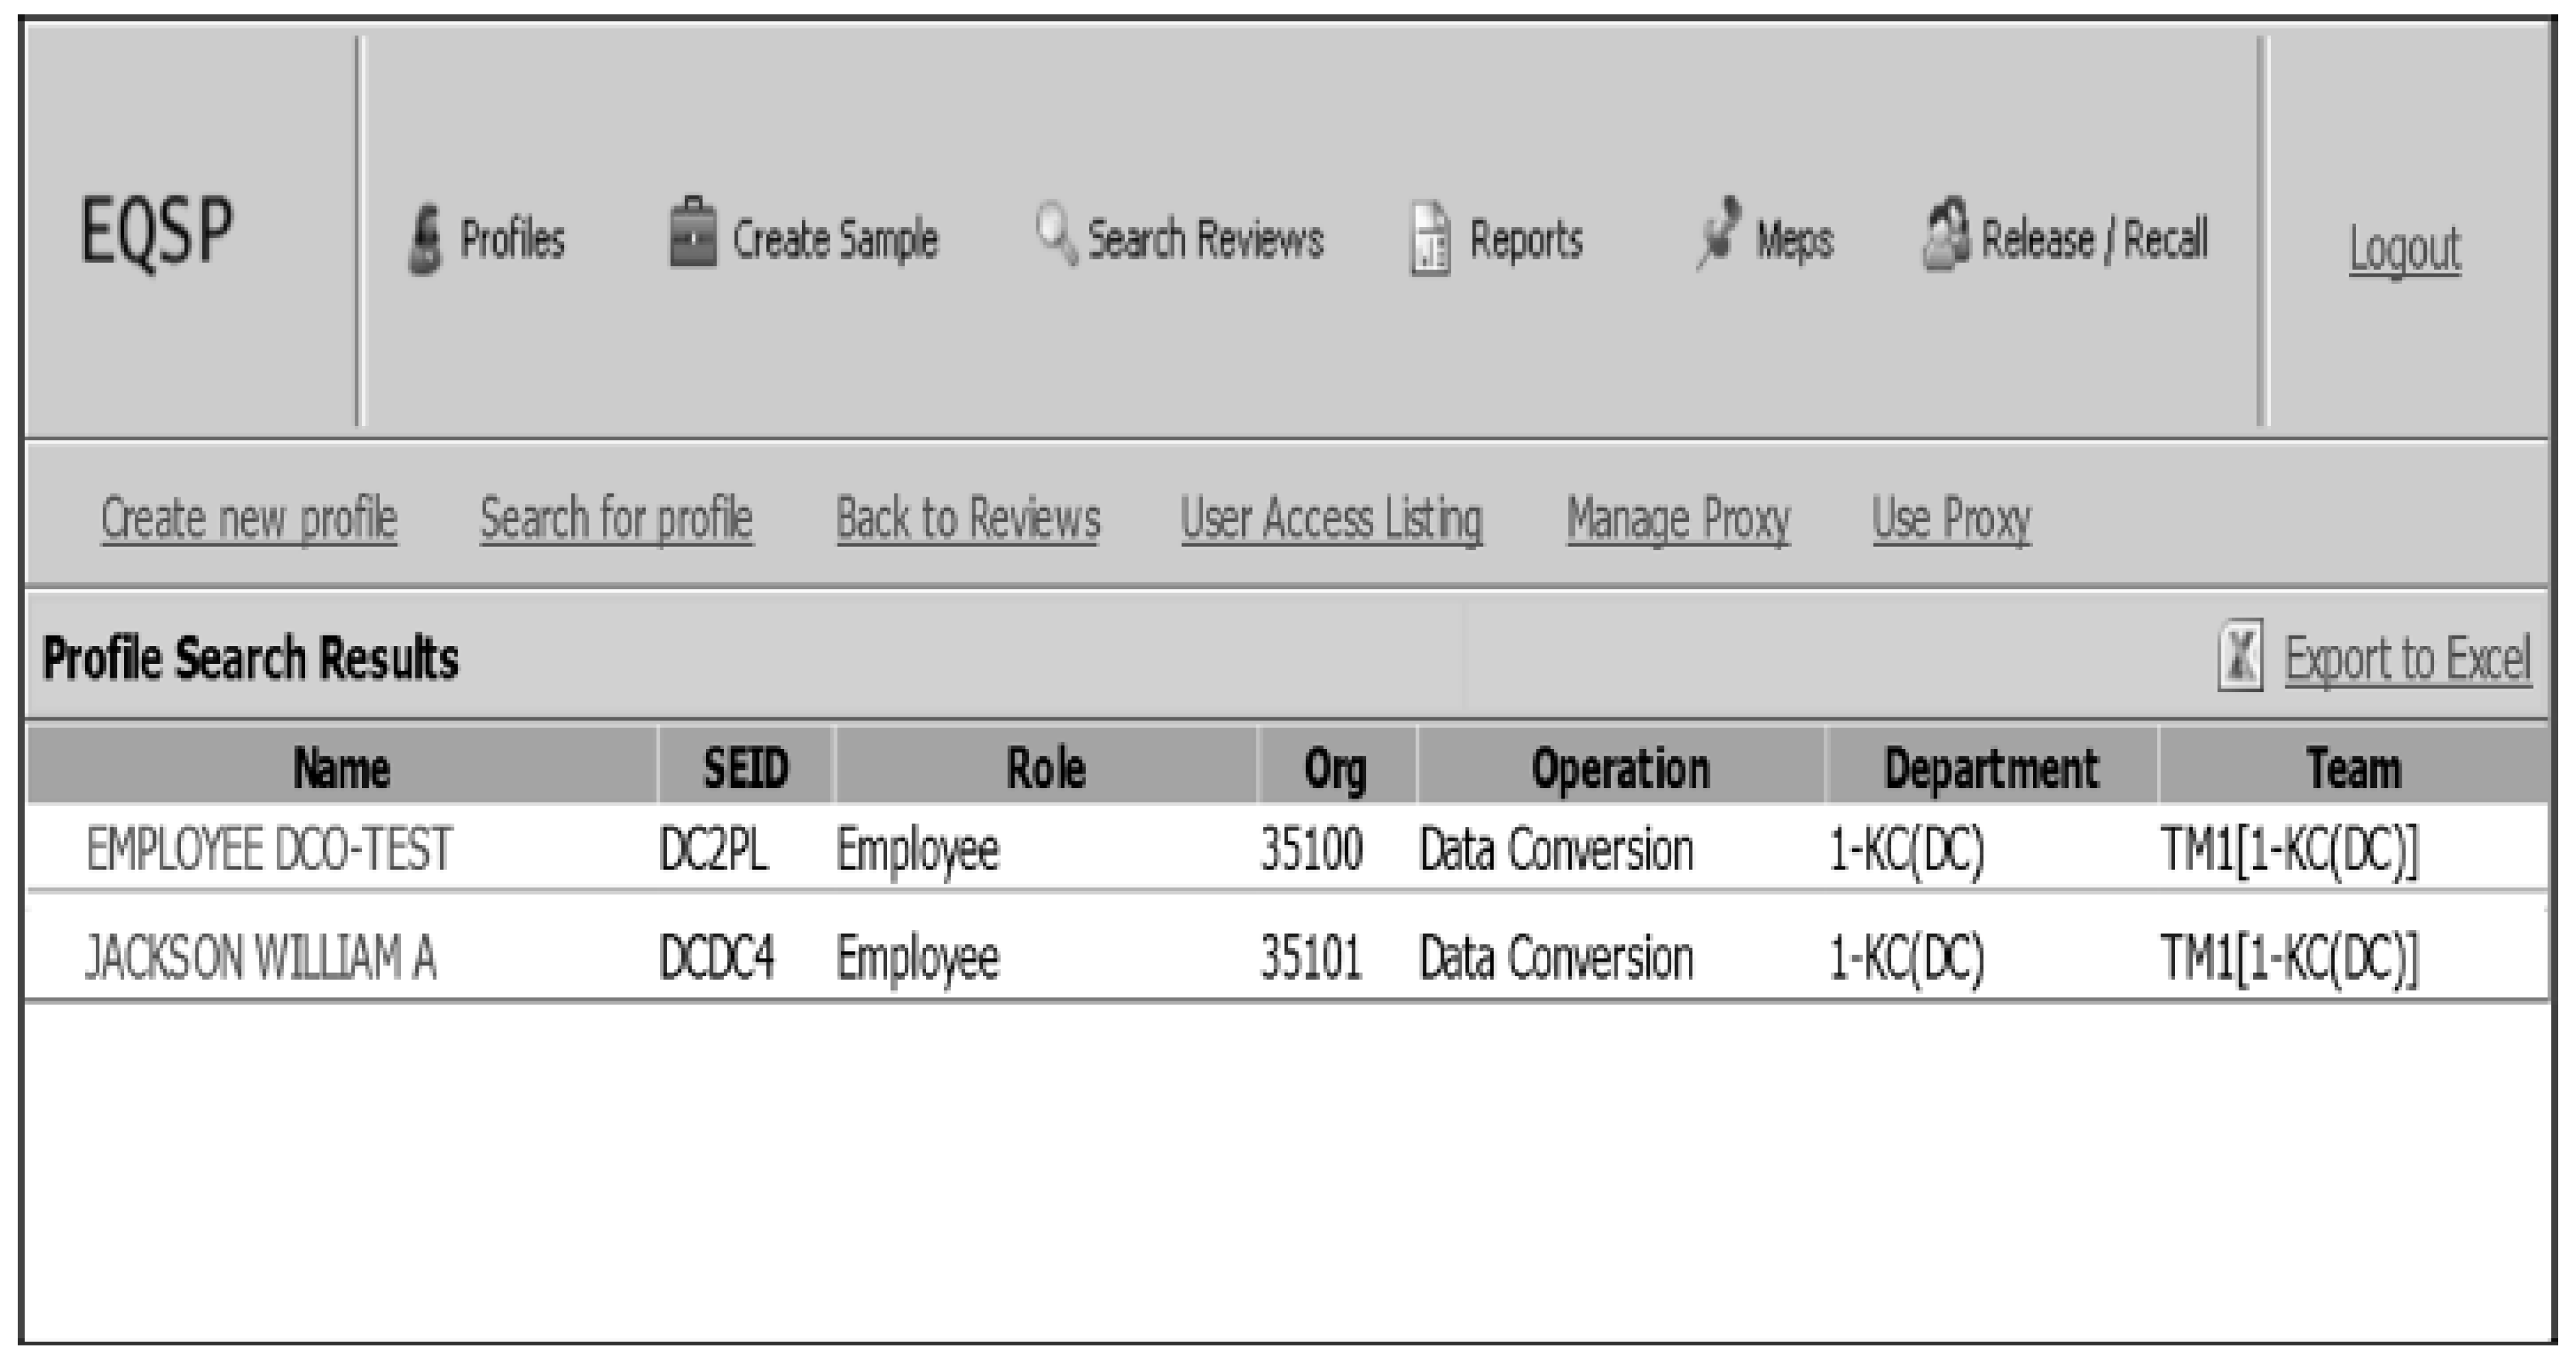
After entering your search criteria, select the "Search" button. The search result "Profile Search Results" will display on the Manager's Main Menu Screen. Each row shows Employee's Name, Employee's SEID, Role, Operation, Department, and Team.
Note:
Search results are systemically retained and refreshed; if a user accesses a profile and then returns to the Manager’s Main Menu Screen.
. See Figure 3.30.30-5.Note:
Additional fields will be displayed based on selected search criteria (i.e., Function and Program)
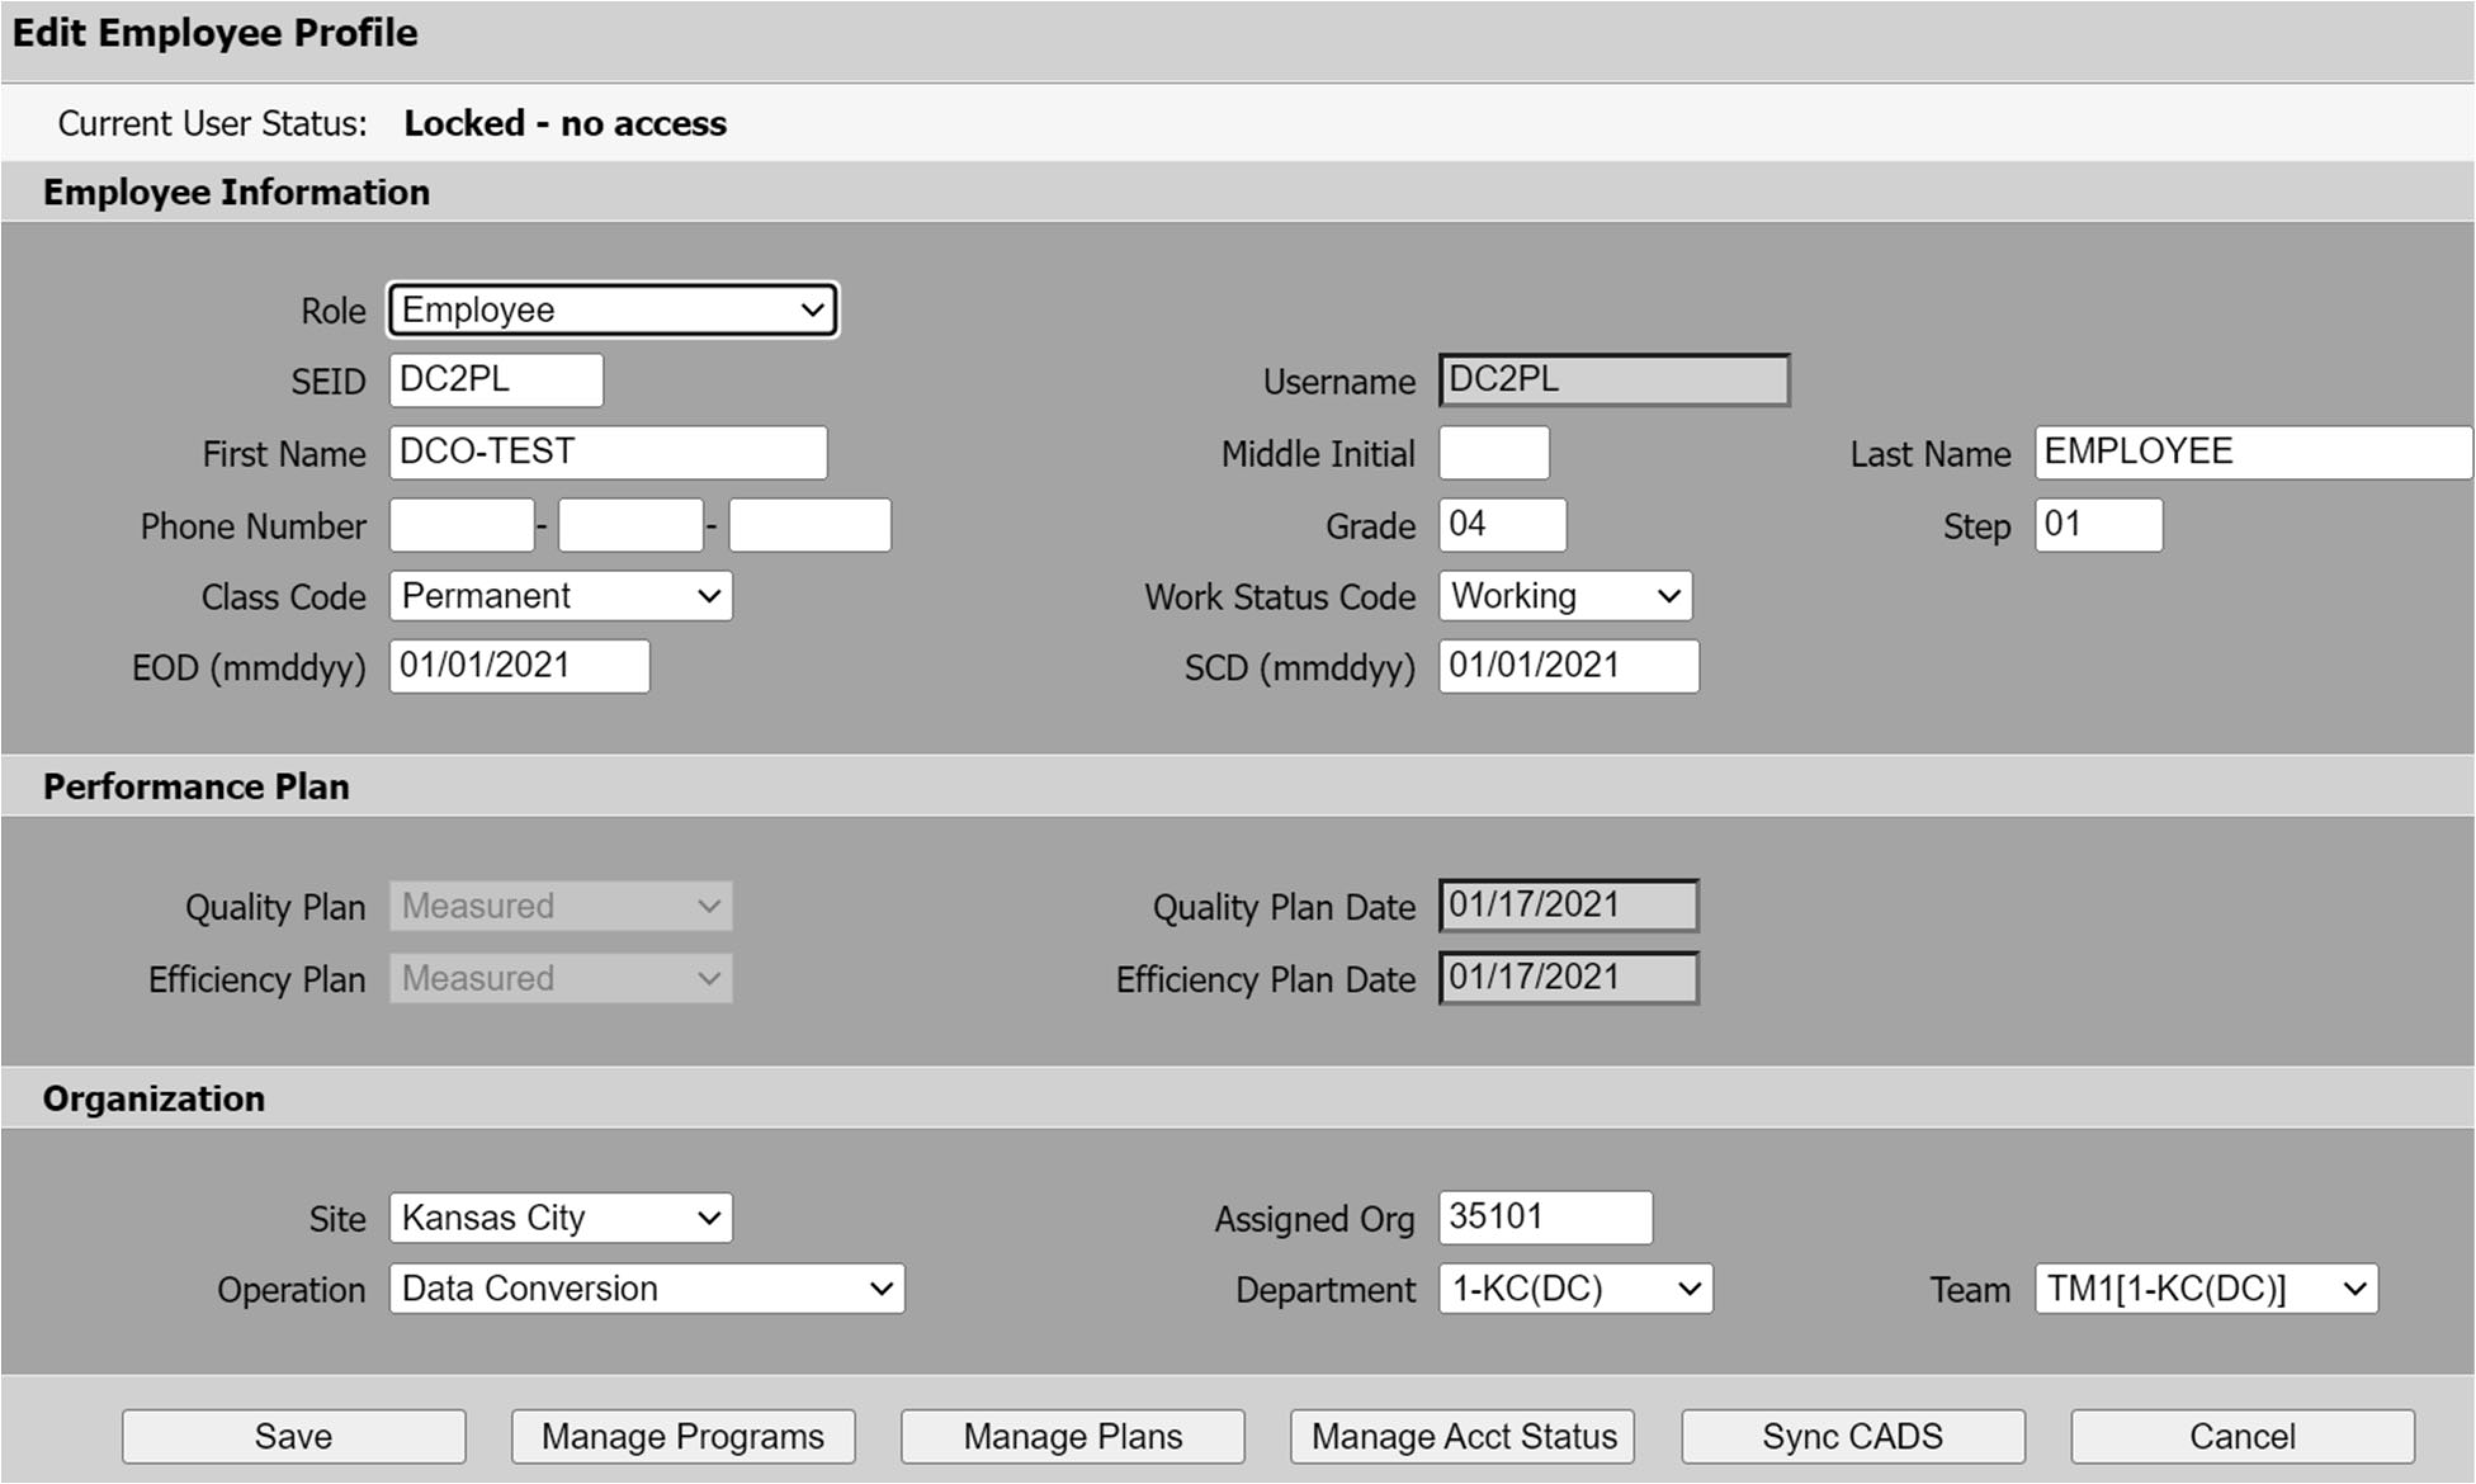
Select "Employee's Name" to generate the Edit Employee Profile Screen to edit the employee’s information. See Figure 3.30.30-6.
The action buttons on the Edit Employee Profile screen will vary based on EQSP Role assignment. The action buttons on the Edit Employee Profile screen are listed below:
Save
Manage Programs
Manage Plans
Manage Acct. Status
Sync CADS
Cancel
Managers must regularly review security controls for information systems. Managers must review access and permissions for EQSP at least monthly. User Access List provides an automated mechanism to facilitate the review of user access and permissions.
Select User Access Listing link located on Manager's Main Menu Screen to generate User Access Listing for all users within manager span of control.
Review each user account to ensure only authorized users have access to the system. Lock accounts for users no longer authorized to access the EQSP system.
Review active user roles to ensure users have the level of access needed to perform official duties. (Refer to IRM 3.30.30.5, Systems Profiles, for permissions associated with EQSP roles.) Change assigned role, as needed.
Request audit records for user activities from EQSP System Administrator when review of User Access Listing or information from another report or source indicates improper use of system or unauthorized access.
The Proxy Role allows a managerial role to be granted to another user (the grantee) for a specified length of time.
The ability to grant or receive a proxy is limited to:
Team Manager
Quality Review Manager
Operation Manager
Department Manager
Once assigned, proxies give the grantee the same permissions and level of access to the system as if the role was the grantee’s home assignment (original role).
After logging into EQSP, this functionality also allows the grantee to either select a proxy or return to their assigned role.
The grantee’s home assignment must be in the same organizational structure as the proxy grantor.
-
The Proxy Role Hierarchy for the Team, Quality Review, Operation and Department Managers are listed in the table below.
Role Proxy Role Hierarchy Team Manager Can access the Manage Proxy and the Use Proxy Screens.
Can grant:A proxy to Team Managers within their assigned Site, Operation, and Department.
The proxy role of a Team Manager for their assigned teams within their Site, Operation, and Department.
Quality Review Manager Can access the Manage Proxy and the Use Proxy Screens.
Can grant:A proxy to Quality Review Managers within their assigned Site, Operation, and Department.
The proxy role of a Quality Review Manager for their assigned teams within their Site, Operation, and Department that have a Quality Review Manager.
Department Manager Can access the Manage Proxy Screen.
Can grant:A proxy to Department Manager within their assigned Site and Operation; and Team Managers, within their assigned Site, Operation, and Department.
The proxy role of a Department Manager for their assigned departments within their Site, and Operation; and Team Manager for all teams within their assigned Site, Operation, and Department.
Operation Manager Can access the Manage Proxy and Use Proxy Screens.
Can grant:A proxy to Department, Team, and Quality Review Managers, within their assigned Site and Operation.
The proxy role of an Operation Manager for their assigned Site and Operation; Department Manager for all departments within their assigned Site and Operation; Team Manager for all teams within their assigned Site and Operation; and Quality Review Manager for all teams within their assigned Site and Operation that have a Quality Review Manager.
A grantee will be granted a proxy role for a maximum of 90 calendar days.
The beginning date of a proxy role must be equal to or greater than the current date.
The ending date of a proxy role must not exceed 90 calendar days from the current date.
Proxies automatically terminate at the end of 90 calendar days or on the ending date specified by the grantor.
Proxy dates must be in MM/DD/YYYY format.
Managers will use the Manage Proxy Screen to either grant or terminate a proxy role.
The manager will not be able to duplicate proxy assignments (same grantee, role, operation, department, and team).
-
To access the Manage Proxy screen:
From the Manager’s Main Menu screen select the "Manage Proxy" hyperlink.
The Manage Proxy Screen will generate. See Figure 3.30.30-7.
The Manage Proxy Screen displays the following:
Assignee: A list of names from which the grantor may select an individual to grant a proxy.
Beginning date (mmddyy): The date the proxy begins.
Ending date (mmddyy): The date the proxy ends.
Assign to organization – Operation, Department, and Team: lists the current managers' span of control.
Add Proxy button: Select to add the proxy information.
Cancel button: Select to remove entered fields and return to Manager's home page.
Currently Assigned Proxies: A list of active proxy roles (displayed alphabetically by the grantee's last name), with applicable Operation, Department, Team and Beginning and Ending dates. This list may be resorted by selecting the column headers.
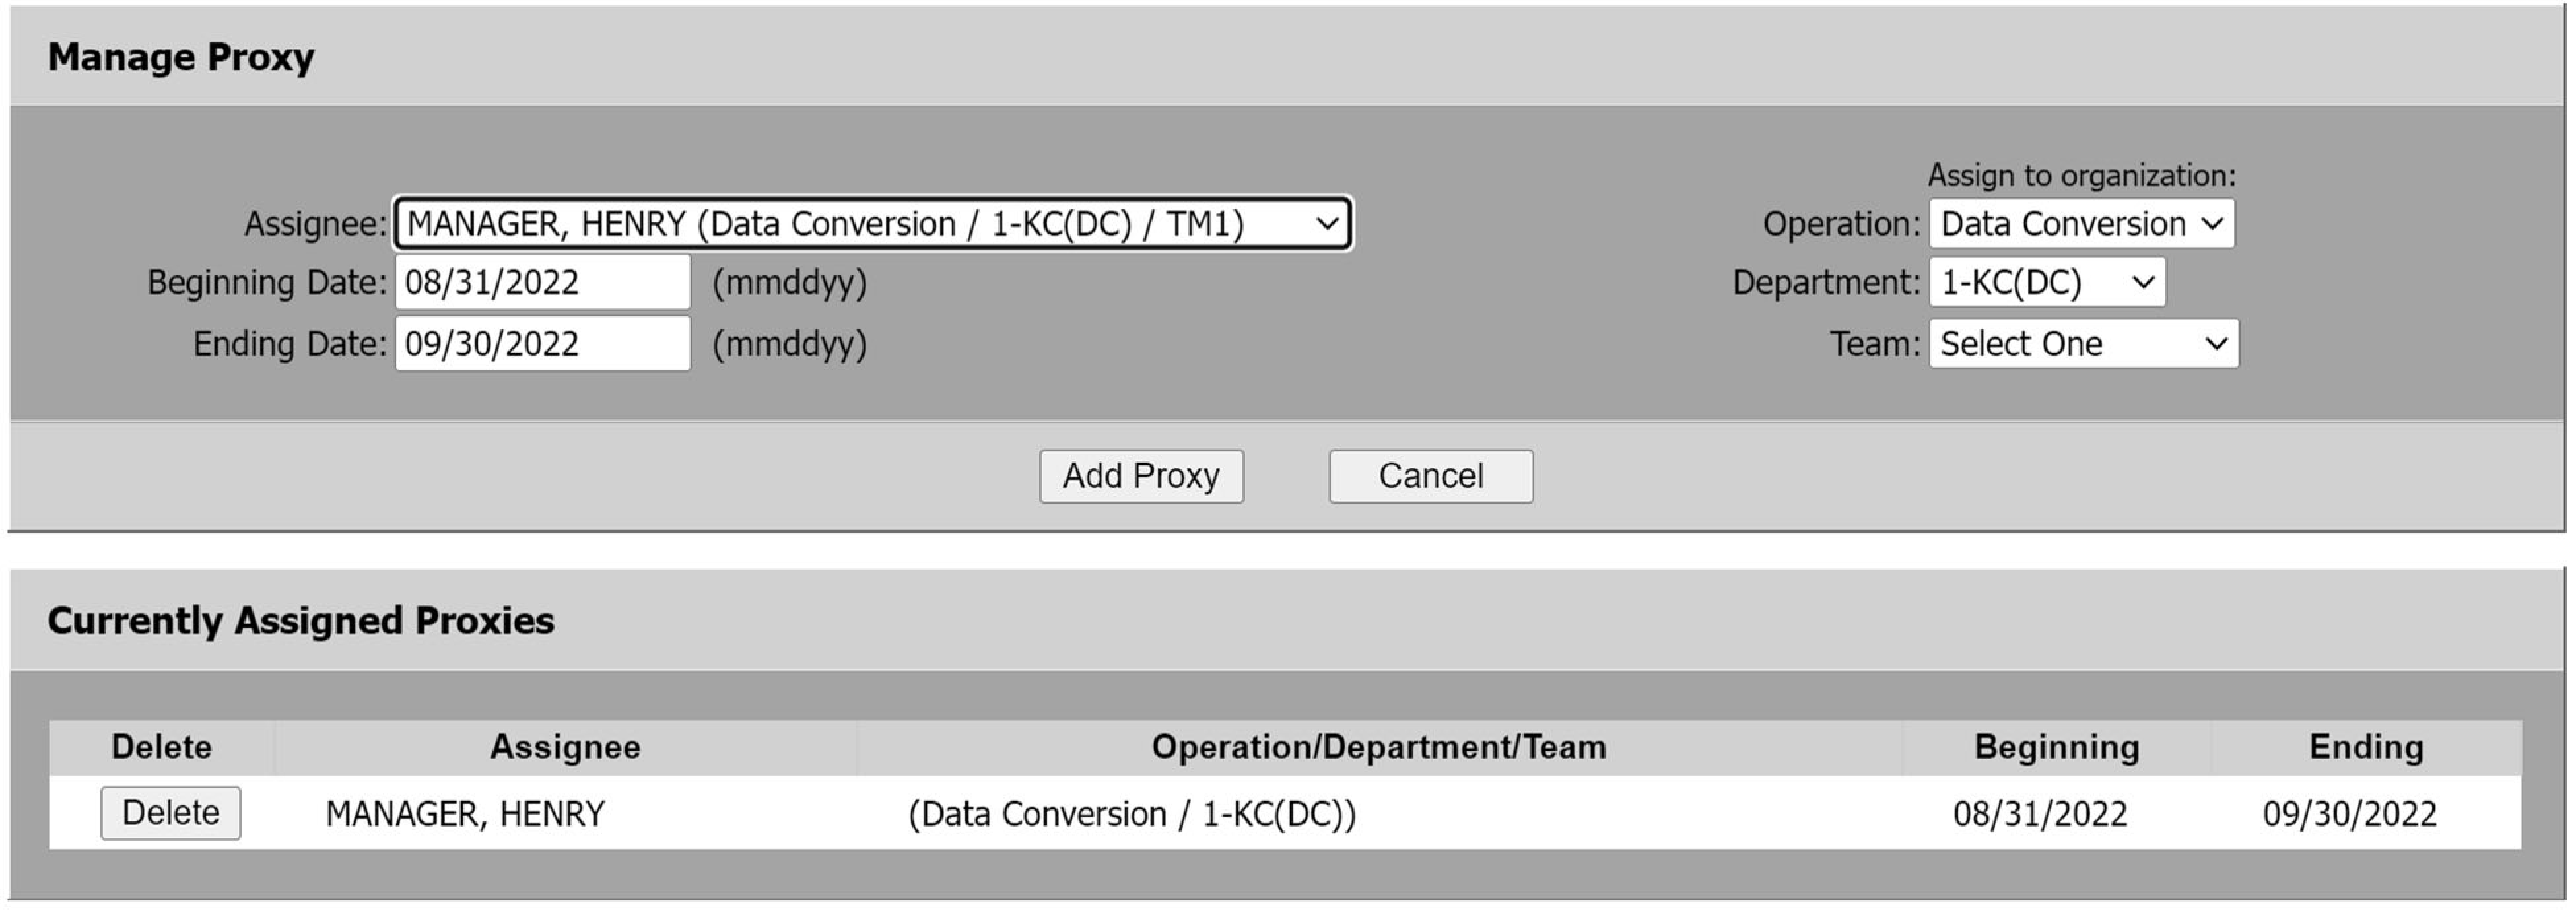
To grant a proxy, from the Manager Proxy Screen:
Select a grantee from the Assignee drop-down menu.
Enter the Beginning date (mmddyy).
Enter the Ending date (mmddyy).
Select the Operation, Department, and Team.
Select the "Add Proxy" button. Either a Confirm Assignment Screen or Confirmation Message Screen will generate.
The Confirm Assignment Screen will state, "Are you sure you want to grant the following proxy?" The grantee’s name and proxy information will also be listed.
Select either the "Yes" button to accept the proxy assignment or the "No" button to cancel your selections and return to the Manage Proxy Screen.
If you select "Yes," a confirmation message will generate stating, "The following user proxy was granted." The grantee’s name and proxy information will also be listed.
Select either the "Continue" button to return to the Manager’s Main Menu Screen or the "Back to Manage Proxy" button to return to the Manage Proxy Screen to grant another proxy.
If the grantee is assigned a proxy role for a team that already has a Quality Manager, the "Confirmation Message Screen" will generate, stating, "This team has quality review employees. Do you want to assign the proxy for a Quality Manager?"
Select either the "Yes" button to assign the proxy of a Quality Manager to the team or the "No" button to assign the proxy of a Team Manager to the team.
Only the grantor of a proxy may manually terminate the proxy
To terminate a proxy role, from the Manage Proxy Screen:
Select the Delete button, located to the left of the grantee’s name. A Confirm Termination Screen generates asking, "Are you sure you want to terminate the following proxy?" The grantee’s name and proxy information is listed.
Select either the "Yes" button to accept the terminate proxy role or the "No" button to cancel and return to the Manage Proxy Screen.
A grantee may have more than one proxy at a time.
Grantees may only use one role at a time, either the proxy or their assigned role.
The grantee selects the proxy role through the "Use Proxy" hyperlink.
The grantee returns to their assigned role through the "Use Proxy" hyperlink.
After logging into EQSP, the system checks for any proxies that expire within seven calendar days.
A "Warning Message" generates stating, "One or more current proxy roles will expire within seven days."
Select the "OK" button to continue.
-
Accessing the Use Proxy Screen:
From the Main Menu Screen, select the "Profile" button, select the "Use Proxy" hyperlink.
The Use Proxy Screen will generate. See Figure 3.30.30-8.
The Use Proxy screen displays the following:
Home Role and Organization-section: List Home Role and Home Organization (Operation, Department, and Team).
Return to Home Role button
Use Proxy-section: Use Proxy, Role (displayed alphabetically by last name), Operation, Department, Team, and Ending Date. The Use Proxy button is used to select a proxy.
Cancel button: Select to return to the Manager’s Main Menu Screen.
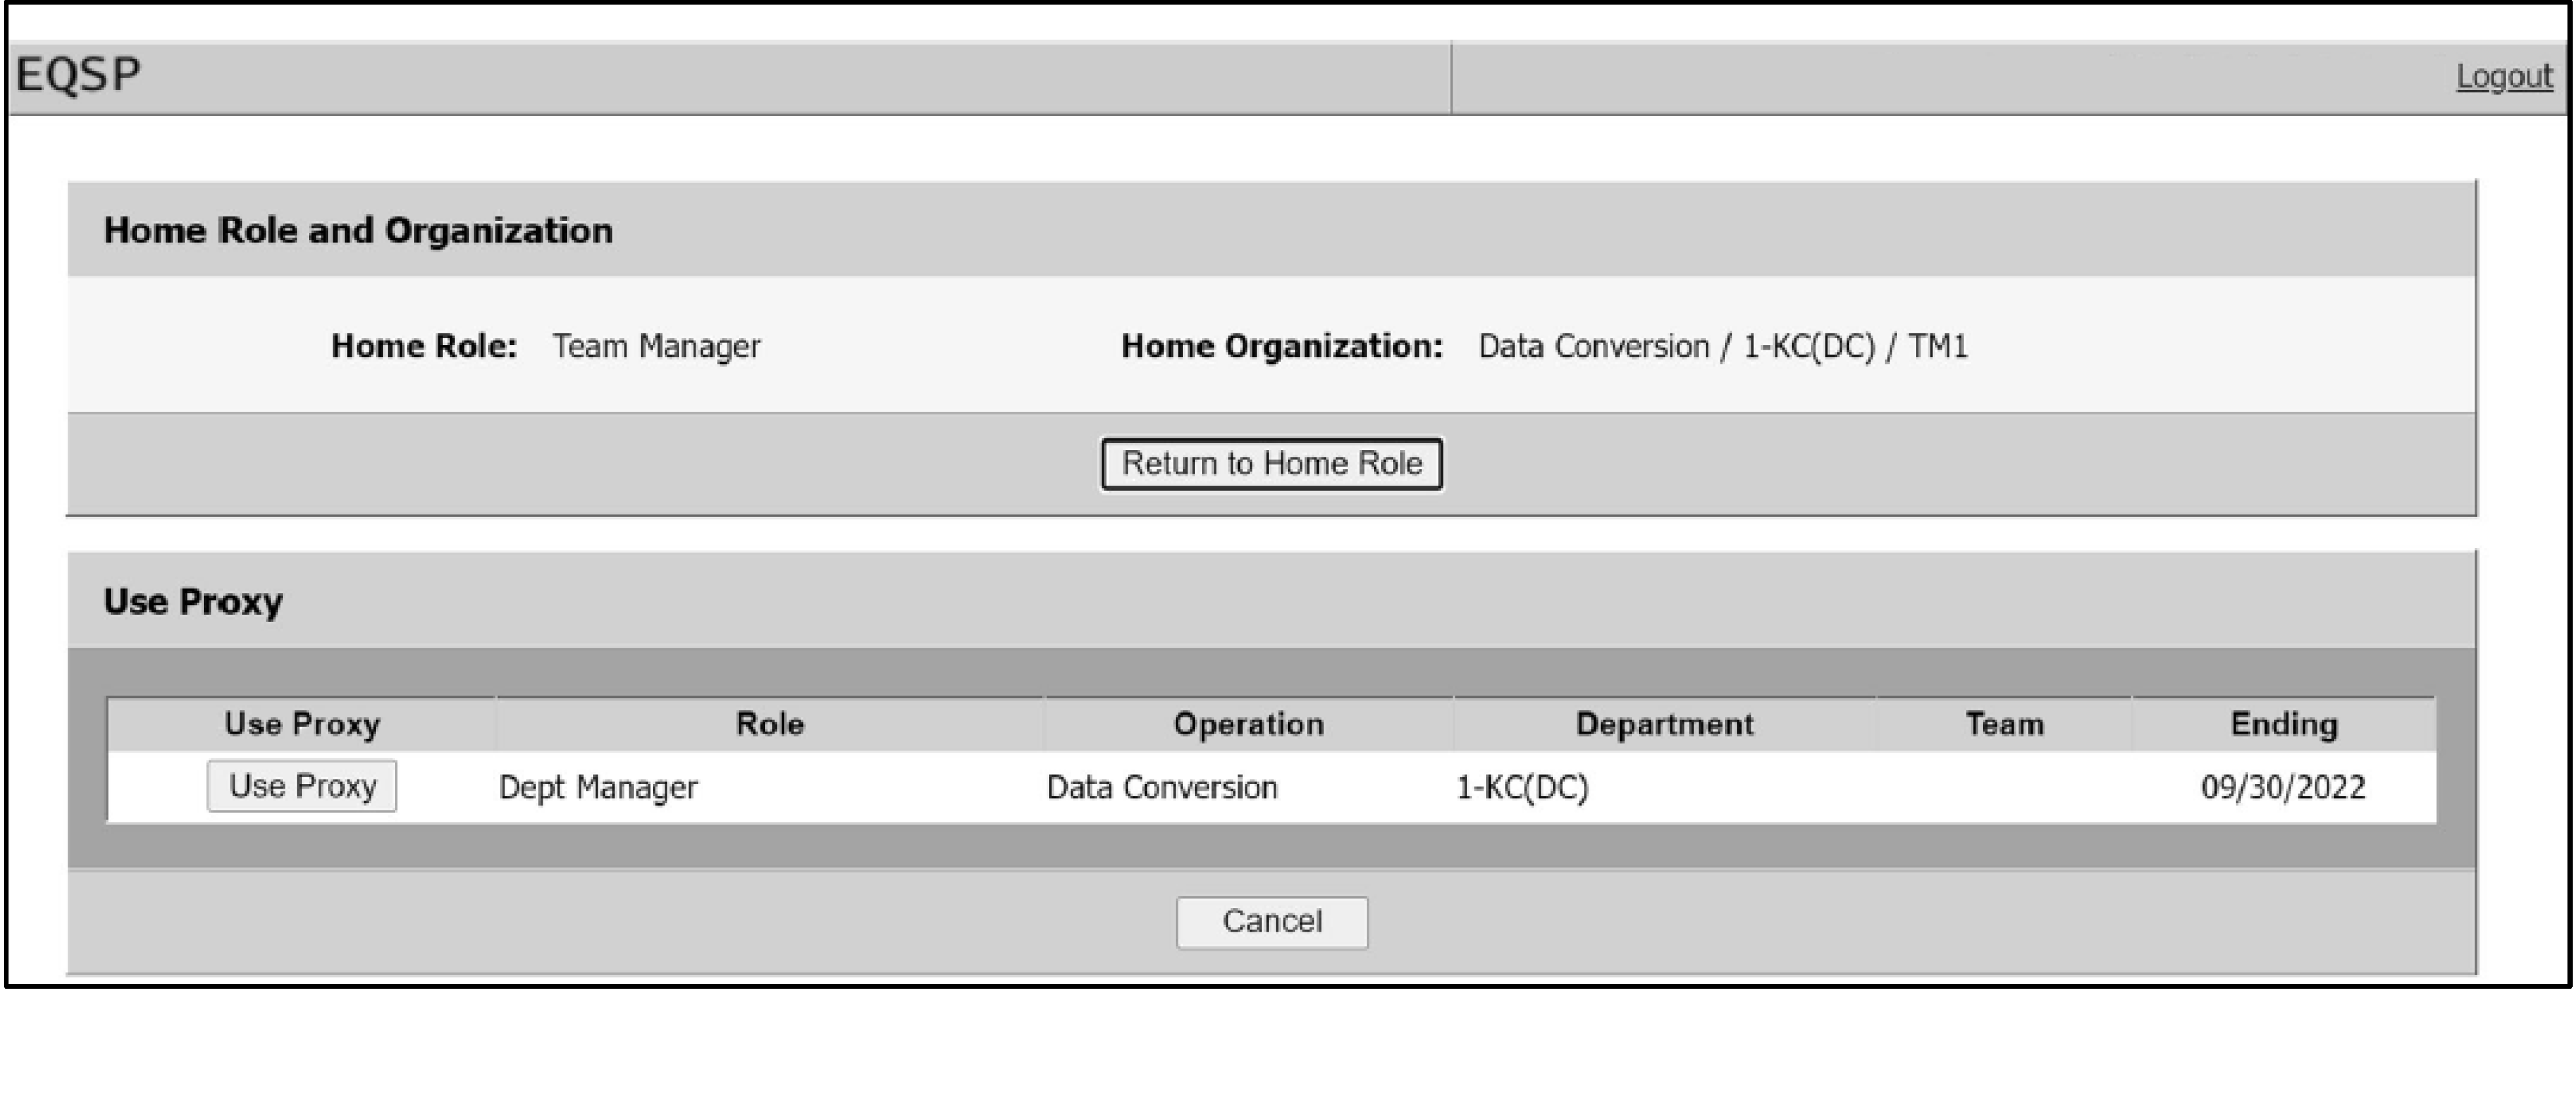
Select "Use Proxy" from the Manager's home page.
-
To select the proxy role from the "Use Proxy Screen" :
Under Use Proxy, select the Use Proxy button. The "Confirm Proxy Change Screen" generates stating, "Are you sure you want to change to the following proxy?" The proxy information will also be listed.
Select "Yes" button to accept the change or the "No" button to cancel your selections and return to the Use Proxy Screen.
If "Yes" is selected, a Proxy Change acknowledgment screen generates stating, "Proxy has been changed." Select the "OK" button. The Main Menu Screen generates.
The Main Menu Screen displays the grantee’s assigned proxy role. See Figure 3.30.30-9. The Operation, Department, and Team will appear as necessary.
Grantees will remain in this proxy role until either logging out of EQSP or going back to their assigned role.

Assigned Role is accessed from the "Use Proxy" screen.
To return to the assigned role:
Select the Return to Home Role button, under the Home Role and Organization-section (See Figure 3.30.30-8). A "Confirm Proxy Change" message generates asking, "Are you sure you want to change to your home role ?"
Select "Yes" to accept the change and generate an acknowledgment message indicating "Proxy has been changed" . Select the "OK" to acknowledgment the Manager's Main Menu screen.
Select "NO" , to cancel the selection and return to the, "Use Proxy " screen.
Each function within Submission Processing has a Data Collection Instrument (DCI) which is unique to the work performed by the employees in that area.
Each review will be assigned a unique DCI number. The number will consist of the year the review was created followed by a system-generated number.
Opportunities on the DCIs are listed in the order they appear on the form or non-form document. The Key Elements of the DCI, which are located on the Review Detail Screen are:
Section: identifies opportunities that are grouped together to form a work process.
Location: clarifies where this opportunity might be found on the form or in relation to the work process.
Opportunity is the point at which a specific action of an employee’s job was either performed or should have been performed.
Defect Types are used to describe an inappropriate action for the work under review. The defect types are "Incorrect" and "Omitted."
Defect Description explains the characteristics of a defect type. A defect description is required whenever a defect type is identified during a review.
-
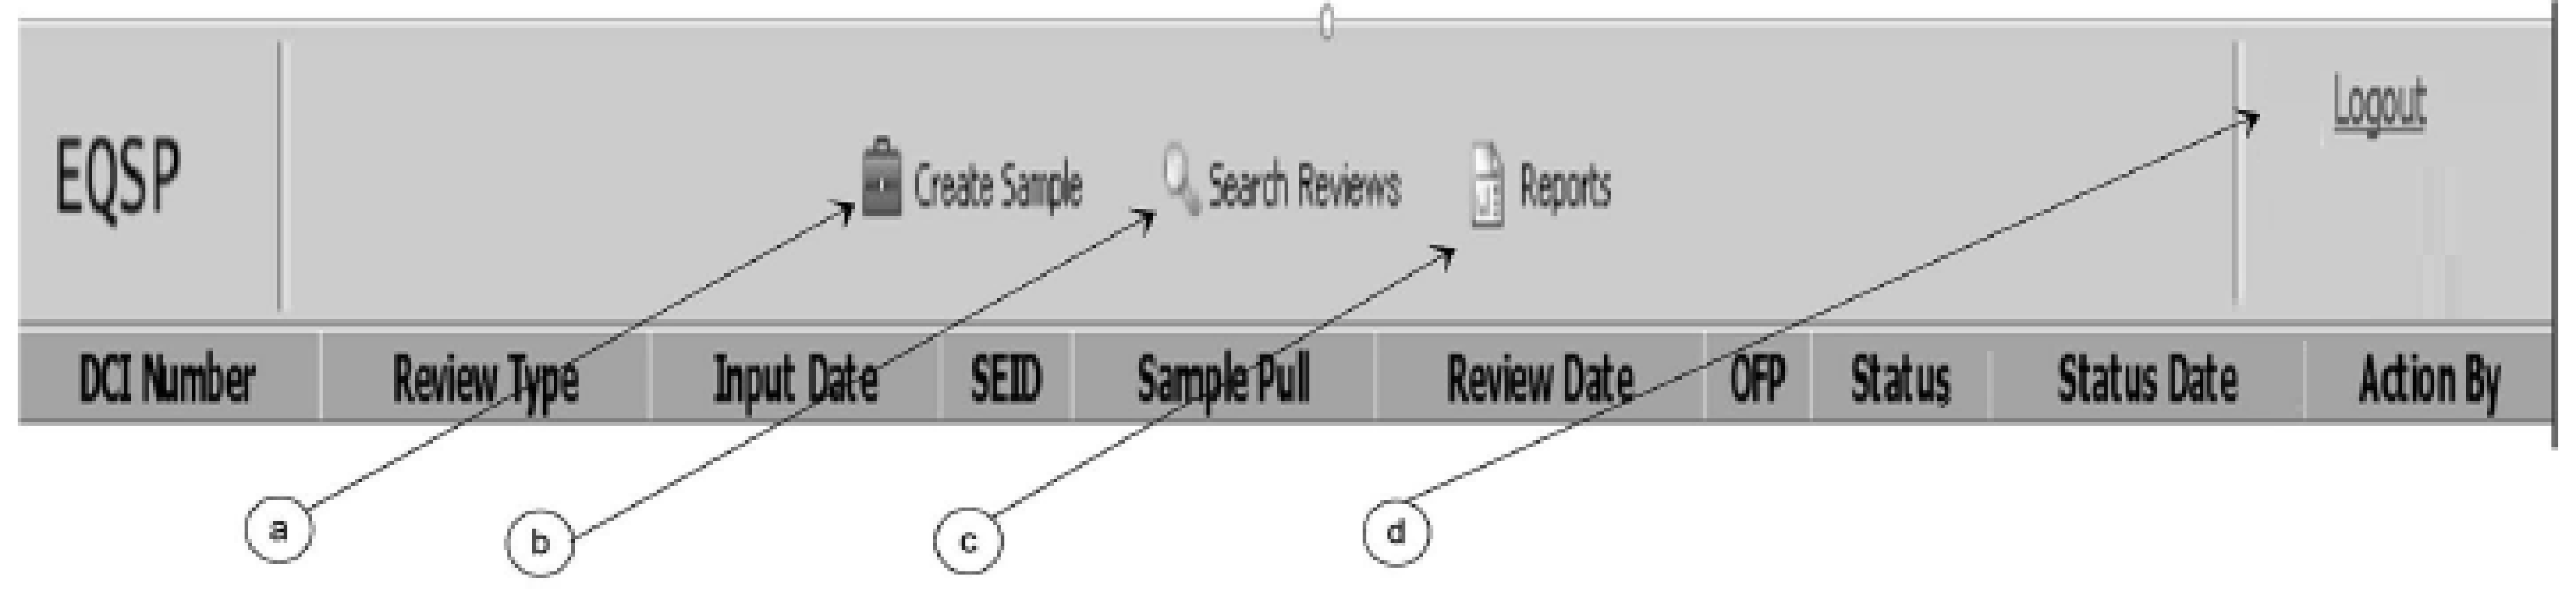
There are several menu options shown on the Reviewer's Main Menu Screen. See Figure 3.30.30-10.
The menu options are listed below.
Create Sample: Select to begin the review.
Search Reviews:
Reports: Select to generate the Reports Screen.
Logout: Select to logout of the EQSP.
-
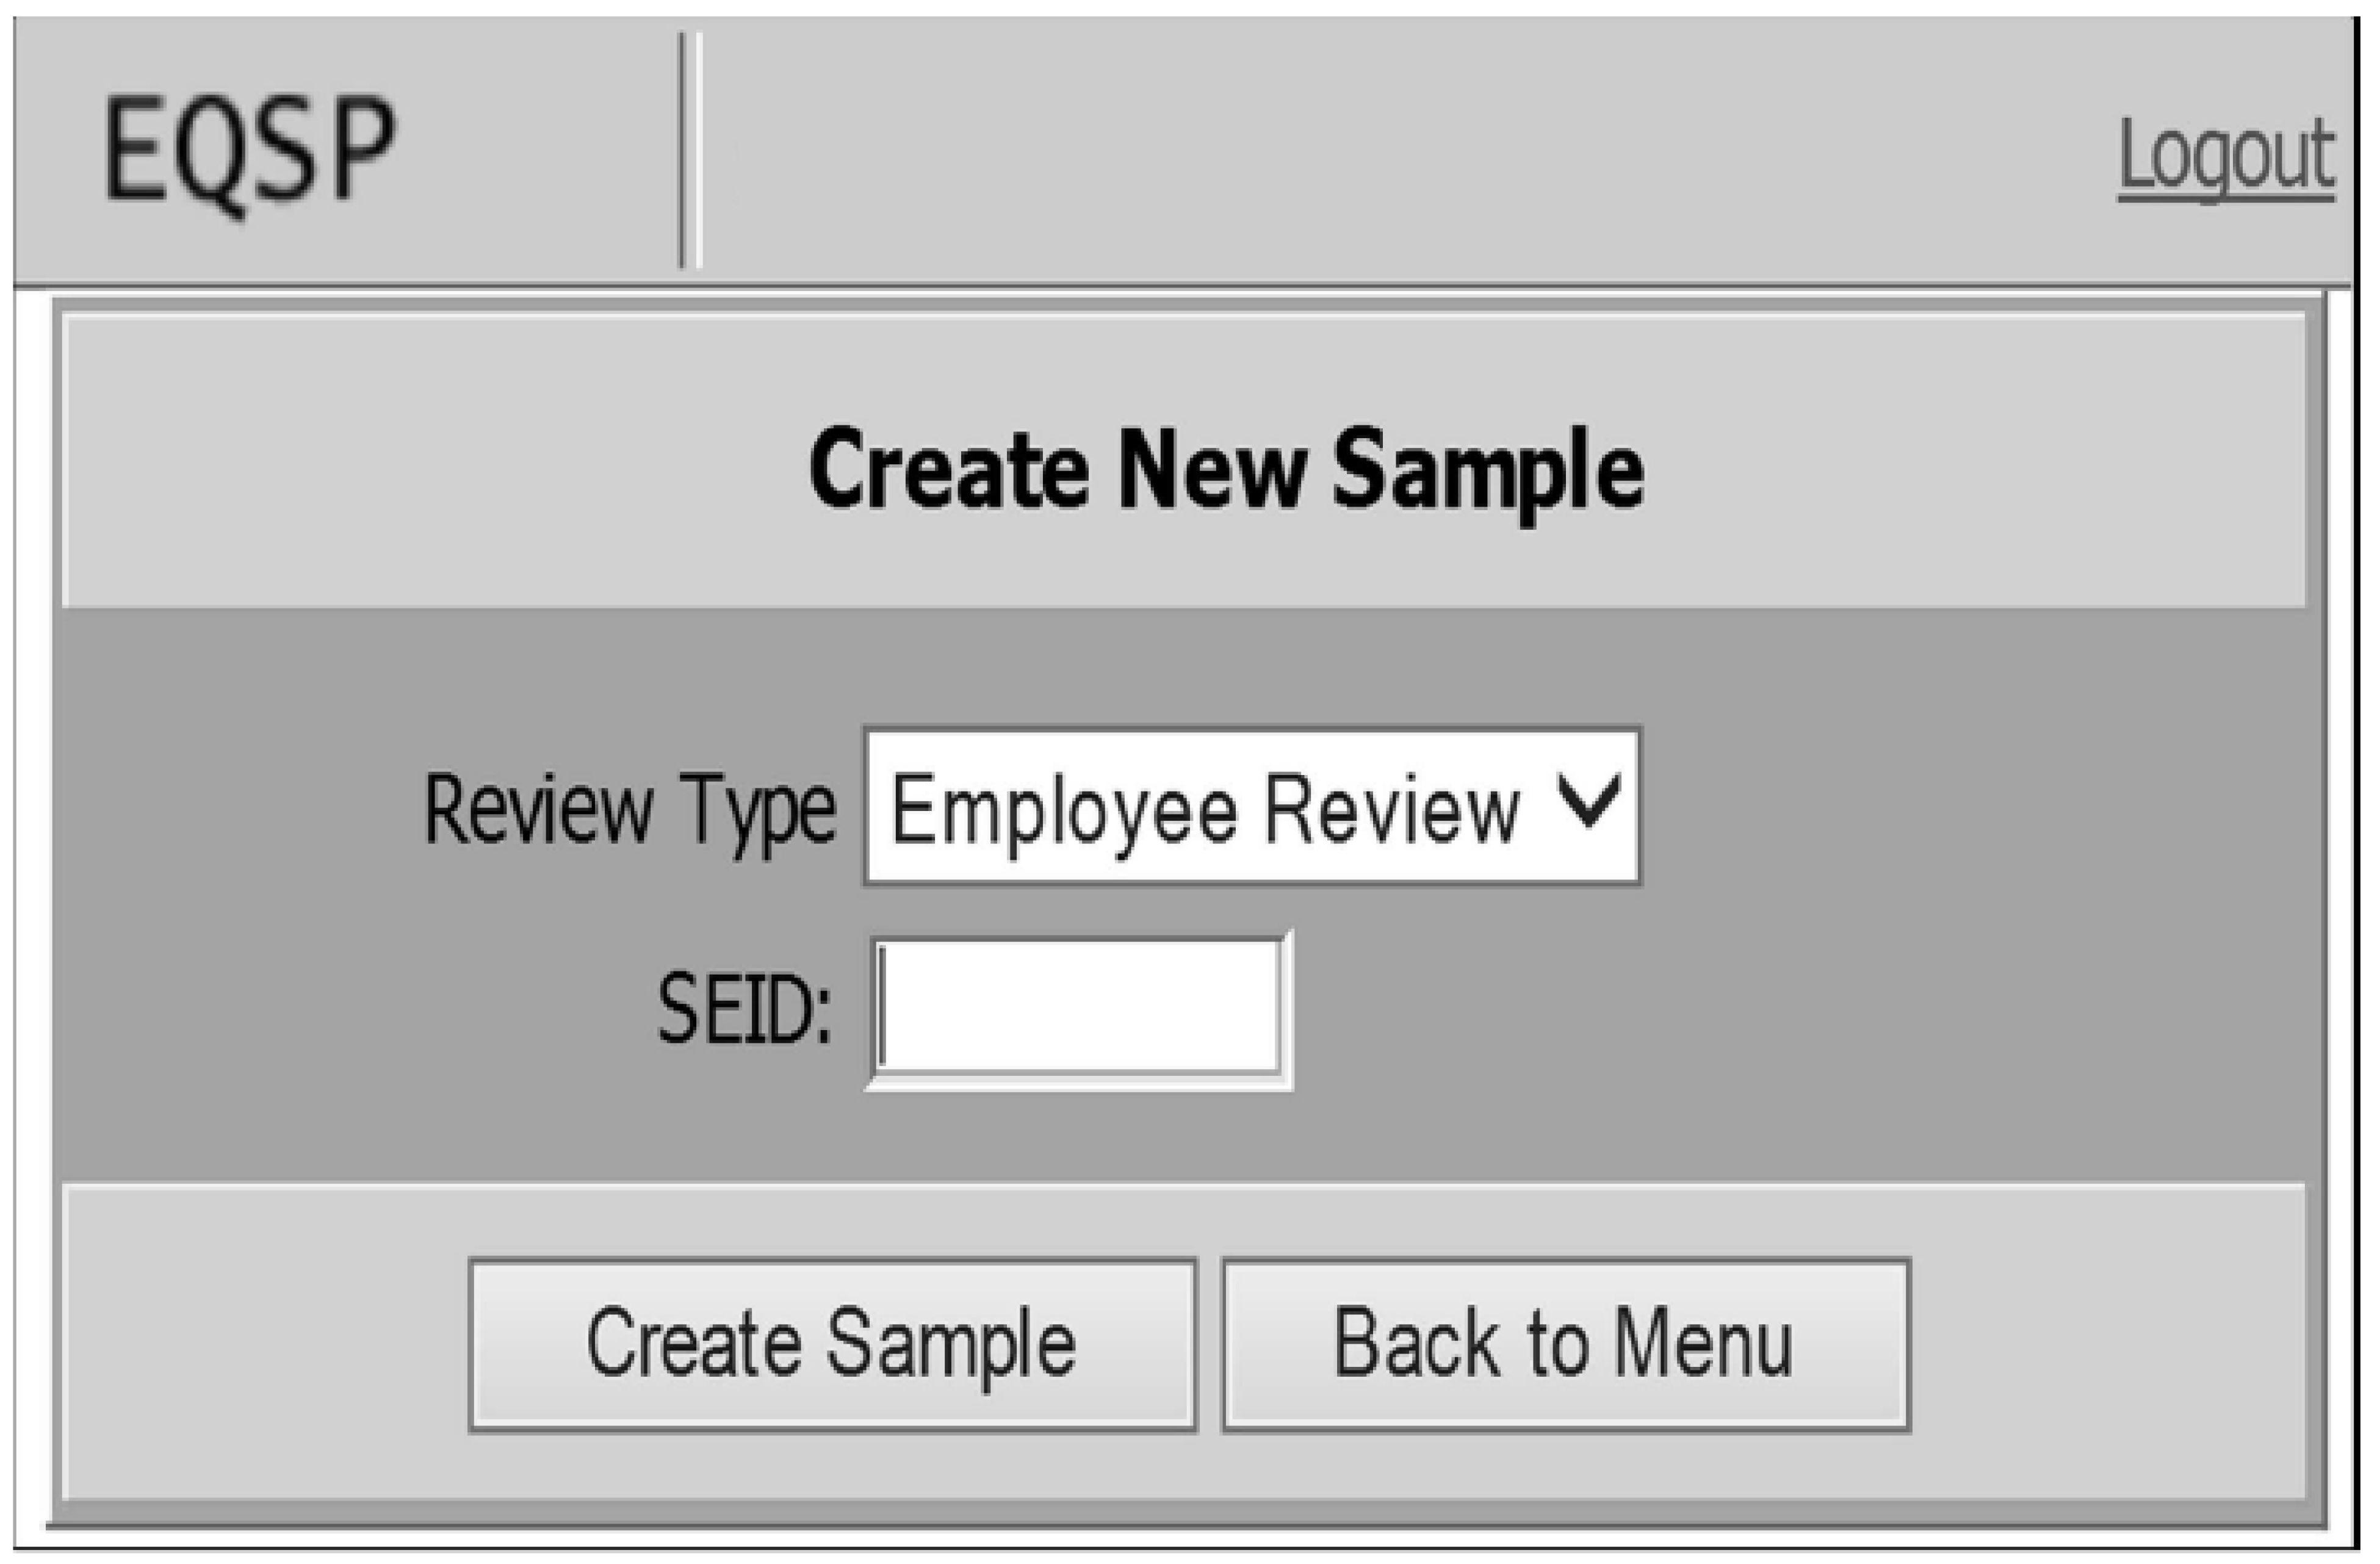
There are several menu options shown on the Reviewer's Main Menu - Create Sample Screen. See Figure 3.30.30-11.
The menu options are listed below.
Review Type: Select Employee Review (Review with SEID) or Product Review (No SEID).
SEID: Enter the SEID (the SEID will default to all CAPS) of the employee you are reviewing.
Create Sample: Select to begin the review.
Back to Menu
Logout: Select to logout of the EQSP.
The Search hyperlink allows Quality Reviewers to view and edit DCIs they created within their Site and Operation.
The results returned will depend on the parameters entered in the "Provide Search Criteria" screen.
The screen displays a list of reviews. This list shows the DCI number, Review Type, Input Date, SEID, Sample Pull, Review Date, OFP, and Status, Status Date, and Action By.
To create a review, select the "Review Type," enter the employee's SEID and then select "Create Sample." The "Review Header" screen will generate.
-
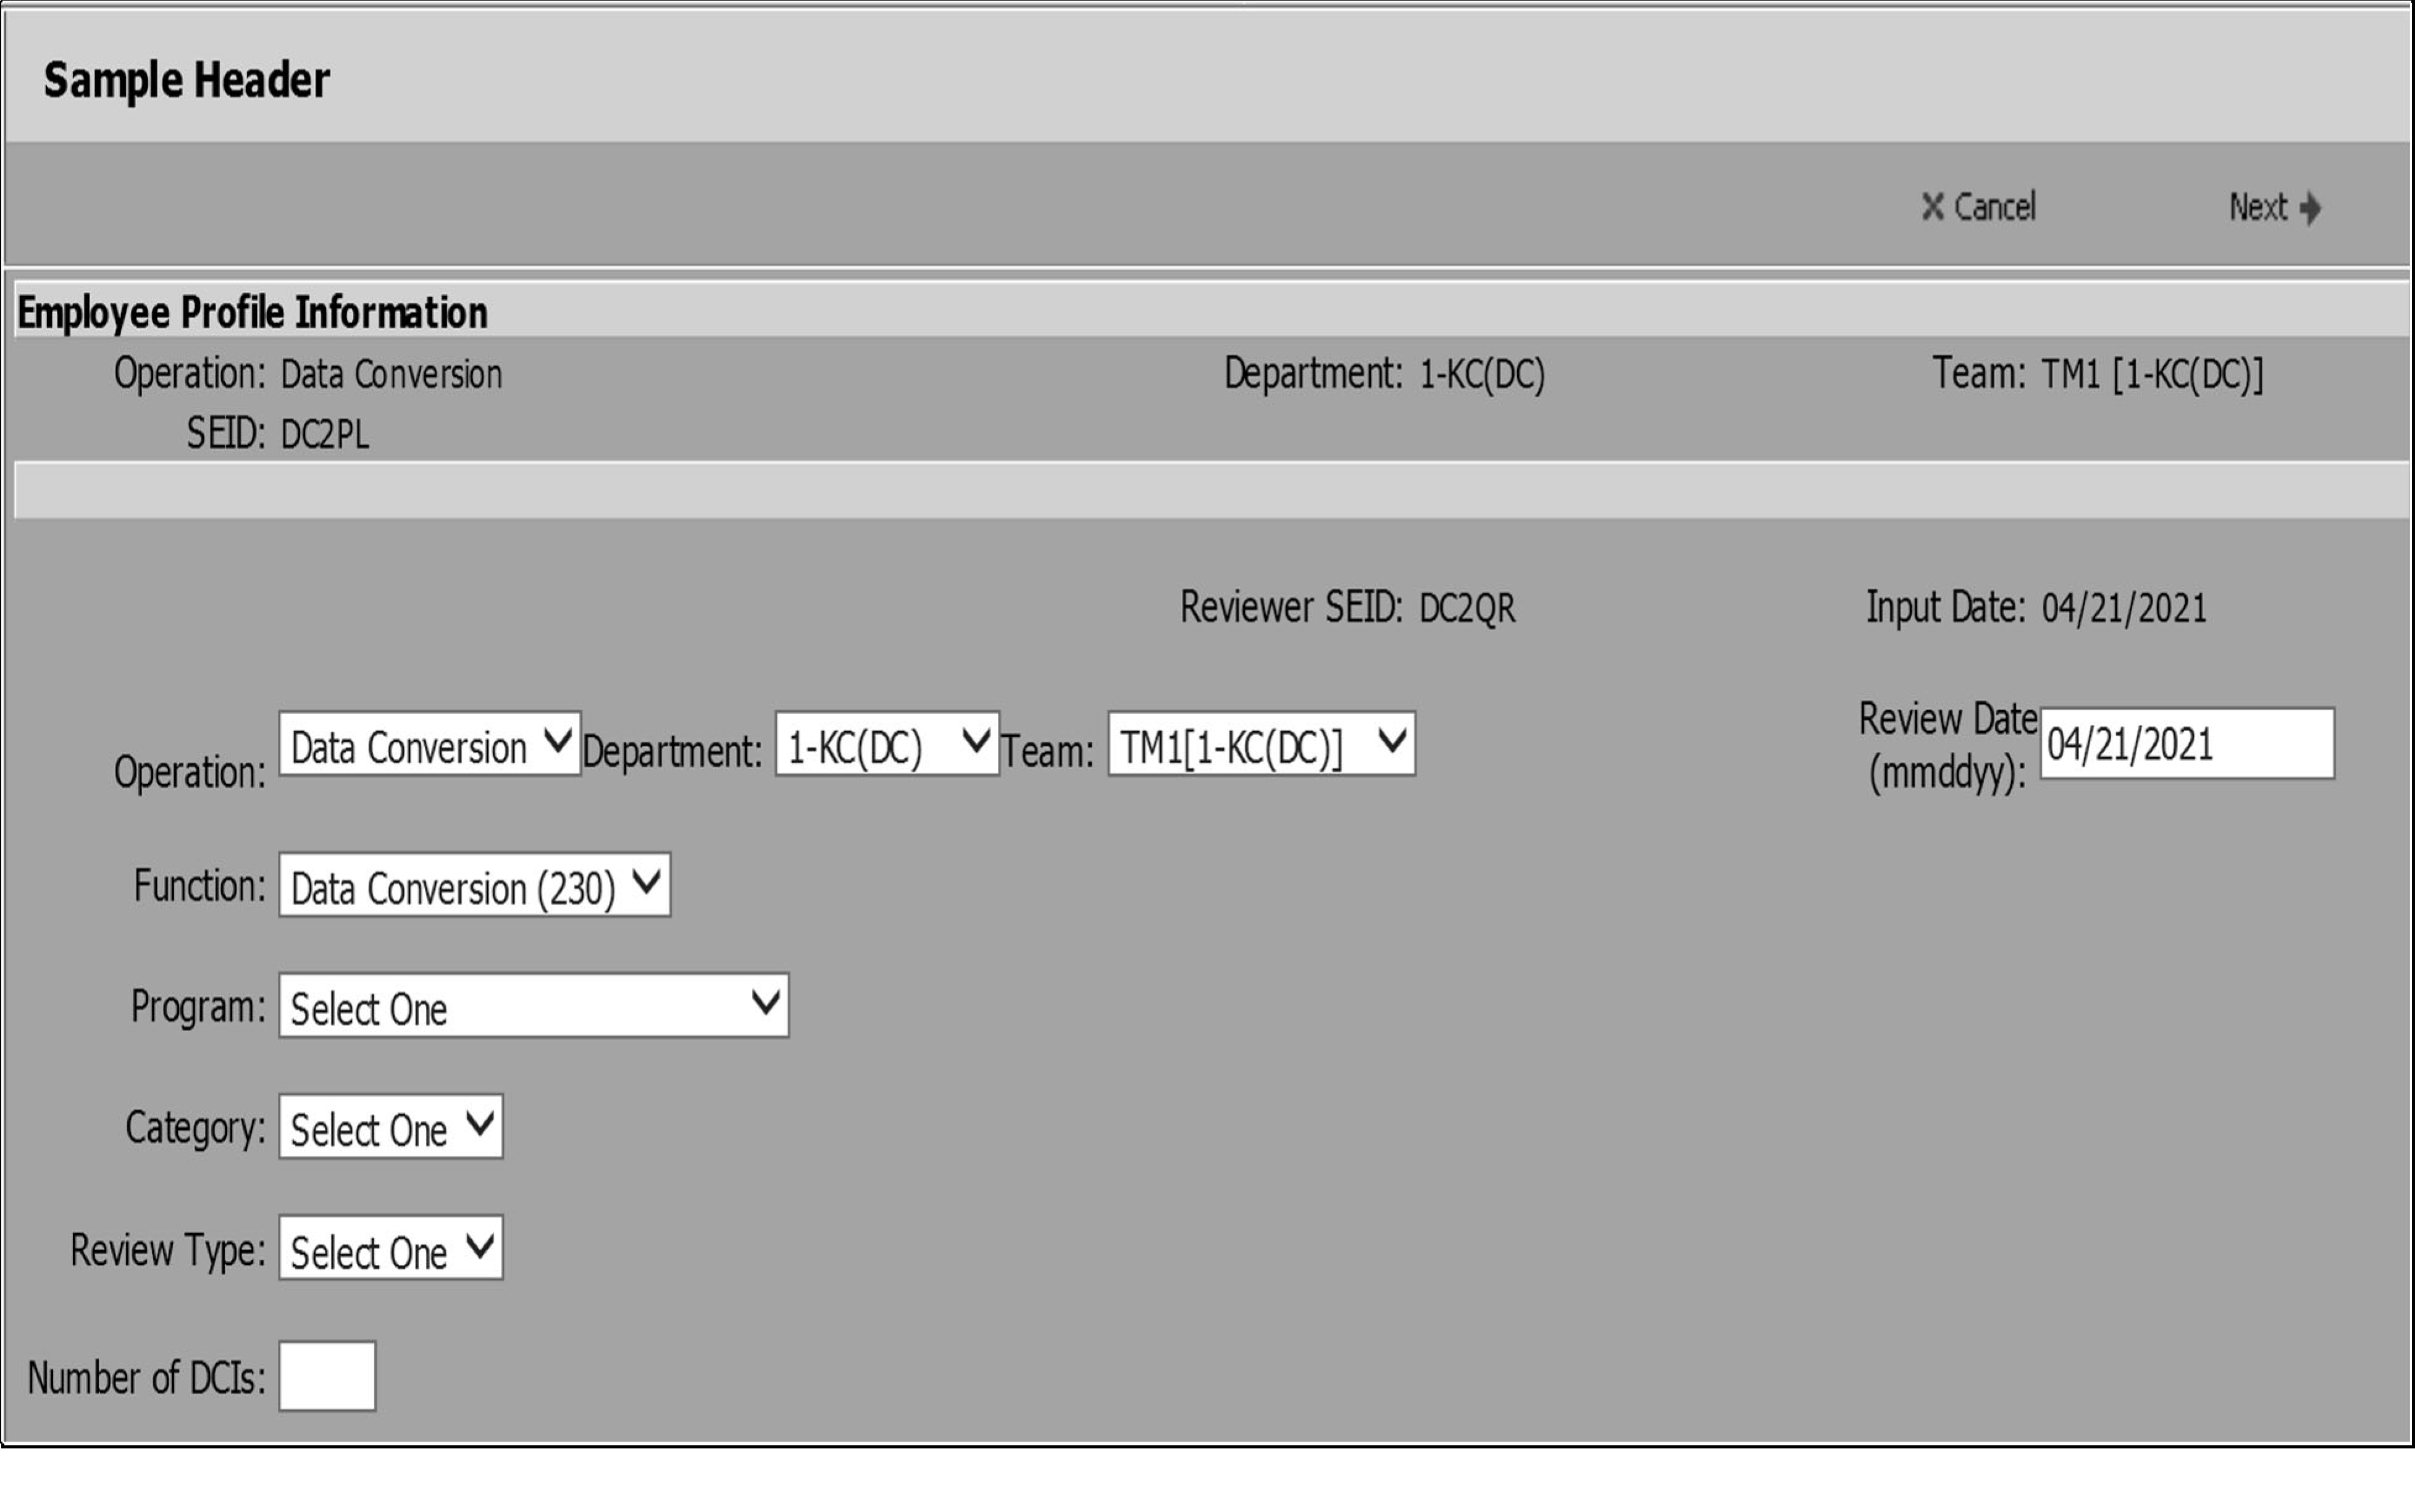
The Review Header screen will only show fields applicable to the Operation, Function, and Program of the employee being reviewed. See Figure 3.30.30-12.
The system will automatically generate information such as the DCI number, Input Date, Reviewer SEID, and Review Date.
The system will automatically enter slashes when a reviewer is entering a date into a date field. The system will convert a two-digit year ending entry into a four-digit year entry.
Drop down menus are Character Key sensitive. This allows you to select an entry by entering the first character from a drop-down menu instead of manually scrolling through the entire menu to locate it.
The Organization Field contains fields for Operation, Department, and Team. These fields reflect the assigned organization of the employee being reviewed. They will default to the employee's assigned organization.
The Review Date field is computer-generated. The date the review was performed starts the systemic date counting. After completing a review, reviewers have five business days, from this date, to modify/delete the review.
The Function field contains codes available for the type of work being reviewed. This field will default to the employee's assigned function.
The Program field contains codes available for the type of work being reviewed. This field will default to the employee's assigned program.
The Category field allows the type of return to be captured. Only one Category can be associated with each review.
Review Type field contains codes available for the type of review being performed. Select Individual Performance Review, Product Feedback Review, Team Defect Review, Managerial/OJT Review. See IRM 3.30.30.2.7. Quality Review Types.
The Number of DCIs box is used to enter the number of documents within a sample pull.
Select the "Next" button located in the upper right corner.
The EQSP Manage Sample screen allows you to manage all of the parameters associated with a sample. See Figure 3.30.30-13.
The top of the screen includes action button:
ADD DCI allows the user to add a new DCI to the sample.
View/Edit DCI allows the user to open the Quality Review Details for a selected DCI.
Complete DCI allows the user to mark a DCI as correct, updates the MEPS performance record.
Single Event Report generates the Single Event Sample Pull Report for the selected sample. The Single Event Report will only generate if all DCIs in the sample are in Complete, Modified, or Deleted status.
Note:
The quality review team manager must ensure each Single Event Individual Employee Report is printed and provided to the team manager for every quality review input to the employee’s SEID. The team manager must provide the employee with a copy of the report. This notification serves as a record of all quality reviews completed for each employee as well as a record of any defect(s) identified.
Back to List navigates back to the Main Menu.
Delete DCI allows the Quality Manager and Quality Lead to edit or delete Individual Performance, HQW, and Team Defect for 14 calendar days after the Review completion Date, Quality Lead can edit or Delete for 14 calendar days, Quality Reviewers can Edit or Delete for five calendar days from the completion date. This button will not appear for learning curve samples.
The Sample Header Information includes the following:
Employee SEID
OFP Code
Review Date
Sample Header ID Number
Review Type (if the review type is Learning Curve Review, the required documents per sample are also displayed).
DCI Number
Status
Program (and Form Type)
Category
Schedule Selection Box
Defects (the count associated with each DCI in the Sample).
Below the action button row, is the sample header information including:
The employee SEID
The applicable OFP Code for the sample.
The review date for the Sample.
The sample header ID number.
The review type for the sample.
If the review type is Learning Curve Review, the required documents per sample are also displayed.
The bottom half of the screen displays columns for the DCI number, Status, program (and form type), Category, schedule selection check box, and Defect count associated with each DCI in the Sample.
The DCI Selection check box column on the left side of the screen allows the user to select/deselect all DCI’s or each DCI individually. If there are no defects in the sample, the user may select all the DCI by checking the DCI selection column, and simply press the Complete DCI button at the top of the screen. This changes the status for each selected DCI to Complete, and displays 0 for each DCI in the Defects column. If defects are present in one or more of the DCIs in the Sample, check the box next to the DCI, or if the DCI is for a different form or category, use the drop-down menu to select the "Select a different program (form) and or category" .
Review the document and select the check box for schedules and/or Forms that are included in the sample and have a defect to be coded.
To code the review click, the View/Edit button or click the DCI number.
If there are no defects in a sample, you may select all of the DCI by checking the DCI selection column check box and simply press the Complete DCI button at the top of the screen. This changes the status for each DCI to "Complete" and displays "0" for each DCI in the defects column.
If the user checks the "Schedules" check box on the Manage Sample screen, the system will be directed to the Select the Schedules to Review screen.
Check the box next to the schedule(s) the user is adding to this DCI and enter the number of the schedule needed.
The Quantity Entry box defaults to "1" . This number can be changed to accommodate multiples schedules and/or forms. DCIs may have multiple schedules that may be selected, and in some cases multiples of the same schedule can be attached.
Select the count for the schedule(s), then click Next. This will generate the Review Detail screen. If schedules are not added to the DCI, the screen will be bypassed.
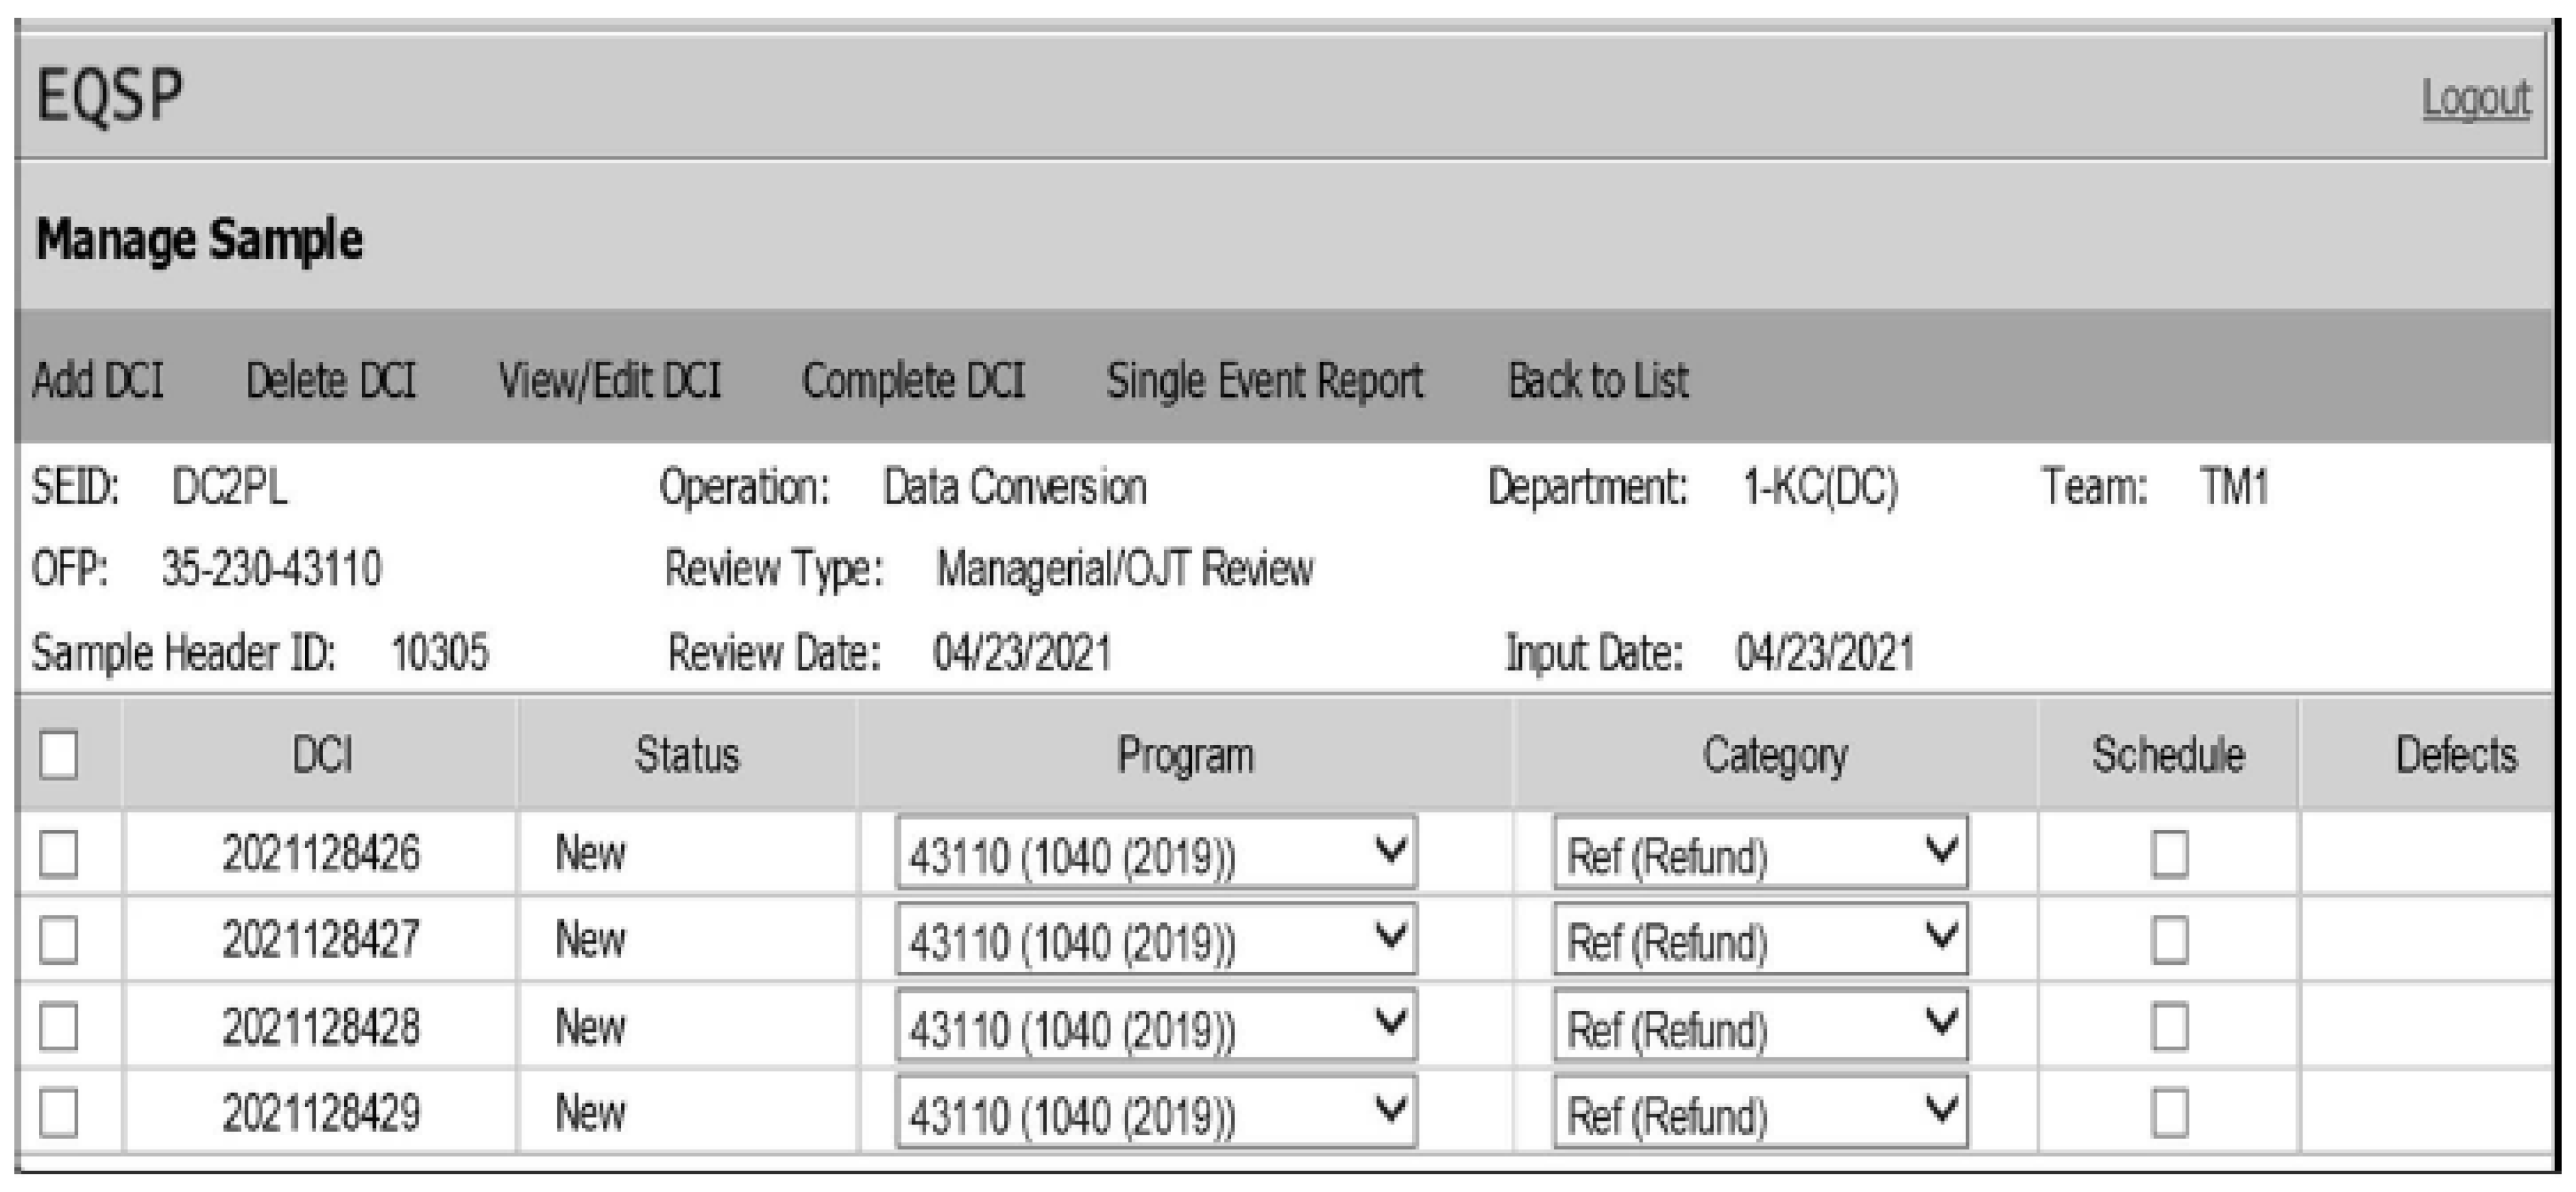
-
The Review Details Screen is used to code the defect(s) for the reviewed document. See Figure 3.30.30-14.
The Review Header portion of this screen contains the following:
DCI Number
SEID of the employee being reviewed
Reviewer SEID
Sample Pull ID
Review Date
Input Date
Operation
Department
Team
Function
Program
Finish hyperlink
The Review Detail portion of this screen contains a list of opportunities that apply to the document being reviewed.
Schedules Tab: select to review the requested schedules and/or forms.
Page Hyperlinks: select to navigate through available pages of the DCI.
Section: identifies opportunities that are grouped together to form a work process.
Location: clarifies where this opportunity might be found on the form or in relation to the work process.
Opportunity is the point at which a specific action of an employee’s job was either performed or should have been performed.
The "Correct?" column lists two radio buttons: N (No); and NA (Not applicable).
Defect Type is only selectable when "Correct?" was coded with an N value. There are two Defect Types:
Incorrect: Is defined as a failure to take the correct action, when the action was taken.
Omitted: Is defined as a failure to take an action, when an action was needed.Defect Description further defines how the opportunity was defective.
When all defective opportunities have been coded, select the Finish hyperlink. The Review Summary Screen will generate. See IRM 3.30.30.7.1.7 the Review Summary Screen.
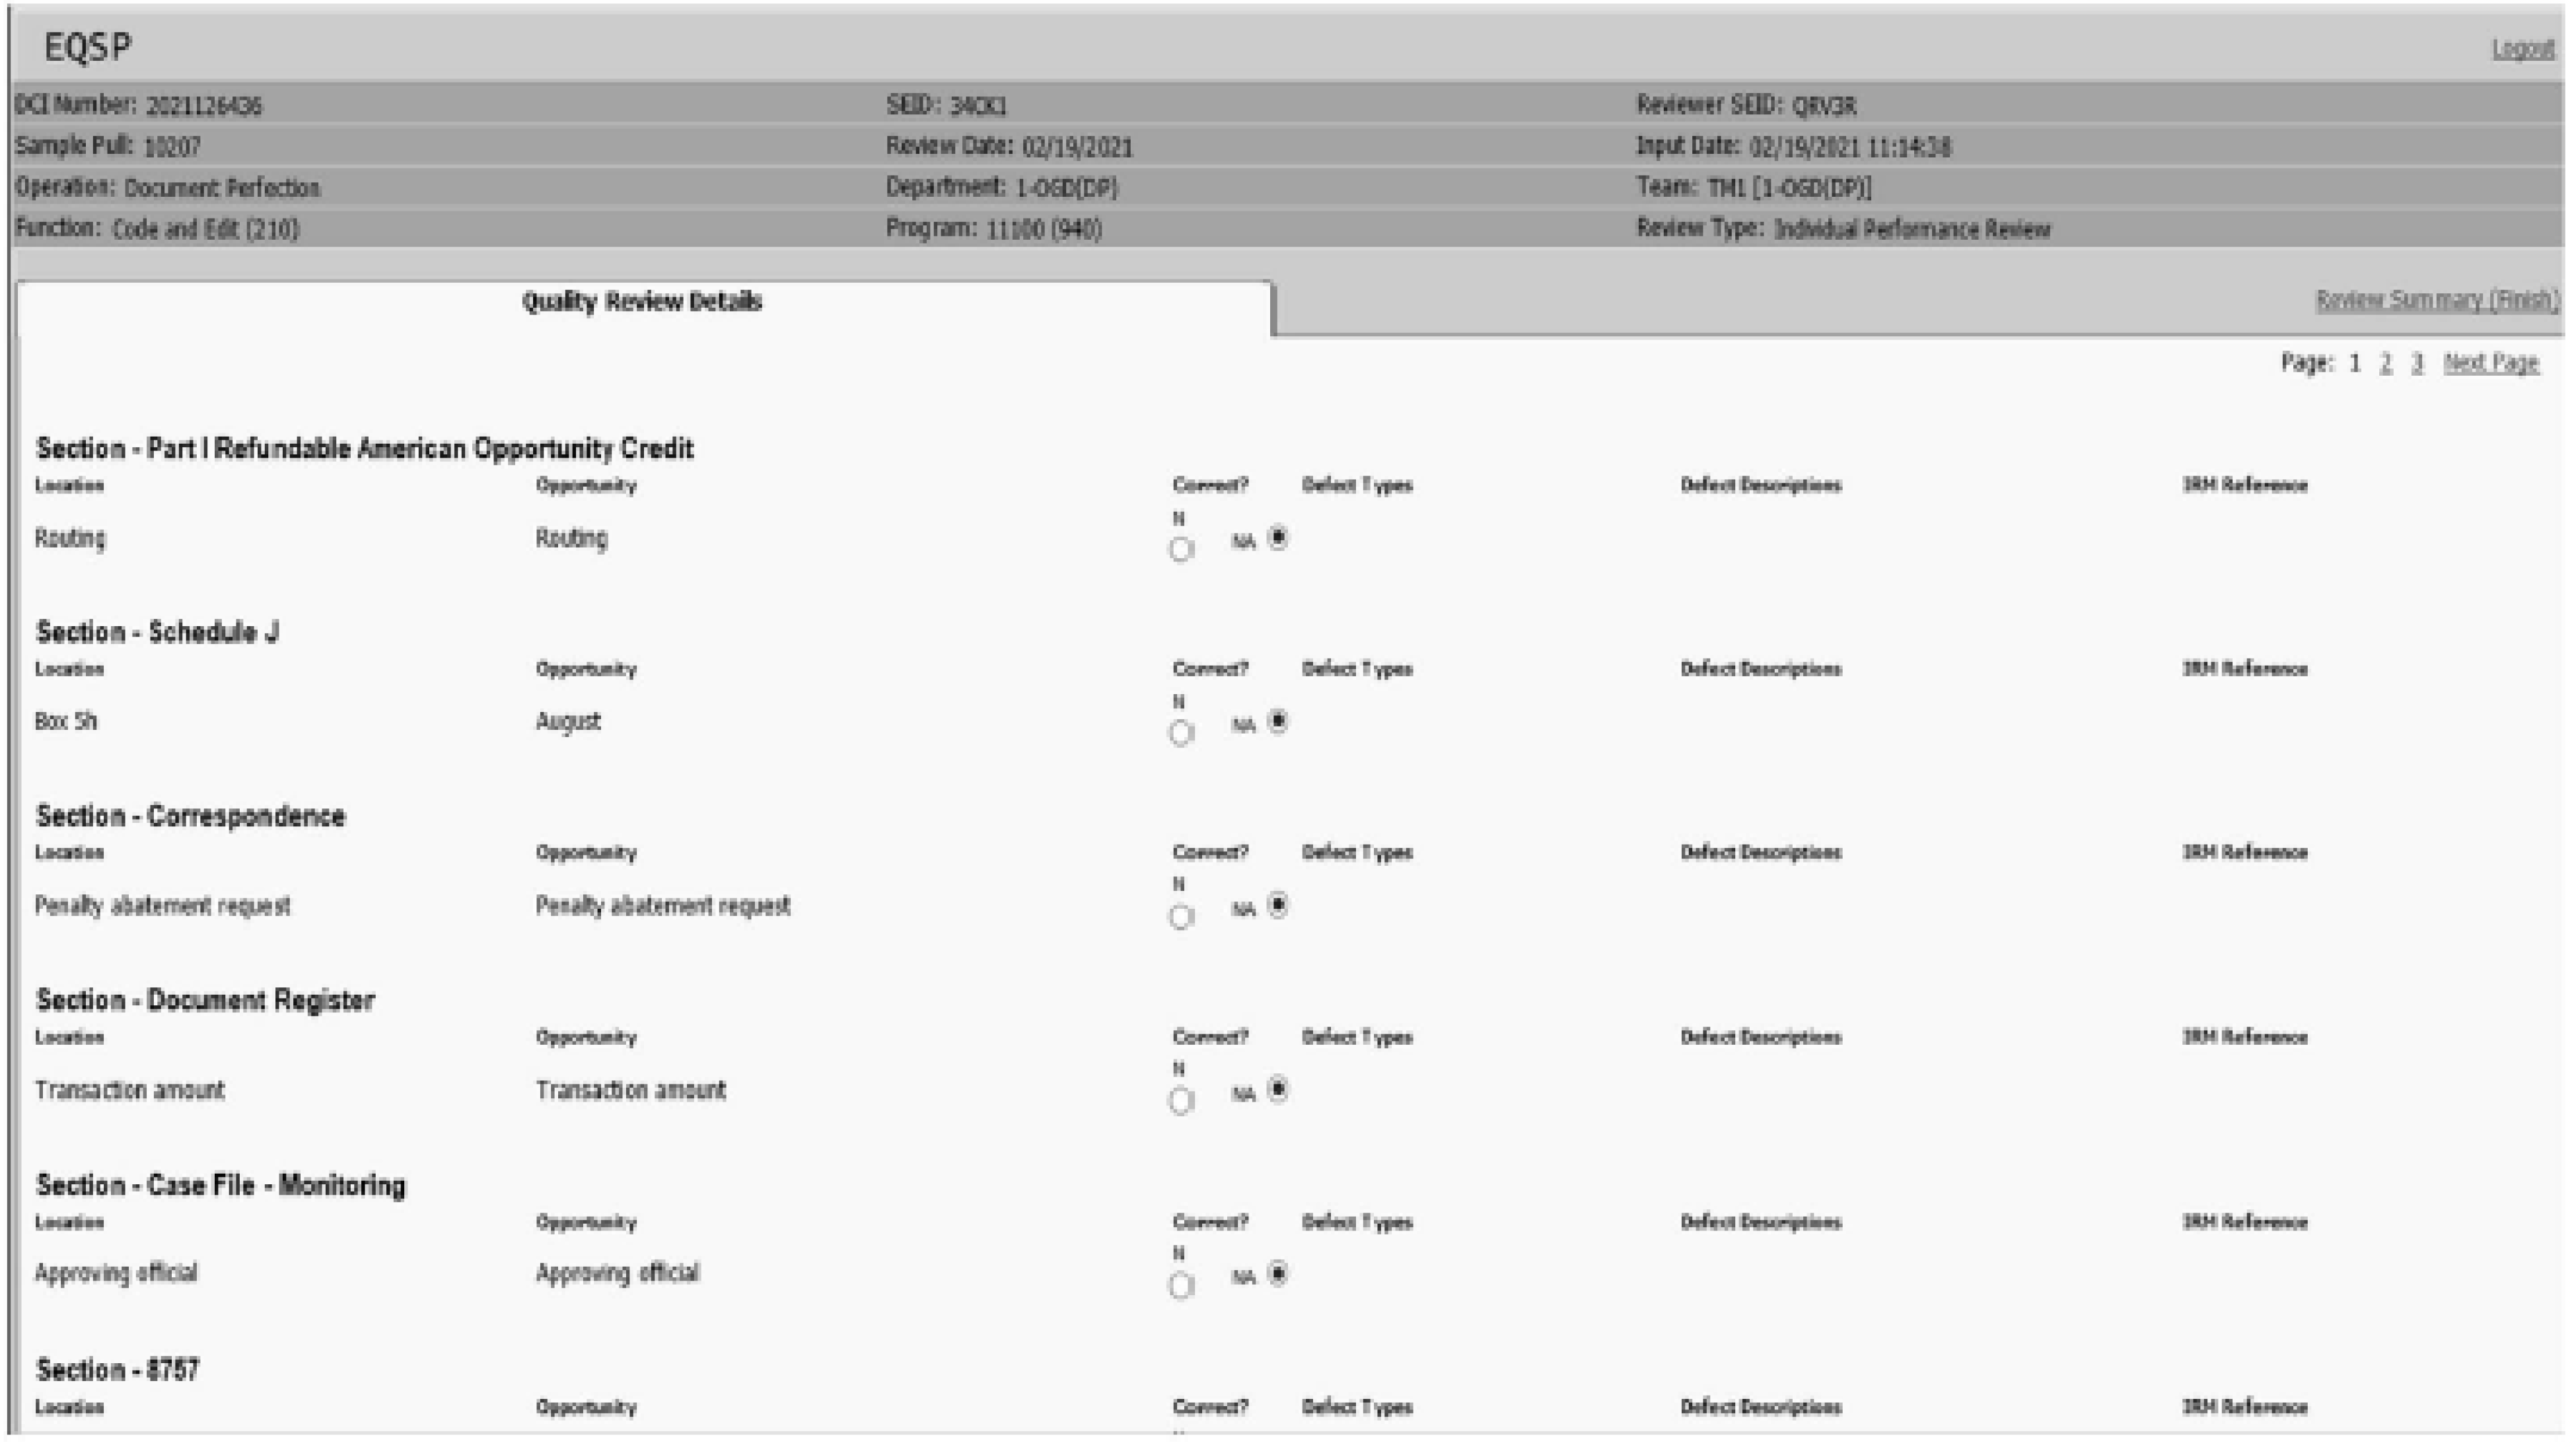
The methods used for coding the DCI are similar in all functions. The opportunities were established based on the actions taken by employees, according to the applicable IRM procedures, to complete their duties.
Locate the opportunity the employee performed incorrectly or omitted.
Select the "N" radio button for all defective opportunities identified on a review. The drop-down menu for "Defect Type" will generate. An error message indicating "Please select defect type" appears if a defect type is not selected. Select "OK" and select a defect type to clear the error message.
Note:
It is important to identify the point where the first error occurred, i.e., "point of error" . Do not code "ripple" defects. Consider the order of operation when determining the "point of error" and potential "ripple" defect(s). Ripple defects are defined as a defect(s) made as a result another defect. If an original "point of error" defect did not lead to additional defect(s) - meaning additional defect(s) can also be determined as a "point of error" . the additional defects should be charged "point of error." Do not code "ripple" errors.
Example:
If an entry should have been made on Line 12, but the entry was transcribed to line 13, the defect changed would be an “Omitted Entry” for "Line 12" and the defect of an “Incorrect Entry” for "Line 13" would be considered a "ripple" defect and not charged. The same would be true if the incorrect transcription to "Line 13" resulted in line-item entries (values) after "Line 13" to be incorrect.
Select the appropriate defect type: "Omitted" or "Incorrect." The drop-down menu for "Defect Description" will generate.
Select the appropriate description for the defective opportunity. An error message indicating "Please select description" appears if a defect description is not selected. Select "OK" and select a defect description to clear the error message.
Example:
Functions requiring transcription use Keying and Entry Defect Descriptions. “Incorrect Keying” defect(s) are defined as entries where numbers and/or letters are transposed or partially entered but incomplete.
Example one: Line 13 on a form should have an entry of 598 (five hundred and ninety-eight) but is keyed as 589 (five hundred and eighty-nine).
Example two: The name field on a form should have an entry of John Smith but is keyed as Jon Smit.
“Incorrect Entry” defect(s) are defined as entries where the value of the entry was placed on the incorrect line.
Example three: The entry on Line 12 on a form should have been entered on Line 13.
“Omitted Entry” defect(s) are defined as a required entry line being left blank.
Example four: Line 12 on a form should have an entry of 2,651.00 (two thousand, six hundred and fifty-one), but nothing is entered.All defect descriptions default to N/A.
If a defective document has only one defect on the DCI and the defect was charged incorrectly, change the N to a N/A.
A "Location" with Repeated Opportunities is identified in blue with an underlined hyperlink. See Figure 3.30.30-15. This functionality allows you to code opportunities that occur multiples times.
Enter the number of repeated opportunities in the "# of Repeated Lines" box.
Select the blue colored hyperlink location. A screen generates listing the repeated opportunities.
Code the defective opportunities.
Select either the "Cancel" hyperlink to cancel your selections and return to the Review Detail Screen or select the "Save" hyperlink to save your selections. "The Repeated lines have been saved" confirmation screen will generate.
Select "Close" to return to the Review Detail Screen.
Complete coding of any additional defective opportunities.
When defects are identified on schedules or forms included in the review, select the "Schedules" tab at the top to the right of the Review Details tab and code the appropriate defects. See Figure 3.30.30-16.
If multiple schedules or forms were identified for review, select the drop-down arrow from the "Select a Schedule" field. Highlight the schedule/form and then select "Go."
Complete defect coding through all requested schedules or forms.
Select the "Finish" hyperlink.
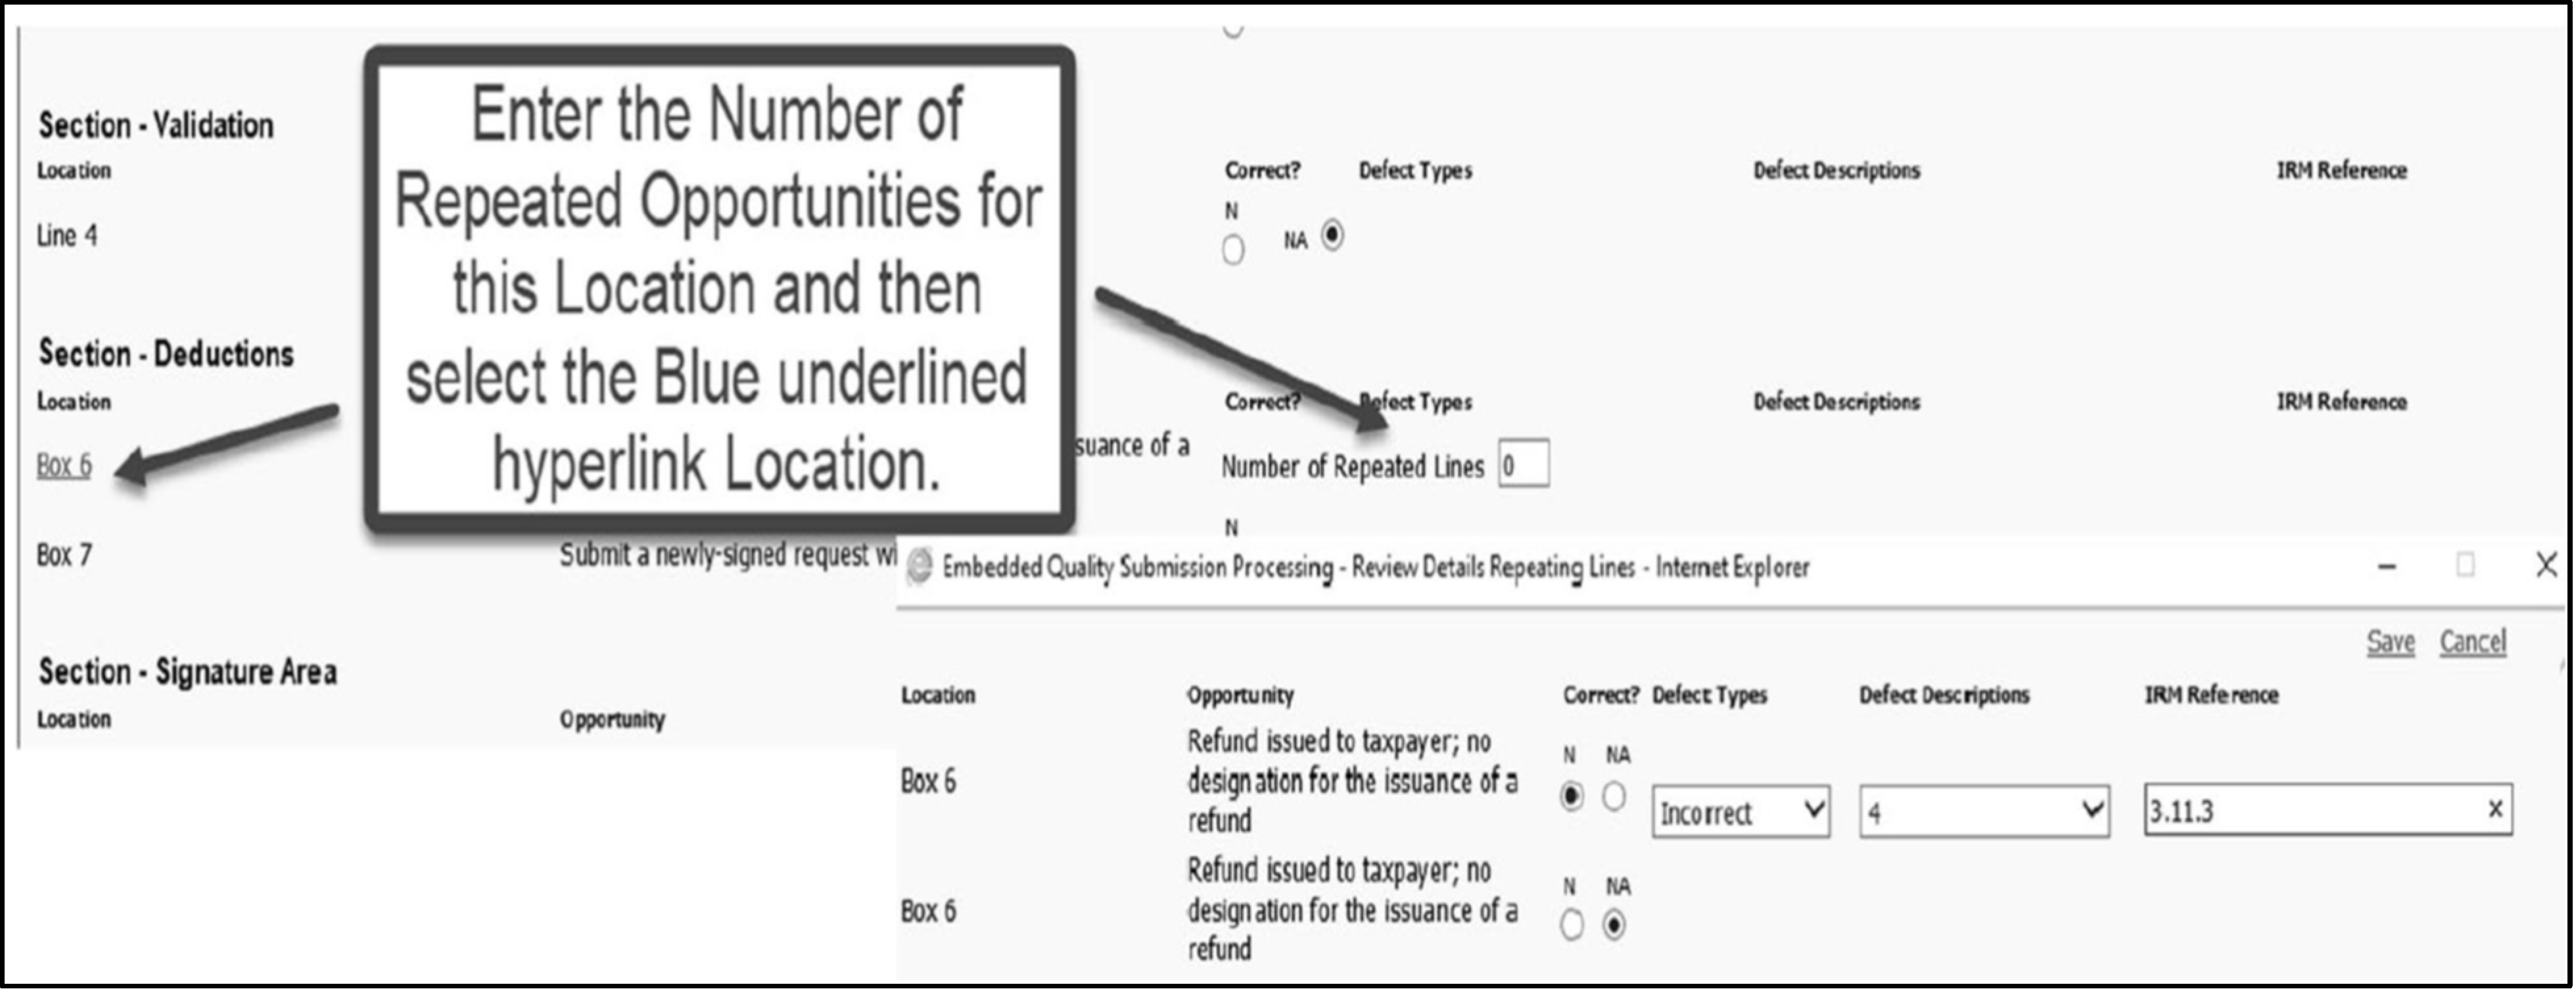
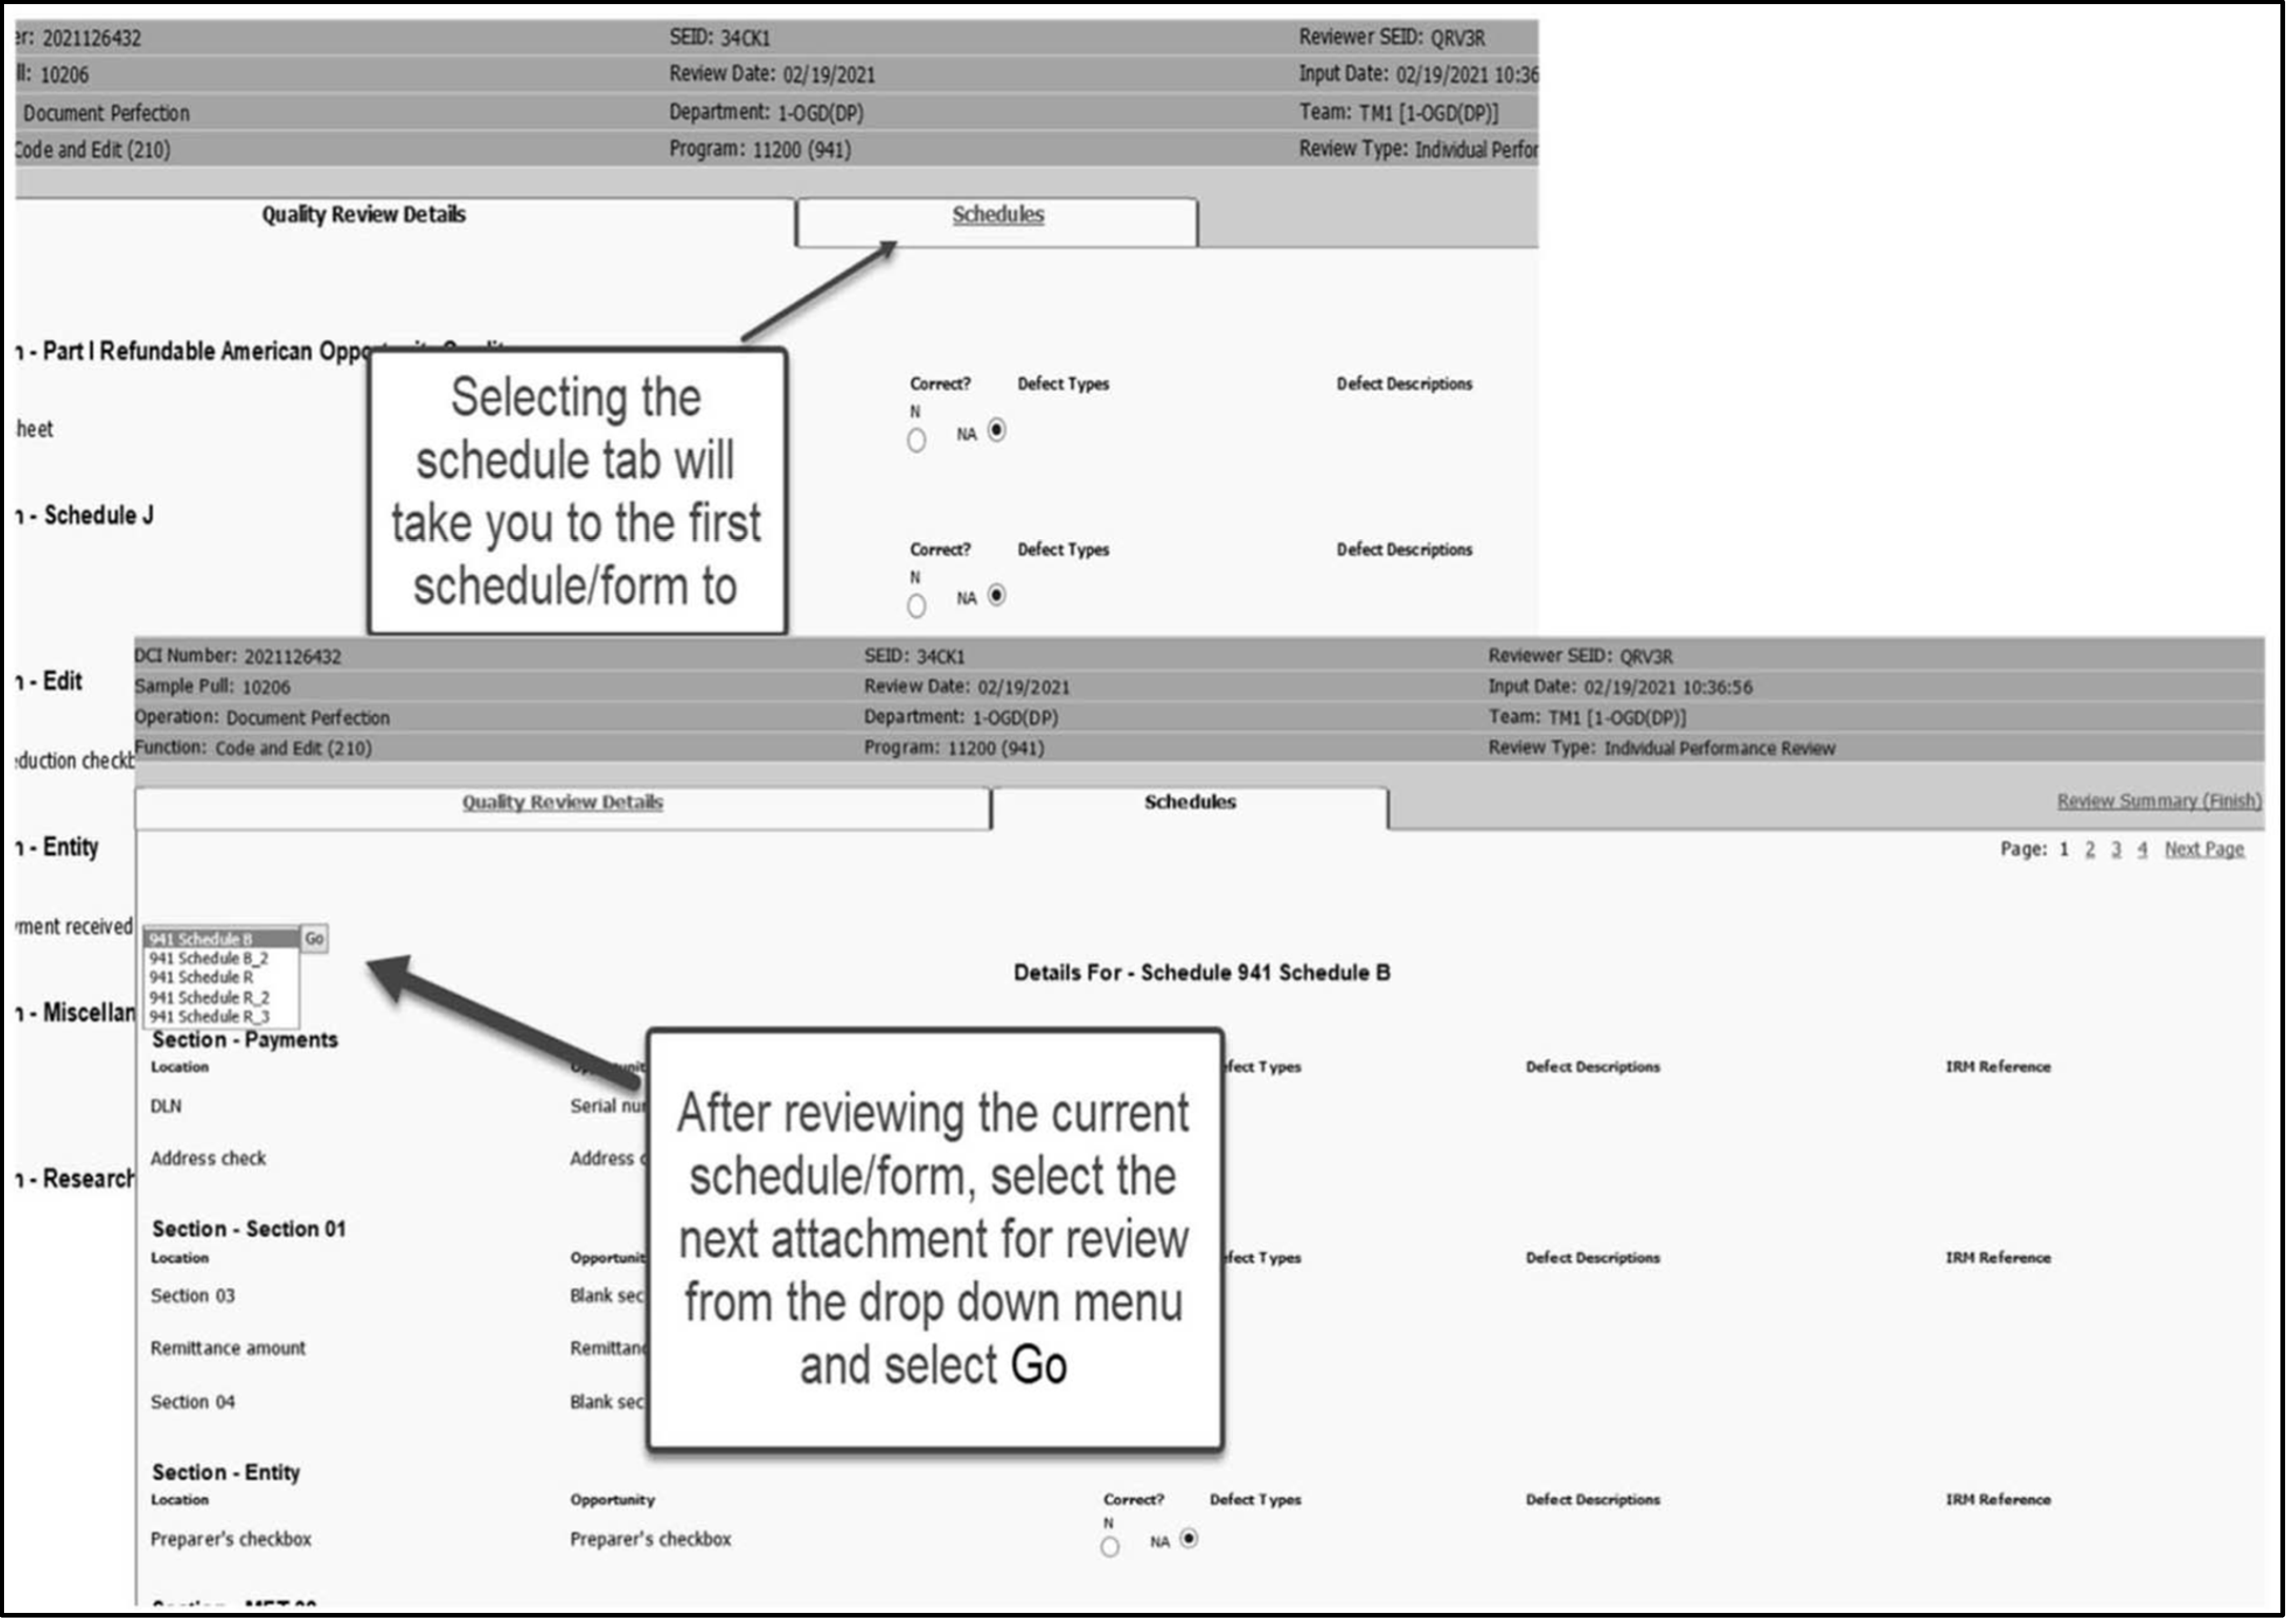
-
The Review Summary Screen summarizes the total number of defects based on the review just completed. You should validate that the total defects coincide with the review document. See Figure 3.30.30- 17.
The Review Header portion of this screen displays the following:
DCI Number
SEID
Reviewer SEID
Sample Pull ID (Not Required on a Product Review)
Review Date
Input Date
Operation
Department
Team
Function
Program
"Edit Review Details" hyperlink: Select if you need to edit the "Quality Review Details" information.
"Finish" hyperlink: Select the "Finish" hyperlink again to complete the review and save all data entered. The Reviewer's Main Menu Screen will generate.
The Quality Review - Summary displays below the Review header:
Sample Pull Id
Total number of defect opportunities
Total number of defects found
For defective DCIs Forms, Section, Line Number, Line Text, Defect Type, and Description are displayed.
"Defects Summary" shows the defect information i.e.: Total Number of Defect Opportunities, Total Number of Defects Found, Form, Section, Line Number, Line Text, Defect Type, and Description.
Sample Pull Id
Total number of defect opportunities
Total number of defects found
For defective DCIs Forms, Section, Line Number, Line Text, Defect Type, and Description are displayed.
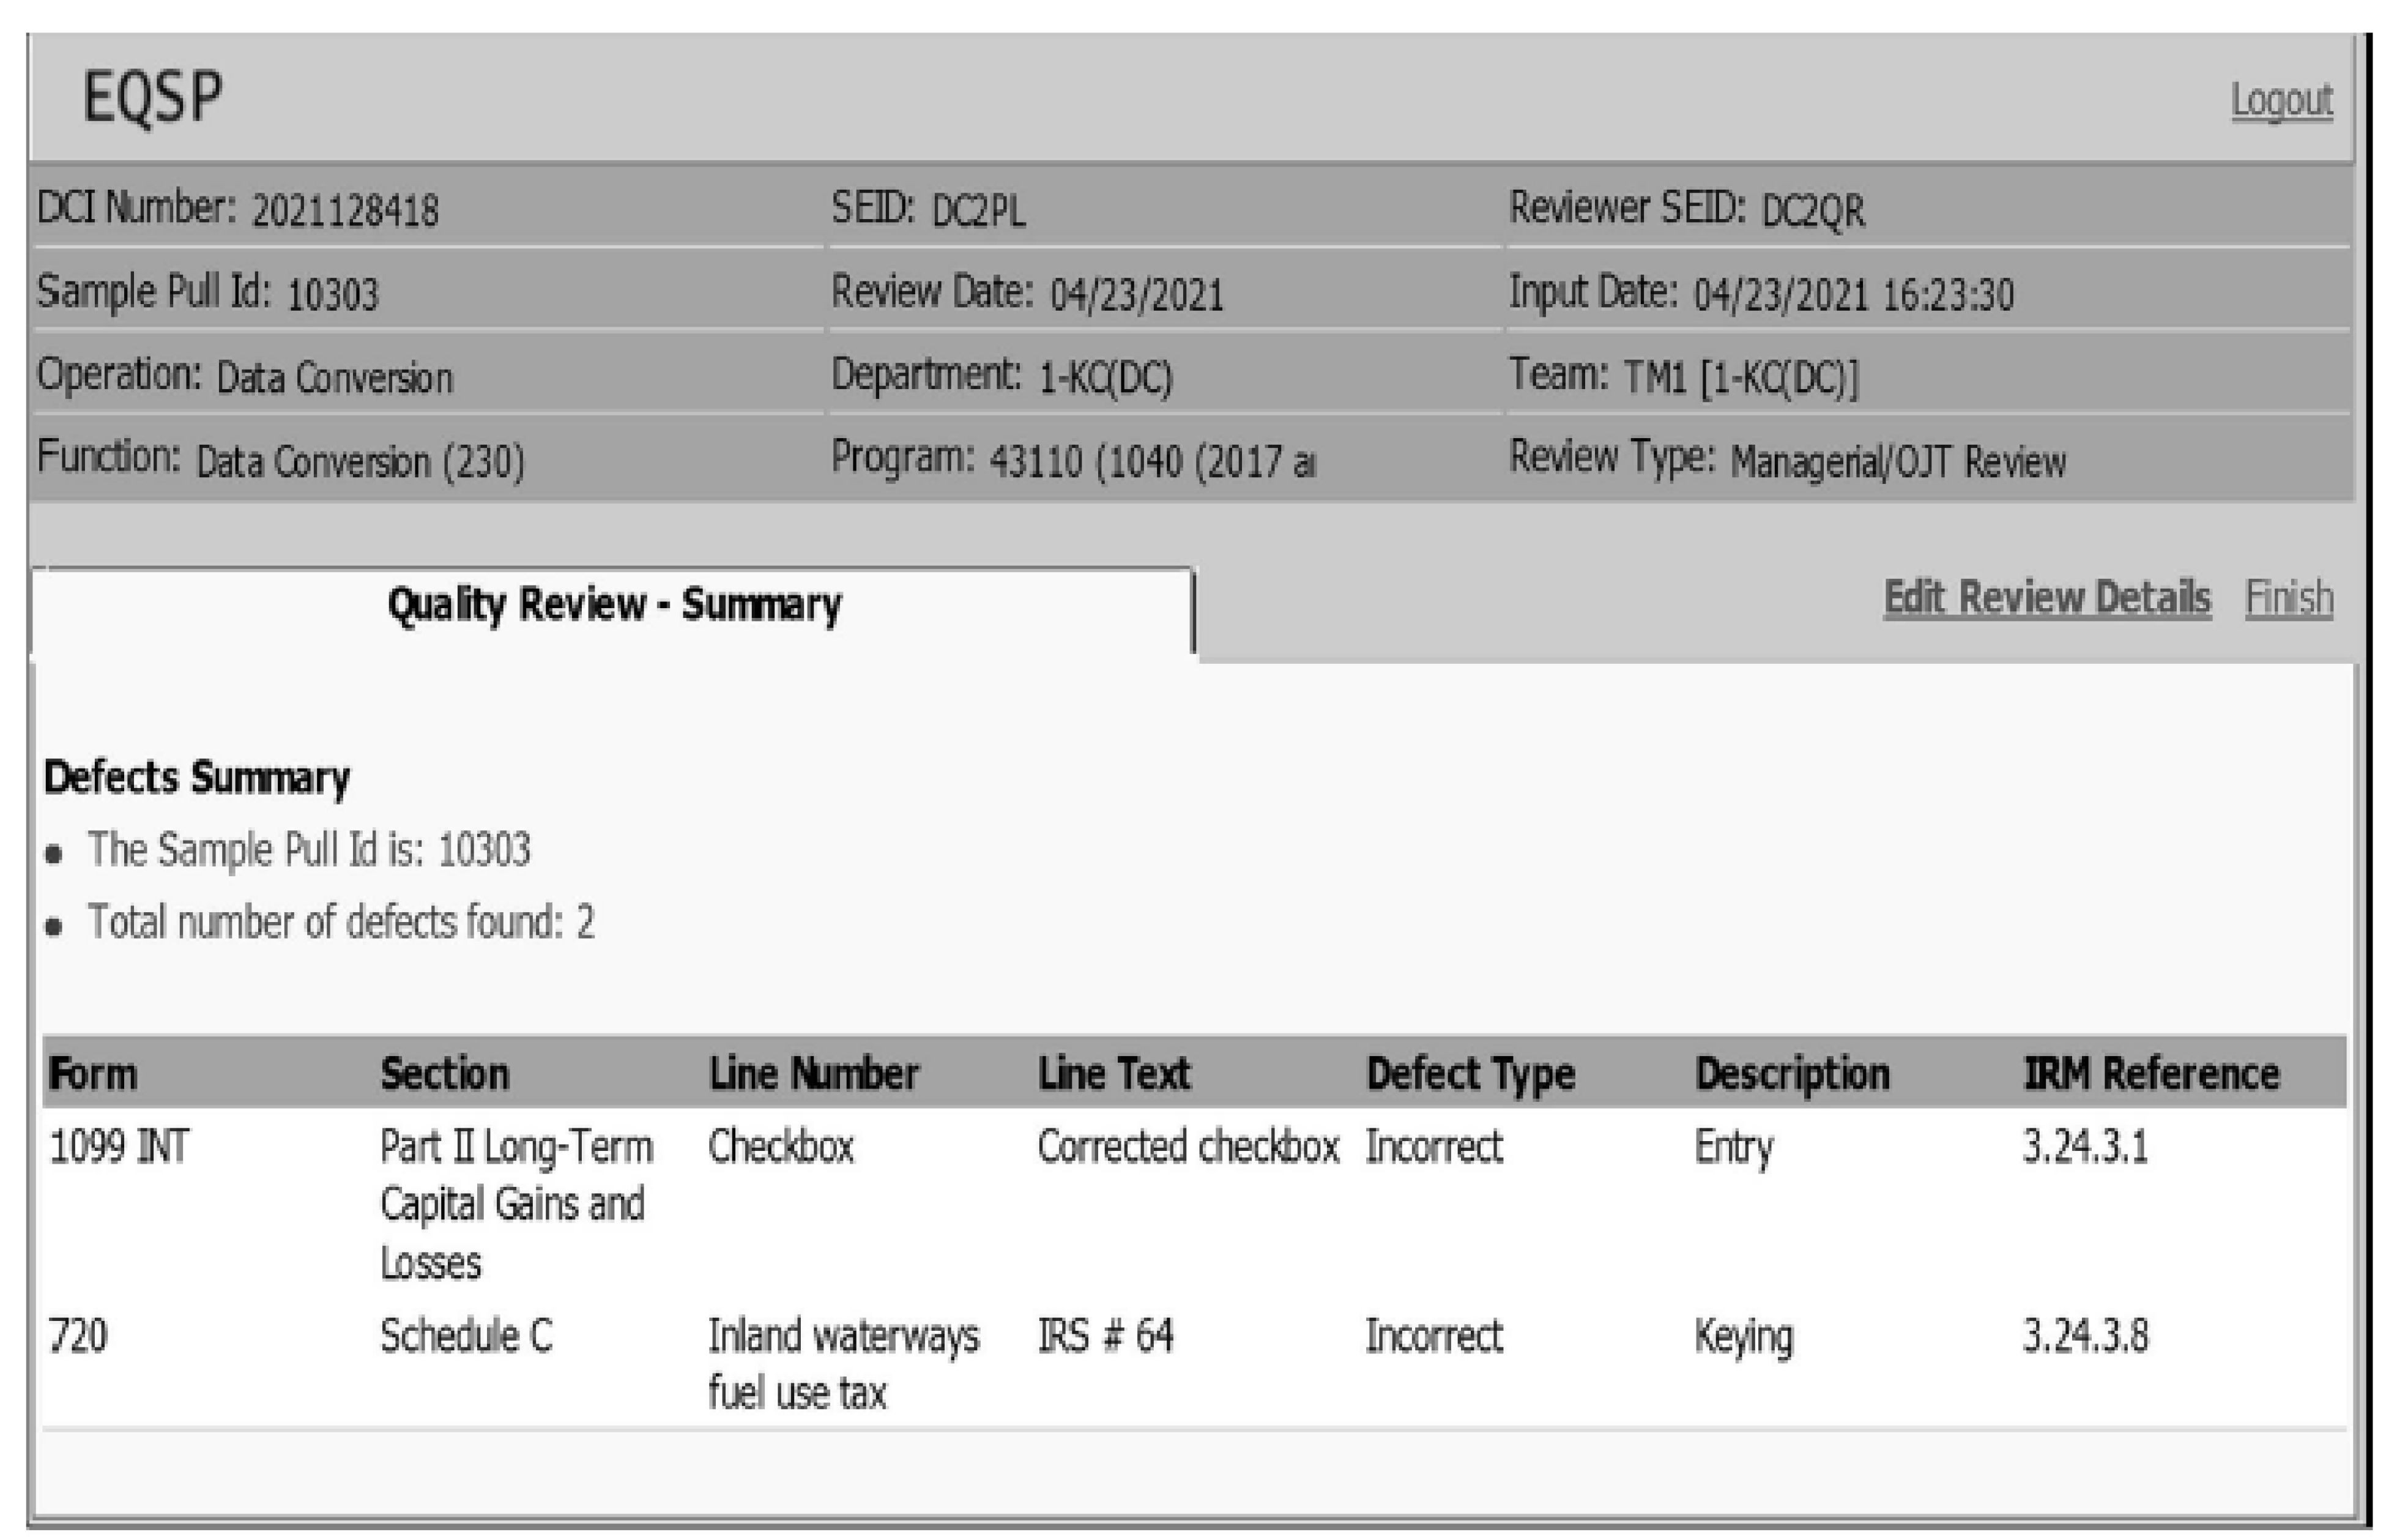
-
To generate the Provide Search Criteria Screen (see Figure 3.30.30-18), go to the Reviewer's Main Menu Screen (see Figure 3.30.30-10) or the Manager Main Menu Screen (see Figure 3.30.30-5) and select the "Search" button.
This screen has buttons; "Search" returns the search criteria entered; "Cancel" returns you to the Main Menu Screen; "Clear" removes the current search criteria entered.
To search for a review, enter or select one or more of the following searchable parameters:
Review Date Range (mmddyy): "From" and "To" date (the "To" date is not required for a single day search).
DCI number
Sample Pull
SEID (of the employee)
Site (computer generated)
Operation
Department
Team
Function
Program(s) (One or more programs may be selected based on the parent Function selected).
Reviewer SEID (limited to Quality Review Manager)
Review Type (Select one or more review types (based on user permissible role restrictions) including: Individual Performance Review, High Quality Work, Team Defect Review, Learning Curve Review, Managerial/OJT Review, or Product Feedback Review)
Status (Select one or more Statuses including: In-progress, completed, deleted, or modified)
Select the Search Button. The Review Search Results displays in a row or rows on the Reviewer's Main Menu Screen. Each row shows a "red X" (delete icon), a "fountain pen" (edit icon), DCI numbers, Review Type, Input Date, Employee's SEID, Sample Pull, Review Date, Reviewer, OFP, and Status.
Note:
If no reviews satisfy search criteria, a message will generate at the bottom of the screen, which states, "No Reviews were found matching your search criteria."
Selecting the "red X" will delete the DCI. See IRM 3.30.30.5, System Profiles (Permissions), to determine which reviews may be deleted.
Selecting the "fountain pen" will allow you to edit the DCI, beginning at the Review Header Screen. See IRM 3.30.30.5, System Profiles (Permissions), to determine which reviews may be edited.
Selecting a column header will sort lists by the selected column. A warning message will generate, if a sorted column header will cause a delay, stating, "Warning! Large list size will cause a long sort delay. Continue?" Select either Continue or Cancel.
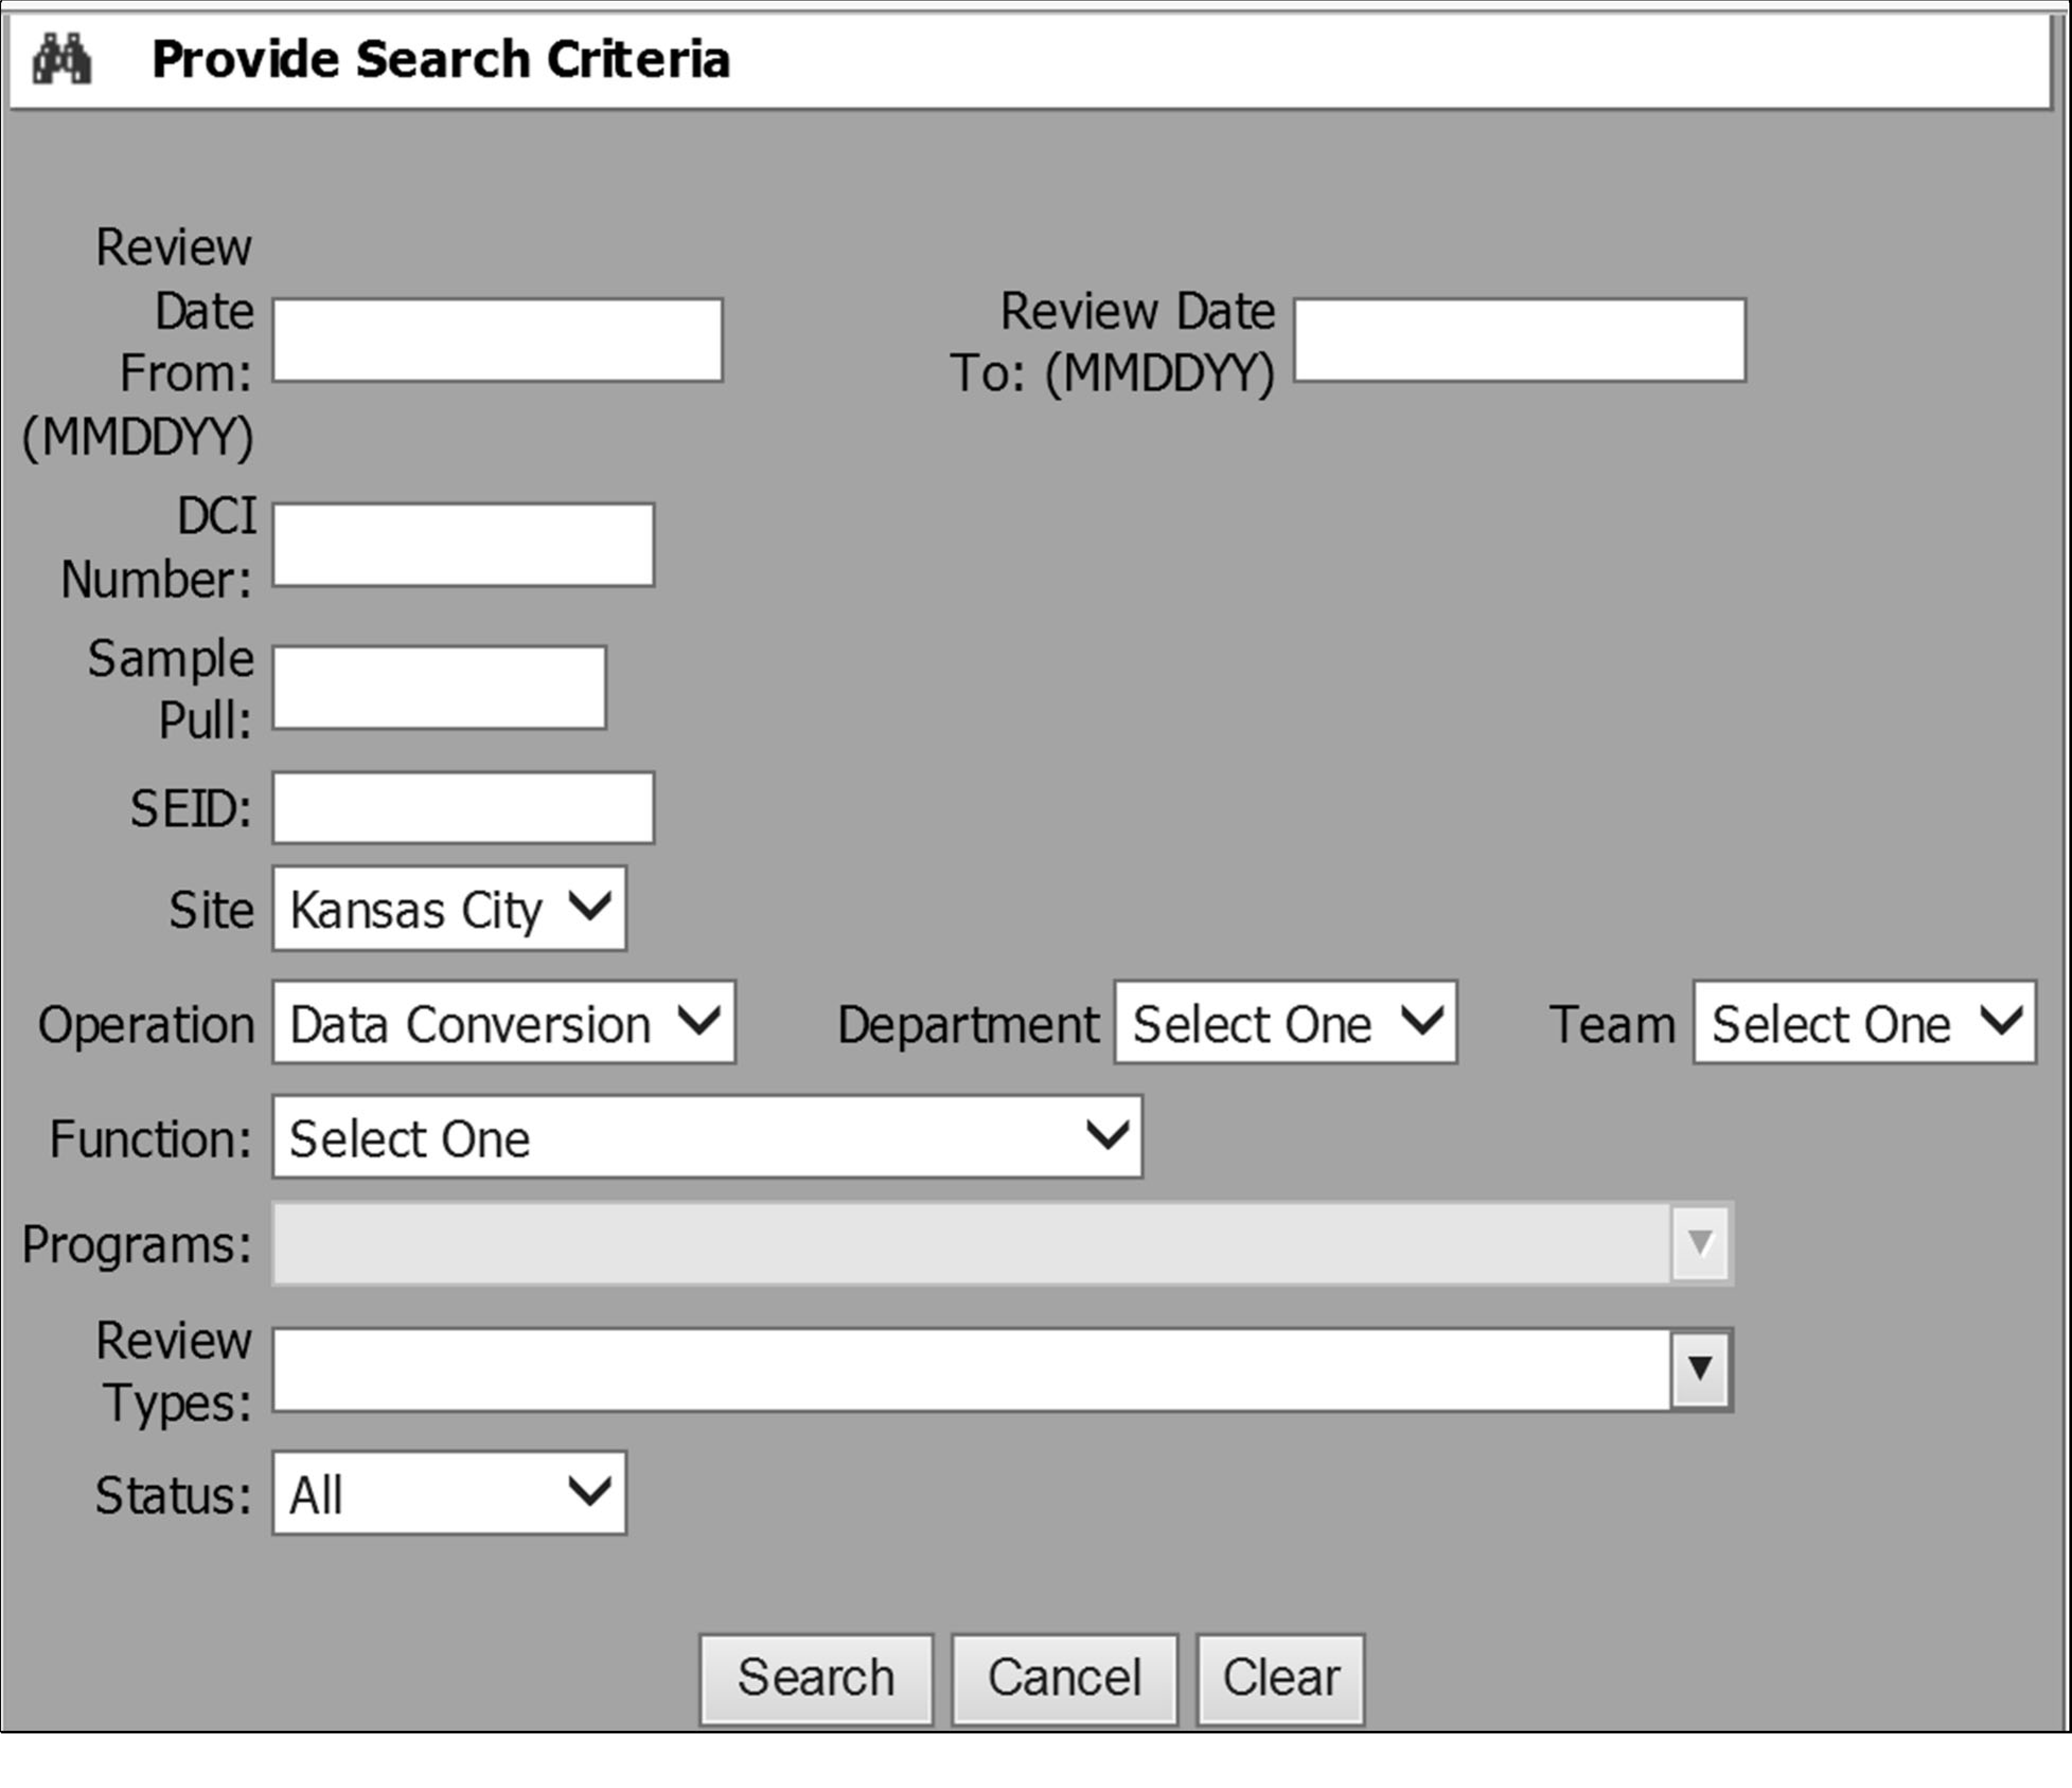
The process of selecting a portion of completed work to be reviewed is called sampling.
Random sampling is the process of selecting a portion of completed work during each week in such a way that all completed work has the same opportunity of being sampled, regardless of when the work is completed; this includes regular time, overtime, comp time, and/or credit hours.
The sample is generally selected by the quality team clerk after the work is released by the employee. Quality reviewers select the sample in limited circumstances, but the reviewer of the work should not select the sample.
The work must include the date it was completed and include at least one employee identification to ensure the employee’s work is correctly identified. Example: Data Conversion Operation samples ISRP work by Entry Operator (EOP). Input Correction Operation samples Notice Review work by employee IDRS number. Some work areas identify an employee’s work by SEID. Seldom is work sampled by the employee’s name.
Similar OFP work is batched together to facilitate sample selection; the work is identified by OFP and usually includes the volume (number of cases or documents in the batch).
Sites may use the Randomizer located on the EQSP SharePoint site (at the bottom of the page), a Table of Random Numbers, or other method to secure a random sample pull from all completed work.
To use the Randomizer:Access Embedded Quality Submission Processing (EQSP) SharePoint site: EQSP SharePoint.
Click on the "Randomizer.org”.
Select "New! Randomizer.org" and "Randomize Now."
Set of Numbers - Generate "1" set of numbers to be used for all employees or generate the number of employees being reviewed to obtain a set of random numbers for each employee.
Numbers Per Set - Enter the number of documents required for the sample pull.
Number Range - Enter the number of documents available in the completed work (the number to be sampled from, always beginning with the number "1" .
Leave the number in a set to remain unique, sort the numbers that are generated, and view your random numbers with "Place Markers Off."
Click "Randomize Now" to obtain the set(s) of unique random numbers requested.
The Individual Quality Review is a process designed to sample an employee’s completed work for the purpose of providing feedback to the employee and providing the basis for evaluation of the employee’s performance on the measured CJE Business Results-Quality.
The Recommended Annual Sample (RAS) is the recommended number of reviews required for each OF a measured employee works during the employee’s annual rating period, regardless of the number of programs worked or the length of the season.
The RAS is 260 documents for each OF per employee. Additional documents can be sampled but the annual sample should remain as close as possible to the RAS. IF the RAS is reached prior to the end of an employee’s rating period, sampling may be decreased, but it must continue.
Valid individual quality review sampling includes random sampling to ensure the sample adequately represents an employee’s actual performance and therefore is taken on a continuous basis (generally weekly) throughout the employee's rating period.
Management provides the Quality Team with a weekly recommended sample size for each employee. The Quality Team pulls the sample based on the sample request.
The recommended weekly sample is four samples for each OF the employee works during the week, pulled across the week. (A sample contains at least one document but there is no limit to the maximum number of documents in a sample.)
Note:
The recommended weekly sample of four samples for each OF the employee works is based on the availability of work completed across the week after Learning Curve is met for the OFP (parent); if the employee does not complete work within the OF at least four days a week, the daily sample is based on only the number of days the employee completed the work within the OF.
A Sampling Report is available in the EQSP system (MEPS Menu). The Sampling Report is created by Team Managers and by Quality Managers and is utilized to monitor and adjust an employee's sample size. The MEPS Sampling Report can be exported to Excel and serves as the weekly sample pull sheet. See IRM 3.43.405 for information on MEPS Sampling Report.
Review results for all documents within a sample are input to EQSP with the same Sample Pull ID and require the same review date.
Note:
The review date should be the date the sample was pulled for review; however, the review date can be the date the quality reviewer begins reviewing the documents sampled.
When quality review results for an OF produces an accuracy rate of 97.0% or higher, the work is considered High Quality Work (HQW) and sampled as High Quality Function (HQF).
HQF is sampled as OF/Product Review rather than Individual Quality Review because it does not require the same degree of sampling as work producing a lower accuracy rate.
HQF is sampled randomly from all work processed within the function on a continuous basis (generally weekly) throughout the quarter.
HQF sampling requirements for an OF for the quarter are:
Review results for High Quality Work samples are entered into EQSP as Employee Review (employee SEID). The EQSP system recognizes the Operation/Function work as HQF and, if the employee has met Learning Curve, only High Quality Review and Managerial Feedback are available review types for the reviewer’s selection.
Random sampling must include any work processed within the function (from all shifts) throughout the week at a minimum of four days per week.
High Quality Function (HQF) review results are input to EQSP as Individual Performance Reviews (employee’s SEID) with the same Sample Pull ID for each document within the sample and must reflect the same review date for each document within the sample.
The EQSP Reports:
Capture specific defect information.
Provide data to assist with SP work process improvement initiatives.
Listed below are ten reports that can be generated using the EQSP Quality Review System:
Single Event Sample Pull Report
Employee Report
Employee (Team) Report
Team Report
Department Report
Operation Report
Site Report
Defect Summary Report
Site/Program Summary Report
Blank DCI Report
From the Reviewers or Manager Main Menu Screen select the "Reports" button. The Report Selection Screen will generate. See Figure 3.30.30-19.
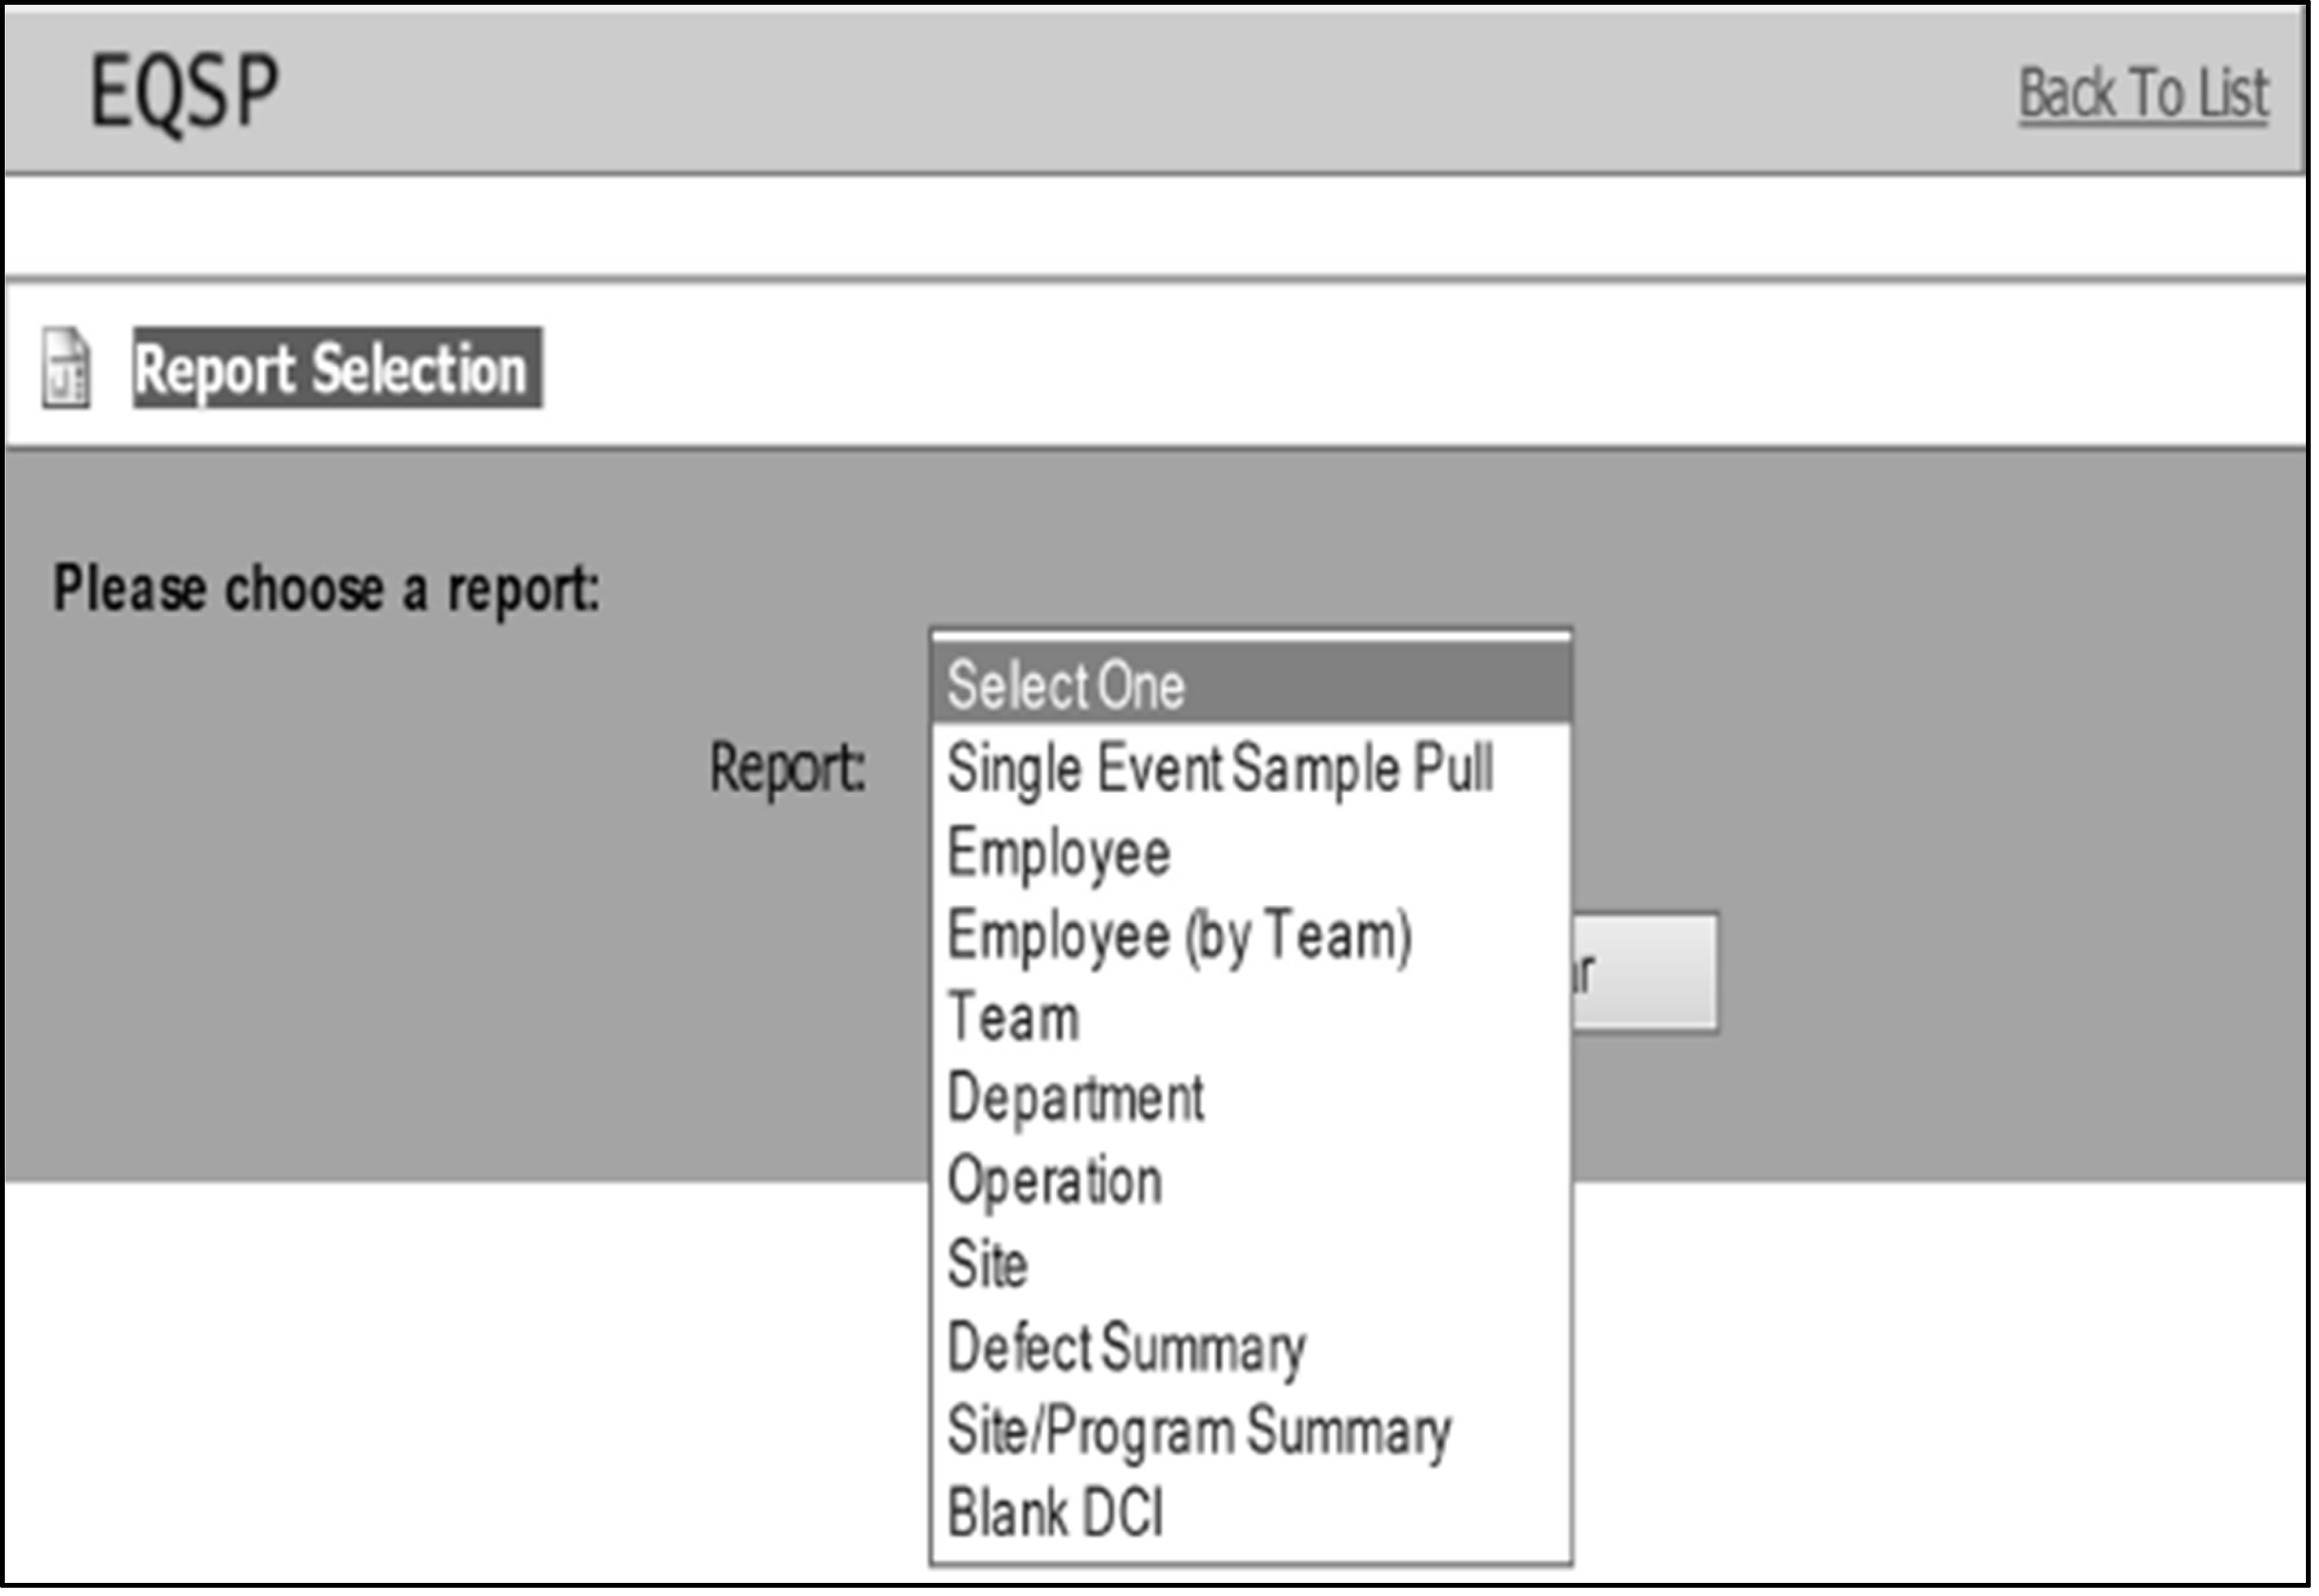
The Single Event Sample Pull provides real-time feedback on an employee's quality performance. See Figure 3.30.30-20.
The Report Header contains details from a single individual sample pull.
The Report Detail contains information for one DCI or multiple DCIs for a single sample. In the event of multiple DCIs, all reviews must be the same Review Type, Operation, Function, and Program.
This report will ONLY generate details for reviews in a "Completed" status.
Team Managers must provide the employees with a copy of the report.
Note:
The quality review team manager must ensure each single Event Sample Pull Report is printed and provided to the team manager for every quality review input to the employee's SEID. The team manager must provide the employee with a copy of the report. This notification serves as a record of all quality reviews completed for each employee as a record of all quality reviews completed for each employee as well as a record of any defect(s) identified. It also provides required written notification when Learning Curve is met for each OFP (parent).
Reminder:
Manager must keep an employee initialed and dated copy of a Single Event Sample Pull Reports for any Individual Performance Review type indicating the sample is the Last Learning Curve Review and Single Event Sample Pull Reports with defect(s) identified.
Review errors and provide specific suggestions for improvement.
Identify training needs.
The table below describes each item shown on the Single Event Sample Pull.
Number Item Explanation 1 Sample Pull System generated number used as sample identifier. 2 Employee SEID SEID of employee reviewed. 3 Team Employee's team. 4 Total DCIs in Sample Number of DCIs within the Sample Pull. 5 Total Defective DCIs Total number of defective documents in the sample. 6 Review Date The calendar date the review was performed. 7 Review Type The type of review (Individual Performance, High Quality, Team Defects, Learning Curve, or Managerial/OJT) performed. 8 Report Run date The calendar date the report was generated. 9 Employee Initials Placeholder for employee's initials (proof of receipt). 10 Date Placeholder for the date the employee received feedback. 11 DCI Details Summary of the review sampled. 12 OFP Operation, Function, and Program details of the DCI. 13 Defect Count Total number of defects from each individual review within the sample. 14 Defect Details Summary of review results for each individual ID number within the sample(indicates "0" on defect free review). 15 DCI Number System generated number for the Individual review within the sample and the related (Form/Program). 16 Form The name of the form/type where a defect occurred. 17 Section The name of the section where a defect occurred. (Blank on defect free DCIs). 18 Location The name of the location where a defect occurred. (Blank on defect free DCIs). 19 Opportunity The name of the opportunity where the defect occurred. (Blank on defect free DCIs). 20 Defect Type A description of how the opportunity was defective. (Blank on defect free DCIs). 21 Defect Description A description of why the opportunity was defective. (Blank on defect free DCIs). 22 Defect Count Total number of occurrences for the defect identified. 23 IRM Reference The IRM tridoc supporting the defect identified (The field will be blank if the reference is not input for the defect on the Quality Review Details screen and for defect free DCIs).
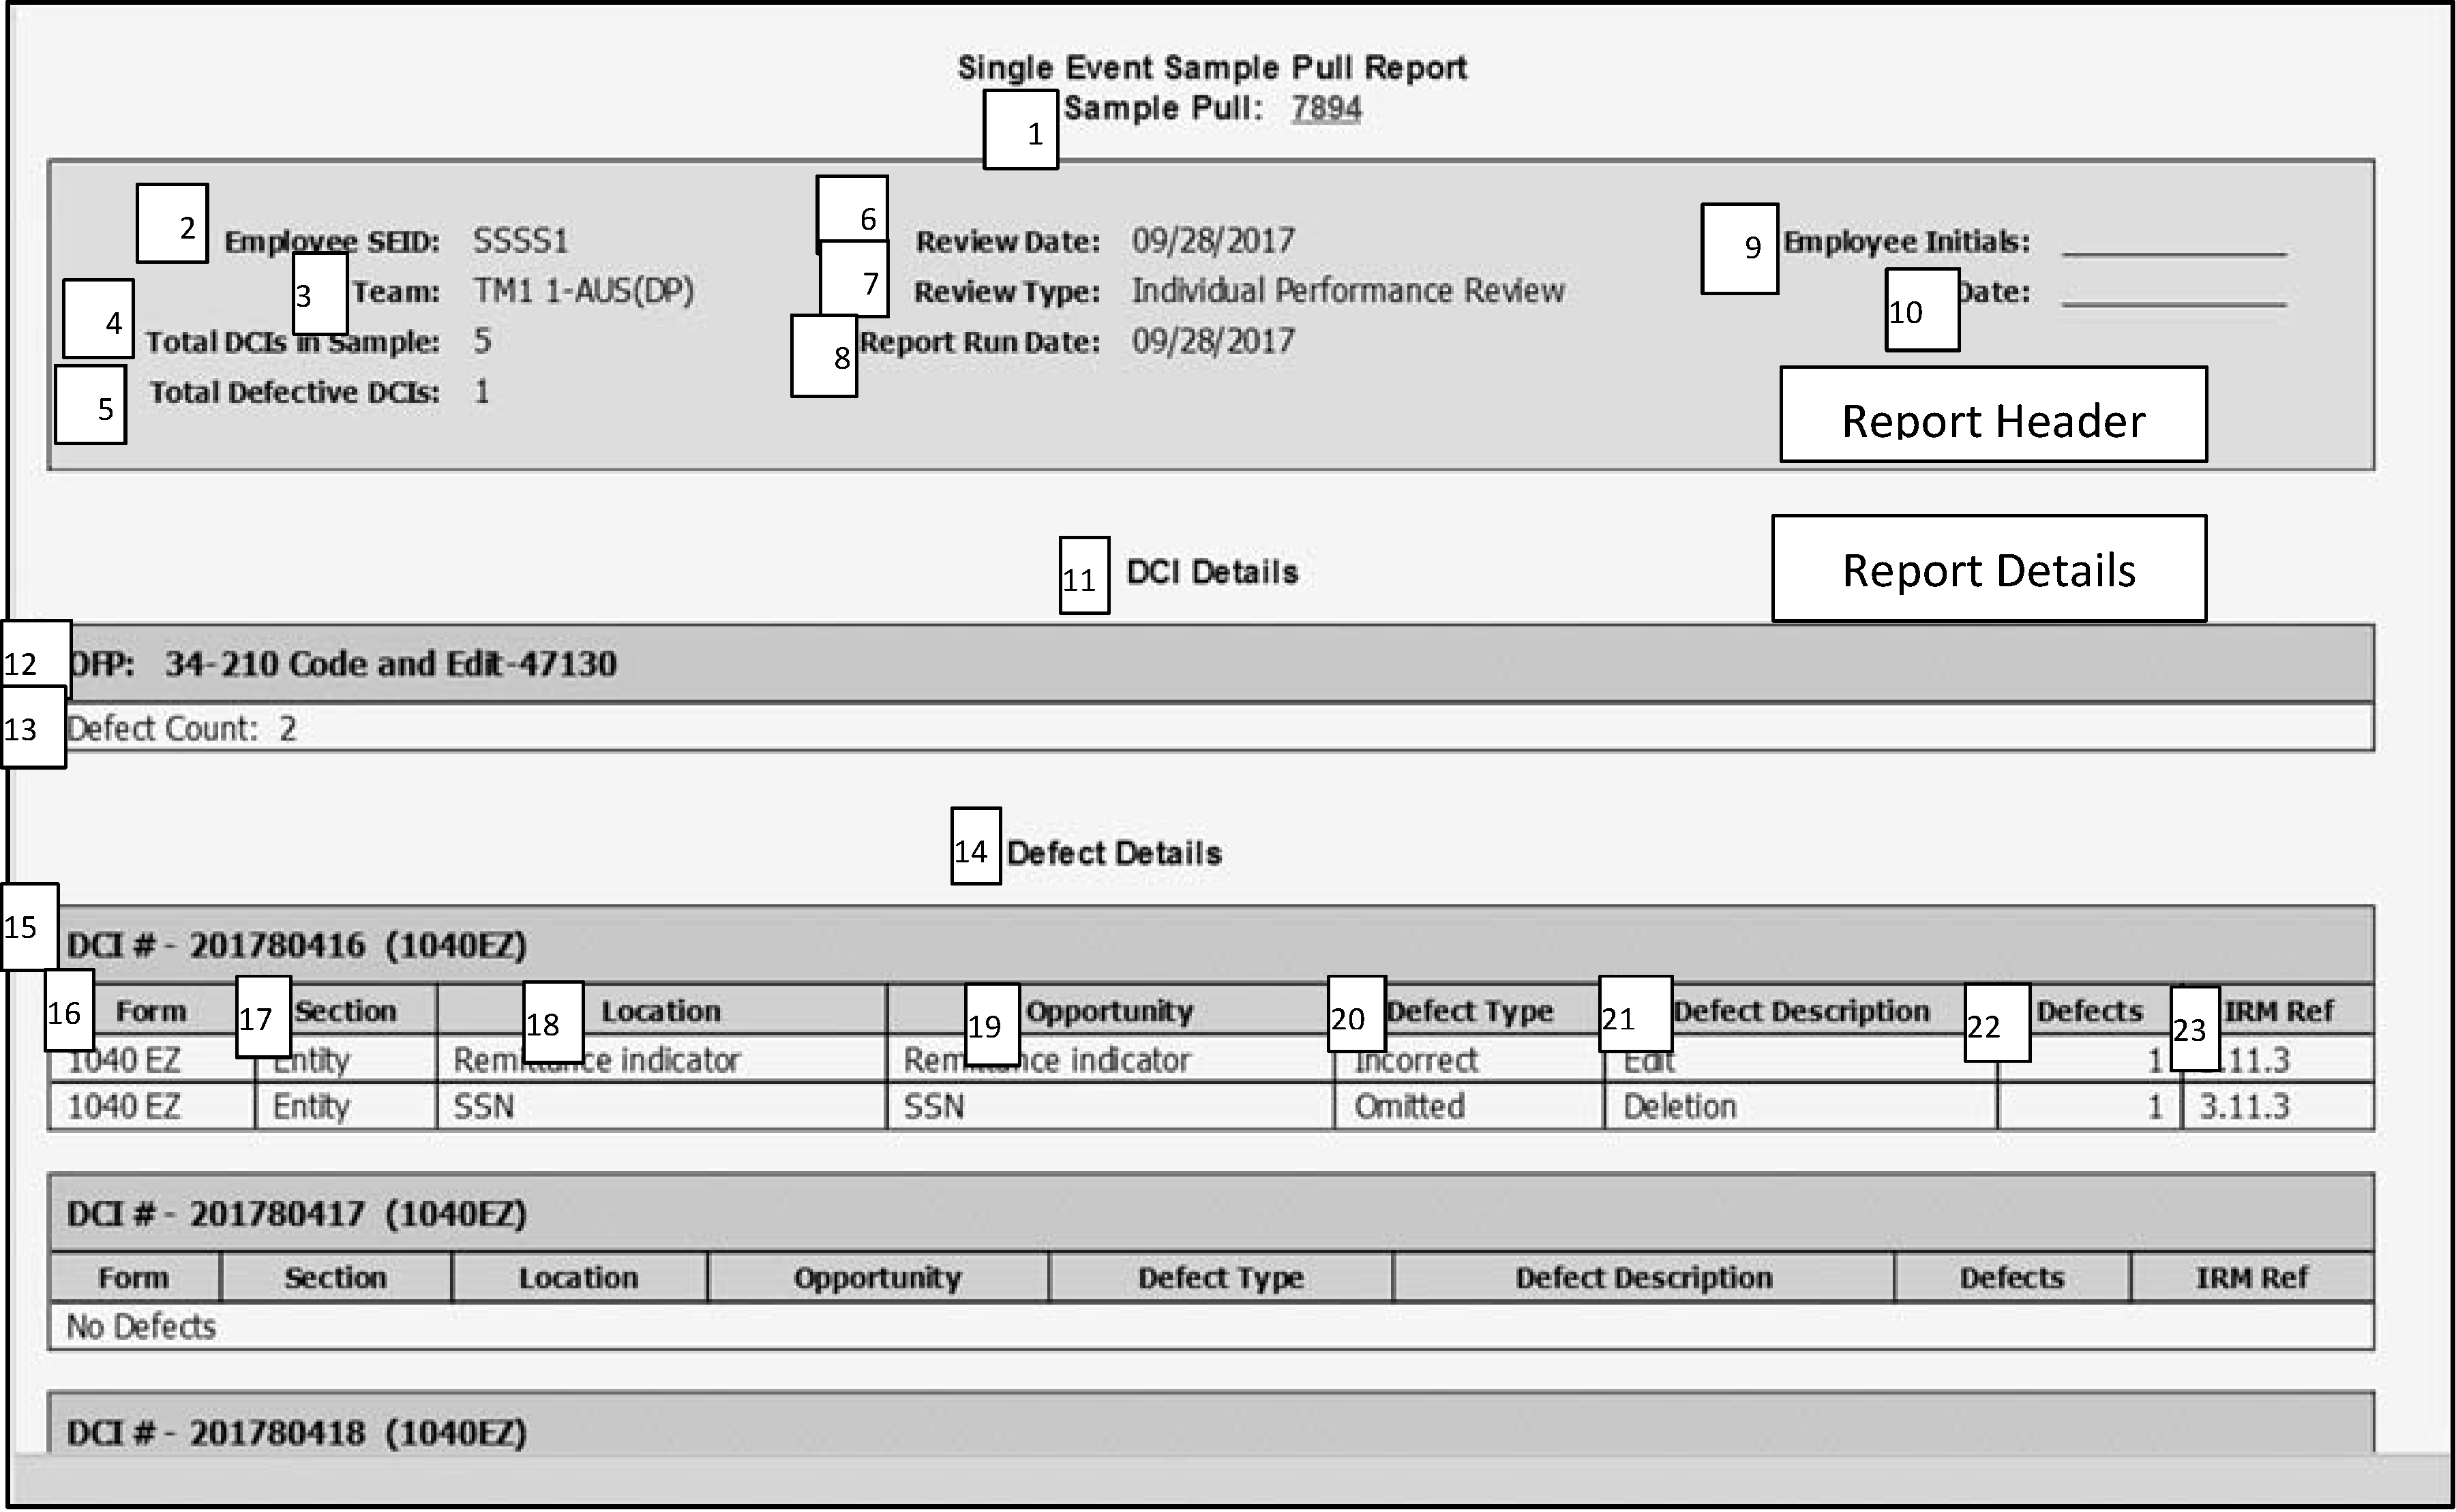
The Employee Report provides individual employee quality data for a specific time period, defined by the date parameters input on the Reports Selection Screen. It displays quality performance and feedback by all review types and OFP combinations. See Figure 3.30.30-21.
The Report Header contains details, by Review Type.
The Report Detail contains the summary information. All employee quality data is stratified by Review Type and OFP. All reviews with the same Review Type and OFP combination within the defined time period will be summarized.
This report will ONLY generate details for reviews in a "Completed" status.
Managers and/or Leads may share this report with the employees:
Review what was done correctly.
Review errors and provide specific suggestions for improvement.
Identify coaching opportunities.
Identify training needs.
The table below describes each item shown in the Employee Report.
Number Item Explanation 1 Period Covered The "to" and "from" dates used in the parameter selection. 2 Run Date The calendar date the report was generated. 3 Name Name of employee reviewed. 4 Employee SEID SEID of employee reviewed. 5 Grade The employee's grade. 6 Team Employee's team 7 Review Type The type of review (Individual Performance, High Quality, Team Defects, Learning Curve, or Managerial/OJT) performed. 8 DCIs Total DCIs for each review type. 9 Def DCIs Total defective DCIs for each review type. 10 Accuracy Calculated accuracy 11 OFP Operation, Function, Program and related form details. 12 Review Type Identifies review type related to the review details being displayed. 13 Sample Pull Count Number of samples included in the review type for the related OFP 14 Total DCIs Number of DCIs included in the review type for the related OFP. 15 Total DCIs Defect Type Number of defective DCIs included in the review type for the related OFP. 16 Form The name of the form/type where a defect occurred. 17 Section The name of the section where a defect occurred. 18 Location The name of the location where a defect occurred. 19 Opportunity The name of the opportunity where the defect occurred. 20 Defect Type A description of how the opportunity was defective. 21 Defect Description The descriptive of why the opportunity was defective. 22 Total Defects Total number of occurrences for the defect identified. Note:
A team manager may choose the "Employee (Team)" option on the Reports Selection screen to produce an "Employee Report (Cumulative)" for each individual in the team. This feature allows a team manager to input the report parameters one time, and each individual team member should be on their own page(s) when the "print" option is selected.
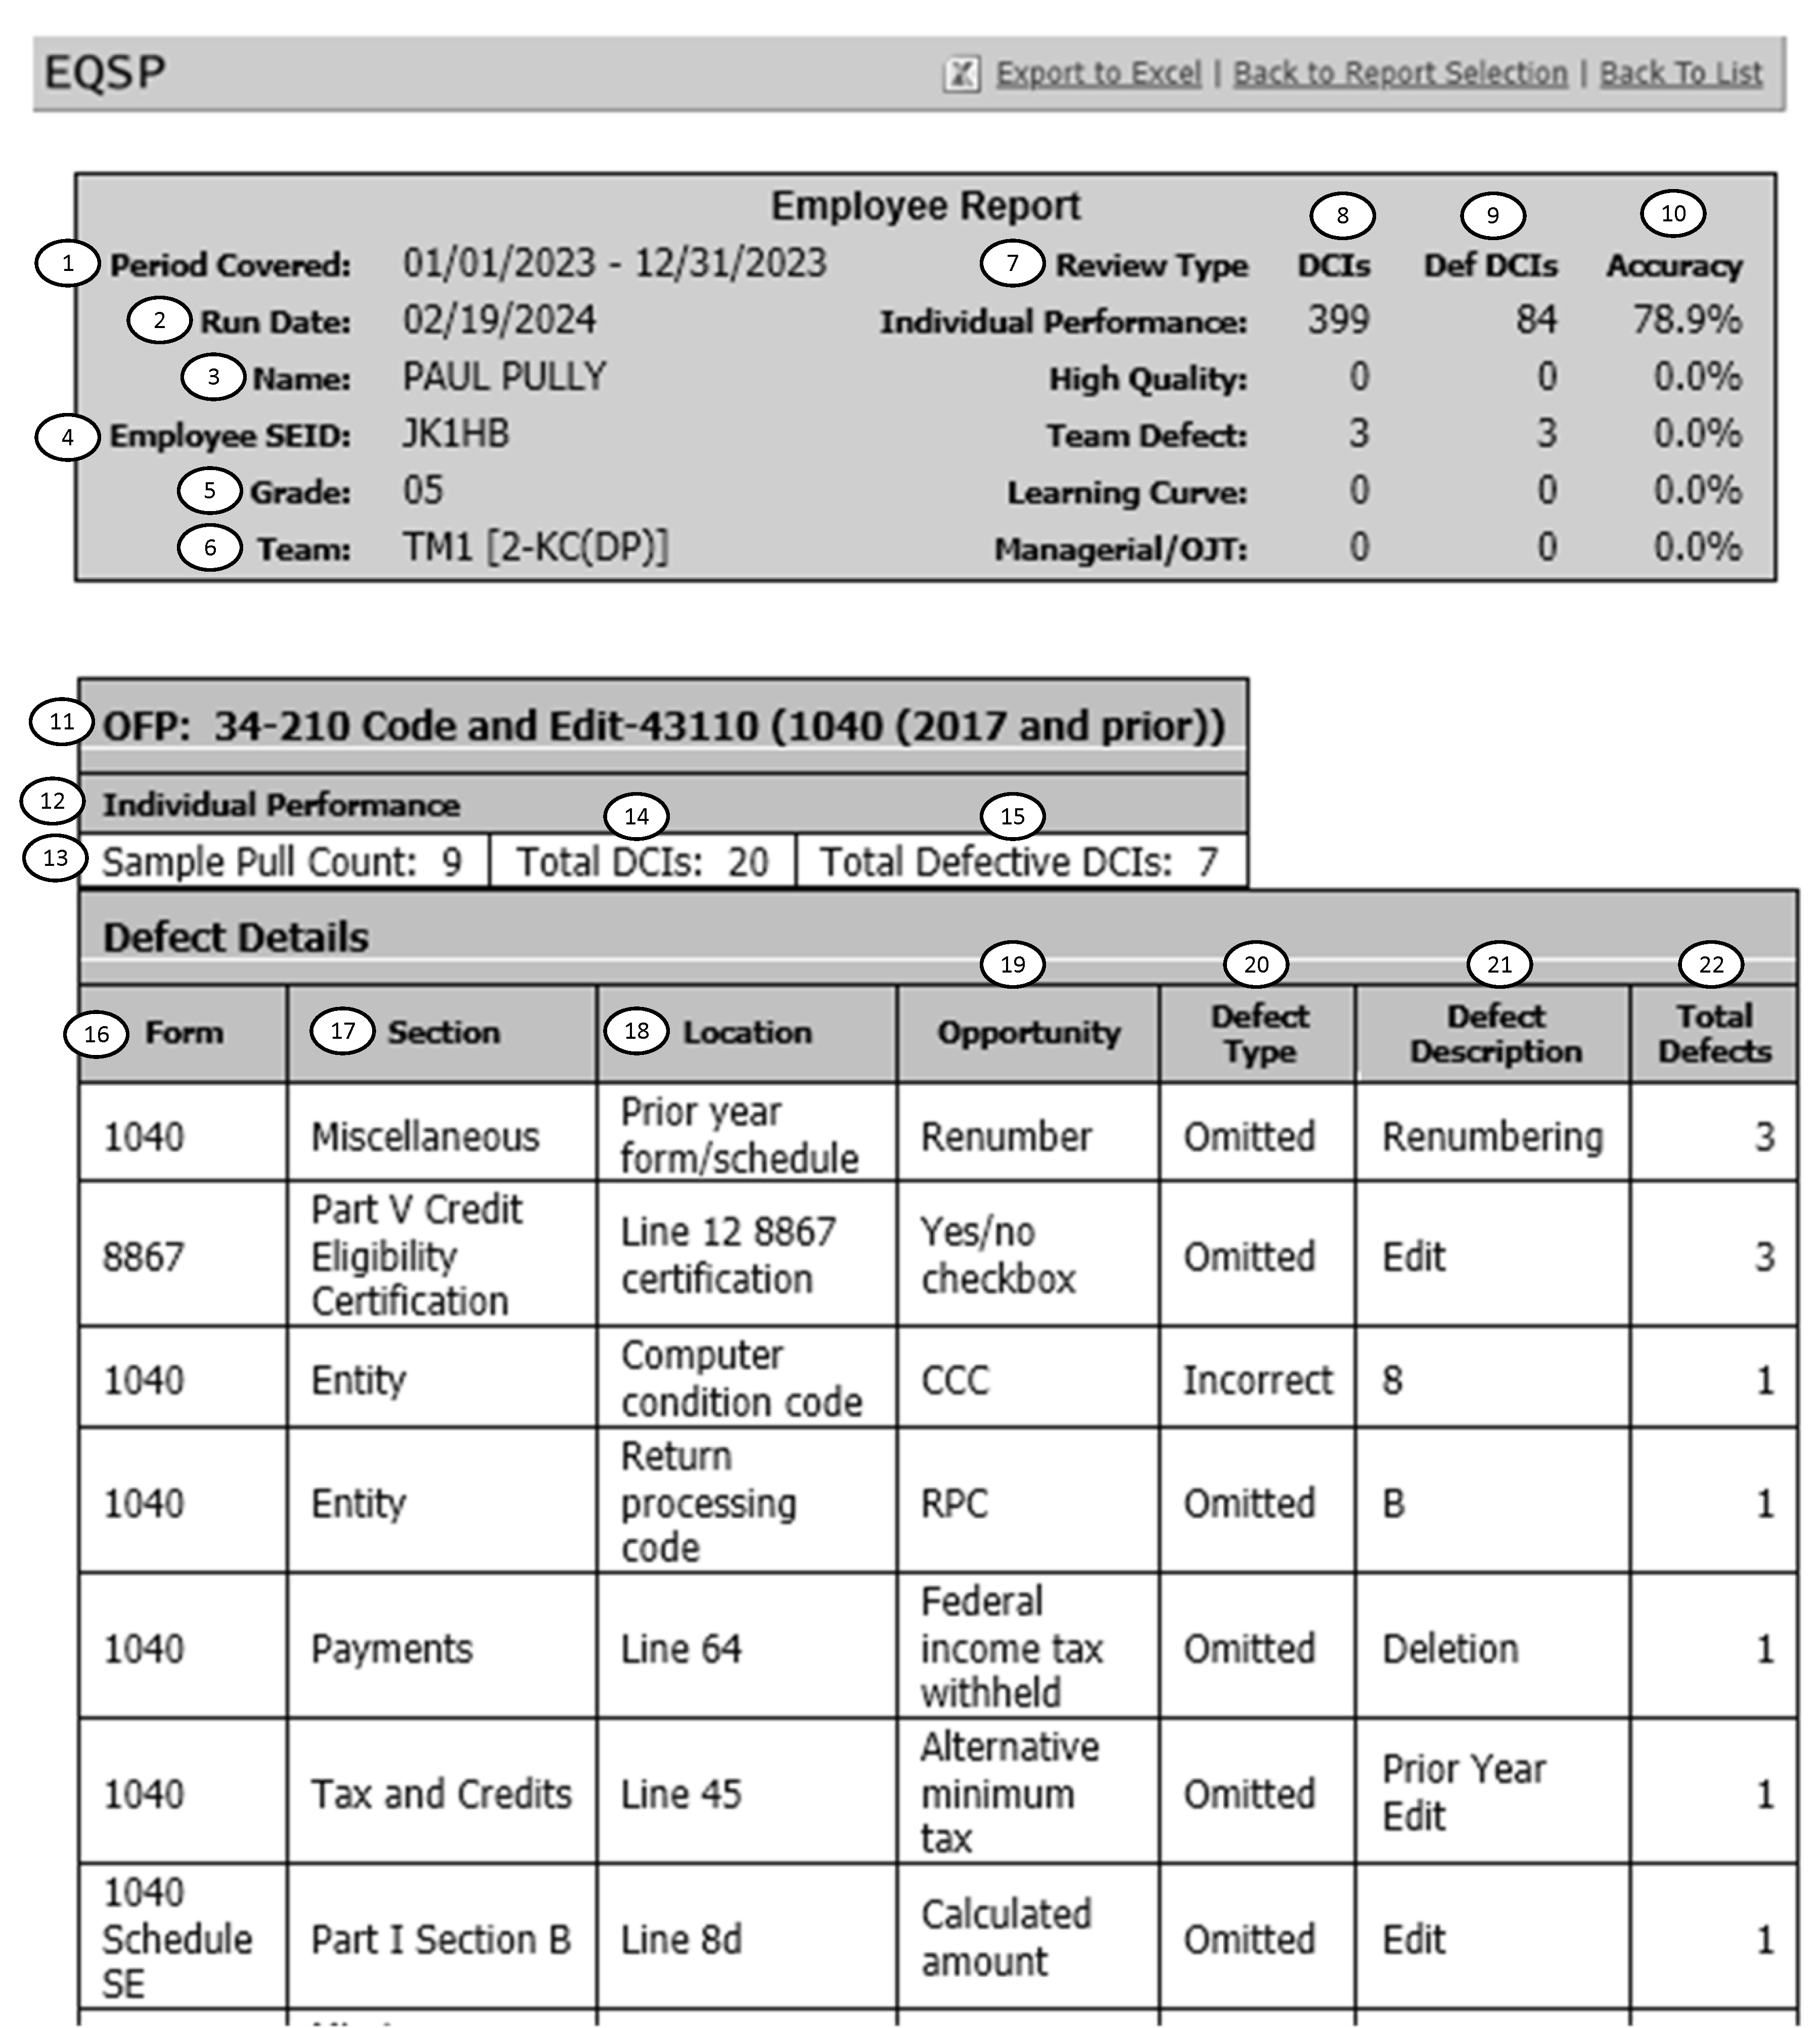
The Team Report provides quality data for a defined period of time. The Report displays quality performance and feedback by all review types and OFP combinations within the designated period of time. See Figure 3.30.30- 22.
The Report Header contains details of a single team (as defined by the date parameters on the Reports Screen). Details on all reviews are provided by Review Type for a single team.
The Report Detail contains a single team’s summary information. All quality data is stratified by the employees who belong to the team. All Review Types are aggregated in the employee details.
This report will ONLY generate details for reviews in a "Completed" status.
This report contains performance information for all employees on the team. The manager and/or lead should use this report to:
Identify Best Practices for leveraging to other teams.
Review the team’s performance.
Identify points for process improvement.
-
The table below explains each item shown on the Team Report.
Number Item Explanation 1 Period Covered The "to" and "from" dates used in the parameter selection. 2 Run Date The calendar date the report was generated. 3 Operation The name of the Operation selected by the end user. 4 Department The name of the Department selected by the end user. 5 Team The name of the Team selected by the end user. 6 Function The name of the Function selected by the end user. 7 DCIs Total DCIs for each review type. 8 Total Defective DCIs Total defective DCIs for each review type. 9 Review Type The type of review (Individual Performance, High Quality, Team Defects, Learning Curve, or Managerial/OJT) performed 10 DCIs Total DCIs included in "Accuracy" calculation. 11 Defective DCIs The total number of defective documents in the sample. 12 Accuracy Calculated accuracy 13 Total Cumulative total of DCIs and defective DCIs 14 Accuracy Calculated Accuracy 15 "*" Identifies specific review types used in "Accuracy" 16 Top five Defects The summary of the Team's top five defects. 17 Form The name of the form/type where a defect occurred. 18 Section The name of the section where a defect occurred. 19 Location The name of the location where a defect occurred. 20 Opportunity The name of the opportunity where a defect occurred. 21 Defect Type A description of how the opportunity was defective. 22 Defect Description A description of why the opportunity was defective. 23 Defect Count The number of occurrences for the defect identified. 24 Managerial Summaries Review information associated with Managerial/OJT review type will be displayed following the same format as Employee Summaries 25 Employee Name/SEID Name and SEID of employee reviewed. 26 Total DCIs Total DCIs from all review types with the exception of Managerial /OJT. 27 Total Defective DCIs Total DCIs with defects from all Review Types with the exception of Managerial/OJT. 28 Total Defects Total defects pertaining to the employee and OFP combination identified.
The Department Report provides departmental quality data for a specific time period defined in the date parameters on the Reports Screen. The Report displays quality performance by all Review Types and OFP combinations within the designated period of time. See Figure 3.30.30-23.
The Report Header contains details from a single department. Details on all reviews are provided by Review Type for the selected department.
The Report Detail contains a department’s summary information for Individual Performance, High Quality, and Team Defect Review Types only. All quality data is stratified by the teams in the department.
This report will ONLY generate details for Individual Performance, High Quality, and Team Defect Reviews in a "Completed" status.
This report should be used to:
Identify Best Practices for leveraging to other areas.
Review the department’s performance.
Identify points for process improvement.
The table below explains each item shown in the Department Report.
Number Item Explanation 1 Period Covered The "to" and "from" dates used in the parameter selection. 2 Run Date The calendar date the report was generated. 3 Operation The name of the Operation from the end user selection. 4 Department The name of the Department from the end user selection. 5 Function The name of the Function from the end user selection. 6 DCIs The total number of DCIs for a given review type within the date parameters. 7 Def DCIs The total number of defective DCIs for a given review type within the date parameters. 8 Review Type The type of review. (Individual Performance, High Quality, Team Defects, Learning Curve, or Managerial/OJT) performed. 9 DCIs Total DCIs included in "Accuracy" calculation. 10 Defective DCIs The total number of defective documents in the sample. 11 Accuracy Calculated accuracy 12 Total Cumulative total of DCI’s and defective DCI’s 13 Accuracy Calculated accuracy 14 "*" Identifies specific review types used in "Accuracy" . 15 Top five Defects The name of the form/type where a defect occurred. Summary of the Department's Top five defects. 16 Team Summaries Summary of each team in the Department. 17 Team Name Indicates that summary information is going to be provided for the identified team and then further defined by the OFPs that were worked in that team for the time period parameter selected. 18 Team Name Identifies the team summary information pertains to. 19 Total DCIs Cumulative DCIs pertaining to the team identified. 20 Total Defective DCIs Cumulative defect DCIs pertaining to the team identified. 21 Total Defects Cumulative defects pertaining to the team identified. 22 Team/OFP Identifies the "team" and "OFP" following summary information pertains to. 23 Total DCIs DCIs pertaining to the team and OFP combination identified. 24 Total Defective DCIs Defect DCIs pertaining to the team and OFP combination identified. 25 Total Defects Defects pertaining to the team and OFP combination identified. 26 Top five Defects Reflects the top five defects pertaining to the team and OFP combination identified.
The Operation Report provides operational quality data for a specific period of time. The Report displays quality performance by all review types and OFP combinations. See Figure 3.30.30-24.
The Report Header contains details from a single operation for a specific time period (as defined in the date parameters utilized on the Reports Screen). Details on all reviews are provided by Review Type for the selected operation.
The Report Detail contains a single operation’s summary information. All quality data is stratified by the departments belonging to the operation (as defined in the Operation parameter in the Report screen). ONLY Individual Performance Review, High Quality and Team Defect Types are included in the defect details.
This report will ONLY generate details for Individual Performance, High Quality, and Team Defect Reviews in a "Completed" status.
This report should be used to:
Identify Best Practices for leveraging to other areas.
Review the operation’s performance.
Identify points for process improvement.
The table below explains each item shown on the Operation Report.
Number Item Explanation 1 Period Covered The "to" and "from" dates used in the parameter selection. 2 Run Date The calendar date the report was generated. 3 Operation The name of the Operation from the end user selection. 4 Function The name of the Function from the end user selection. 5 DCI Number of DCIs in the Sample Pull. 6 Total Def DCIs The total number of defective opportunities from all DCIs in the sample. 7 Review Type The type of review. (Individual Performance, High Quality, Team Defects, Learning Curve, or Managerial/OJT) performed. 8 DCIs The calendar date the report was generated. 9 Def DCIs Total defect DCIs included in "Accuracy" calculation. 10 Accuracy Calculated Accuracy 11 Total Cumulative total of DCI’s and defective DCI’s. 12 Accuracy Calculated Accuracy 13 "*" Identifies specific review types used in "Accuracy" . 14 Top five Defects Reflects the cumulative top five defects related to the team. 15 Department Summaries Summary of each department in the Operation. 16 Department Name Indicates that summary information is going to be provided for the identified department and then further defined by the OFP’s worked in that department for the specified time period. 17 Department Name Identifies the department summary information pertains to. 18 Total DCIs Cumulative DCIs pertaining to the department identified. 19 Total Defective DCIs Cumulative defect DCIs pertaining to the department identified. 20 Total Defects Cumulative defects pertaining to the department identified. 21 Department and OFP Identifies the "department" and" OFP" the following summary information pertains to. 22 Total DCIs DCIs pertaining to the department and OFP combination identified. 23 Total Defective DCIs Defect DCIs pertaining to the department and OFP combination identified. 24 Total Defects Defects pertaining to the department and OFP combination identified. 25 Top five Defects Reflects the top five defects pertaining to the department and OFP combination identified. Note: Follows the same format as all other "Top five Defects" areas.
The Site Report provides operational quality data for a specific time period. The Report displays quality performance by all review types and OFP combinations. See Figure 3.30.30- 25.
The Report Header contains details from a single site over a given period of time (as defined in the date parameters in the Reports screen). Details on all reviews are provided by Review Type for the selected site.
The Report Detail contains a single site’s summary information. All quality data is stratified by the operations that belong to the site. ONLY Individual Performance, High Quality, and Team Defect review types are included in the defect details.
This report will ONLY generate details for Individual Performance, High Quality, and Team Defect Reviews in a "Completed" status.
This report should be used to:
Identify Best Practices for leveraging to other areas.
Review the site’s performance.
Identify points for process improvement.
The table below explains each item shown on the Site Report.
Number Item Explanation 1 Period Covered The "to" and "from" dates used in the parameter selection. 2 Run Date The calendar date the report was generated. 3 Site The name of the Site from the end user selection. 4 Function The name of the Site from the end user selection. 5 DCIs Number of DCIs in the Sample Pull. 6 Def DCIs The total number of defective opportunities from all DCIs in the sample. 7 Review Type The type of review. (Individual Performance, High Quality, Team Defects, Learning Curve, or Managerial/OJT) performed. 8 DCIs The calendar date the report was generated. 9 Defective DCIs Total defect DCIs included in "Accuracy" calculation. 10 Accuracy Calculated accuracy 11 Total Cumulative total of DCI’s and defective DCI’s 12 Accuracy Calculated accuracy 13 "*" Identifies specific review types used in "Accuracy" . 14 Operation/OFP Identifies the "operation" and "OFP" following summary information pertains to. 15 Operation Name Identifies the operation summary information pertains to. 16 Total DCIs Cumulative DCIs pertaining to the operation identified. 17 Total Defective DCIs Cumulative defective DCIs pertaining to the operation identified. 18 Total Defects Cumulative defects pertaining to the operation identified. 19 Top three Defects Reflects the top three defects pertaining to the operation identified.
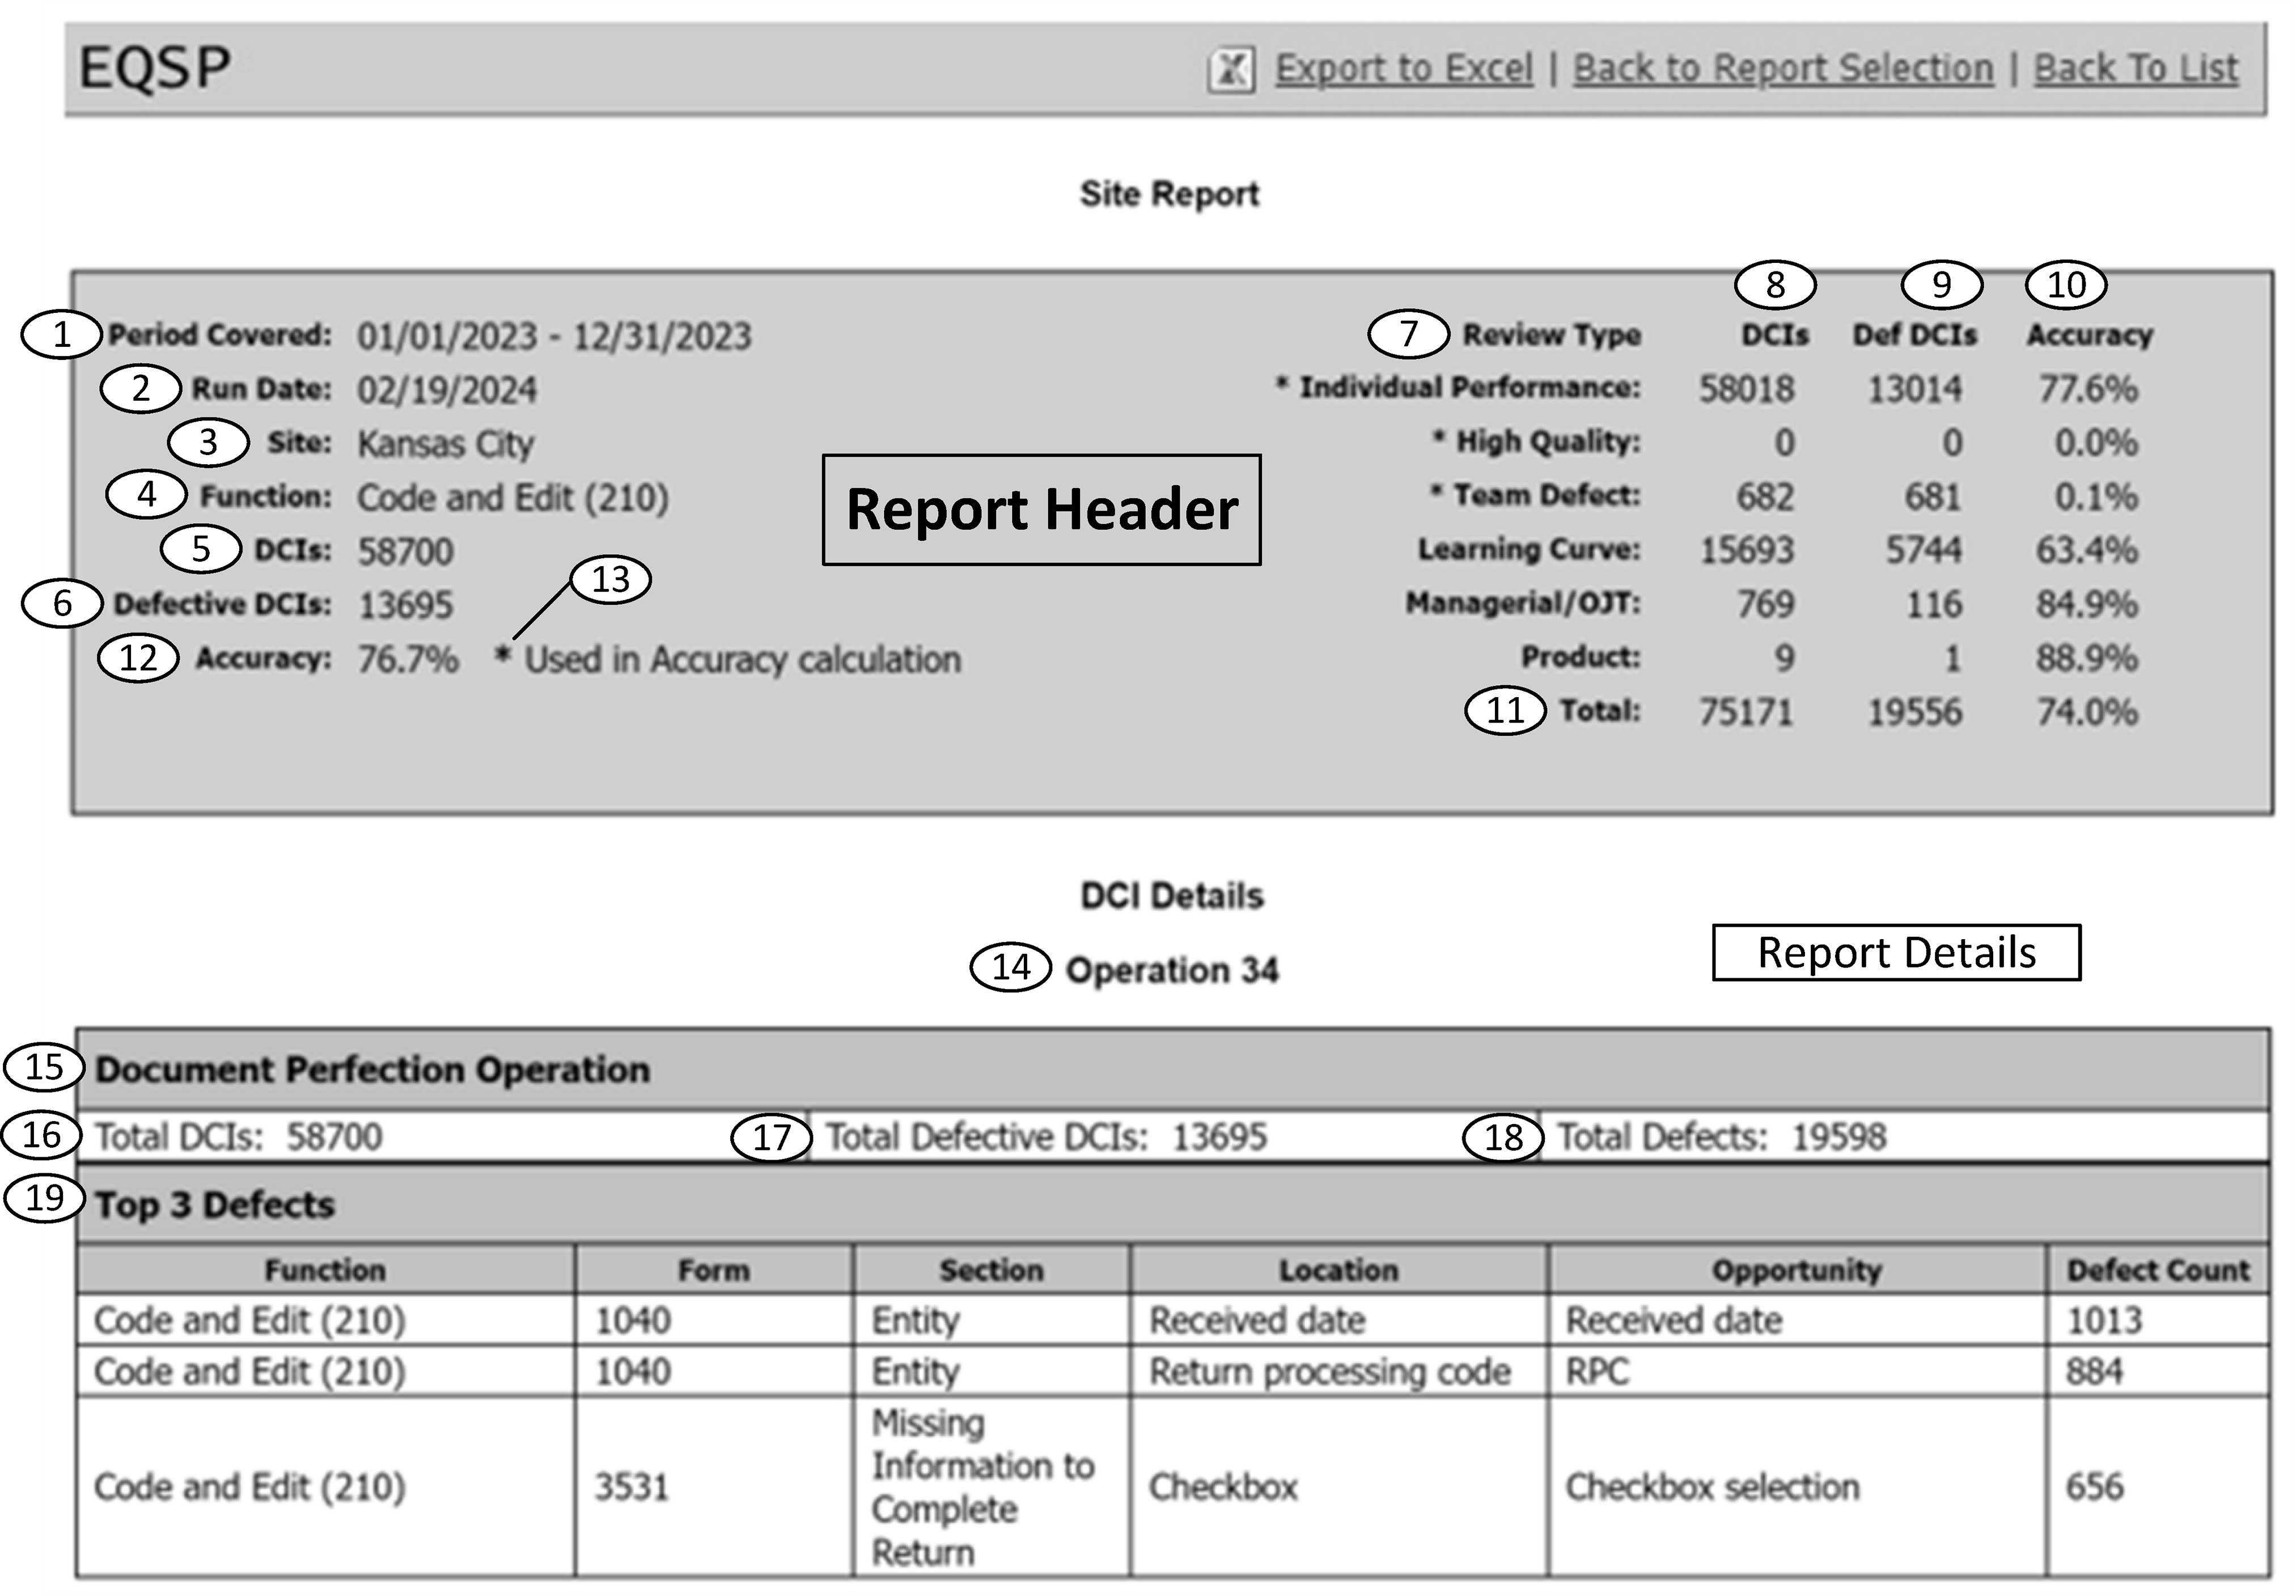
The EQSP Defect Summary Report provides functional quality data for a defined period of time. The Report displays functional quality performance by all review types and OFP combinations within the designated period of time. See Figure 3.30.30-26.
The Report Header contains the period of time (as defined in the date parameters in the Reports screen).
The Report Detail contains all of Submission Processing’s Defect summary information. All quality data is stratified by function. Only Individual Performance, High Quality, and Team Defect Review types are included in the defect details.
This report will ONLY generate details for Individual Performance, High Quality, and Team Defect Reviews in a "Completed" status.
This report should be used to:
Identify Best Practices for leveraging to other areas.
Review the site’s performance.
Identify points for process improvement.
The table below explains each item shown on the EQSP Defect Summary Report.
Number Item Explanation 1 Period Covered The "to" and "from" dates used in the parameter selection. 2 Report Date The calendar date the report was generated. 3 DCIs The calendar date the report was generated. 4 Defective DCIs Total defect DCIs included in "Accuracy" calculation. 5 Accuracy Calculated accuracy 6 Submission Processing Top Five Defects Cumulative top five defects for all sites. 7 Function The name of the function where a defect occurred. 8 Form The name of the form where a defect occurred. 9 Section The name of the section where a defect occurred. 10 Location The name of the location where a defect occurred. 11 Opportunity The name of the opportunity where a defect occurred. 12 Total Defects Total number of defects pertaining to the opportunity/defect and type of defect description combination from a defective review. 13 Top three Defects by Site Cumulative top three defects for by individual sites. 14 Site Name Identifies the site summary information is being provided for.
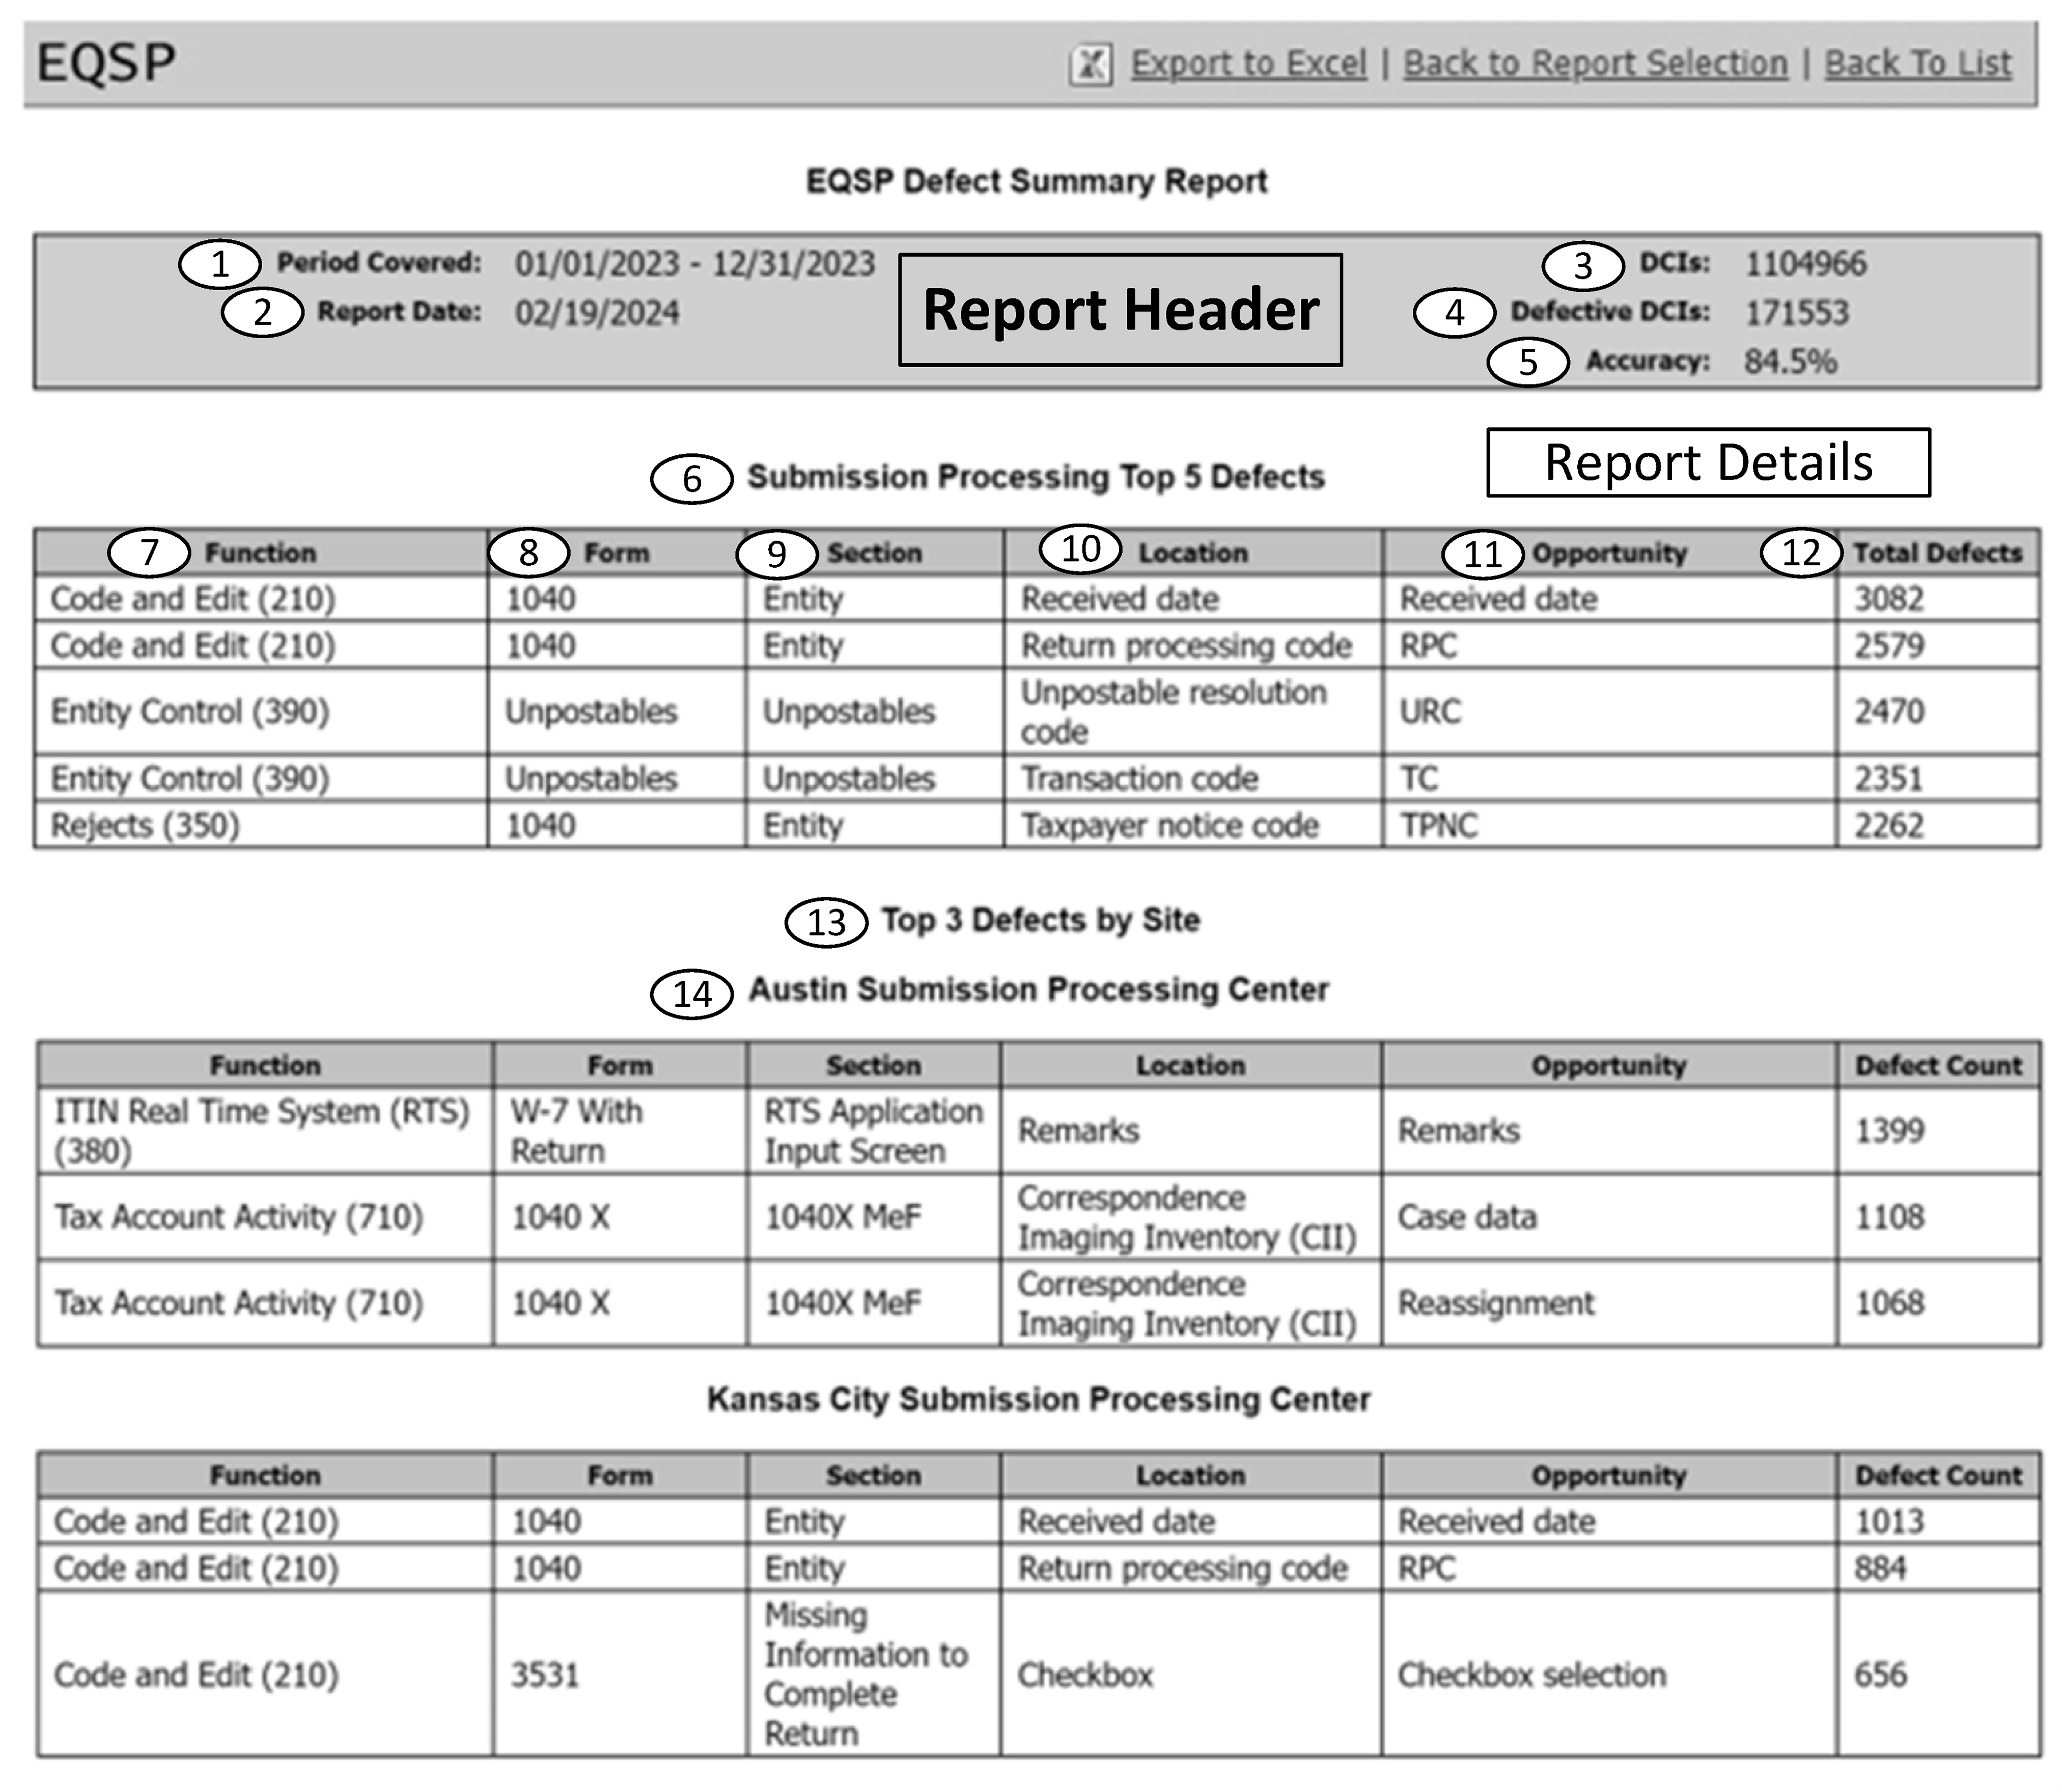
The EQSP Site Program Summary Report provides site and program quality data for a specific period of time. The Report displays site quality performance by all review types and OFP combinations. Additionally, the Report provides program quality performance by all review types by all OFP combinations. See Figure 3.30.30-27.
The Report Header contains the period of time (as defined in the date parameters in the Reports screen).
The Report Detail contains all sites opportunity and defect summary information. All quality data is stratified by site. ONLY Individual Performance and High Quality Review types are included in the defect details.
This report will ONLY generate details for Individual Performance and High Quality Reviews in a "Completed" status.
This report should be used to:
Identify Best Practices for leveraging to other areas.
Review the site’s performance.
Identify points for process improvement.
The table below explains each item shown on the EQSP Site Program Summary Report.
Number Item Explanation 1 Period Covered The "to" and "from" dates used in the parameter selection. 2 Report Date The calendar date the report was generated. 3 DCIs Cumulative DCIs for all sites combined. 4 Defective DCIs Cumulative accuracy for all sites combined. 5 Accuracy Cumulative accuracy for all sites combined. 6 Site Program Summary Summarizes program information by each site. 7 Site Identifies the site program information will be provided for. 8 Average Sample Size The average number of DCIs per sample pull. 9 Total DCIs Count Total number of DCIs for a given Review Type within the date parameters. 10 Total Defective DCIs The total number of defects from all Review types for. 11 Total Defects The total number of Defects for all Individual Performance Reviews. 12 Program Summary Summarized information by individual programs. 13 Program Number Displays individual programs numbers pertaining to summary. 14 Average Sample Size The average number of DCIs per sample pull. 15 Total DCI Count Total number of DCIs for a given Review Type within the date parameters. 16 Total Defects The total number of defects for the Review Type/OFP combination. 17 Program Defects Summaries defect information by the related program. 18 Program The name of the program where a defect occurred. 19 Function The name of the function where a defect occurred. 20 Form The name of the form/type where a defect occurred. 21 Section The name of the section where a defect occurred. 22 Location The name of the location where a defect occurred. 23 Total Defects Total number of defects pertaining to the opportunity/defect and type of defect description combination from a defective review.
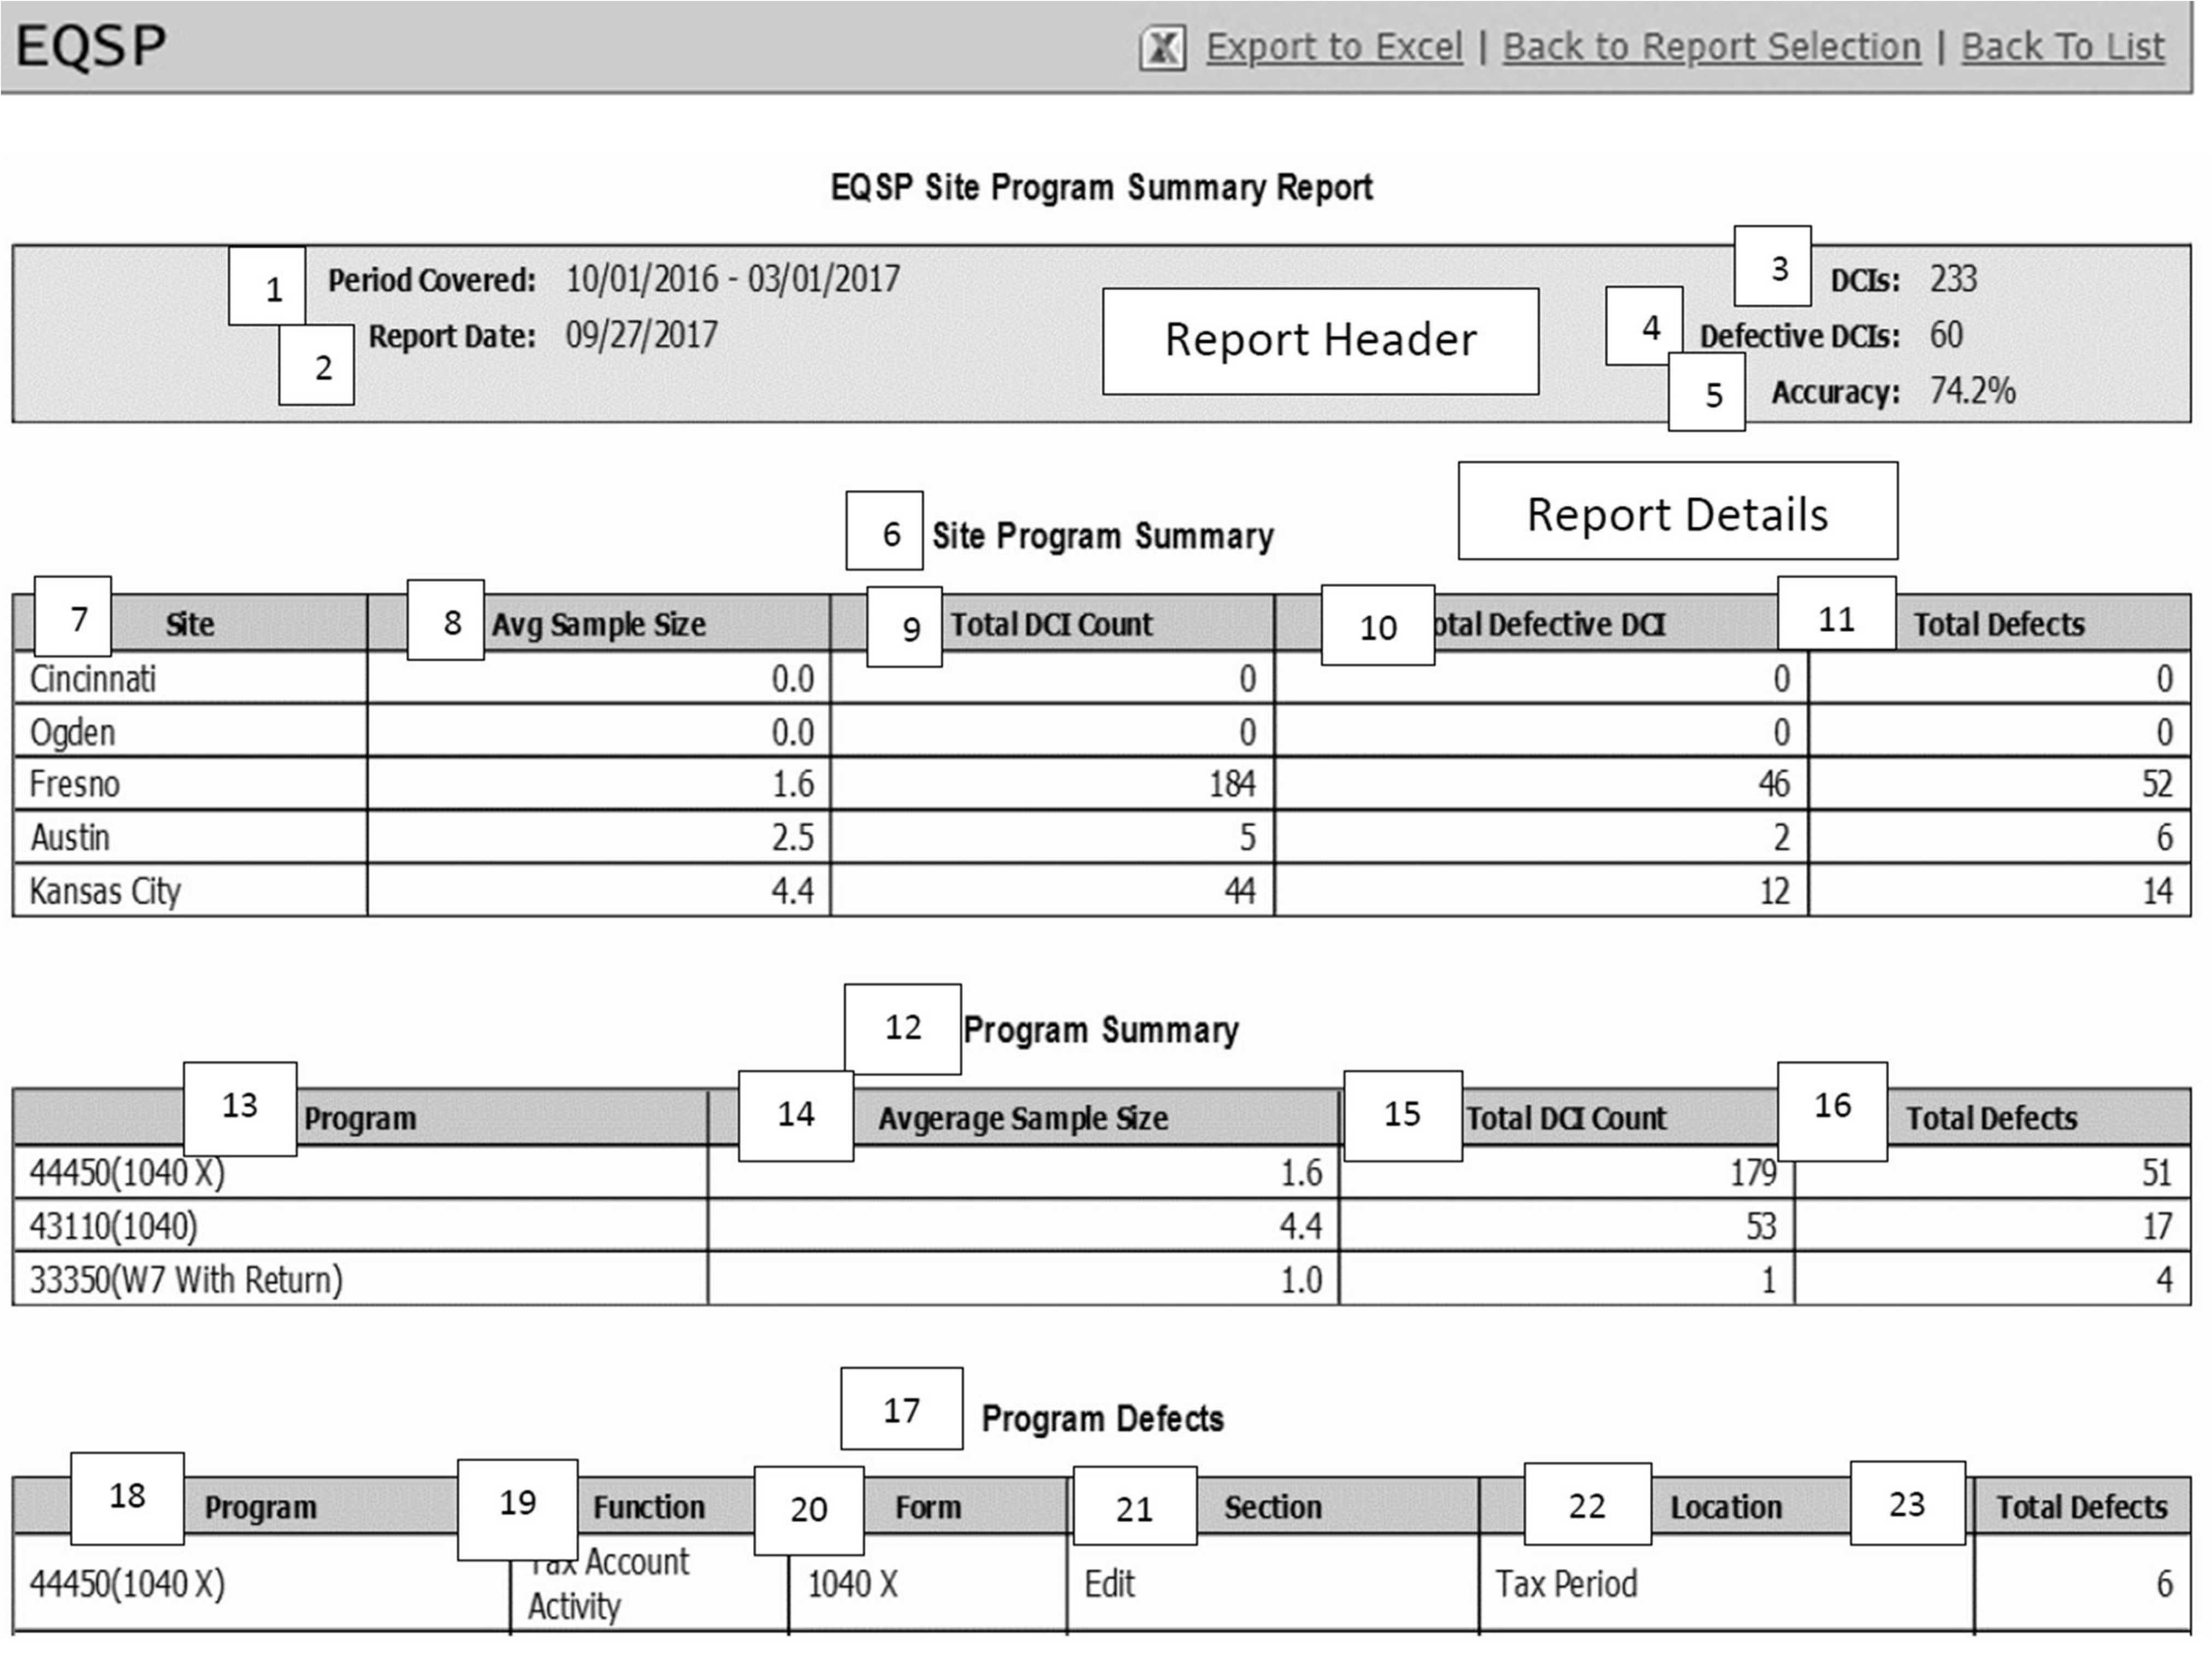
The Blank DCI Report provides a report to allow users to view Incorrect and Omitted defect descriptions for each opportunity in the selected DCI. The report allows users to expand or collapse Incorrect and/or Omitted columns to show or hide the defect descriptions. See Figure 3.30.30-28.
The Report Header contains details from a single operation for a specific function and program DCI (based on span of control).
The Report Detail contains information for Incorrect and/or Omitted defect descriptions for each opportunity in the selected DCI
For all opportunities in the entire report, an overall "+" and "-" control appears at the top of the report.
For opportunities within each section of the report, "+" and "-" control appears in the section header for Incorrect defect description and Omitted defect descriptions.
For each individual opportunity within the report, a "+" and "-" control appears in each defect description column.
Any Incorrect or Omitted that does not have associated defect descriptions displays as N/A with a gray background when the field is expanded.
-
The table below describes each item shown on the Blank DCI Report.
Number Item Explanation (If needed) 1 Operation The name of the operation of the DCI. 2 Function The name of the function of the DCI. 3 Program The name of the program of the DCI. 4 Incorrect + or - This field allows users to expand or collapse the defect descriptions for the Incorrect column. 5 Omitted + or - This field allows the users to expand or collapse the defect descriptions for the Omitted column. 6 Section The name of the section where a defect will occur. 7 Location The name of the location where a defect will occur. 8 Opportunity The name of the opportunity where a defect will occur. 9 Defect Type - Incorrect A description of the opportunity for Incorrect defect description. 10 Defect Type - Omitted A description of the opportunity for Omitted defect description.
The EQSP SharePoint page contains current resources and information for all levels of the EQSP User Community. Go to the SharePoint address and select the MEPS Information folder : EQSP SharePoint.
Comments and questions on this page or the information obtained from it should be sent to the HQ Quality Analyst responsible for the EQSP SharePoint site maintenance.
The Issue Resolution Process (IRP) provides a structured way for users to efficiently communicate their concerns, suggestions, or changes needed regarding the EQSP DCIs.
Note:
New EQSP DCI development requests are submitted directly to the Program Management/Process Assurance (PMPA) Quality Analyst overseeing this process. The EQSP Opportunity Change Request Template can be utilized for “New DCI requests”; please contact the PMPA Quality Analyst that oversees the IRP process for more details .
The “EQSP Issue Log Job Aid 20xx.docx” and the “EQSP Blank Issue Log with Instructions (revised 20xx).xlsx” are located on the EQSP SharePoint (Embedded Quality, MEPS, and Release/Recall Reference Information > EQSP Information > EQSP Issue Logs and Guide) site. Refer to this link: EQSP SharePoint.
When users from the functional area identify a missing opportunity or required change to an EQSP DCI, they should complete the EQSP Issue Log and send it to the P&A Site Improvement Specialist. The functional area should contact the P&A Site Improvement Specialist if assistance is needed to complete the template.
The Site Improvement Specialist should:
Review the EQSP Issue Log to ensure it is filled out correctly and contains entries in all required fields.
Validate that the request is significant and appropriate.
Return the request to the submitter if the Issue Log is incomplete.
Complete the template (if not completed by the functional area).
Submit the reviewed template to the PMPA Quality-section by utilizing the EQSP Issue Resolution e-mail group "*TS SP Quality EQSP Issue Resolution Requests" .
The Site Improvement Specialist or functional area should complete the EQSP Opportunity Change Request Template to submit a request to add, delete, change, or move a location/opportunity related to DCIs. The Template and Issue Resolution Process Job Aid is available on the EQSP SharePoint site (Embedded Quality, MEPS, and Release/Recall Reference Information > EQSP Information > EQSP Issue Logs and Guide): EQSP SharePoint
Open the spreadsheet. Select "file" , then "save as." In the file name, select a name for the spreadsheet so it can be located easily. The file name should include the applicable operation symbol (SOI, RCO, DPO, DCO, ITIN, ICO, ACO), program, function, and current date.
The appropriate PMPA Quality Section analyst will enter the Issue Source, Issue Year, and Issue Number in columns A - D. The analyst may provide additional comments in column S outlining changes or denials.
The Site Improvement Specialist will enter or verify the following fields before submitting the template:
Column (E), Operation: Enter the Operation Area (SOI, RCO, ITIN, DCO, DPO, ICO, or ACO).
Column (F), Function: Enter the Function as shown in EQSP (e.g., 210, 230, 340, 350)
Column (G), Program: Enter the Program as shown in EQSP (e.g., 43110, 43120, 11500)
Column (H), Form/DCI Name: Enter the Form or DCI name as shown in EQSP (e.g., 1040 (2019 and later), 1040 SR, 1120)
Column (I) Schedule (if applicable): Enter the Schedule as shown in EQSP (e.g., Schedule 1, 8606, 3471)
In Column (J), (Add/Delete/Change): Enter the requested action.
Follow the instructions in the table below:
Note:
To see if “Multiple entries” can be included on the same line in columns G and H (When the requested change applies to multiple programs/DCIs); please contact the PMPA Quality Analyst overseeing this process for more detail information.
If requested change impacts more than one Operation a separate template is required for each Operation.
The Designated HQ Quality Analyst should:
Review and research the submitted issue or request.
Coordinate with other HQ Quality Section Analysts on overlapping issues or when requested change(s) are also applicable to other operations.
Inform the submitter, within ten* business days, of the acceptance or rejection of their request. The ten* day time frame ensures that submitters receive prompt feedback and minimize the number of duplicate Issue Log submissions.
Update/revise the submitted EQSP Opportunity Change Submission Template to comply with EQSP consistency and terminology guidelines.
Notate in the Status column (D) whether the request is accepted or rejected. If rejected, a reason should be provided to the submitter.
If the request is accepted, input the EQSP system changes into DAT.
Send the completed template to the originator, with a cc to the EQSP Issue Resolution e-mail group for control closure.
HQ Analyst Issue Log Coordinator should:
Retrieve submitted requests from the EQSP Issue Resolution e-mail.
Review the request for EQSP consistency and appropriate verbiage.
Assign the request a control number on the current year Quality Section Control Log.
Assign to the designated HQ Quality Analyst.
Monitor the team controls for timely responses.
Close the Quality Section control upon issue resolution.
The following exhibits contain specific coding guidance for each Operation.
| Function | Specific Guidance |
|---|---|
| 130 Pre-Batching | Opportunities generally revolve around:
|
| 140 Extracting/ Secondary Sort | Opportunities generally revolve around:
|
| 160 Remittance Perfection | Opportunities generally revolve around:
|
| 170 Manual Deposit | Opportunities for generally revolve around the:
|
| 180 Batching | Opportunities generally revolve around:
|
| 210 RAIVS (4506T) | The Opportunities generally revolve around:
|
| 360 Imaging | Opportunities generally revolve around:
|
| 460 ICT Validation | Opportunities generally revolve around: Validating documents scanned into Correspondence Imaging Inventory. Common defect description:
|
| 550 Document Preparation | Opportunities generally revolve around:
|
| 720 Receiving, Sorting, and Miscellaneous | Opportunities generally revolve around:
|
| Function | Specific Guidance |
|---|---|
| 180 Batching | Opportunities generally revolve around:
|
| 380 ITIN Real Time System (RTS) | Opportunities generally revolve around: • Processing request using the RTS system
|
| 720 Receiving Sorting and Miscellaneous | Opportunities generally revolve around:
|
| 790 Tax Account Support Activity | Opportunities generally revolve around:
|
| Function | Specific Guidance |
|---|---|
| 230 ISRP | Block Header: Opportunities generally revolve around:
|
| 440 RRPS | Opportunities generally revolve around:
|
| 470/480 SCRIPS | These returns are scanned through SCRIPS. If the information is not picked up by the scanner, the data transcriber (DT) is responsible for inputting this information. For example, the scanner did not pick up the information on line 10. The DT was required to input Line 10 but incorrectly input the entry on Line 11. Code an incorrect entry for Line 11. Common defect descriptions:
|
| 550 Post Doc Prep | For Post-Doc Prep, defects generally revolve around:
|
| 790 RAIVS/IVES | Opportunities generally revolve around:
Common defect descriptions:
|
| Function | Specific Guidance |
|---|---|
| 270 Error Resolution | Opportunities revolve around: The Correcting of Business Master File (BMF) and Individual Master File (IMF) Original and Loop Error Records on Error Registers not otherwise specified. Common defect descriptions:
|
| 290 Unpostables | Opportunities revolve around: Analyzing and resolving Unpostable listings and resolving (correcting or nullifying) Unpostable cases. Common defect descriptions:
|
| 290 Notice Review | Opportunities revolve around: Analyzing and resolving Unpostable listings and resolving (correcting or nullifying) Unpostable Identity Theft cases. Common defect descriptions:
|
| 310 Research | Opportunities generally revolve around: Researching the entries of microfilm records to obtain requested (except Unpostables) data. Common defect descriptions:
|
| 340 ERS | Opportunities revolve around: The review, research, and correction of records in unsolved or error status. Common defect descriptions:
|
| 350 Rejects | Opportunities revolve around: The correction of ERS Suspense Records on terminals pertaining to BMF and IMF returns. Common defect descriptions:
|
| 360 Correspondence Imaging | Opportunities generally revolve around: The preparation and scanning of documents into the Correspondence Imaging Inventory (CII). Common defect descriptions:
|
| 390 Entity Unpostables | Opportunities revolve around: The resolving and perfection of BMF and IMF Unpostables documents related to the Entity module. Common defect descriptions:
|
| 510 Cycle Control | Opportunities generally revolve around:
|
| 520 Central File Control | Opportunities generally revolve around:
|
| 530 Pulling Returns | Opportunities generally revolve around:
|
| 540 Re-filing Returns | Opportunities generally revolve around:
|
| 550 Document Preparation | Opportunities revolve around:
|
| 590 Special Search | Opportunities generally revolve around: The pulling process of all Master File returns and related documents. Includes all special search activities performed (microfilm research and IDRS research). Common defect descriptions:
|
| 710 Notice Review | Opportunities revolve around: The preparation of appropriate adjustment documents to effect corrective action of BMF and IMF notices other than those requiring refund deletions. Common defect descriptions:
|
| 710 Tax Account Activity | Opportunities revolve around: The processing of taxpayer-initiated inquiries, reasonable cause penalty abatements, as well as the following request:
|
| 770 Correspondence | Opportunities revolve around: The input, preparation and processing of Correspondence. Common defect descriptions:
|
| 780 Correspondence | Opportunities revolve around: The input, preparation and processing of Correspondence. Common defect descriptions:
|
| Function | Specific Guidance |
|---|---|
| 340 ERS (EFTPS) | Opportunities revolve around:
|
| 410 Accounting Activity | Opportunities revolve around:
|
| 410 Journalization | Journal Numbers include activity counts, posting numbers, system dates and dollar amounts for a specific ledger posting to IRS accounts. The opportunities revolve around:
|
| 420 Automated Non-Masterfile | Opportunities revolve around:
|
| 420 Dishonored Checks | Opportunities revolve around:
|
| 420 Manual Refunds | Opportunities revolve around:
|
| 630 Balancing | Opportunities revolve around: Review of invalid transcripts and error coded control records, resolution of errors.
|
| 710 Erroneous Refund | The 710 Erroneous Refund DCI is the main DCI. This DCI will be selected when reviewing all erroneous refund cases. Optional DCIs are listed as "Schedules" and should be selected only when applicable to the case being reviewed for Erroneous Refund. |
| 710 Unidentified Remittance | Opportunities revolve around:
|
| 710 Tax Account Activity | Opportunities revolve around:
|
| 790 Tax Account Support Activity | Opportunities revolve around:
|
Batch: A batch is typically equivalent to one cart/truck of completed work.
Block: A block is typically equivalent to one folder of one employee’s work, with multiple documents in it. Blocks are typically broken into three approximate sizes (<25 documents, 50 documents, or 100 documents). The block size depends on how many documents fit into a folder. Blocks may be in carts/trucks, bins, clips, baskets, etc.
Critical Job Elements (CJE): IRS document, specific to each position series, which states the performance requirements for the specific position series.
Data Collection Instrument (DCI): A Data Collection Instrument (DCI) is equivalent to one review in EQSP. One sample pull per DCI with one document reviewed is the standard (exceptions are Numbering and Batching).
Defect: An incorrect action taken or correct action not taken on a document/case/return.
Defect Description: The characteristics of the Defect Type within a work process.
Defective Document/Case/Return: A document/case/return which contains one or more defects.
Defect Type: General category used to describe an action inappropriate for the function being reviewed. For the EQSP system, there are two primary defect types:
Incorrect: Is defined as a failure to take the correct action, when the action was taken.
Omitted: Is defined as a failure to take an action, when an action was needed.
Document: One document is typically equivalent to one review in EQSP. If the weekly sample size for a function is five documents, then the sample process would consist of using the Random Number Calendar to identify first the block and then the document. Exceptions are the Batching and Numbering functions, where one block is equivalent to one document.
Embedded Quality Submission Processing (EQSP): A measurement system that will identify the cause and impact of errors, apply common measures to every level of the organization, and enable frontline employees to understand how their contributions impact IRS’ performance.
Individual Performance Review: A process designed to sample an individual’s work for the purpose of providing feedback to the employee and to provide the basis for evaluation of the employee’s performance.
Location: Further clarifies where this opportunity might be found.
Example:
On a tax form, location should match the corresponding position on the form, (i.e. Line 7). For Non-Form based actions, the Location text often matches the Opportunity text.
Managerial/On-the Job Training (OJT) Review: Reviews are typically 100% reviews of an employee's work during an initial training or coaching period. The results are used to identify training issues, determine job readiness, and monitor employees’ procedural skill and progress.
Organization-Function-Program (OFP): The Organization, a five-position number, representing (from left to right) two digits for the Operation, one-digit for the Department, and two digits for the Team or Group. The Function, a three-position number, represents a work action, group of actions, or specific action.
Product Feedback Review: Random samples of a team's completed work to determine the quality of the product versus quality of the team's performance.
Opportunity: An opportunity is the point at which a specific action of an employee’s job was either performed, or should have been performed.
Quality Analysis: An appraisal of an operation or process to determine and report on whether that operation/process is functioning properly and whether it is conforming to established procedures, or to determine the core cause of quality problems.
Quality Improvement: The process of identifying problems or areas for improvement and approaching them with methodical problem-solving process.
Randomizing : A process of randomly identifying and selecting documents for quality review. May use randomizer.org or other methods to secure a random sample pull from all completed work..
Ratable: An employee is ratable when the individual spends at least 25% of their total time on measurable work or 40% of their direct time on measurable work.
Review Detail Screen: This screen contains the following information: Section, Location, Opportunity,, Defect Type, and Defect Description.
Review Header Screen: This screen gathers data, such as the "Who, What, When, Where, and Why" of each review. It includes items such as Employee SEID, Organization, Function, and Program.
Review Summary Screen: This screen displays the Defects Summary, total opportunities, and total number of defects.
Sample Pull ID: The unique identification number for the sample being reviewed. The ID number groups like review samples into a single group. You must create a new Sample Pull ID every time a different employee or a different work product is being reviewed.
Sample Size: A group of items or documents selected for quality review.
Section: The Sections on the Form or Schedule.
Standard Employee Identifier (SEID): A unique five-character identifier assigned to each IRS employee.
Issue Resolution Process: A structured approach to identifying EQSP DCI changes and elevating to headquarters for consideration.
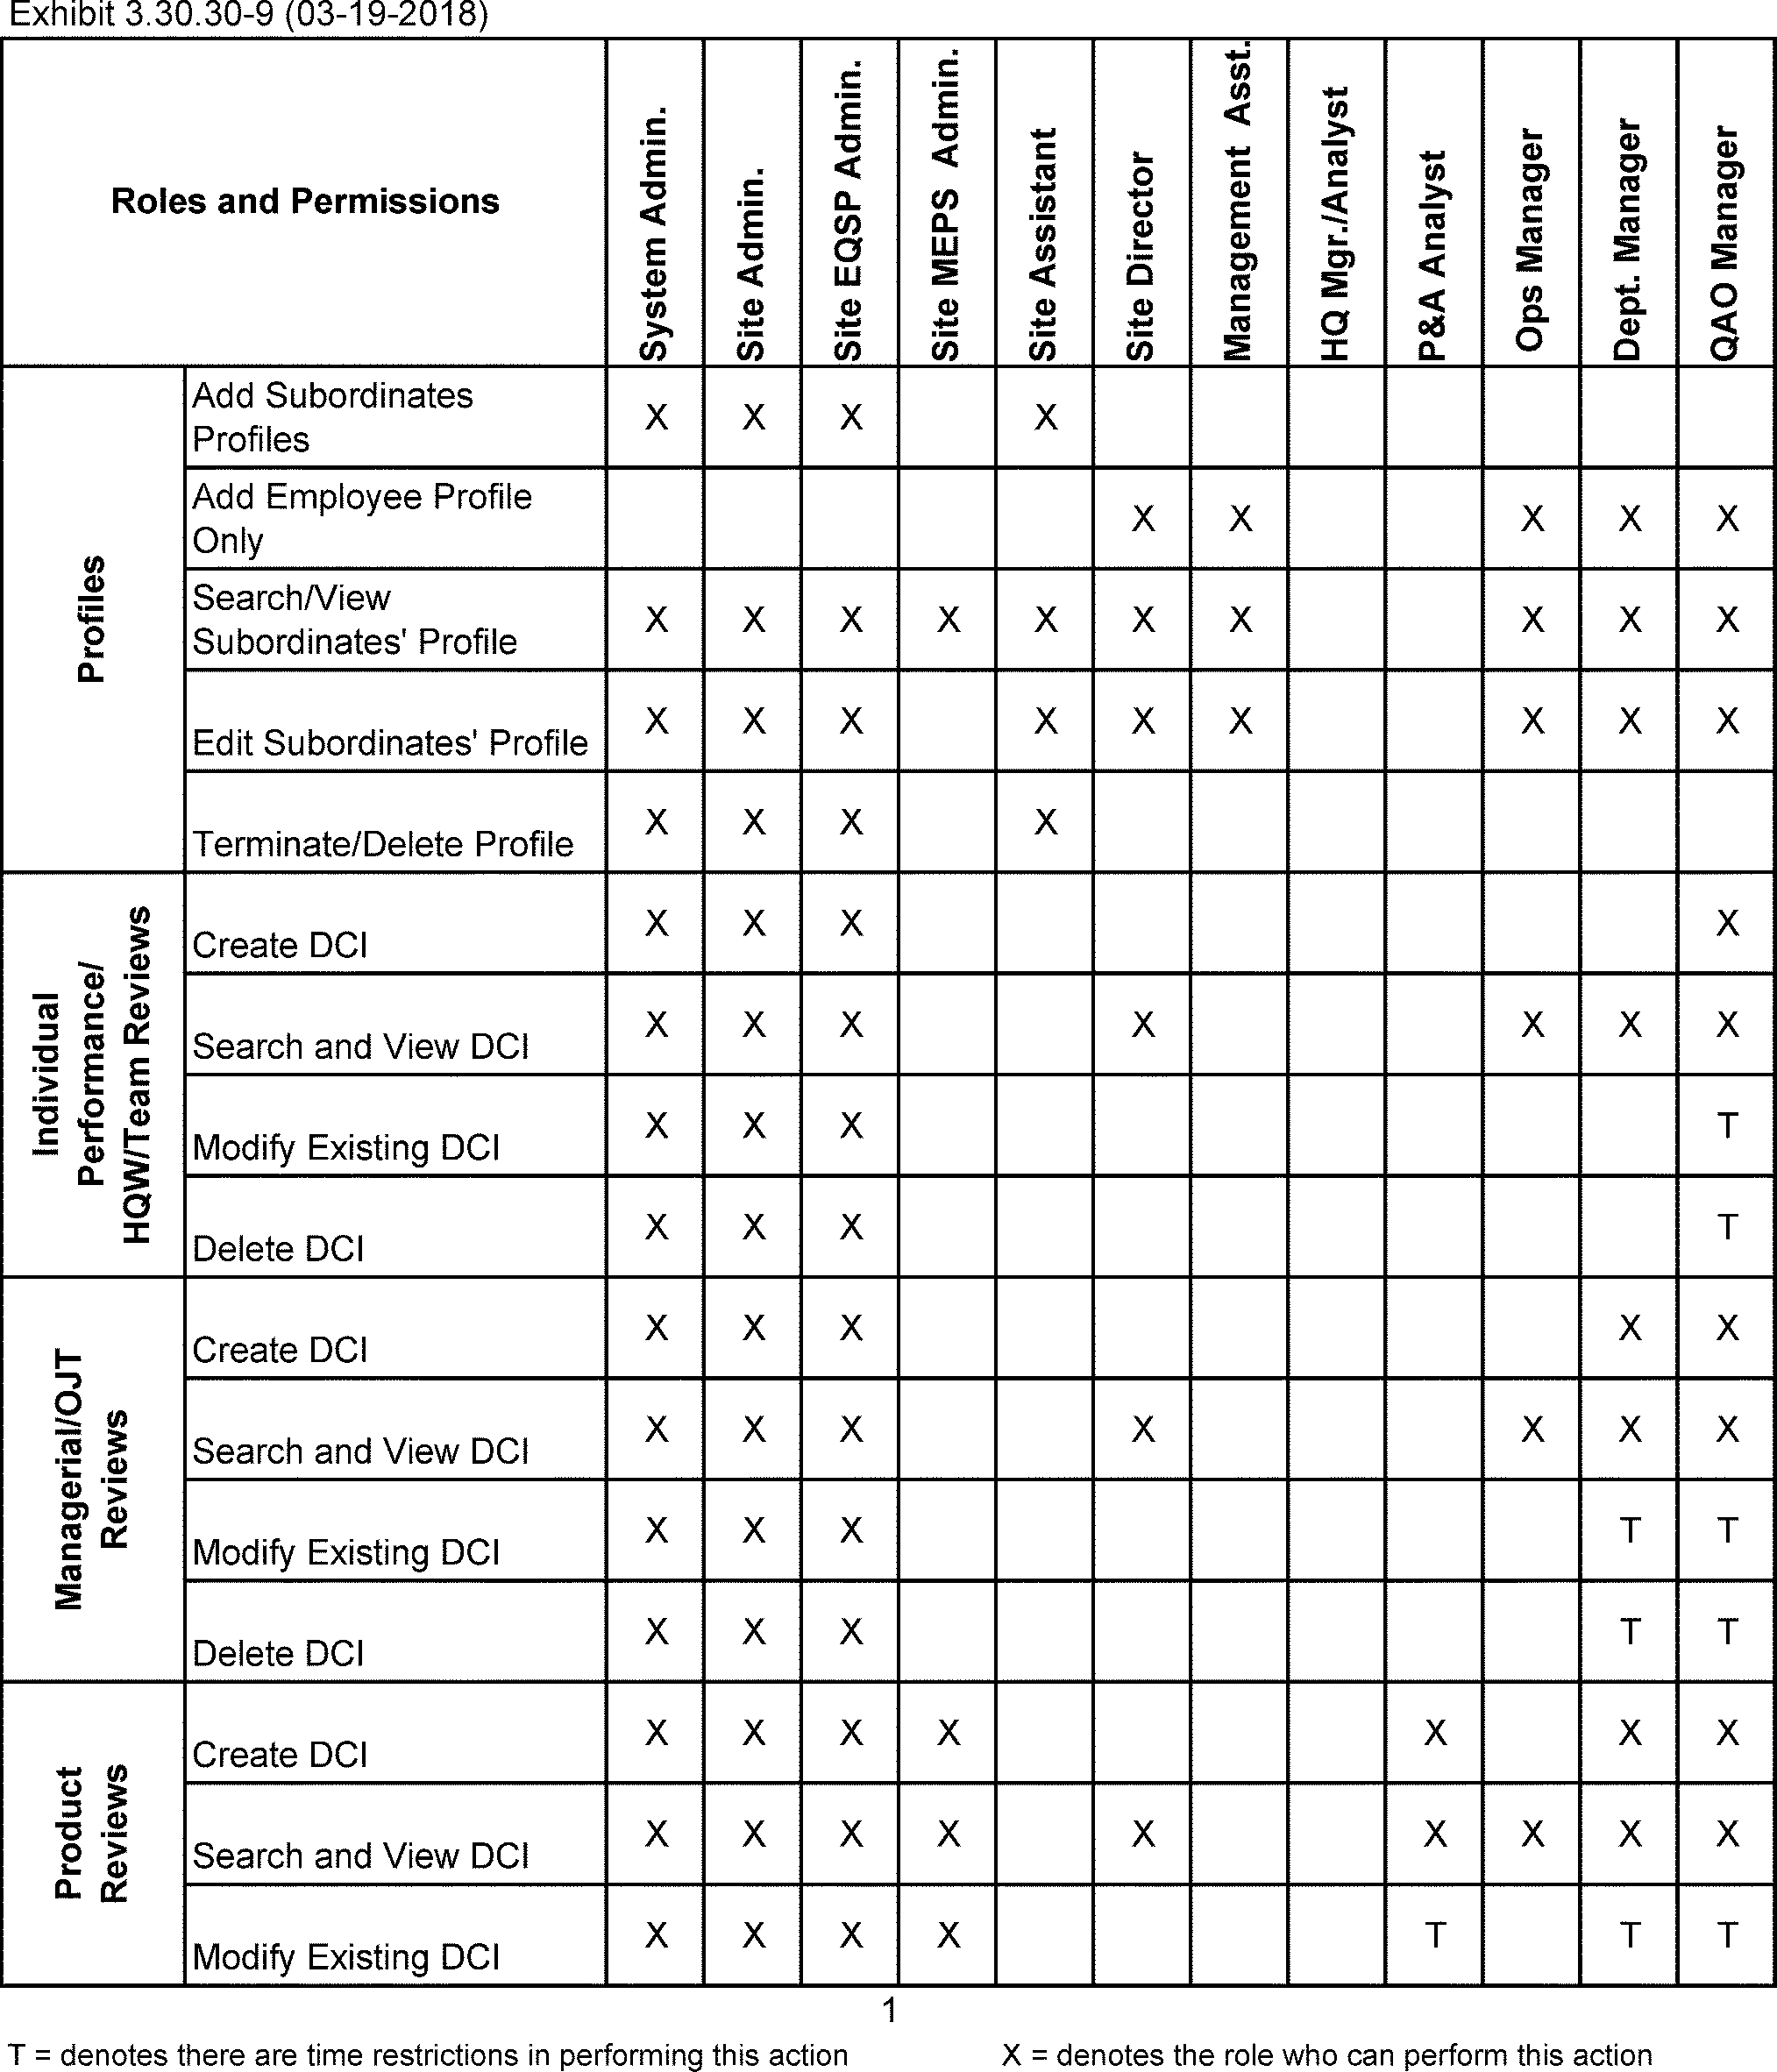
Please click here for the text description of the image.
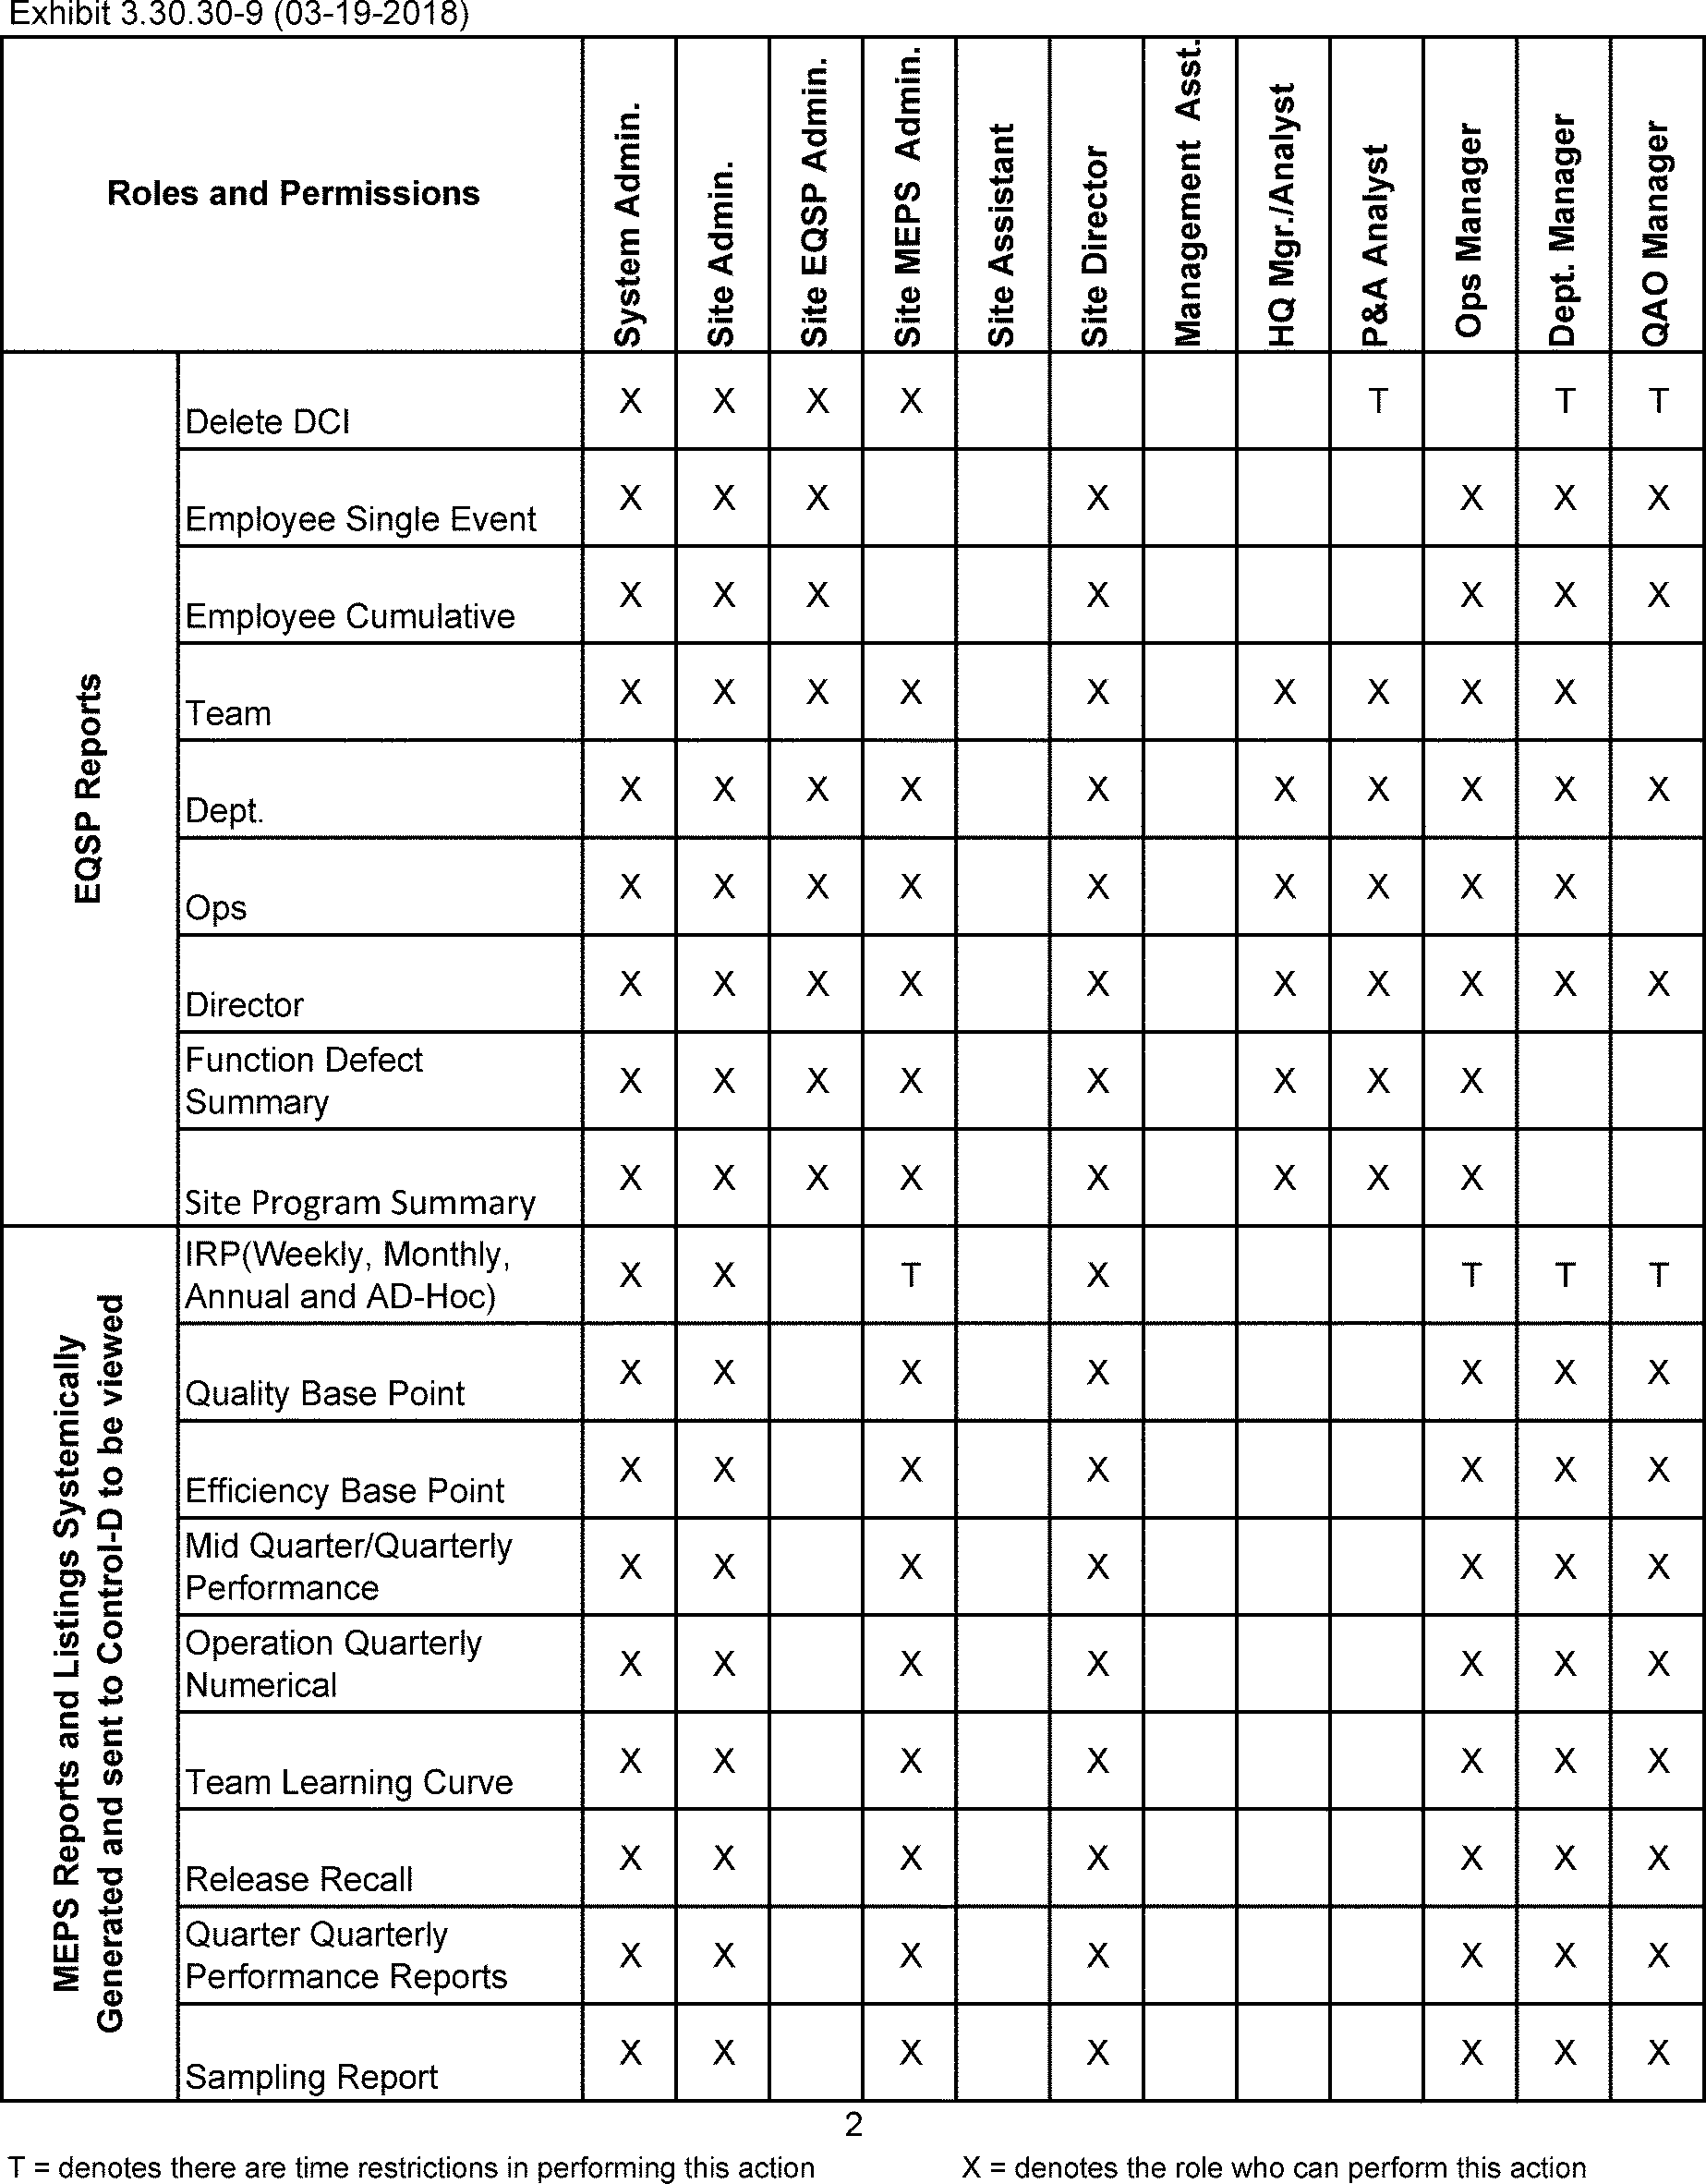
Please click here for the text description of the image.