)
hoặc https:// có nghĩa là bạn đã kết nối an toàn với trang web .gov. Chỉ chia sẻ thông tin nhạy cảm trên các trang web chính thức, an toàn.
)
hoặc https:// có nghĩa là bạn đã kết nối an toàn với trang web .gov. Chỉ chia sẻ thông tin nhạy cảm trên các trang web chính thức, an toàn.
- 4.19.9 FCP (FUTA Case Processing) Technical System Procedures
- 4.19.9.1 Program Scope and Objectives
- 4.19.9.1.1 Background
- 4.19.9.1.2 Authority
- 4.19.9.1.3 Roles and Responsibilities
- 4.19.9.1.4 Program Controls
- 4.19.9.1.5 Acronyms
- 4.19.9.1.6 Related Resources
- 4.19.9.2 FCP (FUTA Case Processing)Technical System Procedures
- 4.19.9.3 System Authorization and Security
- 4.19.9.4 Accessing Windows/FCP
- 4.19.9.5 FCP Navigation
- 4.19.9.5.1 File Options
- 4.19.9.5.2 Edit Option
- 4.19.9.5.2.1 FUTA Form 940C Table
- 4.19.9.5.2.2 Search FUTA Form 940C Table
- 4.19.9.5.2.3 New FUTA Form 940C Input
- 4.19.9.5.3 Help Option
- 4.19.9.6 New FUTA Query Screen
- 4.19.9.7 Case Header Section
- 4.19.9.7.1 Open/Closing Status Codes
- 4.19.9.8 FCP Screens
- 4.19.9.8.1 FCP Detail Screen
- 4.19.9.8.2 Money Screen
- 4.19.9.8.3 Adjustment Screen
- 4.19.9.8.4 Correspondence Screen
- 4.19.9.8.4.1 Types of Correspondence
- 4.19.9.8.4.2 Form 3465
- 4.19.9.8.5 Entity Screen
- 4.19.9.8.6 Import/Export Screens
- 4.19.9.8.7 History Screen
- 4.19.9.1 Program Scope and Objectives
Part 4. Examining Process
Chapter 19. Liability Determination
Section 9. FCP (FUTA Case Processing) Technical System Procedures
4.19.9 FCP (FUTA Case Processing) Technical System Procedures
Manual Transmittal
September 24, 2020
Purpose
(1) This IRM transmits revised IRM 4.19.9, FCP (FUTA Case Processing) Technical System Procedures.
Scope
These procedures are to be followed regardless of the tax year of the case the campuses are working.
Material Changes
(1) IRM 4.19.9.6 Figures Figure 4.19.9-12 archived data added to query screen.
(2) IRM 4.19.9.8.3 "Adjustment Screen" added as new features to track assessment and abatements.
Effect on Other Documents
This IRM supersedes IRM 4.19.9 FCP (FUTA Case Processing) Technical System Procedures dated September 26, 2017.Audience
FUTA tax examiners and management officials at Small Business/Self Employed sites.Effective Date
(09-24-2020)Maha H. Williams
Director, Exam Field and Campus Policy
Small Business/ Self-Employed
-
Purpose: This Internal Revenue Manual (IRM) provides instructions for using the FUTA Case Processing (FCP) System.
-
Audience: The FCP System is used by SB/SE Document Matching Federal Unemployment Tax Act (FUTA) operation for the reconciliation of FUTA cases. This IRM provides instructions to technical staff for using the FCP system which consists of various screens and windows.
-
Policy Owner: Director, Exam Field and Campus Policy.
-
Program Owner: BMF Doc Matching, under Exam Field and Campus Policy is responsible for the content of this IRM and providing guidance.
-
The Federal Unemployment Tax Act (FUTA) provides for cooperation between the federal and state governments in the establishment and administration of unemployment insurance programs. Under this dual system, the employer is subject to a payroll tax levied by the federal and state governments. The taxpayer may be allowed a maximum credit of 5.4% against the FUTA tax of 6.0% for payments made to the state. Employers whose payments are received by the state after the due date of the federal return plus extensions are allowed 90% of the credit that would have been allowed had the payments been made on time. In addition, an employer's credit will be reduced if the employer paid wages that are subject to the unemployment tax laws of a credit reduction state.
-
As a result of the FUTA, IRS is responsible for receiving and processing the Form 940, Employer's Annual Federal Unemployment (FUTA) Tax Return, and Schedule H (Form 1040), Household Employment Taxes, on which FUTA tax is reported, and for collecting FUTA tax. All FUTA tax paid and reported on these tax returns is deposited in the Unemployment Trust Fund, from which funds are dispensed to the states for administration of their unemployment compensation programs. Department of Labor (DOL) is charged with monitoring the Unemployment Compensation Systems for each state and can withhold funds from a state if the state does not comply with Federal standards.
-
The FUTA Certification program is the method IRS uses to verify with the states that the payment claimed on the Form 940 and/or Schedule H were actually paid into the states unemployment funds. There are currently 53 participating agencies which encompass the 50 states, the District of Columbia, Puerto Rico, and the U.S. Virgin Islands.
-
The FCP system is used for the reconciliation of FUTA tax cases. The IRM provides instructions to the technical staff for using the FCP system which consists of various screens and windows. Cases selected for the FUTA program are worked by tax examiners who perform an in-depth analysis of each case to resolve tax cases.
-
The authority for the FUTA Program originates from the Federal Unemployment Tax Act (FUTA) which is contained in Title 26 of the Internal Revenue Code.
-
The Director, Small Business/Self Employed (SB/SE), Exam Field and Campus Policy, is responsible for the FUTA program.
-
Management officials are responsible for:
-
Providing internal controls relating to the program, process and activity.
-
Ensuring the instructions are communicated to and carried out by the proper officers and employees.
-
-
The FUTA program is monitored through the FCP system. The FCP system generates several different system reports for tracking cases and inventory delivery.
-
The following acronyms apply to this IRM.
Acronyms Definitions 6020 Closed 6020B AADJ Closed Agreed Adjustment AP Audit Potential ASED Assessment Statute Expiration Date BANK Closed Bankruptcy CADJ Closed Unagreed CAFE Closed Cafeteria Plan CATRS CAWR Annual Tax Reporting System CAUE Closed California Unity of Enterprise CAWR Combined Annual Wage Reporting CCA Case Control Activity CDUP Closed Duplicate Record CMUL Closed Multi-State Filer CNOC Closed No Change COMM Closed Common Paymaster CSYS Headquarters Systemic Closure CTOL Closed Under Tolerance DFNT Closed Defunct Corporation DLN Document Locator Number EIN Employer Identification Number FCP FUTA Case Processing FUTA Federal Unemployment Tax Act IDRS Integrated Data Retrieval System LEAS Closed Leasing Company LTWR Closed Late Reply Worked MFT Masterfile Transaction NRPY Closed No Reply REIM Closed Reimbursable Account RSED Refund Statute Expiration Date SSN Social Security Number STEX Closed Statute Expired SB/SE Small Business/Self Employed TRAN Closed Transfer UNDL Closed Undeliverable
-
This IRM is to be used by employees in the SB/SE Document Matching FUTA operations in conjunction with the following IRMs:
-
IRM 4.19.5,Certification of State Federal Unemployment Tax Act (FUTA) Credits
-
IRM 4.19.23,FUTA Controls
-
IRM 1.4.23,FUTA Managers and Coordinator Guide
-
-
Additional resources can be found on the CAWR/FUTA website at http://wc.web.irs.gov and the CAWR FUTA Research Portal found at http://serp.enterprise.irs.gov/databases/portals.dr/compliance.dr/crc.dr/cawr_futa/cawr_futa_default.htm
-
This section is designed to assist employees in SB/SE Document Matching FUTA Operation in accessing and navigating the FUTA Case Processing (FCP) System.
-
Access to the FUTA Case Processing (FCP) System is restricted to authorized users. The FUTA Coordinator, appropriate management official and security personnel must authorize individual user access.
-
A security profile is established and maintained for each user. Users may choose their own password. Each password should:
-
Password may not be the same as the user name
-
Password must be at least 8 characters long
-
Password must not be too common. (the security package will reject common passwords)
-
Password must contain at least one letter
-
Password must contain at least one of the following punctuation marks #$_
-
Password MAY NOT contain other punctuation marks
-
Password must contain at least one number
-
-
User profiles are established to allow access to the specific areas/functions of the system needed to perform your assigned duties. Inform your manager/coordinator if you are prohibited from accessing an area of the system needed to complete an assigned task.
-
The system produces audit trail information on any updates/changes made to the system. Each user must ensure only authorized accesses are performed. Do not attempt unauthorized system queries.
-
To ensure the security and integrity of the FCP system:
-
Protect your password. Do not reveal it to anyone.
-
Never allow anyone access to the system using your login and password.
-
If you have reason to believe that your password has been compromised, alert your manager immediately.
-
Lock your workstation when it is not in use.
-
Log off the system at the end of your shift.
-
Never leave sensitive information on the screen and leave your workstation.
-
Do not eat or drink near computer hardware.
-
Use computers and software for official purposes only.
-
Do not copy licensed or copyrighted software for private use. It is a violation of federal law with civil and criminal penalties.
-
Retrieve your hard copy prints from the printer. Give prints, remaining near or on the printer for an extended period of time, to your manager for disposition.
-
-
Access to the FCP system requires a login and password for both Windows XP and the FCP system.
-
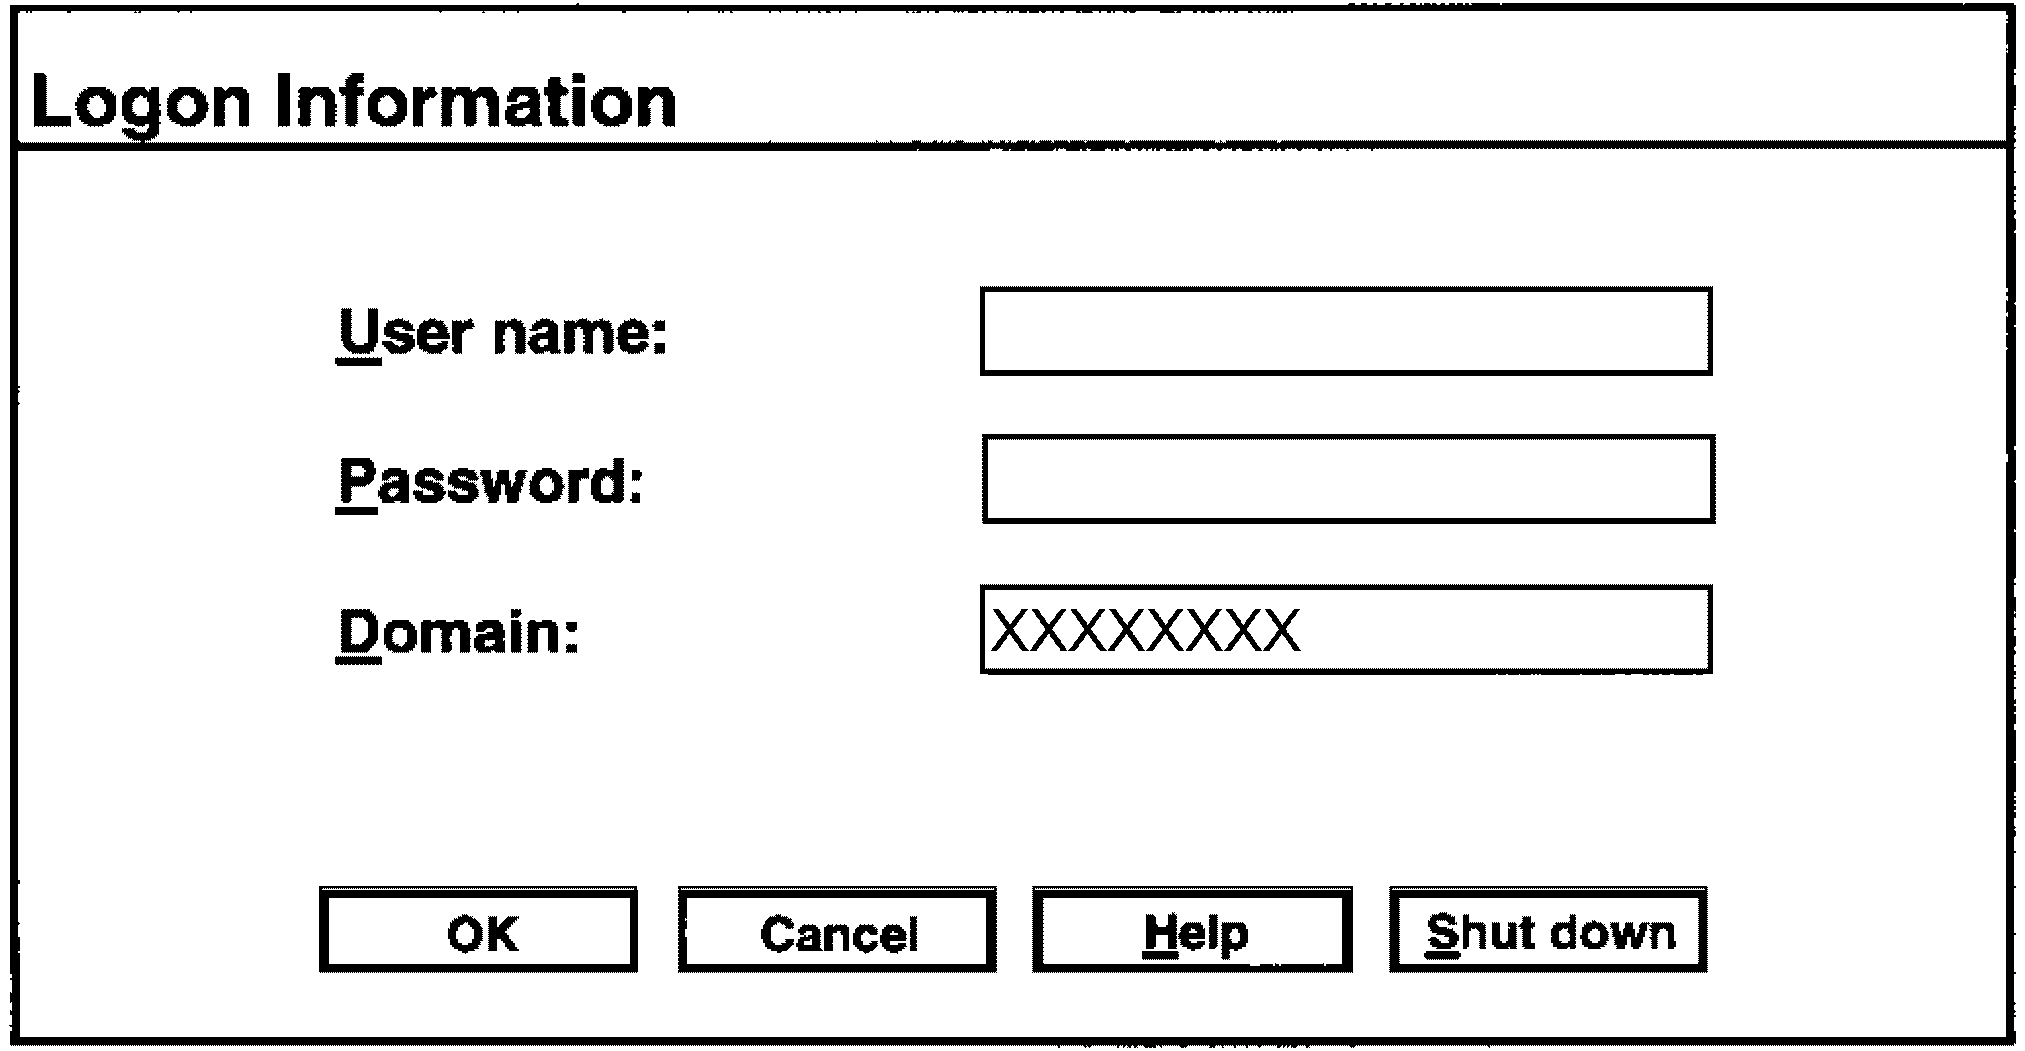
To display the Windows XP logon window depress the <CTRL><ALT><DEL> keys simultaneously. When the logon screen appears you will be required login using your SEID (standard employee identifier) and Password. The Domain field should already be filled in. Once you have entered the required information use your mouse and click on "OK." Figure 4.19.9-1 Windows Login Screen.
-
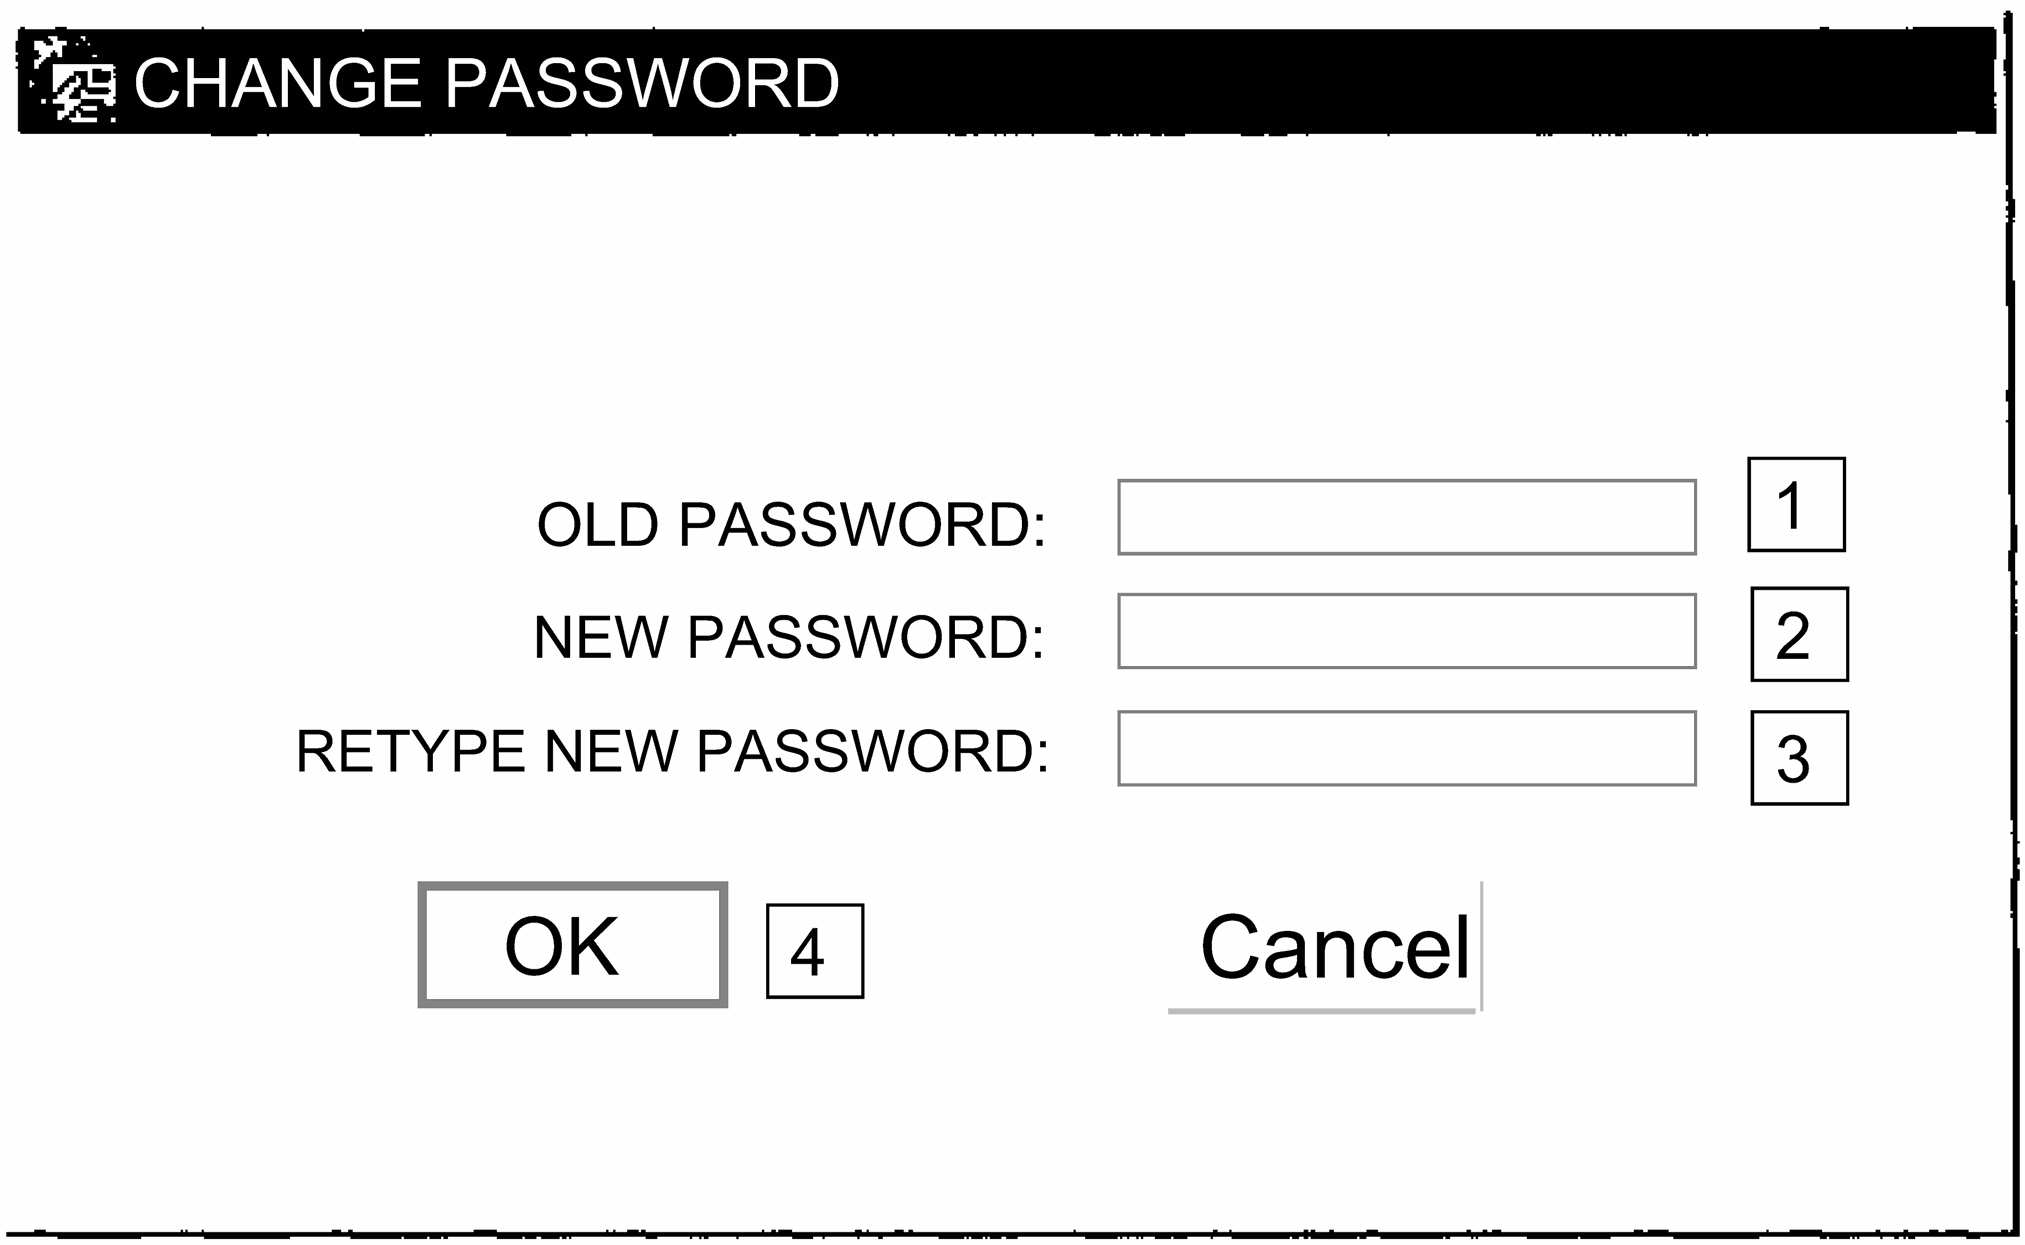
The first time you logon to the workstation you will use an assigned/temporary password. The system will prompt you to change your password.
Step Action 1 Enter your old password 2 Choose a new password following the guidelines provided in IRM 4.19.9.3 3 Re-enter your new password 4 Click on the OK button -
Once the required information is entered the workstation desktop applications will appear.
-
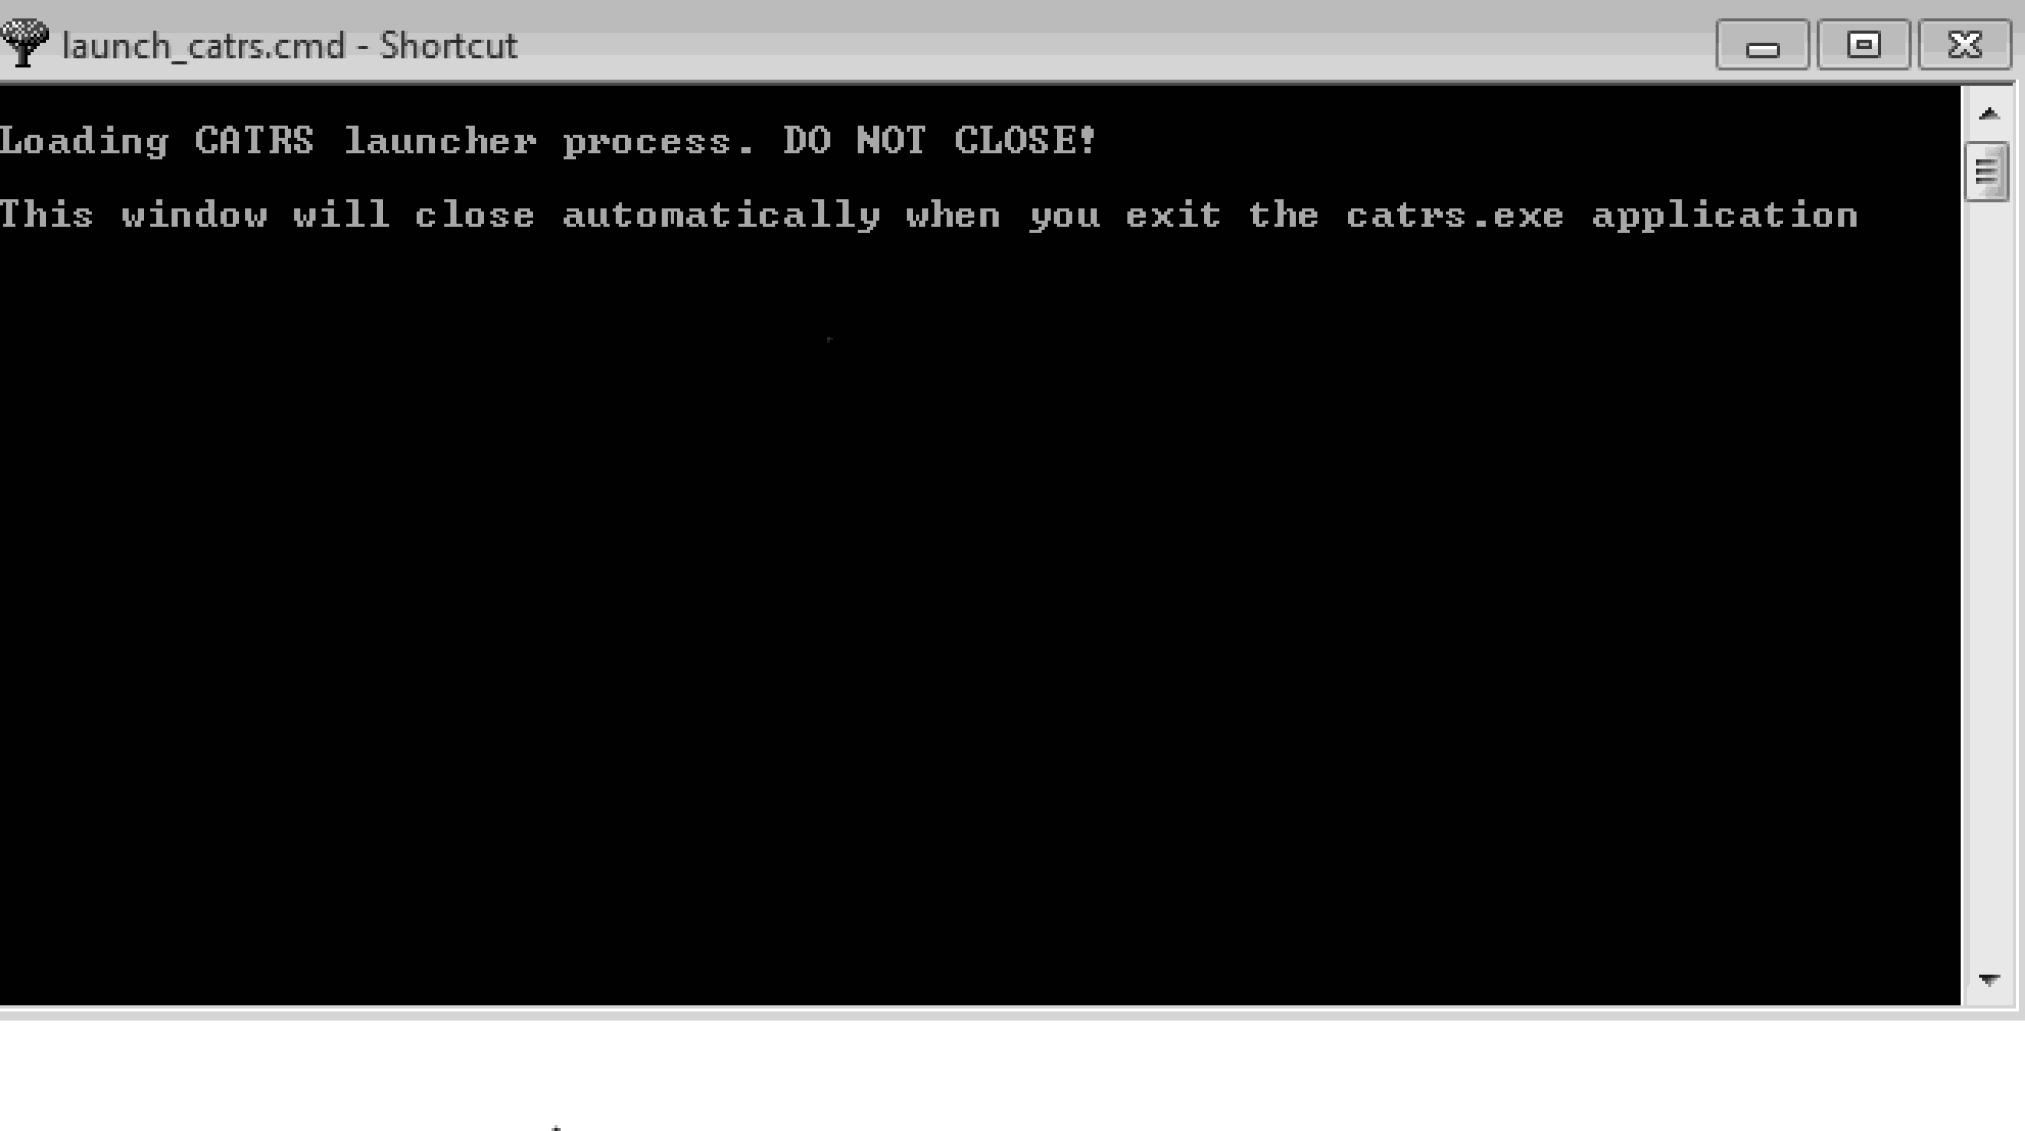
From the desktop double click on the " CATRS" icon. The FCP system allows access to multiple tax years through the use of a single icon.
-
The "CATRS Launch Screen" will appear. Figure 4.19.9-3
-
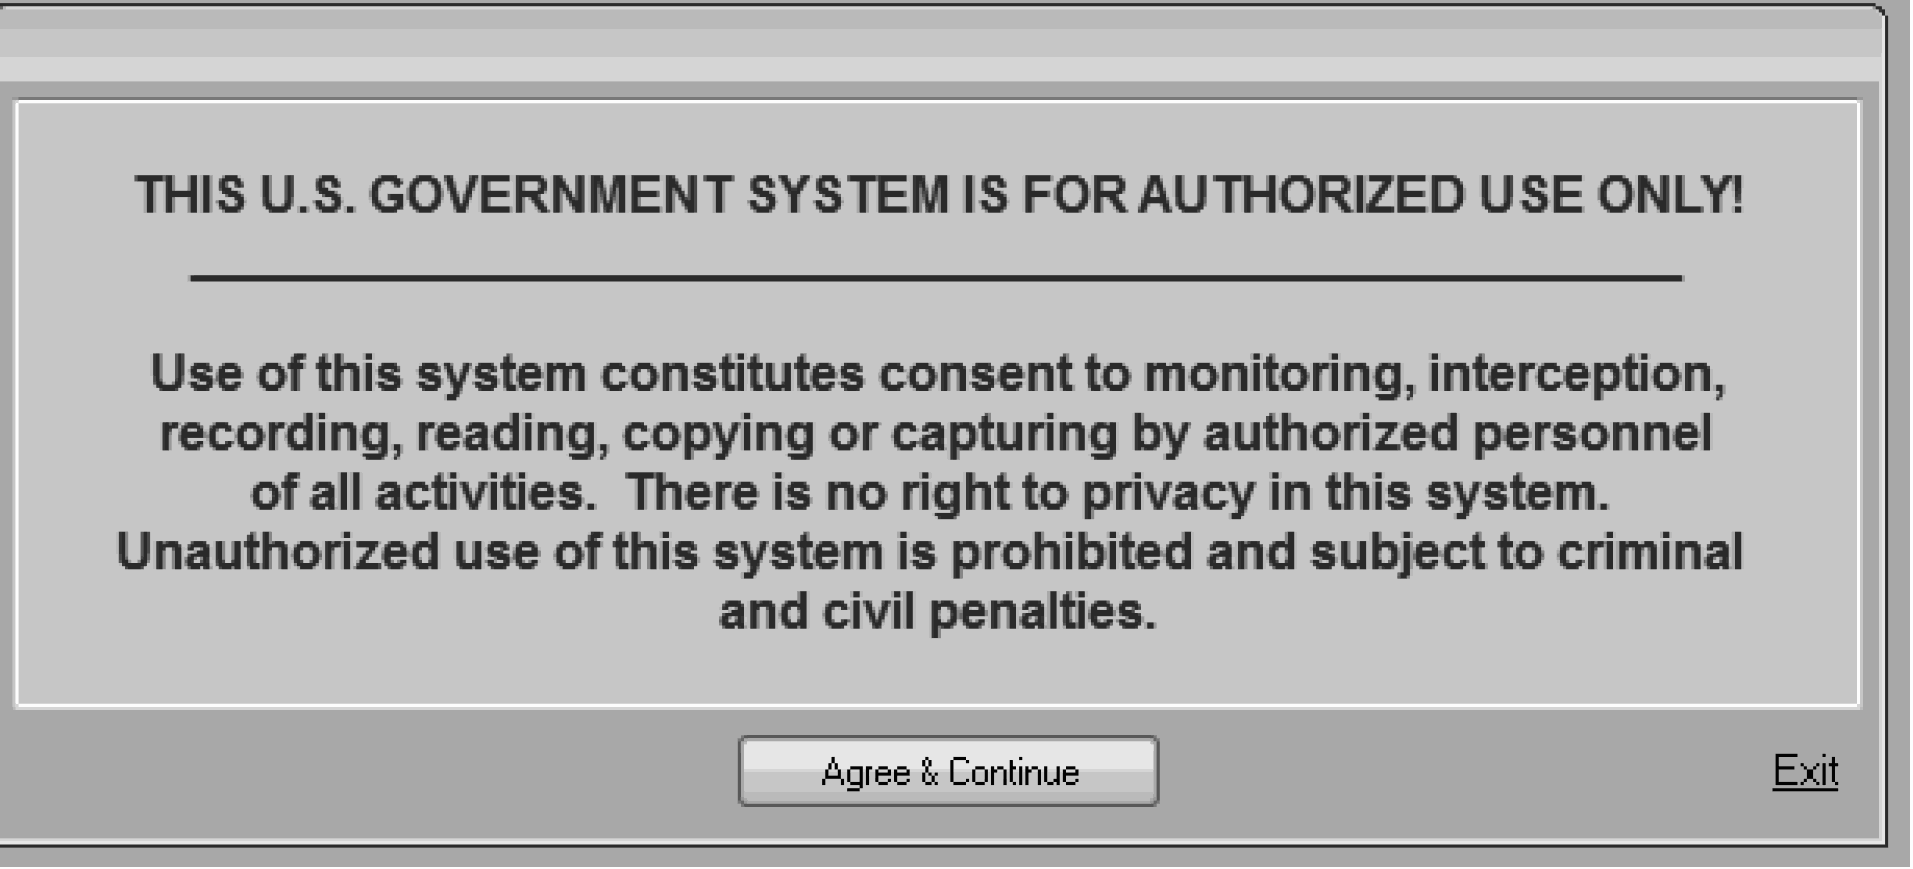
The CATRS launch will automatically load the FCP system and Warning Banner. Figure 4.19.9-4
-
A user has the option to agree and continue or exit the program from the warning banner screen.
-
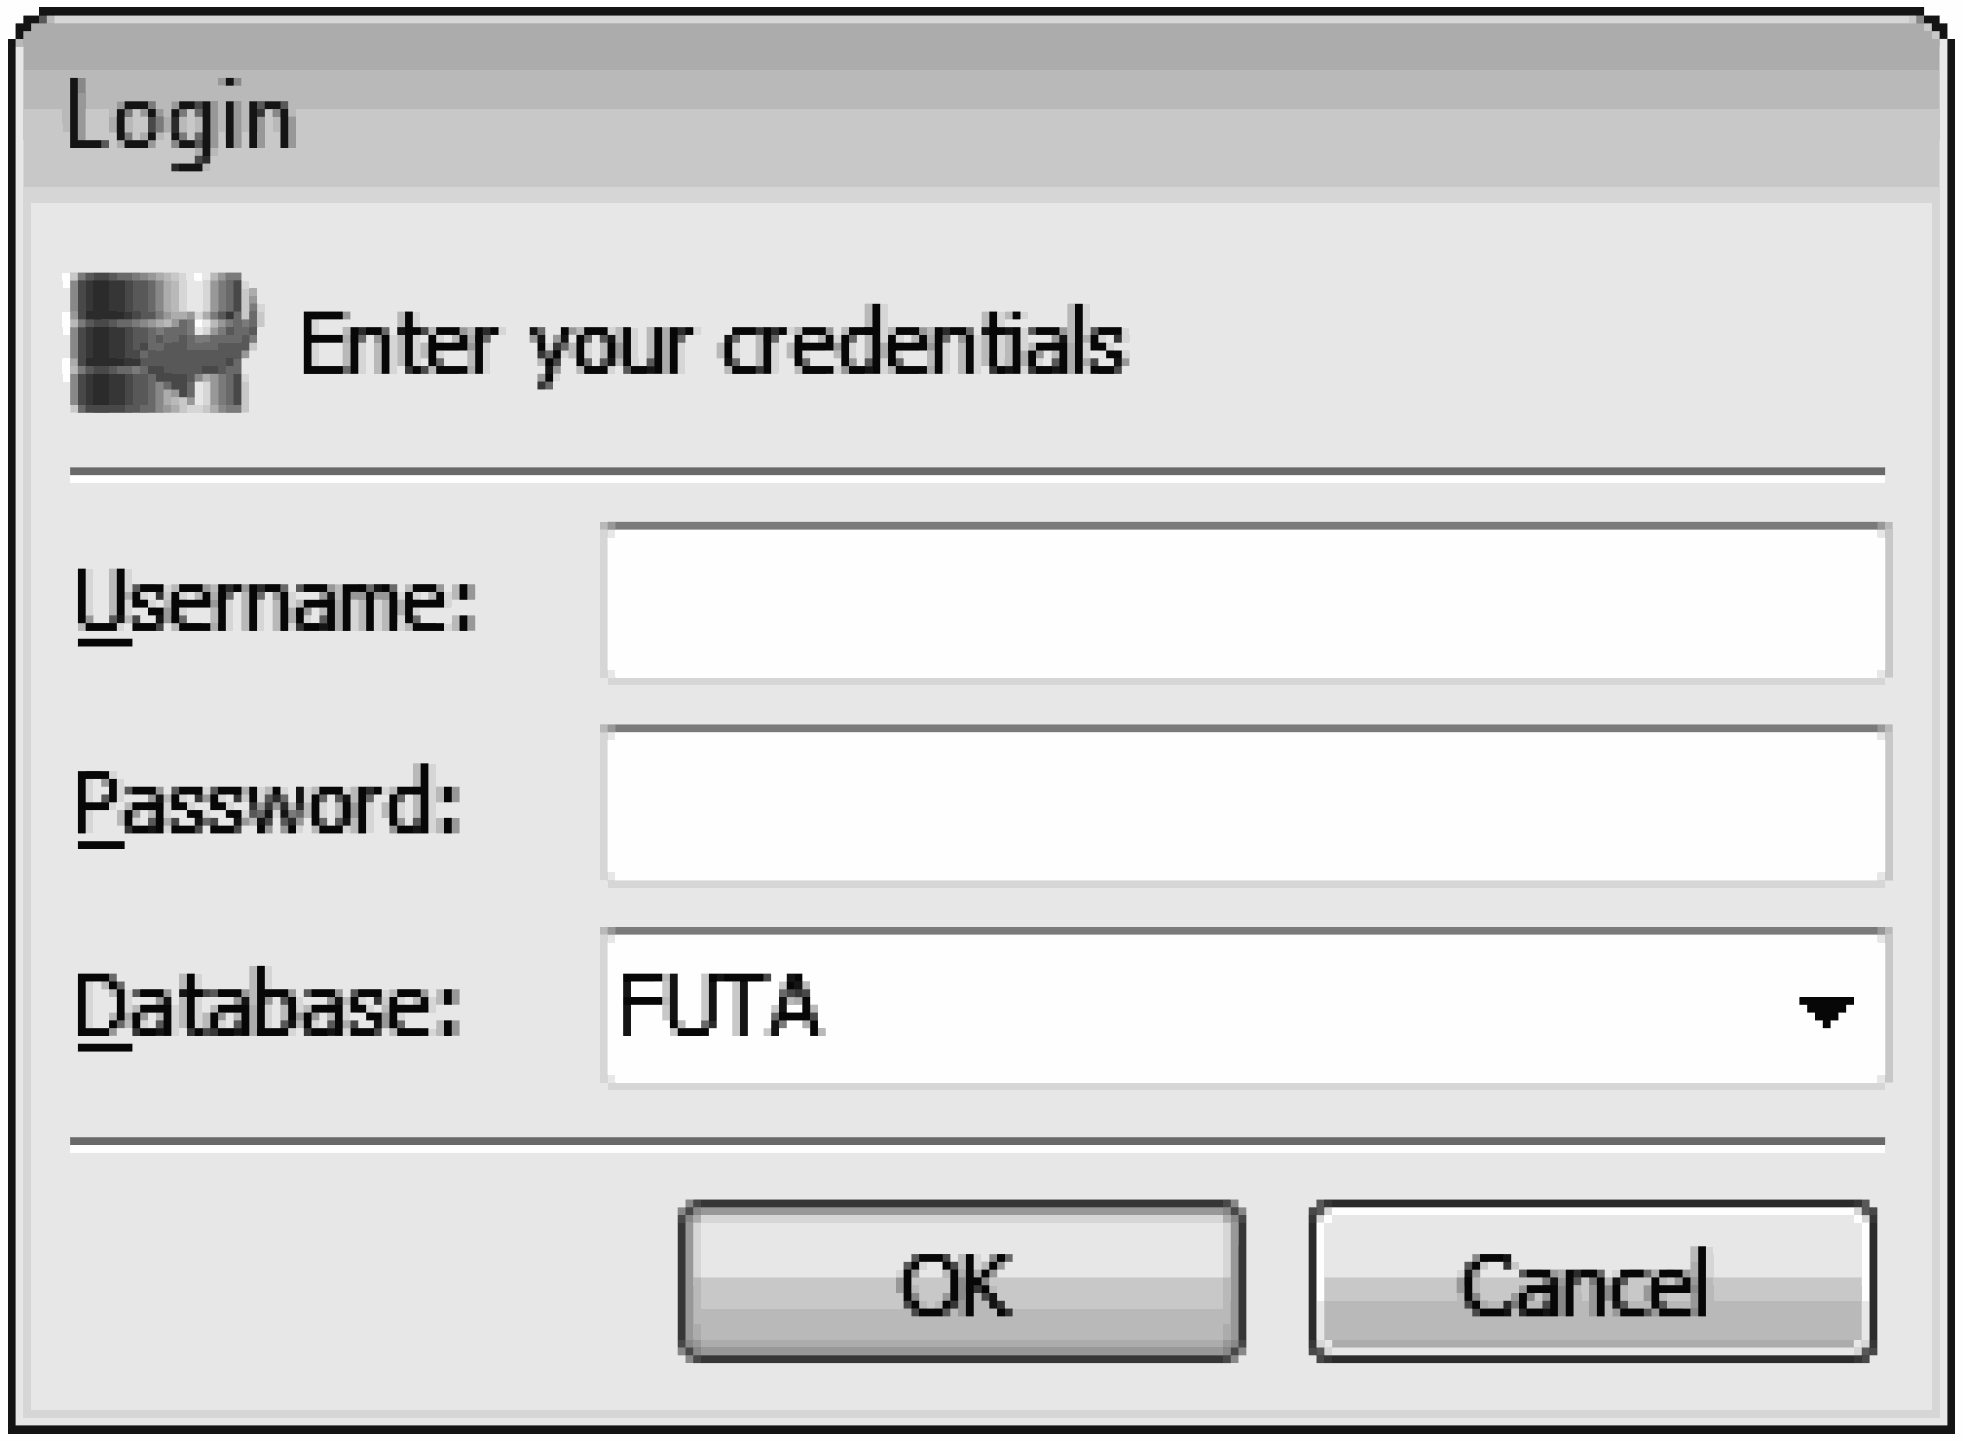
After agreeing to continue FCP system logon screen will display. Figure 4.19.9-5
Various problems may occur while logging on. Correct mistakes made while entering your login and/or password by using the <Backspace> key. The <Delete> key will not work for logging on.-
Enter your FCP user name
-
Enter your FCP password
-
Click on "Login" to gain access to the FCP system
-
-
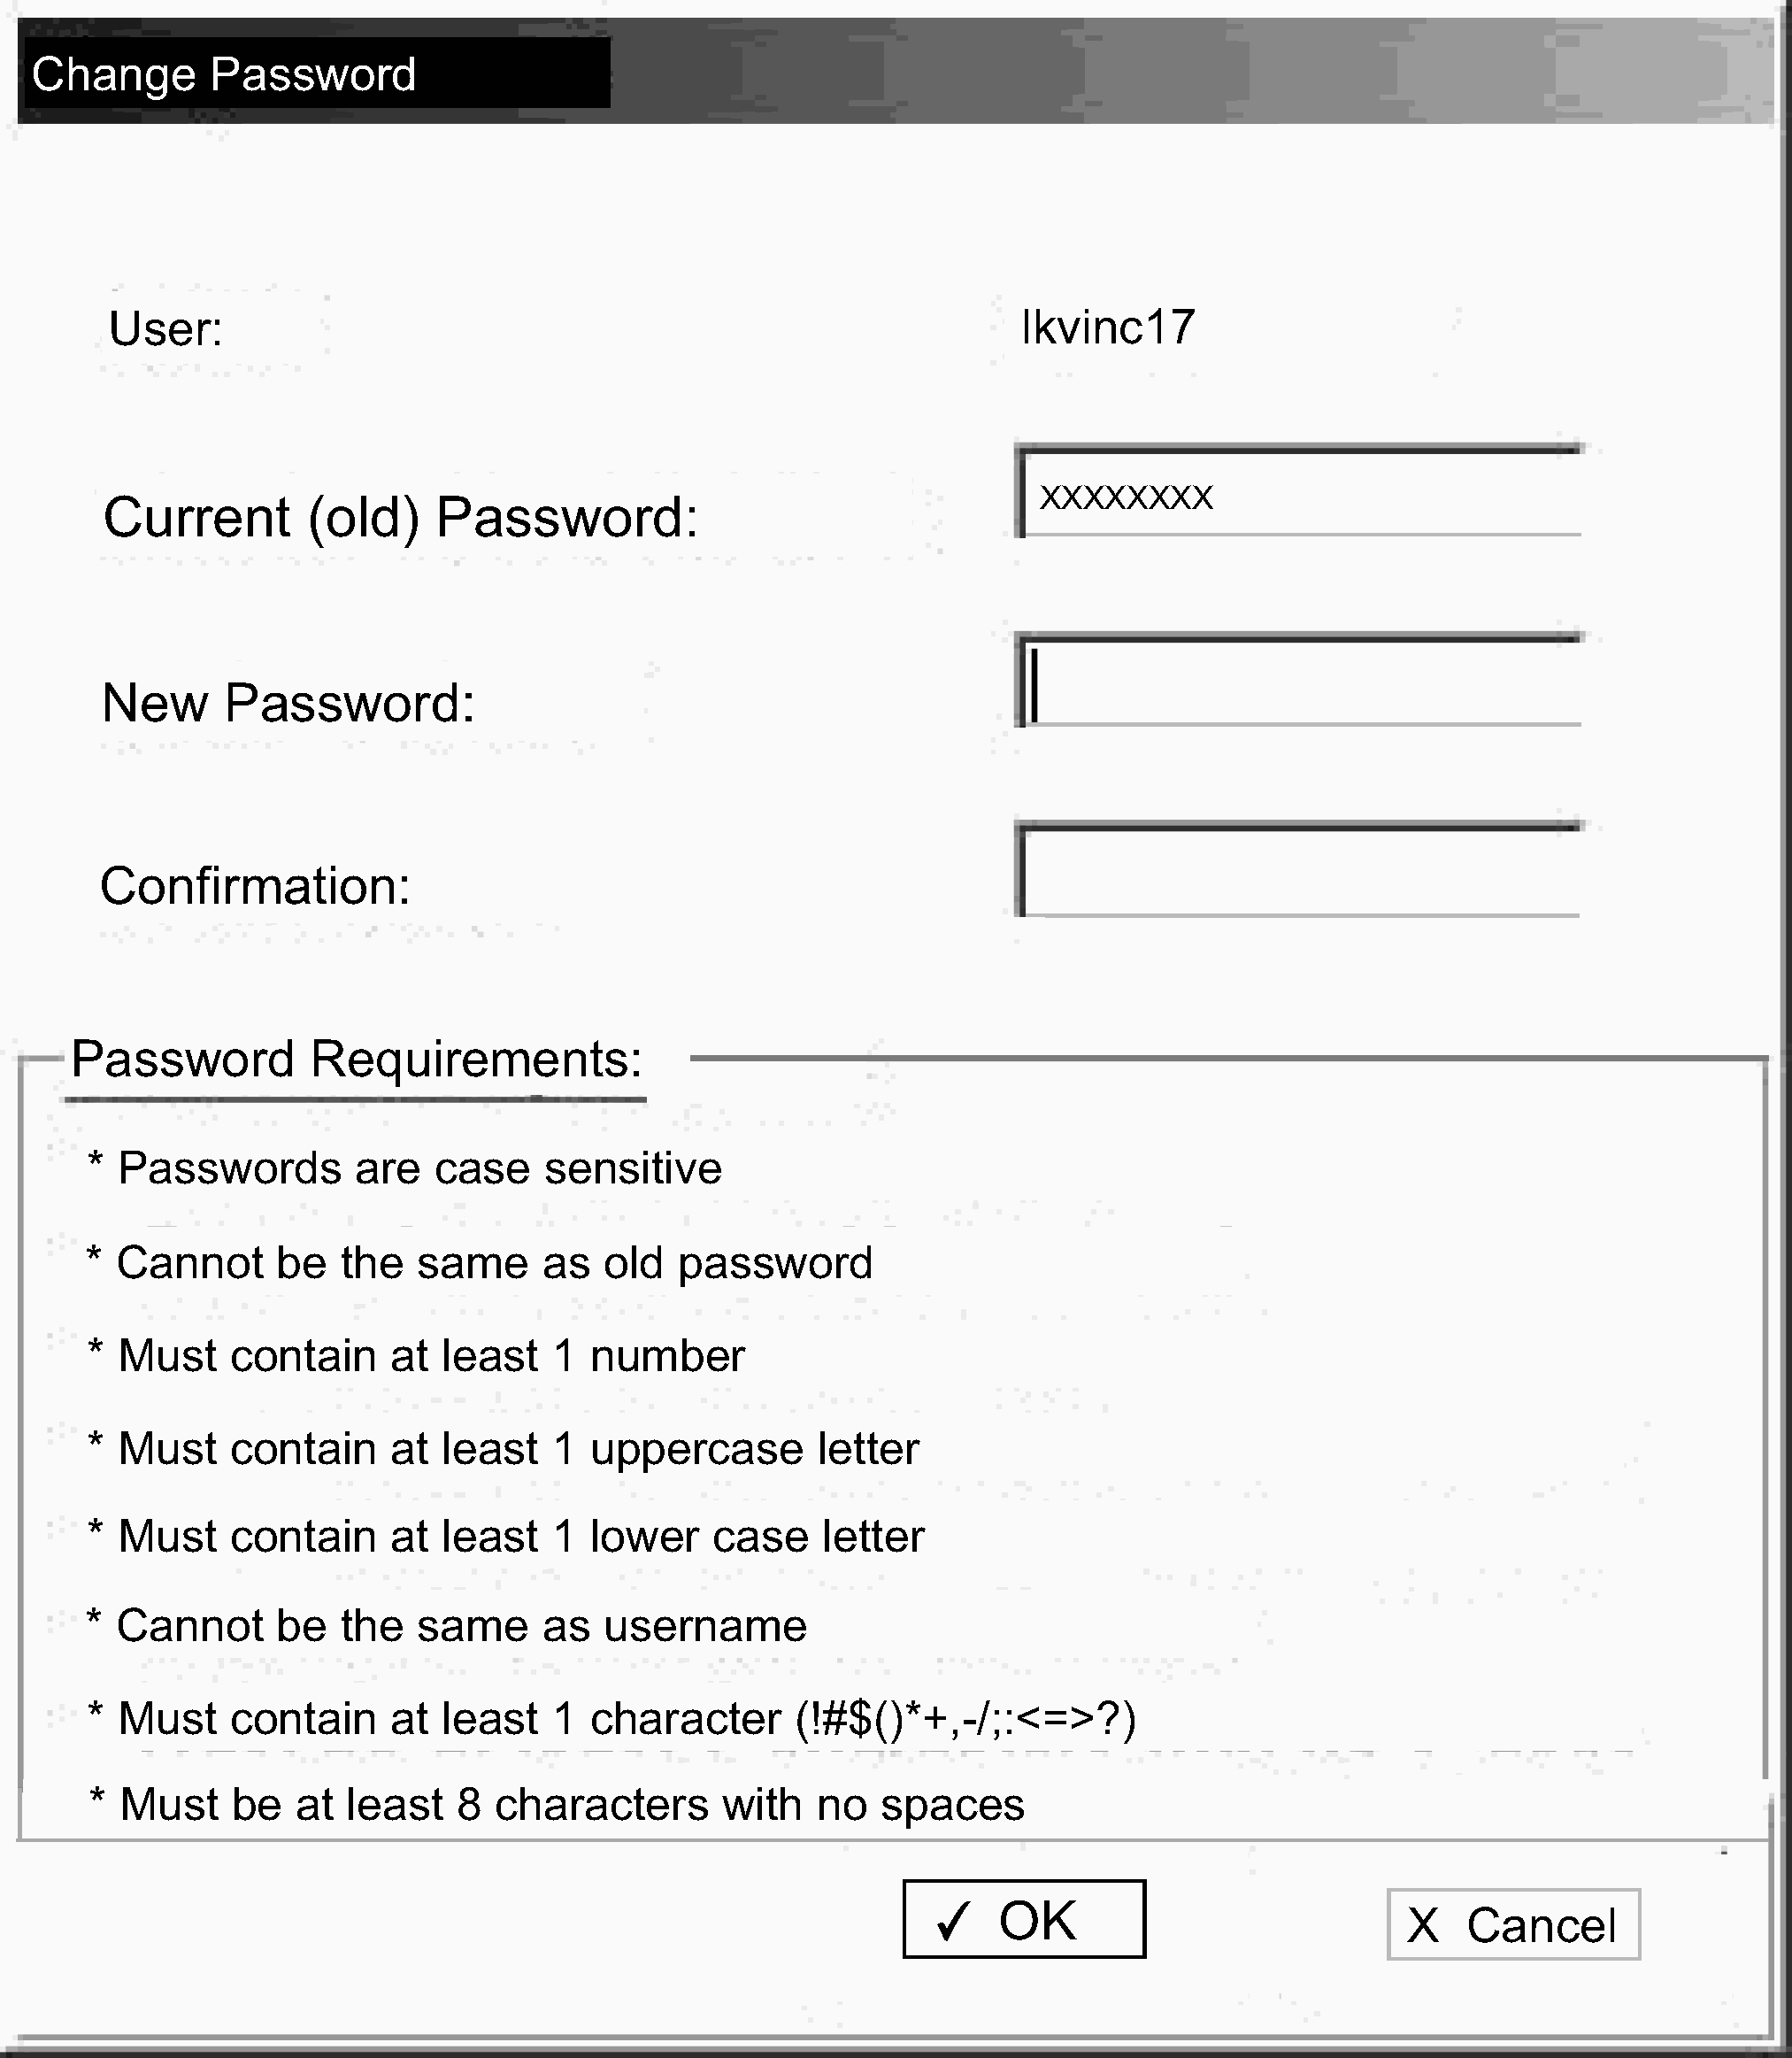
The first time you log into FCP you will receive the prompt "Your Password has expired." Click "OK" to create a new one. After clicking "OK" the following window will appear. Figure 4.19.9-6Password Change Screen You will need to input:
-
Create a new password
-
Re-enter the new password
-
Click the "OK" button at the bottom of the screen
-
-
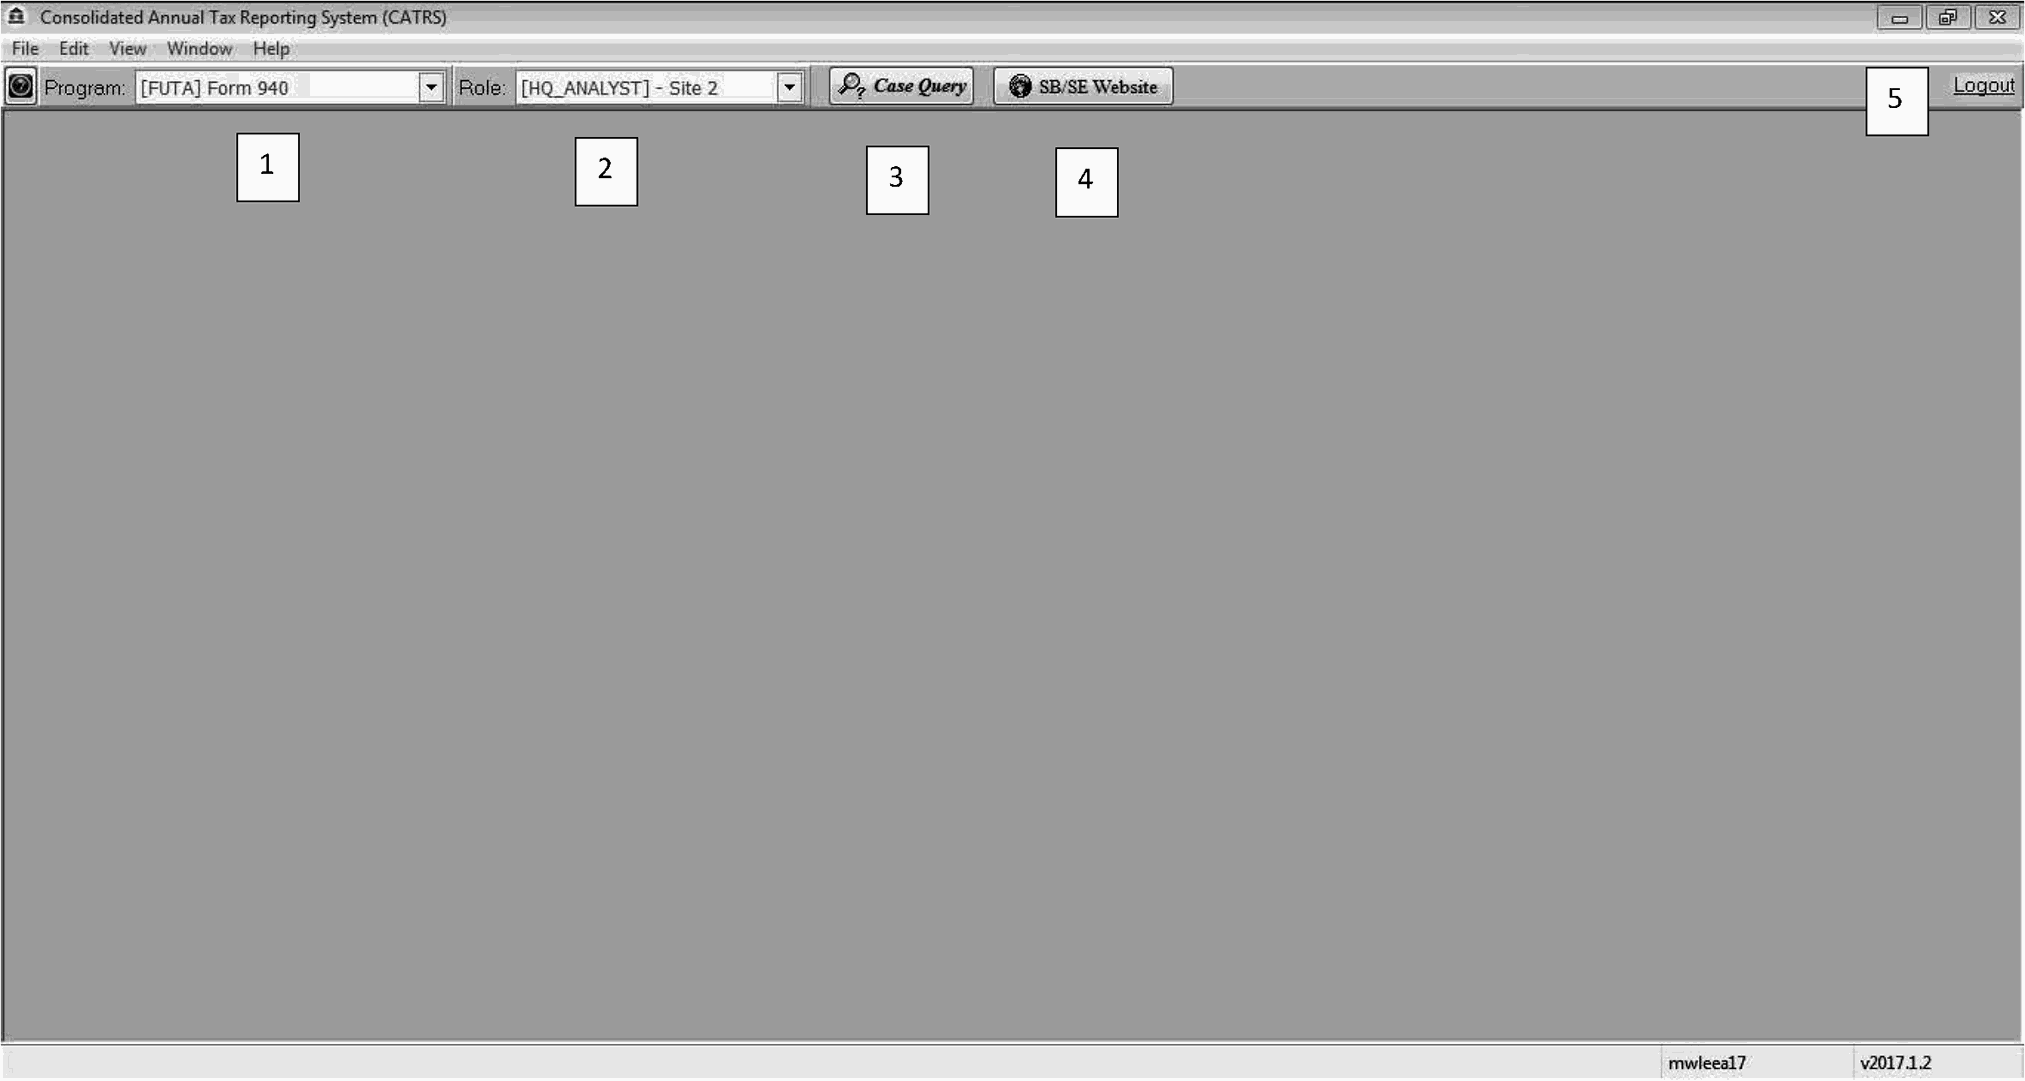
When you login, the following screen will be displayed. Any of the following can be executed by placing the cursor over the button and clicking the left mouse button. Figure 4.19.9-7First View of FCP
-
"Program Option" drop down that allows a user to switch programs
-
"User Role" this display is reading your profile based on your login information
-
Case Query button
-
SB/SE Website button
-
Logout button
-
-
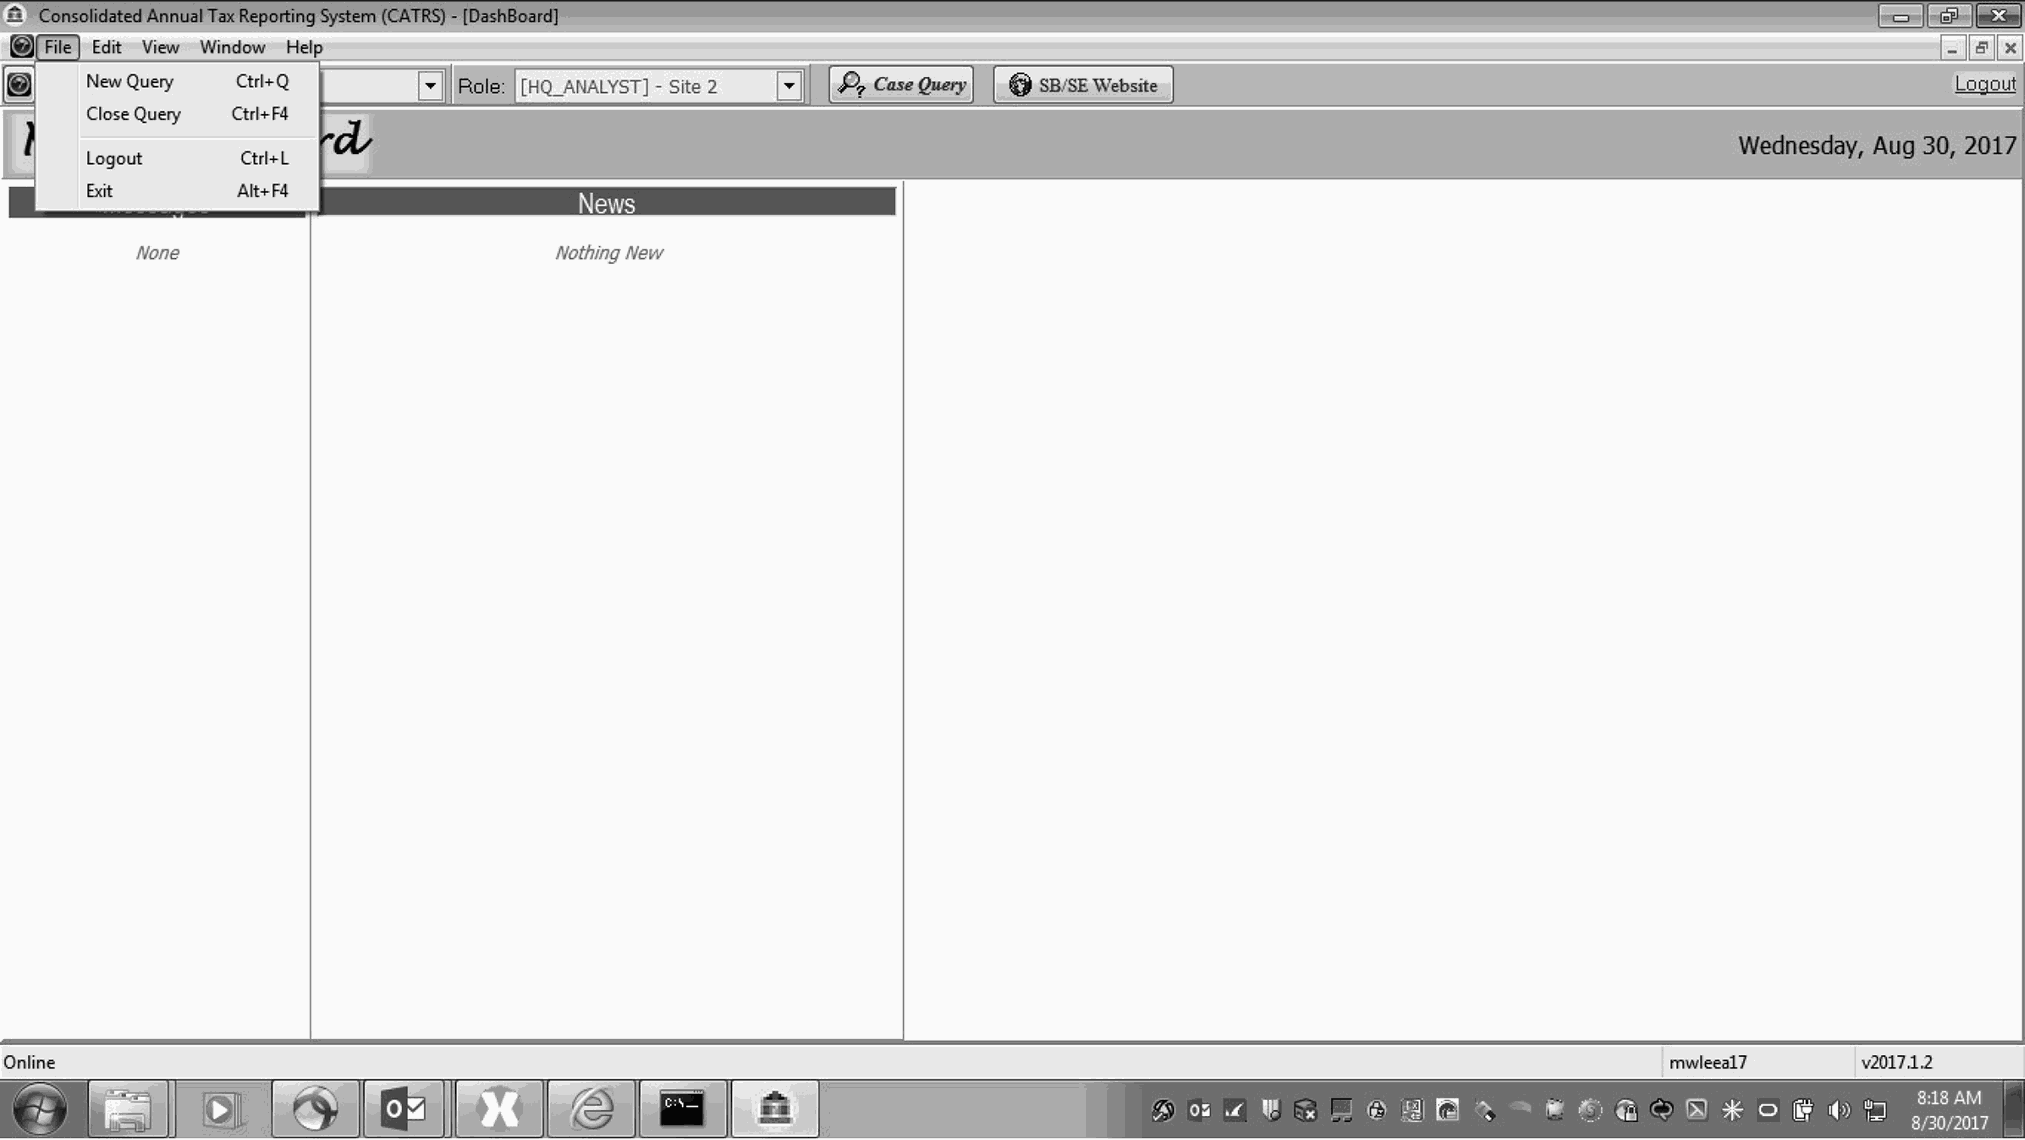
When you place the cursor over File option located in the upper left hand corner and left click the mouse button a drop down will open. The functions shown are activated by either scrolling over the listed item and clicking the left mouse button or by pressing the combination of keys on the keyboard simultaneously. Figure 4.19.9-8File Option
-
New Query or <Ctrl> + <Q>
-
Print Screen or <Ctrl> + <P>
-
Logout of FCP or <Ctrl> + <L>
-
Exit FCP or <Alt> + <F4>
-
-
The File drop down can be closed either by placing the cursor over the file option and left click the mouse or by placing the cursor else where in the FCP database and left clicking the mouse.
-
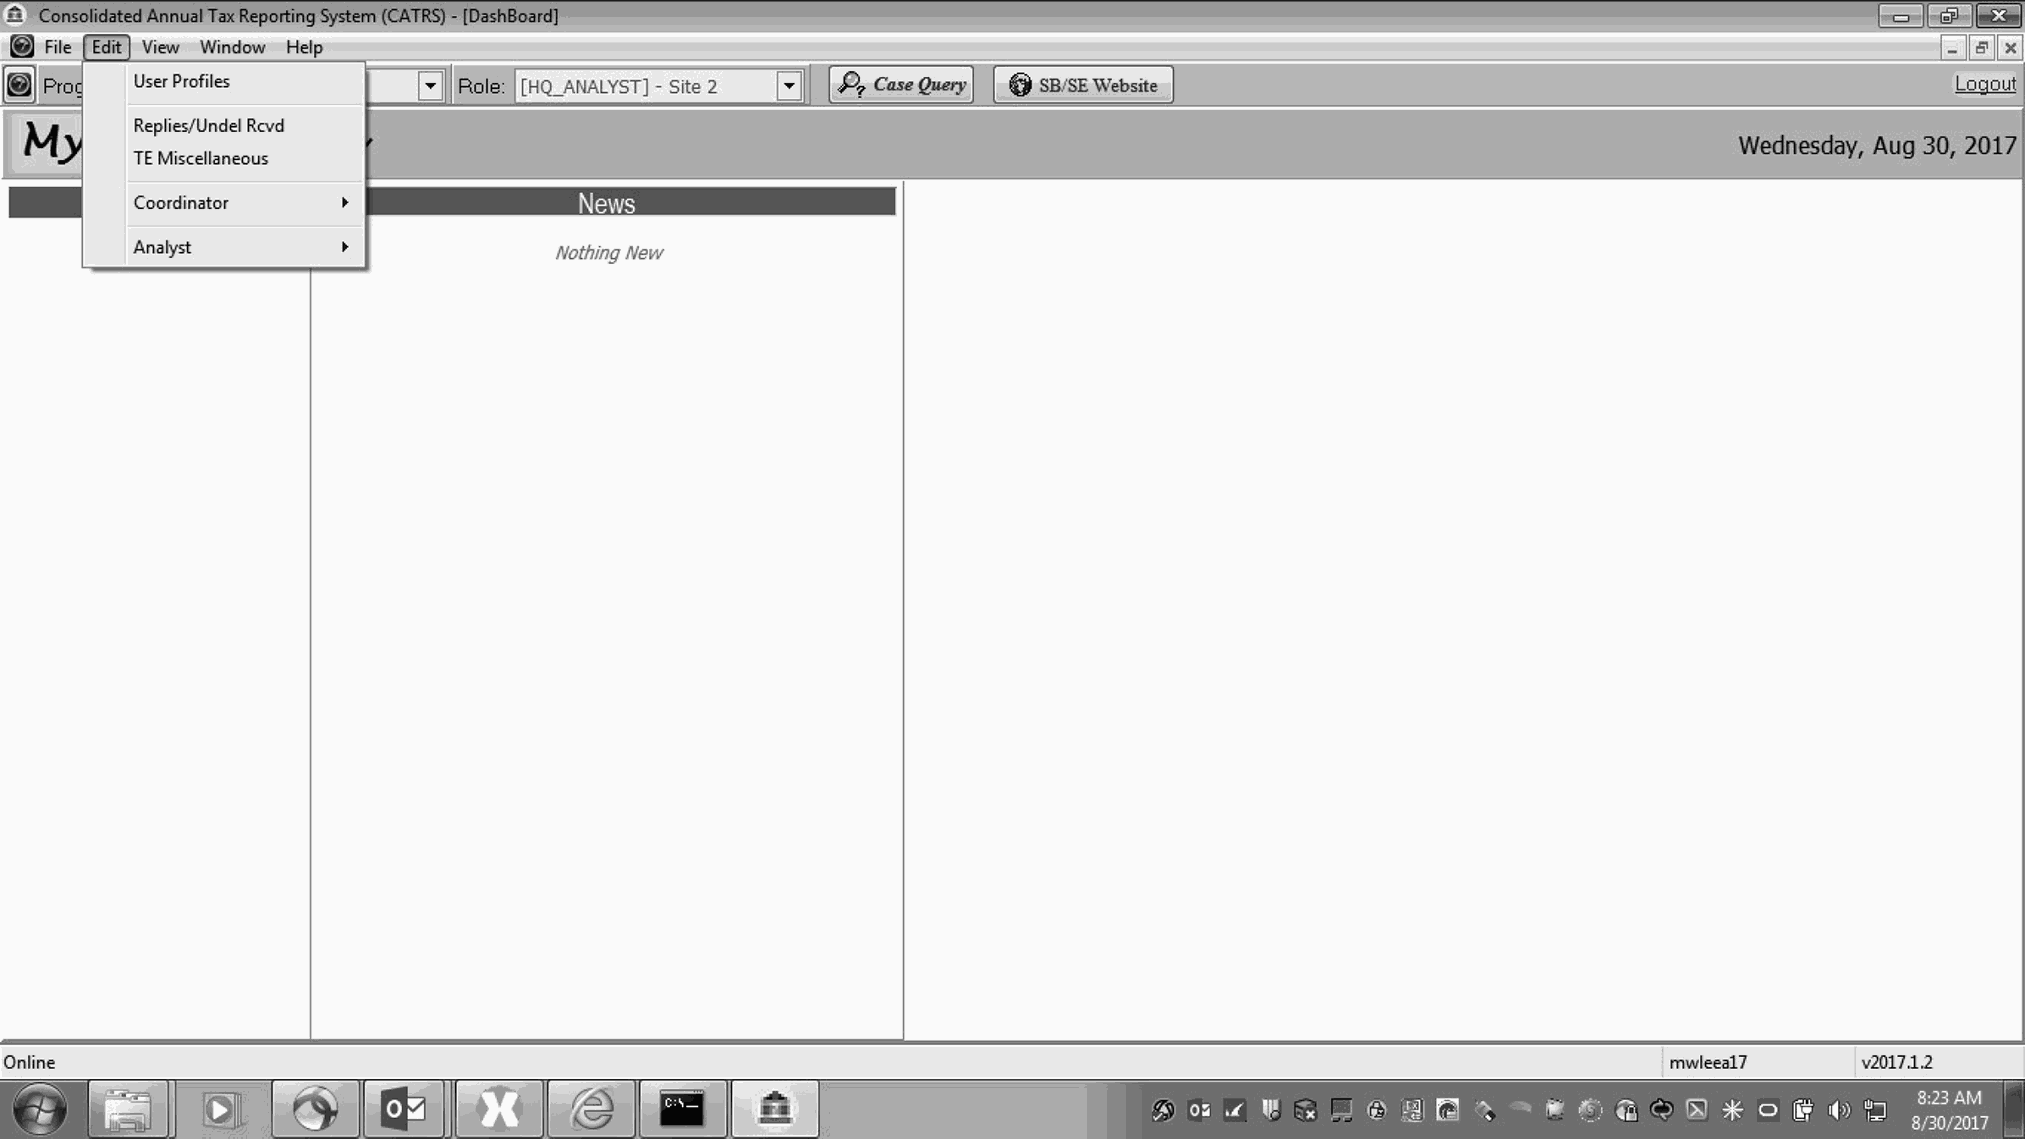
When you place the cursor over the Edit option and left click the mouse button a drop down will open. The functions shown are activated by scrolling over the listed item and clicking the left mouse button. Figure 4.19.9-9Edit Option
-
User Profile: This function is used by the site coordinator to grant roles and permission levels to a user.
-
Replies/Late Replies/Undeliverables Rcvd: This function is used by the clerical staff to input replies, late replies and undeliverable dates to specific cases within the FCP database.
-
TE Miscellaneous: This function allows access to the loose state certification and Disaster tables.
-
Coordinator: This function allows the site coordinator to assign batches, mass generate letters and access program settings.
-
Analyst: This function is used by headquarters staff only.
-
-
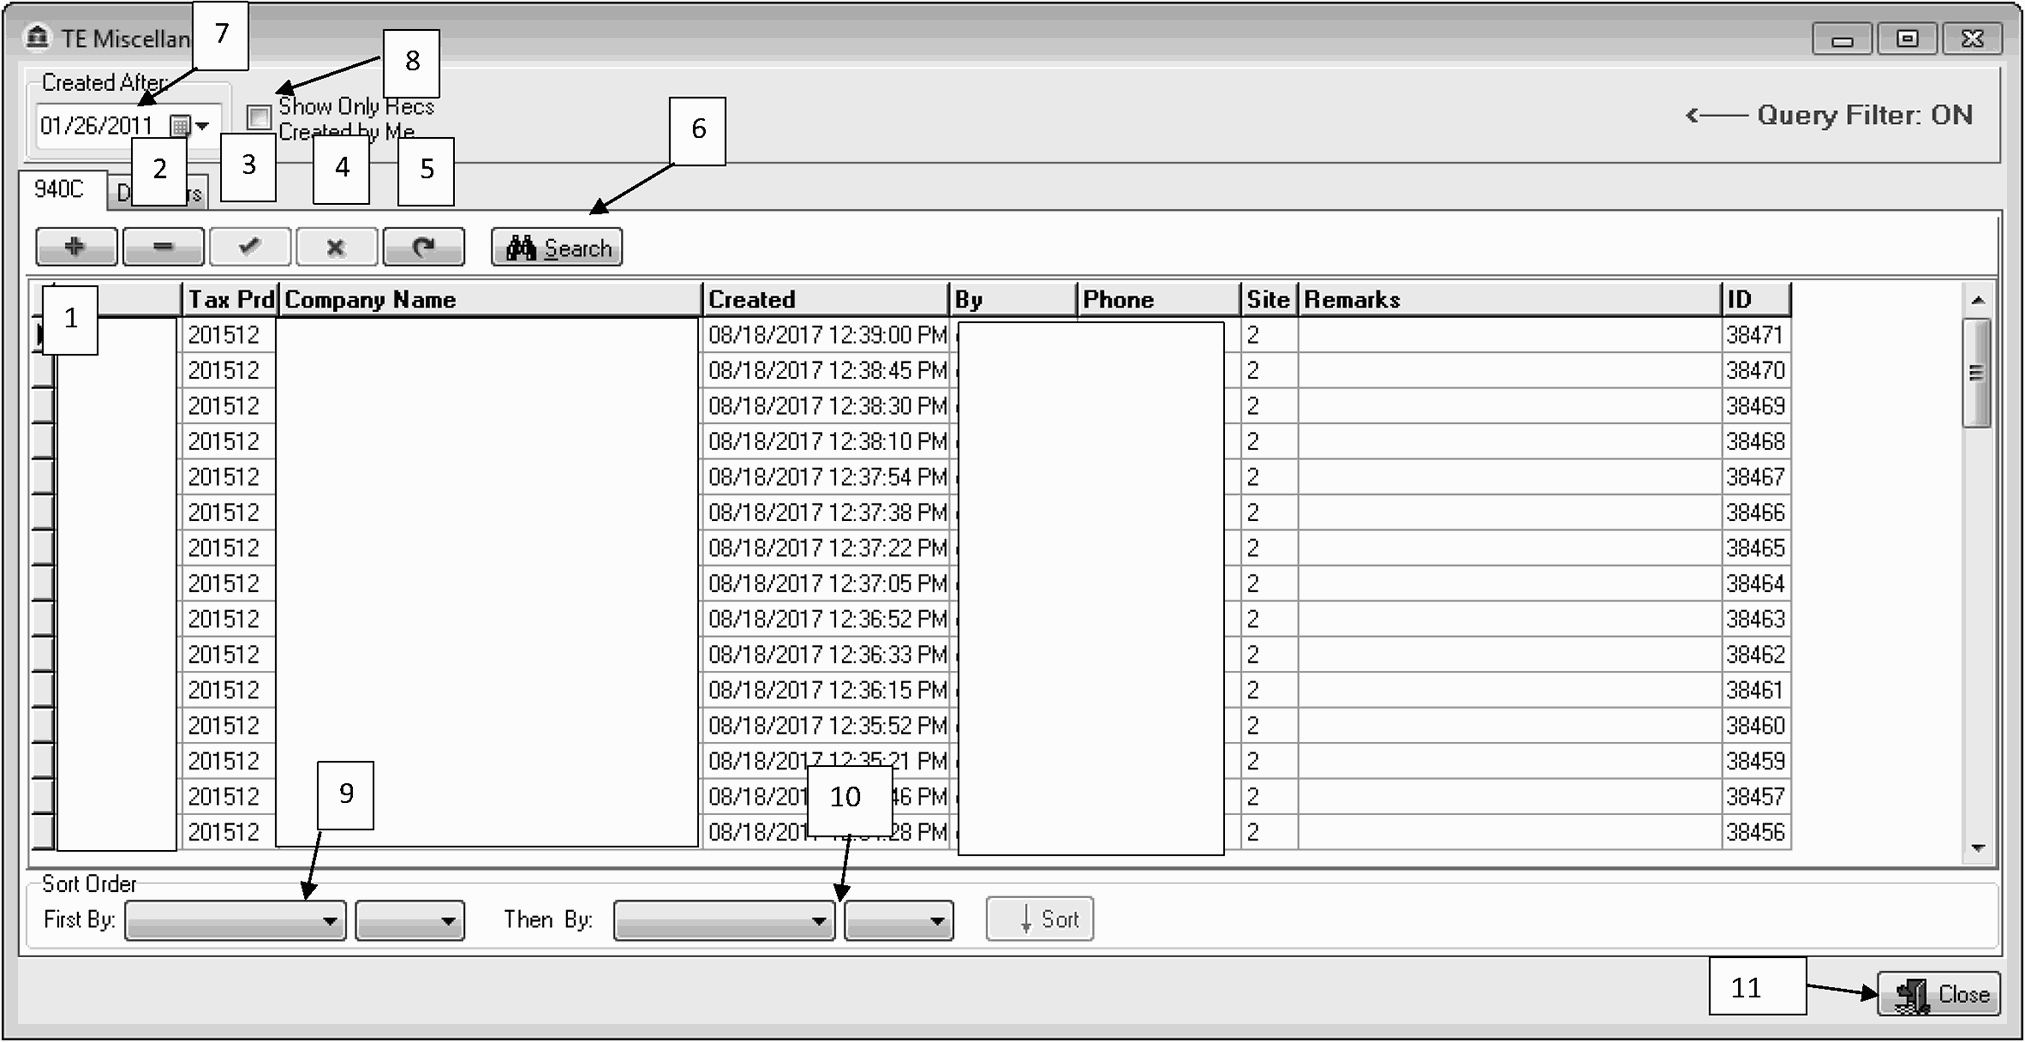
When Form 940C (loose state certs) are received in the FUTA unit with no additional correspondence, the FCP system needs to be immediately updated upon receipt to show the Form 940C exists and needs to be considered prior to any taxpayer correspondence. Figure 4.19.9-10Futa Form 940C Table.
Field Number Field Description 1 Insert New Record 2 Delete Record 3 Post Edit 4 Cancel Edit 5 Refresh Data 6 Search Function 7 Data Search Function 8 Sort Self Inputs 9 First Sort Option 10 Second Sort Option 11 Close Exits the Loose Cert Screen
-
Selecting the Search button allows users to search for a specific Form 940C by selecting one of the following fields from the drop down arrow: Figure 4.19.9-10Search FUTA Form 940C Table.
-
EIN (Employer Identification Number)
-
Tax Period
-
Company Name
-
Created
-
By
-
Phone
-
Site
-
Remarks
-
ID Number
-
-
To begin a search click the "Search Button."
.-
Select the specific criteria from the search field
-
Complete search string criteria.
-
After search field and search string are populated the "Find Button" will become available to begin the search of the loose cert table
-
The "Close Button" will close the process and return the user to the loose cert table
-
-
This responsibility may be assigned to specific users at each site. Check with your manager or lead before inputting any Form 940C.
-
When adding a new Form 940C record you will be required to complete the following information:
-
After input the Post edit button will save the entry. Delete record and Cancel edit will void the request.
-
After inputting a new record write the ID number on the front of the Form 940C. No two ID numbers are the same. This number is used to file the documents in sequence order at each site.
-
After a new Form 940C record is input, any subsequent case that is loaded to the FCP database will be cross checked with the Form 940C table. Any case that matches a Form 940C record will get a " yellow bar across the screen of the case" to notify the tax examiner that a Form 940C record exists. The yellow bar will display "940C" and the associated " Sequence Number."
-
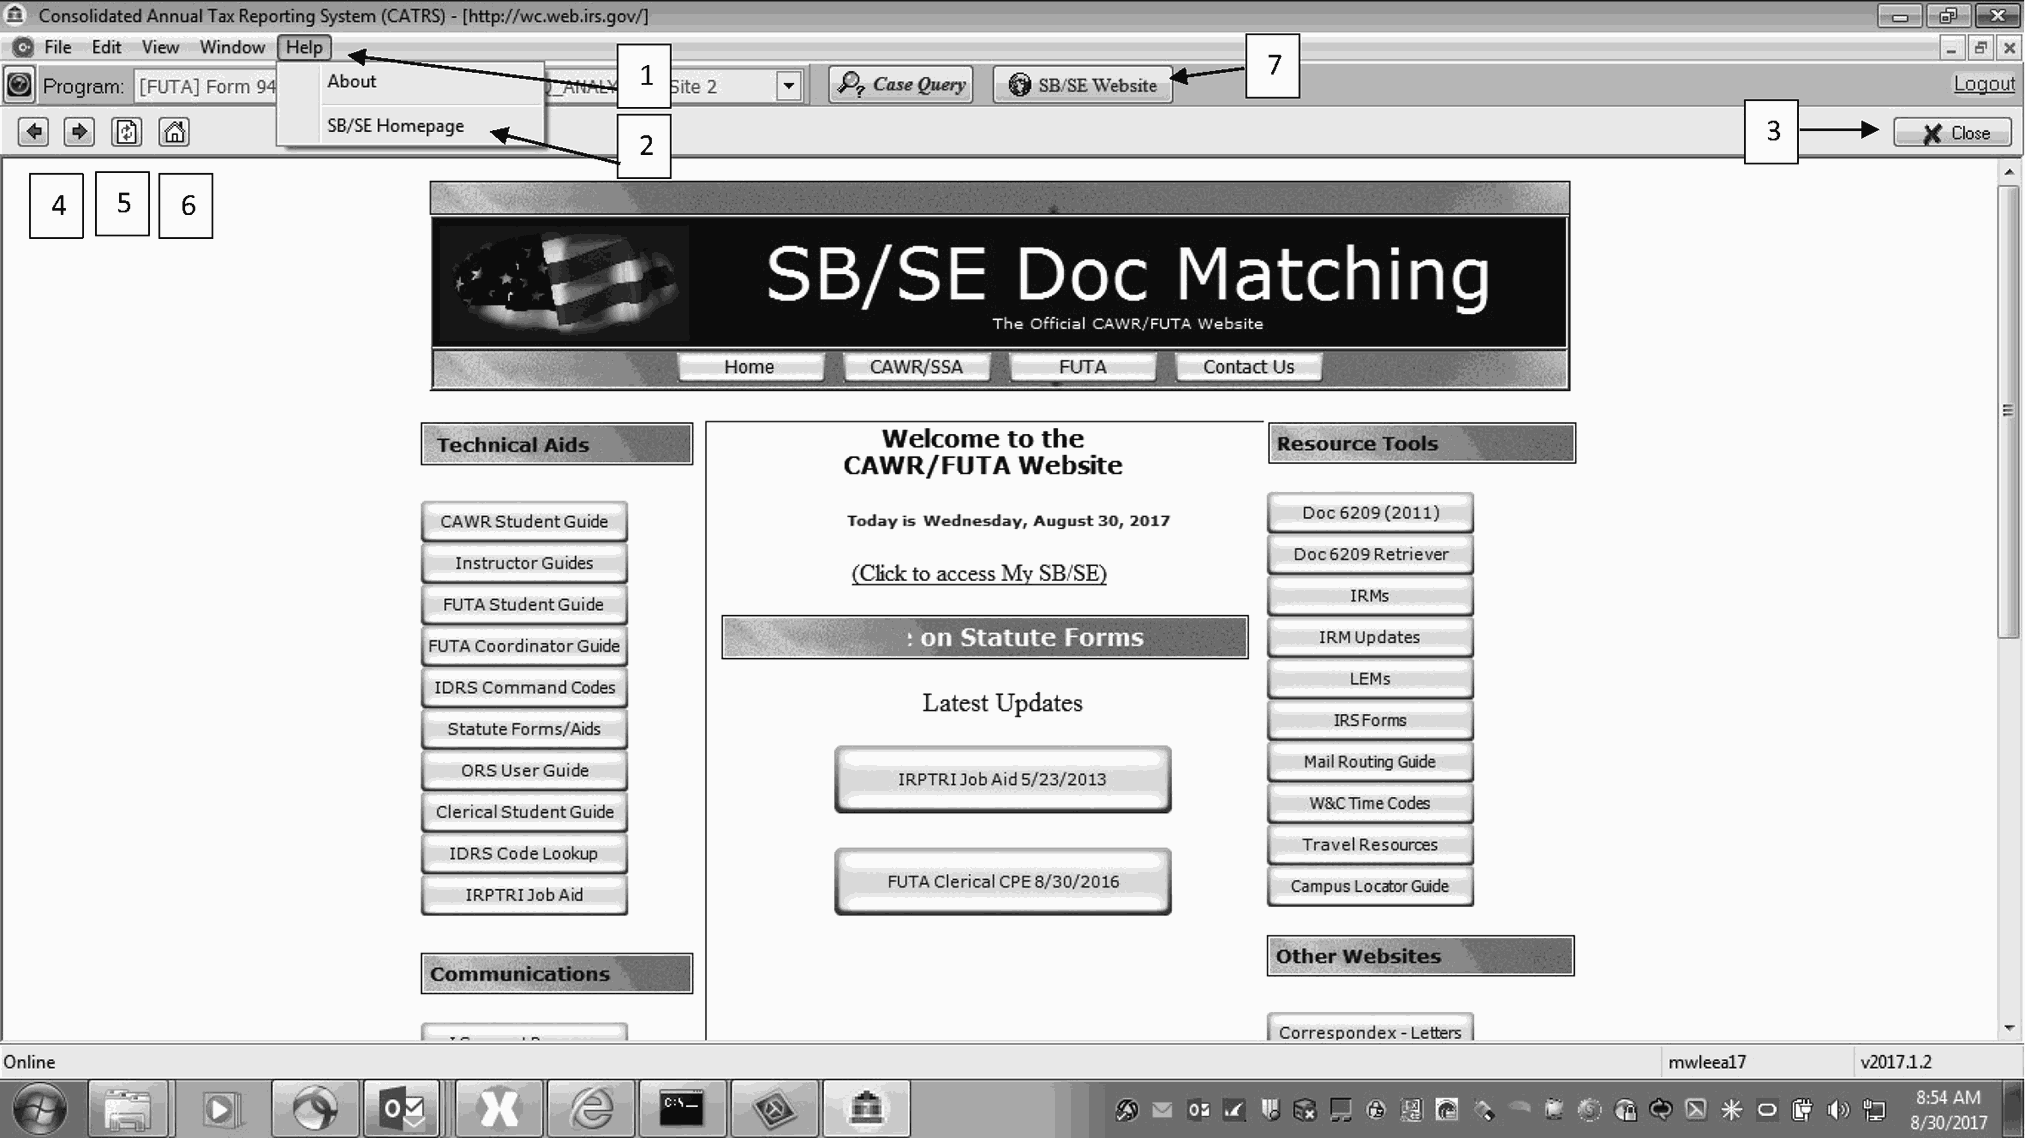
When the cursor is placed over the "Help Option" and clicked with the left mouse button you will see a drop down for the CAWR/FUTA web site. The web site can be accessed through FCP during your login session. The site can also be accessed via the internet explorer icon located on your workstation desktop at http://wc.web.irs.gov/. Figure 4.19.9-11Help Option.
-
Left mouse click "Help Option"
-
Scroll down to SB/SE home page , left mouse click and web site will open and run as wallpaper in the FCP database
-
Close web site option
-
The arrow buttons serve the function of forward and backward while using the web site
-
This button will refresh the current web page
-
This button will return you to the SB/SE home page
-
This button will also access the SB/SE home page
-
-
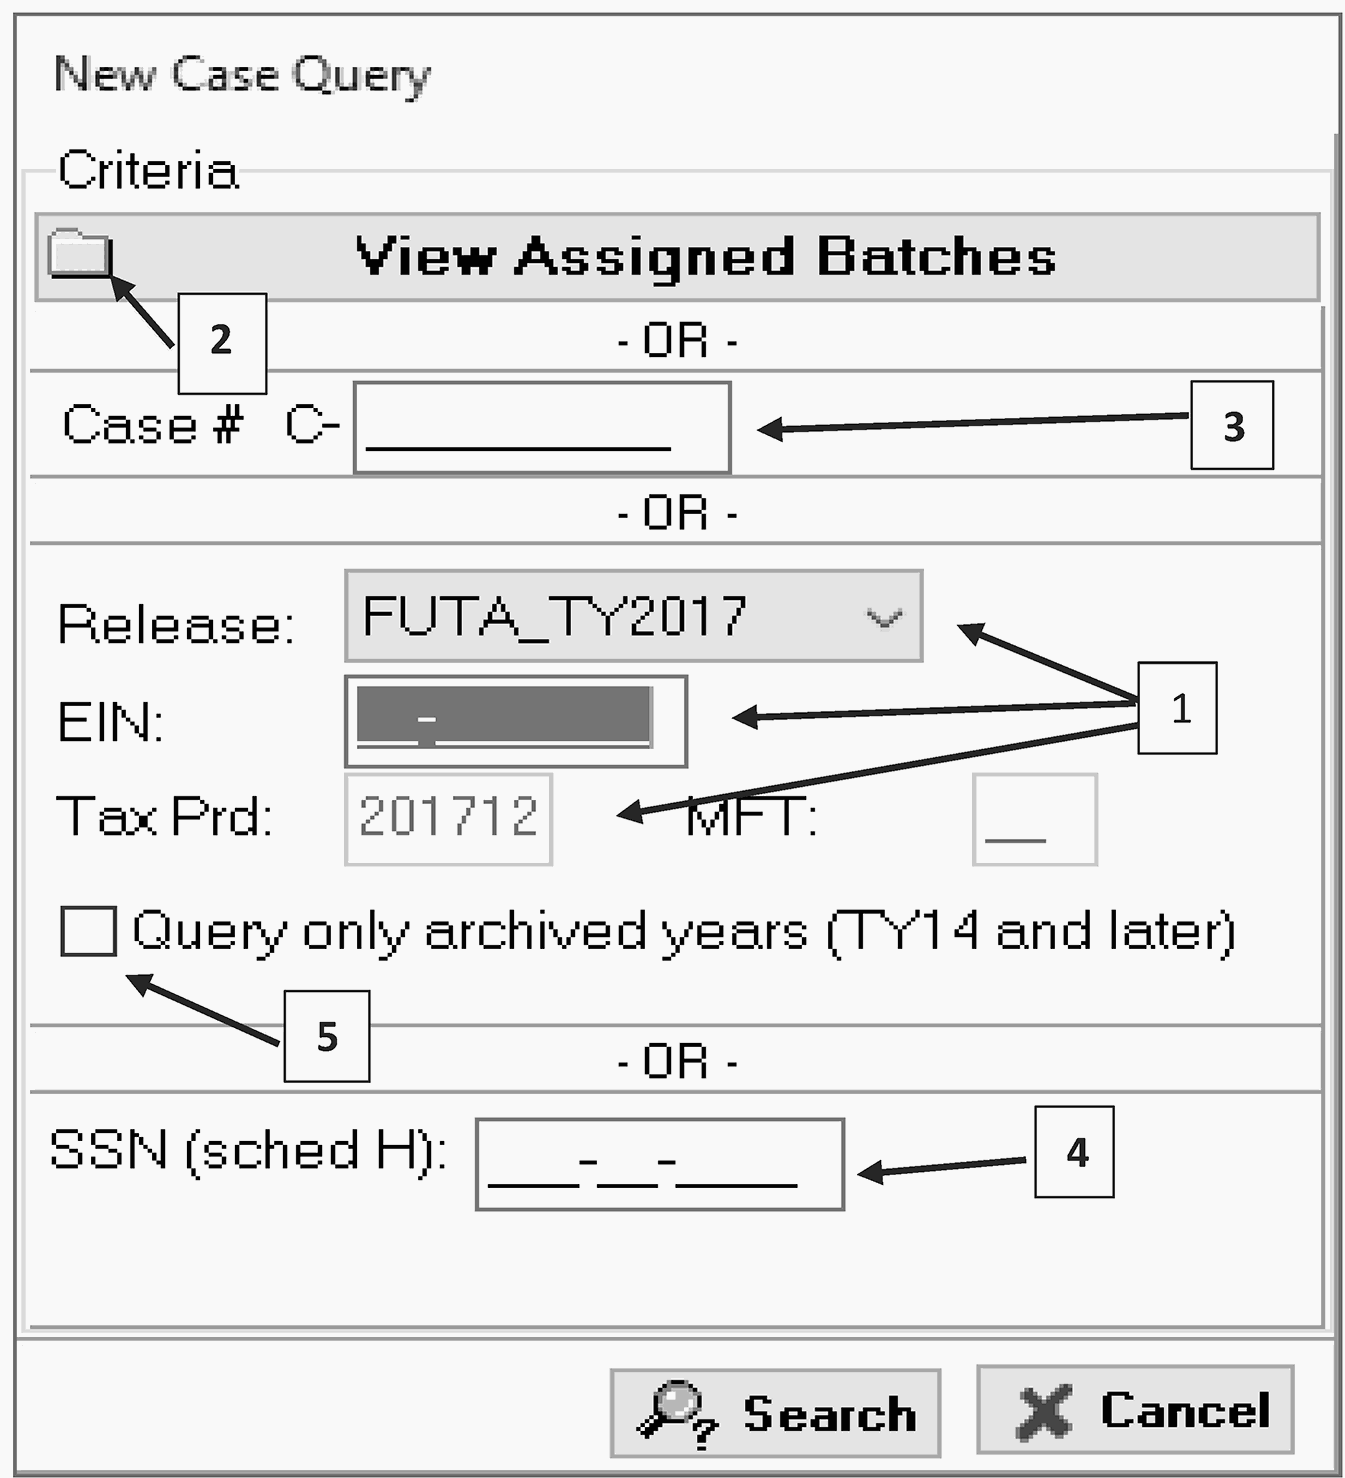
How and when to use the FUTA Query screen depends on what phase of the program you are working. You can access either your Assigned batches or Individual case files. There are two parts on the FUTA Query screen. They are "Query By" and "Case Fields" . To access the FUTA Query screen left mouse click on the query button.
-
The FUTA Query screen has five main functions that a user can access.
-
Individual Case Query: This is used mainly after the initial screening phase
-
View Assigned Batches: This is mainly used in the initial screening phase of the program when cases are assigned in batches
-
Case # Query: This is used to query by control number
-
SSN (Sched H) Query: This query is used when only the SSN is available
-
Archive Query: This query option is used to access recon case that no longer exist in FCP.
-
General Case Information
-
Original Business Address
-
Misc Indicators
-
Money Screen Tax Return Information
-
Money Screen State Reporting Information
-
Adjustment Screen Information
-
Letters Screen Information
-
TE Remarks
-
History Screen Information
-
-
To perform a single case query input:
T-
Release
-
EIN
-
Tax Period
-
The search button executes the query function. Figure 4.19.9-12
-
-
To access assigned batches: select" View Assigned Batches" . This will automatically access the "Select Batch User Inventory Screen" . Batches are assigned to a user by either a manager or coordinator. To open an assigned batch, scroll over the batch you want to open and left click mouse. Figure 4.19.9-13
-
The select batch user inventory screen displays the following information: Figure 4.19.9-13
-
User name and total batches assigned
-
Batch types assigned, by left mouse clicking on the batch type this will expand to show the batches assigned if the volume assigned is greater than 1. Click it again and it will hide the associated batches
-
Batch number and volume of cases within each batch
-
Program release of the batch, Site ID and date the batch was assigned to the user
-
-
After you select a batch or perform a single case query, FCP will access the information associated to the requested record(s). When a record(s) is accessed it will automatically default to display the Detail screen.
-
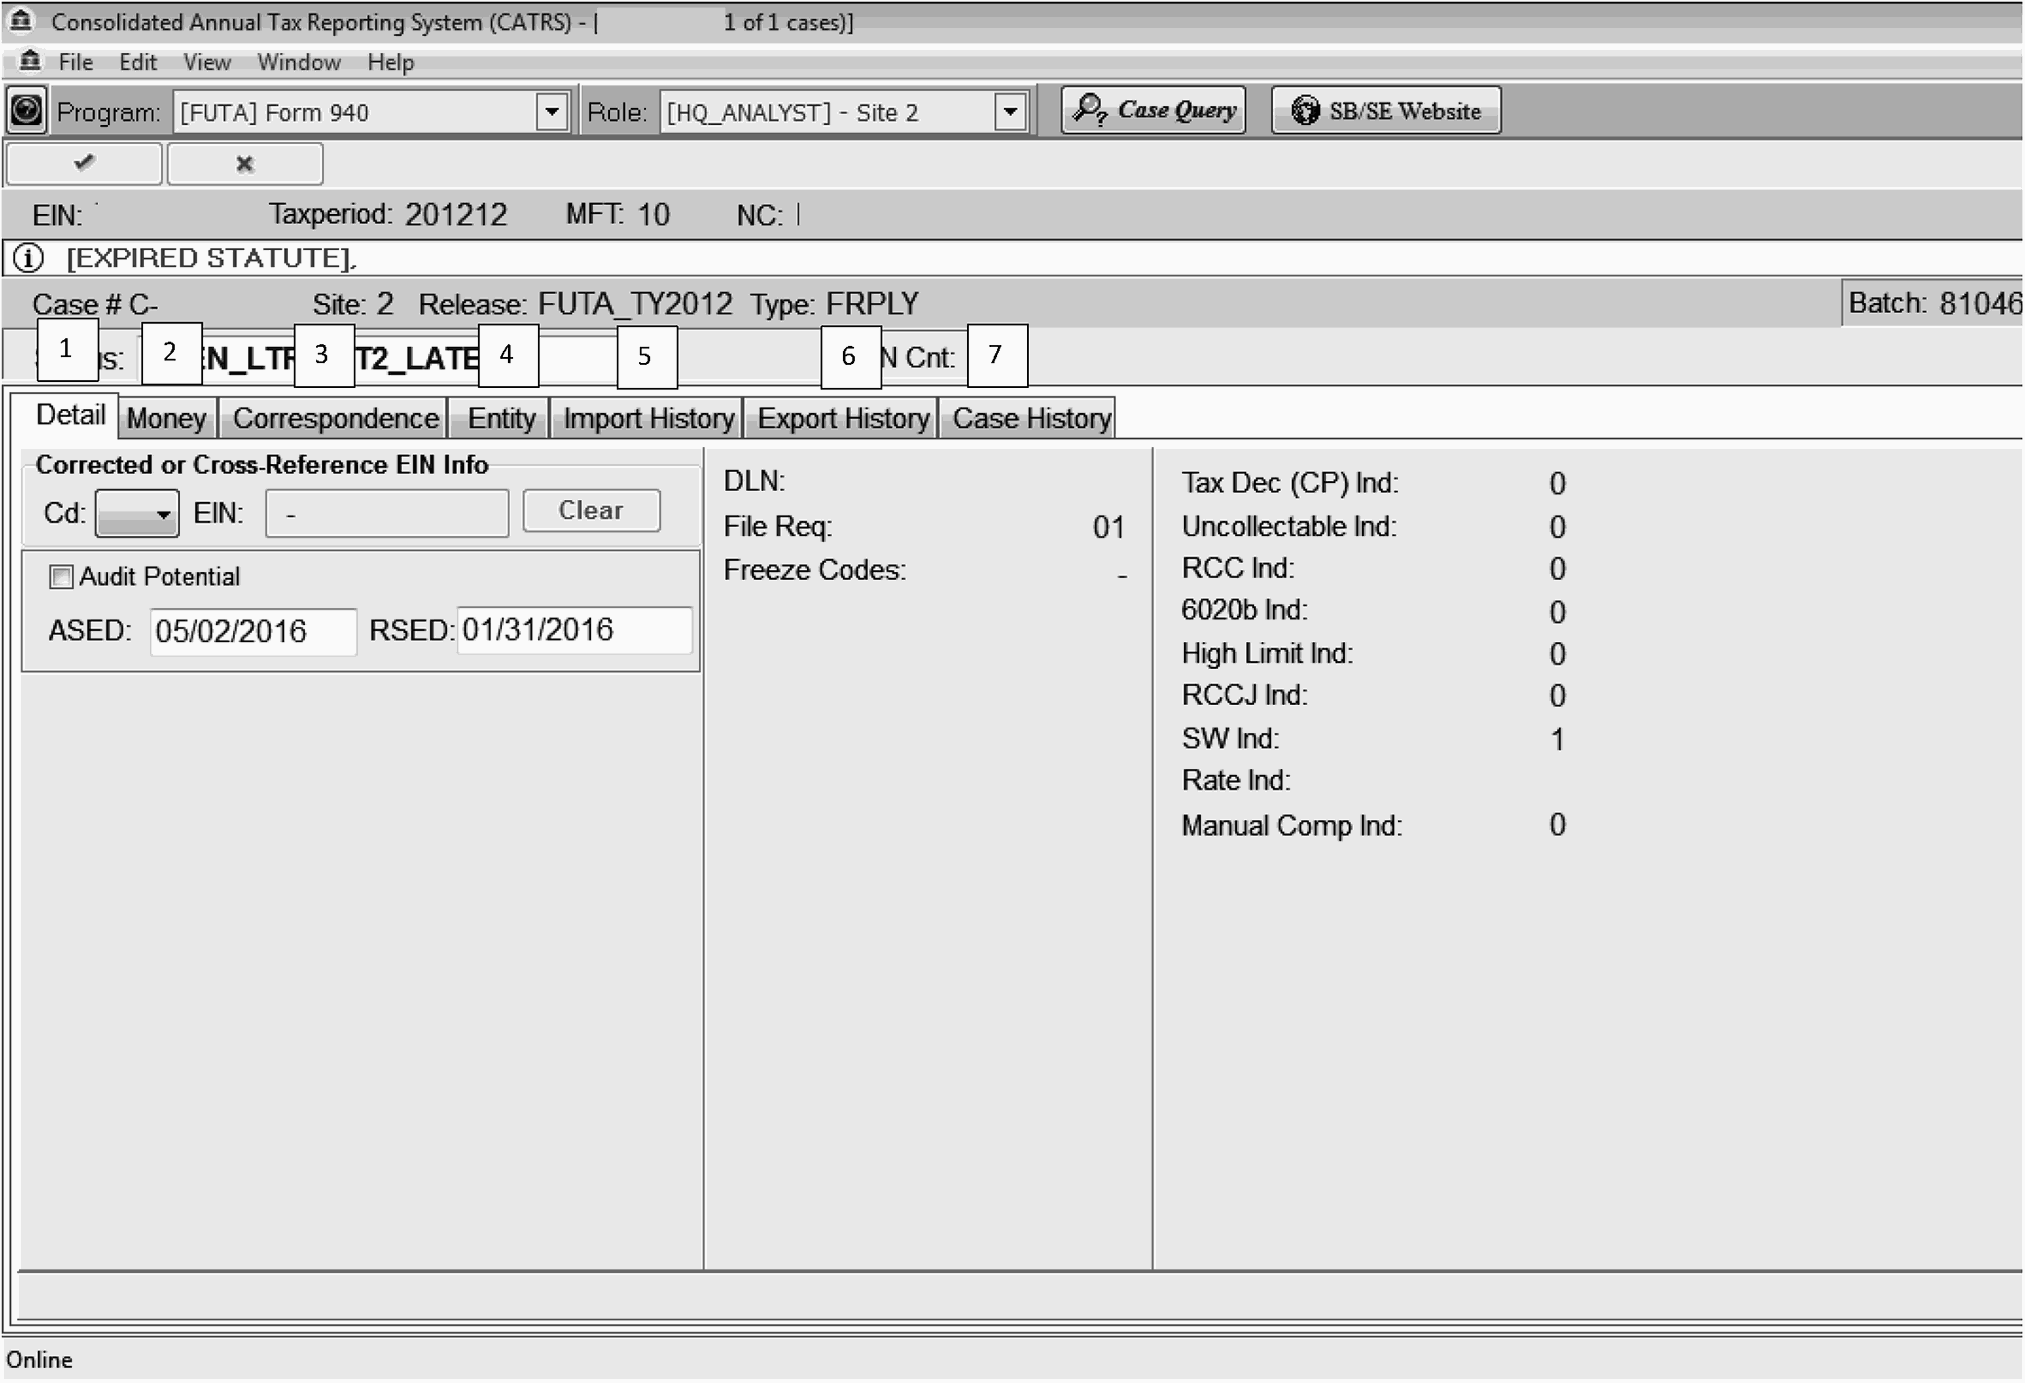
The "Header Section" contains the following information. Figure 4.19.9-14Case Header Section.
-
Shows the EIN of the record you are viewing and the amount of records contained within the batch
-
Displays the case EIN
-
Tax Period of case
-
MFT of case
-
Program Release (REL)
-
Name Control of business
-
Business Name
-
EIN count: This field displays the amount of cases for the EIN being viewed
-
Batch Type
-
Batch number
-
User name the batch/case is assigned
-
Exit case button: By selecting this button you can close a query or remove a case from the assigned batch
-
Assigned Date
-
Site ID
-
Case ID number
-
Close query button: By selecting this button you will close the view of the current case or batch
-
Case Cycling buttons
-
Case information bar: This field is used to display various case issues to the user
-
-
The Case Cycling buttons are also part of the Detail screen header section. Each Case Cycling button performs a different function. Figure 4.19.9-15Cycling Button The breakdown of their functions is shown below:
-
These buttons will allow a user to cycle to the first or the last record within a batch
-
These buttons will allow a user to cycle one record at a time within the batch
-
The Check Mark is called the post edit button. This button is normally grayed out, but once an update is made to a case the post edit button will become available and has to be selected to save any changes made to a case.
-
The "X" button is also grayed out until an update is made to a case. This button allows the user to delete any changes made to a case prior to selecting the post edit function
-
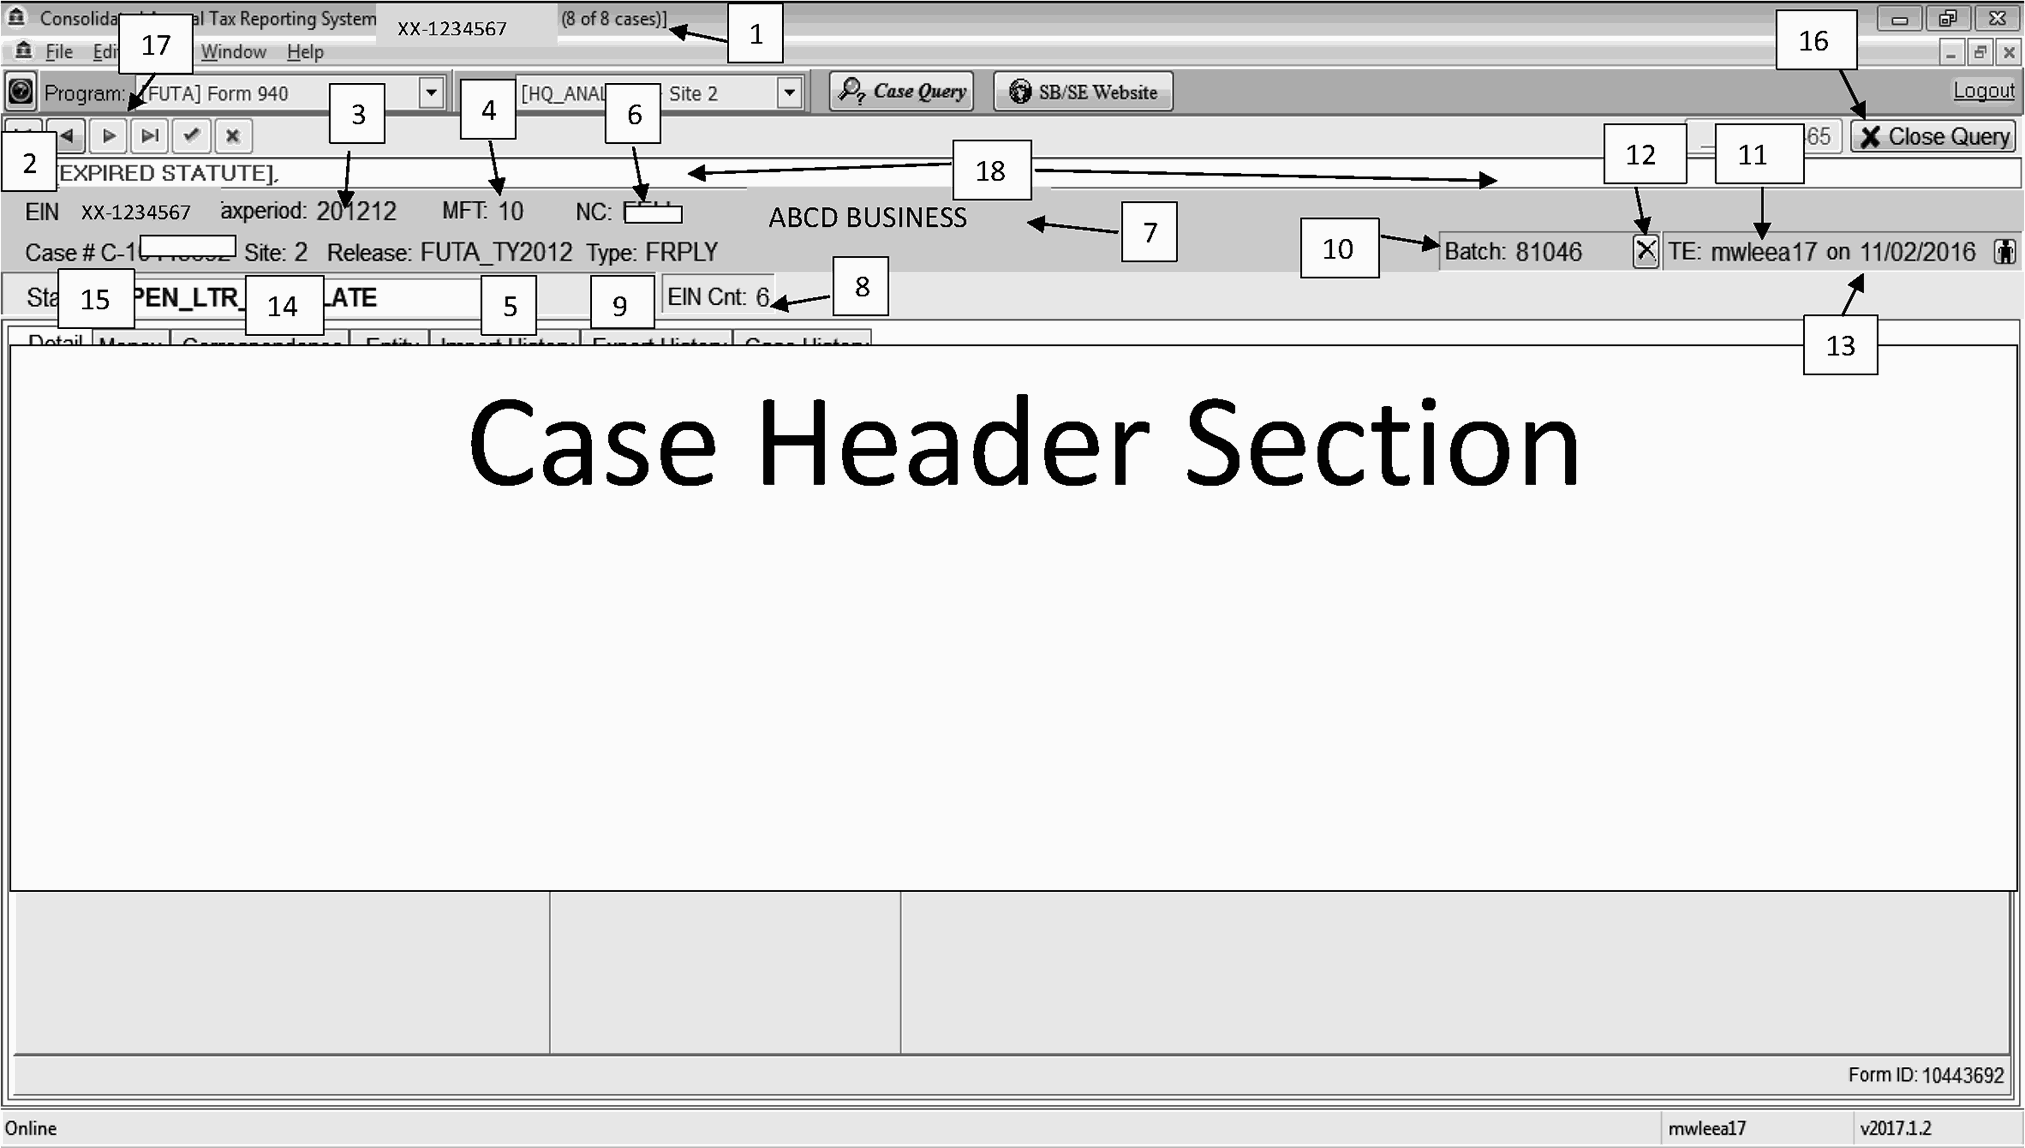

-
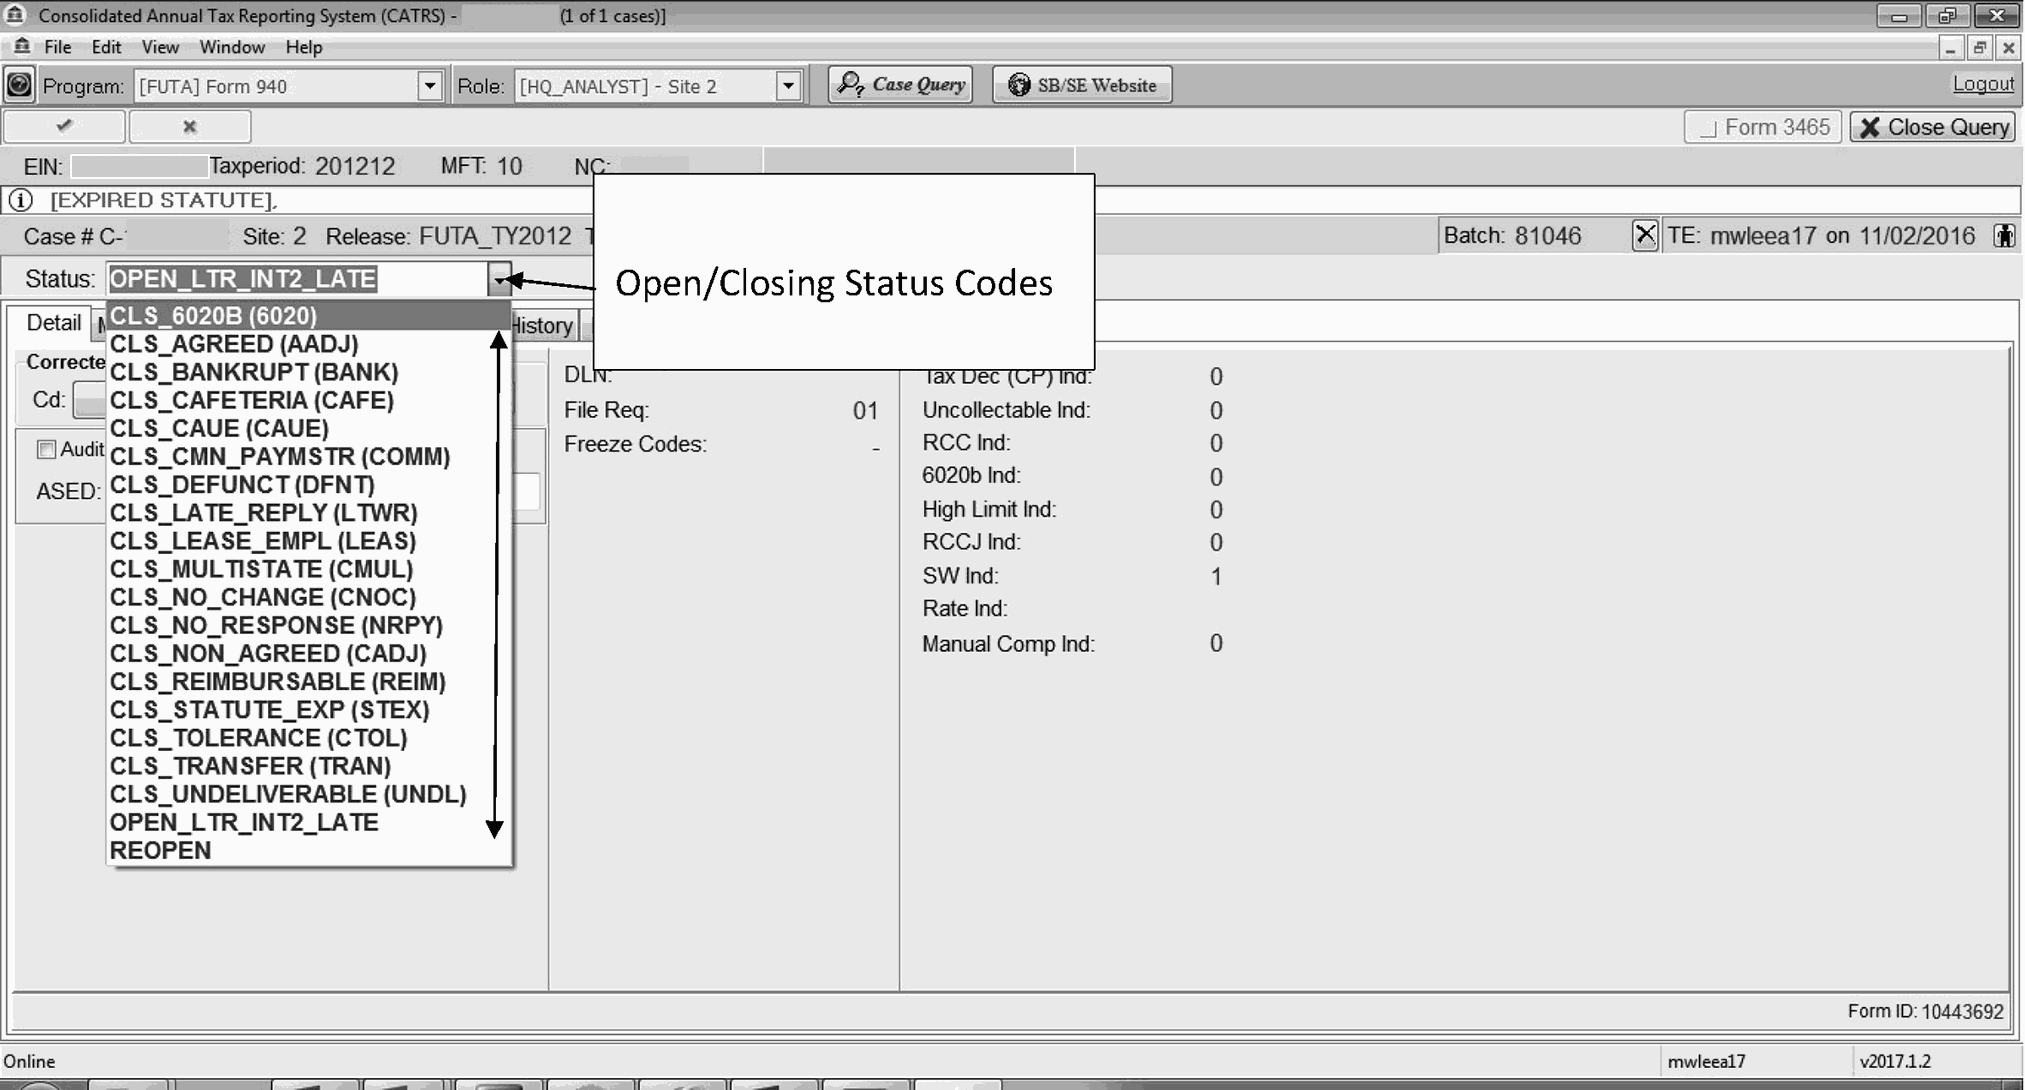
FCP has fourteen open status codes:
Every case in the FCP database starts with a "OPEN" status code. Open status code "REOPEN" is accessed by clicking the left mouse button while your cursor is placed over the case status drop down located in the header section of the case. This code will allow a user to reopen a previously closed case. The open/closing status codes are displayed in the drop down menu in alphabetical order. "OPEN_LATE_REPLY" status code applies when a reply is received after the initial case has been closed. Figure 4.19.9-16Open/Closed FUTA Status Codes.-
OPEN
-
OPEN_DUP
-
OPEN_LTR_380C
-
OPEN_LTR_4010
-
OPEN_LTR_4011C
-
OPEN_LTR_INT
-
OPEN_LTR_INT2
-
OPEN_LTR_INT_LATE
-
OPEN_LTR_INT2_LATE
-
OPEN_NO_RESPONSE
-
OPEN_REPLY_RECV
-
OPEN_LATE_REPLY
-
OPEN_UNDELIVERABLE
-
REOPEN
-
-
Below is a list of the possible closing status codes.
Closing Status Codes Definitions CLS_6020 (6020) 6020b case CLS_AGREED (AADJ) Agreed adjustment CLS_BANK (BANK) Bankruptcy CLS_NON_AREED (CADJ) Unagreed adjustment CLS_CAFETERIA (CAFE) Cafeteria Plan CLS_CAUE (CAUE) California Unity of Enterprise CLS_CDUP (CDUP) Duplicate Record CLS_MULTISTATE (CMUL) Multi-state Filer CLS_NO_CHANGE (CNOC) No Change CLS_CMN_PAYMSTR (COMM) Common Paymaster CLS_HQ (CSYS) Systemic Closure (cannot be undated by user) CLS_TOLERANCE (CTOL) Tolerance CLS_DEFUNCT (DFNT) Defunct Corporation CLS_LEASE_EMPL (LEAS) Leasing Employees CLS_LATE_REPLY (LTWR) Late Reply Worked CLS_NO_RESPONSE (NRPY) No Reply CLS_REIMBURSABLE (REIM) Reimbursable Account CLS_STATUTE_EXP (STEX) Statute Expiration Case CLS_TRANSFER (TRAN) Transfer CLS_UNDELIVERABLE (UNDL) Undeliverable
-
A case can contain five separate screens of information. There are two ways to access a screen: first by clicking the left mouse button on a screen tab, and second sing the shift key and the underlined character listed on the screen tab. Figure 4.19.9-17FCP Screens. Below is a list of the screens and their related underlined characters keys.
-
Detail screen <D>
-
Money Amounts screen
-
Correspondence screen <C>
-
Entity screen <E>
-
Import History <I>
-
Export History <X>
-
Case History screen <H>
-
-
The Case Information Section contains both information input by the user and information compiled by (IDRS). The information provided in this section of the detail screen must always be considered in the processing of a case. Figure 4.19.9-18FCP Detail Screen.
-
Below is a list of the information available:
-
Audit Potential "AP" check box: This only applies to accounts that the federal taxable wage limit is the same as the state taxable wage limit
-
ASED (Assessment Statute Expiration Date)
-
RSED (Refund Statute Expiration Date)
-
Corrected and Cross Reference Information: The indicator field allows two options: "C" if this is a Correct EIN and "X" if this is a Cross Reference EIN. Once the indicator field and EIN field are populated the "clear button" will enable. This button will clear the fields prior to post editing the information
-
Document Locator Number (DLN)
-
Filing Requirements (see Doc 6209 for definitions)
-
Freeze Codes (see Doc 6209 for definitions)
-
Case Indicators: Case indicators of zero or blank means no condition exists
Indicator Definition CP 0 = 4010C, 1 = 4011C (See Note) Un-collectable TC 530 present RCC Return Condition Code Present 6020b Substitute for Return Present High Limit Balance Due Greater Than $20,999.99 RCCJ Return Condition Code (Not Subject to FTD Penalty) SW State Wages Present Rate Rate Code Manual Comp Case Requires Manual Processing -
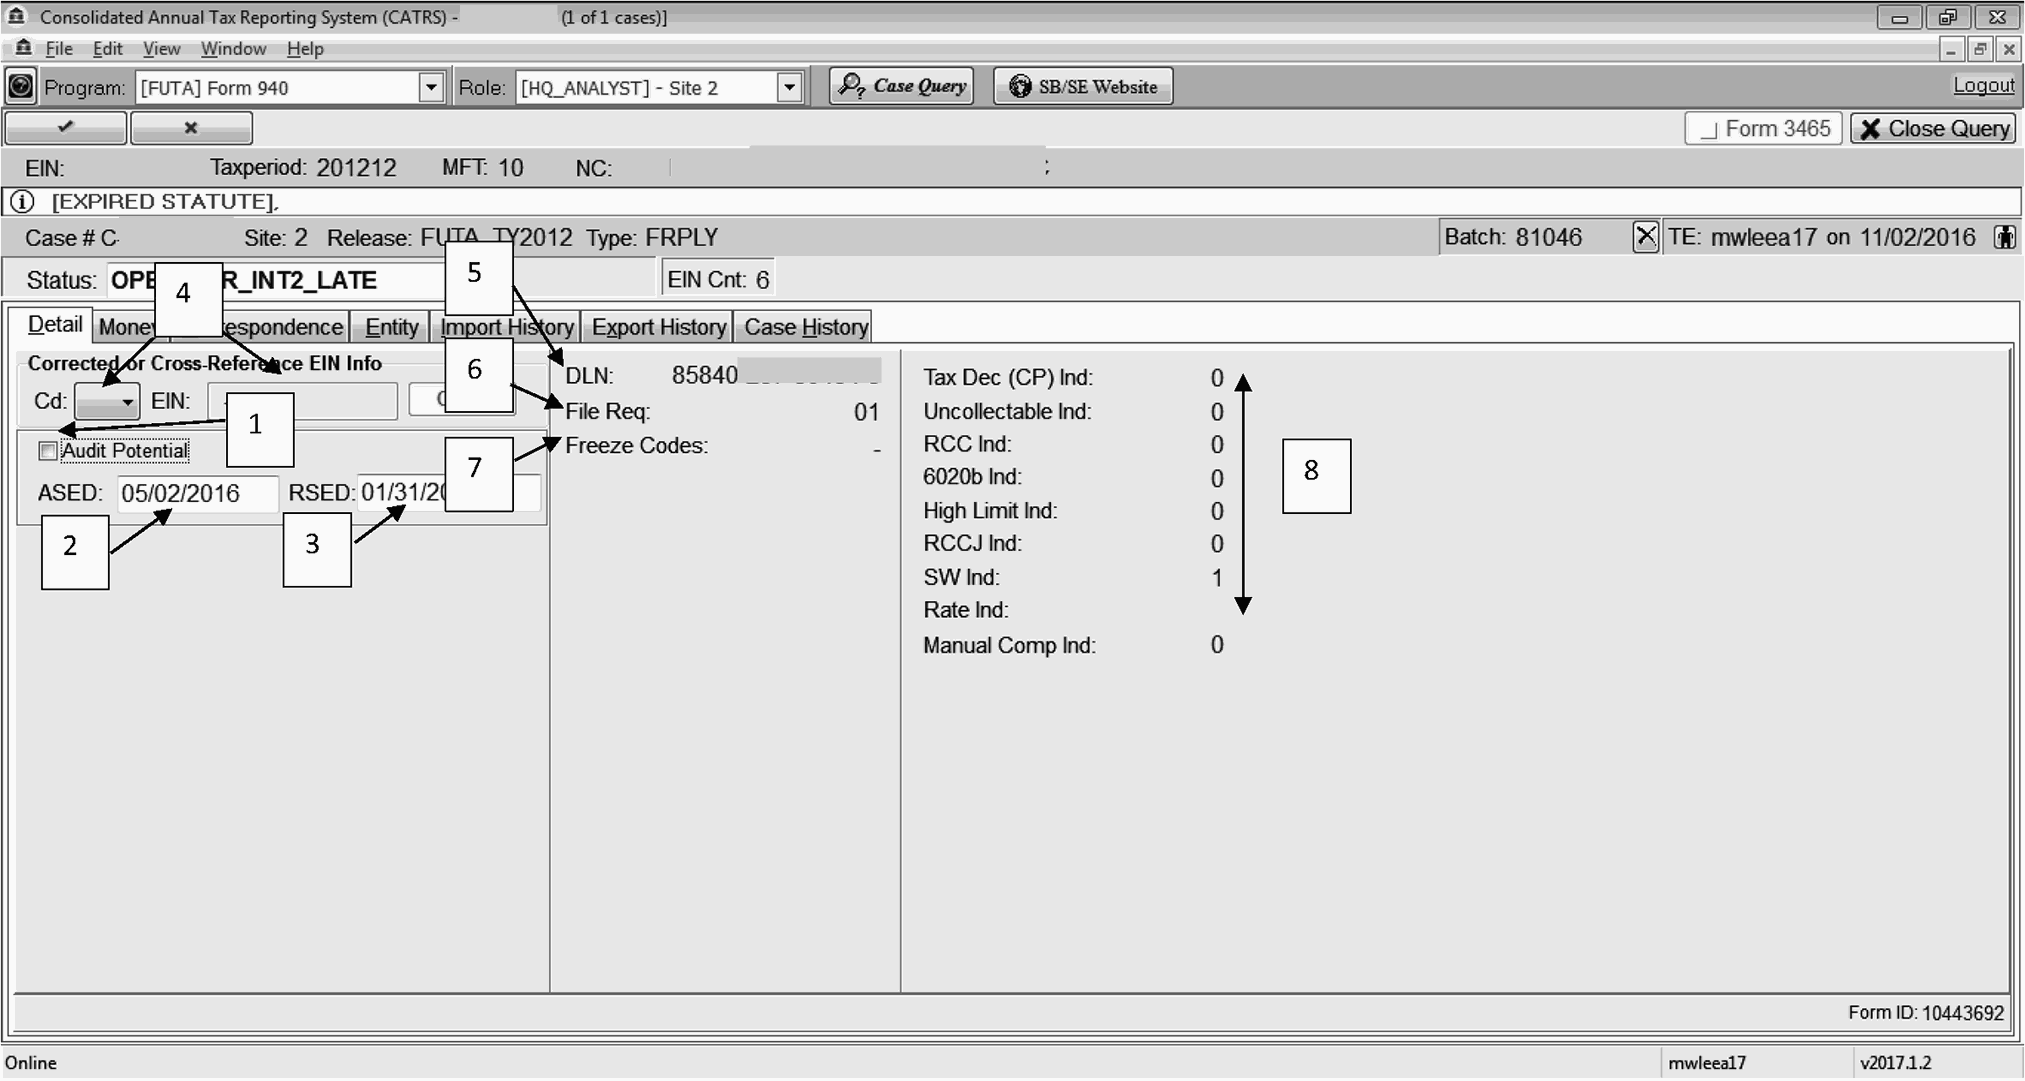
-
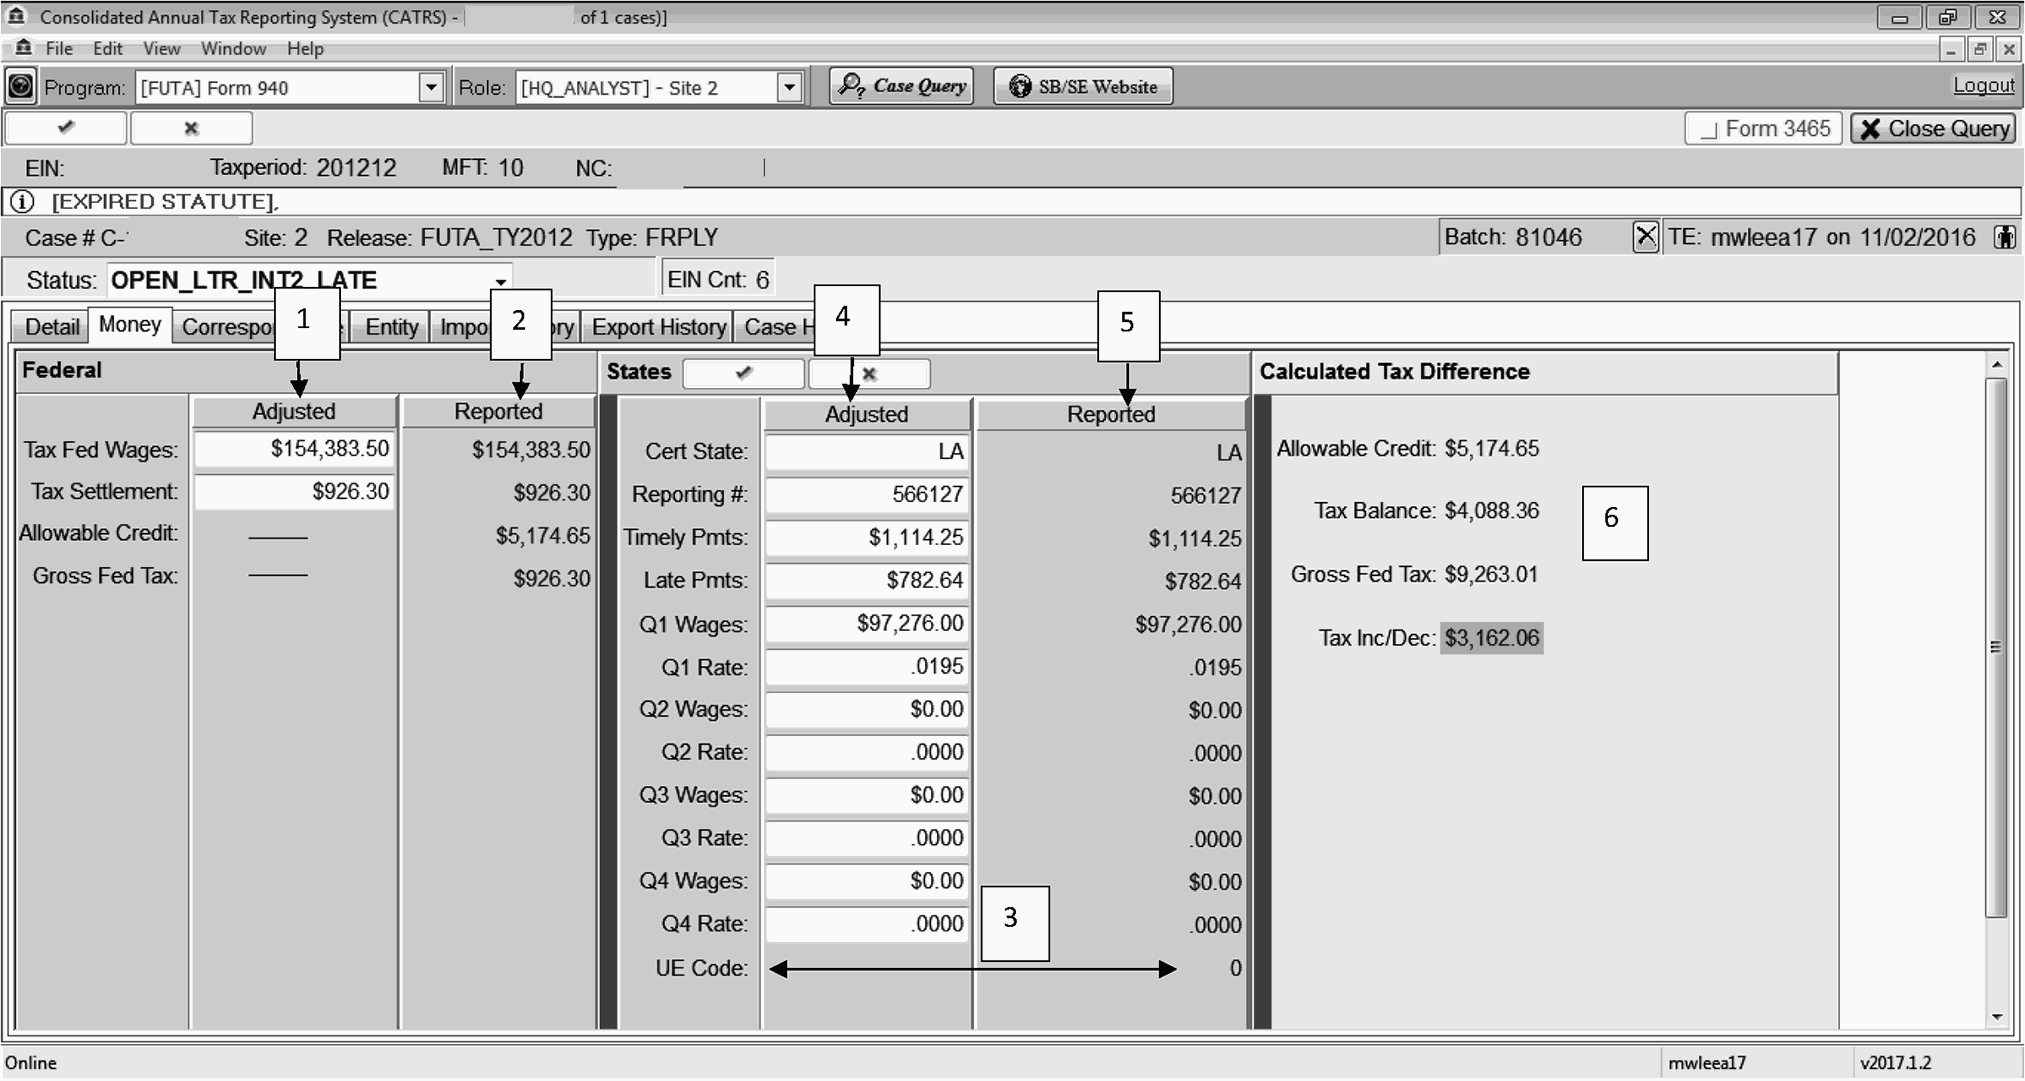
The Money screen provides federal wage and tax information reported to the IRS. It also includes state wages, timely and late contributions, that were processed by the certifying state(s). The FUTA program compares the amounts reported by the certifying state to determine if the proper wages/tax was reported on the Form 940, Form 1040 or Form 1041. Figure 4.19.9-19Money Screen.
-
The screen has six main sections:
-
Federal Adjusted
-
Federal Reported
-
Miscellaneous State Information
-
State Adjusted
-
State Reported
-
Calculated Amounts Fields
-
-
-
Taxable Federal Wages
-
Tax Settlement
-
-
-
Taxable Federal Wages: Amount originally reported as taxable wages on Form 940, Form 1040, Form 1041 Schedule H
-
Tax Settlement: Amount originally reported as tax paid on Form 940, Form 1041 , Form 1041 Schedule H
-
Timely Payments: Contributions reported by the state as being received timely
-
Late Payments: Contributions reported by the state as being received late
-
Allowable Credit: FCP automatically calculated field
-
Gross Federal Tax: FCP automatically calculated field
-
-
Miscellaneous State Information: The UE (Unity of Enterprise) indicator applies to California and North Carolina cases only. See IRM 4.19.5. Value of this field is "blank" for no UE present and "9" if UE is present. FCP will set the UE indicator based on case conditions.
-
The State Adjusted line is where the user can make changes/corrections to any of the following fields:
-
Certifying State
-
State Reporting Number
-
First Quarter State Wages Reported
-
First Quarter Experience Rate
-
Second Quarter State Wages Reported
-
Second Quarter Experience Rate
-
Third Quarter State Wages Reported
-
Third Quarter Experience Rate
-
Fourth Quarter State Wages Reported
-
Fourth Quarter Experience Rate
-
-
State Reported line displays the following information:
-
Certifying State
-
State Reporting Number
-
First Quarter State Wages Reported
-
First Quarter Experience Rate
-
Second Quarter State Wages Reported
-
Second Quarter Experience Rate
-
Third Quarter State Wages Reported
-
Third Quarter Experience Rate
-
Fourth Quarter State Wages Reported
-
Fourth Quarter Experience Rate
-
Timely Payments
-
Late Payments
-
-
Calculated Amounts fields are calculated based on the information contained in the Federal Adjusted line and State Adjusted line. An increase or decrease amount will show after calculation.
-
The Adjustment Screen is used to track revenue produced by the FUTA program. Values input to this screen will create an output to the revenue tracking report.
-
Any changes or updates to this screen are initiated by using one of the six the functions buttons. Below is a list of the six button functions.
-
Cancel Changes
-
Refresh
-
Edit Record
-
Post Edit
-
Cancel Edit
-
Refresh Data
-
-
When a user selects "Edit Record" the Edit Case Adjustment History Screen will open. In this screen the user will be able to complete revenue values from the case in this screen.
-
Expected Close Status "Required"
-
Masterfile Posting Module, defaults to case information but can me modified by the user if needed.
-
TC29X, TC18X, TC16X, these fields are used to designate the type of assessment/abatement and applicable penalties. "Required"
-
Amount field is the dollar amount of the assessment/abatement and applicable penalties "Required"
-
Remarks "Optional"
-
OK button "Required" the post any changes.
-
-
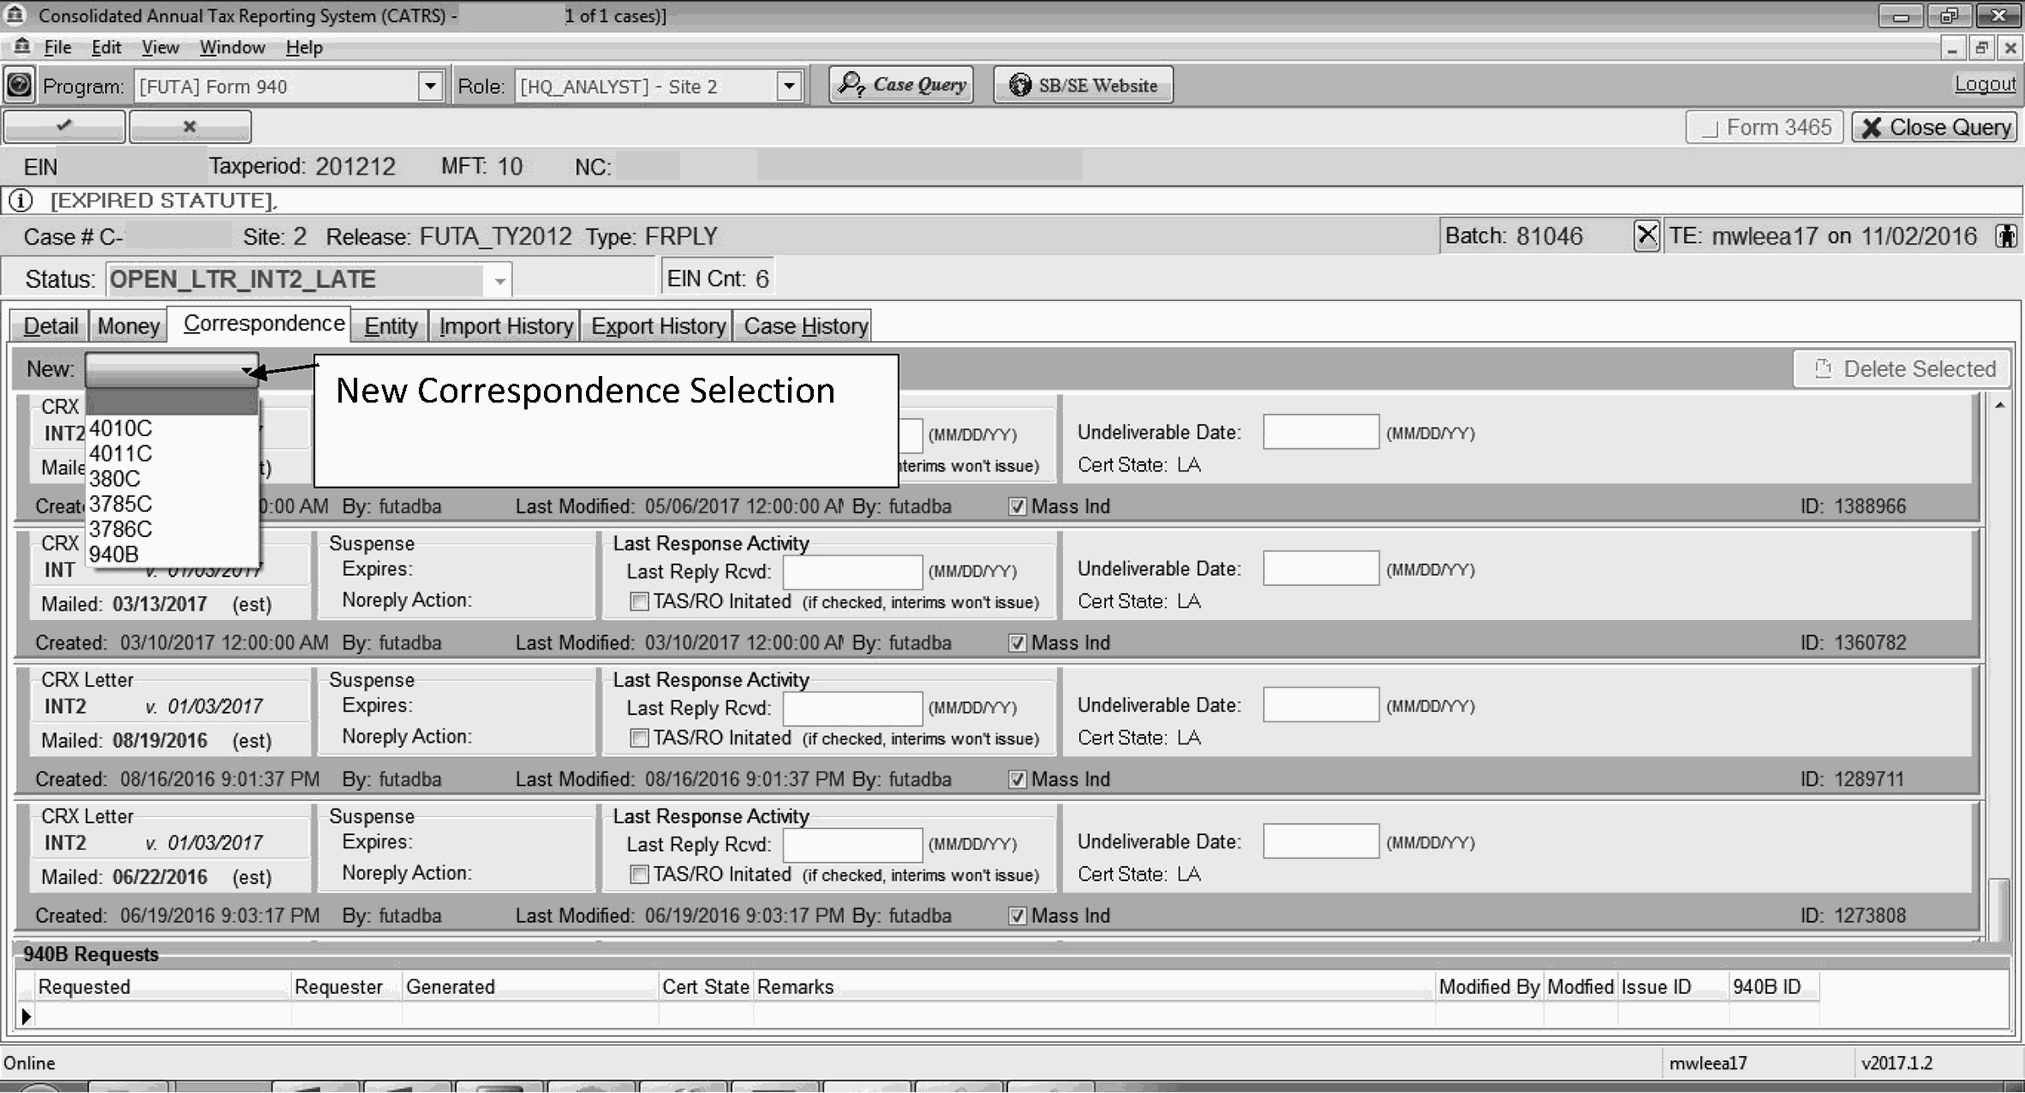
The Correspondence Screen is used for issuing the appropriate correspondence from the FCP system. You can choose the appropriate letter using the drop down arrow. Figure 4.19.9-20 Correspondence Screen.
-
The correspondence screen contains the following information:
-
Delete Correspondence button: This button will allow a user to delete a letter by left mouse clicking on the letter then selecting the "Delete Correspondence button" .
-
Letter ID - Letter Identification
-
Type - C Letter selected
-
Issue - Date correspondence is issued
-
Suspense/No Reply - The suspense date is updated automatically, if a response is not received from the taxpayer prior to the suspense date expiring the case will update itself to no reply status
-
Reply
-
Undeliverable
-
940B request fields
-
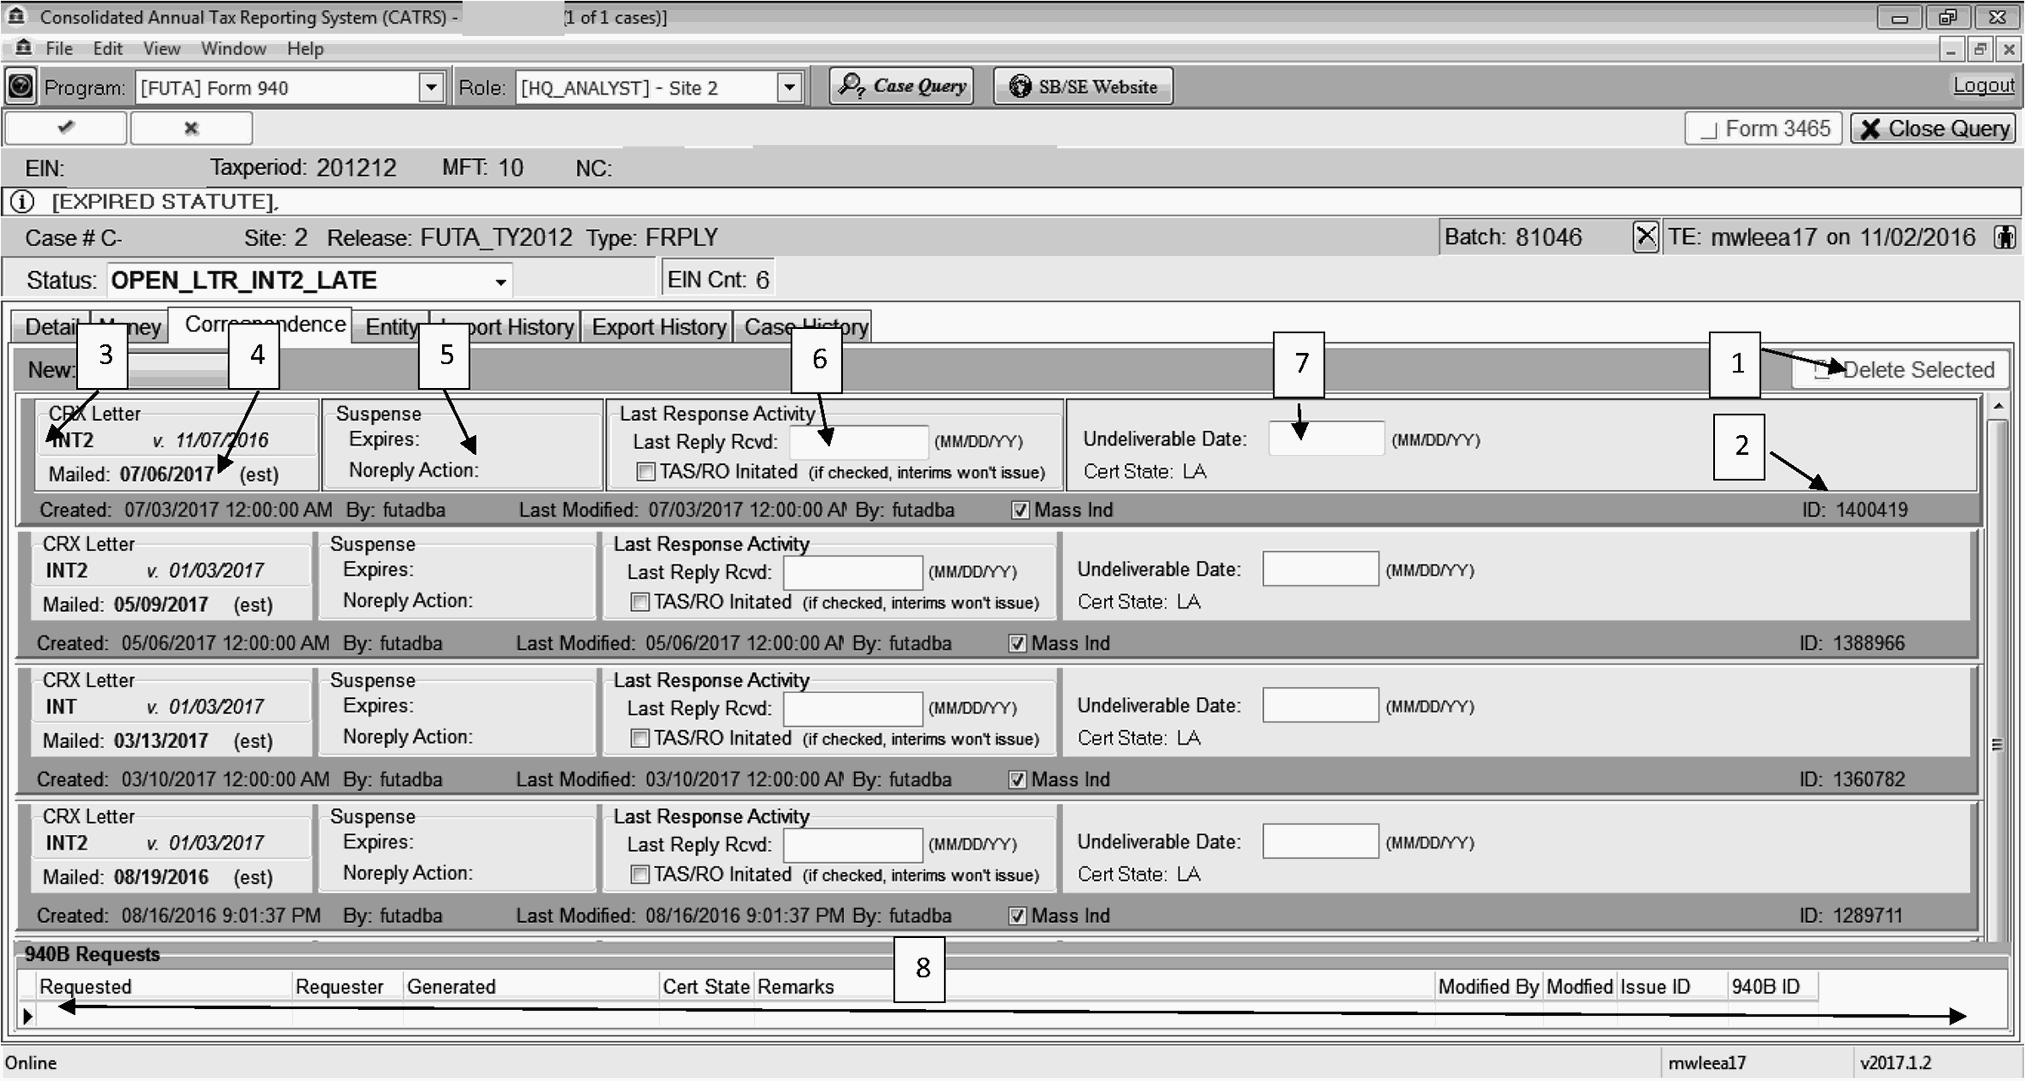
-
The correspondence screen has five different types of letter that can be generated from the FCP system. Because all five letters are classified as "C" letters the user requesting the letter has to be interfaced with the IDRS system at the time of the request. There are five letters and one form available to select from New the drop down. Figure 4.19.9-21Types of Correspondence.
-
The available forms/letter are listed below:
-
Letter 4010C : This letter is the first proposed balance due letter
-
Letter 4011C : This letter is the first proposed credit due letter
-
Letter 380C: This letter is used as the main reply and late reply correspondence
-
Letter 3785C : This letter is used in place of the 4010C when the statute expiration date is within 90 days
-
Letter 3786C : This letter is used in the reply phase to inform the taxpayer the information provided resolved the discrepancies
-
940B: This generates a recertification form to be printed by the FUTA Coordinator once a week
-
-
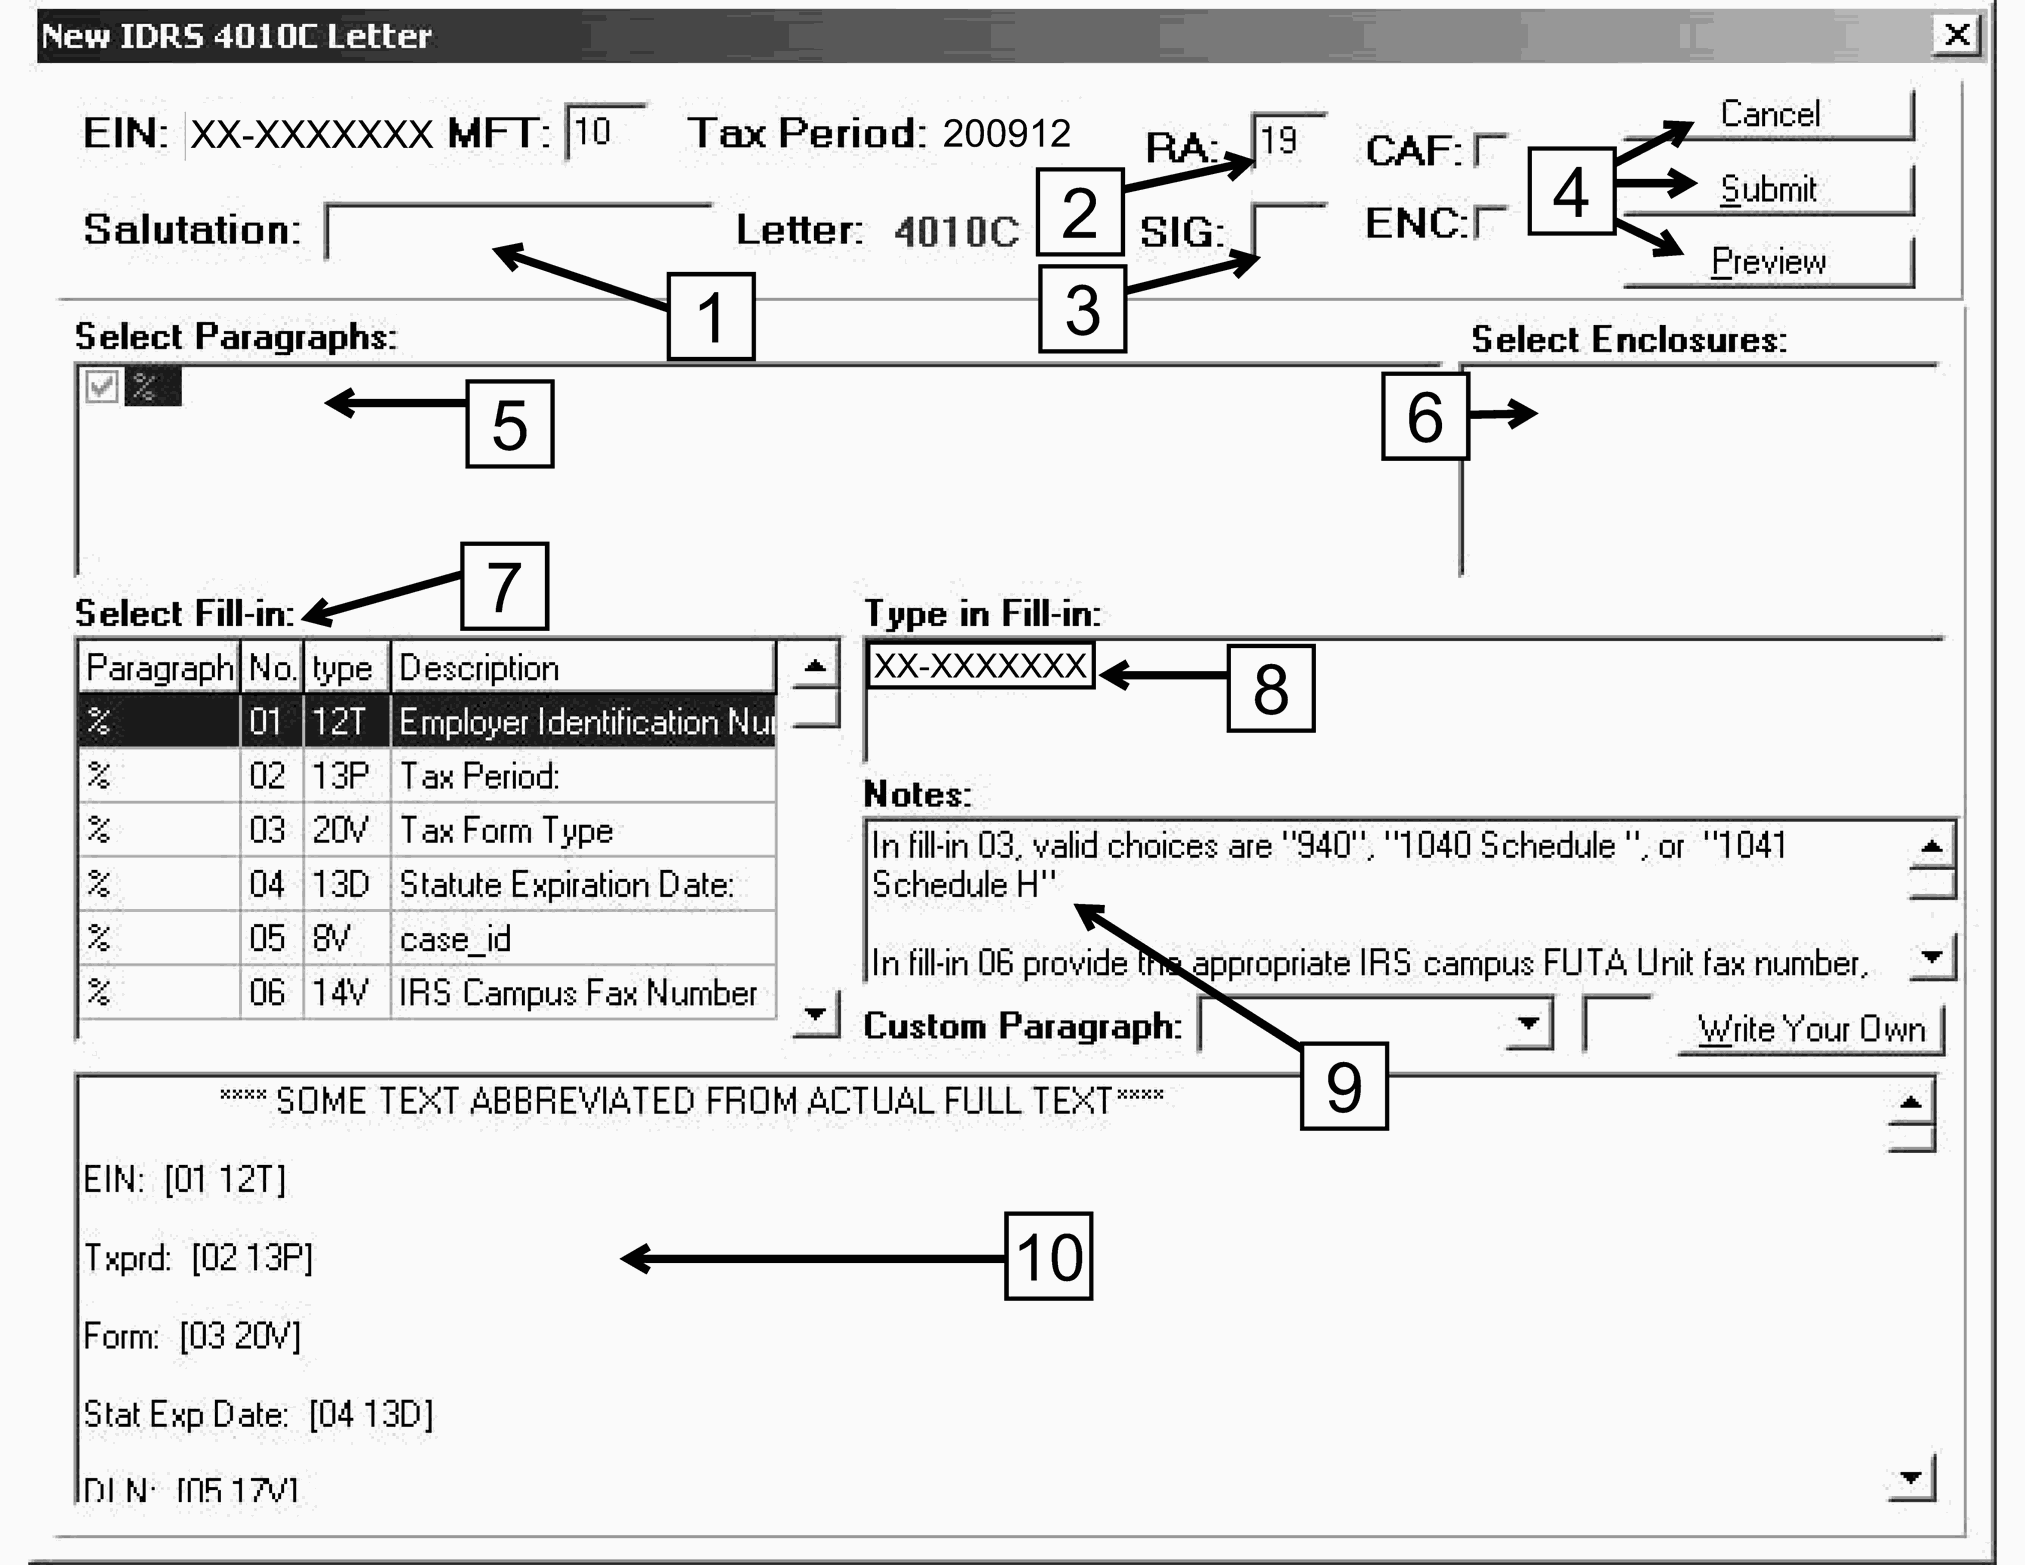
When a "C" letter is requested FCP will load the letter input screen. Portions of the letter input screen will auto populate from the FCP system. Figure 4.19.9-224010C Interface Window
-
The letter input screen displays the following information:
-
Salutation
-
Return Address Code: Two digit code that tells IDRS the return address to be printed on the letter
-
Signature Code: Two digit code that has been established by each site to print the signature that will appear on the letter
-
"Cancel button" will exit letter input screen; "Submit button" ; processes the letter to IDRS; and "Preview button" will allow the user to view the letter content
-
Selective Paragraphs
-
Selective Enclosures
-
Selective Fill-ins: This section displays the "selected paragraphs" , "fill-in numbers" , "Type" (this is the character requirements for the fill-in), "Descriptions" of the fill-in
-
Type in Fill-in: This field is where the user inputs the fill-in requirements to the selected paragraphs
-
Notes: This field gives guidance for valid fill-ins. This field also is used when an open paragraph is selected
-
Preview Window
-
-
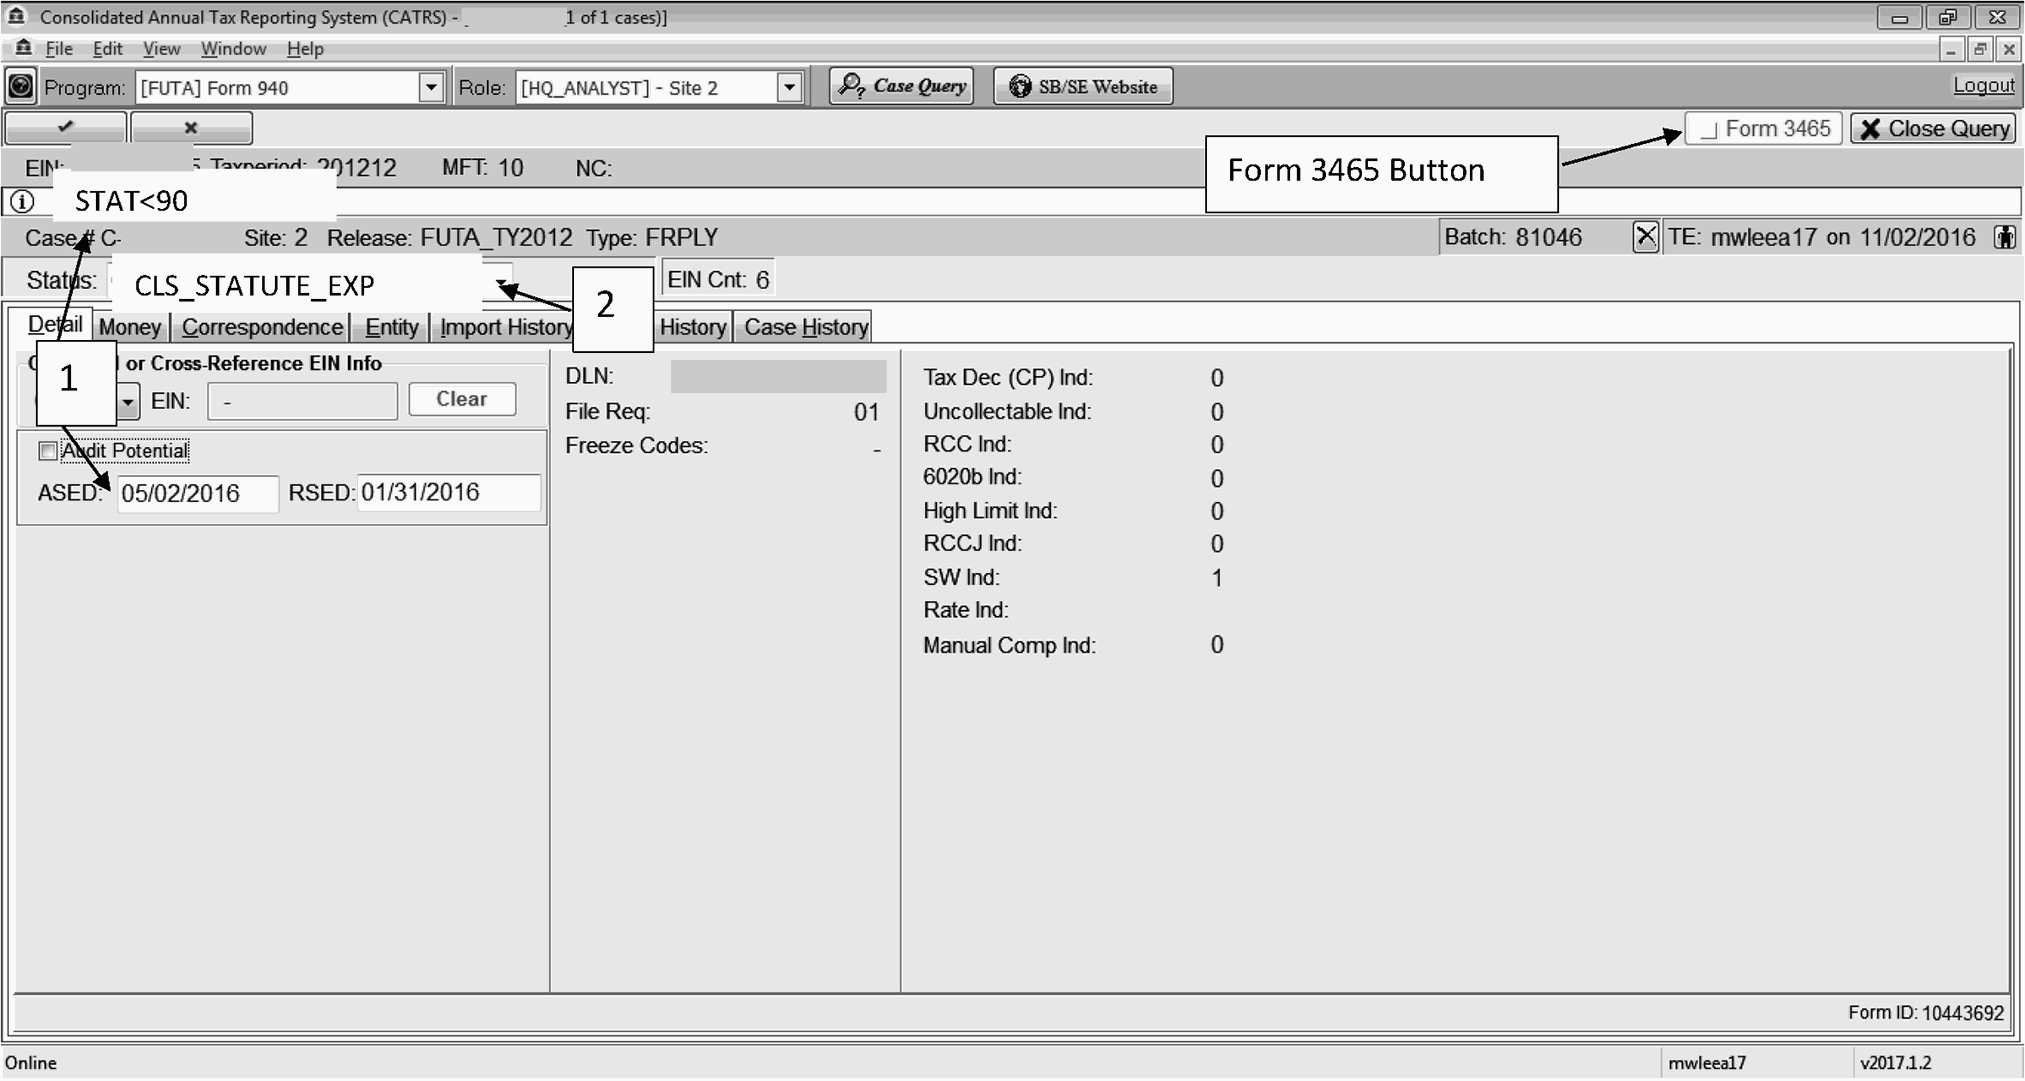
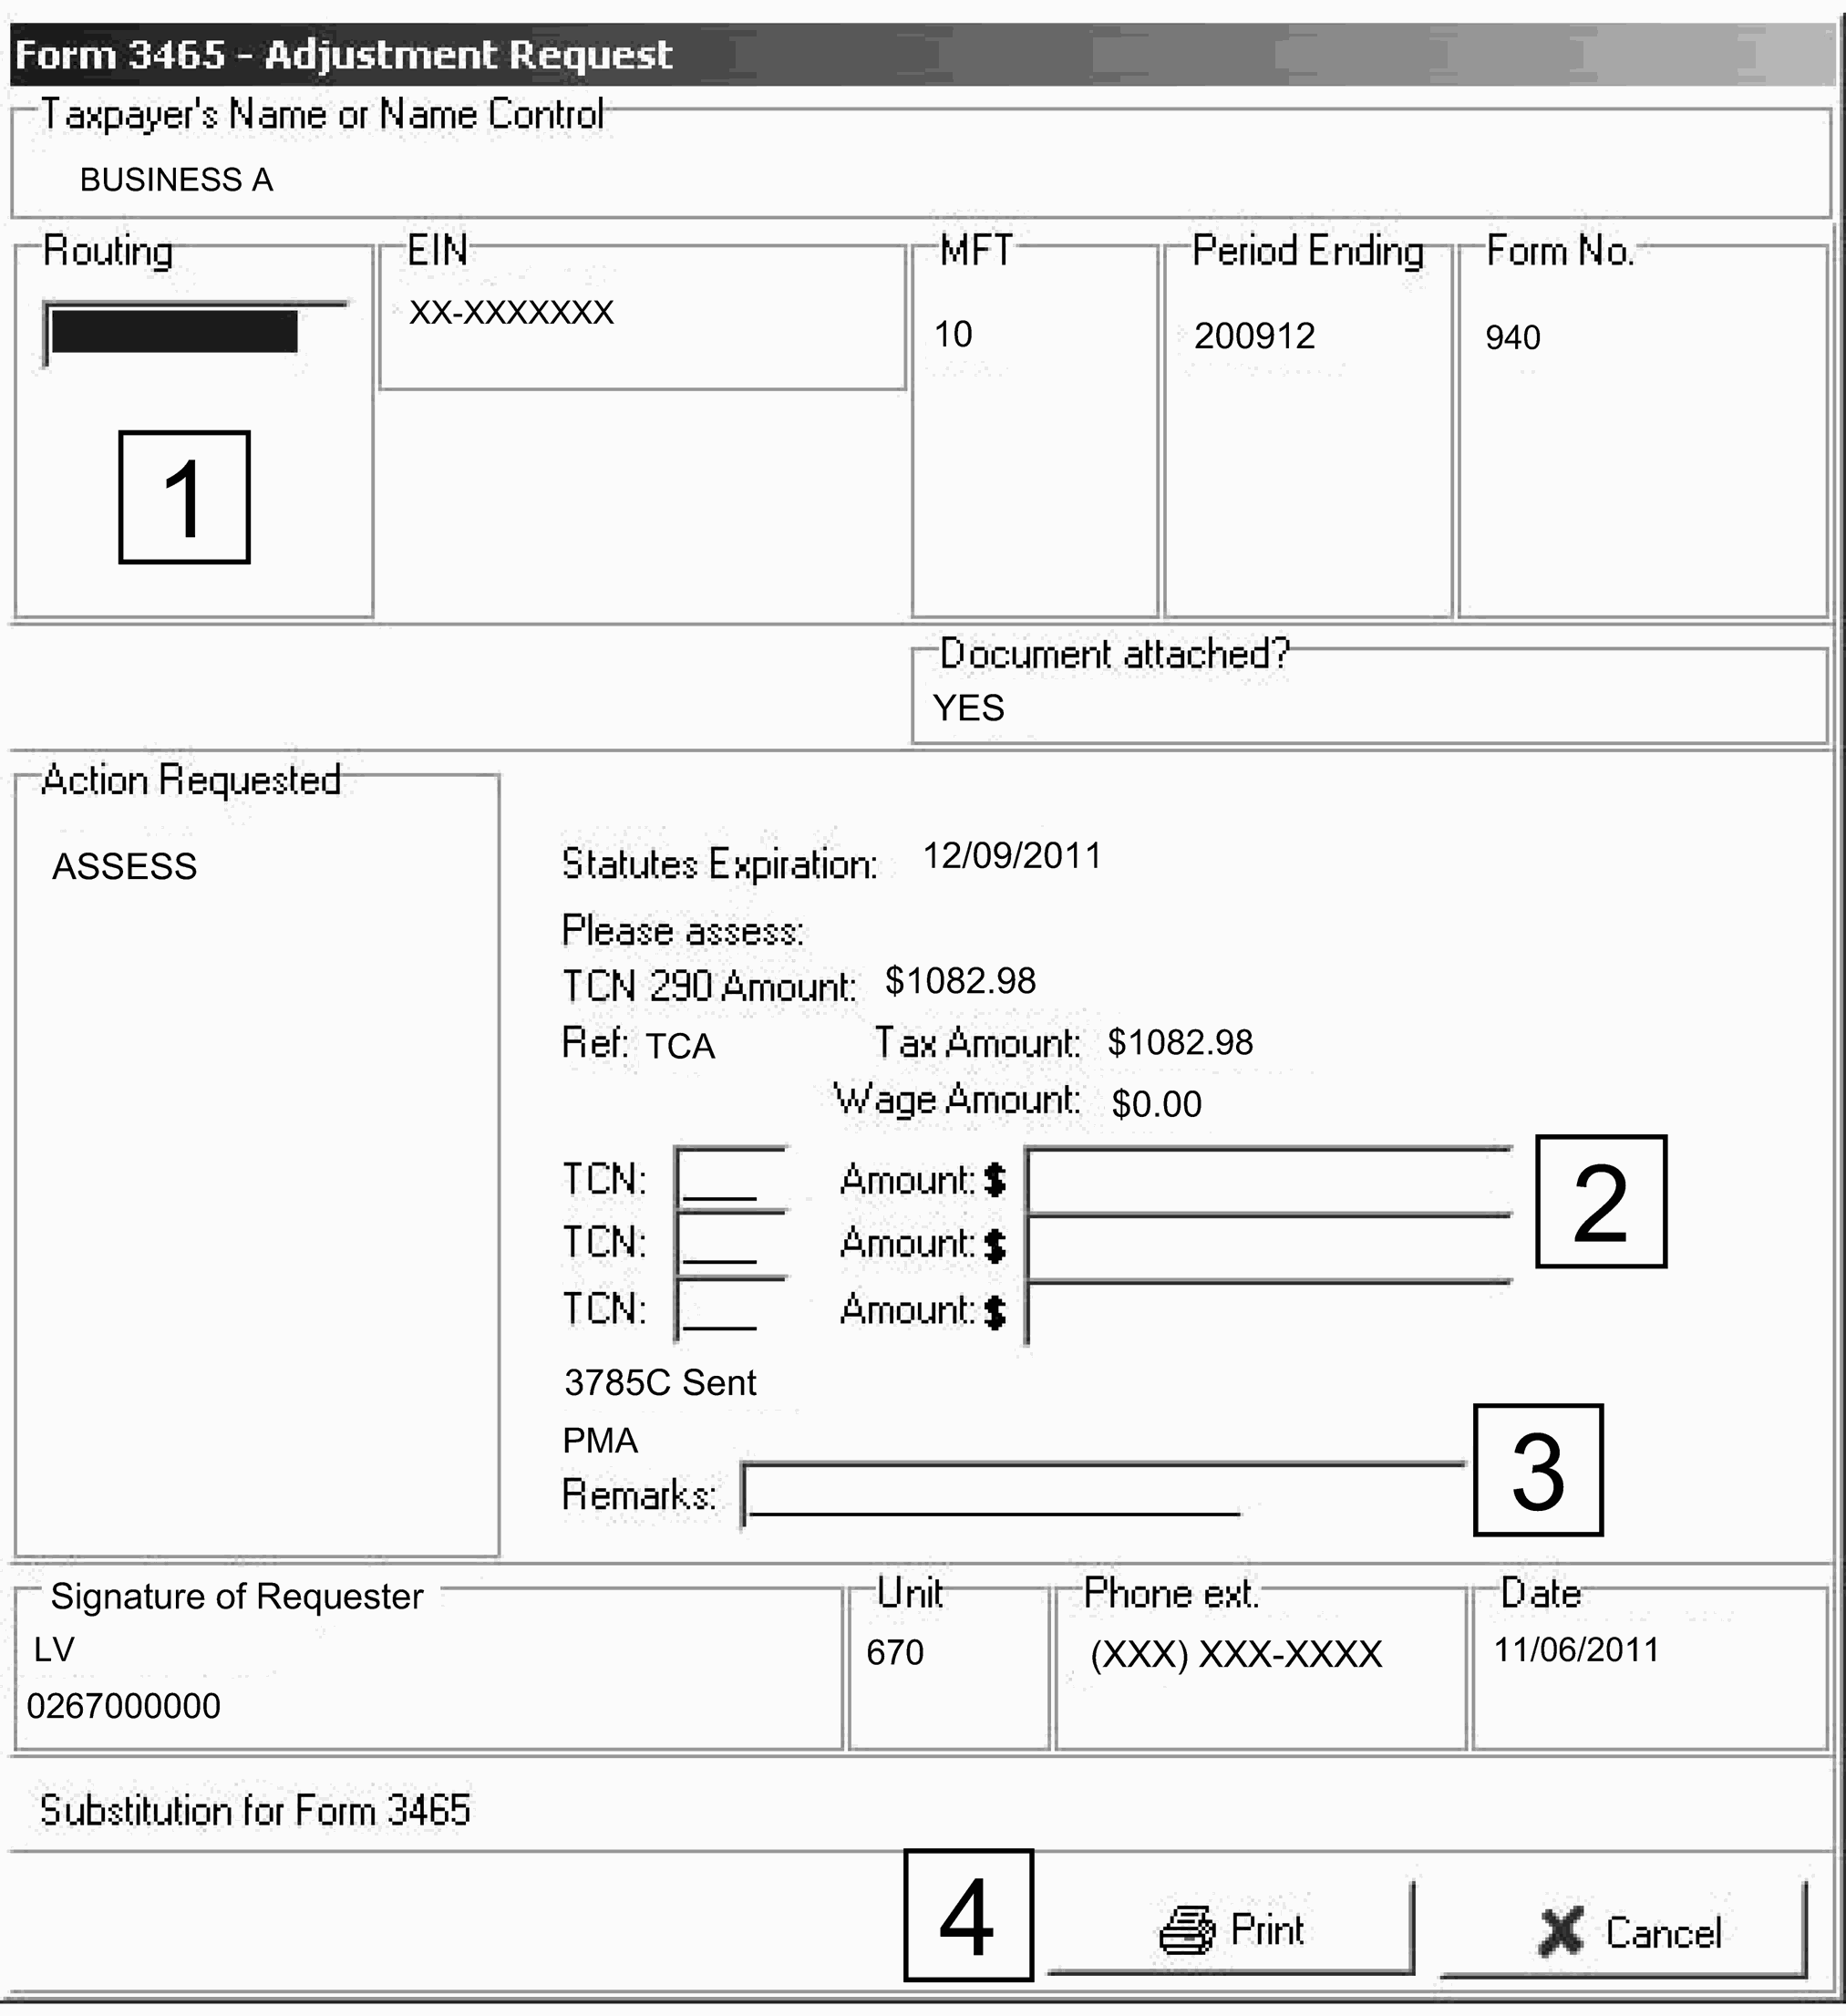
The Form 3465 Adjust Request ,is used when a case is within 90 days of ASED (Assessment Statute Expiration Date) expiring. The Form 3465 will be auto populated with the tax, taxpayer and user information from the FCP database. The Form 3465 button is located in the Detail Header section of the case but requires certain conditions to make it accessible to the user. The requirements have to be completed in this order:
-
"STAT <90" Literal has to exist on the case
-
Closing Status Code is updated to CLS_STATUTE_EXP
-
Once the case is closed CLS_STATUTE_EXP, FCP system will allow the selection of the 3785C letter Figure 4.19.9-21Types of Correspondence
-
After the letter is input the Form 3465 button will become accessible
-
-
The Form 3465 will be auto populated with the tax, taxpayer and user information from the FCP database. Figure 4.19.9-24Form 3465.
-
However the user will be required to complete:
-
The routing information
-
Applicable Penalties
-
Remarks
-
Printing of form and attach it to the case
-
-
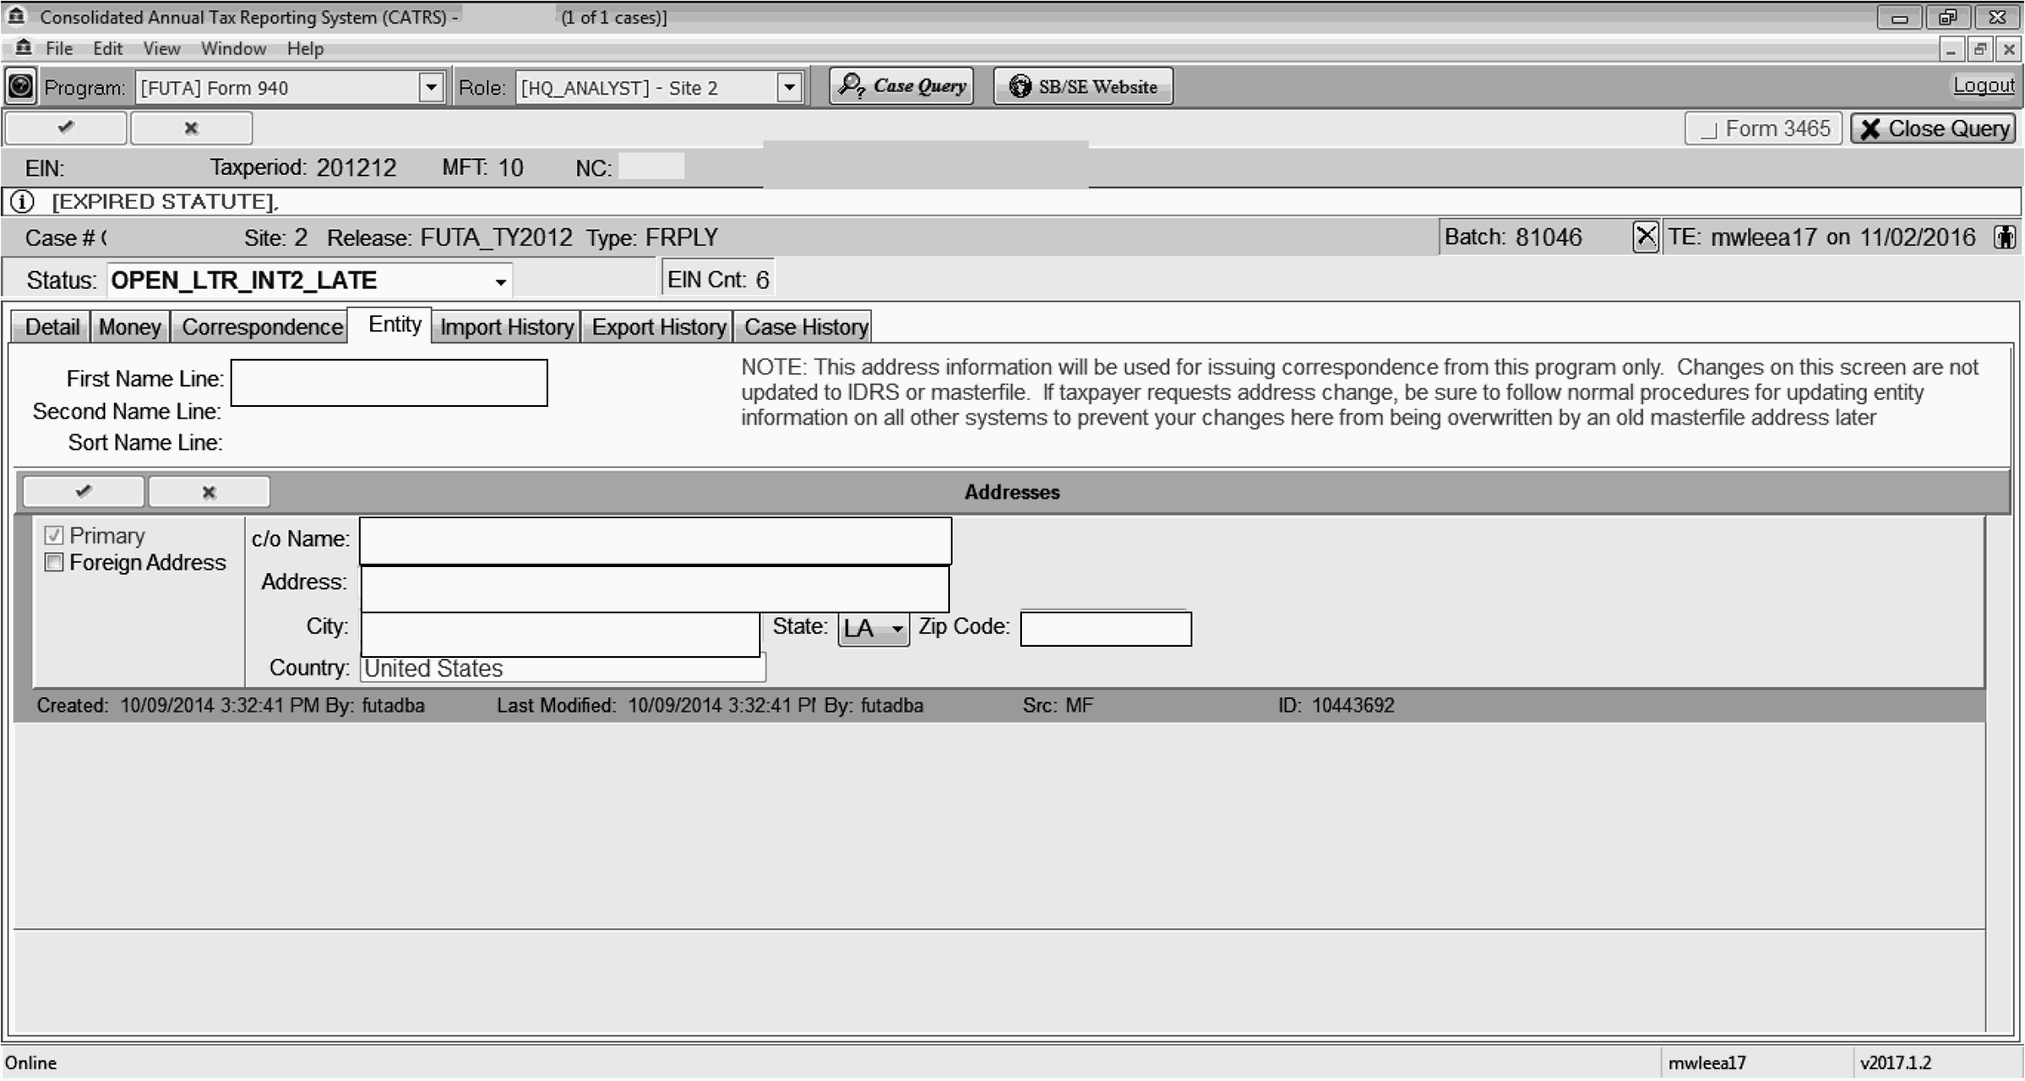
The Entity screen stores the business care of, street address, state and zip code. This information is downloaded from IDRS when the case is created. The address, state and zip code should only be modified, if a better address has been secured. When the entity screen tab is selected, the following screen appears: Figure 4.19.9-25
-
Neither of these screens contain information towards working a FUTA case. These two screens exist with the purpose of tracking upload and download data files. Examples of the types of files it tracks would be CCA uploads and case download.
-
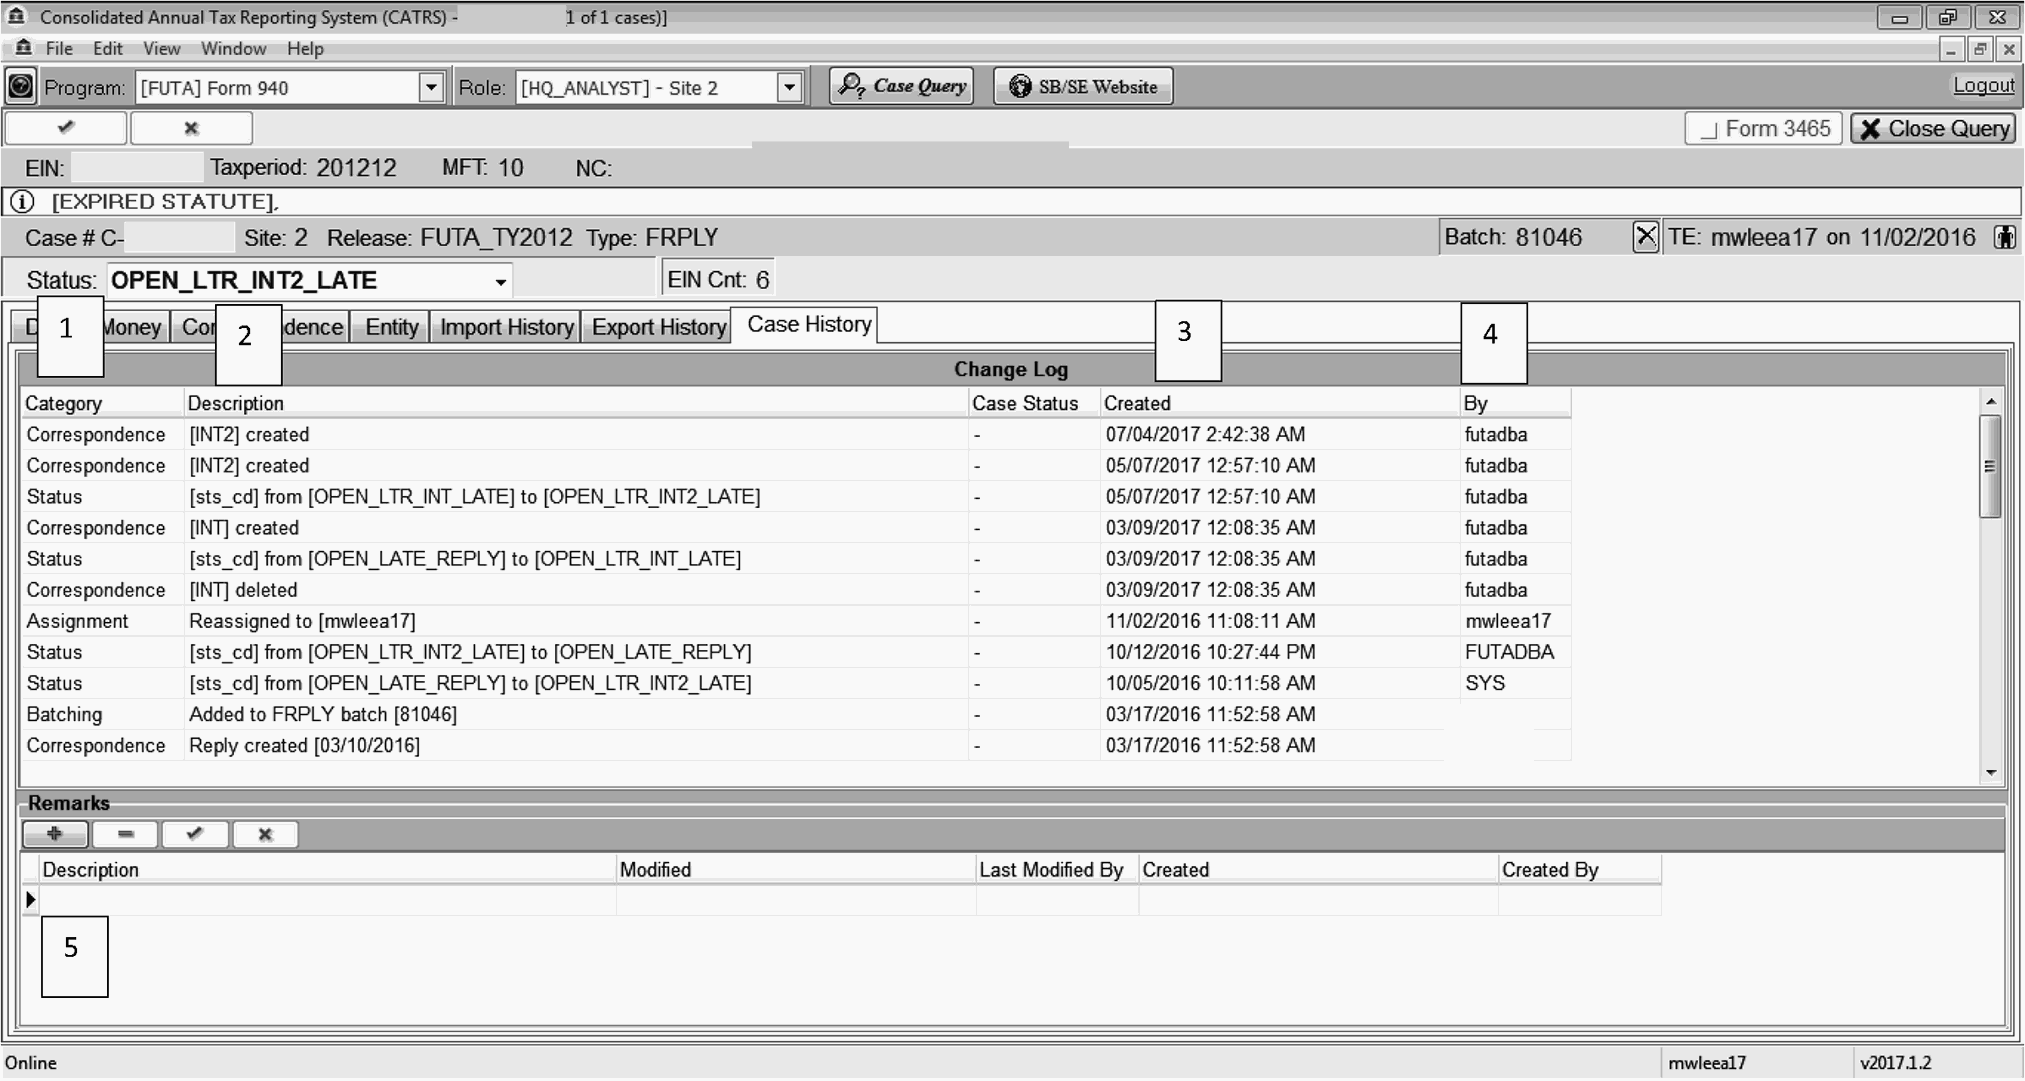
The History screen gives a line by line account of all actions taken by current and previous user to a specific case.
-
Category: Type of action taken
-
Description: A brief description of the action taken
-
Created: The date the action was taken
-
By: User that took the action
-
Case note: Stored information field
Figure 4.19.9-26Note:
This section of the history screen will store case information. Once a case note is input and saved any subsequent user that accesses the case can view the case note information.
-